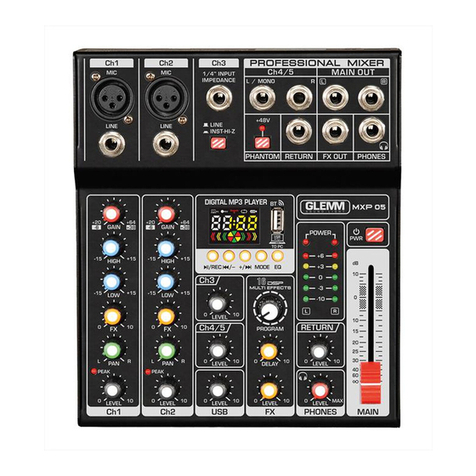
GLEMM MXP 05 User manual

www.glemm.eu
Manuale di istruzioni • Instruction manual
MXP 05
Mixer Microfonico multicanale
Multichannel Microphone Mixer

32
Grazie per aver scelto il
marchio GLEMM
Il prodotto GLEMM da Lei acquistato è frutto di
un’accurata progettazione da parte di ingegneri
specializzati. Per la sua fabbricazione sono
stati impiegati materiali di ottima qualità per
garantirne il funzionamento nel tempo. Il prodotto
è realizzato in conformità alle severe normative
imposte dall’Unione Europea, garanzia di
adabilità e sicurezza. Vi consigliamo di
leggere attentamente questo manuale prima
di iniziare ad utilizzare l’apparecchio, al ne di
sfruttarne appieno le potenzialità. Augurandoci
che rimarrete soddisfatti del vostro acquisto, Vi
ringraziamo nuovamente per la ducia riposta
nel nostro marchio e vi invitamo a visitare il
nostro sito internet
www.glemm.eu
dove troverete l’intera gamma dei prodotti
GLEMM, insieme ad informazioni ed
aggiornamenti utili.
Thank you for choosing
GLEMM brand
The GLEMM product you have purchased is
the result of careful planning by specialized
engineers. High quality materials were used for
its construction, to ensure its functioning over
time. The product is manufactured in compliance
with the strict regulations imposed by the
European Union, a guarantee of reliability and
safety. Please read this manual carefully before
starting using the device in order to exploit its full
potential.
Hoping that you will be satised of your purchase,
we thank you again for your trust in our brand and
we invite you to visit our website
www.glemm.eu
where you will nd the whole range of GLEMM
products, along with useful information and
updates.
• Conservate il manuale per future
consultazioni e allegatelo se cedete
l’apparecchio ad altri.
• Assicuratevi sempre di collegare
l’apparecchio con il voltaggio adeguato.
• Evitate di utilizzare l’unità:
- in luoghi con temperatura superiore ai
35°C
- in luoghi soggetti a vibrazioni e/o possibili
urti
- in luoghi esposti alla pioggia o con troppa
umidità
• In caso di problemi di funzionamento
interrompete l’uso immediatamente.
Non tentate di riparare l’apparecchio per
conto vostro, ma rivolgetevi all’assistenza
autorizzata. Riparazioni eettuate da
personale non competente potrebbero
creare gravi danni sia all’apparecchio che
alle persone.
• Controllate che il cavo dell’alimentatore
non sia rovinato.
• Non scollegate l’alimentatore tirandolo dal
cavo.
Precauzioni ed
avvertenze
• Keep this user manual for future reference
and include it if you give the product to
another user.
• Always make sure to connect the device to
a power source with correct voltage.
• Avoid using the unit:
- in places with temperatures above 35 ° C
- in places subject to vibrations and / or
possible impacts
- in places exposed to rain or humidity.
• In the event of a serious operating problem,
stop using the product immediately. Never
try to repair the product by yourself, but
contact the authorized technical service
center. Repairs carried out by unskilled
persons could lead to serious damages
both to the xture and to people.
• Make sure the adaptor’s power cord is not
damaged.
• Never disconnect the adaptor from the
power outlet by pulling on the cord.
Precauzioni ed
avvertenze

32
Spedizioni e reclami
Al momento dell’acquisto o della ricezione
del prodotto aprite la scatola e controllate
attentamente il contenuto per accertarvi
che tutte le parti siano presenti e in buone
condizioni. Segnalate immediatamente al
venditore eventuali danni da trasporto subiti
dall’apparecchio.
In caso di invio in assistenza è importante che
il prodotto sia completo dell’imballo originale:
vi suggeriamo quindi di conservarlo, assieme
allo scontrino o fattura d’acquisto.
Shipments and complaints
When purchasing or receiving the product,
open the box and carefully check the content, to
make sure that all parts are present and in good
condition. Report any transport damage suered
by the device to the seller immediately.
If you send the product for repair, it must be
shipped with complete original packaging: we
therefore recommend to keep it, along with the
invoice or the purchase receipt.
Condizioni di garanzia
Il prodotto è coperto da garanzia in base alle
vigenti normative nazionali ed Europee. Per le
condizioni complete di garanzia e per eettuare
richieste di assistenza visitate il sito:
www.glemm.eu
• La garanzia copre i difetti di fabbrica ed
i guasti vericatisi nei primi 2 anni dalla
data di acquisto. Nel caso di acquisto con
fattura, la garanzia è limitata ad 1 anno.
• Sono esclusi i guasti causati da imperizia
o da uso non appropriato dell’apparecchio
• La garanzia non ha più alcun eetto
qualora l’apparecchio risulti manomesso.
• La garanzia non prevede necessariamente
la sostituzione del prodotto.
• Sono escluse dalla garanzia le parti
esterne, le batterie, le manopole,
gli interruttori, e le parti asportabili o
consumabili.
• Le spese di trasporto e i rischi
conseguenti sono a carico del proprietario
dell’apparecchio
• A tutti gli eetti la validità della garanzia è
avallata unicamente dalla presentazione
della fattura o scontrino d’acquisto.
Warranty conditions
The product is covered by warranty according to
current national and European regulations. For
detailed warranty conditions and RMA requests
please refer to our website: www.glemm.eu
• The warranty covers manufacturing defects
and faults occurred in the rst 2 years from
the date of purchase. In case of purchase
with invoice, the warranty is limited to 1 year
• Damages caused by negligence or wrong
use of the device are not covered by warranty.
• The warranty is no longer eective if the
item is modied or disassembled by not
authorized people.
• This warranty doesn’t necessarily envisage
the product’s replacement.
• External components, batteries, knobs,
switches and any removable or subject
to wear and tear parts are excluded from
warranty.
• Shipment for the return of faulty items is at
expense and risk of the owner.
• For all intents and purposes the warranty
is eective only upon exhibition of the
invoice or of the purchase receipt.

54

54
La presa USB permette di alimentare il
mixer da PC, power bank o da alimentatore
USB standard.
La presa USB accanto al display consente
il trasferimento dati e l’alimentazione
anche da power bank.
Questo mixer dispone di doppia porta USB per lo scambio di dati ma anche per l’alimentazione
del mixer stesso rendendolo di fatto utilizzabile in qualunque situazione anche in assenza di
corrente elettrica.
The USB socket allows to power the mixer
from PC, power bank or standard USB
adaptor.
The USB socket next to the display allows
data transfer and powering also from
power bank.
This mixer is endowed with double USB port for data exchange but also to power the mixer
itself, so that it can operate in any situation even in the absence of electricity.

76
Prima di eettuare i collegamenti,
assicuratevi di aver scollegato la
spina dalla presa elettrica. Tutti i
collegamenti devono avvenire ad
apparecchio spento.
• Collegate i vostri microfoni muniti
di connettore XLR (segnali
bilanciati) alle prese (2). Nel caso
in cui i microfoni connessi alle
prese bilanciate (2) necessitino di
alimentazione Phantom, cliccate il
tasto (8). Il relativo led si illuminerà.
Errata alimentazione potrebbe
danneggiare il microfono collegato.
• Se avete dei segnali di linea mono
da collegare al mixer, sfruttate le
prese (6) mentre in caso di segnale
line stereo utilizzate i connettori
delle prese mono (4) assegnando al
canale 4 il segnale sinistro (L) e al
canale 5 quello di destra (R).
• Il tasto (7) consente di selezionare
la sorgente audio assegnata al
terzo canale 3. Permette di settare
il canale su Line o strumento
musicale.
• Le prese in uscita (5) destinate
all’ amplicatore, sono di tipo jack
6,3mm.
• Alla presa PHONES (10) potrete
collegare una cua munita di Jack
6,3mm stereo. Il suo volume potrà
essere regolato tramite il comando
rotante (20).
• Per l’alimentazione, collegate la
presa (1) ad un cavo USB e quindi
ad un power bank, alimentatore o
PC che possa fornire una tensione
standard di 5VDC e almeno 1A.
Before arranging any connection,
make sure that the power cord is
unplugged from the mains socket. All
operations must be carried out with
the xture o.
• Connect your microphones endowed
with XLR connector (balanced
signals) to the sockets (3). If the
microphones connected to the
balanced sockets (2) need Phantom
power, press (8) key. The led will
light on. Wrong powering could
damage the microphone.
• If you have mono line signals to
connect to the mixer, use the sockets
(6), while for stereo line signals use
the connectors of mono sockets (4),
assigning to channel 4 the left signal
(L) and to channel 5 the right signal
(R).
• The key (7) allows to select the
audio source assigned to the third
channel 3. It is possible to set
the channel on Line or musical
instrument.
• The output sockets, used for the
amplier have a 6,3mm jack.
• You can connect to the PHONES
(10) socket a headphone endowed
with 6,3mm stereo jack. Its volume
can be adjusted through the rotating
knob (20).
• For powering connect the socket (1)
to a USB cable and then to a power
bank, adaptor or PC which can
supply a standard voltage of 5V DC
and at least 1A.

76
• Terminati i collegamenti potete
accendere il mixer tramite il tasto
(14).
• Accendete le vostre sorgenti sonore,
siano esse microfoni, lettori CD o
altro.
• Posizionate il comando main (16) in
posizione centrale quindi regolate i
volumi di ogni canale a piacimento.
Abbiate cura che il livello,
rappresentato dai leds (15) non
raggiunga costantemente il valore
massimo o otterrete distorsioni
e possibili danneggiamenti degli
apparecchi. In questo caso agite
sui comandi di guadagno GAIN (23)
(canali 1 e 2) e LEVEL (22) (canali 3,
4 e 5) per rientrare nei valori corretti.
• I canali 1 e 2 dispongono di vari
cursori (9) per regolare l’incidenza
delle tonalità alte, medie e basse, il
guadagno segnale, il bilanciamento
(PAN) sui canali destro e sinistro,
l’incidenza dell’eetto applicato e
ovviamente il volume del canale
stesso. I canali 3, 4 e 5 dispongono
del solo comando di volume (17).
• La presa FX OUT (11) invia il
segnale ad un secondo mixer o
amplicatore, la presa RETURN
(12) accetta segnali di linea esterni.
Se utilizzate in combinazione, le
prese FX OUT (11) e RETURN (12)
possono inviare la miscelazione ad
un processore esterno e farla poi
rientrare modicata tramite la presa
RETURN (12). Regolate il volume
dell’ingresso tramite il comando
rotante (24).
Il livello del segnale inviato tramite
la presa FX OUT (11) è regolabile,
anche in modo indipendente sui
canali 1 e 2, tramite il comando
rotante FX (19).
• Once the connections are
completed you can switch on the
mixer through the button (14).
• Turn on your audio sources
(microphones, CD players or other
xtures).
• Place the main control (16) in mid
position, than adjust the volumes
of each channel as you wish. Be
careful that the level, indicated by
the leds (15) doesn’t reach costantly
the peak value or you will obtain
distorsions and risk to damage the
devices. In this case act on GAIN
(23) (channels 1 and 2) and LEVEL
(22) controls (channels 3,4 and 5)
to reset the correct values.
• Channels 1 and 2 have several
sliders (9) to adjust the incidence
of bass, mide and treble, the signal
gain, the balance (PAN) on the left
and right channels, the incidence
of the eects and of course the
volume of the channel itself.
Channels 3, 4 and 5 have only the
volume control (17).
• The FX OUT (11) jack sends the
signal to a further mixer or amplier,
the RETURN socket (12) accepts
external line signals. When used
together, the FX OUT (11) and
RETURN (12) sockets can send
mixing to an external processor and
then get it back with modications
through the RETURN jack (12).
Adjust the input volume through the
rotating knob (24).
The level of the signal sent via the
FX OUT (11) socket is adjustable,
also independently, on channels 1
and 2, through the rotating knob FX
(19).

98
Il mixer possiede un sosticato
circuito DSP in grado di elaborare il
suono in tempo reale aggiungendo
l’eetto riverbero impostabile su uno
dei preset tramite il comando (21) e
modicandolo manualmente con il
controllo DELAY posto subito sotto.
• Il comando FX (19) regola l’incidenza
del DSP sull’intera miscelazione.
• Il display mostra le principali
informazioni.
• Il comando rotante (18) permette di
regolare l’incidenza in miscelazione
del lettore USB.
• PRESA USB
La presa USB (13) si presta a diverse
funzioni. Permette il collegamento
a PC per importare ed esportare
audio e legge chiavette USB per la
riproduzione di brani MP3. Riferitevi
allo schema riportato a pag.6.
• FUNZIONE BLUETOOTH
Premete il tasto mode e selezionate la
funzione bluetooth. Cercate sul vostro
smartphone o tablet, il mixer nel menù
bluetooth e selezionatelo. Una volta
accoppiato, potrete mixare la vostra
traccia.
• FUNZIONE REC
Il vostro mixer possiede la capacità di
registrare su chiavetta USB il segnale
audio proveniente dai vari ingressi.
Per registrare inserite una chiavetta
USB formattata nel formato “FAT 32” e
premete il tasto REC.
The mixer has a sophisticated DSP
circuit capable of processing the sound
in real time adding the reverb eect,
which can be set on one of the presets
using the control (21) and modifying it
manually through the DELAY control
located just below.
• The FX(S) rotating control adjusts the
incidence of DSP on the whole mixing.
• The display shows main information
• The rotating knob (18) allows to adjust
the mixing incidence of the USB
player
•
USB SOCKET
The USB socket (13) is useful for
several functions. It allows the
connection to a PC to receive or send
audio and plays MP3 tracks from USB
sticks. Please refer to the diagram on
page 6.
• BLUETOOTH FUNCTION
Press the mode button and select the
bluetooth function. Search on your
smartphone or tablet for the mixer in
the bluetooth menu and select it. Once
paired, you can mix your track.
• FUNZIONE REC
Your mixer oers the possibility to
record the audio signal coming from
the various inputs on a USB stick. To
record insert a USB stick in “FAT 32”
format and press the REC button.

98
MODULO MP3 / MP3 MODULE
A B C D E
APlay - Pausa / Funzione REC
B Traccia precedente / Volume -
C Traccia successiva / Volume +
DTasto Mode
E Equalizzatore. Vi permette di
selezionare una delle equalizzazioni
preimpostate.
APlay - Pause/ REC function
B Previous track / Volume -
C Following track / Volume +
DMode button
EEqualizer. It allows to select one of the
preset equalization modes.
DICHIARAZIONE DI CONFORMITA’ UE
EU COMPLIANCE DECLARATION
Il fabbricante, KARMA ITALIANA SRL, dichiara che il tipo di apparecchiatura radio mixer con
bluetooth MXP 05 è conforme alla direttiva 2014/53/UE. Il testo completo della dichiarazione di
conformità UE è disponibile al seguente indirizzo Internet: www.karmaitaliana.it
Hereby, KARMA ITALIANA SRL declares that the radio equipment type mixer with bluetooth
MXP 05 is in compliance with Directive 2014/53/EU.The full text of the EU declaration of
conformity is available at the following internet address: www.karmaitaliana.it.
Karma Italiana Srl

1110
The manufacturer, in order to improve its products, reserves the right to modify their characteristics
whether technical or aesthetic, at any time and without notice.
Il fabbricante, allo scopo di migliorare i propri prodotti, si riserva il diritto di modicarne le
caratteristiche siano esse tecniche o estetiche, in qualsiasi momento e senza alcun preavviso.
Questo simbolo vi avverte della presenza di istruzioni d’uso e manutenzione importanti, nel
manuale o nella documentazione che accompagna il prodotto
This symbol alerts you of the presence of important operating and maintenance instructions,
in the manual or in the documentation accompanying the product
II marchio CE indica che il prodotto è conforme ai requisiti essenziali delle direttive europee
e relative norme ad esso applicabili. La documentazione di conformità in forma completa è
reperibile presso la società Karma Italiana Srl.
The CE mark indicates that this product complies with the essential applicable European
directives and their related standards. Compliance documentation in complete form can be
asked to the company Karma Italiana Srl.
Ai sensi del Decreto Legislativo N°49 del 14 Marzo 2014 - “ Attuazione delle Direttive
2012/19/UE sui riuti di apparecchiature elettriche ed elettroniche (RAEE)”.
Il simbolo del cassonetto barrato riportato sull’apparecchiatura indica che il prodotto alla
ne della propria vita utile deve essere raccolto separatamente dagli altri riuti. L’utente
dovrà, pertanto, conferire l’apparecchiatura integra dei componenti essenziali giunta
a ne vita agli idonei centri di raccolta dierenziata dei riuti elettronici ed elettrotecnici,
oppure riconsegnarla al rivenditore al momento dell’acquisto di nuova apparecchiatura di
tipo equivalente, in ragione di uno a uno oppure 1 a zero per le apparecchiature aventi
lato maggiore inferiore a 25 cm. L’adeguata raccolta dierenziata per l’avvio successivo
dell’apparecchiatura dimessa al reciclaggio, al trattamento e allo smaltimento ambientale
compatibile contribuisce ad evitare possibili eetti negativi sull’ambiente e sulla salute e
favorisce il riciclo dei materiali di cui è composta l’apparecchiatura. Lo smaltimento abusivo
del prodotto da parte dell’utente comporta l’applicazione delle sanzioni amministrative di
cui al D.Lgs n. Decreto Legislativo N° 49 del 14 Marzo 2014.
Directive 2012/19/UE regarding electric and electronic equipment waste (WEEE).
The symbol of the crossed-out dustbin indicates that the product at the end of its life must
be collected separately from other waste . The user must , therefore , confer the xture
complete with all the essential components to an authorized disposal center for collection
of electronic and electrical waste, or return it to the dealer when buying new equipment of
equivalent type, at a rate of one to one, or one to zero if external dimension is less than
25cm. Appropriate separate collection to send the decommissioned equipment to recycling
, treatment and environmentally compatible disposal helps to prevent negative impact on
the environment and human health and promotes recycling of the materials making up
the product. In Italy illegal dumping of the product by the user entails the application of
administrative sanctions pursuant to Legislative Decree n. 49 (14/03/2014).
Questo simbolo indica il rischio di scossa elettrica in caso di uso improprio o manomissione
del prodotto.
This symbol indicates a risk of electric shock in case of wrong use or alteration of the
product.

1110
CARATTERISTICHE TECNICHE
Canali 5
Ingressi Mic 2 (XLR)
Ingressi Line 5 mono oppure 1 stereo (tramite Jack 6,3 mm)
Bluetooth Sì - Freq. 2.4Ghz
Prese d’uscita 2 x Jack 6,3mm
Alimentazione Phantom Sì (+48V)
Funzione REC Sì
Lettore MP3 Si tramite USB
Connessione PC Sì
Controllo toni Alti, Medi e Bassi
Processore DSP Sì, 16 preimpostazioni
Alimentazione: 5V 1A-Tramite USB (PC, power bank o alimentatore)
Dimensioni: 200 x 200 x 60 mm
Peso: 1,18 Kg
TECHNICAL SPECIFICATIONS
Channels 5
Mic inputs 2 (XLR)
Line inputs 5 mono or 1 stereo (through 6,3 mm jack)
Bluetooth Yes - Freq. 2.4 Ghz
Signal output 2 x 6,3mm jack
Phantom supply Yes (+48V)
REC function Yes
MP3 player Yes (throughUSB)
PC connection Yes
Tones control Bass, mid and treble
DSP Processor Yes, 16 presets
Power supply: 5V 1A -Through USB (PC, power bank o adaptor)
Dimensions: 200 x 200 x 60 mm
Weight: 1,18 Kg

Ver. 20.1
09 - Made in China
La linea GLEMM è prodotta e distribuita da:/ GLEMM line is produced and distributed by:
KARMA ITALIANA srl - Via Gozzano 38/bis - 21052 Busto Arsizio - www.karmaitaliana.it
www.glemm.eu
Other manuals for MXP 05
1
Table of contents
Other GLEMM Microphone System manuals