FISSAGGIOGHOST®
1
4
7
9
2
5
8
10
3
6
ISTRUZIONI DI MONTAGGIO
/
ASSEMBLY INSTRUCTIONS
!
!
!
11 12
SILICONE
Istruzione di montaggio FISSAGGIOGHOST®
N.B: Verificare le quote sulla scheda tecnica con il prodotto prima di fare
i fori di fissaggio
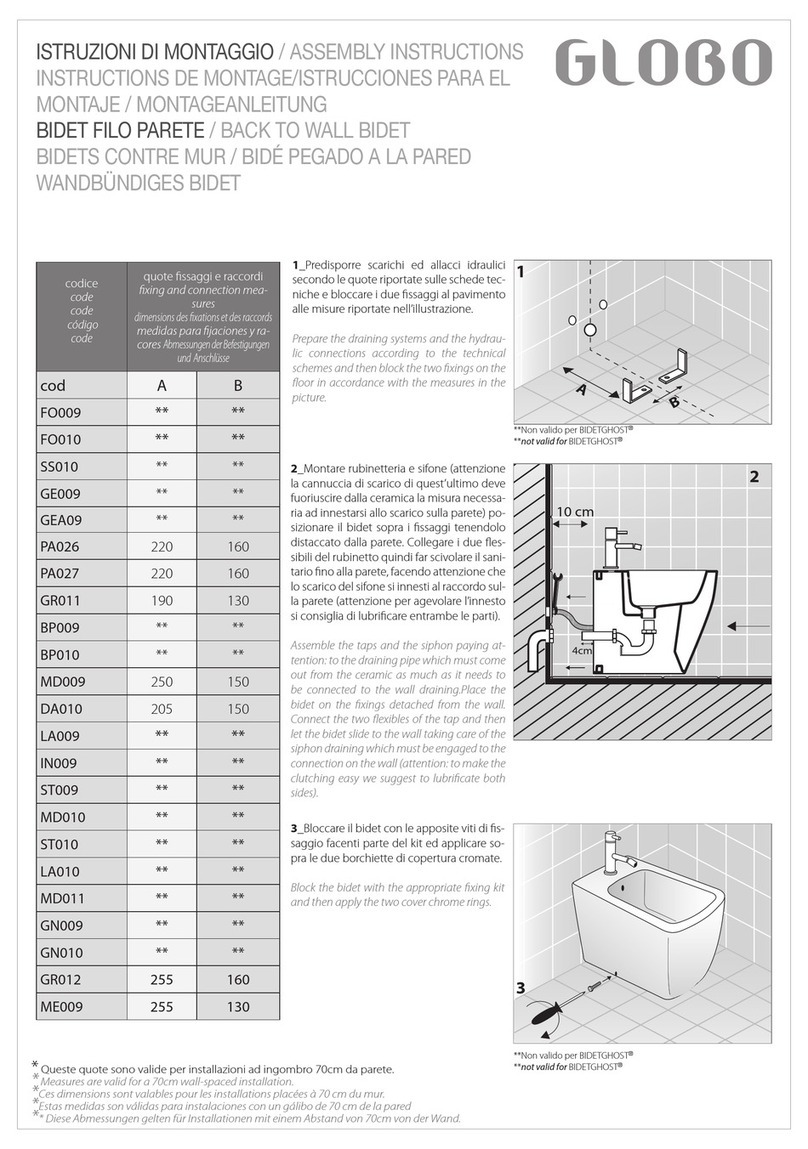
1_ Segnare sul pavimento i due fori per il fissaggio dell’ ancoraggio a
pavimento consultando lo schema qui dietro oppure le apposite dime
pdf sul sito.
5/6_ Bloccare stringendo le viti i due ancoraggi a pavimento verificando
che siano in linea e che i due perni alla misura riportata nella dima.
ATTENZIONE! i due elementi devono essere fissati saldamente e non si
devono
muovere. Per maggior sicurezza verificare che l’ interasse dei
due perni sia lo stesso dei due fori sui particolari fissati sul prodotto,
qualora non lo fossero adeguarli di conseguenza.
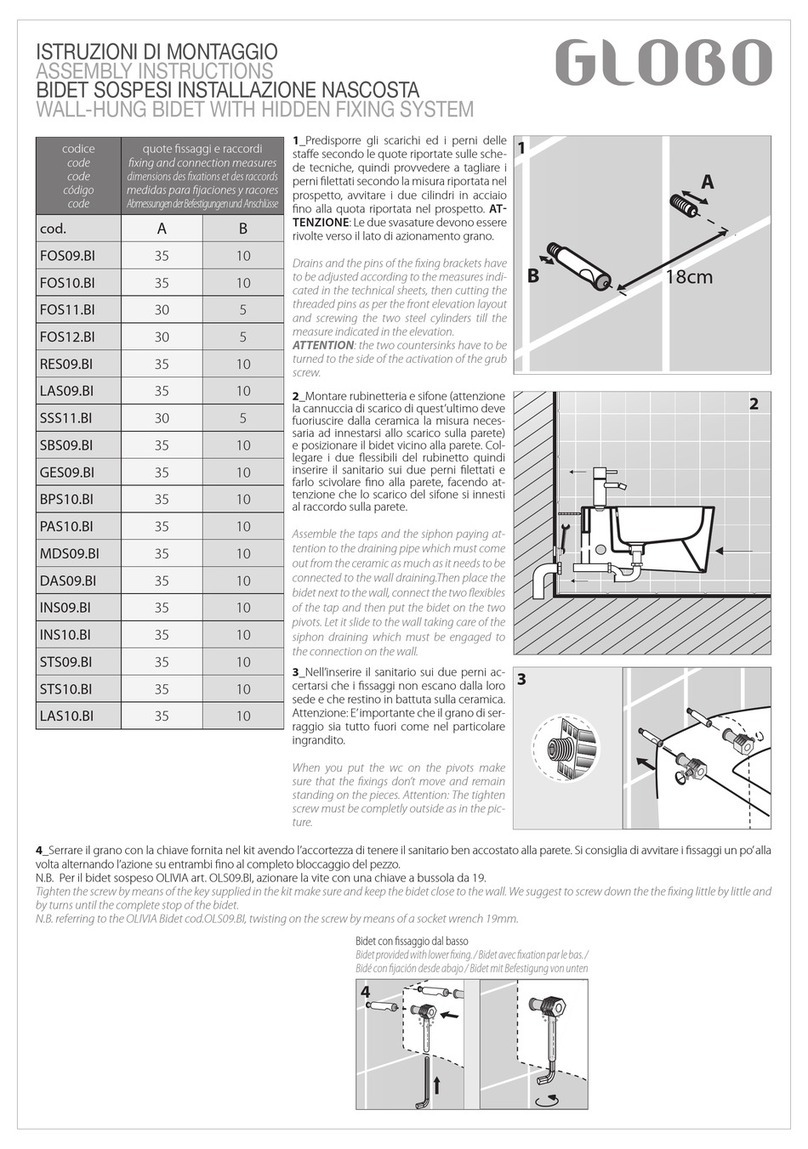
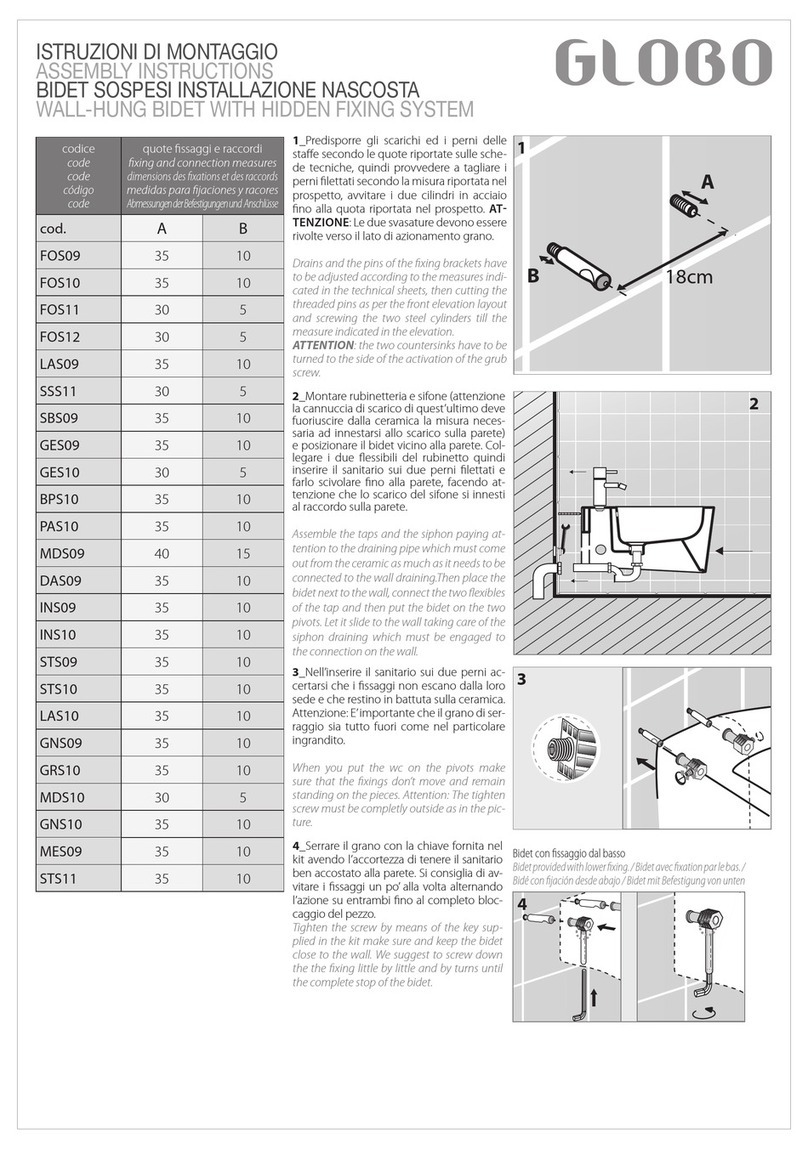
10_ Bloccare i due ancoraggi sulle pareti interne del prodotto
stringendoli con l’ apposita chiave esagonale
fornita nel kit verificando che siano perpendicolari al pavimento ed a filo
con la parte inferiore del pezzo.
ATTENZIONE! i due elementi devono essere fissati saldamente e non si
devono muovere.
11_ Posizionare il pezzo sopra i due fissaggi sufficientemente distante
dalla parete in modo da poter
mettere del silicone sulla parte posteriore del prodotto.
12_ Spingere il pezzo fina alla parete in modo che i quattro elementi si
innestino uno nell’ altro rendendo
il pezzo saldamente ancorato al pavimento, dopodiché ripulire il silicone
in eccesso tra pezzo e parete.
assembly instruction
FISSAGGIOGHO ST®
5/6_ Block the screws by tightening the two oor-mounted anchoring, verify
its linearity and make sure (that) the screws have the same dimensions of the
template.
WARNING! The two elements must be strongly xed and they do not have
to move. For further safety verify that the axle spacing of the screws coincides
with the holes xed in the product. If they do not coincide, please adjust them
consequently.
10_ Block the two anchoring on the inner walls of the product by tightening
them with the appropriate lag screw included in the kit; moreover verify that
the anchoring are perpendicular to the oor and ush with the lower side of
the item. WARNING! The two elements must be strongly xed and they do
not have to move.
11_ Place the item above the two xing suciently distant from the wall in
order to apply silicone in the backside of the product.
into another making the item strongly anchored to the oor; then clean th
rife silicone between the item and the wall
Assembly instruction FISSAGGIOGHOST®
1_
5/6_ Block the screws by tightening the two oor-mounted anchoring, verify
its linearity and make sure (that) the screws have the same dimensions of the
template.
WARNING! The two elements must be strongly xed and they do not have
to move. For further safety verify that the axle spacing of the screws coincides
with the holes xed in the product. If they do not coincide, please adjust them
consequently.
10_ Block the two anchoring on the inner walls of the product by tightening
them with the appropriate lag screw included in the kit; moreover verify that
the anchoring are perpendicular to the oor and ush with the lower side of
the item. WARNING! The two elements must be strongly xed and they do
not have to move.
11_ Place the item above the two xing suciently distant from the wall in
order to apply silicone in the backside of the product.
12_ Push the item toward the wall to allow the four elements to insert one
into another making the item strongly anchored to the oor; then clean the
rife silicone between the item and the wall
N.B: Please check the measures on the technical sheet with the
product before drilling the holes for fixing
Mark the two holes on the floor for the floor installation according to the
diagram on the back page or to the templates pdf on the site


