manuals.online logo
Brands
  1. Home
  2. •
  3. Brands
  4. •
  5. Globo
  6. •
  7. Toilet
  8. •
  9. Globo FOS09 User manual

Globo FOS09 User manual

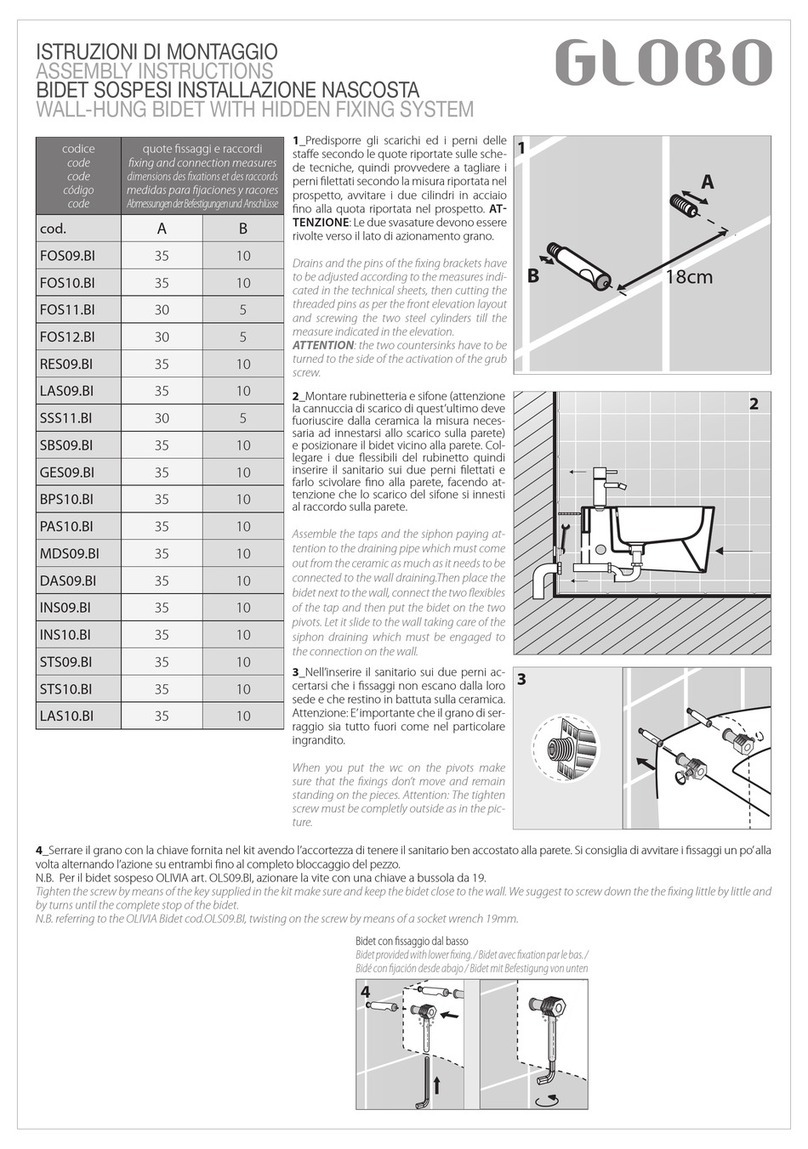
ISTRUZIONI DI MONTAGGIO
ASSEMBLY INSTRUCTIONS
BIDET SOSPESI INSTALLAZIONE NASCOSTA
WALL-HUNG BIDET WITH HIDDEN FIXING SYSTEM
codice
code
code
código
code
quote fissaggi e raccordi
xing and connection measures
dimensions des xations et des raccords
medidas para jaciones y racores
AbmessungenderBefestigungenund Anschlüsse
cod. A B
FOS09 35 10
FOS10 35 10
FOS11 30 5
FOS12 30 5
LAS09 35 10
SSS11 30 5
SBS09 35 10
GES09 35 10
GES10 30 5
BPS10 35 10
PAS10 35 10
MDS09 40 15
DAS09 35 10
INS09 35 10
INS10 35 10
STS09 35 10
STS10 35 10
LAS10 35 10
GNS09 35 10
GRS10 35 10
MDS10 30 5
GNS10 35 10
MES09 35 10
STS11 35 10
3_Nell’inserire il sanitario sui due perni ac-
certarsi che i fissaggi non escano dalla loro
sede e che restino in battuta sulla ceramica.
Attenzione: E’importante che il grano di ser-
raggio sia tutto fuori come nel particolare
ingrandito.
When you put the wc on the pivots make
sure that the xings don’t move and remain
standing on the pieces. Attention: The tighten
screw must be completly outside as in the pic-
ture.
2_Montare rubinetteria e sifone (attenzione
la cannuccia di scarico di quest’ultimo deve
fuoriuscire dalla ceramica la misura neces-
saria ad innestarsi allo scarico sulla parete)
e posizionare il bidet vicino alla parete. Col-
legare i due flessibili del rubinetto quindi
inserire il sanitario sui due perni filettati e
farlo scivolare fino alla parete, facendo at-
tenzione che lo scarico del sifone si innesti
al raccordo sulla parete.
Assemble the taps and the siphon paying at-
tention to the draining pipe which must come
out from the ceramic as much as it needs to be
connected to the wall draining.Then place the
bidet next to the wall, connect the two exibles
of the tap and then put the bidet on the two
pivots. Let it slide to the wall taking care of the
siphon draining which must be engaged to
the connection on the wall.
2
3
4_Serrare il grano con la chiave fornita nel
kit avendo l’accortezza di tenere il sanitario
ben accostato alla parete. Si consiglia di av-
vitare i fissaggi un po’ alla volta alternando
l’azione su entrambi fino al completo bloc-
caggio del pezzo.
Tighten the screw by means of the key sup-
plied in the kit make sure and keep the bidet
close to the wall. We suggest to screw down
the the xing little by little and by turns until
the complete stop of the bidet.
Bidet con fissaggio dal basso
Bidet provided with lower xing. / Bidet avec xation par le bas. /
Bidé con jación desde abajo / Bidet mit Befestigung von unten
4
A
B
A
18cm
1_Predisporre gli scarichi ed i perni delle
staffe secondo le quote riportate sulle sche-
de tecniche, quindi provvedere a tagliare i
perni filettati secondo la misura riportata nel
prospetto, avvitare i due cilindri in acciaio
fino alla quota riportata nel prospetto. AT -
TENZIONE: Le due svasature devono essere
rivolte verso il lato di azionamento grano.
Drains and the pins of the xing brackets have
to be adjusted according to the measures indi-
cated in the technical sheets, then cutting the
threaded pins as per the front elevation layout
and screwing the two steel cylinders till the
measure indicated in the elevation.
ATTENTION: the two countersinks have to be
turned to the side of the activation of the grub
screw.
1
ISTRUZIONI DI MONTAGGIO / ASSEMBLY INSTRUCTIONS
INSTRUCTIONS DE MONTAGE / INSTRUCCIONES PARA EL
MONTAJE / MONTAGEANLEITUNG
BIDET SOSPESI INSTALLAZIONE NASCOSTA / WALL-HUNG BIDET WITH HIDDEN FIXING SYSTEM
BIDETS SUSPENDUS AVEC FIXATIONS CACHÉES / BIDÉ INSTALACIÓN SUSPENDIDA SIN FIJA-
CIONES A LA VISTA / WANDHÄNGENDES BIDET MIT VERSTECKTEM BEFESTIGUNGSSYSTEM
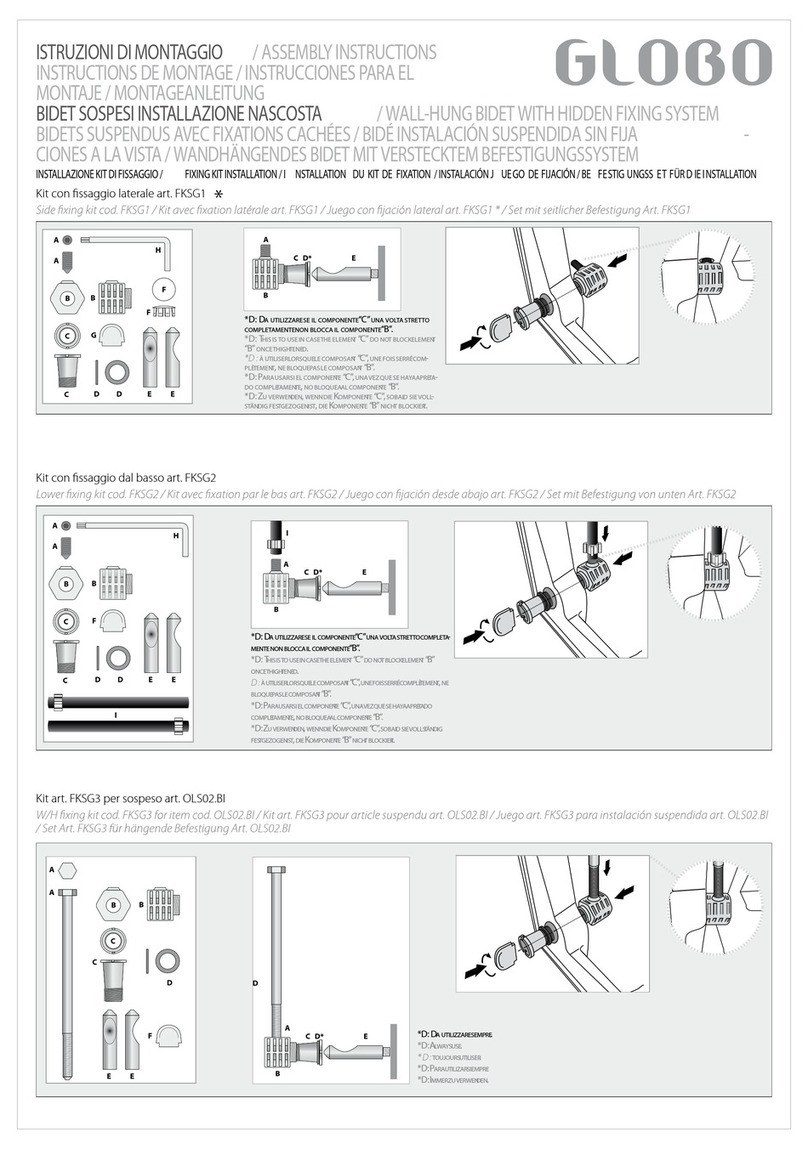
Kit con fissaggio dal basso art. FKSG2
Lower xing kit cod. FKSG2 / Kit avec xation par le bas art. FKSG2 / Juego con jación desde abajo art. FKSG2 / Set mit Befestigung von unten Art. FKSG2
BB
A
A
C
C
F
E E
H
I
DD
A
B
C D* E
I
BB
A
A
C
C
F
E E
H
I
DD
A
B
C D* E
I
BB
A
A
C
C
F
E E
H
I
DD
A
B
C D* E
I
*D: Dautilizzare se il componente “c”una volta stretto completa-
mente non blocca il componente “b”.
*D: This is To use in case The elemenT “c” Do noT block elemenT “b”
once ThighTeneD.
D: àuTiliser lorsque le composanT “c”, une fois serré complèTemenT, ne
bloque pas le composanT “b”.
*D: para usar si el componenTe “c”, una vez que se haya apreTaDo
compleTamenTe, no bloquea al componenTe “b”.
*D: zuverwenDen, wenn Die komponenTe “c”, sobalD sie vollsTänDig
fesTgezogen isT, Die komponenTe “b” nichT blockierT.
1_Prédisposer les évacuations et les pivots des
étriers en respectant les dimensions indiquées dans
les ches techniques. Découper les pivots letés se-
lon la dimension indiquée dans le dessin. Visser les
deux cylindres en acier jusqu’à la dimension indi-
quée dans le dessin. ATTENTION: les deux ouver-
tures doivent être tournées vers le côté d’actionne-
ment du goujon.
1_Preparar los desagües y los pernos de las abra-
zaderas respetando las medidas indicadas en las
chas técnicas, luego cortar los pernos roscados
según la medida indicada en el folleto informativo,
roscar los dos cilindros de acero hasta el punto que
se indica en el folleto informativo. ATENCIÓN: Las
dos concavidades tienen que estar dirigidas hacia
el lado de acción del grano.
1_Bereiten Sie die Abüsse und die Stifte der Hal-
terungen gemäß den Abmessungen auf den Da-
tenblättern vor. Schneiden Sie anschließend die
Gewindestifte in Übereinstimmung mit den in der
Ansicht wiedergegebenen Abmessungen zu, ver-
schrauben Sie die beiden Stahlzylinder auf die in
der Ansicht angegebene Abmessung. Achtung: Die
beiden Senkschrauben müssen zur Antriebseite der
Stiftschraube gedreht werden
2_Monter le robinet et le siphon (attention : le
tuyau d’évacuation de ce dernier doit saillir su-
samment de la céramique pour xer l’évacuation
au mur). Placer le bidet près du mur. Raccorder
les deux tuyaux du robinet puis enler le sanitaire
sur les deux pivots letés et le faire glisser jusqu’au
mur, en faisant attention à ce que l’évacuation du
siphon s’enclenche dans le raccord mural.
2_Montar los grifos y el sifón (cuidado, el tubo
de descarga de este último tiene que salir de la
cerámica lo necesario para que se pueda empal-
mar al desagüe en la pared), colocar el bidé cerca
de la pared . Empalmar las dos tuberías exibles
del grifo e introducir el bidé sobre los dos pernos
roscados y deslizarlo hasta la pared, teniendo cu-
idado de que el tubo de descarga del sifón se em-
palme al racor que está en la pared.
2_Montieren Sie die Armaturen und den Siphon
(achten Sie darauf, dass das Abussrohr von letzte-
rem soweit wie nötig aus der Sanitärkeramik he-
raustritt, um es an den Abuss in der Wand anzu-
schließen), positionieren Sie das Bidet in der Nähe
der Wand. Schließen Sie die beiden Schläuche des
Hahns an und setzen Sie anschließend das Bidet
auf die beiden Gewindestifte und schieben Sie es
anschließend bis zur Wand. Achten Sie dabei da-
rauf, dass der Abuss des Siphons in den Wandan-
schluss greift.
3_En insérant le sanitaire sur les deux pivots, con-
trôler que les xations ne sortent pas de leur loge-
ment et qu’elles restent contre la céramique. Atten-
tion: il est important que le goujon de serrage soit
complètement à l’extérieur comme indiqué dans le
détail agrandi.
3_Durante las operaciones de introducción del
sanitario sobre los dos pernos, asegurarse de que
las jaciones no salgan de su alojamiento y de que
queden en contacto con la cerámica. Atención: es
importante que el grano de apriete esté completa-
mente fuera, como se muestra en la ilustración de
detalle ampliada.
3_Versichern Sie sich beim Einsetzen der Sanitär-
keramik, dass die Befestigungen nicht aus ihrem
Sitz treten und dass sie im Anschlag mit der Sa-
nitärkeramik bleiben. Achtung: Es ist wichtig, dass
die Spannschraube vollständig heraustritt, wie auf
der Vergrößerung dargestellt
4_Visser le goujon à l’aide de la clé fournie dans le
kit, en prenant soin de maintenir le sanitaire bien
appuyé contre le mur. Nous conseillons de visser
les xations chacune un peu à la fois en alternant
l’action jusqu’au blocage complet de la pièce.
N.B. Pour le bidet suspendu OLIVIA art. OLS09.BI,
actionner la vis avec une clé à douille de 19 mm.
4_Apretar el grano con la llave que se ha sumini-
strado con el juego, teniendo cuidado de mantener
el sanitario bien apoyado a la pared. Se aconseja
atornillar las jaciones poco a poco, alternando
la acción sobre las dos hasta bloquear completa-
mente la pieza.
NOTA: Para el bidé de instalación suspendida OLI-
VIA art. OLS09.BI, atornillar el tornillo con una llave
tubular de 19.
4_Ziehen Sie die Stiftschraube mit dem im Set ge-
lieferten Werkzeug fest. Achten Sie dabei darauf,
dass sich die Sanitärkeramik nahe an der Wand
bendet. Es wird empfohlen, die Befestigungen ab-
wechselnd Stück für Stück festzuschrauben, bis die
Sanitärkeramik vollständig blockiert ist.
Anmerkung: Drehen die beim wandhängenden
Bidet OLIVIA Art. OLS09.BI die Schraube mit einem
19er Steckschlüssel.

This manual suits for next models

23

Other Globo Toilet manuals

Globo FO009.BI User manual

Globo

Globo FO009.BI User manual

Globo RE003.BI User manual

Globo

Globo RE003.BI User manual

Globo FOS11.BI User manual

Globo

Globo FOS11.BI User manual

Globo FISSAGGIOGHOST MD002 User manual

Globo

Globo FISSAGGIOGHOST MD002 User manual

Globo PA001.BI User manual

Globo

Globo PA001.BI User manual

Globo FO009 User manual

Globo

Globo FO009 User manual

Globo SENZABRIDA FO004 User manual

Globo

Globo SENZABRIDA FO004 User manual

Globo PA025.BI User manual

Globo

Globo PA025.BI User manual

Globo FOS09.BI User manual

Globo

Globo FOS09.BI User manual

Popular Toilet manuals by other brands

Scarabeo Moai 8606 manual

Scarabeo

Scarabeo Moai 8606 manual

Grohe 39378SH0 installation manual

Grohe

Grohe 39378SH0 installation manual

Kohler Sterling Windham 402315 installation instructions

Kohler

Kohler Sterling Windham 402315 installation instructions

Dometic 4000 Series Operation manual

Dometic

Dometic 4000 Series Operation manual

Project Source DANVILLE MT-20206TC manual

Project Source

Project Source DANVILLE MT-20206TC manual

WimTec NSIDE Installation and operating instructions

WimTec

WimTec NSIDE Installation and operating instructions

Kohler K-6299 Detailed Planning Dimensions

Kohler

Kohler K-6299 Detailed Planning Dimensions

Separett Tiny 1271-01 installation manual

Separett

Separett Tiny 1271-01 installation manual

Inax DV300G manual

Inax

Inax DV300G manual

Kohler K-3608 Installation and care guide

Kohler

Kohler K-3608 Installation and care guide

Raita EV EASY manual

Raita

Raita EV EASY manual

Kohler K-20184K Installation and care guide

Kohler

Kohler K-20184K Installation and care guide

Toto CS320D Series installation manual

Toto

Toto CS320D Series installation manual

Kohler K-3506 Homeowner's guide

Kohler

Kohler K-3506 Homeowner's guide

Thetford C-200 series instructions

Thetford

Thetford C-200 series instructions

Toto Washlet TCF4914E Series instruction manual

Toto

Toto Washlet TCF4914E Series instruction manual

STUDIOLUX SLi5200 manual

STUDIOLUX

STUDIOLUX SLi5200 manual

Hewi S50.02.000 Series Mounting instructions

Hewi

Hewi S50.02.000 Series Mounting instructions

manuals.online logo
manuals.online logoBrands
  • About & Mission
  • Contact us
  • Privacy Policy
  • Terms and Conditions

Copyright 2025 Manuals.Online. All Rights Reserved.