ISTRUZIONI DI MONTAGGIO
ASSEMBLY INSTRUCTIONS
BIDET SOSPESI INSTALLAZIONE NASCOSTA
WALL-HUNG BIDET WITH HIDDEN FIXING SYSTEM
codice
code
code
código
code
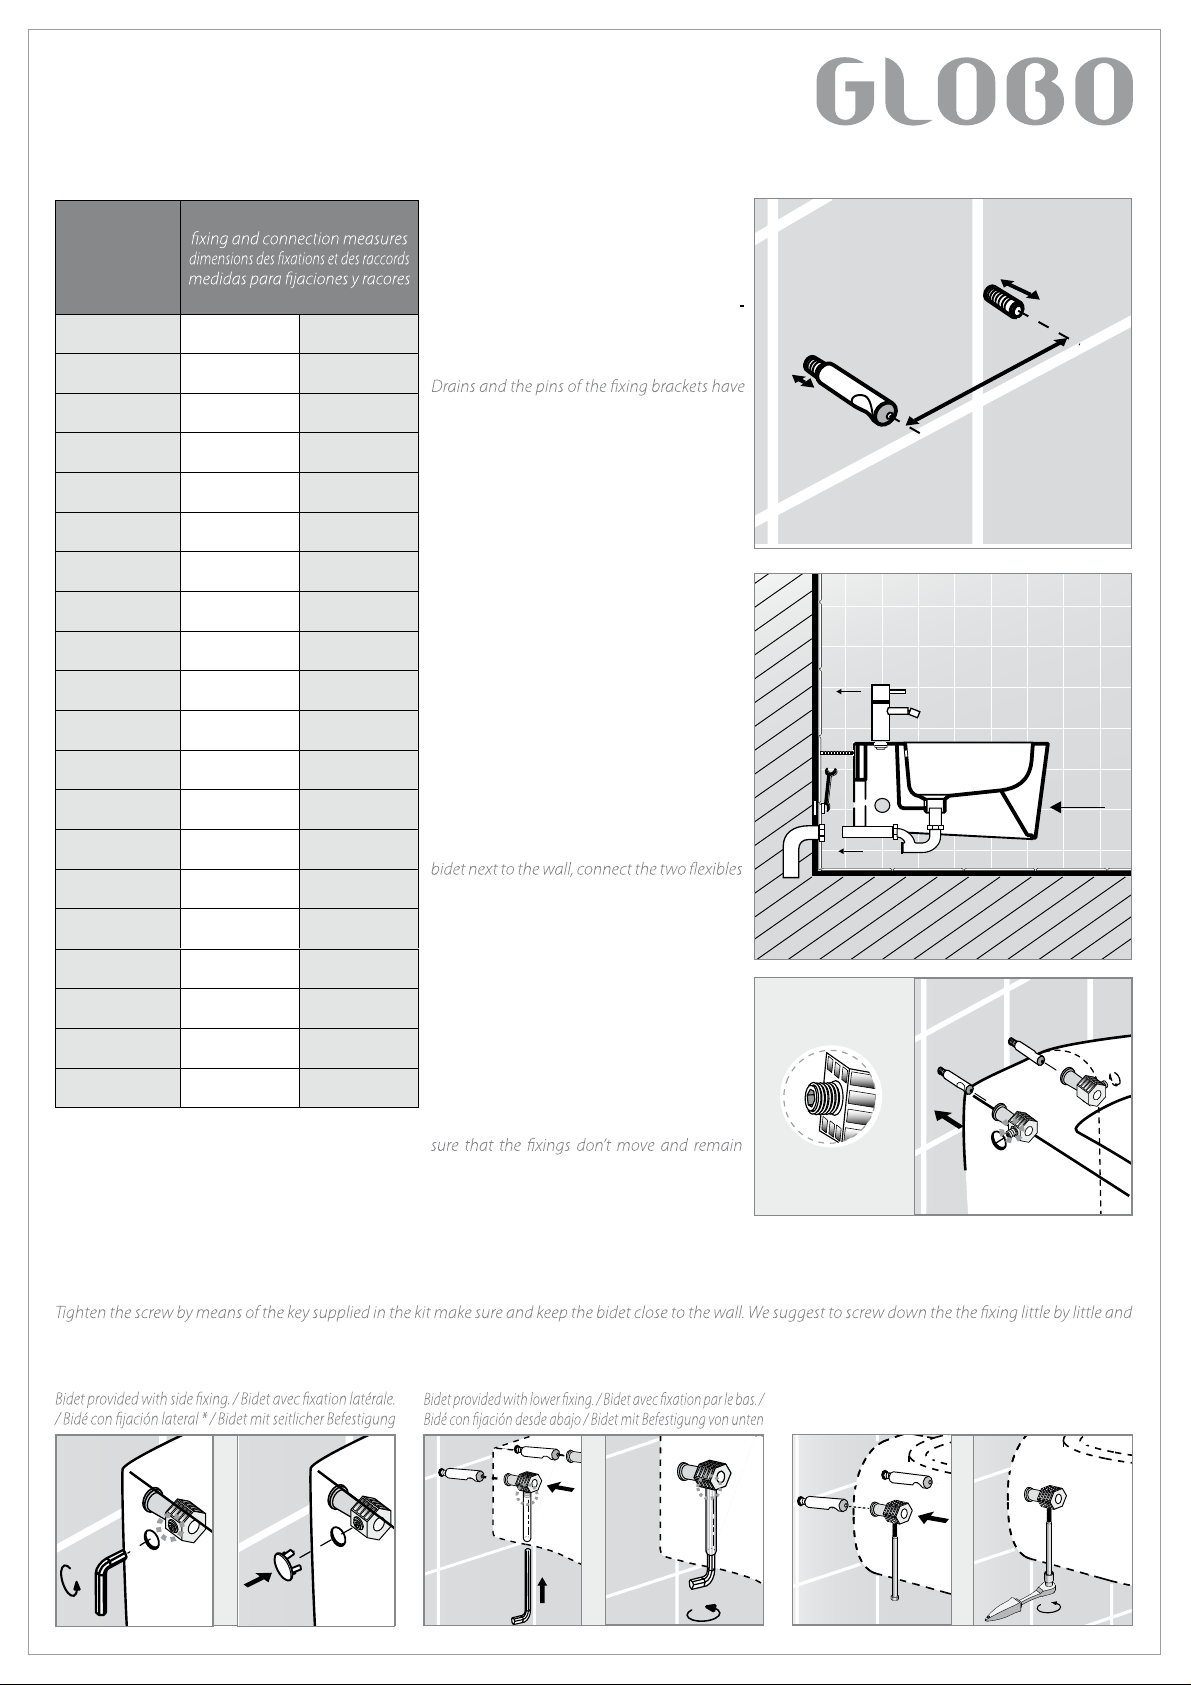
quote fissaggi e raccordi
Abmessungender Befestigungenund Anschlüsse
A B
FOS10.BI 35 10
FOS09.BI 35 10
FOS11.BI 30 5
FOS12.BI 30 5
SAS09.BI 35 10
SAS10.BI 35 10
SSS09.BI * 35 10
SSSN9.BI 35 10
SSS10.BI 35 10
SSS11.BI 30 5
SBS09.BI * 35 10
SBS11.BI * 30 5
GES09.BI 35 10
GES10.BI 30 5
SCS09.BI * 35 10
AFS09.BI * 35 10
BPS10.BI 35 10
PAS10.BI 35 10
MDS09.BI 35 10
3_Nell’inserire il sanitario sui due perni ac-
certarsi che i fissaggi non escano dalla loro
.acimarecallusatuttabnionitserehceedes
Attenzione: E’importante che il grano di ser-
raggio sia tutto fuori come nel particolare
ingrandito.
When you put the wc on the pivots make
standing on the pieces. Attention: The tighten
screw must be completly outside as in the pic-
ture.
2_Montare rubinetteria e sifone (attenzione
la cannuccia di scarico di quest’ultimo deve
fuoriuscire dalla ceramica la misura neces-
saria ad innestarsi allo scarico sulla parete)
e posizionare il bidet vicino alla parete. Col-
legare i due flessibili del rubinetto quindi
inserire il sanitario sui due perni filettati e
farlo scivolare fino alla parete, facendo at-
tenzione che lo scarico del sifone si innesti
al raccordo sulla parete.
Assemble the taps and the siphon paying at-
tention to the draining pipe which must come
out from the ceramic as much as it needs to be
connected to the wall draining.Then place the
of the tap and then put the bidet on the two
pivots. Let it slide to the wall taking care of the
siphon draining which must be engaged to
the connection on the wall.
2
3
4_Serrare il grano con la chiave fornita nel kit avendo l’accortezza di tenere il sanitario ben accostato alla parete. Si consiglia di avvitare i fissaggi un po’alla
volta alternando l’azione su entrambi fino al completo bloccaggio del pezzo.
N.B. Per il bidet sospeso OLIVIA art. OLS09.BI, azionare la vite con una chiave a bussola da 19.
by turns until the complete stop of the bidet.
N.B. referring to the OLIVIA Bidet cod.OLS09.BI, twisting on the screw by means of a socket wrench 19mm.
Bidet con fissaggio laterale
Bidet con fissaggio dal basso
Bidet sospesoart. OLS09.BI
Bidet cod.OLS09.BI / Bidet suspendu art. OLS09.BI / Bidé de instala-
ción suspendida art. OLS09.BI / WandhängendesBidet Art. OLS09
4
ISTRUZIONE DI MON TAGGIO PER VASO SOSPESO OLS02
14 cm
1_
Predispor re gli scarichi ed i perni delle staffe secondo le quote riportate sulle schede tec-
niche, quindi provvede re a taglia re i perni lettati secondo la misura riportata nell'illustra-
zione, avvita re i due cilindri in acciaio no a lascia re 1 cm circa dalla pa rete. ATTENZIONE : E'
importantissimo che le due svasatu re coniche siano rivolte verso il basso come nella gura
quì sopra.
Prepa rez les vidages et les pivots de xation selon les indications des ches techni-
ques et aprés coupez les pivots selon la mesu re indiquée dans l' illustration, vissez les
deux cylinders en acier jusqu'à la parois en laissant à peu près 1 cm du mur. A
TTENTION
:
Il est très important de tourner les deux évasu res vers le bas comme dans la che ci-
dessus.
Prepa re the draining and the xing pivots acco rding to the dimensions of the tecnical
scheme and then cut the pivots acco rding to the distance in the picture, screw the two
steel cylinders leaving about 1 cm from the wall. A
TTENTION
:It is very important to turn
the two conic countersinks towards the bottom as in the pictures above.
4_
Nell'inseri re il sanitario sui due perni accer-
tarsi che i ssaggi non escano dalla loro sede
e che re stino in batt uta sulla ceramica.
A
TTENZIONE
:E' importante che la chiave di ser-
raggio sia tutta fuori come nel particola re
ingrandito.
En mettant le wc sur les deux pivots assurez-
vous que les xations ne sorten pas de leur
siège et qu' ils restent posés sur le pieces.
A
TTENTION
:La vie de serrage doit rester à l'exté-
rieur comme dans la che ci-dessus.
When you put the wc on the pivots make sure
that the xings don't move and remain standing
on the pieces. A
TTENTION
:The screw
must be completly outside as in the picture.
2_Predispor re il racco rdo
particola re ingrandito. Monta
riportata nell'illustrazione.
Prepa rez la connexion pour
ci-dessus. Montez la connexion de vidage sur le sanitai
re indiquée dans l'illustration.
Prepa re the connection for
the pictu re above. Assemble
to the measu re.
3,5 cm
1cm
3,5cm
18cm
1
4
2
ISTRUZIONE DI MON TAGGIO PER VASO SOSPESO OLS02
14 cm
4 cm
Raccordo di scarico
Draining connection
1_
Predispor re gli scarichi ed i perni delle staffe secondo le quote riportate sulle schede tec-
niche, quindi provvede re a taglia re i perni lettati secondo la misura riportata nell'illustra-
zione, avvita re i due cilindri in acciaio no a lascia re 1 cm circa dalla pa rete. ATTENZIONE : E'
importantissimo che le due svasatu re coniche siano rivolte verso il basso come nella gura
quì sopra.
Prepa rez les vidages et les pivots de xation selon les indications des ches techni-
ques et aprés coupez les pivots selon la mesu re indiquée dans l' illustration, vissez les
deux cylinders en acier jusqu'à la parois en laissant à peu près 1 cm du mur. ATTENTION :
Il est très important de tourner les deux évasu res vers le bas comme dans la che ci-
dessus.
Prepa re the draining and the xing pivots acco rding to the dimensions of the tecnical
scheme and then cut the pivots acco rding to the distance in the picture, screw the two
steel cylinders leaving about 1 cm from the wall. ATTENTION :It is very important to turn
the two conic countersinks towards the bottom as in the pictures above.
4_
Nell'inseri re il sanitario sui due perni accer-
tarsi che i ssaggi non escano dalla loro sede
e che restino in battuta sulla ce ramica.
A
TTENZIONE
:E' importante che la chiave di ser-
raggio sia tutta fuori come nel particola re
ingrandito.
En mettant le wc sur les deux pivots assurez-
vous que les xations ne sorten pas de leur
siège et qu' ils restent posés sur le pieces.
ATTENTION :La vie de serrage doit rester à l'exté-
rieur comme dans la che ci-dessus.
When you put the wc on the pivots make sure
that the xings don't move and remain standing
on the pieces. ATTENTION :The screw
must be completly outside as in the pictu re.
5_
Serra
cortezza
consiglia
l'azione
pezzo.
Ser rez
vous que
le de
que fois de l'un à l'aut
bidet.
Tighten
make
suggest to
by turns
2_Predispor re il racco rdo per lo scarico della cassetta secondo la misura riportata nel
particola re ingrandito. Monta re il racco rdo di scarico sulla parete secondo la misura
riportata nell'illustrazione.
Prepa rez la connexion pour le vidage du reservoir selon les dimensions du particulier
ci-dessus. Montez la connexion de vidage sur le sanitai re et, coupez-la selon la mesu-
re indiquée dans l'illustration.
Prepa re the connection for the cistern draining acco rding to the dimension shown in
the picture above. Assemble the draining connection on the wc and cut it acco rding
to the measu re.
3_A questo punto
lo no a pa rete
perfettamente
lubrica re entrambe
Après mettez
faisant attention
les unes aux aut
le de bien lubrier
Then place the
of the connections
(ATTENTION :To
both sides).
3,5 cm
1cm
3,5cm
18cm
1
4 5
32
44
B
A
18cm
1_Predisporre gli scarichi ed i perni delle
staffe secondo le quote riportate sulle sche-
de tecniche, quindi provvedere a tagliare i
perni filettati secondo la misura riportata nel
prospetto, avvitare i due cilindri in acciaio
fino alla quota riportata nel prospetto. AT
TENZIONE: Le due svasature devono essere
rivolte verso il lato di azionamento grano.
to be adjusted according to the measures indi-
cated in the technical sheets, then cutting the
threaded pins as per the front elevation layout
and screwing the two steel cylinders till the
measure indicated in the elevation.
ATTENTION: the two countersinks have to be
turned to the side of the activation of the grub
screw.
1
*
cod.