GME TX4610 User manual

TX4610 INSTRUCTION MANUAL PAGE 1
5 WATT IP67
UHF CB RADIO
INSTRUCTION MANUAL
TX4610

PAGE 2 INSTRUCTION MANUAL TX4610
IMPORTANT INFORMATION........................................ 3
SAFETY INFORMATION ................................................ 3
EMERGENCY CHANNELS........................................... 3
TELEMETRY CHANNELS............................................. 3
FEATURES ..................................................................... 4
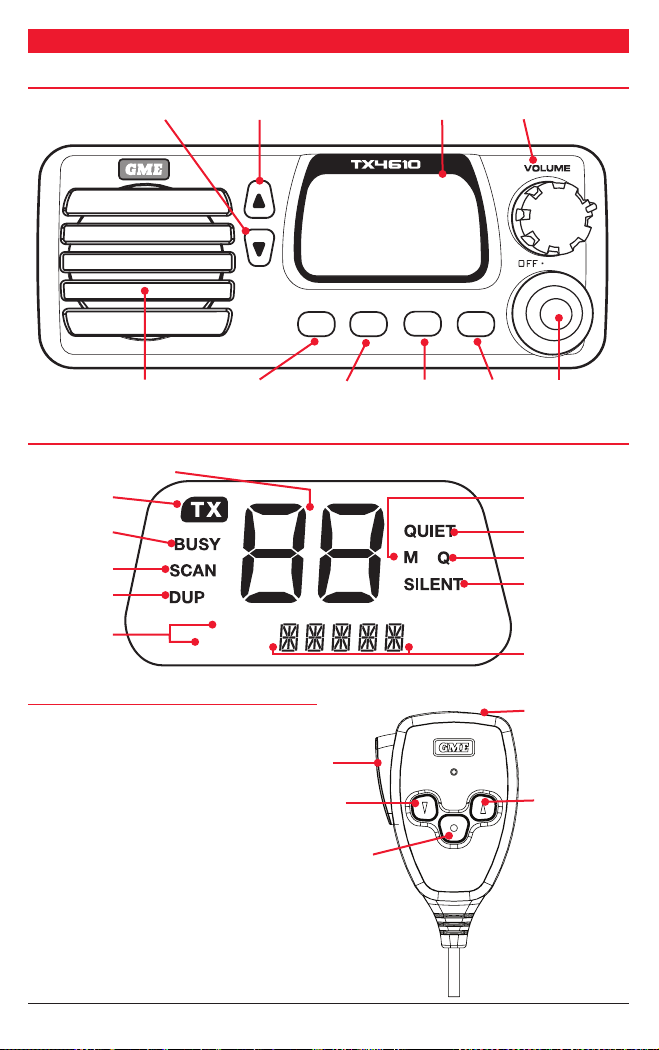
CONTROLS.................................................................... 5
Front Panel .............................................................. 5
LCD Display.............................................................. 5
Microphone ............................................................ 5
GENERAL OPERATION ............................................... 6
Funcon Key............................................................ 6
Volume On/O ....................................................... 6
Selecng Channels ................................................. 6
Transming ............................................................ 6
Squelch Control ...................................................... 6
Squelch Sensivity ................................................. 6
Priority Channel...................................................... 7
Duplex Operaon................................................... 7
CTCSS............................................................................. 7
Overview ................................................................. 7
Monitoring the Channel........................................ 7
Selecng the Tone Set ........................................... 7
Selecng the Required CTCSS Tone .................... 7
Enabling CTCSS on a Channel............................... 7
Disabling CTCSS on a Channel.............................. 8
SCANNING.................................................................... 8
Overview ................................................................. 8
Scan Groups ............................................................ 8
Selecng the Scan Group ...................................... 8
Programming Scan Channels ................................ 8
To Start Scanning.................................................... 9
To Stop Scanning..................................................... 9
OPEN SCAN MODE ..................................................... 9
Using Scan in the Open Scan Mode...................... 9
GROUP SCAN MODE .................................................. 9
Seng Up the Group Scan .................................. 10
Scanning in the Group Scan Mode ..................... 10
Using Two Group Scan or Two Open Scan Modes
10
SELECTIVE CALLING ................................................. 11
Overview ............................................................... 11
SelCall Idencaon Number............................. 11
SelCall Indent Names ........................................... 11
The Quiet Mode (Q) ............................................. 11
SelCall Memories.................................................. 12
USING SELCALL.......................................................... 12
Entering a SelCall Indent...................................... 12
Sending a SelCall................................................... 12
Call Acknowledge ................................................. 12
Storing SelCall Indents.........................................12
Recalling SelCall Indents From Memory............13
Naming Your SelCall Indents...............................13
Displaying Alpha Names ......................................13
Entering and Storing a SelCall Name..................13
Receiving SelCalls ................................................. 14
Cancelling the SelCall Alert ................................. 14
Quiet Mode...........................................................15
Seng Up the Quiet Mode ................................. 15
Acvang the Quiet Mode.................................. 15
De-acvang the Quiet Mode............................15
Receiving Signals in the Quiet Mode..................15
Scanning in the Quiet Mode ...............................16
To Scan in the Quiet Mode .................................. 16
Receiving Signals while Scanning in the Quiet Mode
.16
GROUP CALLING ....................................................... 16
Programming and Sending Group Calls............. 17
LISTENING CHANNELS............................................. 17
Seng the Frequency Steps ...............................18
Acvang Listening Channels.............................18
Programming the Frequencies ...........................18
Seng Alpha Labels for your Listening Channels
.18
SEEK MODE ................................................................19
Enabling the Seek Mode......................................19
Scanning for Acve Frequencies in Seek Mode19
Seng Seek Mode Frequency Limits.................19
MENU SETTINGS.......................................................20
Overview ............................................................... 20
Frequency / Alpha Adjustments.........................21
Seng the Squelch Sensivity ...........................21
Selecng the Scan Mode.....................................21
Selecng Duplex................................................... 22
CTCSS Tones .........................................................22
Lamp Colour..........................................................23
Baery / S Metre / Alpha Selecon ...................23
LCD Contrast ......................................................... 24
Beep Tone Level.................................................... 24
INSTALLATION........................................................... 24
General .................................................................. 24
Installing the Unit .................................................25
DC Connecons .................................................... 25
Antenna Installaon............................................. 26
Noise Suppression................................................ 26
Disconnecng the Microphone.......................... 26
UHF CB OPERATING FREQUENCIES......................27
CTCSS TONE FREQUENCY CHART ......................... 28
SPECIFICATIONS........................................................ 29
SC CONTRACT WARRANTY AGAINST DEFECTS.30
CONTENTS

TX4610 INSTRUCTION MANUAL PAGE 3
IMPORTANT INFORMATION
CONCERNING UHF CB RADIO
The use of the Cizen Band radio service
is licensed in Australia by the ACMA Radio
communicaons (Cizens Band Radio
Staons) Class Licence and in New Zealand
by the Ministry of Economic Development
New Zealand (MED). A General User Radio
Licence for Cizens Band radio and operaon
is subject to condions contained in those
licences.
The class licence for users and equipment
operang in the CB/PRS 477 MHz band has
been amended. This radio meets the new 80
channel standard.
In simple terms the same amount of spectrum
is available; however, radio transceivers can
now operate in a narrower bandwidth and
hence use less spectrum. These radios are
generally referred to as narrowband or 12.5
kHz radios. By using 12.5 kHz channel spacing
instead of 25 kHz, the 40 channels originally
allocated can now be expanded to 80 channels
thereby doubling the channel capacity and
relieving congeson in the UHF CB/PRS band.
Original 40 channel wideband Radios will
connue to operate on the original 40 channels,
however they will not be able to converse
on the newer channels 41 – 80. The newer
narrowband radios will be able to converse
with all older 40 channel wideband radios on all
channels 1 to 40 as well as the newer channels
allocated from 41 to 80.
The mixing of narrowband and wideband
radios in the same spectrum can cause some
possible operang issues of interference and
varying levels of received volume.
SAFETY INFORMATION
The TX4610 is a radio transming device.
• When transming, keep the antenna more
than 25 mm from any part of the head
or body.
• Do not transmit near electrical blasng
equipment or in explosive atmospheres.
• Do not allow children to operate a radio
transmier unsupervised.
POSSIBLE ISSUES
When a new narrowband radio receives a
transmission from an older wideband radio the
speech may sound loud and distorted - simply
adjust the radio volume for best performance.
When an older wideband radio receives a signal
from a new narrowband radio, it may sound
quiet - simply adjust your volume for best
performance.
There can be interference from a transming
radio if it is close to another transming radio
using a channel adjacent to the channel you are
listening to. Simply try going up or down a few
channels from the currently selected channel.
The above situaons are not a fault of the radio
but a symptom of operang wideband and
narrowband radios in the same bandwidth. This
possible interference will decrease over me
as the populaon of wideband radios ages and
decreases.
Further informaon and updates are available
from the Australian Communicaons and Media
Authority (ACMA) at www.acma.gov.au and
the Ministry of Economic Development (MED),
Radio Spectrum Management at: www.rsm.
govt.nz
EMERGENCY CHANNELS
The ACMA has allocated channels 5/35 for
emergency use only. Channel 5 is the primary
Simplex Emergency Channel. Where a Channel
5 repeater is available, you should select Duplex
on CH 5.
NOTE: Channel 35 is the input channel
for the Channel 5 repeater therefore
Channel 35 should also not be used
for anything other than emergency
transmissions.
TELEMETRY CHANNELS
ACMA regulaons have allocated channels
22 and 23 for telemetry only applicaons and
have prohibited the transmission of speech on
these channels. Consequently the TX4610 has a
transmit inhibit applied to channels 22 and 23.
In the event addional telemetry/telecomand
channels are approved by the ACMA, these
channels shall be added to those currently
listed where voice transmission is inhibited.
Currently transmissions on channels 61, 62 and
63 are also inhibited and these channels are
reserved for future allocaon.

PAGE 4 INSTRUCTION MANUAL TX4610
FEATURES
User selectable for only those individual
channels in your area that have repeaters, leaving the others free for use as extra simplex
channels.
User Programmable Receive-Only Channels: Use the TX4610’s front panel controls to
program up to 19 of your own receive-only channels in the 403-520 MHz frequency range.
SCANNING AND MEMORY FUNCTIONS
Microprocessor Controlled Frequency Synthesiser: Allows user programmable control of
scanning, channel memories and selected feature opons.
With Band Edge Selecon.
Scans the programmable UHF CB channels with both Group
and Open scan funcons available.
Priority Channel: A user programmable Priority Channel feature allows your working or local
repeater channel to be instantly recalled at the press of a buon.
PRIVACY FUNCTIONS
In-Built Selcall: Selecve Calling with ve digit ANI and fully user-adjustable 5 tone
transmied SelCall Ident. Also allows naming of Idents for easier caller idencaon.
Unique Page (Transpond) mode: Allows you to transfer an incoming SelCall to another radio if
your radio is unaended.
Quiet Mode: Selectable on individual channels, Quiet mode prevents incoming signals from
being heard on selected channels unless preceded by your SelCall code.
CTCSS: A built-in Connuous Tone Coded Squelch System opon provides quiet channel
operaon.
PHYSICAL PROPERTIES
Special overvoltage detecon circuitry protects the radio and warns
of excessive voltage condions by ashing the display.
Front Facing Speaker: Projects the sound forward for greater clarity.
Water & Dust proof IP67: Provides protecon against dust and temporary immersion in
water.
USER CONTROLS AND INTERFACE
Large High Contrast Liquid Crystal Display: Fully detailed LCD provides a visual indicaon of
the selected channel and all selected funcons at a glance. Backlit for viewing at night.
Allows Scanning, Squelch, Duplex, Priority, Channel selecon and
CTCSS features to be enabled or disabled to make the radio simpler to operate.

TX4610 INSTRUCTION MANUAL PAGE 5
CONTROLS
MICROPHONE
MENU
F
SCAN
DIM
PRI
QUIET
SQL
ALPHA
Volume On/O
Microphone
Socket
Speaker Menu
FUNCTION
Scan
DIM
Priority
QUIET
Squelch
ALPHA
(Dim) Channel Down (Bright) Channel Up LCD Display
Channel Up
Channel Down
Push To Talk
PPT
Priority
Call/Skip
FRONT PANEL
LCD DISPLAY
CALL TO
CALL FROM
Transmit
Indicator
Duplex
indicator
Busy
Indicator
Scan Indicator
QUIET Mode
CTCSS
Indicator
Channel in
Memory
Indicator
QUIET Tag
SelCall
Call Mode
Alpha Numeric
Display
Channel Number

PAGE 6 INSTRUCTION MANUAL TX4610
GENERAL OPERATION
FUNCTION KEY
The four keys beneath the TX4610’s display
have both primary and secondary funcons.
Their primary funcons are printed in Black
while their secondary funcons are printed in
Red.
Simply press the required key. eg. To control the
Squelch, briey press the SQL key.
Press the F key followed immediately by the
required key. Eg. To Dim the display, briey
press the F key (‘F’ is displayed), then press the
DIM key. The display will dim.
NOTE: If the secondary key is not
pressed within 10 seconds the Fkey
selecon will be cancelled.
VOLUME ON/OFF
Rotate the volume control clockwise past
the ‘click’ to turn the TX4610 on. Connue to
advance the control clockwise to increase the
volume. Rotate the control counterclockwise to
turn the radio o.
NOTE: At minimum volume seng
there is sll sucient volume to be
heard in a quiet cabin environment.
SELECTING CHANNELS
Briey press the Channel key to step upwards
one channel or the Channel key to step
downwards one channel. A high beep will be
heard at each press.
Press and hold the or key for 1.5 seconds
to scroll quickly upwards or downwards
through the channels at a rate of 10 channels
per second. When the key is released channel
scrolling stops.
TRANSMITTING
Prior to transming, always check the channel
is not being used. This can be done by either
listening or by checking the ‘Busy’ indicator is
not lit.
To transmit, press the PTT (Push-to-Talk) buon
on the microphone. Hold the microphone about
5-8 cm from your face and speak at a normal
voice level. The microphone is quite sensive so
it is not necessary to raise your voice or shout.
Release the PTT when you have nished talking.
The Squelch control is used to eliminate the
background noise when there are no signals
present. The TX4610 features a preset Squelch
system. The Squelch sensivity has been
factory set to provide opmum performance
in most environments, however the sensivity
can be altered by the user if required, to suit
varying environmental situaons.
The Squelch can be opened or closed with
the SQL key. When the Squelch is open, the
receiver’s background noise can be heard
and ‘BUSY’ is displayed. When the Squelch is
closed, the receiver remains quiet when there
are no signals present but an incoming signal
will override the squelch and be heard in the
speaker.
To open the Squelch
Briey press the SQL key. A low beep will be
heard. If there are no signals present you will
hear the receiver’s background noise.
To close the Squelch
Briey press the SQL key again. A high beep will
be heard and the receiver will become quiet.
NOTE: If an incoming signal is very
weak and is close to the minimum
squelch level, it may become broken
or ‘chopped’ by the squelch acon. To
prevent this, simply open the Squelch
to allow the signal to be heard clearly.
Alternavely you can reduce the Squelch
sensivity as described below.
SQUELCH SENSITIVITY
The sensivity of the Squelch to incoming
signals can be set to suit your operang
environment. For example, excessively noisy
environments may cause the squelch to open on
local noise. The TX4610 has ten preset Squelch
sensivity sengs that can be selected using
the
MENU
funcon.

TX4610 INSTRUCTION MANUAL PAGE 7
Please refer to the
MENU
sengs on page 21.
PRIORITY CHANNEL
The Priority Channel feature allows you to store
one of the channels as a Priority Channel that
can be instantly recalled at the press of a key.
This can be used to provide instant access to
your working channel or your local repeater
channel.
To store a Priority Channel
1. Select the required channel.
2. Press and hold the PRI key unl a high beep is
heard. The selected channel will be stored.
To recall a Priority Channel
Briey press the PRI key. The radio will switch
straight to the selected Priority Channel. Any
acve funcons (such as Scanning or Quiet) will
be cancelled.
DUPLEX OPERATION
Duplex operaon allows the radio to transmit
on a dierent frequency to that which is
receives. This allows operaon through local
repeater staons. These repeater staons
automacally re-transmit your signal over a
wider area, providing greatly increased range.
Duplex operaon is only available on channels
1-8 and 41-48. When duplex is selected on these
channels, the radio receives on that channel but
actually transmits 30 channels higher.
To select Duplex operaon please refer to the
MENU sengs on Page 22.
CTCSS
OVERVIEW
CTCSS (Connuous Tone Coded Squelch System)
is a squelch quieng system that allows several
groups of users to share the same channel
without disturbing each other. It uses a preset
sub-audible (very low frequency) tone to open
and close the squelch on your radio. There are
up to 50 tones available in two oponal tone
sets. The system applies a connuous low-level
tone to your transmission and uses a matching
tone decoder to control your receiver’s squelch.
With CTCSS enabled, the channel remains quiet
to all incoming signals unless they carry the
correct tone. When a transmission with the
correct tone is received, the squelch opens
and remains open for as long as the signal is
present. When the transmission ends, the
channel becomes quiet again. Transmissions
that do not use the correct tone will not be
heard.
The TX4610 allows CTCSS to be enabled or
disabled on individual channels.
NOTE: The CTCSS tone you select will be
used for all CTCSS enabled channels in
your radio.
MONITORING THE CHANNEL
It is useful to be able to temporarily open
your radio’s squelch to allow you to listen for
signals from other CTCSS users outside your
group. Because their CTCSS tone is dierent
to yours, your squelch would normally remain
closed, prevenng you from hearing them.
You can use the
SQL
key to open the squelch
and listen to the channel to check that it is clear
before transming. This will help prevent you
from accidentally transming over the top of
someone.
To monitor the Channel
Press the
SQL
key. If there are no signals
present, you will hear the usual hiss of an empty
channel. Press the
SQL
key again to restore the
Squelch to its previous seng.
SELECTING THE TONE SET
There are two standard tones sets available,
one comprising 50 tones and the other
comprising 38 tones. Both tone sets are included
in the TX4610 to provide compability with other
GME radio systems.
SELECTING THE REQUIRED CTCSS TONE
To preselect the CTCSS tone on your radio,
please refer to the MENU sengs on page 22.
ENABLING CTCSS ON A CHANNEL
If a CTCSS tone has been selected, it can be
enabled on individual channels.

PAGE 8 INSTRUCTION MANUAL TX4610
1. Press the or keys to select the required
channel.
2. Press and hold the
SQL
key. A high beep
will be heardand ‘SILENT’ will appear on the
display.
You may acvate CTCSS on as many channels
as you wish except channel 5/35 which is
designated for emergency use.
DISABLING CTCSS ON A CHANNEL
Repeat steps 1 and 2 above. A low beep will be
heard and ‘SILENT’ will disappear.
NOTE: You will not be able to acvate
CTCSS if the CTCSS tone is set to ‘oF’.
SCANNING
OVERVIEW
The TX4610 has a SCAN funcon that allows
groups of user programmable channels to be
scanned for signals. Channels can be scanned at
20 channels per second. When a signal is found,
scanning will pause on that channel to allow the
signal to be heard, then resume scanning when
the channel is clear again.
SCAN GROUPS
The TX4610 features two scan groups - Open
Scan and Group Scan.
Open Scan
Allows any of the installed channels to be
scanned for acvity. If a busy channel is found,
scanning will pause to allow the signal to be
heard. Once the channel has been clear for 5
seconds, scanning will resume automacally.
eg: Scanning channels 1 - 8 in Open Scan
Group Scan
Also allows any of the installed channels to
be scanned for acvity, but in addion, it also
inserts your Priority channel into the scan
sequence. This means that your Priority channel
will be monitored regularly while scanning to
ensure that no calls are missed. Any signals
received on your Priority channel will take
precedence over any signals received on the
other channels.
213420 567820
eg: Scanning channels 1 - 8 with Priority channel
20 in Group Scan.
SELECTING A SCAN GROUP
To preselect a Scan Group
The radio is inially set to Open Scan Mode.
Please refer to the
MENU
sengs on page 21 to
change the Scan Group.
PROGRAMMING SCAN CHANNELS
Your TX4610 is supplied with all 80 UHF CB
channels programmed into the Open Scan
memory. Any channels not needed, can be
removed if required. The Group Scan memory is
empty by default and you will need to add
channels to it before use.
To add or remove Channels from either
Scan Memory
1. Ensure that the radio is not already scanning.
If it is, briey press the
SCAN
key to cancel
the scan funcon.
2. Ensure you have the required scan group
preselected (See
MENU
sengs on page
21).
3. Select the required channel using the or
keys.
• If ‘M’ is visible to the right of the channel
number, the selected channel is already in the
scan memory. It can be removed by holding
the
SCAN
key in for a few seconds unl a
21 345678

TX4610 INSTRUCTION MANUAL PAGE 9
low beep is heard. ‘M’ will then disappear
indicang the channel is no longer in memory
• If ‘M’ is not visible, then the selected channel
is not in the memory. To add it, hold the
SCAN
key in for a few seconds unl a high
beep is heard. ‘M’ will now appear.
4. Repeat step 3 to add or remove other
channels in the scan memory.
TO START SCANNING
To begin scanning, briey press the
SCAN
key.
A high beep will be heard, ‘SCAN’ will appear in
the display and the radio will begin scanning.
In addion the selected scan group will be
displayed below the channel number.
NOTE: If there is only one channel
programmed into the Open Scan
memory or none in the Group Scan
memory, a long low beep will be heard
when you press the SCAN key and the
command will be ignored.
TO STOP SCANNING
To cancel the Scan, briey press the
SCAN
key. A low beep will be heard and ‘SCAN’ will
disappear from the display.
OPEN SCAN MODE
USING SCAN IN THE OPEN SCAN MODE
• If a busy channel is found, scanning will
pause on that channel to allow the signal to
be heard and will remain there for as long as
the channel remains busy. Once the channel
has been clear for 5 seconds, scanning will
resume automacally.
• If your radio pauses on a busy channel and
you don’t wish to listen to that conversaon,
briey press the
SKIP
buon on the
microphone (or one of the channel selector
keys). The radio will skip over that channel
and resume scanning from the next channel
in the sequence.
• If your radio is paused on a busy channel and
you wish to remain there, briey press the
SCAN
key. The radio will exit the Scan mode
and remain on the busy channel.
• To transmit while paused on a busy channel,
simply press the
PTT
buon. The radio will
exit the Scan mode and remain on the busy
channel. You can now converse on that
channel in the usual way. When you have
nished your conversaon, briey press the
SCAN
key to resume scanning.
• If your radio is scanning and you need to use
your Priority channel (for an urgent call or an
emergency), briey press the
PRI
key. The
Scan mode will be cancelled and the radio will
jump straight to the Priority channel.
NOTE: In the Open Scan mode your
TX4610 will not allow you to transmit
while it is scanning. If the PTT buon
is pressed while scanning, the radio
will give a low beep and will ignore the
command. Your radio will only transmit
while it is paused on a busy channel.
GROUP SCAN MODE
Group Scan allows you to transmit and receive
normally on your priority (working) channel,
while connuing to scan several other channels.
The receiver will scan the other channels
ONLY WHILE THERE ARE NO SIGNALS ON THE
PRIORITY CHANNEL.
If a signal appears on the Priority channel it will
override any signals being received on any of
the other channels. In addion, if you press the
PTT
buon at any me, the radio will transmit
on the priority channel in the usual way.

PAGE 10 INSTRUCTION MANUAL TX4610
SETTING UP THE GROUP SCAN
Referring to the appropriate secons of this
manual:
1. Preselect the Group Scan mode (see
MENU
sengs on page 21).
2 . Store your preferred working channel into
the Priority channel memory (see ‘Priority
Channel’).
3. Program the required ‘other’ channels into
your Group Scan memory (see ‘Programming
Scan Channels’).
SCANNING IN THE GROUP SCAN MODE
To scan in the Group Scan mode, briey press
the
SCAN
key. A high beep will be heard,
‘SCAN’ will appear in the display and the radio
will begin scanning.
NOTE: If there are no channels
programmed in the Group Scan memory
when you press the SCAN key (or there
is only one channel programmed and
it is the same as the Priority channel),
a low beep will be heard and the
command will be ignored.
When scanning, the TX4610 scans all the
channels programmed into the Group Scan
memory, with the Priority channel being
scanned aer every fourth channel (Dealer
programmable opon, if you require dierent
ming for your priority channel, please contact
your dealer).
• If a signal appears on the priority channel - at
any me - the receiver will switch straight to
the Priority channel and will stay there for
as long as the channel is busy. During this
me you can transmit on the priority channel
in the usual way. Once there has been no
acvity for 5 seconds, the radio will resume
scanning the other channels.
• If a signal appears on one of the other
channels, scanning will pause on that channel
and will remain there while the channel is
busy, as long as there are no signals on the
priority channel. During this me the receiver
will connue to check the priority channel
for signals every 2 seconds, resulng in a
series of small ‘breaks’ in the recepon of
the paused channel. Once there has been
no acvity on any channel for 5 seconds, the
radio will resume scanning.
• If your radio pauses on a busy channel and
you don’t wish to listen to that conversaon,
briey press the
SKIP
buon on the
microphone (or one of the channel selector
keys). The radio will skip over that channel
and resume scanning from the next channel
in the sequence.
• If your radio is paused on a busy channel and
you wish to remain there, briey press the
SCAN
key. The radio will exit the Scan mode
and remain on the busy channel. Note that
the radio will no longer be monitoring the
Priority channel (unless it is the same as the
busy channel). To resume scanning, press the
SCAN
key again.
• To transmit on a scanned channel, press the
PTT
buon while the radio is paused on that
channel, then talk in the usual way. The radio
will resume scanning when you have nished
your conversaon and there has been no
further acvity on the channel for 5 seconds.
• To transmit on the priority (working) channel
AT ANY TIME, simply press the
PTT
buon
while the radio is scanning. The radio will
switch straight to the priority channel. When
you have nished your conversaon and
there has been no further acvity on the
priority channel for 5 seconds, the radio will
resume scanning the other channels.
• To go directly to the Priority channel, briey
press the
PRI
key. The radio will exit the Scan
mode.
USING TWO GROUP SCAN OR TWO
OPEN SCAN MODES
If you prefer, the TX4610 can be re-
programmed to have two Group Scan modes or
two Open Scan modes instead of one of each.
For example there may be applicaons where
you have no need to scan the Priority channel
and would prefer to have two separate Open
Scan modes. Alternavely you may have
applicaons where you prefer to have two Group
Scan modes with dierent Scan groups in each.

TX4610 INSTRUCTION MANUAL PAGE 11
Your TX4610 can be Dealer programmed to
convert the Group Scan mode into a second
Open Scan mode and vice versa. If you would
prefer to have two Group Scan or two Open
Scan modes, you should contact your GME
Dealer to arrange for this feature to be enabled
(when using two Group Scan modes the Priority
channel will be the same channel for both scan
groups).
When the second Open or Group Scan mode is
enabled, the resulng two Scan modes become
Scan 1 and Scan 2. To select the required scan
mode, refer to the
MENU
sengs on page 21.
When enabled, the two Scan modes will be
idencal in operaon. To program and operate
each, refer to the Open Scan/Group Scan
secons above.
NOTE: Enabling or disabling the second
Open or Group Scan mode is not a user
selectable opon. Once enabled by your
dealer, the changed Scan mode becomes
a permanent part of the TX4610’s
features and replaces the standard
Scan selecon. If you nd later that you
need the original Group or Open Scan
funcon re-enabled, you will need to
return your TX4610 to your dealer for
re-programming.
SELECTIVE CALLING
OVERVIEW
Your TX4610 has a Selecve Calling system
known as SelCall that operates like a telephone.
Your radio is pre-programmed with its own
unique SelCall Idencaon number. If this
number is called by another radio, your TX4610
will beep to alert you. If you do not want to hear
any other acvity while waing on a channel,
you can select the QUIET mode. This will force
the radio to remain quiet to all incoming signals
unl your SelCall number is called.
Your TX4610 will allow you to store up to ten of
your most frequently called SelCall numbers in
memory and each number can be labelled with
a 5-leer name for easy idencaon.
SELCALL IDENTIFICATION NUMBER
Your TX4610 is factory programmed with its
own unique SelCall Idencaon Number
(Ident). This number idenes your radio from
others in your area. Your radio’s own SelCall
Ident will be displayed for a few seconds,
directly beneath the channel display, when you
rst turn the radio on.
You will need to make your Ident known to
anyone who may need to call you using Selcall.
Whenever your TX4610 hears a SelCall signal,
it compares the incoming Ident with its own.
If the two Idents match, the radio knows it is
being called and sounds an alarm to alert you,
otherwise the call is ignored.
NOTE: Although your radio’s SelCall
Ident is pre-programmed at the factory,
you can arrange to have your dealer
change it if required.
SELCALL IDENT NAMES
When storing SelCall Idents in memory, the
TX4610 allows you to add a 5 character name
to each one, making it easier to idenfy whose
Ident you are recalling from the memory. In
addion, if an incoming SelCall matches one of
the Idents stored in the memory, the name can
be displayed to make it easier for you to idenfy
the caller.
To add or display names
Your TX4610 must be in the ALPHA mode. To
switch between ALPHA mode and NUMERIC
mode, briey press the
F
(funcon) key
followed by the
ALPHA
key. ‘ALPHA’ or
‘NUMER’ will be displayed for 2 seconds below
the channel display to indicate the selected
mode.
Your TX4610 can be set to monitor signals on
a busy channel but remain QUIET unless it
receives its own SelCall Ident. In this way, you
won’t be disturbed unless someone calls you.
When a signal containing your SelCall Ident is
received, the QUIET mode is deacvated and
an alarm sounds to alert you to the call. You
can then converse normally on the channel.

PAGE 12 INSTRUCTION MANUAL TX4610
To use the QUIET mode, refer to the QUIET
Mode secon further below.
NOTE: The QUIET mode overrides the
normal Squelch system to ensure that
the radio remains quiet even when the
channel is busy. When QUIET is set,
you may see the ‘BUSY’ icon appear
on the display indicang the channel is
being used. However, unless someone
transmits your SelCall Ident, nothing will
be heard in the speaker.
You can acvate the QUIET mode on individual
channels ie. some channels can be set to remain
Quiet while others can remain open to all
incoming signals.
TIP: Seng the QUIET mode is not
mandatory. You can sll use SelCall on
any channel whether the QUIET mode is
set or not.
SELCALL MEMORIES
Your TX4610 is ed with one ‘Call’ memory
and 10 SelCall Ident memories. The 10 SelCall
Ident memories are used to store frequently
used SelCall Idents. The addional ‘Call’
memory holds the Ident you last sent or
received. The memories can be viewed by
briey pressing the
CALL
buon. The inial
memory displayed is the ‘Call’ memory.
Pressing the channel selecon keys will step
through the other 10 SelCall storage memories
in sequence. SelCall memories are labelled ‘c0’
to ‘c9’.
USING SELCALL
ENTERING A SELCALL IDENT
1. Press the
CALL
buon. ‘CALL TO’ is displayed,
along with the last sent or received SelCall
Ident.
NOTE: If an ALPHA label is displayed
you will need to switch to Numeric
Mode. To toggle between Alpha mode
and Numeric mode, briey press the F
key followed by the ALPHA key. A high
beep indicates Alpha mode is selected
while a low beep means the Numeric
mode is selected.
2. Enter the required SelCall Ident as follows:
(a) Press and hold the
F
key unl the radio
beeps. The right-hand digit of the SelCall
Ident will ash.
(b) Press the or keys to select the required
number in the ashing digit posion.
(c) Briey press the
F
key again to select the
next digit posion.
(d) Repeat steps (b) and (c) to enter all 5 digits
as required. The SelCall number is now
ready to send.
SENDING A SELCALL
With the SelCall number displayed, press and
hold the
CALL
buon for 2 seconds. A long
beep will be heard and the radio will transmit
the SelCall Ident.
NOTE: If the call is not sent within 10
seconds of entering the last Ident digit
the call mode will me out and the radio
will return to normal mode. To exit the
CALL TO mode without sending the
SelCall briey press the CALL buon.
CALL ACKNOWLEDGE
If your SelCall transmission is successful,
the radio you called should respond with an
‘acknowledge’ signal - usually two quick beeps.
This will conrm to you that the radio you called
is now alerng its user to your signal.
STORING SELCALL IDENTS
Your TX4610 is ed with 10 user
programmable SelCall Ident memories, allowing
you to store up to 10 frequently used SelCall
Idents. The memories are accessed by pressing
CALL TO

TX4610 INSTRUCTION MANUAL PAGE 13
the CALL buon, then pressing the channel
selector keys to scroll through the memories.
Ident memories are labelled ‘c0’ to ‘c9’.
To store a SelCall Ident in memory
1. Press the
CALL
buon to select the CALL TO
mode. ‘CALL TO’ is displayed along with the
last sent or received SelCall Ident.
2.
Press channel selector keys to select the
required Ident memory (locaons ‘c0’ to ‘c9’).
TIP: If the radio displays leers instead
of numbers in the SelCall Ident posion,
your radio is in ALPHA mode. To
switch back to NUMERIC mode, briey
press the F (Funcon) key followed
immediately by the ALPHA key. A low
beep will be heard and ’NUMER’ will be
displayed for a few seconds in the Ident
posion.
3. With the required memory locaon
displayed, enter the SelCall Ident as follows:
(a) Press and hold the
F
key unl the radio
beeps. The right-hand digit of the SelCall
Ident will ash.
(b) Press the or keys to select the required
number in the ashing digit posion.
(c) Briey press the
F
key again to select the
next digit posion.
(d) Repeat steps (b) and (c) to enter all 5 digits
as required.
(e) Now press and hold the
F
key. The enre
Ident will ash for a few seconds then the
radio will beep as the new Ident is stored.
RECALLING SELCALL IDENTS FROM MEMORY
1 Press the
CALL
buon to select the CALL TO
mode. ‘CALL TO’ is displayed along with the
last sent or received SelCall Ident.
2. Press the or keys to select the required
Ident memory in locaons ‘c0’ to ‘c9’.
3. When the required SelCall Memory is
displayed, press and hold the CALL buon to
send the Ident.
NAMING YOUR SELCALL IDENTS
The TX4610 allows you to name each SelCall
Ident using a 5 character ALPHA name. The
name is stored in memory along with the Ident
making it easier to idenfy whose Ident you
are recalling from the memory. If an incoming
SelCall matches one of those in your radio’s
memory, the name can be displayed instead of
the SelCall Ident.
DISPLAYING ALPHA NAMES
To display the Selcall’s ALPHA Name, you must
have the radio’s ALPHA display mode selected.
To toggle the ALPHA display mode, briey press
the
F
(Funcon) key followed by the
ALPHA
key. ‘ALPHA’ or ‘NUMER’ will be displayed for 2
seconds below the channel display to indicate
the selected mode.
TIP: The normal channel display may
give no indicaon of which display mode
is selected. The selected mode will only
become obvious when displaying Idents.
ENTERING AND STORING A SELCALL NAME
NOTE: Before adding an ALPHA Name to
a SelCall Ident, you should rst store the
required Ident in memory as described
above under ‘STORING SelCall IDENTS’
on page 12.
1. Ensure the ALPHA mode is selected (briey
press the
F
key followed by the
ALPHA
key
to toggle ALPHA mode).
2. Briey press the
CALL
buon. The CALL
TO mode will be selected and the last-sent
SelCall memory locaon will be displayed.
3. Press the or keys to select the required
SelCall memory (locaons c0 to c9). If no
ALPHA name has been programmed for that
memory the radio will probably display ‘- - - -
-’ otherwise it will display the last ALPHA
name programmed into that memory.
4 With the required memory locaon
displayed, enter the required ALPHA name
as follows:

PAGE 14 INSTRUCTION MANUAL TX4610
(a) Press and hold the
F
key unl the radio
beeps. The le-hand character of the ALPHA
name will ash. Press the Channel selector
keys to select the required leer in the
ashing character posion.
The following characters are available:
A B C D E F G H I J K L M N O P Q
R S T U V W X Y Z _ SPACE - ,
0 1 2 3 4 5 6 7 8 9
TIP: Holding the channel selector key
for a few seconds will cause the radio
to step quickly through the available
characters.
(b) Briey press the
F
key again to select the
next character posion.
(c) Repeat steps (b) and (c) to enter all 5
characters as required.
(d) Now press and hold the
F
key. The enre
ALPHA name will ash for a few seconds
then the radio will beep as the name is
stored.
Repeat the procedure to add ALPHA names to
any other SelCall Idents stored in memory.
To exit the CALL TO mode
Briey press the
CALL
buon. The radio will
return to normal operaon.
NOTE: The radio can be le in the
ALPHA display mode so that an
incoming SelCall matching one of those
in the radio’s memory will display the
name associated with that SelCall Ident
instead of the Ident itself. Any incoming
Selcalls not matching those in the
memory will display ‘NEW’.To display the
SelCall Ident of that caller, briey press
the F key followed by the ALPHA key to
return to the NUMERIC display mode.
RECEIVING SELCALLS
When your TX4610 receives its SelCall Ident,
an alarm will sound to alert you to the call.
Inially the alarm will beep urgently at 2 beeps
per second for around 10 seconds then slow
to around 1 beep every 3 seconds if the call
is not answered. It will then connue to beep
indenitely unl you cancel it (the way your
TX4610 handles the SelCall alert can be altered
by your Dealer).
In addion to the alarm, the words ‘CALL FROM’
will appear on the display along with the callers
SelCall Ident or ALPHA name to inform you of
the identy of the person calling. To switch
between the SelCall Ident and the ALPHA name
briey press the
F
key followed by the
ALPHA
key.
CANCELLING THE SELCALL ALERT
The following are the recommended methods:
To cancel the Alarm and talk on the
Channel
Press the
PTT
switch and talk in the usual way.
The alarm will be cancelled and the channel will
be open for normal communicaon.
To return the Call
Press and hold the
CALL
buon for a few
CALL TO
CALL FROM
CALL FROM

TX4610 INSTRUCTION MANUAL PAGE 15
seconds unl the radio beeps. The callers SelCall
will be sent to the caller.
To cancel the Alarm and listen on the
Channel
Briey press the
QUIET
buon (if QUIET has
been acvated). The alarm will stop beeping and
the channel will remain open to any incoming
signals.
QUIET MODE
The QUIET mode mutes the TX4610’s receiver
to prevent any incoming signals from being
heard in the speaker unl your SelCall Ident
is received. In this way you can monitor a
busy channel for personal calls without being
disturbed by unwanted signals.
If your SelCall Ident is received, the QUIET mode
is then cancelled and all incoming signals are
heard in the speaker.
SETTING UP THE QUIET MODE
To setup the QUIET mode you must rst ‘tag’
the channels that you want to stay Quiet, then
acvate the QUIET mode. Once the QUIET
mode is acvated, the channels you have
tagged will remain Quiet to all incoming signals
unless your SelCall Ident is received. Channels
not tagged will remain open to all signals and
will operate normally.
1. Select the required channel using the or
keys.
2. Briey press the
F
key then press and hold
the
QUIET
key unl the radio beeps. ‘Q’ will
appear to the right of the channel display
indicang the selected channel is now
tagged for Quiet operaon.
To remove the QUIET Tag from individual
Channels
1. Select a channel that has been tagged for
Quiet operaon. ‘Q’ will be displayed.
2. Briey press the
F
key then press and hold
the
QUIET
key unl the radio beeps. ‘Q’ will
disappear indicang this channel is no longer
tagged for Quiet operaon.
ACTIVATING THE QUIET MODE
1. First, select a channel that has been tagged
for Quiet operaon (you cannot acvate
the Quiet mode unless you have selected a
‘tagged’ channel). ‘Q’ will be displayed.
2. Now briey press the
F
key followed by
the
QUIET
key. ‘QUIET’ will appear on the
display.
Now all channels that were tagged for Quiet
operaon will be operang in the Quiet Mode.
1. Select any channel that has been tagged
for Quiet operaon. ‘Q’ and ‘QUIET’ will be
displayed.
2. Briey press the
F
key followed by the
QUIET
key. ‘QUIET’ will disappear from the
display and all channels that were tagged for
Quiet operaon will now operate normally
again.
RECEIVING SIGNALS IN THE QUIET MODE
• If a normal signal is received on a QUIET
channel, the channel will appear busy (the
‘BUSY’ indicator will be visible) but no sound
will be heard from the speaker. This means
you will not be disturbed by the signal.
• If a normal signal is received on an Open
channel (one that is not tagged with ‘Q’) the
signal will be heard in the usual way.
• If a signal containing your SelCall Ident is
received on any channel - Open or QUIET -
the QUIET mode will be cancelled and the
alarm will beep to alert you to the call. In
addion, the callers Ident or ALPHA name will
be displayed. All channels will now be open
for normal transmission and recepon.

PAGE 16 INSTRUCTION MANUAL TX4610
If you wish to respond to the calling radio using
Selcall, press and hold the call buon for 1.5
seconds unl the radio beeps. The callers Ident
will be transmied back to them causing the
alarm in their radio to be acvated.
To cancel the alarm on your radio
Briey press the
PTT
.
To return your radio to the QUIET mode
Briey press the
F
(Funcon) key followed by
the
QUIET
key. ‘QUIET’ will re-appear on the
display.
SCANNING IN THE QUIET MODE
The TX4610 will allow you to scan while the
QUIET mode is acve. Using this feature you
can monitor a group of Quiet channels or a
combinaon of Quiet and Open channels.
TO SCAN IN THE QUIET MODE
1. Preselect the Group Scan mode (see MENU
sengs).
2. Select the channels you wish to scan and
store them in the Scan memory.
3. From those channels, select the ones you
wish to remain Quiet and tag each one for
QUIET operaon.
4. Select a tagged channel and acvate the
Quiet Mode (press the
F
key followed by the
QUIET
key).
5. Press the
SCAN
key. The radio will begin
scanning and ‘SCAN’ and ‘QUIET’ will be
displayed, indicang the radio is scanning
in the QUIET mode.
RECEIVING SIGNALS WHILE SCANNING
IN THE QUIET MODE
• If a normal signal is received on an open
channel, scanning will pause while the
channel is busy and will resume scanning 5
seconds aer the channel becomes clear. (If
you were scanning in Group Scan mode, the
radio may switch between the open channel
and the Priority channel - this is normal).
• If a normal signal is received on a Quiet
channel but your SelCall Ident is not
detected, the signal will be ignored and
scanning will connue.
• If a signal containing your SelCall Ident is
received on any channel - Open or Quiet
– both scanning and QUIET modes will be
cancelled and the receiver will stay on that
channel. In addion, the alarm will beep to
alert you to the call and the callers Ident or
ALPHA Name will be displayed. The channel
will now be open for normal transmission and
recepon.
TIP: To ensure reliable SelCall detecon
when scanning in the Quiet mode, it
is recommended that you restrict the
number of channels in the Scan group
to 4 or less.
GROUP CALLING
The TX4610’s SelCall system includes a Group
Call funcon which allows you to call up to 1000
radios simultaneously. This can be useful in an
emergency situaon where you may need to
transmit a message to a large number of radios
in your group.
By default, your radio is factory-set to allow
up to 10 radios to be called at once. If your
applicaon requires more, you can arrange for
your Dealer to re-program this opon to allow
100 or 1000 radios to be called. The following
descripon assumes the default Group Call
seng of
10 radios.
The Group Call funcon works by allowing you
to enter a special ‘group code’ into the last digit
posion of the SelCall Ident you are sending. The
‘group code’ appears as an ‘A’ when displayed in
the radio. When this ‘group code’ is received, it
substutes for all other numbers in the last digit
posion. As long as the rst 4 digits of the SelCall
you are sending match those of the radios you
are calling, their SelCall alarm will be acvated
as if their full 5 digit SelCall Idents had been
received.
To achieve this, the 10 radios you are calling
must be programmed with sequenally
numbered SelCall Idents.
eg. 12330, 12331, 12332, 12333 . . --> , 12339

TX4610 INSTRUCTION MANUAL PAGE 17
• Transming the SelCall Ident 12031 will
only acvate the alarm in the radio with the
SelCall Ident of 12331.
• Transming 1233A will acvate the alarms in
all radios with Idents 12330 through 12339
(a total of 10 radios).
If the radios in your eet do not have sequenally
numbered SelCall Idents and you want to make
use of this funcon, you can arrange for your
Dealer to re-program the SelCall Idents in your
radios.
PROGRAMMING AND SENDING GROUP
CALLS
The process for entering a Group call Ident is
the same as entering a normal SelCall Ident.
1. Press the
CALL
buon. ‘CALL TO’ is
displayed, along with the last sent or
received SelCall Ident.
2. Enter the required SelCall Ident as follows:
(a) Press and hold the
F
(Funcon) key unl
the radio beeps. The right-hand digit of
the SelCall Ident will ash.
(b) Press the or keys to select ‘A’ in the
ashing digit posion. This is the special
code that will create the Group Call.
(c) Briey press the
F
(Funcon) key again to
select the next digit posion.
(d) Repeat steps (b) and (c) to enter the
other 4 digits as required. The last digit
will be set to ‘A’.
Once the Ident has been entered you have 10
seconds to send it otherwise the CALL TO mode
will be cancelled and the Ident you entered will
be lost.
NOTE: Where your TX4610 allows it,
programming group calls for 100 radios
is idencal except that you will need
to select ‘A’ for the last two digits (e.g.
123AA). For 1000 radios you will need to
select ‘A’ for last three digits
(eg: 12AAA).
eg:
100 Radios Ident Sent: 123AA
Idents called: 12300 -> 12399
1000 Radios Ident Sent: 12AAA
Idents called: 12000 -> 12999
To send the SelCall Ident
With the required SelCall Ident displayed in the
CALL TO mode, press and hold the
CALL
buon
for a few seconds unl the radio beeps. The
SelCall Ident will be sent automacally and the
radio will return to normal operaon.
Call acknowledge in Group Mode
There is no call acknowledge when sending
group calls. This is to prevent all the radios
in your group from trying to respond to your
SelCall transmission at the same me.
Storing Group Call Idents
Group Call Idents can be stored in memory in
the same way as a standard SelCall Ident.
Receiving Group Calls
Receiving a Group call is idencal to receiving
a normal SelCall except that the alarm sound
is a LOW tone beep instead of the normal High
tone beep. The Caller’s Ident or ALPHA Name
appears on the display in the usual way.
LISTENING CHANNELS
The TX4610 has provision for adding an
addional 19 user programmable ‘Listening’
frequencies between 403 MHz and 520 MHz.
These channels can be programmed by you
using the front panel keys, making the TX4610 a
useful UHF scanning receiver.
CALL TO

PAGE 18 INSTRUCTION MANUAL TX4610
SETTING THE FREQUENCY STEP
The extra frequencies can be programmed in
12.5 kHz or 25 kHz steps. The step rate is preset
and can be toggled as follows.
1. Switch the radio OFF.
2. Hold the key while switching the radio ON.
3. 12.5k or 25.0k will be displayed indicang
the select frequency step is 12.5 kHz or 25.0
kHz.
ACTIVATING LISTENING CHANNELS
By default, the Receive–Only channels are
disabled and only the standard 80 UHF CB
channels can be accessed. To make use of
the extra channels you must acvate the
programming mode and program frequencies
into the channels you wish to use. Those
channels will then become available.
1. Switch the radio o.
2. Hold the MENU key while switching the radio
ON again.
Using the or keys you will now be able to
select addional channels between 81 and 99.
Once you have enabled and programmed your
addional Listening channels, switch the radio
o to end the programming mode. When you
switch it on again, normal operaon will be
restored and any Listening channels you have
enabled will now be available above channel 80.
PROGRAMMING THE FREQUENCIES
Before programming channel frequencies, make
sure the radio is in the NUMERIC mode. If it is in
the ALPHA mode press
F
(Funcon) followed by
ALPHA
. ‘NUMER’ will be displayed.
To program a frequency into a channel
1. Acvate the Programming mode (hold
MENU
then switch
ON
).
2. Press the or keys to select the required
channel number (81 – 99).
3. Press and hold the
MENU
key unl the
radio beeps. If the channel has never been
acvated, ‘OFF’ will be displayed, otherwise
a frequency will be displayed.
4. Press the or keys to adjust the ashing
digit value.
5. Press the
CALL
buon to advance to the
next digit.
• Advancing above 9 or below 0 causes the
adjacent digit to change accordingly.
• The display only indicates to 10 kHz
resoluon. The kHz digit is not displayed.
eg. 468.425 MHz will display as:
• While you are selecng the frequency, the
receiver is live and will receive signals on
the frequency being displayed. You can
use this feature to manually idenfy acve
frequencies and store them.
6. Once you have the correct frequency
displayed, press and hold the
MENU
key to
store it.
TIP: To remove a listening frequency
from a channel, rotate the channel
selector unl the display reads ‘–o–’.
Repeat steps 2 – 6 above.
When you have nished programming your
channels, switch the radio o. When you switch
it on again, normal operaon will be restored
and the Listening channels you programmed
will now be available above channel 80.
SETTING ALPHA LABELS FOR YOUR
Your extra listening channels can be set to
display either the channel Frequency or a
meaningful label that you choose. Please refer
to the Frequency/ALPHA Adjustment funcon in
the MENU sengs on page 21.
46842
12.5 / 25 kHz
100 kHz
1 MHz
10 MHz
100 MHz

TX4610 INSTRUCTION MANUAL PAGE 19
SEEK MODE
The Seek mode is a unique feature that allows
you to connuously scan a band of frequencies
between 403 MHz and 520 MHz for acvity.
Once the radio has reached the upper limit of
520 MHz it will resume scanning from 403 MHz
again. If you nd an acve frequency you can
assign it to a Listening Channel. This feature
makes it easier to locate acve channels when
you aren’t sure of the exact frequency you want
to listen to.
ENABLING THE SEEK MODE
NOTE: Before using the Seek mode you
should:
1. Preselect your preferred frequency step
(12.5 kHz or 25 kHz).
2. Enable the Listening channel numbers that
you wish to store acve frequencies into.
You cannot use Seek mode unless at least
1 channel is enabled.
3. Select the Numeric mode so that the
frequency can be displayed (rather than the
ALPHA label).
To enable the Seek mode
1. Switch the radio OFF.
2. Hold the
SCAN
key while switching the radio
ON
again. ‘SEEK’ will be displayed for a few
seconds. The radio is now in Seek mode.
NOTE: When you have nished using
the Seek mode simply switch the radio
o. When you switch it on again, normal
operaon will be restored.
SCANNING FOR ACTIVE FREQUENCIES IN
THE SEEK MODE
them into a listening channel:
1. Select the required Listening channel (81
– 99). The frequency currently selected for
that channel will be displayed.
2. Briey press the
SCAN
key. The radio will
begin scanning the frequency band starng
from the selected frequency. The channel
number will remain constant (because the
radio is scanning frequencies not channels)
but the frequency will change as the scan
advances through the band.
3. To change the scanning direcon press the
or keys. Press key to scan upwards in
frequency or key to scan downwards.
4. When a signal is found, scanning will pause
on that frequency. Once the signal has
gone and the frequency remains clear for 5
seconds, scanning will resume.
5. To manually skip over an acve frequency
and connue scanning, press the
CALL
buon. To connue scanning in a specic
direcon or to change the direcon, press
the appropriate or key.
6. When you nd a frequency you wish to store,
press and hold the
SCAN
key unl the radio
beeps. The frequency will be stored under
the selected Listening channel number.
To store acve frequencies into other Listening
channels repeat steps 1 – 6 above.
SETTING SEEK MODE FREQUENCY LIMITS
When in Seek mode, the default frequency
range is the enre Listening band of 403 - 520
MHz. However, in many cases you may only be
interested in a searching for signals within a
small secon of the available frequency band.
To make searching easier the TX4610 allows
you to set upper and lower frequency limits.
The Seek funcon will then search only within
those limits. This limits the scan to the area you
are most interested in, thereby increasing the
chance of nding an acve frequency within
that band.
To scan within frequency limits
1. Select the required Listening channel (81
– 99). The frequency currently selected for
that channel will be displayed.
2. Hold the
MENU
key unl the radio beeps.
The radio will enter the Frequency Edit
mode.
3. Select the LOWER frequency limit using
the
CALL
buon to select the ashing digit
posion and the or keys to change the
frequency value.

PAGE 20 INSTRUCTION MANUAL TX4610
4. When the LOWER frequency limit has been
selected, briey press the
SCAN
key then
press and hold the key. The radio will give
a long beep. The LOWER limit is now stored.
5. Now select the UPPER frequency limit using
the
CALL
buon to select the ashing digit
posion and the or keys to change the
frequency value.
6. When the UPPER frequency limit has been
selected, briey press the
SCAN
key then
press and hold the key. The radio will give
a long beep. The UPPER limit is now stored.
7. Press and hold
MENU
to exit the frequency
edit mode. Now follow the same steps
as described under ‘Scanning for acve
frequencies in the Seek Mode’ on page 19.
The only dierence will be smaller frequency
band which will now scan only within the
frequency limits set above.
NOTE: The Seek frequency limits will
remain stored in the radio even aer
you have switched the radio OFF. The
next me you use the Seek mode the
same frequency limits will apply. To
change the frequency limits simply reset
them as described above.
TIP: The Lower frequency limit should
normally be lower than the upper
frequency limit. However, if you should
enter a lower frequency limit that is
higher than the upper frequency limit
the radio will then scan frequencies
OUTSIDE these limits. In other words
you can exclude the frequencies
between the limits.
If Upper Limit is greater than Lower Limit, radio
will scan INSIDE the limit range.
If Upper Limit is less than Lower Limit, radio will
scan OUTSIDE the limit range.
MENU SETTINGS
OVERVIEW
The
MENU
feature provides a convenient
method of customizing or storing some of the
radio’s funcons. The following Menu Opons
are available. Note that some items are only
available on certain channels.
1. Press and hold the
MENU
key. The rst
MENU
funcon is displayed.
2. Briey press the
MENU
key again to cycle
through each available funcon in the order
listed above. Aer the last funcon has been
selected, the cycle returns to the beginning.
3. Press the or keys to alter the
parameters of the selected funcon.
4. Press and hold the
MENU
key to exit and
store any changes.
520403
MHz
Lower
Limit
Upper
Limit
Lower
Limit
520403
MHz
Upper
Limit
Ch 1-8
Ch 41-48
Ch 9-40
Ch 49-80
RX Only
Ch
Frequency/
ALPHA Adjustment
•
Squelch Sengs • • •
Open/Group Scan
• • •
Duplex/Simplex
Mode •
CTCSS Tones • • •
Lamp Colour • • •
Baery/S-Meter
Selecon • •
Baery/S-Meter
ALPHA Selecon •
LCD Contrast • • •
Beep Tone Level • • •
Table of contents
Other GME Radio manuals