Goodmans GLCD17W2DVD User manual

GLCD17W2DVD
LCD+DVD Combo

17 "LCD+DVD Combo

IMPORTANT SAFEGUARDS
WARNING: UNDER NO CIRCUMSTANCESMUST THE LIVEOR NEUTRAL
WIRES BE CONNECTEDTO THE EARTH TERMINAL INA 3-PIN
MAINS PLUG.
This symbol means that this unitis double insulated.
An earth connection is not required.
IMPORTANT
The wires in the mains lead are coloured in
accordance with the following code:
If your product is fitted with a moulded plug
which requires replacement please cut off the
plug and dispose of safety. The replacement
plug should then be rewired as shown in the
diagram.
As the colours of the wires in the mains lead of
this apparatus may not correspond with the
coloured markings identifying the terminals in
your plug, proceed as followings.
The wire which is coloured green and yellow
must be connected to the terminal which is
marked with the letter E, or by the earth symbol
( ), or colour green or green and yellow.
The wire which is coloured blue must be
connected to the terminal which is marked with
the letter N or coloured blue or black.
The wire which is coloured brown must be
connected to the terminal which is marked with
the letter L or coloured red.
This appliance must be earthed.
If a 13 AMP (BS 1363) Plug is used, fit an ASTA
approved 3 or 5 AMP Fuse.
BLUE : NEUTRAL
BROWN : LIVE
GREEN & YELLOW : EARTH
GREEN
BLUE
(Neutral)
FUSE
BROWN
(Live)
&
YELLOW
(Earth)

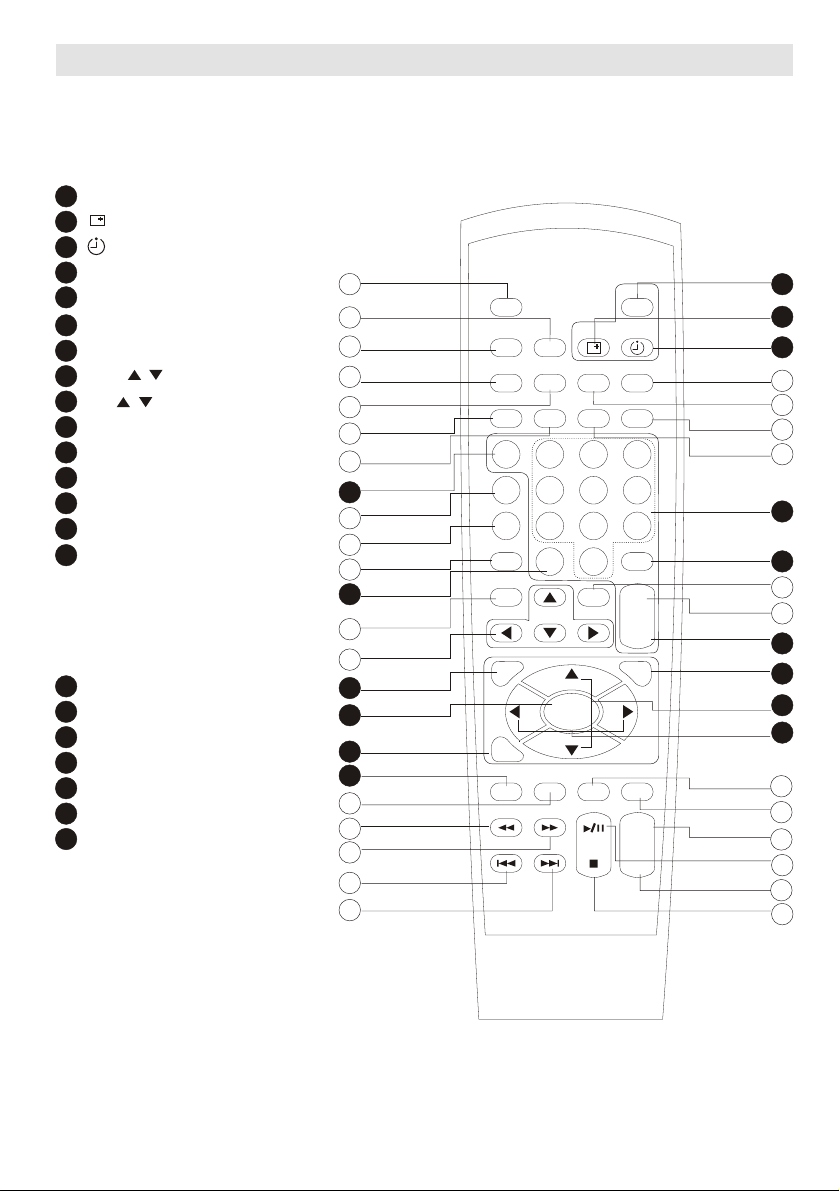
Remote Control Buttons............................. 5-6
Location of Controls.................................... 7-8
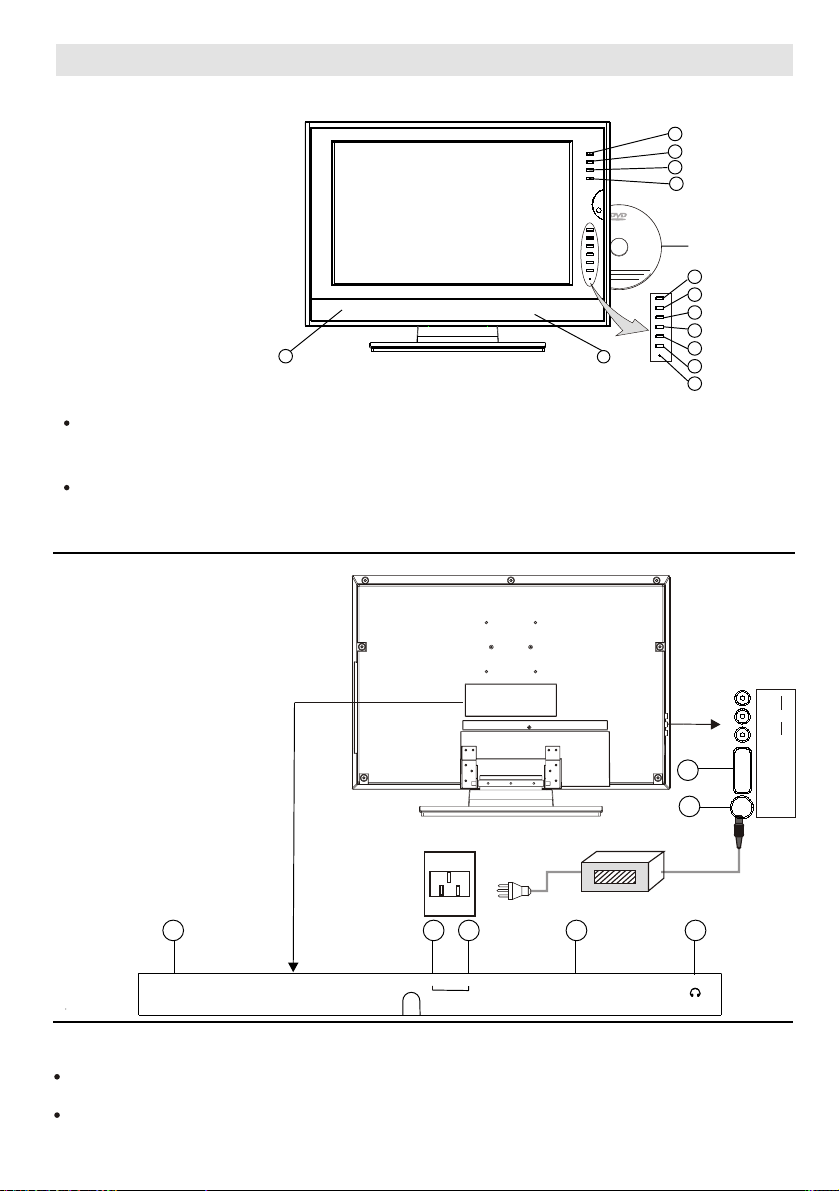
Front View of TV Set................................... 8
Rear View of TV Set.................................... 8
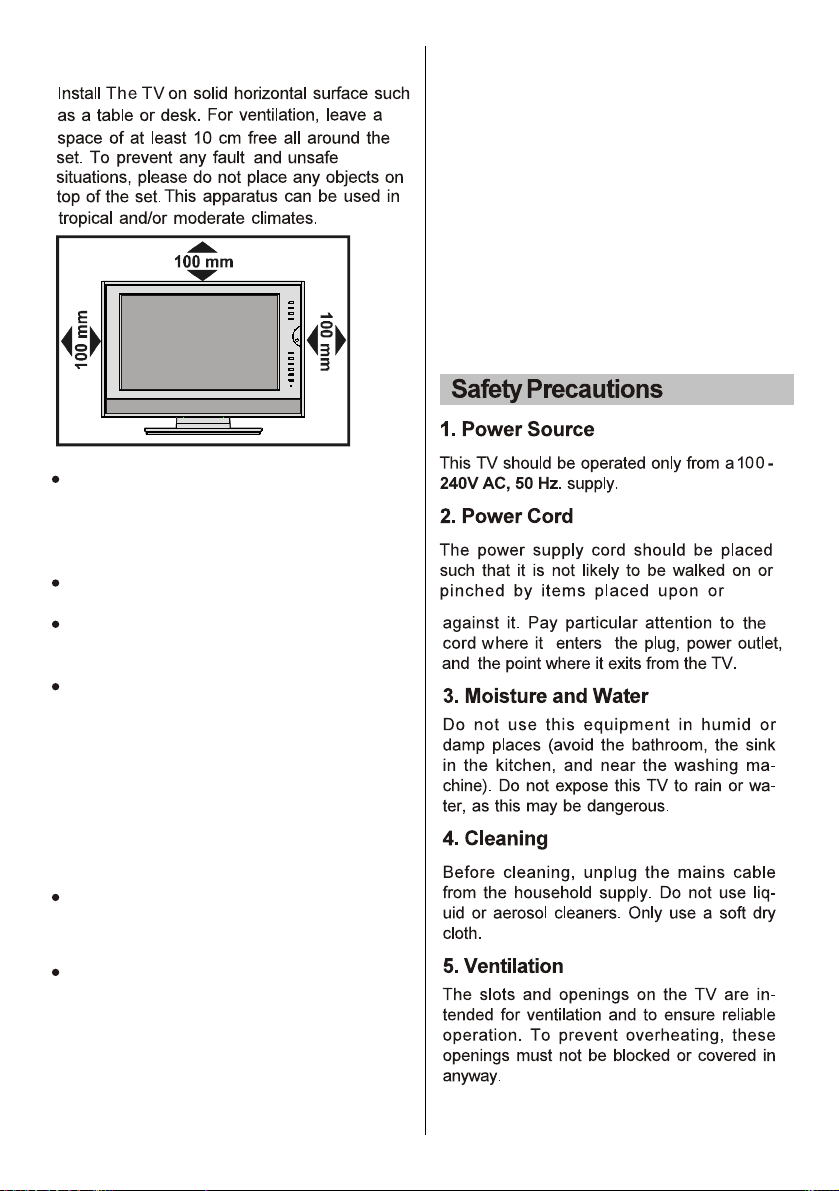
Installation........................................................ 9
For TV Features.......................................... 9
Safety Precautions ................................... 9-10
Before Switching on the TV ................... 10-11
Power Connection .................................... 10
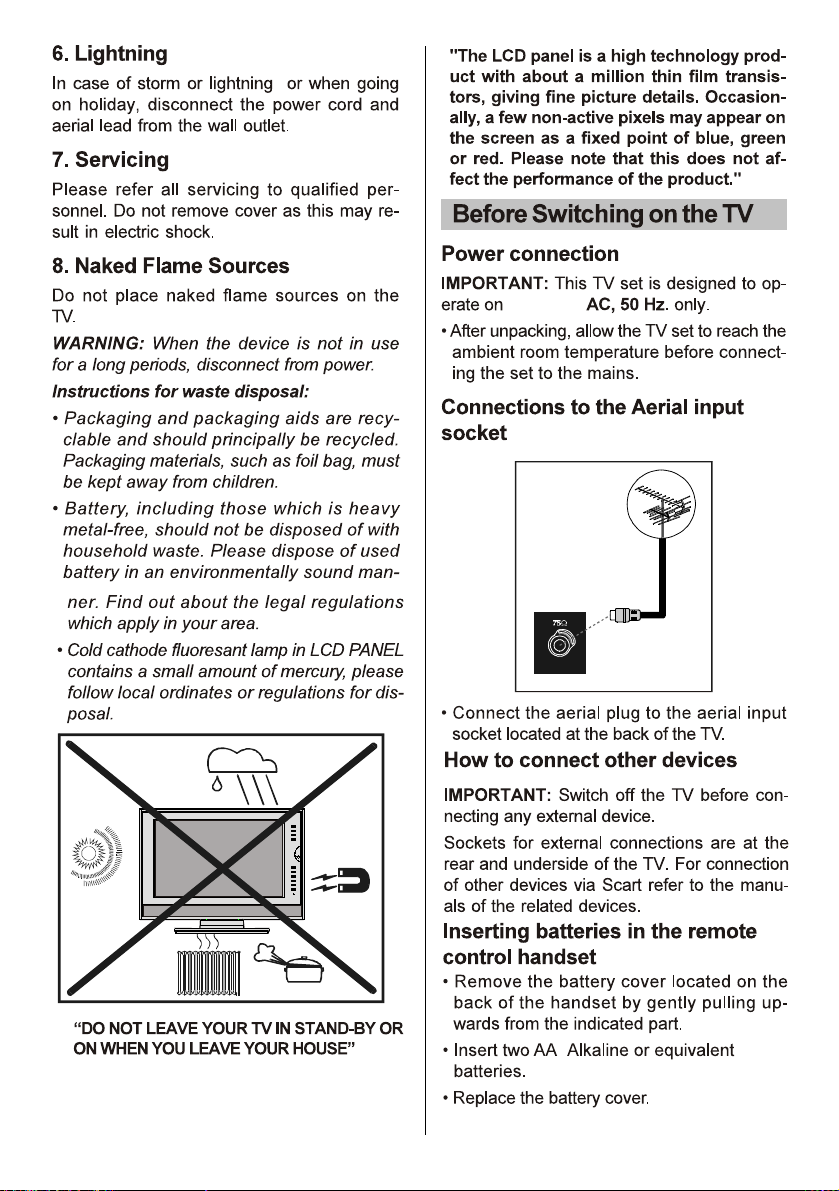
Connections to the Aerial
input socket ............................................... 10
How to connect other devices ..................10
Inserting batteries in the
remote control handset ........................10-11
Switching the TV ON/OFF............................. 11
Operating the TV ......................................11-12
Menu menu ............................................... 11
Picture menu ............................................. 11
Sound menu .............................................. 11
Setup menu ............................................... 11
Input Select menu .................................... 12
Tune menu ................................................ 12
PC MODE ...................................................... 12
Installation ................................................. 12
VGA SET menu ................................... 12-13
Teletext Operations ..................................... 13
Peripheral Equipment Connections ........ 14
PC Sound Connection ............................. 14
Via the Scart Sockets ............................... 14
ViaAnt Input ............................................. 14
FOR DVD PART
Main Features ...........................................14
Playback Features ....................................14
Basic Operation ...................................14-15
Interactive Function .................................. 15
Other Useful Function Operation ........15-16
Picture Disc Operations ........................... 16
Initial Settings of Setup Menu .............. 17-18
Common Procedures of
Initial Settings ........................................... 17
General Setup Page .................................17
Speaker Setup Page ................................ 17
Dolby Digital Setup Page ......................... 17
Preferences Setup Page ......................... 17
Password Change Page ...........................18
Definition of Terms ......................................... 18
Service Tips(DVD) .......................................... 19
Service Tips(TV).............................................. 20
The Causes of Interference .......................... 21
-4-

2
1
Q.
VIEW
PBC
ANGLE
STEP L/R
OSD
EJECT
ZOOM
MIX
AUDIO
PROG
BOOKMARK
SF
POWER
DISPLAY SLEEP
2
5
8
3
6
9
1
4
7
TV/AV/DVD
0
MENU
VOL VOL
PROG
PROG
SIZE
REP
A-B REP
RETURN
ENTER
NICAM
RANDOM
SUBTITLE
GO TO
TITLE
INDEX
ROOT
MENU
DVD
SETUP
10F
CLEAR
SWAP
LANGUAGE
-/---/--
I/II
P.M. OK
MUTE
HOLD SUB.PAGE
REVEAL
Remote Control Buttons
2
4
5
6
7
8
9
11
12
13
14
15
18
19
21
43
42
40
39
37
36
34
32
31
30
29
28
25
24
23
3
10
17
16
20
41
38
35
22
26
1
2
3
8
12
13
14
15
27
28
29
30
37
9
1
1
FOR TV BUTTONS
Power ON/Standby
=Display
=Sleep
0-9=Direct Program
TV/AV/DVD
I/II(option)=Stereo/Bilingual Sound
OK
PROG /
VOL /
SWAP(withDVD Public Button)
MUTE
MENU
P.M.=PictureMode
Q.VIEW = QuickView
=Programme up/down
=Volume up/down
27
FOR TV TELETEXT BUTTONS
(with DVD public buttons)
SUB.PAGE
HOLD
REVEAL
MIX
LANGUAGE
SIZE
INDEX
33
44
33 -/-- = Two or ThreeDigit
18
19
20
22
23
24
25
**Four Colour Buttons=RED/GREEN
/YELLOW/BLUE
-5-

2
1
Q.
VIEW
PBC
ANGLE
STEP L/R
OSD
EJECT
ZOOM
MIX
AUDIO
PROG
BOOKMARK
SF
POWER
DISPLAY SLEEP
2
5
8
3
6
9
1
4
7
TV/AV/DVD
0
MENU
VOL VOL
PROG
PROG
SIZE
REP
A-B REP
RETURN
ENTER
NICAM
RANDOM
SUBTITLE
GO TO
TITLE
INDEX
ROOT
MENU
DVD
SETUP
10F
CLEAR
SWAP
LANGUAGE
-/---/--
I/II
P.M. OK
MUTE
HOLD SUB.PAGE
REVEAL
Remote Control Buttons
2
4
5
6
7
8
9
11
12
13
14
15
18
19
21
43
42
40
39
37
36
32
31
30
29
28
25
24
23
3
10
17
16
20
41
38
35
22
26
4
5
6
7
10
16
17
18
19
20
21
22
23
24
25
26
27
31
32
34
35
36
38
39
40
41
1
27
L/R=LEFT/RIGHT
AUDIO
OSD(On Screen Display)
ZOOM
PROG = Programme
A-B REP=A-B Repeat
RETURN
SF=Slow Forward
=Play and Pause
BOOKMARK
=Stop
=Next Button
REP=Repeat
CLEAR
=Direction Buttons
TITLE
10+ =
DVD SETUP
ROOT MENU
ANGLE
42
43
44
FOR DVD BUTTONS
=Previous Button
=Fast Forward
=Fast Reverse
33
34
SUBTITLE
STEP
GO TO
RADOM
PBC
44 EJECT
11 ENTER
-6-

Location of controls
-7-

Location of controls
If you are not going to use this TV set for a long time please disconnect the power plug from the
wall outlet.
NOTE
If TV is selected input without signal received and NO operation is performed for about 8 minutes
continuously, the TV set will enter standby mode. For any inputs other than TV , the TV set will not
enter standby mode automatically without users instruction.
Front View of TV Set
1. EJECT Button(DVD)
2. PLAY/PAUSE Button(DVD)
3. STOP Button(DVD)
4. OK Button(TV)
5. Menu Button
6. PROG.+Button
7. PROG.- Button
8. VOL.+Button
9. VOL.- Button
10. Power Switch
11. Power Indicator
12. Speakers
44
55
66
77
88
99
1010
1212
11
22
33
1212
1111
1*1*
1*The CD contents must be in front.
NOTE
Precautions when connecting to other equipment
When using externalequipment with thisTV set, please read the instructionmanualof the external
equipment.
Switch off allpower supplies tothe equipment and TV set beforeconnection.Always ensurethat the
input and outputterminals are correctlyconnected.
Rear View of TV Set
1. DC 12V In
2. VGA In
PC Audio Right In
4. PC Audio Left In
5. Antenna Input Socket(75Ohm)
6. SCART
7. Earphone Socket
3.
3344556677
Adaptor
ANT INANT IN PHONEPHONE
SCARTSCART
LLRR
PC AUDIOPC AUDIO
11
22
L-OUT
R-OUT
COAXIAL
PC INPUT
DC 12V IN
DVD
-8-

Installation
Locate the receiver in the room where direct light
does not strike the screen.
Total darkness or a reflection on the picture screen
can cause eyestrain. Soft and indirect lighting is
recommended for comfortable viewing.
Allow enough space between the receiver and the
wall to permit ventilation.
Avoid excessively warm locations to prevent
possible damage to the cabinet or premature
component failure.
This TV operates on a Dc supply provided by the AC-
DC adaptor. The voltage is as indicated on the label
on the back cover. Only use the AC-DC adaptor
supplied with the TV and never apply an AC mains to
the TV directly. The AC-DC adaptor operates on an
AC mains supply, the voltage is as indicated on the
label of the AC-DC adaptor. Connect the DC plug of
the AC-DC adaptor to the DC 12V socket at the back
of the TV. Connect the AC-DC adaptor and Its mains
cord. Insert the mains plug in the wall socket having
a mains voltage of 100-240V.
Do not install the receiver in a location near heat
sources such as radiator, air ducts, direct sunlight, or
in a place somewhere like close compartment and
close area.
Do not cover the ventilation openings when using the
set.
16:9 Aspect Ratio
System (PAL/SECAM/BG/DK/LL NTSC M)
DVD, CD,CD-R/DIVX
00
Viewing Angle 176 /176
PC monitor mode (PC/VGA input)
Scart (RGB)
Headphone jack
Sleep Timer
NICAM stereo
Teletext
For TV Features
,
-9-

TV REAL PANEL
100-240V
-10-

Do not useold and new batteries together.
Do not usedifferent types of batteries (for
example, Manganese andAlkaline batteries)
together.
Note that there arechargeable and non-
chargeable batteries. Do not attempt to charge
non-chargeable batteries.
Remove the batteries fromthe remote control
unit if you donot intend to use the unit for a long
time.
Do not dropthe remote control unit.
Do not subjectthe remote control unit to
physical shocks.
Keep the remote controlunit dry. Wetting it may
cause the unit tomalfunction.
Replace the batterieswith new ones when
operation of theunit deteriorates.
Precautions when using batteries
NOTE:
12
To turn the TV power OFF
Press the Standby button to switch the TV set
to Standby Mode., then disconnect the power
plug from the wall outlet.
To turn the TV power ON
connect the DC plug of theAC-DC adaptor to
the DC 12V socket at theback of the TV set.
Connect the adaptor main cord tothe wall
outlet, the power indicator turns redand the TV
set is in Standby Mode. In Standby Mode, if
Standby button is pressed the power indicator
will change to green. It takesa few seconds
before the picture appears.
Operating the TV
Press MENU button to enter main menu. In the
main menu select submenu using PROG+/-
buttons and enter the submenu using the OK
button .To understand the use of the menus,
refer to the menu system section.
This TV setallows the adjustment of any settings
by selecting fromthe menu screens.
Press this button to display main menu, including Picture,
Sound, Setup, Tune, VGA setup and Exit items. You can
select them by pressing the PROG+/- or VOL+/- buttons,
and enter the submenu press the OK button.The
selected item will change to highlight colour.
Menu button
Picture
MENU
VOL VOL
PROG
PROG
P.M. OK
MUTE
S.
SYS
Picture menu
Picture
Bri
Col
Shp
48
50
2
60
PICTURE menu by pressing VOL+/- or OK button.
Enter Picture menu, you can select brightness,
Contrast, Colour, Sharpness and Hue(in NTSC
system) items by pressing PROG+/- buttons. You
can adjust the item selected by pressing VOL+/-.
Sound menu
Sound
Vol
Bal
35
50
Press MENU button to
enter the main menu. In the
main menu, select SOUND
by using PROG+/- or
VOL+/-buttons,then enter the SOUND menu by
pressing OK button.
Enter the Sound menu, you can adjust Volume and
Balance by pressing VOL+/-.
Enter this menu, you can select Input Select
,Language, Aspect ,Factory Reset, Hpos and Vpos
items by pressing PROG+/- buttons. You can adjust
the horizontal and vertical position of OSD on the
screen by pressing VOL+/- buttons, or enter the
submenu including the Input Select menu,
Setup menu
Setup
Input select
Hpos
Vpos
32
50
Factory Reset
Language
Aspect
Press MENU button to
enter the main menu. In the
main menu, select SETUP
by using PROG+/- or
VOL+/- buttons,then enter
the SETUP menu.
Switching the TV ON/OFF
Press MENU button to
enter the main menu. In
the main menu, select
PICTURE by using
PROG+/- or VOL+/-
buttons, then enter the
-11-

Language menu, Aspect menu and Factory
Reset menu by pressing OK button. In Aspect
submenu you can select the display mode
among 16:9, 4:3 mode 1 and 4:3 mode 2(except
for VGA input).
In Input Select submenu
you can select the signal
source, TV, DVD, SCART
or VGA.
Input Select menu
InPut Select
TV
Scart
VGA
DVD
In this menu you can complete the tuning
function.Select the Sound SYS(for UK this should
be set to I), adjust the item to correct sound
system, then select the Auto Search item and
press OK button to begin channel search. After
completing the search, the program will go to
Channel NO.0. The picture will appear and sound
will be heard.
Tune menu
Tune
Program
MST
Search
Skip
Band
Auto Search
Sound SYS
1
49.75MHZ
OFF
V-L
I
1. Program
In this item, you can store the program number
which are watching, and changethe number by
VOL+/-.
2. Skip
You can set ON by VOL+/- buttons if you want
to skip the channel which you are watching.
3. Band
You can select V-L, V-H or UHF.
4. MST
Frequency fine turn. To tune in weak station this
item must be used.
5. Search
Press VOL+/- buttons to start searching. The
VOL- button decrease the frequency, the VOL+
button increase the frequency.
6. Auto Search
Press OK button to start search program
automatically from V-L to UFH, the searched
program will be stored automatically in order of
reception.
7. Sound SYS
You can select BG, DK, I ,ll or M.I is the default
for the UK.
Press MENU button to
enter the main menu. In
the main menu, select
TUNE by using PROG+/-
buttons, then enter the
TUNE menu.
‘
15 Pin MiniD-Sub Connector
VOL+/- or OK buttons.
This menu is only for PC monitor mode (VGA input).
1. Auto Config
Select auto config to adjust the screen position
automatically. It will take a few seconds and during
this process the screen will be black.
2. Clk
Press the VOL+/- to minimize any vertical bars or
stripes visible on the screen background.
3. Phs
When necessary, adjust the pixel phase of the
picture to avoid picture interference.
4. Hpos/Vpos
Press the VOL+/- buttons to adjust the picture
Horizontal and Vertical position.
VGA SET menu
Setup
Auto Config
Hpos
Vpos
Clk
Phs
Press MENU button to
enter the main menu. In
the main menu, select VGA
SET by using PROG+/-
buttons, then enter the
VGA SET menu by pressing
Monitor Display modes
SVGA
MODE
640X480 31.5KHz 60Hz
VGA
XGA
Resolution Horizontal
Frequency
Vertical
Frequency
800X600 37.9KHz
48.4KHz
1024X768
60Hz
60Hz
-12-
This unit canbe used as a PC monitor to
connect to aPC use a standard 15 pin cable.
(Not Supplied)

NOTE:
1.If the set is cold, there may be a small "flicker"
when the set is switched on. It is normal. There is
nothing wrong with the set .
2.If possible , use the VESA 1024X768@60HZ
video mode to obtain the best image quality for
your LCD monitor. Under other resolutions some
scaled or processed pictures may appear on the
screen.
3. Some dot defects may appear on the screen
,like red. green or blue. Spots, However, this will
have no impact or effect on the monitor
performance.
4. Do not press the LCD screen with your finger
for a long time as it may incur some damage to
the screen.
Press these buttons to accessdirectly to the
corresponding pages displayedat the lower
part of theTeletext screen.
Press this button to revealthe hidden information
for some Teletext pages (e.g. answers to puzzles
or riddles). Press again to hide the information.
Press this button to changethe Teletext screen
display mode amongthe following:
Teletext Operations
Several languages are supported for teletext by
this TV set, and are divided into three language
groups. Press this button to select the teletext
language.
Press this button to holdthe Teletext page on
display to preventthe page from changing.
Some Teletext pages(e.g. P250)may contain
several sub-pages. Pressthis button once,
"P250/---" will bedisplayed on screen. Enter
number buttons (0-9)to display the sub-page if
available. Press this button again to exit from
sub-page mode.
Select a TVstation on which Teletextis being
transmitted.
Press mix button, usually thelist of contents
(index) is displayedon the screen.
TELETEXT PAGEUP / DOWN
buttons
Press these buttons to increase or decrease
the Teletext page number.
PROG
PROG
PAGE NUMBER SELECTION buttons
Press the number buttons toselect a Teletext
page number.
COLOUR button
INDEX button
Press this button to goto the index page.
LANGUAGE button
REVEAL button
SIZE button
- Upper halfscreen enlarged
- Lower half screen enlarged
- Normal screenstate
HOLD button
Press again to release thehold state.
SUB.PAGE button
-13-

Make sure any connections to the PC Audio
in Socket are removed.
If an external device is connected to the. TV
via the scart socket the TV will switch to AV
mode automatically.
PC Audio LinPC Audio R in
PC
Audio Output
FOR DVD PART
Main Features
-Fully compatible with DVD,DIVX,CD,CD-R,CD-
RW, MP3, DVD-RW , DVD+RW, KODAK PICTURE
CD .
-Compatible with full DVD playback functions:
multi-angle, multi-language, multi-story, parental
control, etc.
-Audio output: 2ch mixed, stereo output, Coaxial
digital output, liner PCM decoding output.
-
3-step zoom/smooth scan.
-Skipping ahead and skipping back.
-Multi-speed slow motion playback.
-3-step zooming playback.
-3-way repeat playback
-Numeric selection
24-bit/96kHz audio D/A converter.
-
Playback Features
Basic Operation
Press EJECT button to load or eject the disc.
Hold the disc without touching either of its surfaces,
with the printed title side facing to front, and insert it
into the disc slot, then the disc will be automatically
loaded, and the set will automatically read the
disc.In case of interactive DVDs with playback
control, a menu appears on the screen.
Press PLAY button to start playback. Press PAUSE
button to pause playback.
When this button is pressed once, the unit records
the stopped point, from where playback will resume
(resume function) if PLAY is pressed afterwards.
But if STOP button is pressed again instead of PLAY
button, there will be no resume function.
Stop button( )
Play and pause button( )
-14-

FR/FF button( / )
Press these buttons to go to the previous/next
chapter(DVD) When Playing CD disc , press these
buttons twice to select previous song.
Prev/next button( / )
These buttons allow skipping ahead/back at 5
different speeds. Press PLAY button to return to
normal playback.
SF button:
Press this button , you can play the disc slow
Forward.
Step button
You can watch frame by frame by pressing
this button.
" "& Enter buttons
Their functions is to choose the previous or next
song to be displayed.
L/R button
Press this button consecutively and the audio output
will change as follows:
MONO-LEFT MONO-RIGHT STEREO
Interactive Function
Subtitle button
Press this button, to change the subtitle language
from the one selected at the initial settings to a
different language, if available.
Angle button
Some DVDs may contain scenes which have been
shot simultaneously from a number of different
angles. For these discs, the same scene can be
viewed from each of these different angles by using
the ANGLE button.
Audio button
Press this button, to change the audio language
from the one selected at the initial settings to a
different language, if available.
OSD button
Press this button once to show playback information
on the LCD screen and press it again to show
playback time. Press this button for the fifth time,
and then the display will be cancelled.
Zoom button
Press this button during normal, zoom in, zoom out,
slow or still playback mode.
Press this button to magnify
picture and use direction buttons " " to select
the required part of the zoomed picture.
This player can magnify
a picture upto 3 times.
Title button:
DVD disc:
Press TITLE button, then the DVD menu or titles
available on the disc will be displayed. Then you can
use " " and ENTER button to select items.
Root Menu button
If playing some DVD discs , press this button back
to root menu screen . If playing DVDs you can use
the functions of ROOT MENU, PROGRAM and
RANDOM.
Other Useful Function Operation
Repeat button
Using this function you can repeatedly play a title
(DVD) or all tracks(CD) when " ALL " appears on
the LCD screen ,You can repeatedly play a
chapter(DVD) or a single track(CD) when " "
appears on the LCD screen ,The repeat function is
cancelled when no " " appears on the LCD
screen .
A-B repeat button
You can repeatedly play a given portion by operating
as follows:Press this button once to define the
start point press this button again to define the
end point. And then the portion will be played
repeatedly. Press this button again to return to
normal playback.
Program button:
When you want to play only partial tracks/chapters
of a disc(DVDs) or to arrange the tracks/chapters
playback order, to use the Program function:Press
PROGRAM button. Then "PROGRAM" appears on
the screen. Press the track number in the required
order. For example, if the track numbers you want
to play are 1, 3 and 8, just input in the order of
1-3-8.You can press CLEAR button to cancel and
input again if you mis input track numbers.Now
you can press " " and "ENTER" button to select
"START"option and Playback the programmed
tracks.
-15-

Numeric buttons(0-9):
You can select desired titles(DVD) by pressing these
buttons directly only if the title or track number is
less than 10.If the title or track number is over 10.
For instance ,if "28" is wanted, press "10+" twice,
and then press the 2nd-digit number "8".
[DVD only]
TITLE XX/XX CHAPTER [ ]/XXX
[DVD only]
DISC GOTO TRACK GOTO
T: XX
[DVD only]
CHAPTER XX/XX TIME
[CD]
Go to button
Press this button to go to desired position. The
player provides 3 search mode.
When the above items are shown on the screen,
you can input numbers to locate a required section
or chapter, then press PLAY to start playback.
Random button
Press this button, to play tracks randomly,
and pressing it again will cancel random playback.
Picture Disc Operations
Press OPEN/CLOSE:
Insert a picture CD label side to the front, the system
will search automatically. After searching, the
direction arrows and PLAY button can be used to
choose the option required. Also the numeric
buttons can be used to select directly. Press
NEXT/PREV/STOP buttons to control.
Optional Play Modes:
SINGLE - Play the selected song or JPEG picture
once and stop.
REP-ONE - Play the same song or JPEG picture
over and over.
FOLDER - Play the contents of the current folder.
FOLDER R - Repeat play contents of the current
folder.
- Randomly play songs or JPEG pictures
in the current directory, forever and ever.
Sixteen slideshow transition modes are provided, use
"PROGRAM" button to select:
mode 1: wipe top
mode 2: wipe bottom
mode 3: wipe left
mode 4: wipe right
mode 5: diagonal wipe left top
mode 6: diagonal wipe right top
mode 7: diagonal wipe left bottom
mode 8: diagonal wipe right bottom
mode 9: extend from center h
mode 10: extend from center v
RANDOM
mode 11: compress to center h
mode 12: compress to center v
mode 13: window h
mode 14: window v
mode 15: wipe from edge to center
mode 16: random
Image transformation
There are four modes of transformation: "Invert",
"Mirror","Left" and "Right". The arrow keys are used
to select.
Up - Invert/Normal
Down - Mirror/Normal
Left - Turn left
Right - Turn right
Zoom
Press ZOOM button to enter ZOOM mode. Then
press"FF"/"REV" button zoom in/out.
Bookmark button:
When playing DVD/CD disc, press this button to
mark a place where required.
BOOK MARK
Press Enter key to mark /play;
Press clear key to cancel.
You can use¡° ¡¡¡±key to select different content to
mark /play.
Note: during ZOOM function, slide show transition and
image transformation are disabled.
Stop
The "Stop" key is used to enable PICTURE menu
mode when in stop state. After it is enabled, up to 12
scaled down jpeg pictures will be displayed on the
screen. The " " keys can be used to display
the next/prev twelve pictures. By pressing "direction
and ENTER" key the corresponding picture will be
enlarged to fill screen, and the digest mode will be
cancelled.
Prev & Next
-16-

Setup Menu
DVD DISPLAY
ANGLE MARK
OSD LANGUAGE
SPDIF OUTPUT
DVD CLOSED CAP.
SCREEN SAVER
GENERAL SETUP PAGE
Press DVD SETUP button to open the setup menu.
Use direction buttons " " to select the preferred
item .
To exit the setup menu ,press SETUP again to revert
to the TV display.
The following menu items can changed:
GENERAL SETUP :selects the GENERAL PAGE menu.
SPEAKER SETUP: selects the SPEAKER SETUP PAGE
menu.
DOLBY DIGITAL SETUP :selects the DOLBY DIGITAL
SETUP menu.
PREFERENCE: selects the PREFERENCES PAGE
menu.
GENERAL SETUP PAGE
4 : 3 PAN SCAN
4 : 3 LETTERBOX
16 : 9
ON
OFF
SPDIF OFF
ALL
PCM ONLY
ENGLISH
FRENCH
ITALY
SPANISH
ON
OFF
ON
OFF
The following me u items can be changed:
DVD DISPLAY: selects the aspect ratio of the play-
back picture.
4 :3 : pan scan display.
4 :3 : letterbox display.
n
/ PS &
/ LB
16 : 9: widescreen display.
ANGLE MARK: viewing angles change option(if avail-
able). See changing the angles on
page 9.
SPDIF OUTPUT: select audio output :SPDIFOFF, ALL,
PCM ONLY.
DVD CLOSED CAP.: this is to turn on/off captions.
(Subtitles)
SCR SAVER: this is to turn on/off screen saver.
SPEAKER SETUP PAGE
LT / RT
STEREO
SPEAKER SETUP PAGE
DOWNMIX
LT/RT:2 CH output, main channel with surround.
STEREO: 2 CH output, main right channel with right
surround; main left channel with left surround.
The following menu items can be changed:
DUAL MONO: Reproduction mode, used only when
the input consists of two independent audio channels
(1/1 mode). Possible selections are:
STEREO: Reproduce both channels as is.
L-MONO: Reproduce the left channel only.
R-MONO: Reproduce the right channel only.
MIX-MONO: Mix both channels.
The default is STEREO.
DYNAMIC: Dynamic range compression.
DOLBY DIGITALSETUP PAGE
STEREO
L-MONO
R-MONO
MIX-MONO
FULL
/4
/2
/
OFF
DOLBY DIGITAL SETUP PAGE
3
1
1 4
DUAL MONO
DYNAMIC
PREFERENCES SETUP PAGE
AUDIO
SUBTITLE
DISC MENU
PARENTAL
PASSWORD
DEFAULT
ENGLISH
FRENCH
SPANISH
ITALY
CHINESE
KOREAN
RUSSIAN
THAI
ENGLISH
FRENCH
SPANISH
ITALY
CHINESE
KOREAN
RUSSIAN
THAI
ENGLISH
FRENCH
SPANISH
ITALY
CHINESE
KOREAN
RUSSIAN
THAI
1 KID SAF
2 G
3 PG
4 PG 13
5 PGR
6 R
7 NC-17
8 ADULT
OFF
CHANGE
PREFERENCES PAGE
RESET
The following menu items can be changed:
AUDIO: Selects a language for audio(if available).
SUBTITLE: Selects a language for subtitles(if avail-
able). no subtitles are display after selecting OFF.
DISC MENU: Selects a language for title menus or
DVD menus(if available).
PARENTAL [DVD only]: This is to disable the playing
of specified DVDs which are unsuitable for children.
Some DVDs are encoded with specific rating level.
If the rating level of the disc is higher than that
preset in the setup operation, playback of the disc
will be prohibited. After selecting one of the
PARENTAL items,the screen will change to the
PASSWORD page, and password is required. The
factory setting is 1369.
PASSWORD[DVD only]: Change the PASSWORD.
-17-

OLD PASSWORD [ XXXX ]
NEW PASSWORD [ YYYY ]
CONFIRM PASSWORD [ YYYY ]
PASSWORD CHANGE PAGE
OK
PASSWORD CHANGE PAGE
OLD PASSWORD: Enter the OLD password, (Factory
setting is 1369), and the cursor will jump autom
atically to NEW PASSWORD.
NEW PASSWORD: Enter the NEW password. Enter
4 digits from the remote control unit numeric
buttons, and the cursor will automatically jump to
CONFIRM PASSWORD.
CONFIRM PASSWORD: Confirm the NEW password
by entering it again. If the confirmation is incorrect,
the cursor will stay in this column. After entering,
the correct new password again ,the cursor will
jump automatically to OK.
OK: When cursor is on this button ,press ENTER key
to confirm setting.
DEFAULT: Back to the factory setting.
Definition of Terms
Recorded onto some DVD discs are scenes which
have been simultaneously shot from a number of
different angles(the same scene is shot from the
front, front the left side, from the right side, etc.).
With such discs, the ANGLE button can be used to
view the scene fromdifferent angles.
ANGLE
This refers to a high-density optical disc on which
high-quality pictures and sound have been recorded
by means of digital signals. Incorporating a new
video compression technology(MPEG II) and high-
density recording technology, DVD enables
esthetically pleasing full-motion video to be recorded
over long periods of time(for instance, a whole movie
can be recorded).DVD has a structure consisting of
two 0.6mm thin discs which are adhered to each
other. Since the thinner the disc, the higher the
density at which the information can be recorded,
a DVD disc has a greater capacity than a single 1.2
mm thick disc. Since the two thin discs are adhered
to each other, there is the potential to achieve
double-sided play sometime in the future for even
longer duration play.
DVD
CHAPTER NUMBER
SUBTITLES
These numbers are recorded on DVD discs. A title is
subdivided into many sections, each of which is
numbered, and specific parts of video presentations
can be searched quickly using these numbers.
These are the printed lines appearing at the bottom
of the screen which translate or transcribe
the dialogue. They are recorded on DVD discs.
TIME NUMBER
TRACK NUMBER
This indicates the play time which has elapsed from
the start of a disc or a title. It can be used to find
a specific scene quickly. (It may not work with some
discs.)
These numbers are assigned to the tracks which are
recorded on Cds. They enable specific tracks to
be ocated quickly.
-18-

BEFORE CALLING FOR SERVICE, HAVE YOU
CHECKED ( ) THE FOLLOWING CHART
ON SYMPTOMS AND SOLUTIONS?
No sound output for DVD OUT
No play
No remote control
Can not play DVD
Can not select the desired DVD audio
Can not select the desired DVD subtitle
Can not select the different angle
Symptoms
Ensure thattheamplifierisconnected properly ,andthe settingof amplifier isproper
Thisplayercan not playdiscs other thanDVD,MP3,CD.
Ensure the disc is installedwiththe label side up.
Check the batteriesare installed properly.
Point the remote control unit at the remote control sensor.
Thedistancebetween remotecontrol unit andsensoris less than 8M.
Confirm the PARENTAL SETTING rating.
Confirmthe DVD disc containthem.
Tryselecting them from the DVDSETUPMENU.
Examinethe GENERAL SETUP page,andthe ANGLE MARKmust besetON.
Even ifadisc has a number ofanglesrecorded,these anglesmay be recorded for
Solution
specificscenes only.
Service Tips(DVD)
-19-

Please make these simple checks as
indicated ( ) on the chart for the
respective symptoms and their possible
remedies.
No picture, no sound
Poor sound, picture OK
Poor picture, sound OK
Weak picture
Blurred picture
Double image
Lines in picture
Distorted picture
Weak reception on some channels
Horizontal bars
Picture rolls vertically
Poor colour
No colour
Misoperation of Remote control
Remote control unit no operation
On Screen Display Control outside the screen
Trydifferent channel, if OK, probablystation trouble
Checkaerial connections on backof set
Checkaerial for brokenwires
Re-orientaerial(if indoortype)
Probablylocalinterference,such as anappliance
Adjustfine tuningcontrol
Adjust brightnesscontrol
Adjustcontrastcontrol
Checkifstation isbroadcastingcolour
Adjust colour control
Checkif systemis correctlyset
Checkif on/offswitch is"on"
Checkbatteriesin remotecontrol unit
PossibleRemedies
Symptoms
Service Tips(TV)
-20-
Table of contents
Other Goodmans TV DVD Combo manuals

Goodmans
Goodmans GPTV70WLCD User manual

Goodmans
Goodmans GTVC14N14DVD User manual

Goodmans
Goodmans GTVL19W17HVFW User manual

Goodmans
Goodmans UD04363B User manual

Goodmans
Goodmans GTV14T5DVD User manual

Goodmans
Goodmans GTV51N16DVD User manual

Goodmans
Goodmans GM700 Series User manual

Goodmans
Goodmans GTVL19W19DVD User manual

Goodmans
Goodmans GTV51RFDVD User manual

Goodmans
Goodmans GTVL15DVDS User manual