Goodmans GTV51N16DVD User manual

2 1 ” ( 5 1 c m ) C O L O U R T E L E V I S I O N
W I T H D V D P L A Y E R
GTV51N16DVD
I N S T R U C T I O N M A N U A L
G O O D M A N S H E L P L I N E
0 8 7 0 8 7 3 0 0 8 0

21
CONTENTS
Before Operation
Basic operation
G T V 5 1 N 1 6 D V D .....................................2
Warning and cautions............................................................................3
.................................................................................4
Using the remote control.......................................................................7
Switching on/off the TV set ..................................................................8
Searching channels................................................................................9
Full automatic mode............................................................................9
Semi-automatic search.......................................................................10
Manual fine tune..................................................................................11
Program skip ......................................................................................12
Watching TV .........................................................................................13
Watching TV program.........................................................................13
Program swap and auto scan functions..............................................14
Convenient picture and sound control functions.............................15
Multiple picture modes ......................................................................15
Black stretch and noise reduce..........................................................16
Mute ...................................................................................................17
Time functions......................................................................................18
Clock setting and timer on/off functions...........................................18
Sleep timer and program preset ......................................................19
Setup function ....................................................................................20
Screen saver and childlock functions.................................................20
AVL and calendar functions ...............................................................21
Position exchange function................................................................22
Teletext..................................................................................................23
DVD Operation
Basic Playback......................................................................................25
Advanced Playback..............................................................................26
Special Function Playback...................................................................27
DVD System Setup................................................................................28
Playable Discs.......................................................................................32
Disc Protection and DVD Characteristics...........................................33
Others
Connection to the external audio and video equipment...................34
Trouble shooting guide........................................................................35
Specifications........................................................................................36
A D D I T I O N A L I N F O R M A T I O N
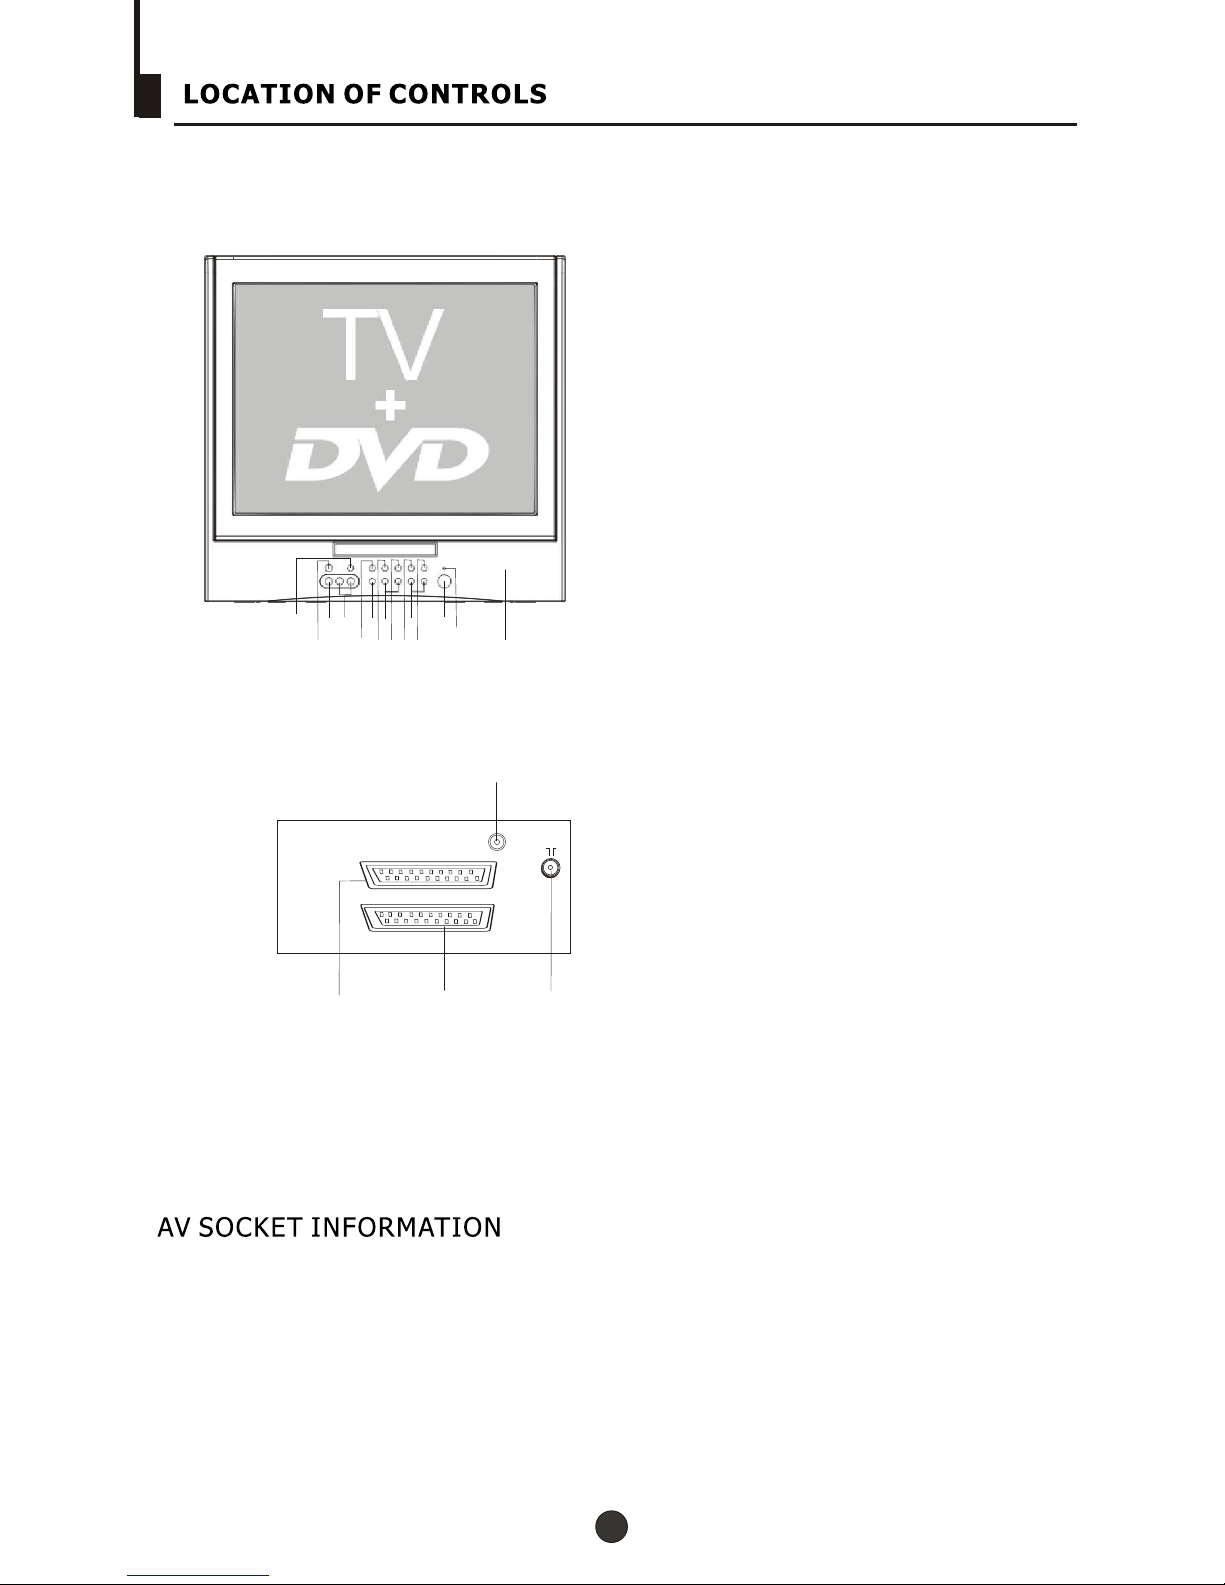
Location of controls

22
2
G T V 5 1 N 1 6 D V D A D D I T I O N A L I N F O R M A T I O N
O n s o m e D V D d i s c f o r m a t s t h e n a v i g a t i o n ( a r r o w b u t t o n s ) b u t t o n s o n t h e r e m o t e m a y
n o t o p e r a t e . I n s u c h c a s e s p l e a s e p r e s s t h e " T I T L E " b u t t o n o n t h e r e m o t e t h e n o p e r a t e
t h e a r r o w / n a v i g a t i o n b u t t o n s o n t h e r e m o t e c o n t r o l l e r .
D V D F u n c t i o n B u t t o n P l e a s e n o t e t h e D V D f u n c t i o n b u t t o n o n t h e r e m o t e c o n t r o l
s w i t c h e s t h e u n i t b e t w e e n T V a n d D V D , a f t e r w a t c h i n g a D V D D i s c p r e s s t h e D V D
b u t t o n t o r e t u r n t o T V m o d e .

3
Warning and cautions
CAUTION: TO REDUCE THE RISK OF ELECTRIC SHOCK. DO NOT REMOVE COVER (OR
BACK). NO USER SERVICEABLE PARTS INSIDE. REFER SERVICING TO QUALIFIED SERVICE
PERSONNEL.
The graphic symbols on the back cover of the set mean the following:
WARNING: TO REDUCE THE RISK OF FIRE OR ELECTRIC SHOCK, DO NOT EXPOSE THIS
APPLIANCE TO RAIN OR MOISTURE.
INSTALLATION
LOCATE the receiver in the room where direct light does not strike the screen. Total darkness or
a reflection on the picture screen can cause eyestrain. Soft and indirect lighting is recommended
for comfortable viewing. ALLOW enough space between the receiver and the wall to permit
proper ventilation. AVOID excessive warm locations to prevent possible damage to the cabinet or
component failure.
CONNECTION
This TV receiver can be connected to 230V- 50Hz, NEVER connect to DC supply or any other
power.
The lightning flash with arrowhead symbol within an equilateral triangle is intended to
alert the user to the presence of uninsuiated "dangerous voltage" within the product's
enclosure that may be of sufficient magnitude to constitute a risk of electric shock to
persons.
The exclamation point within an equilateral triangle is intended to alert the user to the
presence of important operating and maintenance (servicing) instructions in the literature
accompanying the appliance.
AUTOMATIC DEGAUSSING
All colour television receivers are sensitive to magnetic influences, usually caused by either
moving the receiver from one place to another or using certain electrical appiiances near the
receiver. This residual magnetism as it is called, sometimes causes distortion which gives rise to
"blotchy" areas of colour in the picture. To avoid these effects the receiver incorporates an
automatic degaussing circuit which operates for a short while immediately each time the receiver
is switched on using the mains switch. This circuit removes any residual magnetism in the metal
parts of the picture tube and therefore ensures that each time the receiver is switched "ON"
using the Mains switch, the purity of the colours displayed on the screen remain true and lifeiike.
If the set is moved or faced in a different direction, the mains switch must be switched off at least
10 minutes in order that the automatic degaussing circuit operates properly.

Warning and cautions
CAUTION
Never tamper with any components inside your set, or any other adjustment controls not mentioned
in this manuai. All television receivers are high voltage instruments. Your PICTURE TUBE is highly
evacuated. Ifbroken, glass fragments will be violently expelled. Scratching, shipping or undue
pressure is dangerous and should be avoided. When you dust or wipe the PICTURE TUBE FACE
or CABINET, the power cord should be pulled out from the wall then wipe the receiver with a dry
soft cloth. Ali "inside work" on your receiver should be performed only by Professional Service
Personnel.
DANGER
LASER SAFETY
This unit employs an optical laser beam system in the
CD mechanism, designed with built in safeguards. Do
not attempt to disassemble, refer to qualified service
personnel. Exposure to this invisible laser light light
beam may be harmful to the human eye.
THIS ISA CLASS-1 LASER PRODUCT. USE OF
CONTROLS, OR ADJUSTMENTS OR PROCEDURES
OTHER THAN THOSE SPECIFIED HEREIN, MAY
RESULT IN HAZARDOUS LASER LIGHT BEAM
Invisible laser radiation when open
and interlock failed or defeated. avoid
direct exposure to laser beam.
CLASS 1
LASER PRODUCT
Manufactured under license from Dolby Laboratories "Dolby", "Pro Logic" and the double-D symbol
are trademarks of Dolby Laboratories. Confidential unpublished works. c.1992-1997 Dolby
Laboratories, Inc. All rights reserved.
4

I M P O R T A N T S A F E G U A R D S P R E F I T T E D M A I N S P L U G S
F o r y o u c o n v e n i e n c e a m a i n s p l u g h a s b e e n f i t t e d t o t h i s a p p l i a n c e . F o r y o u r s a f e t y p l e a s e o b s e r v e
t h e f o l l o w i n g i n f o r m a t i o n .
1 . S h o u l d t h e f u s e i n t h e p l u g f a i l r e m o v e t h e p l u g f r o m t h e w a l l s o c k e t a n d r e p l a c e t h e f u s e w i t h a
5 A m p A S T A a p p r o v e d t o B S 1 3 6 2 f u s e .
2 . N e v e r u s e t h e p l u g w i t h o u t t h e f u s e c o v e r f i t t e d . R e p l a c e m e n t f u s e c o v e r s a r e a v a i l a b l e f r o m
y o u r d e a l e r o r m o s t e l e c t r i c a l r e t a l l o u t l e t s .
3 . I f t h e m a i n s p l u g i s o u t o f f t h e c a b l e , r e w i r e t h e r e p l a c e m e n t p l u g i n a c c o r d a n c e w i t h i n s t r u c t i o n
g i v e i n t h i s m a n u a l .
4 . C A U T I O N : U n d e r n o c i r c u m s t a n c e s s h o u l d t h e d i s c a r d e d p l u g b e i n s e r t e d i n t o t h e m a i n s s o c k e t .
T o p r e v e n t a s h o c k h a z a r d c a r e f u l l y d i s p o s e o f t h e d i s c a r d e d p l u g . D o n o t l e a v e t h e p l u g l y i n g
a r o u n d w h e r e c h i l d r e n m i g h t s e e i t . W A R N I N G : T o p r e v e n t f i r e o r s h o c k h a z a r d d o n o t e x p o s e t h i s
u n i t t o r a i n o r m o i s t u r e .
C A U T I O N : D A N G E R O U S V O L T A G E S E X I S T I N S I D E T H I S U N I T D O N O T R E M O V E C O V E R ( O R
B A C K ) . N O U S E R S E R V I C E A B L E P A R T S I N S I D E R E F E R S E R V I C I N G T O Q U A L I F I E D S E R V I C E
P E R S O N N E L . D I S C O N N E C T F R O M M A I N S S U P P L Y W H E N N O T I N U S E .
T h i s w i r e s i n t h i s m a i n s l e a d a r e c o l o u r e d i n a c c o r d a n c e w i t h
t h e f o l l o w i n g w i r i n g c o d e s :
B lu e ................................... N e u tr a l
B r o w n ................................... L iv e
T h i s w i r e s i n t h i s m a i n s l e a d m u s t b e c o n n e c t e d t o t h e
t e r m i n a l s i n t h e p l u g a s f o l l o w s :
B l u e W i r e . . . . . . . . . . . . . . . . . . . . . . . . . . . N o r B l a c k B r o w n
W ir e .......................... L o r R e d
B L U E
( N e u t r a l )
B R O W N
( L i v e )
O n l y a 5 A m p f u s e s h o u l d b e f i t t e d i n t h e p l u g f u s e o r a t t h e d i s t r i b u t i o n b o a r d .
W A R N I N G : U N D E R N O C I R C U M S T A N C E S M U S T T H E L I V E O R N E U T R A L
W I R E S B E C O N N E C T E D T O T H E E A R T H T E R M I N A L I N A 3 - P I N M A I N S
P L U G .
T h i s s y m b o l m e a n s t h a t t h i s u n i t i s d o u b l e i n s u l a t e d . A n e a r t h c o n n e c t i o n i s n o t
r e q u i r e d .
5

6
1. Remote control receiving window
2. Menu Button
3. Open / Ciose Button
4. Volume Button(V-)
5. Volume Button(V+)
6. DVD Play/Pause Stop Button
7. Channel Button(P-)
8. Channel Button(P+)
9. DVD Fast reverse / Fast forward
10. TV l DVD Button
11. Indicator
12. Main power switch
13. Video in
1 4 . R / L A u d i o i n
1 6 . D i g i t a l A u d i o c o a x i a l o u t p u t
1 8 . Scart Connector(TV input and output)
1 9 . 7 5 o h m A n t e n n a S o c k e t
1
2
3
4
5
6
7
8
9
1 0
1 1
1 2
1 3
1 4
1 6
1 7
DVD EXT
TV EXT
COAXIAL
1 7 . Scart Connector(DVD output)
1 5
1 8
1 9
15.S peaker
1. Front AV: AV1 signal input in TV mode.
2. Scart Connector(TV input and output): in TV mode, containing one AV2 signal input, one RGB
signal input and one AV output.
3. Scart Connector(DVD output): in DVD mode, containing one AV (CVBS) output.
4. Coaxial: in DVD mode, coaxial signal (digital and audio) output.

7
U s i n g t h e R e m o t e C o n t r o l
(Available when inteletext mode only)
Stand By
DVD Open/close
DVD 10+
Scan
Zoom
Mute
Former Program
Call Screen Display
Program Number
Nicam / A2
TV/AV Exchange
Digital Selector
TV/DVD
Volume/Channel Selection
MENU
DVD Audio
Picture Mode
DVD STOP
Tune Menu Button
DVD SETUP
DVD PAUSE/STEP
DVD FAST REVERSE
DVD FAST FORWARD
DVD MENU
DVD NEXT
DVD PREVIOUS
DVD REPEAT
DVD PLAY/ENTER
DVD A-B REPEAT
DVD Cursor Move button
DVD SLOW
DVD ANGLE
DVD SEARCH
DVD PROGRAM
DVD TITLE
DVD SUBTITLE
DVD CALL
(No available)
TELETEXT BUTTONS
Exit Screen Display
PICTURE MENU BUTTON (Red)
Green Button
FUNCTION MENU BUTTON (Blue)
TIME MENU BUTTON (Yellow)
Buttons on the remote control
UP
DOWN
LEFT RIGHT
POWER ZOOM OPEN/CLOSE
SCAN SWAP CALL MUTE
1 2 3 4
5 6 7 8
90-/--
TV/AV
TV/DVD
P+
P-
V- V+
MENU
AUDIO P.STD
STOP SETUP PAUSE/STEP
REV FWD .PREV NEXT
D.MENU REPEAT A-B
PLAY/ENTER SLOW
ANGLE TITLE/PBC SEARCH
SUBTITLE D.CALL
10+
PROGRAM
TUNE
PICTURE SOUND TIME FUNCTION
EXIT
I/II

8
4
AUTO
I
Switching on/ off the TV set
1 Press the Power switch on. The power
indicator will light.
Note
1 To turn the set off to "Standby "press
button on the remote control.
2 To turn off the TV fully, press the Power button
and release.
Auto switch-off function
This section explains the use of the power button and remote handset
to turn your unit on and off.
2 If the indicator is "Red" press the button
on the remote control. Alternatively you
can turn the TV on with P+ or P- buttons,
if the"Child lock" is not set .
Should the signal input from the aerial be
interrupted for morethan 5 minutes,the TV
will automatically switchto "Standby".
If the Tv is in A/V mode or the "background"
is set to off (see page 18), the set will not
switch to standby.
POWER

9
6
AUTO SEARCH
152.25MHz
Searching channels
This TV set has three methods to set the channels, which are respectively
automatic, semi automatic and manual fine TUNE.
-
Full automatic mode
Automatic search
1 Press the TUNE button, the
TUNE menu shown on the right
display on the screen.
2 buttons to
select "AUTO SEARCH".
Press the P+/-
9
TUNE
BAND VHFL
SKIP OFF
PROGRAM 0
SEARCH
FINE TUNE
AUTO SEARCH
COLOUR AUTO
Display function
Press the CALL button, then
the channel number and the
systems will be displayed on
the screen.
3
AUTO
I
TUNE
COLOUR AUTO
BAND VHFL
SKIP OFF
PROGRAM 0
SEARCH
FINE TUNE
AUTO SEARCH
In this section, how to use the remote control to set the channel is
explained. You can also use the buttons on the TV to set the channel.
3 Press V+to start theAuto
search. All channels will be
stored in theorder they are
received. After the search
has finished, the first channel
received will be displayed.
P+
P-
V- V+
MENU
TUNE
CALL

1
AUTO
I
10
6
Searching channels
Continued
Semi-automatic search
1 Press the P+/- buttons or
PROGRAM NUMBER 0-9
buttons to choose desired
channels I.E. channel 1
3 buttons to
select " SEARCH".
Press the P+/-
SEARCH
152.25MHz
To turn off the on-screen menu
In general, after you press the MENU button, the menu
display (PICTURE, TIME
ETC.) will automatically disappear within 15 seconds. If you
want to eliminate these contents immediately, please press
the EXIT button.
item
, FUNCTION, TUNE, EXCHANGE,
TUNE
COLOUR AUTO
BAND VHFL
SKIP OFF
PROGRAM 0
SEARCH
AUTO SEARCH
FINE TUNE
2 Press the TUNE button, the
TUNE menu will be shown on
the right of the screen.
4 Press theV- /V+buttons to
start search.
Press the V- to search down
the scale and V+ to search up
the scale.
P+
P-
V- V+
MENU
TUNE
EXIT

11
5
FINE TUNE
152.25MHz
Searching channels
Continued
Manual fine tune
Manual fine tune
2 Press the TUNE button, the
TUNE menu shown on the right
display on the screen.
3 buttons to
select " FINE TUNE".
Press the P+/-
4 Press the V-/+ buttons all
through to carry out fine tune,
till the best picture and sound
are obtained.
TUNE
COLOUR AUTO
BAND VHFL
SKIP OFF
PROGRAM 0
SEARCH
AUTO SEARCH
FINE TUNE
1
AUTO
I
If the pictureand/or sound are poor, try using the FINE
TUNE feature. Do not use this feature unless
reception is poor.
1 Press the P+/- buttons or
PROGRAM NUMBER 0-9
button to choose desired
channels I.E. channel 1
P+
P-
V- V+
MENU
P+
P-
V- V+
MENU
TUNE

12
Searching channels
Continued
Programme skip
Programme skip
2 Press the TUNE button , the
TUNE menu shown on the right
display on the screen.
3 buttons to
select "SKIP".
Press the P+/-
4 Press the V-/+ buttons to
turn the SKIP function "ON".
5 Press the TUNE button to close
the menu. When you use the P /
buttons to select channel, this
channel will be skipped. However,
you can still use the PROGRAM
NUMBER buttons to select the
skipped channel numbers.
+-
If you want to recover the skipped channel
1 Use the PROGRAM NUMBER buttons to select the channel
number to be recovered.
2 Repeat those steps just now.
3 Press the V-/+ buttons to turn the SKIP function "OFF".
TUNE
COLOUR AUTO
BAND VHFL
PROGRAM 0
SEARCH
FINE TUNE
AUTO SEARCH
SKIP OFF
TUNE
COLOUR AUTO
BAND VHFL
PROGRAM 0
SEARCH
FINE TUNE
AUTO SEARCH
SKIP ON
1 Press the P+/- buttons or
PROGRAM NUMBER 0-9
button to choose desired
channels I.E. channel 1
1
AUTO
I
During "Auto tune"some channels mayhave been
received which areof poor quality, noisy orghosting.
These can beremoved with "Program Skip".
P+
P-
V- V+
MENU
P+
P-
V- V+
MENU
TUNE

Watching TV
Watching TV program
Select the desired program
1 Using "Program number" buttons
Press the V-/+ buttons on the remote or the front of the TV
set to adjust the volume level. The range is 0~100. When the
volume buttons are pressed the volume level is displayed
automatically on the TV screen.
13
TUNE
BAND VHFL
SKIP OFF
PROGRAM 0
SEARCH
FINE TUNE
AUTO SEARCH
COLOUR AUTO
Directly enter thechannel number withthe numeric keypad
on the remotecontrol.
Toselect channel numbersfrom 10 ~99 press [-/--] button
and enter thetwo digit channel number
Toselect channel numbers from 100 ~218 press [-/--] button
twice and enterthe 3 digit channel number
2 Using the P+/- buttons
Press the P+button to increase channel number.
Press the P-button to decrease channel number.
Press the TUNE button, the
TUNE menu shown on the right
display on the screen.
How to select a TV programme
Adjust the Volume level
If the picture colour is incorrect
This may bedue to theTV being set to the incorrect
standard. Use P+ or P- to select Colour then the V+ /V-
buttons to change between Auto, PAL, NTSC and
NTSC443. Press the EXIT button to save the setting.
P+
P-
V- V+
MENU
P+
P-
V- V+
MENU
1 2 34
5678
90
TUNE

14
18
AUTO
I
8
AUTO
I
18
AUTO
I
Watching TV continued
!Swap function enables quick swap to the last watched program.
Auto scan function enables automatic successive scanning of all the programs in
Program swap and auto scan functions
Program swap
1
Suppose the channel number
you used just now is 8 and the
channel number you are using
is 18 (as shown in the figure).
2 If you want to return to the
last watched program channel
8, you can simply press the
SWAP button.
3 If you want to return to
channel 18, press the button
again. Through this function,
you can easily change
between the channel you are
using and the channel you
used last time.
Auto program scan
2 If you want to stop the function
during auto scanning, simply
press the SCAN button again.
SWAP
SCAN 1
AUTO
I
SCAN
2
AUTO
I
SCAN
3
AUTO
I
SCAN
1
AUTO
I
SCAN
1 Press the SCAN button to
scan through all the memorized
TV channels. The scan will
pause for about 2 seconds on
each channel.

15
Multiple picture modes
How to select picture modes
You can quickly select the desired picture mode from
four preset modes and one customized mode.
Convenient picture and sound control functions
Press the P.STD button to select the
desired picture quality. Five kinds
of picture modes (i.e.,
"RICH", "USER","LISTEN",
"SOFT" ) can be selected in turn.
"STANDARD", USER
LISTEN
RICH
STANDARD
SOFT
How to customize your own picture status
1 Press the PICTURE button, the menu shown on
the right display on the screen.
PICTURE
2 Press the P+/- buttons to
select the item to adjusted,
then press the V-/+ buttons
to obtain the desired effect.
BRIGHTNESS
SHARPNESS
*Hue
CONTRAST
COLOUR
Weak
Shallow
Dark
Soft
lean to purple
Strong
Deep
Bright
Sharp
lean to green
ITEM
Press V -
Press V +
PICTURE
BRIGHTNESS 32
COLOUR 48
SHARPNESS 40
*HUE 60
BLACK STRETCH OFF
CONTRAST 48
Note:
The "Hue" item only appears when the colour system is NTSC.
The 5 modesare
Listen-This is anew feature thatblacks out theTV
screen when listeningto music onlychannels;
Soft-Designed for night time low light viewing;
Standard -Designed for rooms that have good all round
lighting;
Rich-Designed for roomswith high ambientlighting such
as daytime sport;
User-A spare setting that can be adjusted to personal
tastes.
P+
P-
V- V+
MENU
P.STD
PICTURE

Black stretch and noise reduce
16
Convenient picture and sound control functions
Continued
How to select BLACK STRETCH
How to select NOISE REDUCE
1 Press the button, the
menu shown on the
right display on the screen.
PICTURE
PICTURE
1 Press the FUNCTION button,
the menu shown on
the right display on the screen.
FUNCTION
2 buttons to
select "BLACK STRETCH".
Press the P+/-
2 buttons to
select "NOISE REDUCE".
Press the P+/-
3 Press the V-/+ buttons to
turn the BLACK STRETCH
function "ON" or "OFF".
3 Press the V-/+ buttons to
turn the NOISE REDUCE
function "ON" or "OFF".
PICTURE
BRIGHTNESS 32
COLOUR 48
SHARPNESS 40
*HUE 60
BLACK STRETCH OFF
CONTRAST 48
PICTURE
BRIGHTNESS 32
COLOUR 48
SHARPNESS 40
*HUE 60
BLACK STRETCH ON
CONTRAST 48
Noise Reduce Picture Noise & Grain Reduction Circuit. (Use only on poor reception)
Black Stretch Automatically increases the contrast range
FUNCTION
NOISE REDUCE ON
FADE ON
CHILD LOCK OFF
AVL ON
CALENDAR
BACKGROUND ON
FUNCTION
BACKGROUND ON
CHILD LOCK OFF
AVL ON
CALENDAR
NOISE REDUCE OFF
FADE ON
P+
P-
V- V+
MENU
P+
P-
V- V+
MENU
PICTURE
FUNCTION

17
Convenient picture and sound control functions
Continued
MUTE
Sound mute
MUTE
Mute
1 Press the MUTE button on the
remote control to turn off the
sound. MUTE will appear on the
top left of the display.
2 Press MUTE again to turn the
sound back on.

On/off timer
Clock setting
18
Time functions
Clock setting and timer on/off functions
1 Press the TIME button, and
the TIME menu display on the
screen.
2Press the P
.
+/- buttons select
"CLOCK", then press the V-/+
buttons to adjust the time in
hour position; press again the
P+/- buttons to select the time
in minute position, then press
the V-/ +buttons to adjust the
value of minutes
The clock will only work if the TV set if left turned on
or in standby. When the set is disconnect from the
power supply or is turned off by the main power on
the front panel,the clock losespower and willneed to
be reset when the power is reconnected.
4 Repeat step 1-2 to set OFF
TIME.(take 23:00 as an example)
3 Press the P+/- buttons to
select "ON PROG", then press
the V-/+ or program direct
number buttons to select your
desired channel (take 8 as an
example).
2 Press the P+/- buttons to
select "ON TIME", then press
the V-/+ buttons to set the value
in hour position; press again the
P+/- buttons to select the minute
position and set the value of the
minute.(take 18:00 as an
example)
1 Press the TIME button to call
up the TIME menu on the
screen.
Using on/off timer function, the TV set can automatically
turn on to a preset program or shut down in a preset time.
TIME
ON TIME 18:00
ON PROG 1
OFF TIME --:--
SLEEP TIMER 0
REMIND TIME --:--
REMIND PROG 1
CLOCK 17:18
TIME
ON TIME 18:00
ON PROG 1
OFF TIME --:--
SLEEP TIMER 0
REMIND TIME --:--
REMIND PROG 1
CLOCK 17:18
TIME
ON TIME 18:00
ON PROG 8
OFF TIME 23:00
SLEEP TIMER 0
REMIND TIME --:--
REMIND PROG 1
CLOCK 17:18
P+
P-
V- V+
MENU
P+
P-
V- V+
MENU
TIME
TIME

Sleep timer and program preset
Sleep timer
REMIND PROG function
19
0
10
20
170
180
1 Press the TIME button, and
the TIME menu display on the
screen.
2 Press the P+/- buttons to
select "SLEEP TIMER ".
1 Press the TIME button to call
up the TIME menu on the
screen.
2 Press the P+/- buttons to
select "REMIND TIME", then
press the V-/+ buttons to set
the value in hour position;
press again the P+/- buttons to
select the minute position, and
then set the value of the
minute.(take 19:00 as an
example)
3.Press the P+/- buttons to
select "REMIND PROG", then
press the V -/+ buttons or the
program direct number buttons
to set the desired channel
(take 18 as an example).
Time functions
Continued
TIME
ON TIME 18:00
ON PROG 8
OFF TIME 23:00
SLEEP TIMER 120
REMIND TIME --:--
REMIND PROG 1
CLOCK 17:18
TIME
CLOCK 17:18
ON TIME 18:00
ON PROG 8
OFF TIME 23:00
SLEEP TIMER 120
REMIND PROG 1
REMIND TIME 19:00
TIME
CLOCK 17:18
ON TIME 18:00
ON PROG 8
OFF TIME 23:00
SLEEP TIMER 120
REMIND TIME 19:00
REMIND PROG 18
NOTE: For
CHILD LOCK must be
turned off.
REMIND PROG to
operate
Program remind timer, that displaysan on-screen reminder
prompt, when aprogram on a different channel is due tostart.
3 press the V -/+ buttons to set
the value of the SLEEP TIMER.
The TV has 18 option settings for
"Sleep timer", each setting has
a time valueof 10 minutes.
P+
P-
V- V+
MENU
P+
P-
V- V+
MENU
TIME
TIME
Table of contents
Other Goodmans TV DVD Combo manuals

Goodmans
Goodmans GTVC14N14DVD User manual

Goodmans
Goodmans GTVL15N5DVD User manual

Goodmans
Goodmans GLCD17W2DVD User manual

Goodmans
Goodmans GTVL15DVDS User manual

Goodmans
Goodmans GM700 Series User manual

Goodmans
Goodmans GTV51RFDVD User manual

Goodmans
Goodmans GTVL19W19DVD User manual

Goodmans
Goodmans GTVL19W17HVFW User manual

Goodmans
Goodmans GTV14T5DVD User manual

Goodmans
Goodmans GTVL19W17HVFW User manual