GR ASA6 ID410 Series User manual

Questions – service@automaticsolutions.com.au
Page 1
ASA6 ID410
•TIP – You need solid opening and closing stops. The control board will search for these when
programming. Make sure they have no movement or flex.
•TIP– You need to fit three small loops of wire to your safety inputs to make anything work. These
can be removed later if you install safety devices to these input terminals. But for now, take three
pieces of light gauge wire (speaker or telephone wire is good) about 50mm long and strip both ends
7mm and insert them as above from 6 to 9, 7 to 9 and 12 to 13.
•TIP - Ensure JP1 on the control board is set to the correct voltage for your system.
•TIP – The transformer has two voltages. Use red and black for 12 volts or red and green for 24 volts.
These connect to FS3 and FS4.
•TIP – The manual offers both automatic programming and manual programming. Manual
programming gives more control and is preferred by professional installers, but auto programming
works just fine so give it a try first.
•TIP – If using solar power refer to the manual for correct input power connection. Also get hold of a
copy of the solar power tips n tricks.
•TIP – This control board has a higher level of security than previous versions and will not accept
older style remote controls. Use REMGR only.
•TIP – If using wireless keypad KEYPADP6 set it to 20Bit mode to work with this board.
CONVERTING FROM AN OLD K50 OR CTR50
•The terminals from J1 (left side) are now terminals 16 to 21 (right side)
•The terminals from J2 (middle) are now terminals 3 to 9 (left side)
•Your power input and battery connect to the same terminals as the old K50 or CTR50.
•As your installation used the K50 / CTR50 board your mechanical stops should all be in place so you
might find it easiest to program using the “AU” method (automatic). You can make adjustments via
the menu from there. Just be certain to start with the gates in the fully open position.

GR
GRGR
GR6
66
6–
––
–8
88
8EUO
EUOEUO
EUO
G.R. SISTEMI AUTOMATICI DI APERTURA SRL
MOTOR FOR SLIDING GATES
MOTOR FOR SLIDING GATESMOTOR FOR SLIDING GATES
MOTOR FOR SLIDING GATES

INSTALLATION MANUAL
Our compliments for your excellent choice. The GR6-8 electro-
mechanical gear motor has been produced for reliability and high quality.
This Manual will offer information you may need to install your gear motor
assuring long-lasting performance and to safeguard your safety.
HOWEVER CAUTION IS UNQUESTIONABLY INDISPENSABLE AND
NOTHING IS BETTER THAN PREVENTING ACCIDENTS. GR products
have been made to conform with rules and laws in force at time of
manufacture.
This manual is designed exclusively for the specialized installation
expert in the criteria of construction and equipment to assist in the
protection against accidents in the installation and use of the gate; door
and automation of such gates (adhere to the rules and laws in force).
On completion the installer should issue to the end consumer an
instruction manual according to EN 12635.
Before proceeding with the installation the installer must provide an
analysis of the identification and management of risks as per the
standards EN 12453 and EN 12445.
All wiring of the various external electrical components connected to
the automation (e.g. Photocells, flashing lights, keypads etc) must be
carried out according to EN 60204-1 and the amendments made of the
point 5.2.2 of EN 12453.
It is prohibited to do any repair or adjustment of the equipment if you
have not taken all necessary precautions to avoid possible accidents
(example: power supply disconnected, engine block). All mechanisms in
motion must be equipped with appropriate protections.
The mains power line must be protected for maximum current in
locked rotor condition as per government electrical laws.
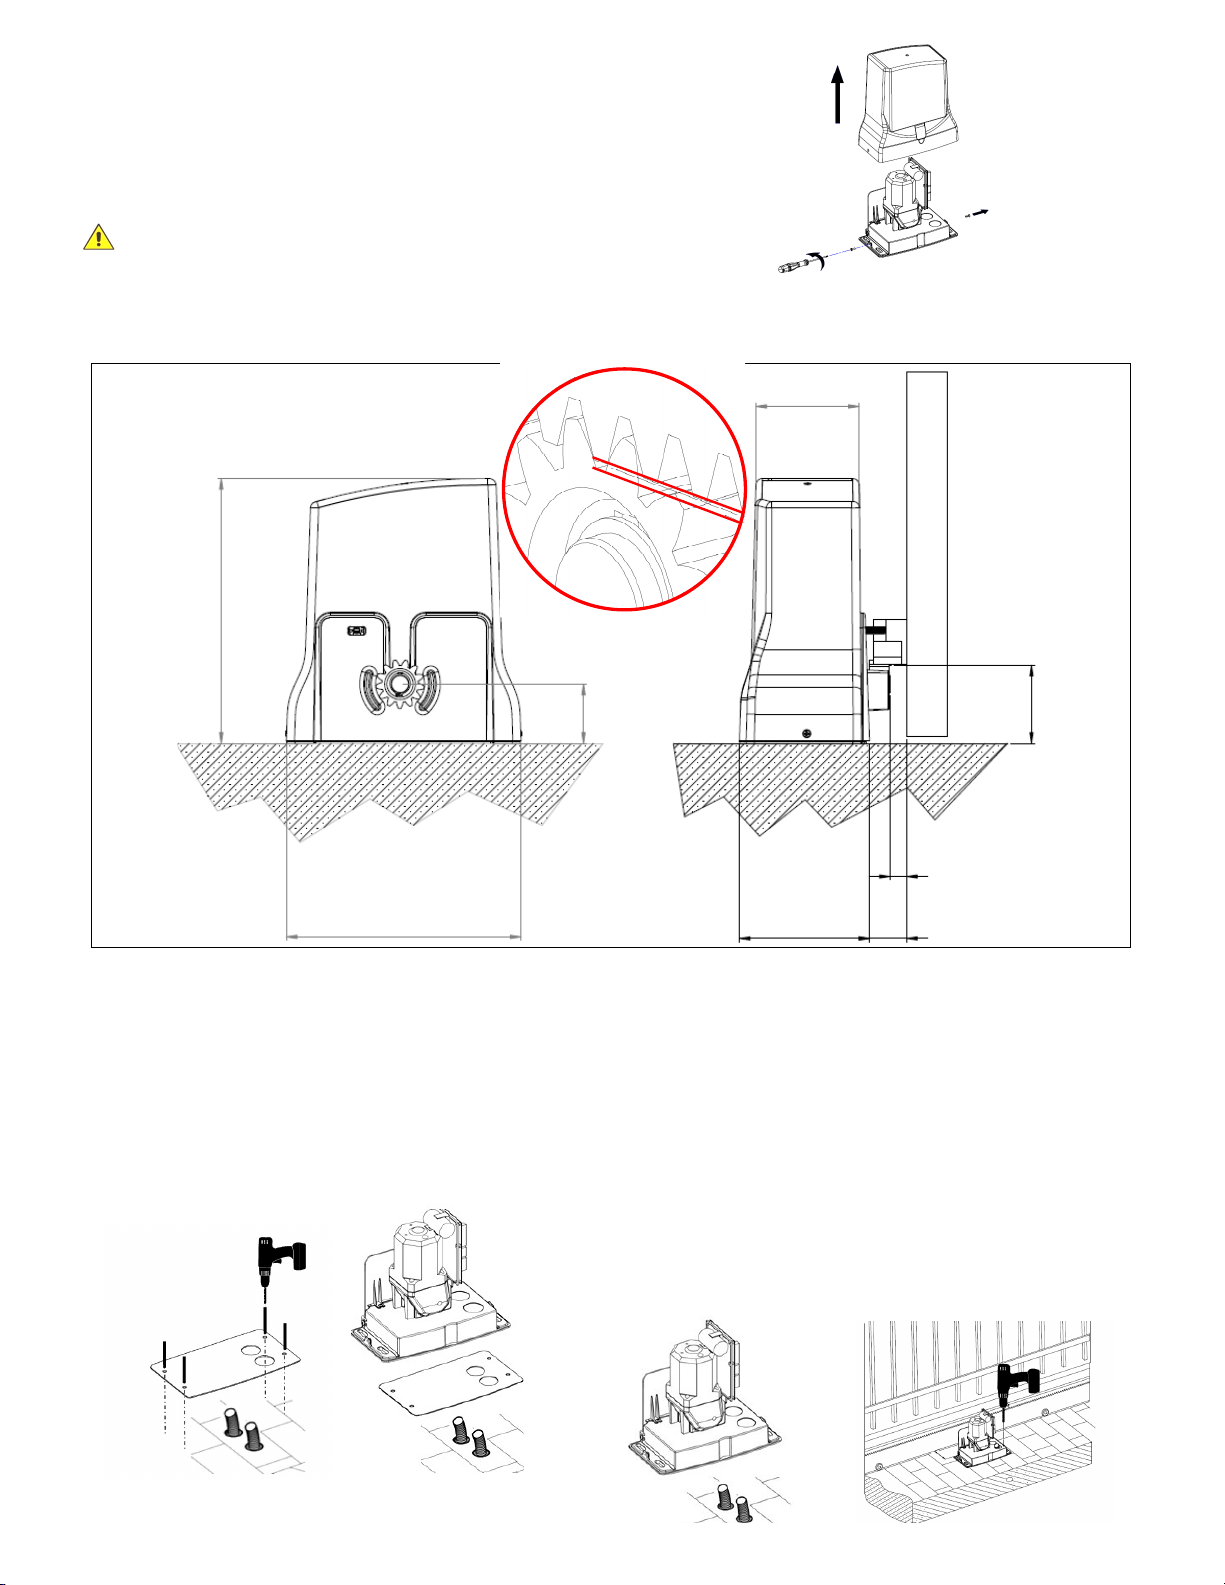
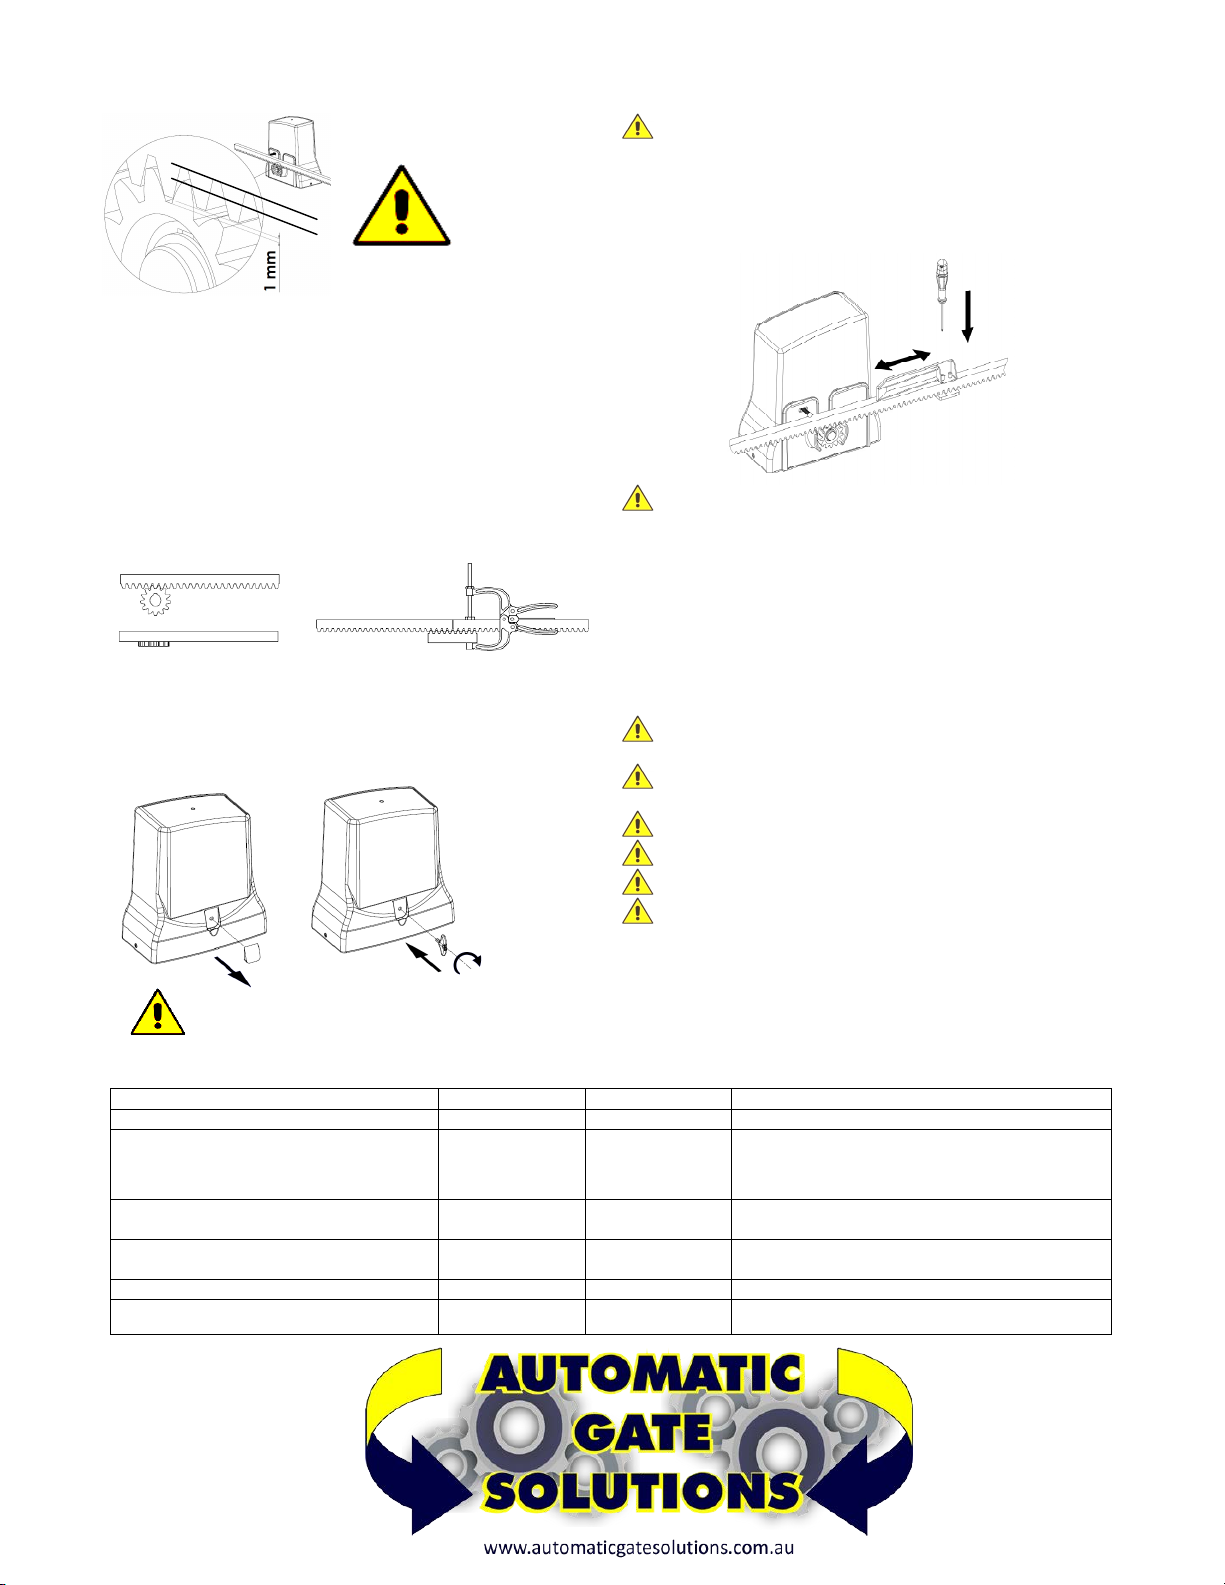
Install the gear motor on gates that conform to EN 12604.
Perform the measure of strength developed by the gear motor and
take the appropriate steps as per EN 12445.
Positioning photocells: These safety devices must be installed at a
height not exceeding 70cm from the ground and at a distance from the
floor movement of the door of no more than 20cm. Their proper
functioning of the photocells must be verified at the end of installation
according to Section 7.2.1 of EN12445.
Keep the activation controls of automation out of reach of children.
The controls should be installed at a minimum 1.5m height above the
ground and outside the range of actions of moving parts such as the
gate.
All activation actions must be executed only at points from where
the automation is fully visible.
Operate the remote only in view of automation.
Store carefully this manual in a suitable place known to all
interested people.
Any unauthorized and arbitrary modification made to this product,
releases the company GR SISTEMI AUTOMATICI DI APERTURA Srl
and from any liability resulting from damage or injury to things, people or
animals.
The non-observance of regulations and of safety standards here
listed releases the company GR SISTEMI AUTOMATICI DI APERTURA
Srl from any liability resulting from damage or injury to things, people or
animals.
The automation must be coupled to a control board equipped with
torque regulation that provides an anti crushing safety as described in EN
12453 - EN 12445
CONFORMITY DECLARATION:
It’s in accordance with Machine Directive 39/89/CE and following modify.
It’s in accordance with the following directive CE:
Electromagnetic compatibility Directive 89/336/CEE and following modify.
Low tension Directive 73/23/CEE and following modify.
Have been applied the following harmonized norms:
EN292/1/2, EN 294, EN60335-1, UNI EN 12453, and what applicable of
the EN12445-2000.
Castiglione d/St. 05-10-2020
DISMANTLING / REINSTALLING
This product falls within the scope of the Directive 2012/19 / EU
concerning the management of waste electrical and electronic equipment
(WEEE). The appliance must not be disposed of with domestic waste as
it is made of different materials that can be recycled at the appropriate
facilities. Inquire through the municipal authority regarding the location of
the ecological platforms to receive the product for disposal and its
subsequent correct recycling. Furthermore, it should be remembered
that, upon purchase of an equivalent appliance, the distributor is obliged
to collect the product for disposal free of charge. The product is not
potentially dangerous for human health and the environment, not
containing harmful substances, but if abandoned in the environment
negatively impacts on the ecosystem. Read the instructions carefully
before using the appliance for the first time. It is recommended that you
do not use the product for any purpose other than that for which it was
intended, there being a danger of electric shock if used improperly.
The crossed-out bin symbol, on the label on the appliance,
indicates the compliance of this product with the
regulations regarding waste electrical and electronic
equipment. Abandonment in the environment of the
equipment or illegal disposal of the equipment is
punishable by law.
To dismantle or reinstall the automation elsewhere, you need to:
1 - Disconnect the power supply and disconnect the electrical system.
2 - Remove the control panel and all the components of the installation.
In the event that some components are damaged or unable to be
removed, replace them.
SAFETY RULES
During the installation and the use of the automation, pay attention to the
following safety rules:
Distance security!
Mechanisms moving!
Do not install automation in an environment saturated with explosive
mixtures!
Electric Shock!
Use gloves!
Use welding glasses!
Maintain ear protection!
USE OF THE AUTOMATION
The gearmotor GR6-8 was designed and built for the opening of gates
with weight max. 800kg. G.R. Srl assumes no responsibility for a
purpose other than that provided by gearmotor GR6-8. Since automation
can be put into motion in view by button or remotely by remote control, it
is essential to check frequently the perfect efficiency of all safety devices.
It is advisable to check periodically (every six months) the regulation of
electronic friction of which must be equipped the electronic control board.
TECHNICAL DATA
GR6 12V GR8 12V
MAX. weight of the gate
600Kg 800Kg
Power supply
12Vdc 12Vdc
Nominal power
190W 350W
Absorption
2.6A 2,5A
RPM
1400 1400
Torque
13,4Nm 21,2Nm
Gate speed
10,2m/min 10,2m/min
Thermal protection
150°C 150°C
Working temp.
-20°C +60°C -20°C +60°C
Lubrication
GREASE GREASE
Protection IP
IP44 IP44
Use frequency
65% 65%

PRELIMINARY CHECKS
– Read the instructions in the manual carefully.
– Check that the gate is perfectly horizontal
– Check that it slides smoothly and without friction points
–
Check that there is an adequate base for fixing the motor, otherwise
prepare it
– Check that the electrical system complies with the characteristics
required
by the gearmotor
The gearmotor is delivered UNLOCKED
– Remove the motor from the box, check that it is not damaged. Unscrew
the screws A and B and remove the cover FIG.1
INSTALLATION
A = 105mm = VERTICAL DISTANCE BETWEEN THE TEETH OF
THE RACK AND THE GROUND
B = 20mm= HORIZONTAL DISTANCE BETWEEN THE DRIVE
WHEEL AND THE GATE
C = 55mm = HORIZONTAL DISTANCE BETWEEN THE BASE OF
THE MOTOR AND THE GATE
FOUNDATION PLATE (OPTIONAL)
If the base has yet to be prepared and the installation of the motor is
not immediate, it is possible to cement the foundation plate (NOT
INCLUDED) following the installation dimensions FIG.2
– Position the foundation plate as shown in FIG. 3
GEARMOTOR POSITIONING
If there is a concrete base already prepared, it is possible to install the
motor, without using the foundation plate, following the installation
dimensions in FIG. 2. In this case, suitable M10 screw anchors must
be used
– Position the motor so that the cable outlets correspond to the
appropriate holes on the motor body. FIG. 4
– Secure the motor to the ground with suitable anchors, using the
slots provided FIG. 5.
Or if the foundation plate is installed, fix the motor to the 4 log bolts
provided as shown in FIG.3.
A
B
FIG. 3
C
325
mm
288
mm
72
mm
155
mm
125
mm
FIG. 2
FIG.1
FIG.4
1,0mm
FIG.5

INSTALLING THE RACK
If the rack is already installed, check that there is a space of
approximately 1mm between the drive wheel and the rack FIG.5,
if the rack is not installed, proceed as follows:
–Take the first piece of rack and position it on the motor sprocket
making sure that at the end of the installation there is always 1mm of
space (if necessary use temporary shims under the motor). Slide it to
the point indicated in FIG. 5
– Weld or screw the first pin or spacer to the gate (depending on the
type of rack).
– Apply all the other elements of the rack so that they are perfectly
joined and aligned with the first one. Use pliers and a piece of rack for
perfect alignment of one element with the other. See FIG. 6
EMERGENCY RELEASE
To unlock the motor proceed as follows:
– remove the cap D
– Insert the supplied key E and turn CLOCKWISE for 4 turns FIG.7
– To overturn the motor turn ANTICLOCKWISE for 4 turns
FINAL OPERATIONS
Once the rack and motor have been fixed, release the motor see
FIG.8, and move the gate to check that it slides freely and effortlessly.
ATTENTION vérifier qu'il ne "repose" pas sur la roue motrice du
moteur. Dans ce cas, réglez la crémaillère pour laisser environ 1 mm
d'espace entre le pignon du moteur et la crémaillère
– Install the limit switch cams on the rack FIG. 8 without fixing them in
a definitive way, in order to be able to adjust them in the optimal
position when programming the control unit.
CAUTION The limit switch cams are used to operate the limit
switches of the motor which, by means of the control unit, interrupt the
movement of the gate during opening and closing. They must be
positioned at the ends of the rack taking into account any inertia and
the delay in stopping the gate with respect to the operation of the limit
switches.
– Proceed with the electrical connections, program the control unit,
carry out the final test and reinstall the cover cards.
SCHEDULED MAINTENANCE WARNINGS
Before any maintenance operation, disconnect the power using
the main switch
The equipment must be maintained in such a way as to maintain
the conditions that guarantee safety and correct operation
Always use original spare parts
Do not carry out any interventions that modify the machine
The modified machine needs a new CE mark
The adjustment of the function of the automation must be carried
out by specialized personnel, in compliance with the relevant
regulations. During these operations the presence of two operators is
expected
SCHEDULED MAINTENANCE - OPERATIONS
DESCRIPTION FREQUENCY ENTRUSTED OPERATION
Photocells cleaning Monthly Operator Clean with damp cloth
Control of the gate supports of the fall arrest
devices, the limit stops, the rack, the sliding
guide and the sliding of the gate
According to
necessity
Operator Check the integrity of all items, state of welds and
corrosion. Unhook the motor and check the friction
points of the gate and the distance between the
pinion and rack (1.0mm).
Control of the sensitivity of the electronic
clutch (torque regulation) of the control unit
Semiannual Technician Check the torque adjustment as indicated in the EN
12453 - EN 12445 standard
Control of the IP protection Semiannual Technician Check that there are no traces of moisture or water
inside the electrical enclosures
Monitoring current dispersion Annual Technician Verify that the dispersion of current is less than 7.5 A
Control of signals Semiannual Operator Verify that the safety warning signage is complete
and intact
FIG. 5
FIG. 6
FIG.8
D
4 TURNS
CAUTION DO NOT RE-LOCK THE MOTOR WHILE
IT‘S RUNNING
FIG.7
E

Mod. IO40/EN - rev. 01
ID410
CONTROL BOARD FOR1 MOTOR12-24V
IMPORTANT: READ CAREFULLY THIS MANUAL BEFORE THE INSTALLATION. THIS MANUAL IS INTEGRAL PART OF
YOUR PRODUCT, KEEP IT FOR REFERENCE.
Warnings:
First of all verify that this product is suitable for the installation.
Read carefully technical characteristic before the installation.
Installation of this control unit must be properly done by qualified installers, following rules and regulations of
installation country.
It's mandatory do periodic maintenance each 6 month.
Maintenance or repairing must be done by qualified Technicians.
Turn power off before maintenance or repairing.
This device is intended for gate automation, any other applications is strongly advised.
Not respecting of rules may cause serious damage to peoples, animals, things.
Manufacturer discharges all responsibility for missed respect of rules.
Don't let this control unit unattended or where children can reach
Preliminary checking: Before to install this control unit,
Verify that all the connected devices respect the technical characteristics mentioned in the table which follows.
Verify that a working and suitable life switch is installed upline the installation.
Verify that cables composing the installation, are suitable for it.
This product falls within the scope of the Directive 2012/19 / EU concerning the management of waste electrical and
electronic equipment (WEEE). The appliance must not be disposed of with domestic waste as it is made of different
materials that can be recycled at the appropriate facilities. Inquire through the municipal authority regarding the
location of the ecological platforms to receive the product for disposal and its subsequent correct recycling.
Furthermore, it should be remembered that, upon purchase of an equivalent appliance, the distributor is obliged to
collect the product for disposal free of charge. The product is not potentially dangerous for human health and the
environment, not containing harmful substances, but if abandoned in the environment negatively impacts on the
ecosystem. Read the instructions carefully before using the appliance for the first time. It is recommended that you
do not use the product for any purpose other than that for which it was intended, there being a danger of electric
shock if used improperly.
The crossed-out bin symbol, on the label on the appliance, indicates the compliance of this
product with the regulations regarding waste electrical and electronic equipment.
Abandonment in the environment of the equipment or illegal disposal of the equipment is
punishable by law.
G.R. SISTEMI AUTOMATICI DI APERTURA S.R.L.

The manufacturer:
Declares:
The control unit ID410 is compliant to following
directives:
- 2006/95/CE Low voltage directive.
- 2004/108/CE Electromagnetic compatibility.
Castiglione 10-01-2023
TECHNICAL CHARACTERISTICS
Power Supply
12-20Vac/100-200VA
Max. Current out (14-15)
250mA
Max. Current Low power out LPW
250mA
Embedded Battery charger
12/24V 100mA
Max motor current
16A (200VA transformer)
Max flashing light current
1A
Operating temperature range
-5 +60°C
Backup battery
(2x) 12V 4.5Ah / (1x) 12V 7Ah
Max codes
250
88

1
Antenna
16-17
Low power supply output 12Vdc 250mA (off in
standby and gate closed).
2
Antenna's shield
18-19
Flashing light output (12/24Vdc, 1A, according to
transformer output). With blinking or fix output. A
very slow blinking it alerts for power failiture.
3
Start input N.O. or Open input N.O. (See menu
operative logic“OL”).
It completely opens the gate
20-21
Motor output.
4
Start Pedestrian input N.O. or Open input N.O.
(See menu operative logic “OL”).
It opens just 1 meter
TR1
Slowing down speed trimmer.
5
Common
TR2
Obstacle detection sensibility trimmer.
6
Photocells input N.C. or N.O (see advanced menu
“PC”).
During pause: Reloads pause
During closing: Reverses motors direction
TR3
Slow down time trimmer.
7
Photostop input N.C. or Detect input N.O. (see
advanced menu “5F”).
During pause: Reloads pause
During closing: Reverses motors direction
During opening: stops the motors and waits till
contact returns close.
TS1-TS3
Buttons up/down
8
Closing Edge input (see advanced menu “EC”).
Waiting an opening command: inhibits opening
During opening: reverses motor direction for 1
second.
If not used left unconnected.
TS2
Enter button
9
Common
DSP
Display
10
Limit Switch open. Letting unconnected both limit
switches they are automatically disabled
FS3-FS4
Transformer input 12-20Vac / 100-200VA
11
Limit Switch close. Letting unconnected both limit
switches they are automatically disabled.
F2
Battery fuse 10A Fast
12
Stop input NC or NO (see advanced menu 5P), or
Opening edge input (see advanced menu “Eo”).
13
Common
FS1-FS2
Backup battery input 12/24Vdc
14-15
Aux power supply output 12Vdc 250mA.
JP1
Charger voltage selector for backup battery:
12/24Vdc
INPUT STATUS
When the control unit is in standby, user can read inputs status on display:
--
No inputs active.
5T
Start input active.
5p
Stop input active.
PD
Pedestrian input active.
P5
Photostop input active.
op
Open input active.
EO
Analog edge opening input active.
CL
Close input active.
EC
Analog edge closing input active.
fO
Limit switch open.
DT
Detect input active.
fC
Limit switch close.
pc
Photocells input active.
During pause, the display show the seconds countdown to closing.

TRIMMER SETTINGS
TR1 Slow down speed trimmer regulates the slow down speed. Do not set speed to low (less than 10cm/sec on the wing
edge) to avoid that gate stops in too cold conditions.
TR2 Obstacle sensibility trimmer fine tunes the obstacle detection level learned by the control unit during working times
programming. This fine regulation must be do after working times learning.
TR3Regulates the slowdown time lasting.
Attention: during first 2 seconds after start, the motor pushes at 100% of is power (Boost power).
SLOWER
FASTER
TR1 SLOWING DOWN SPEED
PUSH LESS
PUSH
MORE
TR2 OBSTACLE DETECTION
SHORTER
SLOWDOWN
LONGER
SLOWDOWN
TR3 SLOWDOWN TIME
USE OF DOWN MENU AND UP BUTTONS FOR PROGRAMMING
Control unit function programming is made within a special configuration menu, to which
you can access and where you can shift through DOWN, MENU and UP keys placed under
the display.
The configuration menu consists in a list of configurable items; the display shows the
selected item.
• By pressing DOWN, you will pass to the next item
• By pressing UP, you will return to the previous item
• By pressing together UP and DOWN buttons you exit from the item
• By pressing MENU, you can view the current value of selected item and possibly change
it.
There are 2 main menus:
- BASE PROGRAMMING (MAIN MENU): only the useful parameters for a base
programming are displayed.
- ADVANCED PROGRAMMING (ADVANCED MENU): parameters of the advanced menu are
displayed.
UP
ENTER
DOWN
BOARD PROGRAMMING
Quick installation
Put the automation completely closed before starting the learning procedure, the equipment will recognize the active limit
switch as a closing limit switch, and will set the direction parameter automatically (See parameter "GD" in the advanced menu)
Quick radio code learning:
Push DOWN button, “C1” will appear on display. Transmit with the remote to be learn as Start or Open command
(according to “OL” menu). Push more time DOWN to select other channels (C1 – Start/Open, C2 – Pedestrian/Close,
C3 – Courtesy light on).
Quick radio code erasing:
Hold down DOWN button up to on display it appears “OK” (5 seconds about), then release the button. All codes are
now erased.
Transmitters auto learning:
It's possible to learn transmitters quickly without using the base menu. To insert a new transmitter, transmit 3 times with
the new remote, making at least 1 second pause between each transmission. Then transmit 3 times with a transmitter already
in memory and then once with the new. When programming is done, the blinker flash once.
Attention: function must be enabled, refer to “advanced menu” - auto learning transmitters. The new code takes the same
channel as the one used to insert it.
Mass entering mode.
In this mode, if you push 5 times Open command (example), the control unit count 5 cars passing through the detect sensor,
then it closes the barrier. This mode must be enabled in advanced menu (MM). This mode can be enabled just when pause time
is 0, this means when automatic closing is disabled.

MAIN MENU
Push Enter button shortly, on the display will appear OL. With up/down it's possible to select all items in this menu. To exit this
menu select EX or push up and down together. After 20 seconds without actions, control unit exits itself from this menu.
MAIN MENU MAP
PRESS SHORTLY
oL Operating logic
5T
Step by step logic.
At
Step by step with automatic closing.
CD
Automatic closing for condominium function.
OC
Open / Close mode (Start and Pedestrian inputs
become Open and Close inputs).
oa
Open / Close mode with automatic closing (Start and
Pedestrian inputs become Open and Close inputs).
EX
EXIT or push together
LC
Learning/
removing
transmitters
C1
Learn Start / Open command (according to Ol menu).
C2
Learn Pedestrian / Close command (according to Ol
menu).
C3 Learn Courtesy light (see advanced menu LX).
C4 STOP command
NOTE: Each time a code is learnt, on the display is shown
the memory position for a while
rt
Removing a remote transmitting its own code.
rN
Removing a remote according to memory position.
rA Removing all the remotes, must confirm with “Y5”
EX
EXIT or push together
LT Learn working times
Attention: if you are not sure of the direction
of the sliding/barrier, put
the automation
completely closed
before starting the learning
procedure, th
e equipment will recognize the active
limit switch as a closing limit switch, and will set the
direction parameter automatically (See parameter
"GD" in the advanced menu)
If the gate/barrier is not fully closed, the equipment
will close it in search of the closing limit switch.
Subsequently, the equipment will open the
gate/barrier until it is completely open and finally
close it one last time.
The flashing light stays ON while learning the work
times.
EX
EXIT or push together
5P Set pause time
0 –99
5P Set pause time: Use up/down to set the pause time between 0 and 99 seconds. Push enter to
confirm. To exit without modifications push together up and down.
Attention, setting a pause time doesn't enables automatic closing, please refer to chapter “OL
operating logic” to enable this function
F5 Fast Speed
Set max. speed 3 –10
DM Dead man mode
Op
Open motor
Cl Close motor

EX EXIT or push together
EX Exit
ADVANCED MENU
To enter advanced menu hold down enter button 4 seconds, till on display it appear TM. With up/down it's possible to select all
items in this menu. To exit this menu select EX or push up and down together.
After 20 seconds without actions, control unit exits itself from this menu.
ADVANCED MENU MAP
4 SEC.
tm Working times
T1 Working time in seconds
0 –99
TP Pedestrian time
tc Courtesy light time (x 10 sec)
ex EXIT or push together
Attention: For the motors times you can set time longer than 2 digits. When the value is over
100 the decimal dot point of 2nd digit will be on.
Example: 15. = 115.
When the value is over 200 both the the decimal dots are on.
Example: 1.2. = 212.
gd Gate direction
Rh Gate direction RIGHT
Lf Gate direction LEFT
ex
EXIT or push together
Attention: if you aren't sure about the direction of the gate, set the gate fully closed before to
start the working time learning(See working time programming)
PC Photocell mode
NC Normally close
No Normally open
ex
EXIT or push together
Attention: Rules of several countries forbit to use safety systems with N.O. Output. Please be
sure of safety regulations of your country before to modify this parameter.
5p Stop mode
NC Normally close
No Normally open
ex
EXIT or push together
Attention: Rules of several countries forbit to use safety
systems with N.O. Output. Please be
sure of safety regulations of your country before to modify this parameter.
L5 Limit switches
mode
NC Normally close
No Normally open
ex
EXIT or push together
5f Safety input mode
P5
Photostop mode N.C. (Photocell operating in opening
mode too)
dt
Detect mode N.O.(Photocell for rapid close after the
car has passed through the gate)
ex
EXIT or push together

Eo Opening edge
D5 Edge input disabled, this inputs works as STOP.
no Edge input in Normally Open mode.
nc Edge input in Normally Close mode.
an Edge input in 8K2 analog mode.
5p Transform the opening edge input in STOP input
ex
EXIT or push together
ec Closing edge
D5 Edge input disabled, this inputs works as STOP.
no Edge input in Normally Open mode.
nc Edge input in Normally Close mode.
an Edge input in 8K2 analog mode.
ex
EXIT or push together
55 Soft start
Y5
Soft start enabled.
nt
Soft start disabled.
ex
EXIT or push together
bl Blinker mode
Y5
Blinker light with flashing output.
nt
Blinker light with fix on output.
ex
EXIT or push together
lh Light mode
cr Light output as courtesy light.
0g Light output as open gate light.
gr Light output as traffic light.
ex
EXIT or push together
D2 Reset to factory
defaults
Y5
Selecting Y5 the factory default are restored.
Attention:
This function doesn't delete radio
codes.
nt
Maintain settled parameters
ex
EXIT or push together
ar Automatic remotes
learning
Y5
Automatic remotes learning enabled.
nt
Automatic remotes learning disabled
ex
EXIT or push together
rm Radio mode
1b
Each radio button is learned separate.
The installer can choose how to learn a code: (C1
Start/Open, C2 Pedestrian/close).
4b
Learning a button of a remote, let all the other 3
buttons being learn automatically.
ex
EXIT or push together
cn Cycles counter
- Shows cycle counter in 3 group of 2 digits.
Example: 123.456 is shown as: 1.2 - 34. - 56
ex
EXIT or push together

mm Mass mode
Y5
Enables the Mass entering mode
nt
Disables Mass mode
ex
EXIT or push together
MM MASS MODE - In this menu you can enable the mass enter mode. This mode can be enabled just
when pause time is 00, this means when automatic closing is disabled. In this mode, if you push 5 times
Open command (example), the control unit count 5 cars passing through the detect sensor, then it
closes the barrier.
br Barrier mode
Y5
Enables Barrier mode.
nt
Sliding gate mode.
ex
EXIT or push together
EX Exit
MAIN MENU QUIK TABLE
DISPLAY DESCRIPTION DATA DESCRIPTION DEFAULT DATA
oL Operating logic
5T
Step by step logic. 5T
At
Step by step with automatic closing.
CD
Automatic closing for condominium
function.
OC
Open / Close mode (Start and Pedestrian
inputs become Open and Close inputs).
oa
Open / Close mode with automatic
closing (Start and Pedestrian inputs
become Open and Close inputs).
EX
EXIT
LC
Learning/
removing
transmitters
C1
Learn Start / Open command (according
to Ol menu).
-
C2
Learn Pedestrian / Close command
(according to Ol menu).
C3
Learn Courtesy light (see advanced menu
LX).
C4 STOP command
rt
Removing a remote transmitting its own
code.
rN
Removing a remote according memory
position.
rA
Removing all the remotes, must confirm
with “Y5”
EX
EXIT
LT Learn working
times
Working time learning procedure -
EX
EXIT or push together
5P Set pause time
0 –99
10
F5
Fast Speed Set max. speed
3 –10
10
DM Dead man mode
Op Open motor -
Cl
Close motor
EX
EXIT

MAIN MENU QUIK TABLE
DISPLAY
DESCRIPTION
DATA
DESCRIPTION
DEFAULT
DATA
tm Working times
T1 Working time in seconds 180
TP Pedestrian time 08
tc Courtesy light time (x 10 sec) 12
ex EXIT
gd Gate direction
Rh Gate direction RIGHT rh
Lf Gate direction LEFT
ex EXIT
PC Photocell mode
NC Normally close nc
No Normally open
ex EXIT
5p Stop mode
NC Normally close nc
No Normally open
ex EXIT
L5 Limit switches
mode
NC Normally close nc
No Normally open
ex EXIT
5f Safety input
mode
P5
Photostop mode N.C. (Photocell operating
in opening mode too)
dt
Detect mode N.O.(Photocell for rapid close
after the car has passed through the gate)
dt
ex EXIT
Eo Opening edge
D5
Edge input disabled, this inputs works as
STOP.
D5
no Edge input in Normally Open mode.
nc Edge input in Normally Close mode.
an Edge input in 8K2 analog mode.
5p
Transform the opening edge input in STOP
input
ex EXIT
ec Closing edge
D5
Edge input disabled, this inputs works as
STOP.
D5
no Edge input in Normally Open mode.
nc Edge input in Normally Close mode.
an Edge input in 8K2 analog mode.
ex EXIT
55 Soft start
Y5
Soft start enabled. Y5
nt
Soft start disabled.
ex EXIT
bl Blinker mode
Y5
Blinker light with flashing output.
yh
nt
Blinker light with fix on output.
ex EXIT
lh Light mode
cr
Light output as courtesy light. cr
0g Light output as open gate light.

gr Light output as traffic light.
ex
EXIT
D2 Reset to factory
defaults
Y5
Selecting Y5 the factory default are
restored.
Attention:
This function doesn't
delete radio codes.
-
nt
Maintain settled parameters
ex
EXIT
ar
Automatic
remotes
learning
Y5
Automatic remotes learning enabled.
nt
Automatic remotes learning disabled nt
ex
EXIT
rm Radio mode
1b
Each radio button is learned separate.
The installer can choose how
to learn a
code: (C1 Start/Open, C2
Pedestrian/close).
1b
4b
Learning a button of a remote, let all the
other 3 buttons being learn automatically.
ex
EXIT
cn Cycles counter - Shows cycle counter in 3 group of 2 digits.
Example: 123.456 is shown as: 1.2 - 34. - 56 -
ex
EXIT
mm Mass mode
Y5 Enables the Mass entering mode
nt
Disables Mass mode nt
ex
EXIT
br Barrier mode
Y5
Enables Barrier mode.
nt
Sliding gate mode.
nt
ex
EXIT

GENERALSOLARNOTES
SOLAR PANEL SIZE
Generally speaking simple automatic gate installations will work perfectly in Australia using a 10 watt solar panel. The solar panel size
determines the amount of energy you can collect each day. In a simple gate installation we need to collect enough energy to power our
control board and run the gate and a 10 watt panel will do this. If however the installation is to include keypads, safety beams or other
power hungry devices it may be necessary to increase the solar panel size. Another example where you may wish to consider upsizing
your solar panel is where you may have a partially shaded area and you need to collect your energy each day in a shorter period of time. If
you do decide to increase the size of your solar panel it may be necessary to install a simple regulator to protect your battery. Check with
Automatic Solutions regarding this.
SOLAR PANEL DIRECTION
Your solar panel ideally should be mounted at an angle of 35 degrees and facing north (NB: In Australia).
NORTH
BATTERYSIZE
The battery stores theenergy that you collect each day and your systemdraws on this battery to operate. All batteries have a limit to their
storage capacity and can therefore only store enough energy to last our systema certain period of time. What happens if we have for
example three days with little or no sunlight, very dark and overcast days? Our battery capacity reduces. The size of the battery will
determine the number of days we can have as backup or how many days our systemcan survive without charging. In general terms bigger
is better.
CABLES
Cables must be low voltage cables (5mmis good). Length of cables must be kept to a minimum. Ideally the solar panel will be no more
than 10 metres from the battery and the battery will be no more than 5 metres fromthe motor. Connections must be clean and good quality.
If using a regulator go
solar panel to regulator,
regulator to battery and
then battery to control
board. Do not take the
board to the regulator.
If using a regulator go
solar panel to
regulator,
regulator to battery and
then battery to control
board. Do not take the
board to the regulator.

+ -
+ This side
12/24V
Battery
MPPT Regulator
(Optional, if not
assem led connect
Panel to attery)
12/24V
Solar Panel
Fuse 10A (slow)
Solar Panel Connection ID400

Need some help or advice with your installation?
Keep this sheet handy because you might need this email address –
service@automaticsolutions.com.au
Internet and technology give us the ability to have a technician look at your install and help
solve problems whether they are the initial installation or years later.
1. Don’t start dismantling anything until advised.
2. Email the service department at the address above.
SEND US YOUR PHOTOS AND GIVE US SOME EYES ON SITE
•Photo of the overall scene – we should be able to see the whole gate/s in this one photo.
•A couple of photos of the gate hinges (if swing gates).
•Photos of both opening stops and closing stops.
•Photo of the connections to any battery.
•A couple of photos of the control board wiring.
•Any other shots you think important.
NB: Please resize your photos before emailing.
Please attach photos as attachments and do not imbed them in the email.
This manual suits for next models
4
Table of contents
Other GR Gate Opener manuals
Popular Gate Opener manuals by other brands

Chamberlain
Chamberlain LiftMaster Professional SW420 Installation and maintenance instructions

Allmatic
Allmatic PLUS 24V manual

CAME
CAME FROG series manual

Comunello Automation
Comunello Automation LIWIN instruction manual

GDS
GDS GDS 550P Series Installation and maintenance manual

BYOU
BYOU FREEDOM Instructions and Recommendations for installation and use