manuals.online logo
Brands
  1. Home
  2. •
  3. Brands
  4. •
  5. Graff
  6. •
  7. Plumbing Product
  8. •
  9. Graff 7080 User manual

Graff 7080 User manual

For easy installation of your Para la instalación fácil de su producto
GRAFF product you will need: de la GRAFF usted necesitará:
to READ ALL the instructions completely before beginning, LEER TODAS las instrucciones completamente antes de comenzar,
to READ ALL the warnings, care and maintenance information. LEER TODA la información sobre las advertencias,
To complete the project, you should: cuidado y mantenimiento.
gather the tools and all the parts you will need, Para terminar el proyecto, usted debe:
mount trim and test operation. recolectar las herramientas y todas las piezas que usted necesitará,
You should have the following tools: montar el acabado decorativo de la válvula y la prueba de
funcionamiento.
adjustable wrench,
Usted debe tener las herramientas siguientes:
adjustable pliers,
llave ajustable,
screwdriver.
alicates ajustables,
destornillador.
 
 

 







~
ESPANOL
ENGLISH
IOG 2810.20 1
Dear Customer Estimado Cliente
Thank you for selecting our product. We are confident we can fully satisfy Muchas gracias por elegir nuestro producto. Estamos seguros que podemos
your expectations by offering you a wide range of technologically advanced satisfacer completamente sus expectativas ofreciéndole una amplia variedad
products which directly result from our many years of experience in faucet de productos tecnológicamente avanzados que resultan directamente de
and fitting production. muchos años de experiencia en grifos y su producción apropiada.
ENGLISH
~
ESPANOL
For care, use soft towel with soap and water only! Under no
circumstances should you use any chemicals. For products
with decorative finishes please be extra careful not to
damage, scuff or ruin the finish during the installation and
cleaning!
ATTENTION! ATENCIÓN!
Para el cuidado, utilice solamente una toalla suave con jabón y aqua!
Bajo ninguna circunstancia no use productos químicos. Con los
productos con el acabado decorativo hay que tener un cuidado
especial para no dańar, arańar o destruir el acabado durante su
instalación o limpieza!
This product complies with NSF61/9, ASME/ANSI A112.18.1
and CSA B 125 Standards.
Este o se encuentra conforme con losestandares de NSF61/9,
de ASME/ANSI A112.18.1 y de CSA B 125.
product Installation Instructions  Instrucciones de Instalación
PRESSURE BALANCE TUB & SHOWER
LA DUCHA CON GRIFO DE TINA EQUILIBRANTE DE LA PRESIÓN
Trim Only (without Handle) Trim Only (without Handle)
7090
Model
Modelo
7080
Model
Modelo
Ø5-15/16" (Ø150mm)
5-15/16" (150mm)
5-15/16" (150mm)
Model 7080 - **
Available Handles -
see below
Manillas disponibles -
ver abajo
T4 T6T5 T7 T8 T9
T10T13T3T2
T1
Matching
ATRIA Series
Va con
ATRIA Series
Matching
TRANQUILITY Series
Va con
TRANQUILITY Series
LM25BLM24S
Matching
Series
Va con
M.E., M.E.25 Series
M.E., M.E.25
LM37S
1.1
Rev. 3 May2010
IOG 2810.20 2
This product complies with NSF61/9, ASME/ANSI A112.18.1
and CSA B 125 Standards.
Este o se encuentra conforme con losestandares de NSF61/9,
de ASME/ANSI A112.18.1 y de CSA B 125.
product Installation Instructions  Instrucciones de Instalación
PRESSURE BALANCE TUB & SHOWER
LA DUCHA CON GRIFO DE TINA EQUILIBRANTE DE LA PRESIÓN
Available Handles -
see below
Manillas disponibles -
ver abajo
For 7080, 7090 Models ● Para los modelos: 7080, 7090
T5 T6 T7 T8 T9T4
T10T13T3T2T1
Model 7090 - **
LM40S C9S
Matching
Series
Va con IMMERSION
Series
IMMERSION
LM39S
Matching
QUBIC TRE Series
Va con
QUBIC TRE Series
LM38S
Matching
QUBIC Series
Va con
QUBIC Series
LM31S
Matching
FONTAINE Series
Va con
FONTAINE Series
C10S C14S
Matching
SADE, LUNA Series
Va con TARGA,
SADE, LUNA Series
TARGA,
LM23S
Matching
STEALTH Series
Va con
STEALTH Series
Matching
STRUCTURE,
IMMERSION Series
Va con SOLAR,
STRUCTURE,
IMMERSION Series
SOLAR,
Matching
IMMERSION Series
Va con
IMMERSION Series
T1
T2
T3
T4
T5
T6
T7
T1
T2
T3
T4
T5
T6
T7
T8
T9
T10
T11
T12
T13
T8
T9
T10
T11
T12
T13
~
ESPANOL
ENGLISH
SLEEVE
ELONGATION
COUNTERSUNK SCREW
DIVERTER SWITCH
PLATE WITH SEALING
DIVERTER KNOB
WASHER
CASQUILLO
EXTENSION
TORNILLO
CONMUTADOR DE VÁLVULA
CUBIERTA CON SELLADOR
BOLA DESVIADORA
ARANDELA
NUT
DIVERTER CAP
VALVE COVER
HANDLE
SCREW
TRIM RING „optional use”
TUERCA
TAPA DEL DESVIADOR
CUBIERTA DE VÁLVULA
MANILLA
TORNILLO
ANILLO DEL GRIFO „uso
opcional”
TRIM INSTALLATION  INSTALACIÓN DEL GRIFO DECORATIVO
2.1
1.2
HOT
TUB
SHR
R2
R3 R4 R5 R6
B
A
Temporary Sleeve
Protección temporal
Rev. 3 May2010
ENGLISH
ENGLISH
NOTE: Make sure CHECK STOPS are closed.
SEE FIG. 2.1
When finished wall is completed, remove all referenced items starting by
unscrewing (B) from (A), pulling (A) off, unscrewing (R6), pulling (R5)
out of (R4), and then unscrewing (R4) and (R2).
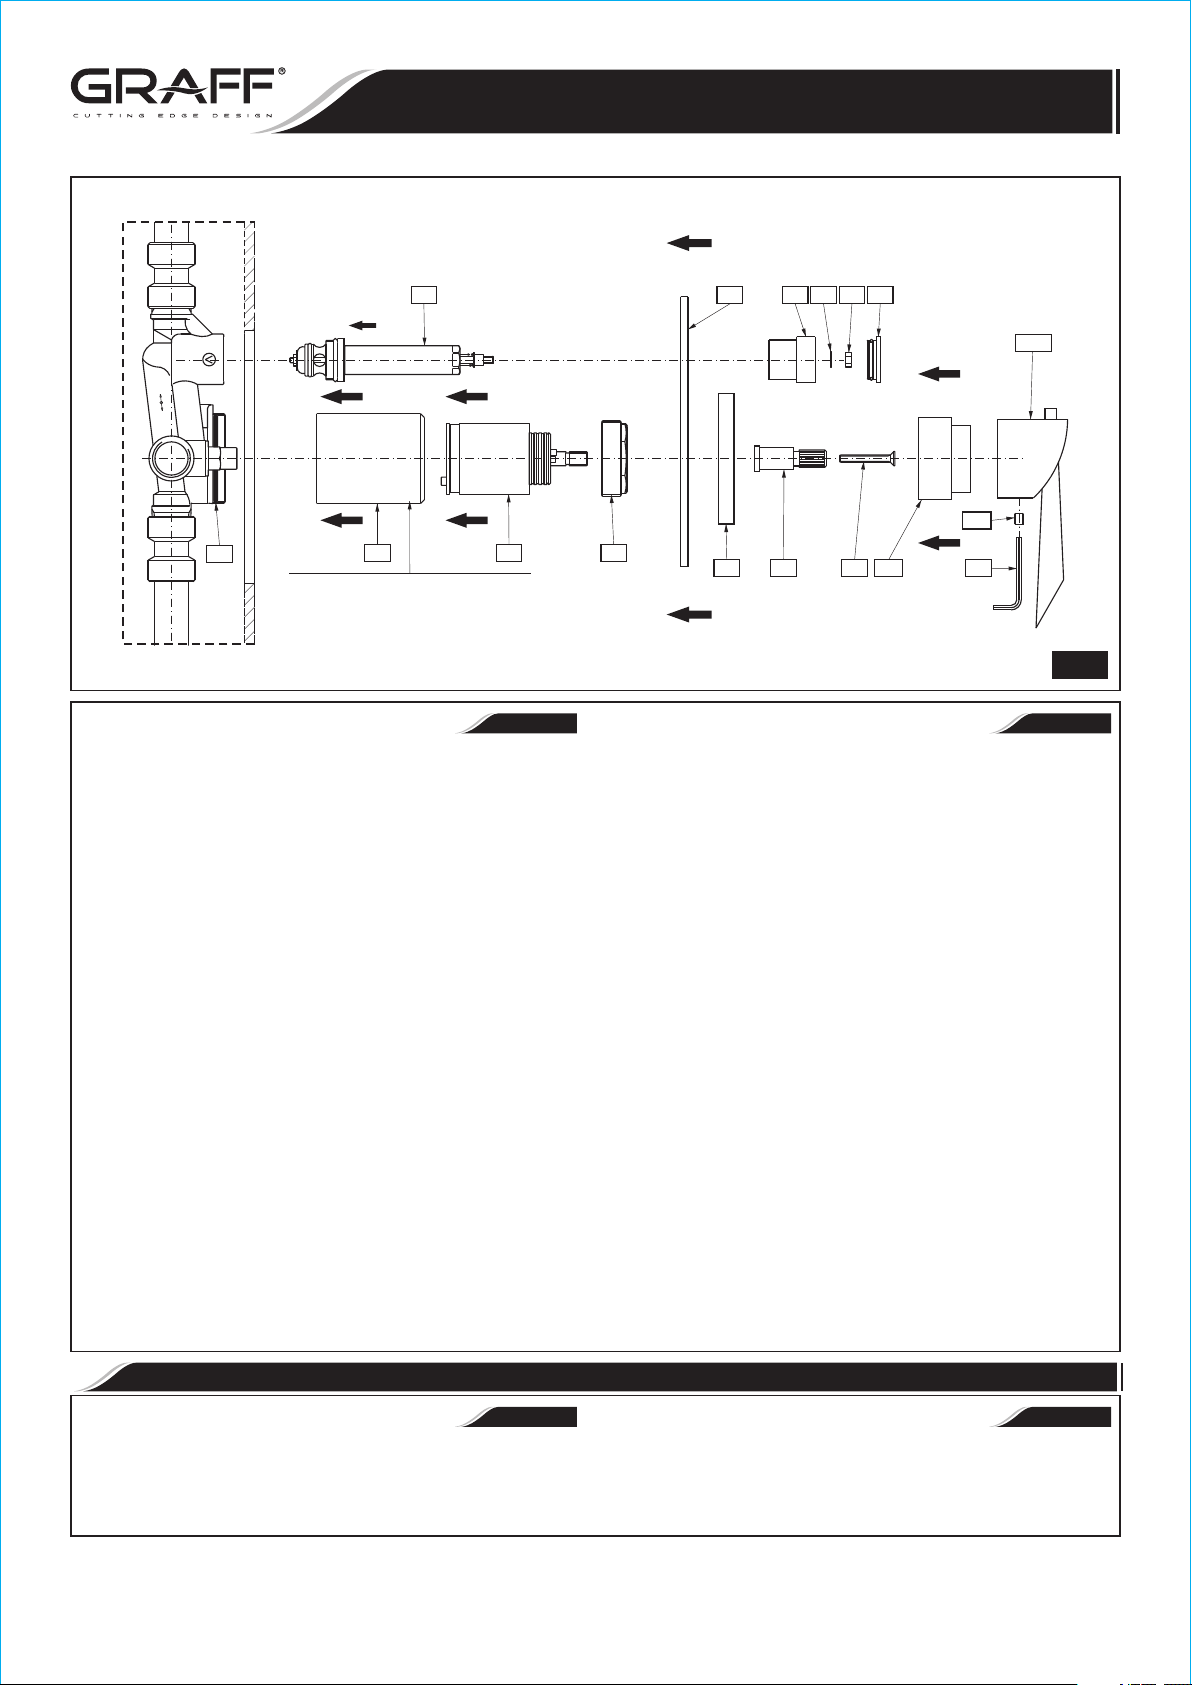
SEE FIG. 2.2
1. Make sure (R3) is seated properly and firmly screw (T1) over it.
2. Place (R5) inside (T1) properly aligning the holes on the bottom of
(R5) to the holes on the rough valve. Screw (R6) into (T1) with a
maximum of 14.76 ft/lbs of torque.
3. Open hot and cold CHECK STOPS by using a flat-bladed screwdriver
and fully turning the screws counter-clockwise.
4. Place non-abrasive PH balanced dish soap around (T1) and (T4).
Make sure the o-rings on (T5) are seated correctly. Apply clear silicon
around the back of (T5) and slide it so (T1) and (T4) fit inside of their
designated holes on (T5). Now push and hold (T5) firmly against
the wall.
(Optional trim ring (T13) is supplied with the trim and can be used to
hold (T4) on the wall.)
5. Push (T2) onto (R5), and screw (T3) in (T2). Screw (T10) onto
(R6), then install (T11*).
6. Remove (T7) and (T8) from (T4). Push (T6) onto (T4), and place
(T7) on (T4), then tighten (T8). Push (T9) into (T6).
* Handle style is dependent on trim series.
NOTE: A stem extension kit G-7050-** is available and sold separately.
The extension kit extends rough in depth by 1-1/2” (38.5mm).
** Designated finish
The red ring (item A fig. 3.1) around the pressure balance cartridge allows
the maximum output temperature to be limited in order to avoid the accidental
scalding. The ring is factory pre-set to the highest setting allowing the greatest
flow of hot water. Adjust the temperature so that it does not exceed
0 0
49 C (120 F).
NOTA: Asegúrese de que las VÁLVULAS DE RETENCIÓN están
cerradas.
VER LA FIG. 2.1
Después de terminar la pared de acabado quite los elementos de referencia
empezando por desenroscar (B) de (A), quitar (A), desenroscar (R6),
quitar (R5) de (R4), y luego desenroscar (R4) y (R2).
VER LA FIG. 2.2
1. Asegúrese de que (R3) está posicionado del modo adecuado y apriete
bien (T1) en él.
2. Coloque (R5) dentro de (T1) del modo adecuado alineando los agujeros
en el fondo de (R5) con los agujeros en la válvula de emportado.
Atornille (R6) en (T1) con el torque máximo de 14.76 ft/lbs.
3. Abra VÁLVULAS DE RETENCIÓN de agua caliente y fría usando el
destornillador plano y girando los tornillos completamente en el
sentido antihorario.
4. Ponga el jabón no abrasivo con el PH equilibrado en (T1) y (T4).
Asegúrese de que la junta tórica en (T5) está bien puesta. Aplique
silicona limpio en la parte posterior de (T5) e introdúzcalo del modo
que (T1) y (T4) se encuentren en los agujeros previstos para ellos en
(T5). Ahora acerque y sujete bien (T5) en la pared.
(Anillo opcional del grifo (T13) es suministrado con el grifo y puede
usarse para sujetar (T4) en la pared.)
5. Introduzca (T2) en (R5), y atornille (T3) en (T2). Atornille (T10) en
(R6), luego instale (T11*).
6. Quite (T7) y (T8) de (T4). Introduzca (T6) en (T4), y coloque (T7)
en (T4), luego apriete (T8). Introduzca (T9) en (T6).
* El tipo del mango depende de la serie del grifo.
NOTA: El juego del caño G-7050-** está disponible y se vende por
separado. El caño se empotra en la profundidad de 1-1/2” (38.5mm).
** Acabado previsto
El anillo rojo (punto A dis. 3.1) alrededor del cartucho del balanceo de la
presión limita la temperatura máxima del agua de salida con el fin de evitar
quemaduras casuales. El anillo está preajustado en la fabrica para permitir la
salida del flujo máximo de agua caliente. Ajustar la temperatura para que
0 0
no supere los 49 C (120 F).
~
ESPANOL
~
ESPANOL
IOG 2810.20 3
This product complies with NSF61/9, ASME/ANSI A112.18.1
and CSA B 125 Standards.
Este o se encuentra conforme con losestandares de NSF61/9,
de ASME/ANSI A112.18.1 y de CSA B 125.
product Installation Instructions  Instrucciones de Instalación
PRESSURE BALANCE TUB & SHOWER
LA DUCHA CON GRIFO DE TINA EQUILIBRANTE DE LA PRESIÓN
2.2
T11*
HOT
TUB
SHR
R3
T4 T5 T8 T9T7T6
T1 R5 R6 T2 T3 KT10
T12
T13
Finished Decorative Threaded Sleeve
Protección roscada decorativa
* Handle style is dependant on series
* El estilo de la manilla depende de la serie
ADJUSTMENT OF TEMPERATURE LIMITING DEVICE  AJUSTE DEL LIMITADOR DE TEMPERATURA
Rev. 3 May2010
Your Graff faucet is designed and engineered in accordance with the highest Su grifo de la Graff está diseñado y dirigido acuerdo con los estándares de
quality and performance standards. Be sure not to damage the finish during funcionamiento y calidad más altos. Este seguro no dañar las
installation. Care should be given to the cleaning of this product. Although its terminaciones del grifo durante la instalación. Cuide el producto
finish is extremely durable, it can be damaged by harsh abrasives or polish. manteniendolo siempre limpio. Aunque su acabado es extremadamente
Never use abrasive cleaners, acids, solvents, etc. to clean any Graff durable, puede ser dañado por los abrasivos o pulientes ásperos. Nunca
product. To clean, simply wipe gently with a damp cloth and blot dry utilice limpiadores abrasivos, ácidos, solventes, etc. para limpiar
with a soft towel. cualquier producto de la Graff. Para limpiar, simplemente use un
paño húmedo y seque con una toalla suave.
OPERATING INSTRUCTIONS  DESCRIPCIÓN DEL FUNCIONAMIENTO
The water flow is opened and water temperature is set using the lever or Para abrir la salida y de ajuste de temperatura sirve la palanca o la llave.
the handle. It is opened fully by turning the lever in counter-clockwise Obtenemos la apertura completa girando la palanca en la dirección
direction. The water temperature is regulated by positioning the lever opuesta al movimiento del reloj. La regulación del agua que sale se
within the range from the “Off “ position through the “Cold” to the “Hot” efectúa entre la posición “Off”, pasando por la posición “Cold”, hasta la
with max temperature. posición “Hot” de la temperatura máxima.
During normal mode of operation the water is directed to the spout; pressing of the Normalmente el agua va dirigida al cańo; empujando la perilla dirigimos
diverter knob redirects the water flow to the shower head. After turning the water el agua al cabezal de la ducha. Al cerrar el agua, la perilla regresa
off the diverter knob returns to the initial position (normal mode). automáticamente a la posición normal (inicial).
ENGLISH
~
ESPANOL
CARE AND MAINTENANCE  CUIDADO Y MANTENIMIENTO
~
ESPANOL
ENGLISH
Warranty conditions and warranty registration card are outlined on a Las condiciones de la garantía y la tarjeta del registro de la garantía
separate sheet. se encuentran en una pagina separada.
WARRANTY  GARANTÍA
~
ESPANOL
ENGLISH
ENGLISH
SEE FIG. 2.2, 3.1-3.3
In order to adjust the maximum desired temperature, the following procedure
should be followed:
1. Place (R5) in the off position using (T11*), then remove (T11*)
and (T10).
2. Pull (A) off of (R5). Then place (A) back onto (R5) with (C)
aligned between the + and - on (A).
3. Place (T11*) on (R5) and rotate fully counter-clockwise, allowing
the set hot maximum temperature to flow.
4. Check if temperature is correct, if not repeat process.
5. Reassemble (T10) and (T11*).
VER LA FIG. 2.2, 3.1-3.3
Para ajustar la temperatura maxima deseada sigua el procedimiento descrito
abajo:
1. Coloque (R5) en la posición “off” usando (T11*), luego quite (T11*)
y (T10).
2. Quite (A) de (R5). Luego vuelva a poner (A) en (R5) con (C)
alineado entre the + y - en (A).
3. Coloque (T11*) en (R5) y gire completamente en el sentifo
antihorario permitiendo fijar la temperatura máxima de flujo.
4. Compruebe si la temperatura es correcta, si no es así repita el
procedimiento.
5. Vuelva a montar (T10) y (T11*).
~
ESPANOL
AR5
TUB
HOT
SHR
Factory preset position –
Max flow of hot water
A - Temperature Limiting Ring
B - Limiting blocks of the cartridge
C - Temperature Limit Indicator
D - Limiting Scale
A - Anillo limitador de temperaturas
B - Limitadores en el cartucho
C - Indicador de la posición del limite de temperatura
D - Escala de limitación
Flow of hot water limited
to desired temperature
Posición preajustada en la fabrica –
flujo máximo del agua caliente
Flujo del agua caliente limitado
a la temperatura deseada
AD
B
C
AD
B
C
3.1 3.2 3.3
IOG 2810.20 4
This product complies with NSF61/9, ASME/ANSI A112.18.1
and CSA B 125 Standards.
Este o se encuentra conforme con losestandares de NSF61/9,
de ASME/ANSI A112.18.1 y de CSA B 125.
product Installation Instructions  Instrucciones de Instalación
PRESSURE BALANCE TUB & SHOWER
LA DUCHA CON GRIFO DE TINA EQUILIBRANTE DE LA PRESIÓN
Rev. 3 May2010

This manual suits for next models

6

Other Graff Plumbing Product manuals

Graff Terra G-6765 User manual

Graff

Graff Terra G-6765 User manual

Graff G-8232 User manual

Graff

Graff G-8232 User manual

Graff G-6156 Series User manual

Graff

Graff G-6156 Series User manual

Graff 2196300 Operator's manual

Graff

Graff 2196300 Operator's manual

Graff b-collection 5127510 Operator's manual

Graff

Graff b-collection 5127510 Operator's manual

Graff TARGA 2309000 Operator's manual

Graff

Graff TARGA 2309000 Operator's manual

Graff ADLEY E-3852-C2 Operator's manual

Graff

Graff ADLEY E-3852-C2 Operator's manual

Graff LM42B User manual

Graff

Graff LM42B User manual

Graff QUBIC TRE 2388100 Operator's manual

Graff

Graff QUBIC TRE 2388100 Operator's manual

Graff ELEGANTE Assembly instructions

Graff

Graff ELEGANTE Assembly instructions

Graff G-6461-LM44 User manual

Graff

Graff G-6461-LM44 User manual

Graff BLACKSTONE Series User manual

Graff

Graff BLACKSTONE Series User manual

Graff 9960 User manual

Graff

Graff 9960 User manual

Graff QUBIC TRE 6255-LM39B-T User manual

Graff

Graff QUBIC TRE 6255-LM39B-T User manual

Graff G-6950-LM48B User manual

Graff

Graff G-6950-LM48B User manual

Graff PHASE G-6612-LM45B User manual

Graff

Graff PHASE G-6612-LM45B User manual

Graff Immersion 2357-LM31N-T User manual

Graff

Graff Immersion 2357-LM31N-T User manual

Graff GN-6836-LM47W Series User manual

Graff

Graff GN-6836-LM47W Series User manual

Graff SENTO G-6310-LM42B User manual

Graff

Graff SENTO G-6310-LM42B User manual

Graff PESARO 1500-C3 User manual

Graff

Graff PESARO 1500-C3 User manual

Graff C14B-WS Series User manual

Graff

Graff C14B-WS Series User manual

Graff G-11520 L1 Series User manual

Graff

Graff G-11520 L1 Series User manual

Graff G-8210 User manual

Graff

Graff G-8210 User manual

Graff PRESCOTT Operator's manual

Graff

Graff PRESCOTT Operator's manual

Popular Plumbing Product manuals by other brands

PEERLESS P1823LF Series quick start guide

PEERLESS

PEERLESS P1823LF Series quick start guide

Elkay BPSR23171 Specifications

Elkay

Elkay BPSR23171 Specifications

Grohe 6593000 Specifications

Grohe

Grohe 6593000 Specifications

DURAVIT C14230 0000 10 Instructions for mounting and use

DURAVIT

DURAVIT C14230 0000 10 Instructions for mounting and use

American Standard Hampton 7471.712 installation instructions

American Standard

American Standard Hampton 7471.712 installation instructions

ACRITEC Roughin EZ installation manual

ACRITEC

ACRITEC Roughin EZ installation manual

Hans Grohe Talis Select S 220 72822001 Installation/User Instructions/Warranty

Hans Grohe

Hans Grohe Talis Select S 220 72822001 Installation/User Instructions/Warranty

Symmons SCOT SLC-6000 Series Operation & maintenance manual

Symmons

Symmons SCOT SLC-6000 Series Operation & maintenance manual

Gessi iSpa 24953 Bath Mixing Program

Gessi

Gessi iSpa 24953 Bath Mixing Program

Luxart BRITANNIA BRL341 Installation

Luxart

Luxart BRITANNIA BRL341 Installation

hernest H200020 user manual

hernest

hernest H200020 user manual

BELLOSTA jeans 4800 Installation instruction

BELLOSTA

BELLOSTA jeans 4800 Installation instruction

Brizo Siderna 85880 Series installation instructions

Brizo

Brizo Siderna 85880 Series installation instructions

BELLOSTA mini-b 4405 installation instructions

BELLOSTA

BELLOSTA mini-b 4405 installation instructions

Hans Grohe Axor 042200 Series Installation instructions / warranty

Hans Grohe

Hans Grohe Axor 042200 Series Installation instructions / warranty

BELLOSTA CUCINA 4410/SF installation instructions

BELLOSTA

BELLOSTA CUCINA 4410/SF installation instructions

RBM kiwa RinoxPlus M manual

RBM

RBM kiwa RinoxPlus M manual

Clou mini wash me CL/03.12130 installation instructions

Clou

Clou mini wash me CL/03.12130 installation instructions

manuals.online logo
manuals.online logoBrands
  • About & Mission
  • Contact us
  • Privacy Policy
  • Terms and Conditions

Copyright 2025 Manuals.Online. All Rights Reserved.