manuals.online logo
Brands
  1. Home
  2. •
  3. Brands
  4. •
  5. Graff
  6. •
  7. Plumbing Product
  8. •
  9. Graff 8605 User manual

Graff 8605 User manual

,2*
(1*/,6+
a
(63$12/
7KLVSURGXFWFRPSOLHVZLWK$60($16,$
DQG&6$%6WDQGDUGV
(VWHSURGXFWRVHHQFXHQWUDFRQIRUPHFRQORVHVWDQGDUHV
GH$60($16,$\GH&6$%
2-1/2" (64mm)
1-7/8" (48mm)
7-5/8" (194mm)
1-3/4" (44mm)
1-9/16" (40mm) 13/16" (20mm)
8654
8632
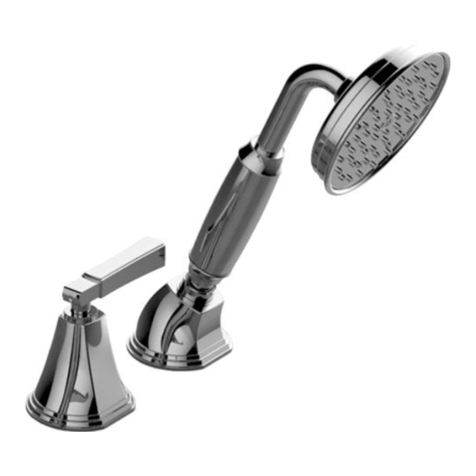
Handshower
Regadera de Mano
Wall Bracket
Agarrador de Punto
Shower Hose
Manguera de la ducha
Handshower Set w/Wall Bracket
Conjunto de Regadera de Mano con Agarrador de Punto
8649
ESPAÑOLENGLISH
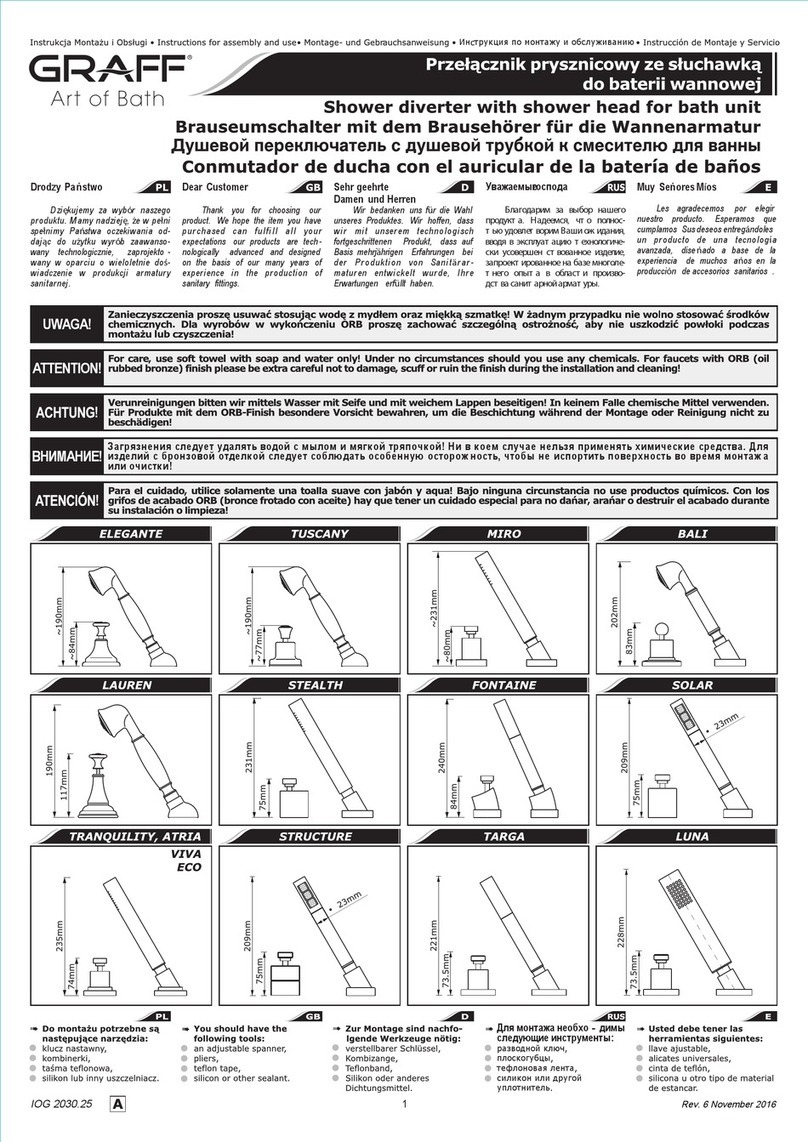
You should have the following tools:
•5/16”(8mm)carbidedrillbit,
•Electricdrill,
•Philipsscrewdriver,
•Level,
•Strapwrench,
•Teon®tape.
Usted debe tener las herramientas siguientes:
•Brocadecarburode5/16”(8mm),
•Toladroelectrico,
•DesarmadorPhilips,
•Nivel,
•Llavedecorrea,
•CintaadhesivadeTeon®.
FLOW RATE INFORMATION
•Maxowrate2.5gpm(9.5l/min.)at80psi(5.5bar).
INFORMACIÓN DE INTENSIDAD DE FLUJO
•Flujomáximo2.5gpm(9.5l/min.)at80psi(5.5bar).
ESPAÑOLENGLISH
InstallationInstructionsInstruccionesdeinstalación
1
HANDSHOWER SET W/WALL BRACKET
CONJUNTO DE REGADERA DE MANO CON AGARRADOR DE PUNTO
ATTENTION! ATENCIÓN!
Thank you for selecting our product. We are condent we can fully satisfy
your expectations by offering you a wide range of technologically advanced
products which directly result from our many years of experience in faucet
and tting production.
Muchas gracias por elegir nuestro producto. Estamos seguros que podemos
atisfacer completamente sus expectativas ofreciéndole una amplia variedad
de productos tecnológicamente avanzados que resultan directamente de
muchos años de experiencia en grifos y su producción apropiada.
Dear Customer Estimado Cliente
For care, use soft towel with soap and water only! Under
no circumstances should you use any chemicals. Please
be extra careful not to damage, scuff or ruin the nish
during the installation and cleaning!
Para el cuidado, utilice solamente una toalla suave con jabón
y aqua! Bajo ninguna circunstancia no use productos quími-
cos. Hay que tener un cuidado especial para no dañar, ara-
ñar o destruir el acabado durante su instalación o limpieza!
Rev. 5 June 2011
2-3/16" (56mm)
1-7/8" (48mm)
1" (25mm)
1/2"NPT
Note: 1/2" FIP
8633
Supplly Elbow
Codo Abastecedor
86
05
2-1/2" (64mm)
1-7/8" (48mm)
,2*
7KLVSURGXFWFRPSOLHVZLWK$60($16,$
DQG&6$%6WDQGDUGV
(VWHSURGXFWRVHHQFXHQWUDFRQIRUPHFRQORVHVWDQGDUHV
GH$60($16,$\GH&6$%
12
11
10
1534
2
6
8
7
A
9
10
1
1WALLBRACKET
2SETSCREWwithhexagonalsocket
3MOUNTINGPLATE
4ANCHOR(2PCS.)
5MOUNTINGSCREWS(2PCS.)
6SUPPLYELBOW
7ESCUTCHEON
8RUBBERINSERT
9FLATSEAL
10 SHOWERHOSE
11 FLATSEAL
12 HANDSHOWERwithFLOWREGULATINGCHECKVALVE
A5/64”(2mm)HEXKEY
ENGLISH
ESPAÑOL
1AGARRADORDEPUNTO
2TORNILLODEFIJACIÓNdecabezaranuradahexagonal
3AZULEJODEMONTAJE
4TAQUETE(2PIEZAS)
5TORNILLODEMONTAJE(2PIEZAS)
6CODOABASTECEDOR
7CHAPETÓN
8INSERTODEGOMA
9JUNTAPLANO
10 MANGUERADELADUCHA
11 JUNTAPLANO
12 REGADERADEMANOconVÁLVULA
DERETENCIÓNYLIMITACIÓN
ALLAVEHEXAGONAL5/64”(2mm)
Carefully unpack and inspect all the components for da-
mage. To protect against damage, return all components
tothecartonuntilreadytoinstall.
Desembale con cuidado y cerciórese de que ningún com-
ponente esté dañado. Para protección contra daños, vuelva
acolocartodosloscomponentesenlacajadeembalajehastael
momentodesuinstalación.
ESPAÑOL
ENGLISH
PRODUCT INSPECTION
INSPECCIÓN DEL PRODUCTO
2
HANDSHOWER SET W/WALL BRACKET
CONJUNTO DE REGADERA DE MANO CON AGARRADOR DE PUNTO
InstallationInstructionsInstruccionesdeinstalación
NOTE:
Coupler End of Hose
to Handshower
NOTE:
Hex End of Hose
to Supply Elbow
Rev. 5 June 2011
,2*
7KLVSURGXFWFRPSOLHVZLWK$60($16,$
DQG&6$%6WDQGDUGV
(VWHSURGXFWRVHHQFXHQWUDFRQIRUPHFRQORVHVWDQGDUHV
GH$60($16,$\GH&6$%
43
5
1
2
A
2 3
12
11
10
10.1
Seeg.2.

Select location.
Select wallposition forwallbracketbased
onfamily’sneeds.
NOTE:Locatesotherewillbeslackinthehosewhenhand-
showerisinextremeupordownposition.
•
Disassemblethewallbracketasshowong.1;loosenthe
setscrew(2)usingtheincludedhexkey(A).
•

Choose the location of the bracket on the wall.
Drill two5/16”
(8mm)
holes
and

put

the

anchors

(4)

into

the 
holes.
•
Tightenthemountingplate(3)usingthemountingscrews
(5).
•
Slideoverwallbracketonthe assembledmountingplate
(3). After positioning the wall bracket in the correct po-
sition,secureitwiththesetscrew(2)usingthehexkey
(A).
Veag.2.
Escoja la ubicación.Escojalaposiciónenlaparedparael
agarradordepuntobasadaenlosrequisitosnecesariosdela
familia.
NOTA: Posicione de tal modo que la manguera quede oja
cuandolaregaderademanoestéenposiciónextrema,hacia
arribaohaciaabajo.
•
Desmonteelagarradordepuntocomoeneldis.1;destor-
nilleeltornillosinn(2)conlallaveallen(A)adjunta.
•
Determine

en

la

pared

los

sitios

para

montar

el

agarrador

de

punto.

Taladre 
dos 
agujeros 
de 
5/16” 
(8mm) 
y
meta 
los 
tacos
(4)enlosforos.
•
Aprieteelazulejodemontaje(3)conlostornillosdemon-
taje(5).
•
Pongaelagarradordepuntosobreelazulejodemontaje
instaladopreviamente(3).Despuésdehabercolocadoel
agarradordepuntoensuposicióncorrecta,asegúrelocon
eltornillosinn(2)usandolallaveallen(A).
ESPAÑOLENGLISH
WALL BRACKET INSTALLATION • MONTAJE DEL AGARRADOR DE PUNTO
Seeg.3.
Seattheatseal(11)rmlyintothehosenut(10.1).Ca-
refully align the thread of the tapered end of hose (10.1)
directly to the handshower(12).
Thenplacethehandshower(12)intothewallmountholder.
Veadis.3.
ESPAÑOLENGLISH
CONNECT TAPERED END OF HOSE TO THE HANDSHOWER
CONECTE EL EXTREMO CÓNICO DE LA MANGUERA A LA REGADERA DE MANO
3
HANDSHOWER SET W/WALL BRACKET
CONJUNTO DE REGADERA DE MANO CON AGARRADOR DE PUNTO
InstallationInstructionsInstruccionesdeinstalación
Reference Mounting
Plate (3) for Mounting
Screw (5) location
NOTE:
Set Screw is
positioned on
the bottom of
Wall Bracket
•
Use
locations on the wall.
the mounting plate as a template to mark the anchor

(3)
•
Use the strap wrench to
tighten hose nut to handshower
(10.1) (12).
Rev. 5 June 2011
  


•        







    
    




      
          
,2*
7KLVSURGXFWFRPSOLHVZLWK$60($16,$
DQG&6$%6WDQGDUGV
(VWHSURGXFWRVHHQFXHQWUDFRQIRUPHFRQORVHVWDQGDUHV
GH$60($16,$\GH&6$%
7&8
10.2
6
9
10
B
4
See

g.

4
ENGLISH
SUPPLY ELBOW INSTALLATION
Verdis.4
ESPAÑOL
MONTAJE DEL CODO ABASTECEDOR
ESPAÑOLENGLISH
CARE AND MAINTENANCE / WARRANTY • CUIDADO Y MANTENIMIENTO / GARANTÍA
• 
YourGraffproductisdesignedandengineeredinaccord-
ancewiththehighestqualityandperformancestandards.
Besurenottodamagethenishduringinstallation.Care
shouldbegiven tothecleaning of thisproduct.Although
itsnishisextremelydurable,itcanbedamagedbyharsh
abrasivesorpolish.Never use abrasive cleaners, acids,
solvents,etc. to clean any Graff product. To clean,
simply wipe gently with a dampcloth and blot dry
with a soft towel.
• Warranty conditions and warranty registration card are
outlinedonaseparatesheet.
• 
SuproductodelaGraffestadiseñadoyseregidodeacuer-
doconlosestándaresdefuncionamientoycalidadmásal-
tos.Esteseguronodañarlasterminacionesdelgrifoduran-
telainstalación.Cuideelproductomanteniendolosiempre
limpio. Aunque suacabado es extremadamente durable,
puede ser dañado por losabrasivos o pulientes ásperos.
Nunca utilice limpiadoresabrasivos, ácidos, solven-
tes, el etc. para limpiar cualquier producto de la Graff.
Para limpiar, simplemente use un paño húmedo y se-
que con una toalla suave.
• Lascondicionesdelagarantíaylatarjetadelregistrode
lagarantíaseencuentranenunapaginaseparada.
Alldimensionsanddrawingsareforreferenceonly.Fordetails,pleaserefertoactualproducts.
Todaslasdimensionesydibujossirvenúnicamentedereferencia.Paraconsultardetalles,verlosproductos.
HOTLINE FOR HELP • NUMERO DE EMERGENCIA
Fortoll-freeinformationandanswerstoyourquestions,call:
Llamesincostoparaobteinerinformacionyrespestasasuspreguntas:
1 - 800 - 954 - GRAF (4723)
www.graffcollection.com
4
HANDSHOWER SET W/WALL BRACKET
CONJUNTO DE REGADERA DE MANO CON AGARRADOR DE PUNTO
InstallationInstructionsInstruccionesdeinstalación
A
Nipple (not provided)
nipple (A) into wall elbow (B).
with rubber insert (8),
CAUTION: Always protect finish parts during installation.
Determine length of nipple (A) needed from wall elbow (B) and the
finished supply elbow (6).
Apply Teflon Pipe Sealer or Teflon Tape to nipple threads,then
thread
Slide the back of the finished supply elbow (6) through the
escutcheon (7) then use a strap wrench
to tighten the finished supply elbow (6) on to the nipple thread
protruding
Slide the escutcheon (7) with rubber insert (8) flat against the
finished wall.
Seat seal (9) in to hose nut (10.2). Attach shower hose (10) to the
finished threaded wall outlet.
•
•
•
•
•
through the wall making sure threaded hose
connection is in a downward facing position.
Rev. 5 June 2011
!   
 

 
" 
 
 
 
 

•
•   
 
 
 
    









#



$

•

$
•


%&'















$
•





(!)*+),-
$


This manual suits for next models

4

Other Graff Plumbing Product manuals

Graff TERRA G-6710-LM62B User manual

Graff

Graff TERRA G-6710-LM62B User manual

Graff E-8527 Operator's manual

Graff

Graff E-8527 Operator's manual

Graff G-6951-C16B User manual

Graff

Graff G-6951-C16B User manual

Graff E-2551M-LC1 Operator's manual

Graff

Graff E-2551M-LC1 Operator's manual

Graff G-6800-LM47 User manual

Graff

Graff G-6800-LM47 User manual

Graff PHASE G-6612-LM45B User manual

Graff

Graff PHASE G-6612-LM45B User manual

Graff G-4425-LM53 User manual

Graff

Graff G-4425-LM53 User manual

Graff Oscar GN-4853 User manual

Graff

Graff Oscar GN-4853 User manual

Graff G-8232 User manual

Graff

Graff G-8232 User manual

Graff ME25 Operator's manual

Graff

Graff ME25 Operator's manual

Graff E-5965C Series Operator's manual

Graff

Graff E-5965C Series Operator's manual

Graff MOD+ G-11530 Series User manual

Graff

Graff MOD+ G-11530 Series User manual

Graff G-8232 User manual

Graff

Graff G-8232 User manual

Graff SENTO 5115000 Operator's manual

Graff

Graff SENTO 5115000 Operator's manual

Graff PRESCOTT Operator's manual

Graff

Graff PRESCOTT Operator's manual

Graff TOPAZ THREE-HOLE BIDETMIXER Operator's manual

Graff

Graff TOPAZ THREE-HOLE BIDETMIXER Operator's manual

Graff G-8031 T Series User manual

Graff

Graff G-8031 T Series User manual

Graff QUBIC TRE 6255-LM39B-T User manual

Graff

Graff QUBIC TRE 6255-LM39B-T User manual

Graff 3852-C2 User manual

Graff

Graff 3852-C2 User manual
Graff BALI 2145000 Operator's manual

Graff

Graff BALI 2145000 Operator's manual

Graff 2196300 Operator's manual

Graff

Graff 2196300 Operator's manual

Graff G-11520 L1 Series User manual

Graff

Graff G-11520 L1 Series User manual

Graff BALI 2368200 Operator's manual

Graff

Graff BALI 2368200 Operator's manual

Graff 2196300 Operator's manual

Graff

Graff 2196300 Operator's manual
Popular Plumbing Product manuals by other brands

Kohler ELLISTON 75522T-4 quick start guide

Kohler

Kohler ELLISTON 75522T-4 quick start guide

Fantini Mare 1004F instructions

Fantini

Fantini Mare 1004F instructions

GoodHome havel 5059340081403 installation instructions

GoodHome

GoodHome havel 5059340081403 installation instructions

American Standard Monterrey 6500 Series installation instructions

American Standard

American Standard Monterrey 6500 Series installation instructions

Aquavista H70K-51D-AV-CH quick start guide

Aquavista

Aquavista H70K-51D-AV-CH quick start guide

Roca ATAI 5A2734 manual

Roca

Roca ATAI 5A2734 manual

Kohler Symbol 18471-4FP installation instructions

Kohler

Kohler Symbol 18471-4FP installation instructions

Elson BUSHPEX Product information and installation manual

Elson

Elson BUSHPEX Product information and installation manual

Toto EGO II quick start guide

Toto

Toto EGO II quick start guide

Kohler K-444 Installation and care guide

Kohler

Kohler K-444 Installation and care guide

Elkay Arezzo LK7420BC Specifications

Elkay

Elkay Arezzo LK7420BC Specifications

Franke F3SM1001 Installation and operating instructions

Franke

Franke F3SM1001 Installation and operating instructions

Hans Grohe Talis 06801XX0 Product specification

Hans Grohe

Hans Grohe Talis 06801XX0 Product specification

KWC QBIX Features

KWC

KWC QBIX Features

Moen BGCW10OU1619 installation guide

Moen

Moen BGCW10OU1619 installation guide

Bradley S19-310DCFW Installation

Bradley

Bradley S19-310DCFW Installation

IKEA HAVSEN 503.592.18 quick start guide

IKEA

IKEA HAVSEN 503.592.18 quick start guide

Hans Grohe Metro E 06572000 Features & dimensions

Hans Grohe

Hans Grohe Metro E 06572000 Features & dimensions

manuals.online logo
manuals.online logoBrands
  • About & Mission
  • Contact us
  • Privacy Policy
  • Terms and Conditions

Copyright 2025 Manuals.Online. All Rights Reserved.