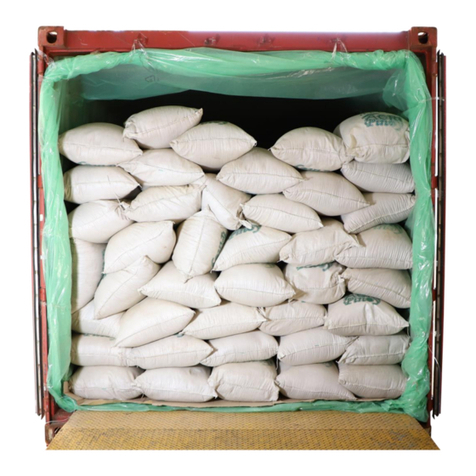
GrainPro TRANSAFELINER BULK User manual

GRAINPRO®TRANSAFELINER™ BULK
INSTRUCTION MANUAL
MA4045RAD1114-6

2/29
GrainPro® TranSafeliner™ Bulk Instruction Manual
MA4045RAD1114-6
GrainPro® Inc.
5520 Connecticut Avenue. NW Washington, DC 20015
Tel : +1 202-921-6700
GrainPro® Philippines, Inc.
Lot 46 Efficiency Avenue, Subic Bay Gateway Park I, Subic Bay Freeport Zone 2222 Philippines
Phone: +63 47 252 7884 Fax: +63 47 252 7885 Website: www.grainpro.com
Email: salesasia@grainpro.com
GrainPro® (Inc) Kenya Ltd.
Space Apartments, GF Shop A1 & A2 Maimahui Rd. Nairobi West, Kenya
Tel: +254 796 904 144
Tel.: +254 791 222 169
Email: africa@grainpro.com
GrainPro® Nigeria Ltd
6, Adu Street, Aguda-Ogba, Ikeja, Lagos
Tel: +234 806 564 3156
GrainPro® Mexico, S de RL de CV
Cto. Garona No. 903, Sección Tres, Col. Amberes, 37237,
León, Gto. Mexico
Mobile: +52 (477) 392 0851
Email: guillermo@grainpro.com
GrainPro® Costa Rica S.R.L.
Residencial Valle del Sol, Calle Lajas, Casa #27 Alto de las Palomas,
Santa Ana, San José, Costa Rica
Tel: +506 2282 9129
Email: infogpcr@grainpro.com
GrainPro® India Post-Harvest Technology Pvt. Ltd.
Office Number 18A109, WeWork Berger Tower 18th Floor,
C-001/A2, Sector 16-B, Noida, INDIA –201301
Landline: +91 120 515 0017
Customer Service: +91 960 292 0202
GrainPro®Inc., 1401 K Street NW, Suite 502, Washington D.C. 20005 USA
Copyright 2019 GrainPro®, Inc.

3/29
GrainPro® TranSafeliner™ Bulk Instruction Manual
MA4045RAD1114-6
TABLE OF CONTENTS
1. INTRODUCTION......................................................................................................................... 4
2. CHECKLIST................................................................................................................................ 5
3. COMPONENTS ......................................................................................................................... .7
4. SPECIFICATIONS. ..................................................................................................................... 7
5. WARNINGS ................................................................................................................................ 8
6. RECOMMENDED MAXIMUM MOISTURE CONTENT FOR SAFE STORAGE (wet basis)...... 8
7. SMALL PARTS ........................................................................................................................... 9
8. INSTALLATION........................................................................................................................... 9
Preparation ........................................................................................................................... .9
Attachment of Rope Braces………………………………………………………………………10
Bulkhead Installation............................................................................................................11
TSL Blower Installation........................................................................................................ 12
TSL Blower (Not Included) Components and Specifications………...……………….………….....…12
Horizontal Loading...............................................................................................................13
Vertical Loading ................................................................................................................... 14
Use of Desiccants/Dry Bags (Required)..............................................................................16
Plastic Valve Installation for Pressure Decay Test and CO2or O2Reading………..……………16
Sealing................................................................................................................................. 17
Pressure (Vacuum) Decay Test...........................................................................................18
Installing the Flexible Adapter Hose for CO2or O2Reading ............................................... 20
Using Oxygen Analyzer for Monitoring (Without CO2Flushing) - Optional ........................20
Using Carbon Dioxide Analyzer for Monitoring (Without CO2Flushing) - Optional............. 21
Carbon Dioxide (CO2) Safety............................................................................................... 21
Procedure for Purging with Carbon Dioxide (CO2) …………………………………………..…………22
Using Oxygen Analyzer for Monitoring (With CO2Flushing) - Optional ............................. 24
Using Carbon Dioxide Analyzer for Monitoring (With CO2Flushing) - Optional.................. 25
Closing and Opening the Container Van.............................................................................26
9. MAINTENANCE AND CARE .................................................................................................... 26
Repairing Punctures and Other Damages...........................................................................26
Recycling ............................................................................................................................. 26
10. FREQUENTLY ASKED QUESTIONS ...................................................................................... 26
11. WARRANTY CLAUSE..............................................................................................................27
4/29
GrainPro® TranSafeliner™ Bulk Instruction Manual
MA4045RAD1114-6
1. INTRODUCTION
The GrainPro®TranSafelinerTM Bulk (TSL Bulk) is designed to protect dry agricultural commodities
shipped in bulk inside an ISO shipping container. It is made of Ultra Hermetic PE with a barrier layer. It
has superior gas and moisture resistant properties to restrict the entry of moist ambient which reduces
risks due to condensation, mold growth, and insect infestation. As a result, the TSL Bulk preserves the
quality of dried agricultural commodities and prevents postharvest losses while in transit. It also has a
GHF inlet port for fumigation. The TSL Bulk consists of “Ultra-Hermetic”liner and bulkhead. Using nylon
rope and pre-installed tape, the liner can be easily hung inside the container. To support the commodity’s
lateral force, a strong woven polyethylene bulkhead is fitted into the container’s doorway using straps
and 1.5” steel tubes positioned horizontally and anchored into the groove of the container’s wall. Loading
the single trip TSL Bulk can be done using grain augers or screw conveyors (with TSL blower) which
can be fitted in the liner’s resealable loading port. Unloading of the TSL Bulk is best done by self-
discharging or by tilt-trailer where unloading can be done by slitting the bottom portion of the TSL Bulk
and tilting the shipping container.
1.1. FEATURES:
1.1.1. “Green” fumigation technology is acknowledged as organic fumigation using CO2.
1.1.2. Preserves quality and minimizes damage to dry agricultural commodities in transit.
1.1.3. A “green” technology for the transport and organic preservation of dry agricultural commodities
(certified safe for organic grain storage)
1.1.4. Minimizes condensation, inhibits/controls mold growth and infestation.
1.1.5. Easy to install in a container van using nylon ropes.
1.1.6. Two options in installing the bulkhead (straps or rigid bars)
1.1.7. Maximizes the volumetric capacity of the shipping container.
1.1.8. Reduces packaging cost vs. bagged commodities.
1.1.9. Reduces labor cost.
1.1.10. Prevents grain contamination.
1.2. PRODUCT GUARANTEE:
1.2.1. In accordance with the terms and conditions herewith, GrainPro®, Inc. fully guarantees the quality
of this product if the product is used according to the instructions in this operator’s manual.
1.2.2. Please read and understand the manual thoroughly before using the TSL Bulk.
1.3. COMMENTS, COMPLAINTS, AND/OR CLARIFICATIONS:
1.3.1. Please contact customercare@grainpro.com.
1.3.2. All queries will be answered by our team of post-harvest solution experts.

5/29
GrainPro® TranSafeliner™ Bulk Instruction Manual
MA4045RAD1114-6
2. CHECKLIST
Please inspect your GrainPro®TranSafelinerTM Bulk package to ensure it includes the following
items:
PART NAME
DESCRIPTION
IMAGE
2.1. TSLTM BULK
BODY
2.1.1. Ultra-Hermetic
Polyethylene with a
barrier layer
2.2. ZIPPER SLIDER
2.2.1. For zipper closing.
Two (2) pieces
2.3. Rope Braces
(Woven OPP
Tape)
2.3.1. TSLTM BULK
15pcs
2.4. NYLON ROPE
2.4.1. For container
mounting installation
(Pulling rope)
TSL Bulk
17 m x 1 rope

6/29
GrainPro® TranSafeliner™ Bulk Instruction Manual
MA4045RAD1114-6
2.5. PLASTIC VALVE
2.5.1. For PDT (Pressure
Decay Test) or CO2
or O2reading
1 piece
2.6. DESICCANTS
2.6.1. TSLTM Bulk
2 packs x 3pcs/pack
2.7. BULKHEAD
2.7.1. Woven Polyethylene
(WPE)
Dimension:
229cm x 246cm
2.8. INSTRUCTION
MANUAL
2.8.1. Installation
instructions.
2.8.2. Maintenance
instructions.
2.8.3. Frequently asked
questions and
answers.
2.8.4. Warranty clause.

7/29
GrainPro® TranSafeliner™ Bulk Instruction Manual
MA4045RAD1114-6
3. COMPONENTS
4. SPECIFICATIONS
4.1 LINER
PARAMETERS
TSLTM BULK
Material
High Strength PE with Barrier Layer
Thickness, microns
100±5%
Color
Green (Pantone 3385)
Material Weight, g/m2
97.5
Oxygen Transmission Rate (OTR), cc/m2
<9
Water Vapor Transmission Rate (WVTR), g/m2/day
<4
Product Life, years
2
Warranty, year
1
Sealing Mechanism
2-Track PE Zipper
Capacity, kg (lbs) based on wheat
21,600 (47620)
Dimension (AxBxC), cm (inch)
230x230x604 (91x91x238)
Product Weight (per piece), kg (lbs)
14 (31)
Packed Dimension, cm (inch)
100x50x20 (39x20x8)
Packed Volume, m3(ft3)
0.05 (1.8)
Packed Weight for Liner and Bulkhead (without pallet),
kg (lbs)
15 (33)
4.2 BULKHEAD
PARAMETERS
BULKHEAD
Material
Woven Coated Polyethylene
Thickness, microns
508±10%
Color
Black
Material Weight, g/m2
320
Product Life, years
2
Warranty, year
1
Dimension (DxE), cm (inch)
229X246 (90x97)
Pre-installed Tape
Bulkhead
Two-track zipper
Body

8/29
GrainPro® TranSafeliner™ Bulk Instruction Manual
MA4045RAD1114-6
5. WARNING!
6. RECOMMENDED MAXIMUM MOISTURE CONTENT FOR SAFE STORAGE (wet basis).
You may also contact us through customercare@grainpro.com for more information or for commodities
that are not on the list.
5.1.1. Do not load fresh produce or commodities with high moisture inside TSLTM Bulk.
5.1.2. Do not wear shoes with spikes as this might damage the TSLTM Bulk.
5.1.3. Do not directly install TSLTM Bulk without clearing the container van of debris and other foreign
materials.
5.1.4. Do not smoke while installing, cigarette butts might burn and damage the TSLTM Bulk.
5.1.5.Do not directly insert or hook nylon rope to the TSLTM Bulk.
5.1.6.Do not put TSLTM Bulk on top of a wooden pallet or equivalent to prevent puncture by sharp
edges and nails.
5.1.7.Do not allow loading vehicles (e.g., forklift/pallet trucks) to run over the TSLTM Bulk as this will
cause damage to the P.E. material.
COMMODITY
RECOMMENDED MC
Barley
12%
Black Pepper
10%
Cashew nuts
8%
Chia seeds
7%
Chickpeas
12%
Cocoa beans
7%
Coffee beans
12%
Cotton seed
10%
Cowpea
12%
Maize
13.5
Millet
12%
Mung bean
12%
Oats
12%
Paddy
13.5%
Paddy, rice bran
11%
Peanuts, shelled
7%
Red Chili Pepper
8-10%
Rice, milled
12%
Rye
12%
Sesame
5.5%
Sorghum
12%
Soybean
12%
Sunflower
7%
Wheat
13%

9/29
GrainPro® TranSafeliner™ Bulk Instruction Manual
MA4045RAD1114-6
7. SMALL PARTS
7.1. Liner
1 piece
7.2. 2 Track zipper slider, blue
2 pieces
7.3. Nylon string
17m x 1 piece
7.4. Desiccant (Calcium Chloride) CaCI2
6 pieces (1,200 grams)
7.5. Plastic Valve
1 piece
7.6. Packaging Box
1-piece TSL Bulk per box
7.7. Woven OPP tape
15 pieces
8. INSTALLATION
8.1 PREPARATION
8.1.1.The TSLTM Bulk is designed for a standard 20-foot
container van.
8.1.2.Check the moisture content of the commodity using
the Moisture Meter to ensure the MC is at a safe level
for storage. Refer to Recommended Moisture
Content for safe storage.
8.1.3.Ensure that the container floor and wall are free of any
sharp objects that may damage the liner.

10/29
GrainPro® TranSafeliner™ Bulk Instruction Manual
MA4045RAD1114-6
8.1.4.Place a mat or thick cardboard on the floor as
additional protection for the TSLTM Bulk.
8.1.5.Carefully unfold the TSLTM Bulk. Lay TSLTM Bulk with
the broken line markings facing upward.
8.1.6. Pull the top portion to unfold.
8.2. ATTACHMENT OF ROPE BRACES (TAPE)
8.2.1.On the laid TSL find the broken line markings from the
back end of the TSL measure 125cm along the
broken line and attach the supplied Woven OPP
Tapes.
8.2.2.Stick another set of Woven OPP Tape along the
broken line with a 100cm distance in between them.
In total there will be 14 pieces of rope braces (Woven
OPP Tape).

11/29
GrainPro® TranSafeliner™ Bulk Instruction Manual
MA4045RAD1114-6
8.3. STALLATION PROCESS
8.3.1. Secure one end of the nylon rope (flexible nylon cord)
into the hook located on the side wall of the container
van.
8.3.2.Pull and insert the rope to the next hook.
8.3.3.Insert the free end of the nylon rope into the first
woven OPP tape. The woven OPP tape in the TSLTM
Bulk should be positioned in-between the hooks
(except for the first woven OPP tape near the TSL
zipper)
Note: Do not insert nylon rope into the woven OPP
tapes aligned with the container’s hooks.

12/29
GrainPro® TranSafeliner™ Bulk Instruction Manual
MA4045RAD1114-6
8.3.4.Secure the bottom of the liner and add additional
woven OPP tape aligned in container hooks. Insert
the nylon rope into the woven OPP tape and tie it to
the hooks.
8.3.5.Hanging of the liner should be done by completing
one side of the container first starting from the door,
then going around the ceiling of the container.
8.3.6.One person should hold and pull the rope while the
other person continues to hang the liner and complete
the setup.
8.3.7.Insert the rope into the woven OPP tapes and hooks
in a uniform direction to easily retrieve the rope after
loading.
8.3.8.Apply proper tension and secure the nylon rope to
minimize the sagging of liner for ease of loading.
8.4 BULKHEAD INSTALLATION
8.4.1.Install the top and outside portion of the Bulkhead
using the straps into the container door. Secure
the straps into the first hooks of the container
ceiling.
8.4.2.Insert the excess portion of the WPE bulkhead
under the TSLTM Bulk liner.
8.4.3.Position 1.5” GI pipes of approximately 235 cm
length horizontally into the container’s door
starting from bottom to top. Insert the pipes in the
installed loops of the WPE bulkhead. Anchor
pipes to the groove of the container’s wall.

13/29
GrainPro® TranSafeliner™ Bulk Instruction Manual
MA4045RAD1114-6
8.4.4 Install four (4) GI pipes (NOT INCLUDED in
the TSLTM Bulk Package) for support, 0.4 m
apart.
Material –1 1/2" G.I. Pipe Schedule 40
Size (Diameter) = 38 mm (1 ½ in.)
Wall Thickness = 3.68 mm (0.145 in.)
Length –Approximately 235 cm (92.52 inch)
Quantity –4 pieces
8.5. TSL BLOWER INSTALLATION
8.5.1.The blower is utilized for ease in loading
operations when using an auger or conveyor. It
is installed at the top portion of the container door
using bracket or holder prior to loading. The
following specifications are required for blower
fabrication:
A-Clamp
B- Angle Bar (1 1/2” x 1 1/2” x 1/16”)
C- Angle Bar (1” x 1” x 1/16”)
D-Blower
8.6. TSL BLOWER (NOT INCLUDED) COMPONENTS AND SPECIFICATIONS
8.6.1.Bracket for Blower
Material-Steel
Bar/F Clamp,
A-30 cm (12 inch)
8.6.2.Angle Bar (1 1/2” x 1 1/2” x 1/16”) – cm (inch)
B-50 (20)
C-1.9 (0.8)
D-1.2 (0.5)
E-0.5 (0.2)
8.6.3.Angle Bar (1” x 1” x 1/16”) – cm (inch)
F-20 (7.9)
G-1.2 (0.5)
H-1.2 (0.5)
I- 9.5 (3.7)
J-1.2 (0.5)
K-1.2 (0.5)
L-0.5 (0.2)

14/29
GrainPro® TranSafeliner™ Bulk Instruction Manual
MA4045RAD1114-6
8.6.4.Blower
M - 25.4 cm (10 in.)
N - 8.9 (3.5 in.)
Type- Axial Flow Fan
Rated Speed, rpm-2200/2100 ± 10%
Maximum Air Flow-1165 m3/hour
(686 ft3/min)
Rated Voltage, Voltage Rating for AC-
110-120/220-240
8.7. HORIZONTAL LOADING
8.7.1. Secure the bulkhead by closing one side of
the container door during loading.
8.7.2.Install the blower clamp into the container
ceiling.

15/29
GrainPro® TranSafeliner™ Bulk Instruction Manual
MA4045RAD1114-6
8.7.3. Load the commodity into the TSLTM Bulk
loading port.
8.7.4.Use a screw conveyor or grain auger that
can be inserted through the loading port of
the TSLTM Bulk positioned at the upper end
of the liner. Use of the blower is
recommended for easy loading.
8.7.5.Make sure to leave at least 20 cm. of space
between the roof of the container and the
top of the commodity to prevent
condensation.
Bulk Loading Port

16/29
GrainPro® TranSafeliner™ Bulk Instruction Manual
MA4045RAD1114-6
8.8. VERTICAL LOADING
8.8.1. Double check the bottom part of the TSLTM
Bulk, make sure that it is securely plastered
on the mat or thick cardboard to prevent it
from tearing due to tension during vertical
loading and unloading. Fixed the container
doors fully open to expose the bulkhead
and the TSLTM Bulk loading port. Refer to
Installation 8.1.10.
8.8.2.Position the container at a loading angle
and the conveyor outlet into the inner center
of the TSLTM Bulk loading port.
8.8.3. Load the commodity into the TSLTM Bulk
loading port. Make sure to load only based
on the capacity of the TSLTM Bulk.

17/29
GrainPro® TranSafeliner™ Bulk Instruction Manual
MA4045RAD1114-6
8.8.4. Make sure that there is a space of at least
20 cm. between the roof of the container
and the top of the commodity to prevent
condensation.
8.8.5.To unload the commodity, slash the TSLTM
Bulkhead and the liner at the bottom part to
partially discharge the commodity.
8.8.6.The size of slash should be enough to the
amount of commodity being discharged to
avoid clogging.
8.8.7.Slowly tilt the container until the commodity
is fully discharged.
8.9. USE OF DESICCANTS/DRY BAGS (REQUIRED)
Hygroscopic commodities, such as cocoa, coffee,
and various nuts and grains, are particularly
susceptible to mold and rot when exposed to
condensation and humidity. But desiccant bags
inside the TSLTM Bulk will protect the goods
against condensation and moisture damage.
8.9.1.Usage requirement:
a. One-thousand two hundred (1200) grams of GrainPro®Dry Bags per 20-footer.
Note: 1 GrainPro®Dry Bag contains 200 grams of calcium chloride.
8.9.2. Place the GrainPro®Dry Bags in perforated bags or sacks to prevent direct contact with the
commodity. Position the Dry Bags on top of the loaded commodity.
8.10. PLASTIC VALVE INSTALLATION FOR PRESSURE DECAY TEST (PDT)
AND CO2OR O2READING USING AN ANALYZER
Install plastic valve before sealing or zipping the liner. Conduct PDT after sealing. CO2or O2reading
(optional) is taken upon arrival of the container to verify the integrity of the TSL’s hermeticity. After
use, close the plastic valve.
HERE

18/29
GrainPro® TranSafeliner™ Bulk Instruction Manual
MA4045RAD1114-6
8.10.1. Plastic valve components:
Cap –To open and close the valve
Body –Where tube or hose is inserted for
PDT and CO2or O2reading
Base –Use for piercing the liner
8.10.2. Disassemble the plastic valve by
unscrewing the base.
8.10.3. Pierce the TSLTM Bulk using the plastic
valve base. Piercing is done from the inner
side of the TSL (approximately 20 cm from
the zipper).
8.10.4. Screw the plastic valve body. The cap of
the plastic valve should be positioned
outside the loaded TSLTM Bulk.
8.11. SEALING
8.11.1. Untie the nylon rope from the side wall of
the container van.
Body
Base
Cap

19/29
GrainPro® TranSafeliner™ Bulk Instruction Manual
MA4045RAD1114-6
8.11.2. Pull the rope out of the container to
provide space between the roof and liner for
air circulation.
8.11.3. Pull the ends of the TSLTM Bulk zipper for
sealing.
8.11.4. Positioning of zipper slider:
a) Manually zip a few centimeters enough
to initially engage the slider.
b) Position the slider on the manually
zipped portion of the zip lock.
8.11.5. Two persons are required for ease in
zipping the TSLTM Bulk.
a) One person will do the zipping and the
other person holds the other end
steadily making both sections of the
zipper in a straight line to avoid the
zipper length being misaligned.
b) Moving the slider while the zipper or
slider is not straight forces one of the
zipper sections to elongate.
Zipper
slider

20/29
GrainPro® TranSafeliner™ Bulk Instruction Manual
MA4045RAD1114-6
c) If uneven zipper ends are observed,
both ends of the zipper should be
slightly stretched and do the zipping
from end to end.
8.12.1. PRESSURE (VACUUM) DECAY TEST
8.12.2. After zipping, perform a pressure
(vacuum) decay test (PDT) to ensure gas-
tightness:
a. Use a digital manometer.
b. Either a commercially available or
improvised U-tube manometer can be
used to monitor the pressure.
8.12.3. Connect the manometer hose to the
flexible adapter hose previously installed in
the TSL.
8.12.4. Twist the plastic valve cap to open.
Table of contents
Other GrainPro Farm Equipment manuals

GrainPro
GrainPro GRAINSAFE BAG-1.0 User manual

GrainPro
GrainPro TRANSAFELINER User manual

GrainPro
GrainPro TRANSAFELINER MA3001RR0208-21 User manual

GrainPro
GrainPro GRAINSAFE 1.0/GHF User manual

GrainPro
GrainPro COLLAPSIBLE DRYER CASE II User manual

GrainPro
GrainPro TRANSAFELINER MA4081RAD1219-01 User manual

GrainPro
GrainPro TRANSAFELINER User manual
Popular Farm Equipment manuals by other brands

Raven
Raven RS1 Guidance and Steering Installation Manual

KUHN
KUHN GF 6401 T Assembly & operators manual

Land Pride
Land Pride Powered Rakes PR1660 Operator's manual

Raven
Raven SmarTrax Case IH MX 210 installation manual

Infinite Cedar
Infinite Cedar Ultimate Chicken Coop instructions

Westar
Westar Udder Gun manual