GrainPro TRANSAFELINER MA4081RAD1219-01 User manual

GrainPro® TranSafeliner™ Instruction Manual MA3001RR0208-18
1
GRAINPRO® TRANSAFELINER™
INSTRUCTION MANUAL
(Vacuum Method)
MA4081RAD1219-01

GrainPro® TranSafeliner™ Instruction Manual (Vacuum Method) MA4081RAD1219-01
2
/14
GrainPro®, Inc.
1401 K Street NW, Suite 502, Washington D.C. 20005 USA
Phone: 202-921-6700 Website: www.grainpro.com
Email: sales@grainpro.com
GrainPro® Philippines, Inc.
Lot 46 Efficiency Avenue, Subic Bay Gateway Park I, Subic Bay Freeport Zone 2222 Philippines
Phone: +63 47 252 7884 Fax: +63 47 252 7885 Website: www.grainpro.com
Email: salesasi[email protected]
GrainPro® Kenya
Shop A2, Space Apartments Mai Mahiu Road, Near T Mall Nairobi, KENYA
Phone: +254 710 933 717 Website: www.grainpro.com
Email: saleseaf[email protected]om
GrainPro® Mexico
Cto. Garona No. 903, Sección Tres, Col. Amberes, 37237, León, Gto. Mexico
Phone (Mobile): +52 1 (477) 392-0851 Website: www.grainpro.com
Email: guillerm[email protected]
GrainPro® Costa Rica
Paseo Colón, Centro Colón, en Bufete Robles Oreamuno District Merced, San José, Costa Rica
Phone: +506 4701-1173Website: www.grainpro.com
Email: chem[email protected]
GrainPro® India Postharvest Technology Pvt Ltd
B305, Grande View 7 Hsg. Soc. Ltd., Phase - I, Near Ashok Leyland, Ambegaon BK, PUNE,
Pune, Maharashtra, India, 411046
Phone (Mobile): +91 9970157263Website: www.grainpro.com
Email: avinas[email protected]
GrainPro®Inc., 1401 K Street NW, Suite 502, Washington D.C. 20005 USA
Copyright 2019 GrainPro®, Inc.

GrainPro® TranSafeliner™ Instruction Manual (Vacuum Method) MA4081RAD1219-01
3
/14
1.1.
PREPARATION
1.1.1. Check the moisture content of the commodity
using GrainPro Moisture Meter (MM5)
(available for sale from GrainPro, Inc.) to
ensure the MC is at a safe level for
storage/transport.
Recommended Moisture Content:
Coffee – 11.5-12%
Cocoa – 6-7%
Rice – 13-14%
1.1.2. Workers should not wear shoes with spikes
that might cause damage to the TSL.
1.1.3. Ensure that container floor is free of any sharp
objects that may damage the liner.
1.1.4. Place a mat or thick cardboard on the floor as
additional protection for the TSL.
1.1.5. Place the TSL box at the back end of the
container.
1.
PREPARATION

GrainPro® TranSafeliner™ Instruction Manual (Vacuum Method) MA4081RAD1219-01
4
/14
1.1.6. Pull the top portion to unfold the TSL, make
sure that the GP logo is facing up for proper
orientation.
2. INSTALLATION USING VACUUM METHOD
2.1.
INSTALLATION
PROCESS
For the vacuum method, a ventilator/fan shall
be used to create negative pressure between the
shipping container and the TSL. The ventilator
should have at least a 1000 m3/minute of flow rate.
2.1.1. Place the ventilator/fan on the top corner of
the container next to its door, this could be on
either left or right side of the container. A
clamp could be used to keep the ventilator in
place.
2.1.2. Fold at least 150cm of the TSL away from the
door opening starting from the zipper. Then
tape the folded section around the perimeter
of the container door.
Note: Make sure not to cover the ventilator
with the folded TSL section to avoid possible
damage.
2.1.3. Turn on the ventilator and wait until the TSL
spreads perfectly on the sides and ceiling of
the container van. A worker can also enter
the TSL to help spread the TSL material and
help correct any folds in the TSL.

GrainPro® TranSafeliner™ Instruction Manual (Vacuum Method) MA4081RAD1219-01
5
/14
2.1.4. Place cardboards on the TSL floor and along
the walls for added protection;
2.1.4.1. For Manual Loading - workers
should not wear shoes with spikes that
might cause damage to the liner.
2.1.5. When stacking bags, make sure to leave at
least 20cm distance between the roof of the
container and top of the stacks to prevent
condensation.
3.1.
USE
OF
DESICCANTS/DRY
BAGS
(REQUIRED)
Desiccants are commonly used to protect
goods against moisture damage. Hygroscopic
commodities, such as cocoa, coffee, and various
nuts and grains are particularly susceptible to mold
and rot when exposed to condensation and
humidity.
3.1.1. Requirement:
a. One-thousand two-hundred (1200) grams or 6 bags of GrainPro Dry Bags per 20-footer.
b. Two-thousand four-hundred (2400) grams or 12 bags of GrainPro Dry Bags per 40-footer.
Note: 1 GrainPro Dry Bag contains 200 grams of calcium chloride and can absorb grams of moisture
3.1.2. Place the GrainPro Dry Bags in perforated bags or sacks to prevent direct contact with commodity.
3.1.3. Cardboards/cartons may be placed on top of the stack (Cardboards/cartons provide increased water
absorption). Then put the desiccants on top of the cardboards/cartons.
3.2.
PLASTIC
VALVE
INSTALLATION
FOR
PRESSURE
DECAY
TEST
(PDT),
CO
2
OR
O
2
READING
Install plastic valve before sealing or zipping the liner. Conduct PDT after sealing. CO2or O2reading
(optional) is taken upon arrival of the container to verify the integrity of the TSL’s hermeticity. After use,
close the plastic valve.
3. SEALING

GrainPro® TranSafeliner™ Instruction Manual (Vacuum Method) MA4081RAD1219-01
6
/14
3.2.1. Plastic valve components:
A. Cap – To open and close the valve
B. Body – Where tube or hose is inserted for
Pressure Decay Test (PDT) and
CO2or O2reading
C. Base – Use for piercing the liner
3.2.2. Dismantle the plastic valve by unscrewing the
base.
3.2.3. Pierce the TSL using the plastic valve.
Piercing is done from the inner side of the
TSL (approximately 20 cm from the zipper).
3.2.4. Screw the plastic valve body. The cap of the
plastic valve should be positioned outside the
loaded TSL. Firmly tightened the body into
the base to prevent leakage.
3.3.
SEALING
OF
2-TRACK
PE
ZIPPER
3.3.1. Remove the ventilator from the container
door. Then remove the tapes and unfold the
excess liner from the door perimeter and let it
loose.

GrainPro® TranSafeliner™ Instruction Manual (Vacuum Method) MA4081RAD1219-01
7
/14
3.3.2. Hold the 2-track zippers together. Align for
proper sealing.
3.3.3. Manually zip a few centimeters enough to
initially engage the zipper slider.
3.3.4. Position the zipper slider on the manually
zipped portion of the zip lock.
3.3.5. For ease of zipping two persons are required.
One person does the zipping and the other
person holds the other end steadily, making
both sections of the zipper in a straight line to
avoid the zipper length being misaligned.
3.3.6. If uneven zipper ends are observed, slightly
stretch both ends of the zipper and redo the
zipping from end to end.
3.3.7. Fold extra liner and tape it against the stack.
Ensure that no liner is stuck in-between
doors.

GrainPro® TranSafeliner™ Instruction Manual (Vacuum Method) MA4081RAD1219-01
8
/14
3.4.
PRESSURE
DECAY
(VACUUM)
TEST
3.4.1. After zipping/sealing of the TSL, perform a
pressure (vacuum) decay test (PDT) to
ensure gas-tightness. With this test a
manometer, vacuum pump and stopwatch
are needed. A digital manometer of a
commercially available or improvised U-tube
manometer can be used to monitor the
pressure.
3.4.2. Connect the manometer hose to the plastic
valve previously installed in the TSL.
3.4.3. Twist the plastic valve cap to open.
3.4.4. Using a vacuum pump with at least 2.3 cubic
meters of suction capacity per minute. Create
at least -250 Pascals (Pa) or -25 millimeters’
water (mm H2O) vacuum inside the TSL by
partially opening a portion of the zipper and
insert the vacuum pump suction port.
3.4.5. For TSL to be considered sufficiently airtight,
the initial vacuum should not decrease by
more than one-half (½) of the final vacuum
(created by the vacuum pump) within five (5)
minutes.
3.4.6. If the PDT test failed, check for holes/tears
and poorly sealed zippers then repeat the
PDT procedures.

GrainPro® TranSafeliner™ Instruction Manual (Vacuum Method) MA4081RAD1219-01
9
/14
3.4.7. After conducting PDT, twist the plastic valve
closed.
3.5.
INSTALLING
THE
FLEXIBLE
ADAPTER
HOSE
FOR
CO
2
OR
O
2
READING
To ensure gas-tightness, instead of PDT as an alternative the container with TSL can be checked
using the CO2analyzer or O2analyzer.
3.5.1. The flexible adapter hose is included in the GrainPro Carbon Dioxide Analyzer or the user can find
equivalent flexible hose from local hardware using the specifications as shown:
Inside Diameter 4 mm (0.16 in.)
Length >5 cm (2 in.)
3.5.2. When taking the carbon dioxide or oxygen
reading, connect the flexible adapter hose to
the plastic valve.
3.5.3. Twist the plastic valve cap to open.
3.5.4. Connect the O2or CO2analyzer to the flexible
adapter hose and the reading. Take readings
of CO2and O2using the available analyzer.
Acceptable Values:
For O2analyzer, 3% or below after 15 to 30
days.
For CO2analyzer, 10 to 15% after 15 to 30
days.

GrainPro® TranSafeliner™ Instruction Manual (Vacuum Method) MA4081RAD1219-01
10
/14
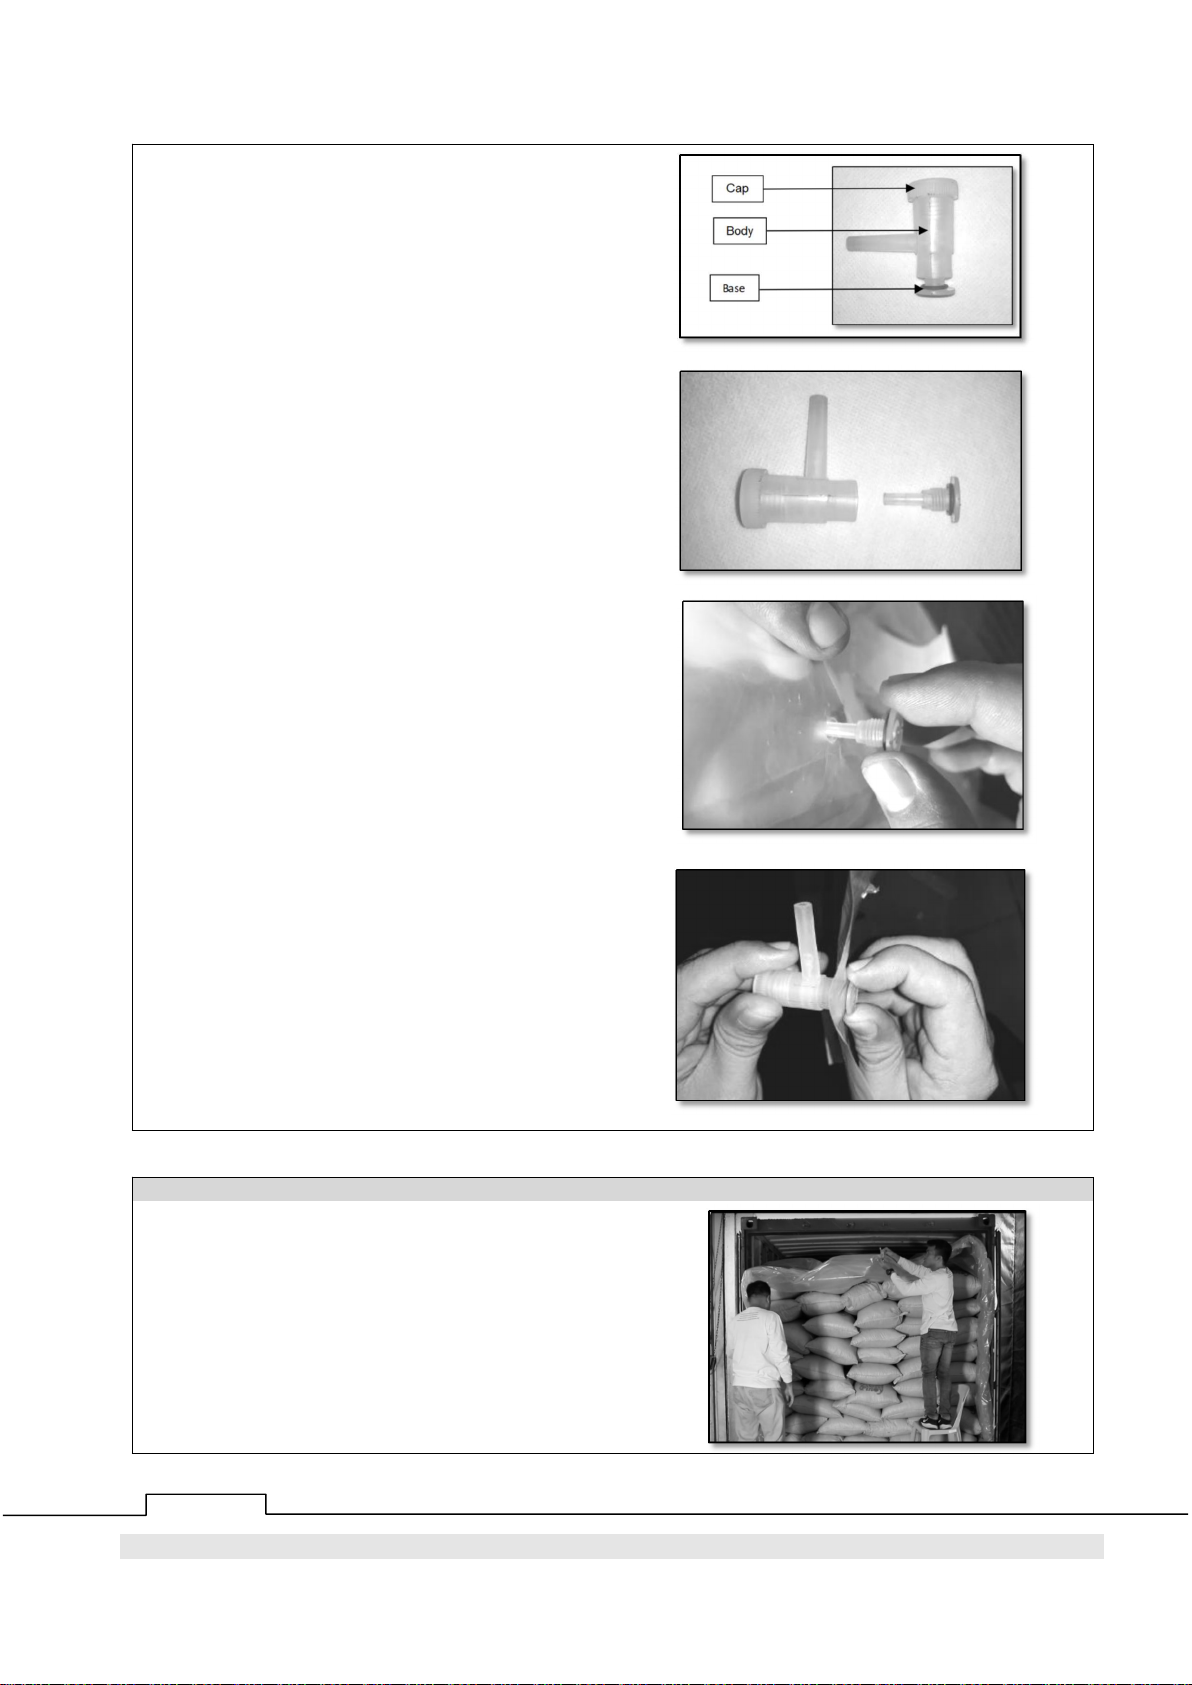
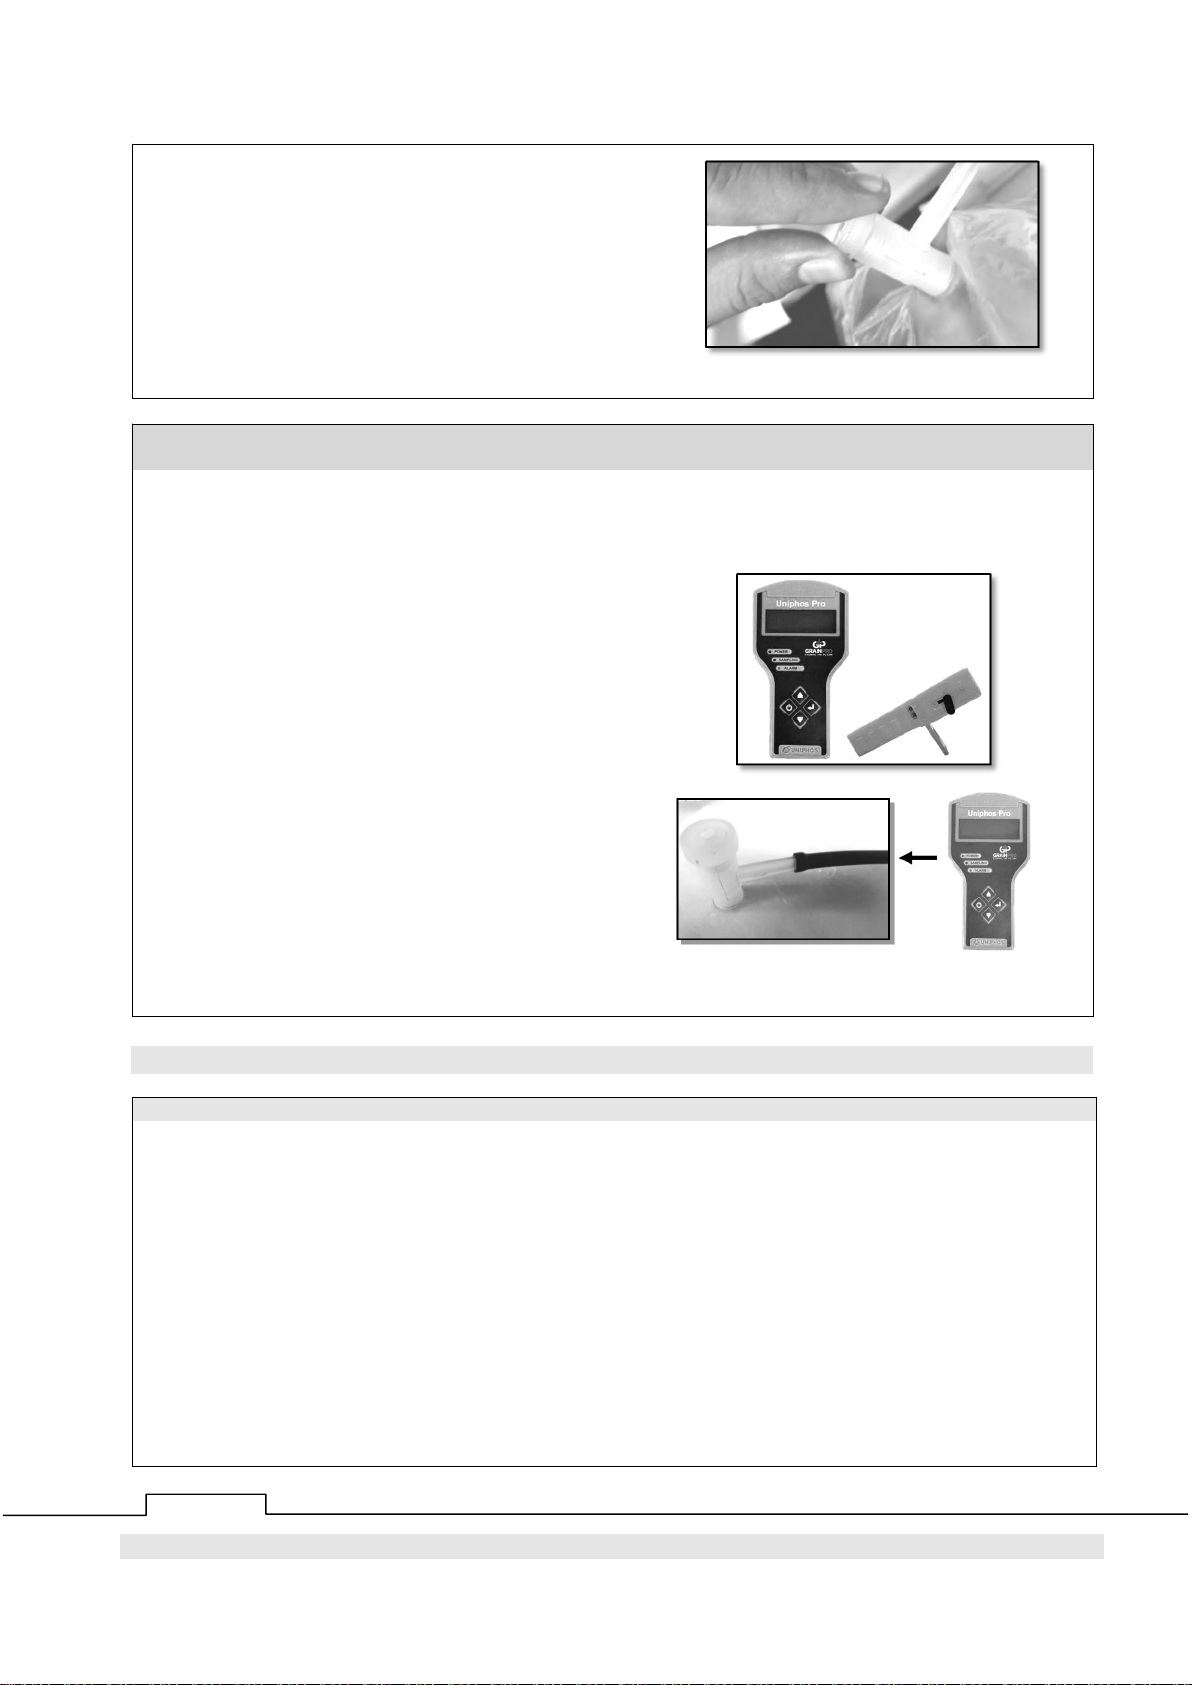
3.5.5. Twist the plastic valve cap to close after
taking the readings.
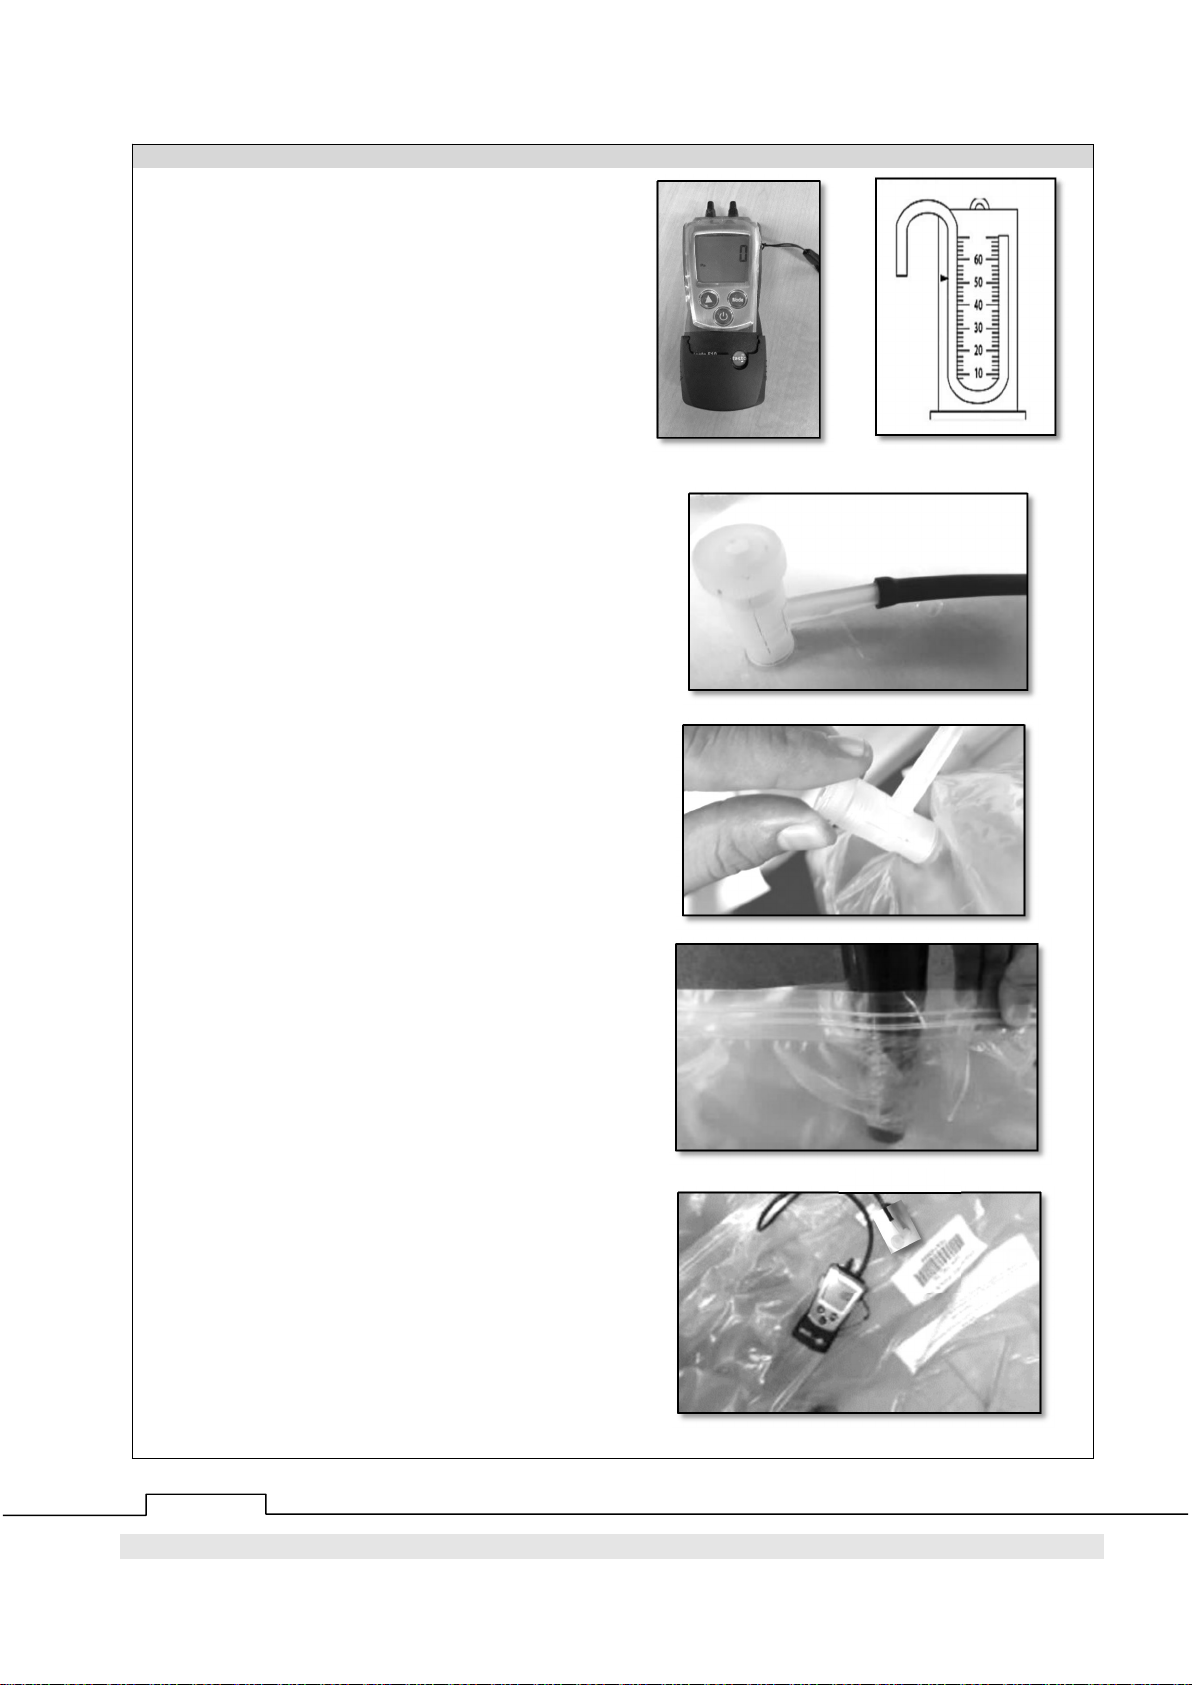
3.6. USING CARBON DIOXIDE ANALYZER FOR MONITORING (WITHOUT CO2FLUSHING) -
OPTIONAL
The GrainPro CO2analyzer uses a non-dispersive infrared radiation (NDIR) sensor for the detection of
carbon dioxide. When a sensor encounters a target gas, voltage signal is generated in proportion to the
gas concentration. This voltage signal is amplified, digitized and displayed on the instrument’s OLED
display.
3.6.1. When taking the carbon dioxide reading,
connect the flexible adapter hose into the
plastic valve.
3.6.2. Using the analyzer, carbon dioxide level can
be checked through the plastic valve with
flexible adapter hose before unloading.
Increased carbon dioxide level indicates
absence of any source of leaks from
punctures, holes or damages. CO2level of
ambient air is 0.04%.
3.6.3. Monitoring of carbon dioxide level is recommended to ensure control of insect infestation. Details of
using CO2analyzer are discussed in the analyzer’s instruction manual.
4.1.
CARBON
DIOXIDE
(CO
2
)
SAFETY
4.1.1. Carbon dioxide does not support life. It can act as a simple asphyxiant by diluting the concentration
of oxygen in air below the levels necessary to support life. As it is heavier than air it will tend to
concentrate at lower levels.
4.1.2. Avoid breathing gas. Do not get in eyes, on skin, or on clothing. Wear leather safety gloves and
safety shoes when handling cylinders.
4.1.3. Protect cylinders from physical damage. Do not drag, roll, slide or drop. While moving cylinder,
always keep the removable valve cover in place. Never attempt to lift a cylinder by its cap; the cap is
intended solely to protect the valve. When moving cylinders, even for short distances, use a cart
(trolley, hand truck, etc.) designed to transport cylinders.
4.1.4. Never insert an object (e.g., wrench, screwdriver, and pry bar) into cap openings; doing so may
damage the valve and cause a leak. Use an adjustable strap wrench to remove over-tight or rusted
caps. Slowly open the valve. If the valve is hard to open, discontinue use and contact your supplier.
4.1.5. Close the cylinder valve after each use; keep closed even when empty.
4.1.6. Never apply flame or localized heat directly to any part of the cylinder. High temperatures may
damage the cylinder and could cause the pressure relief device to fail.
4.
CARBON
DIOXIDE
PURGING

GrainPro® TranSafeliner™ Instruction Manual (Vacuum Method) MA4081RAD1219-01
11
/14
4.2.
CALCULATION
OF
CARBON
DIOXIDE
REQUIREMENT
4.2.1. Carbon dioxide requirement formula:
a. Total Volume – Volume Occupied by the Commodity.
b. For every 2.0 kg CO2, 1 cubic meter of air is replaced.
c.Formula: (1 minus bulk density) x Volume (in m3) x 2
Recommendations:
• If commodity temperature is at 15 deg Celsius or below, there is no need for TSL.
• If commodity temperature is 15-20 deg Celsius, use TSL without carbon dioxide flushing but
fumigation should be conducted upon arrival.
• If commodity temperature is above 20 deg Celsius, use TSL with carbon dioxide flushing.
CARBON DIOXIDE REQUIREMENT BASED ON COMMODITY
COMMODITY
BULK AMOUNT OF CARBON DIOXIDE (CO2) FOR PURGING, kg
DENSITY TSL 20 TSL 40 TSL 40 High Cube
MT/m333 66 76
Barley 0.62 25.1 50.2 57.9
Cashew nuts 0.50 33.0 66.0 76.2
Chia seeds 0.68 21.1 42.2 48.8
Chickpeas 0.74 17.2 34.3 39.6
Cocoa beans 0.56 29.0 58.1 67.1
Coffee beans 0.59 27.1 54.1 62.5
Cotton seed 0.40 39.6 79.2 91.4
Cowpea 0.75 16.5 33.0 38.1
Maize 0.72 18.5 37.0 42.7
Millet 0.63 24.4 48.8 56.4
Mung bean 0.75 16.5 33.0 38.1
Oats 0.43 37.6 75.2 86.9
Paddy 0.60 26.4 52.8 61.0
Paddy, rice bran 0.55 29.7 59.4 68.6
Peanuts, shelled 0.64 23.8 47.5 54.9
Rice, milled 0.80 13.2 26.4 30.5
Rye 0.72 18.5 37.0 42.7
Sesame 0.59 27.1 54.1 62.5
Sorghum 0.72 18.5 37.0 42.7
Soybean 0.75 16.5 33.0 38.1
Sunflower 0.41 38.9 77.9 89.9
Wheat 0.77 15.2 30.4 35.1
Coffee beans 0.59 27.1 54.1 62.5
Cotton seed 0.40 39.6 79.2 91.4
Cowpea 0.75 16.5 33.0 38.1
Maize 0.72 18.5 37.0 42.7
Millet 0.63 24.4 48.8 56.4
Mung bean 0.75 16.5 33.0 38.1
Oats 0.43 37.6 75.2 86.9
Paddy 0.60 26.4 52.8 61.0
Paddy, rice bran 0.55 29.7 59.4 68.6

GrainPro® TranSafeliner™ Instruction Manual (Vacuum Method) MA4081RAD1219-01
12
/14
Peanuts, shelled 0.64 23.8 47.5 54.9
Rice, milled 0.80 13.2 26.4 30.5
Rye 0.72 18.5 37.0 42.7
Sesame 0.59 27.1 54.1 62.5
Sorghum 0.72 18.5 37.0 42.7
Soybean 0.75 16.5 33.0 38.1
Sunflower 0.41 38.9 77.9 89.9
Wheat 0.77 15.2 30.4 35.1
4.3.
PROCEDURE
FOR
PURGING
WITH
CARBON
DIOXIDE
(CO
2
)
4.3.1. Make sure that enough CO2is available on site. The weight of the CO2in the cylinder is supplied by
the industrial companies (i.e. 22kg standard capacities which may be used to calculate the number of
cylinders required). CO2cylinders are available with or without siphon (dip tube). For rapid flushing,
the cylinder without siphon should be inverted.
4.3.2. For rapid flushing, the cylinder should be
inverted using mechanical inverter.
However, the cylinders with siphon should
be in upright position during flushing.
4.3.3. If a mechanical inverter is not available, a
makeshift inverter can be made using
sandbags or other improvised technique.
The cylinder should be inverted with its top
resting on one sandbag and the bottom end
resting on pile of two or three sandbags high.
4.3.4. A standard high-pressure hose (available
only as separate item) should be connected
to the cylinder. This hose should be
guaranteed to withstand a pressure of 88
atmospheres (1,300 psi, or 92 kg/cm2).
Ensure that all connections are made
properly, and gaskets are in place where
they are required. The high-pressure hose
should have a length of about 2-meter and
have matching coupler at cylinder.
4.3.5. Open a section of the zipper and insert the
pressure kit. This serves as outlet to
discharge O2when flushing.

GrainPro® TranSafeliner™ Instruction Manual (Vacuum Method) MA4081RAD1219-01
13
/14
4.3.6. Open the cylinder valve. Adjust opening of
the valve until sound of liquid passing
through the hose is heard. The liquid CO2
flushes into the TSL and evaporates inside, it
pushes the air upward, acting as a piston,
until the air is totally replaced. The opening
through the zipper serve as an outlet for the
displaced air.
4.3.7. Ice formation along the pressurized hose
and the pipe connector during CO2flushing:
4.3.7.1. During this procedure, some ice
may form around the gas inlet and
high-pressure hose.
4.3.7.2. Flushing (emptying of the cylinder) depends on the amount of CO2to be applied. Emptying
one 22kg cylinder should only take about 20 to 30 minutes. If the pressure hose or the inlet
valve gets blocked with ice, this is an indication that the CO2is being released too quickly. If
this happens the cylinder should be closed until the ice melts, and then the cylinder valve
should be re-opened and adjusted to reduce the flow.
4.3.7.3. An additional indication that the gas is being released too quickly is when the liner begins
to balloon out because pressure begins to build-up inside. If this happens, the gas flow
should be decreased at the cylinder valve until the rate of air being expelled through the
outlet port is about the same as the rate of CO2entering the liner.
4.3.7.4. If necessary, for small scale applications and the cylinder is not inverted, weighing scales
may be used to control the weight of the gas delivered. In this case the gas is released
slowly through a pressure gauge which can be adjusted to control the flowrate.
4.3.8. Since CO2is heavier than air, the air in the TSL displaces upwards and is lifted out of the container
through the outlet port. Complete displacement is not possible as there is always some mixing at the
interface between the air and the CO2. However, if the final CO2concentration reaches 80% then the
O2concentration in the remaining air amounts to 4%. This mixing of the CO2with the remaining air,
and absorption of CO2by the commodity, takes 12-24 hours depending on temperature. This is the
time to determine the initial concentration of CO2.
4.3.9. After the required weight of CO2has been
flushed, immediately:
4.3.9.1. Close the CO2cylinder valve.

GrainPro® TranSafeliner™ Instruction Manual (Vacuum Method) MA4081RAD1219-01
14
/14
4.3.9.2. Close the zipper thoroughly using
the slider.
4.3.10. For controlling stored-product insects, maintaining CO2above 50% for 10 days, or CO2above
35% for 15 days is sufficient to provide complete control, after which the liner may be opened. In
addition, temperature accelerates treatment. Effective insect control may be achieved in as little as
three days at 25° and less at higher temperatures.
4.3.11. Although CO2is not toxic, it is an asphyxiant. It is advisable to unzip the TSL and wait until most of
the CO2has dispersed.
4.4.
CLOSING
AND
OPENING
OF
THE
SHIPPING
CONTAINER
4.4.1. Close the shipping container carefully and
be sure not to pinch/squeeze the excess
liner material between the container doors.
4.4.2. Care should be taken when opening the
shipping container considering shifting of
loads while on transit. It is advised to open
one side of the door first to check the
loads.
5.1.
REPAIRING
P
UNCTURES
AND
OTHER
DAMAGES
5.1.1. Use an ordinary 2” wide plastic adhesive
tape:
Clean the surface of the damaged area
with damp cloth and allow the surface to
totally dry before applying the plastic tape.
5.1.2. Protective maintenance:
5.1.2.1. Check the plastic tape
occasionally and replace or re-patch
if necessary.
6.1.
RECYCLING
GrainPro TSL is made of polyethylene with barrier layer.
6.1.1. The products can be delivered to the nearest recycling facilities in the area.
6.1.2. Plastic #4 – LDPE (Low Density Polyethylene) can be recycled into compost bins, paneling, trash
can liners and cans, floor tiles, and shipping envelopes.
5. MAINTENANCE AND CARE
6. RECYCLING
Table of contents
Other GrainPro Farm Equipment manuals

GrainPro
GrainPro COLLAPSIBLE DRYER CASE II User manual

GrainPro
GrainPro TRANSAFELINER BULK User manual

GrainPro
GrainPro TRANSAFELINER User manual

GrainPro
GrainPro GRAINSAFE 1.0/GHF User manual

GrainPro
GrainPro TRANSAFELINER MA3001RR0208-21 User manual

GrainPro
GrainPro TRANSAFELINER User manual

GrainPro
GrainPro GRAINSAFE BAG-1.0 User manual