GRAVOGRAPH M10 JEWEL User manual

F5120 701 - 01.2012 - ENG - (UPDATED EDITION NUMBER : 1)
Before installing and using this machine, you must read this user guide carefully.
Keep it in a safe place, in case you need to refer to it later.
User Manual
Machine
Electronic Engraving Machine
First Contact

M10 JEWEL Machine - Electronic Engraving Machine . 2 First Contact
Importer's address
GravoTechMarking SAS reserves the right to modify the information contained in this document without
notice.
TYPE OF MACHINE : M10 JEWEL Electronic Engraving Machine
MANUFACTURER : GRAVOTECH MARKING SAS
BP 15 - Z.I. - 10600 LA CHAPELLE SAINT LUC - FRANCE
This publication and its contents are proprietary to GravoTech Marking SAS (trademark Gravograph), and are intended
solely for the contractual use of GravoTech Marking SAS customers.
While reasonable efforts have been made to assure the accuracy of this manual, GravoTech Marking SAS shall not be liable
for errors contained herein or for incidental or consequential damage in connection with the furnishing, performance, or
use of this material.
GravoTech Marking SAS reserves the right to revise this manual and make changes from time to time without any
obligation by GravoTech Marking SAS to notify anybody of such revision or changes.
GravoTech Marking SAS can not be held liable for any problems arising out of the application or use of any products, circuits,
or software described herein. Neither does it convey a license under its patent rights nor the patent rights of third parties.
GravoTech Marking SAS provides no warranties whatsoever on any software used in connection with a Gravograph Laser
Engraving System, express or implied. Neither does it guarantee software compatibility with any off-the-shelf software
package or any software program that has not been written by GravoTech Marking SAS.
Intended use of this system must be followed within the guidelines of this manual. In no event will GravoTech Marking
SAS be liable for any damages caused, in whole or in part, by customer, or for any economic loss, physical injury, lost
revenue, lost prots, lost savings or other indirect, incidental, special or consequential damages incurred by any person,
even if GravoTech Marking SAS has been advised of the possibility of such damages or claims.
Gravograph is a registered trademark of GravoTech Marking SAS.
Windows is a registered trademark of Microsoft Corporation.
(c) GravoTech Marking SAS, 2012
All Rights Reserved.

First Contact M10 JEWEL Machine - Electronic Engraving Machine . 3
Summary
Information about regulations .............................................................5
Conformity Standards.......................................................................................................................5
Electrical security.............................................................................................................................5
Presentation.........................................................................................6
Introduction ...................................................................................................................................6
Contra-indications ...........................................................................................................................6
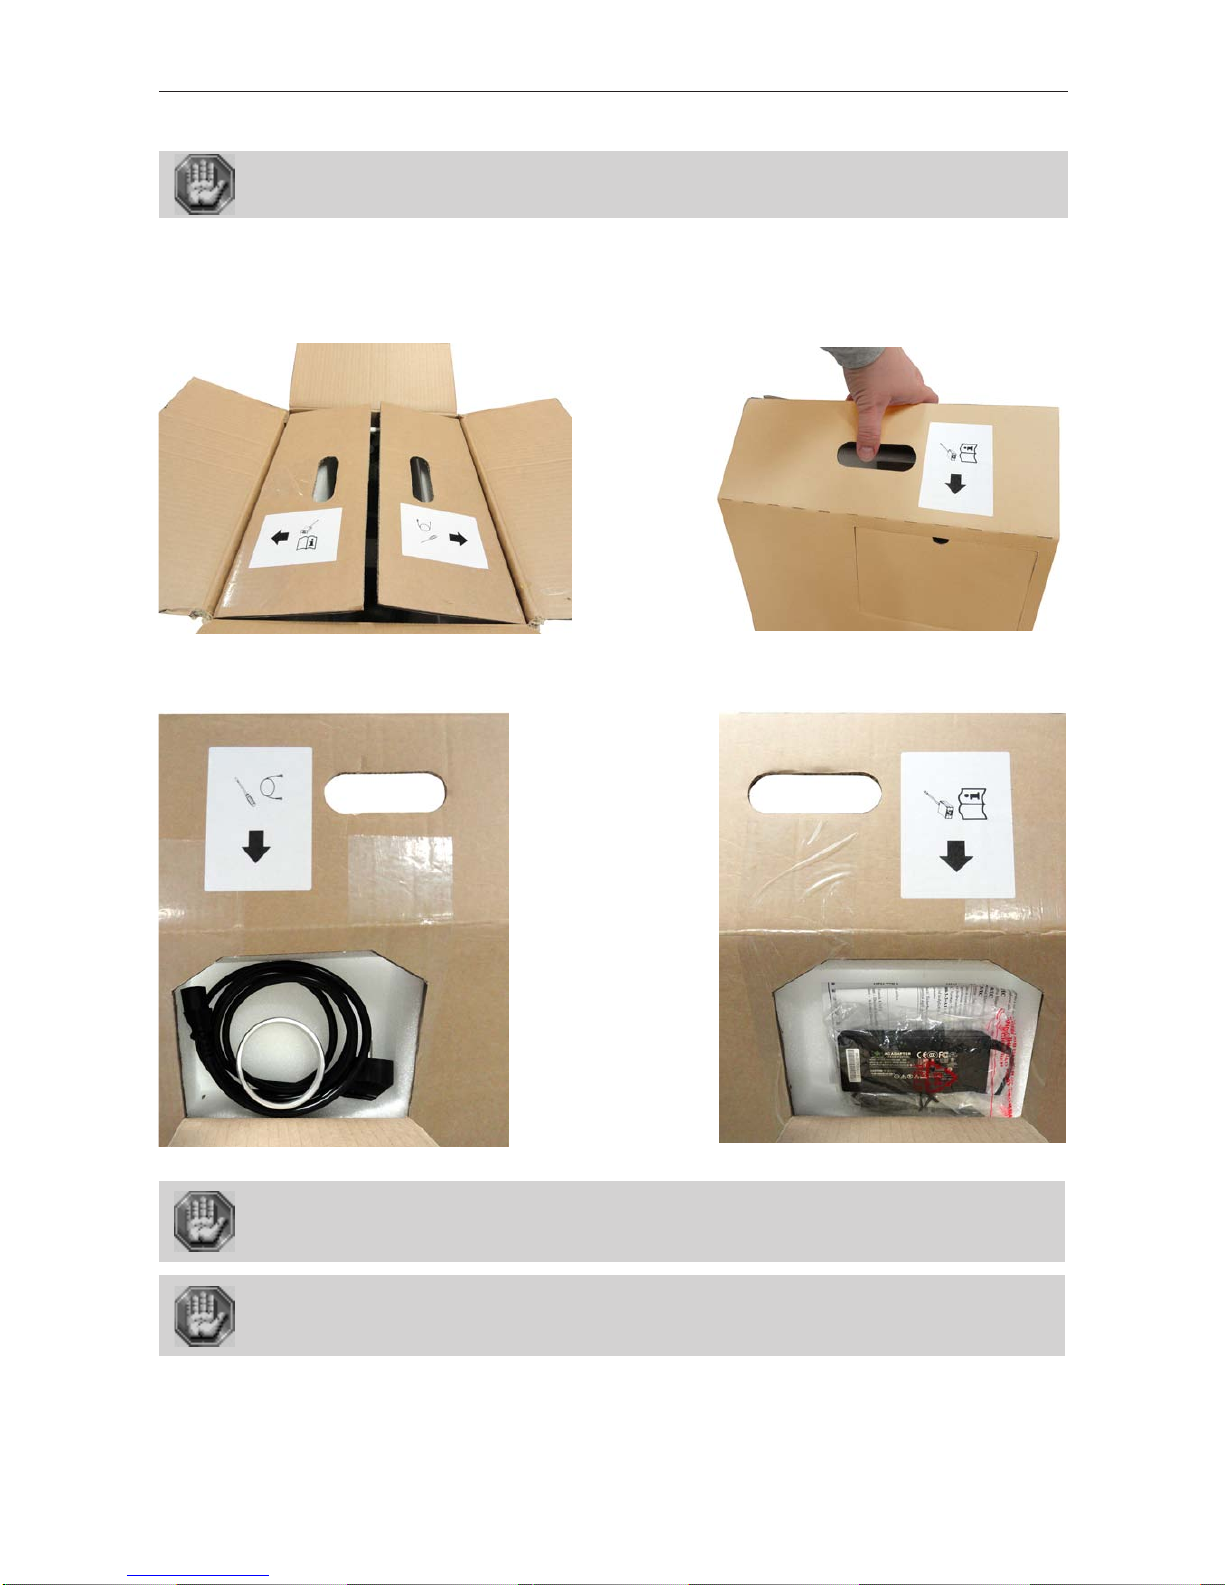
Stages of unpacking.........................................................................................................................7
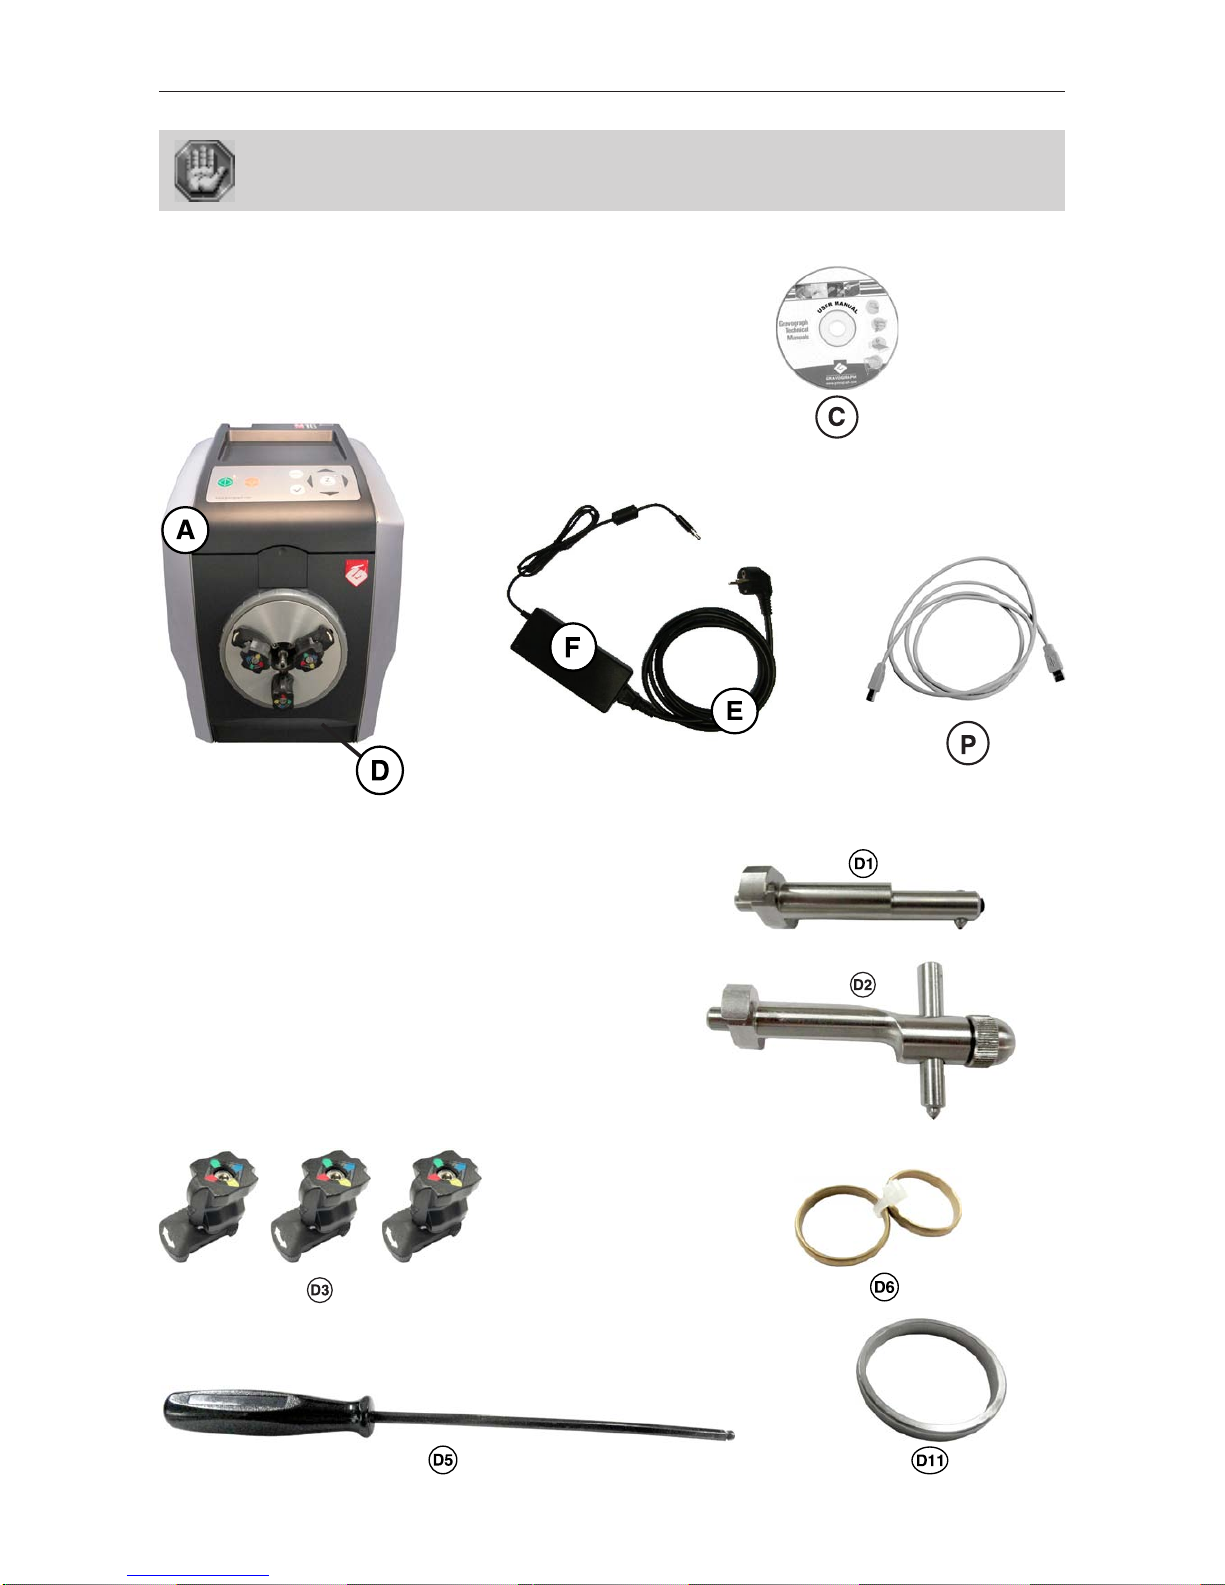
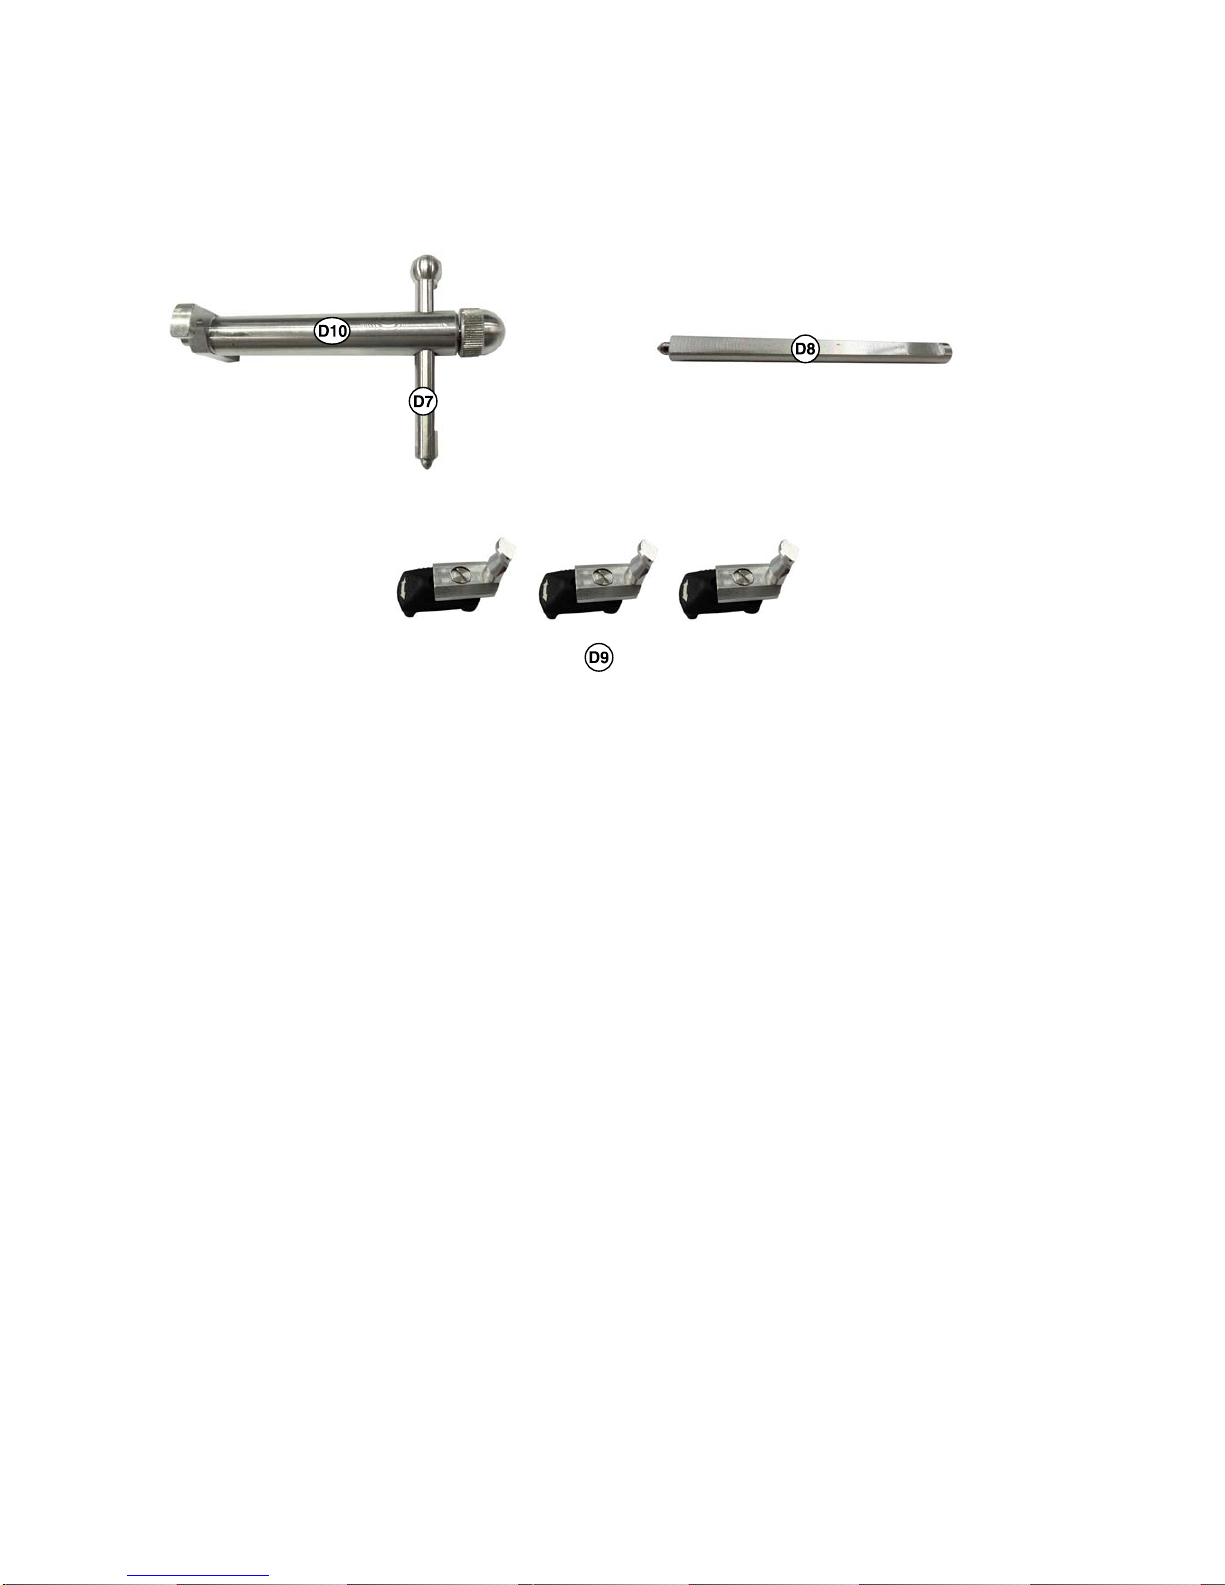
Unpacking - Contents of package.......................................................................................................8
Description.........................................................................................10
Front view of the machine............................................................................................................... 10
Engraving table........................................................................................................................................ 10
Chuck..................................................................................................................................................... 10
Rear view of the machine................................................................................................................ 11
Engraving machine connections.................................................................................................................. 11
Control panel of the machine........................................................................................................... 12
Installation ........................................................................................13
Physical installation advice.............................................................................................................. 13
Electric installation advice............................................................................................................... 13
Electrical connections of the machine ............................................................................................... 14
Connecting the M10 JEWEL machine to a PC.................................................................................... 15
Switching the machine on............................................................................................................... 17
Problems...................................................................................................................................... 17
Switching the machine off............................................................................................................... 17
Switching on again......................................................................................................................... 17
Make the M10 JEWEL machine ready to engrave with GravoStyle........................................................ 18
Engraving...........................................................................................19
Inside engraving............................................................................................................................ 20
Positioning a thin ring onto the jaws and Inside Engraving ............................................................ 21
Positioning a wide ring onto the jaws and Inside Engraving........................................................... 23
Positioning a thin bracelet onto the jaws and Inside Engraving..................................................... 25
Positioning a wide bracelet onto the jaws and Inside Engraving.................................................... 28
Outside engraving.......................................................................................................................... 31
Positioning a ring onto the jaws and Outside Engraving.................................................................. 32
Positioning a thin bracelet onto the jaws and Outside Engraving................................................... 35
Positioning a wide bracelet onto the jaws and Outside Engraving ................................................. 38
General maintenance .........................................................................41
Adjusting the machine (reference points).......................................................................................... 41
To adjust the M10 JEWEL machine on the X,Y axis for an inside engraving of a ring .......................... 42
To adjust the M10 JEWEL machine on the X,Y axis for an inside engraving of a bracelet.................... 43
To adjust the M10 JEWEL machine on the X,Y axis for an outside engraving of a ring........................ 44
To adjust the M10 JEWEL machine on the X,Y axis for an outside engraving of a bracelet.................. 45
To adjust the M10 JEWEL on the Z axis................................................................................................ 46

M10 JEWEL Machine - Electronic Engraving Machine . 4 First Contact
Technical characteristics................................................................... 47
Physical characteristics...................................................................................................................47
Electrical characteristics..................................................................................................................48
Engraving softwares characteristics..................................................................................................48
Optional accessories.......................................................................................................................48
Appendices........................................................................................ 49
Gravograph Machines - Soft setup....................................................................................................49

First Contact M10 JEWEL Machine - Electronic Engraving Machine . 5
Information about regulations
Conformity standards
This hardware was designed and build in conformity with the relevant EC marking and EEC directives :
• "Machine Security" Directive 2006/42/EE
• "Electromagnetic compatibility" Directive 2004/108/EC
• "Low Voltage" Directive 2006/95/EC
Themodicationortransformationofthisequipment,theadaptationandinstallationof
accessories not recommended by GRAVOTECH MARKING SAS, the installation of this
equipment in a manufacturing process, the piloting by a robot, the connection to an
external automaton, modify the characteristics of this material and can make it not
compliant with the European Directives it is subjected.These modications voids the
responsibilityofthemanufacturer.
Inthiscase,thepersonwhotsthemachineandtheequipmentisresponsiblefortheEC
complianceofthenalworkstation.
Electricalsecurity
This hardware complies with standards EN 60204-1 and EN 60950-1.
The different fuses of the machine comply with the IEC 127-2 norm (International Electric Committee).
The different security levels the input/output answer are indicated for each connector in the chapter «Rear view of the
machine». Two security levels are possible :
- Dangerous voltage (power supply, accessories, plugs ...).
- Very low security voltage.
Machinesecurity
This hardware is in conformity with the norm EN ISO12100-1 and EN ISO12100-2.
Electromagneticcompatibility
This hardware is in conformity with electromagnetic compatibility norms:
• EN 55022 - classe B ; EN 61000-3-2 ; EN 61000-3-3 (emission in residential, commercial, and light industrial
environment)
• EN 61000-6-2 (immunity in industrial environment)
All the cables used with this hardware must be in conformity with the electronic compatibility standards, norm EN 55022
- class B.
Electricalsecurity
Thismaterialis«class1».ThemainsplugMUSTalwaysbeconnectedtoaneutralsocket
andcomplywiththeregulationsinforceinthecountryofinstallation.Ifyoudonothave
aplugofthistype,haveoneinstalledbyanapprovedelectrician.Undernocircumstances
shouldyoudepartfromthisinstruction.
The manufacturer bears no responsibility towards any user where alterations have been carried out contrary to the
manufacturer’s specications, notably with respect to electrical/electronic elements.
Anyoperation,otherthanthosementionedhere,mustonlybecarriedoutbyanapproved
Gravographtechnician.
Donottakethemachineaparttorepairorcleanit:thiswillvoidyourguarantee.
Thissymbolindicatesthatoncethisequipmenthasreachedtheendofitsusefullife,it
mustnotbedisposedofwithnon-sortedmunicipalwaste,inaccordancewiththeEuropean
Directive2002/96/EC.
The equipment must be disposed of at an appropriate collection point for processing,
sorting,andrecyclingofWasteElectricalandElectronicEquipment(DEEE).
The elements which compose Electrical and Electronic Equipment may contain
substanceswhichhaveharmfuleffectsontheenvironmentoronhumanhealth.
By following these instructions, you are helping the environment, contributing to the
preservationofournaturalresources,andprotectinghumanhealth.

M10 JEWEL Machine - Electronic Engraving Machine .6 First Contact
Presentation
Introduction
Thank you for purchasing the M10JEWEL machine and for your condence in our knowledge in the eld of the engraving.
Thanks to its innovative design and with its performance results, the M10JEWEL machine combines exibility and full
featured performance without sacricing simplicity, ease of use, or ease of maintenance.
Tobeginwith,wehighlyrecommendthatthisentiremanualbereadbeforeattempting
to use the M10JEWELmachine.Themanualincludesimportantinformationaboutsafety,
assembly,use,andmaintenanceoftheM10JEWELmachine.
Themachinemustneverbehandledwithoutanadultpresent.Keepthemachine,wires
andcablesoutofchildren’sreach.
The M10JEWELengravingmachineisahighperformancemachine:
Alldispositionscontributingtothesafetyofusemustimperativelyberespected.
Contra-indications
This machine is only designed for inside and outside engraving bracelets or rings and
mustneverbeusedforotherapplications.
Donotusethismachineinexplosiveenvironment.
Thismachineisonlydesignedforoneuser.Donotletseveralpeopleusethemachine
simultaneously.
• If the machine is not to be used for a long period, unplug the electricity supply and cover the machine (packaging,
cover, lid...)
• Do not move the engraving head by hand unless mechanical block of the machine as described in the paragraph
"Mechanical block" of this manual's "Installing" chapter.
• Do not spill any liquids onto the machine (drinks, cleaning fluids…) unless when recommended by
GRAVOTECH MARKING SAS (example : lubrication).
• The machine should never be used with anything other than Gravograph accessories and tools.
• Never hold the material to be engraved in your hands. Only use the Gravograph clamping systems designed for your
machine.
• Make sure that the material is well clamped before starting to engrave.
• Do not take the engraving material out of the machine during engraving.
• If the engraving must be stopped, use the function key provided for this purpose on the keyboard of the machine.
Toavoidanyrisksofbeingcrushedbythemachineduringengraving,stayclearofthe
chuckandthediamondtip.

First Contact M10 JEWEL Machine - Electronic Engraving Machine . 7
Stagesofunpacking
Beforeopeningthecardboardbox,checkthatitistherightwayup.
1. Openthebox.
2. Takeoutthemachinewiththeinsideboxusingthetwohandles.
3. Takeouttheaccessories:
Make sure that no components are missing from the packaging. If any part has been
forgottenpleasegetintouchwithyourGRAVOGRAPHdealer.
Keepallthepackagingmaterialssothatyoucanmoveyourmachineintotalsafety.This
packingwasconceivedtoguaranteetheprotectionofthemachineduringitstransport
(forareturninrepairforexample).
ThispackagingisinconformitywithEuropeanrecyclingstandards.

M10 JEWEL Machine - Electronic Engraving Machine . 8 First Contact
Unpacking-Contentsofpackage
Checktheconditionofthepackagingwhenyoureceiveit.Ifthereareanysignsofdamage,
inform the carrier and your GRAVOGRAPH dealer immediately by recorded delivery,
specifyingtheexactnatureoftheproblem.
Contentofpackage
A. A M10 JEWEL engraving machine
C. User instructions (on CD)
D. An accessories drawer
E. One mains cable for the external power supply (F)
F. One external power supply
G. One USB cable
Contentoftheaccessoriesdrawer
-InsideEngraving:
D1. A diamond tip for rings
D2. An adjustable diamond tip for bracelets
D3. 3 rings/bracelets jaws
D4. An adjustable jaws for rings
D5. One short allen key
D6. Two reference rings : - Interior diameter of 21 mm
- Width of 3 mm
D11. A reference bracelet: - Interior diameter of 70 mm
- Width of 10 mm

First Contact M10 JEWEL Machine - Electronic Engraving Machine .9
-OutsideEngraving:
D7. A dimond tip for bracelets
D8. A dimond tip for rings (longer)
D9. 3 rings/outside engraving jaws
D10. An adjustable diamond tip holder for outside engraving (for D7 and D8)

M10 JEWEL Machine - Electronic Engraving Machine . 10 First Contacts
Description
The M10 JEWEL machine is a machine for engraving bracelets, wedding rings and rings.
It has a keyboard for controlling the machine.
Files to be engraved are transferred from the computer to the machine by the intermediary of a cable which is plugged into
the USB port on the M10 JEWEL machine.
The actual engraving process is controlled by a diamond tip.
The object to be engraved is held in place by 3 jaws (j1) tted onto the chuck (J) with concentric fastening (consult your
GRAVOGRAPH dealer to nd out about the various types of jaws available).
The M10 JEWEL machine cover a maximum engraving surface area of 9.8"x 0.6"
(250 x 15 mm).
Front view of the machine
Engraving table
A. Base
B. Control panel (exible 9-key control keyboard)
D. Accessories drawer
E. Location for the outside engraving diamond tips
J. Chuck (concentric fastening)
K. Tightening ring
Chuck
J1. Location for 3 jaws
J2. Location for the inside engraving diamond tips
J3. Directional arrow

First Contacts M10 JEWEL Machine - Electronic Engraving Machine . 11
Rear view of the machine
L. Main stop button (On/Off)
Engraving machine connections:
Each connection responds to one of the following security levels :
- Dangerous voltage.
- Very low security level.
N1 - External power supply 24V - 30W - Very low security level
G - USB slot - Very low security level

M10 JEWEL Machine - Electronic Engraving Machine . 12 First Contacts
Control panel of the machine
START (engraving start)
PAUSE
JOYSTICK
VALIDATION
Z REF
SHIFT
+ = AUTO Z REF
+ X,Y MACHINE SETTING
+ Z MACHINE SETTING
+ ENGRAVING CYCLE
If the LED is lit, the key is activated
If the LED is lit, the machine is switched on

First Contacts M10 JEWEL Machine - Electronic Engraving Machine . 13
Installing
Before carrying out the following operations, make sure the machine is switched off and
unplugged, switch (L) to position 0.
Physical installation advice
• Put the Gravograph machine onto a stable at, clean surface with mini. sizes of 270 x 225mm.
Make sure the machine is well-ventilated.
• Normal lighting is sufcient to use the machine.
• Clear the work surface so that you can
- easily and quickly access all external parts of the machine,
- quickly gain access, in case of necessity, the general shutdown button (L) of the machine,
- make sure that all moving parts of the machine have enough room to move freely,
- avoid any accidental unplugging of the cables.
The machine’s power supply cable being used as a sectionning device, it must be easily
accessible and the wall plug must be installed near the machine and must also be easily
accessible.
• Protect Gravograph equipement against :
- Moisture (rain, snow, condensation…),
- Heat (direct sunlight, heating…),
- Brusque temperature changes,
- Dust (exhaust pipe),
- Liquid splashes, spillages on the electronic rack, cables and connections, and any other part of the machine;unless
recommended by GRAVOTECH MARKING SAS (ex. : lubrication),
- Vibrations,
- Electric or electronic radiation.
Electric installation advice
This material is «class 1». The mains plug MUST always be connected to a neutral socket
and comply with the regulations in force in the country of installation. If you do not have
a plug of this type, have one installed by an approved electrician. Under no circumstances
should you depart from this instruction.
In order to avoid outside interference, the user is advised to carry out the following points.
• Plug the Gravograph machine into a mains line, avoiding having several machines on the same line (several plugs on
the same line or using a multi-plug).
Exception : If other things are connected to the machine (such as a machine and the computer which
pilots it), the machines should be connected to the same mains line.
• Avoid using the same line to supply inductive or capacitive machines as well as the Gravograph machine (motors,
electrosluices, chargers...)
• Avoid using a manual or automatic commutator on the same mains line as the Gravograph machine (relay, temporiser,
programmer, automatic circuit interrupter, automatic interrupter...).
• Check that machines surrounding your Gravograph machine are in conformity to the norms of radioelectric perturbation
emissions (consult the technical leaet of each machine). If they are not in conformity, place them as far away as
possible from the Gravograph machine.
• Only use Gravograph accessories.

M10 JEWEL Machine - Electronic Engraving Machine . 14 First Contacts
Electrical connections of the machine
Position yourself behind the machine.
1. Plug power supply cord of the external power supply (F) of the machine into the External power
supply connection of the M10 JEWEL machine.
2. Plug power supply cord (E) into the external power supply (F) of the machine and then into
the mains socket.
To cut off the mains supply to your machine in the case of severe problems, unplug the mains
cable or switch off the machine with the main stop button at the side of the machine.
Make sure that you can reach them easily.

First Contact M10 JEWEL Machine - Electronic Engraving Machine . 15
Connecting the M10 JEWEL machine to a PC
The computer and the M10 JEWEL Machine must both be switched off.
As PCs and the Windows® graphical environment are in widespread use in the IT sector,
we have used these products as the basis for dening the installation and operating
procedure for the M10 JEWEL machine.
If you don’t have equipment which is compatible and you encounter some problems of installation or use, contact your
Gravograph agent.
Connection cables
• UseGravographconnectioncables(consultyourGravographdistributorfortheproductsavailable).
These cables are adapted for the machines to which they will be connected.
They must be in conformity with the electromagnetic compatibility standards, norm EN 55022 - class B and protect
fromexternalelectric«attacks»(conformtothenormsofimmunityandCEMsusceptibility).
• Donotusecableswhicharetoolong.Keepthemachinesascloseaspossibleanduseashortacableaspossible.
• Separatethemainscableandthetransmissioncable(avoidconnectingthetransmissionandmainscablestothesame
socket,etc...).
Follow the connection procedure depending on the connection cable supplied with the M10 JEWEL machine.
The machine is delivered with the following cables :
•USBcable(P)

M10 JEWEL Machine - Electronic Engraving Machine . 16 First Contact
Connecting the M10 JEWEL machine/PC via an USB link
1. Plug the USB cable (P) into the USB port of the machine (pict.1).
2. Plug the USB cable (P) into the USB port of the PC.
RefertotheinstallationmanualofthecomputerfortheUSBport(1.1).
PC

First Contact M10 JEWEL Machine - Electronic Engraving Machine . 17
Switching the machine on
Switch on the machine main stop button (L) to position I.
Afterfewseconds,themachinewillemitashort"beep".TheLED(L2)islit.
Leave the machine plugged in even if it is not in constant use.
Problems
Ifoneoftheoperationalsignsisabsent(forexample:theLED(L2)isnotlit).,checkthefollowingpoints:
•Arethetwoendsofthemainscablecorrectlyconnected?
•Isthemainsplugconnected?Isitlive?
Ifthemachinedoesnotcomeon,beforecallingatechnician,pleasecheckpowerconnections
to the mains socket.
Switching the machine off
Switch the main stop button (L) to position O.
Switchoffthemachineforthefollowingreasons:
-ifyouareleavingtheworkstation(endoftheday,forexample),
-physicaldamage(fall,re,liquidscomingintomachine…),
- mechanical/electrical/electronic faults, leading to a possible breakdown,
- in case of major problem or mechanical block of the machine,
- to reboot,
- for external cleaning.
Switching on again
If the machine or the programme which runs it crashes you may have to reboot the machine.
If this happens, switch the machine off. Wait 30 seconds and switch it on again.
Respect this rule. This time allows any electric shock to the machine, possibly damaging
the power supply, to be avoided.

M10 JEWEL Machine - Electronic Engraving Machine . 18 First Contact
Make the M10 JEWEL machine ready to engrave with GravoStyle (Version 7 mini.)
1. Check that your computer has the minimum required conguration :
2. See the chapter "Make a Gravograph rotary machine ready to engrave" in the appendix
"Gravograph Machines Soft setup" in order to install the GT Smartstream 3.xx driver and the
Gravostyle 7 engraving software on your PC.
Then add the M10 JEWEL machine in the "Installed printer list" of the GravoStyle 7 engraving
software.

First Contact M10 JEWEL Machine - Electronic Engraving Machine . 19
Engraving
You have just created a composition with your engraving software.
1. Switch on the machine and wait a few seconds.
The machine is ready to receive a le as indicated by the computer :
You can choose between inside engraving and outside engraving and between bracelet and
ring (1) . Use "Layout Wizard", the engraving assistant of GravoStyle 7 :
2. Intheengravingprogramme,makesurethatyouhaveindicatedthegoodengravingparameters,
the good machine parameters, the Z speed and the engraving orientation :
3. transfer the composition to the M10 JEWEL machine using the key (Launch).

M10 JEWEL Machine - Electronic Engraving Machine . 20 First Contact
Wide ring - Inside Engraving
(width : 4 to 8 mm)
(engraving diameter : 12,5 to 25 mm)
Diamond tip (D1) for rings mounted in the
center of the chuck.
The 3 rings/bracelets jaws (D3) mounted on
Blue position.
Wide ring montage procedure - Inside Engraving
described pages 23-24.
Thin bracelet - Inside Engraving
(width : 3 to 12 mm)
(engraving diameter : 45 to 74 mm)
Diamond tip (D2) (adjustable) for bracelets
mounted in the center of the chuck.
The 3 rings/bracelets jaws (D3) mounted on
Yellow position.
Fine Bracelet montage procedure - Inside
Engraving described pages 25-27.
Inside Engraving
For the Inside Engraving, 4 engraving montages are possible according to the sizes of the object
to be engraved :
Thin ring - Inside Engraving
(width : 1.5 to 4 mm)
(engraving diameter : 12 to 25 mm)
Diamond tip (D1) for rings mounted in the
center of the chuck.
The 3 rings/bracelets jaws (D3) mounted on
Red position.
Fine ring montage procedure - Inside Engraving
described pages 21-22.
Wide bracelet - Inside Engraving
(width : 11 to 20 mm)
(engraving diameter : 45 to 74 mm)
Diamond tip (D2) (adjustable) for bracelets
mounted in the center of the chuck.
The 3 rings/bracelets jaws (D3) mounted on
Green position.
Wide Bracelet montage procedure - Inside
Engraving described pages 28-30.
Table of contents
Other GRAVOGRAPH Printer manuals

GRAVOGRAPH
GRAVOGRAPH IM4 User manual

GRAVOGRAPH
GRAVOGRAPH IS400 User manual

GRAVOGRAPH
GRAVOGRAPH LS900 Fibre Operating instructions

GRAVOGRAPH
GRAVOGRAPH L-Solution 700 User manual

GRAVOGRAPH
GRAVOGRAPH IS200 User manual

GRAVOGRAPH
GRAVOGRAPH IS200 Operating instructions

GRAVOGRAPH
GRAVOGRAPH IS900 User manual

GRAVOGRAPH
GRAVOGRAPH M20 BEAUTY CUBE Operating instructions
Popular Printer manuals by other brands

Gainscha
Gainscha PT-380 manual

NEC
NEC Silentwriter 1765 Configuration guide

Rongta Technology
Rongta Technology ACE V1 user manual

Konica Minolta
Konica Minolta Magicolor 4650 brochure

FARGO electronics
FARGO electronics PERSONA C30 user manual

Panasonic
Panasonic KX-PX20M - Photo Printer - 20 Sheets quick guide