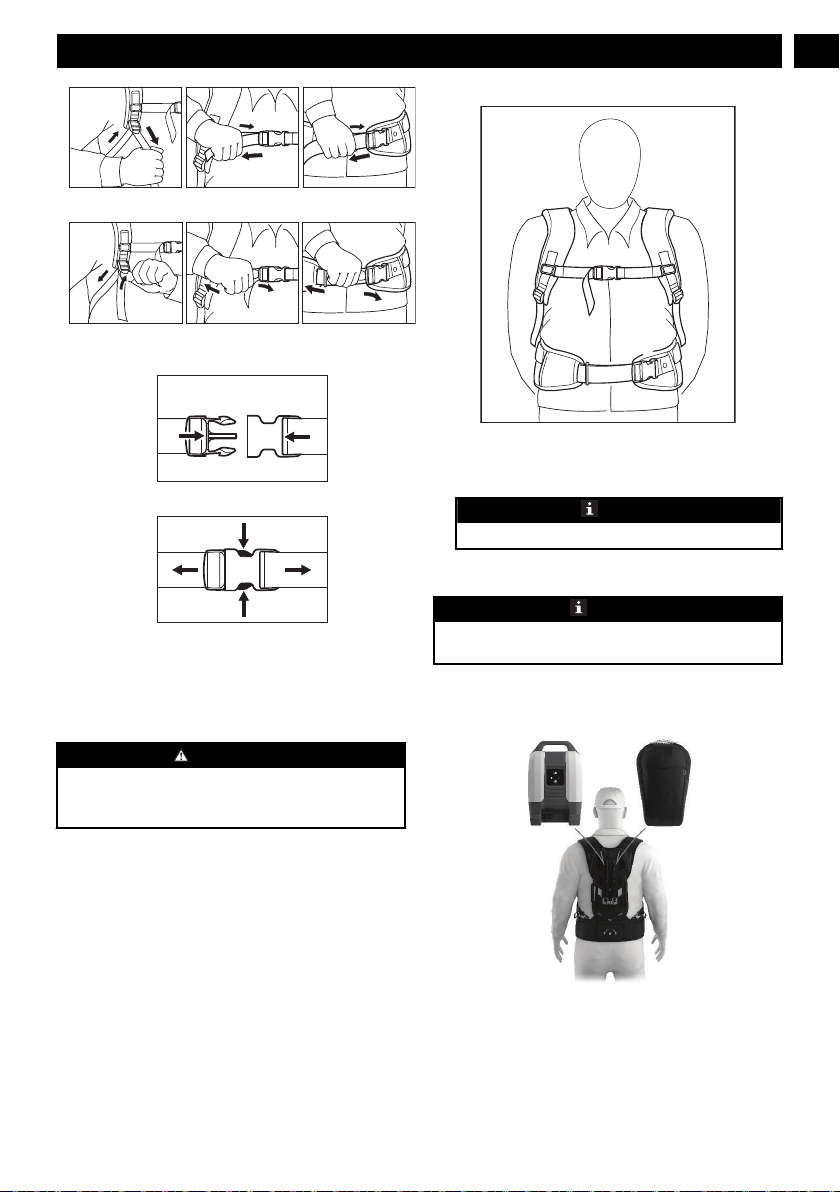
GreenWorks 82BB12 User manual

82BB12/ 82BBH12
EN OPERATOR MANUAL
FR MANUEL D’OPÉRATEUR
Battery
Batterie
ES MANUAL DEL OPERADORBatería
2936202/ 2946602
P0803028-01 Rev B


1 Description.........................................4
2 Overview............................................ 4
3 Important Safety Instructions..........4
4 Safety notes and precautions............4
5 The recommended ambient
temperature range:........................... 5
6 Symbols on the product.................... 5
7 Risk levels...........................................5
8 Proposition 65....................................5
9 Environmentally safe battery
disposal...............................................5
10 Installation......................................... 6
10.1 Connect the adapter........................................... 6
10.2 Charge the backpack battery..............................6
10.3 Put on the backpack...........................................6
10.4 Adjust the backpack harness..............................6
10.5 Install the backpack battery............................... 7
11 Operation........................................... 8
11.1 LED on battery.................................................. 8
11.2 Acoustic signal.................................................. 8
11.3 Adjust the height................................................8
11.4 Connect with APP (for battery with
bluetooth)...........................................................8
12 Maintenance.......................................9
12.1 Clean the machine............................................. 9
12.2 Stow the machine...............................................9
13 Troubleshooting...............................10
14 Technical data.................................. 11
15 Limited warranty............................ 11
3
English EN

1 DESCRIPTION
2 OVERVIEW
NOTE
For 82BB12 (2936202), only the Backpack battery (1), the
cable (5) and the adapter (6) are included. For 82BBH12
(2946602), all the items listed below are included.
1Backpack battery
2Carrying handle
3Shoulder straps
4Hip/Waist belt*
5Cable
6Adapter
7Trimmer Support Plate
3 IMPORTANT SAFETY
INSTRUCTIONS
For the proper use, maintenance and storage of this battery, it
is crucially important that you read and understand the
instructions given in this manual.
To avoid serious injury, risk of fire, explosion and danger of
electric shock or electrocution:
• If the battery pack case is cracked or damaged, DO NOT
insert into the charger. Replace with a new battery pack.
• Charge the battery pack only with the recommended
charger.
• DO NOT try to short circuit any terminals of battery
pack.
WARNING
If the battery fluid gets in your eyes, flush immediately with
clean water for at least 15 minutes. Get immediate medical
attention. Do not expose the battery pack to rain or wet
conditions. Do not immerse the tool, battery pack, or
charger in water or other liquid.
• Do not allow the battery pack or charger to overheat. If
they are warm, allow them to cool down. Recharge only
at room temperature.
• Do not place the battery pack in the sun or in a warm
environment. Keep at normal room temperature.
• Store in shady, cool and dry environments. If battery has
not been charged for an extended period of time, charge
for at least two (2) hours every two (2) months.
• The battery pack cells may develop a small leak under
extreme usage or temperature conditions. If the outer seal
is broken and the leakage gets on your skin:
- Use soap and water to wash immediately.
- Neutralize with lemon juice, vinegar, or other mild
liquid.
• If leakage gets in your eyes, follow instructions above
and seek medical attention.
• Please check prior use, if output voltage and current of
the battery charger is suitable for the battery pack.
• Use protective packaging when transporting battery pack.
• Handle with care.
• Keep away from humidity and fire.
• Disconnect the battery pack from the appliance before
making any adjustments, changing accessories, or storing
appliance. Such preventive safety measures reduce the
risk of starting the appliance accidentally.
• Recharge only with the chargers specified by the
manufacturer. A charger that is suitable for one type of
battery pack may create a rise of fire when used with
another battery pack.
• CAUTION – This appliance is not intended for use by
persons with reduced physical, sensory or mental
capabilities, or lack of experience and knowledge, unless
they have been given supervision or instruction
concerning use of the appliance by a person responsible
for their safety. Children should be supervised to ensure
that they do not play with the appliance.
4 SAFETY NOTES AND
PRECAUTIONS
• Do not disassemble the battery.
• Keep away from children.
• Do not expose battery to water or salt.
• Battery should be stored in cool, dry location.
• Do not place the battery in high-temperature locations,
such as near a fire, heater, etc.
• Do not reverse the positive terminal and the negative
terminal of the battery.
• When battery pack is not in use, keep it away from other
metal objects like paper clips, coins, keys, nails screws or
other small metal objects that can make a connection
from one terminal to another. Shorting the battery
terminals together may cause burns or a fire.
• Do not knock, strike or step on the battery.
• Do not solder directly onto the battery or pierce the
battery with nails or other sharp tools.
• In the event that the battery leaks and the fluid gets into
one’s eye, do not rub the eye. Rinse thoroughly with
water for at least 15 minutes.
4
English
EN

• Immediately discontinue use of the battery if, while
using, the battery emits an unusual smell, feels hot,
changes color, changes shape, or appears abnormal in any
other way.
5 THE RECOMMENDED
AMBIENT TEMPERATURE
RANGE:
ITEM TEMPERATURE
Battery Charg-
ing Tempera-
ture range
41 ˚F(5 ˚C)~125.6 ˚F(52 ˚C)
Battery storage
Temperature
range
1 year: 32 ˚F(0 ˚C)~73 ˚F(23 ˚C)
3 months: 32 ˚F(0 ˚C)~113 ˚F(45 ˚C)
1 month: 32 ˚F(0 ˚C)~140 ˚F(60 ˚C)
Battery Dis-
charging Tem-
perature range
6.8 ˚F(-14 ˚C)~149 ˚F(65 ˚C)
6 SYMBOLS ON THE PRODUCT
Some of the following symbols may be used on this tool.
Please study them and learn their meaning. Proper
interpretation of these symbols will allow you to operate the
tool better and safer.
Symbol Explanation
V Voltage
W Power
Direct current
Read all safety warnings and all instruc-
tions.
Precautions that involve your safety.
7 RISK LEVELS
The following signal words and meanings are intended to
explain the levels of risk associated with this product.
SYM-
BOL
SIGNAL MEANING
DANGER Indicates an imminently haz-
ardous situation, which, if not
avoided, will result in death
or serious injury.
WARNING Indicates a potentially hazard-
ous situation, which, if not
avoided, could result in death
or serious injury.
SYM-
BOL
SIGNAL MEANING
CAUTION Indicates a potentially hazard-
ous situation, which, if not
avoided, may result in minor
or moderate injury.
CAUTION (Without Safety Alert Sym-
bol) Indicates a situation that
may result in property dam-
age.
8 PROPOSITION 65
WARNING
This product contains a chemical known to the state of
California to cause cancer, birth defects or other
reproductive harm. Some dust created by power sanding,
sawing, grinding, drilling, and other construction activities
contains chemicals known to cause cancer, birth defects or
other reproductive harm. Some examples of these chemicals
are:
• Lead from lead-based paints;
• Crystalline silica from bricks and cement and other
masonry products;
• Arsenic and chromium from chemically treated lumber.
Your risk of exposure to these chemicals varies depending
on how often you do this type of work. To reduce your
exposure to these chemicals, work in a well-ventilated area,
and work with approved safety equipment, such as dust
masks that are specially designed to filter out microscopic
particles.
9 ENVIRONMENTALLY SAFE
BATTERY DISPOSAL
5
English EN

WARNING
If the battery pack cracks or breaks, with or without leaks,
do not recharge it and do not use. Dispose of the battery and
replace with a new battery pack. DO NOT ATTEMPT TO
REPAIR IT! To avoid injury and risk of fire, explosion, or
electric shock, and to avoid damage to the environment:
• Cover the battery’s terminals with heavy-duty adhesive
tape.
• DO NOT attempt to remove or destroy any of the
battery pack components.
• DO NOT attempt to open the battery pack.
• If a leak develops, the released electrolytes are
corrosive and toxic. DO NOT get the solution in the
eyes or on skin, and do not swallow it.
• DO NOT place these batteries in your regular
household trash.
• DO NOT incinerate.
• DO NOT place them where they will become part of
any waste landfill or municipal solid waste stream.
• Take them to a certified recycling or disposal center.
10 INSTALLATION
10.1 CONNECT THE ADAPTER
1. Connect the plug (1) to the socket (2).
2. Turn clockwise the plug (1) to secure.
3. Connect the plug (3) to the socket (4).
4. Turn clockwise the plug (3) to secure.
NOTE
Pull the lock button (5) to release the cable plug.
10.2 CHARGE THE BACKPACK
BATTERY
1. Connect on end of the adapter to the backpack battery.
2. Connect the other and of the adapter to the battery pack.
3. Plug the charger into an AC power outlet.
10.3 PUT ON THE BACKPACK
1. The backplate is fastened to the hip belt through the
pocket in the back.
2. The shoulder straps are attached to the D-rings at the back
of the hip belt.
10.4 ADJUST THE BACKPACK
HARNESS
10.4.1 INSTALL THE HARNESS
• Pull the ends of the straps downward to tighten the
harness.
6
English
EN

• Lift the tabs of the adjusters to loosen the straps.
• Close and lock the quick-release fastener by pushing it
together.
• Squeeze the hooks to open the quick-release fastener.
10.4.2 REMOVE THE HARNESS
• Open the quick-release fasteners on the waist belt and
chest strap.
• Loosen the harness straps by lifting the sliding adjusters
and then take off the battery.
WARNING
The battery must be quickly thrown off in the event of
imminent danger. The waist belt and chest strap must be
opened before throwing the battery to the ground.
10.4.3 PUT ON THE SHOULDER STRAP
1
4
33
2
1. Adjust and fasten the waist belt (1) so that it rests
comfortably on your hips.
2. Thread the end of the belt through the loop (2).
NOTE
Do not let the strap hang down.
3. Adjust the harness straps (3) to the correct length.
4. Adjust and fasten the chest strap (4) to correct length.
NOTE
The back padding must fit firmly and securely against your
back.
10.5 INSTALL THE BACKPACK
BATTERY
1. Insert the backpack battery in the backplate, the battery
slides into the compartment
2. Press the backpack battery down carefully until it snaps
into position.
7
English EN

11 OPERATION
CAUTION
Charge in a well-ventilated area. Do not block charger
vents. Keep them clear to allow proper ventilation.
11.1 LED ON BATTERY
Press the power button (8) to activate the LEDs– the display
(9) goes off automatically after 5 seconds. The acoustic signal
must sound briefly when the button is pressed (to confirm
function) – see also "Acoustic Signal".
NOTE
The display (13) will indicate the battery capacity.
If the fault LED Indicator (10) glow continuously / flash, and
the display (9) will show the fault code as below:
E0 BMS fault
E1 Over-current (discharging)/(charging)
E2 Communication fault (with charger or external
tools)
E3 Over-voltage of cell
E4 Low-voltage of cel
E5 Bad consistency of cell
E6 The external devices steal power
HI Over temperature of battery
Lo Low temperature of battery
11.2 ACOUSTIC SIGNAL
NOTE
This signal is activated by pressing the button (8) on the
battery.
A Short beep Acoustic signal works as it
should.
B Short beep once
every 10 sec
The battery is less than 20%
capacity.
C Short beep once
every 0.5 sec
Malfunction in battery.
11.3 ADJUST THE HEIGHT
NOTE
To get a digital version of the user manual or to get more
product information,scan the QR code (12) at the backside
of the harness.
NOTE
The lock button (14) is to release the backpack battery.
1. Push inward the lock button (13).
2. While pushing the lock button (13), move the lock button
(13) up or down to adjust the height.
3. Release the lock button (13) once the desired height is
set.
11.4 CONNECT WITH APP (FOR
BATTERY WITH BLUETOOTH)
This App can provide remote battery locking/ unlocking, a
battery locate feature, a battery serial number, a battery
firmware, a battery temperature, a battery charger, mode
repairing and firmware updating.
• The APP is governed by separate terms and conditions
available for viewing through the mobile application.
Download the application at:
https://appinstallation.globetools.systems?
brand=greenworks
APP ( Android,IOS)
• Follow the instructions in the app to create your account.
NOTE
If the connect time is more than 30 seconds, please repress
the battery indicator button to activate the battery again.
8
English
EN

12 MAINTENANCE
CAUTION
Do not let brake fluids, gasoline, petroleum-based materials
touch the plastic parts. Chemicals can cause damage to the
plastic, and make the plastic unserviceable.
CAUTION
Do not use strong solvents or detergents on the plastic
housing or components.
WARNING
Remove the battery pack from the machine before
maintenance.
12.1 CLEAN THE MACHINE
• Clean dust and dirt off the battery with a dry cloth or soft,
dry brush.
• Do not use solvents or aggressive detergents to clean the
battery. They may damage the polymer housing and other
components.
• Do not spray the battery with water.
12.2 STOW THE MACHINE
• Remove the connecting cord from the power tool or
adapte.
• Remove the adapter from the power tool or charger.
• Store the battery indoors in a dry, secure place that cannot
be accessed by children or other unauthorized users.
• Never store the battery in damp or corrosive
environments or in conditions that could lead to the
corrosion of its metal components.
• Never store the battery plugged into the adapte or power
tool.
• Never store the battery in a metal container or in a
container with metal objects (e.g., paper clips, nails,
coins, keys).
9
English EN

13 TROUBLESHOOTING
Problem Cause Solution
Power tool does not
start after switch-
on.
No electrical contact between power tool
and battery.
Remove adapter, check contacts and refit adapter.
Battery has low charge (beep once per 10
sec).
Charge the battery.
Battery too hot / too cold (LED indicate
HI or LO & beep continuously).
Allow battery to cool down to temperatures of about 10-40°C
(50-104°F). Allow battery to warm up slowly.
Malfunction in battery (LED will indi-
cates Malfunction code such as
E0,E1,E2,E3,E4,E5,E6).
Disconnect battery from power tool, take it off your back, ob-
serve battery and contact your GREENWORKS servicing
dealer immediately.
If the battery emits fumes, heats up, smells, makes noises or
shows signs of deformation, disconnect it from the power tool,
take it off your back, put it down and immediately move a safe
distance away. Keep children and animals away from the work
area. Keep battery away from combustible materials.
Electromagnetic problem or malfunction
in machine.
Take the adapter out of the power tool and refit it. Switch on
the power tool – if it still doesn't work, the power tool has a
malfunction and must be checked by a Greenworks servicing
dealer.
Moisture in power tool and/or battery. Allow power tool battery to dry.
Power tool does not
start after switch-
on.
Battery or machine's electronics are too
hot.
Take the adapter out of the power tool; allow the battery and
power tool to cool down.
Electrical or electromagnetic malfunc-
tion.
Remove the adapter and refit it again.
Malfunction in battery (LED will indi-
cates Malfunction code such as
E0,E1,E2,E3,E4,E5,E6).
Disconnect battery from power tool, take it o ff your back, ob-
serve battery and contact your Greenworks servicing dealer
immediately.
If the battery emits fumes, heats up, smells, makes noises or
shows signs of deformation, disconnect it from the power tool,
take it off your back, put it down and immediately move a safe
distance away. Keep children and animals away from the work
area. Keep battery away from combustible materials.
Running time is too
short.
Battery not fully charged. Charge the battery.
Useful life of battery has been reached or
exceeded.
Replace with a new battery pack.
LED indicates (E0,
E1, E2, E3, E4, E5,
E6) & beep once
per 2 sec.
Malfunction in battery. Disconnect battery from power tool, take it off your back, ob-
serve battery and contact your GREENWORKS servicing
dealer immediately.
If the battery emits fumes, heats up, smells, makes noises or
shows signs of deformation, disconnect it from the power tool,
take it off your back, put it down and immediately move a safe
distance away. Keep children and animals away from the work
area. Keep battery away from combustible materials.
10
English
EN

Problem Cause Solution
LED indicates LO
& beep once per 10
sec.
Battery has low charge. Charge the battery.
Adapter jams when
being inserted in
power tool / charg-
er.
Guides dirty. Carefully clean the guides.
Battery is not being
charged even
though LED on
charger blinks
green.
Battery too hot / too cold (LED indicate
HI or LO & beep continuously). Allow battery to cool down to temperatures of about 10-40°C
(50-104°F). Allow battery to warm up slowly.
Operate charger only in closed, dry rooms at ambient tempera-
tures of 10-40°C (50- 104°F).
LED on charger
flashes red.
No electrical contact between charger
and battery.
Remove the adapter and refit it again.
Malfunction in battery (the status LED
blinks RED). When the battery is inserted into the charger and the status
LED blinks RED, remove the battery from the charger for 1
minute, then reinsert. If the status LED blinks GREEN, then
the battery is properly charging. If the status LED is still blink-
ing RED, remove the battery and unplug the charger for 1 mi-
nute.
After 1 minute, plug in the charger and reinsert the battery. If
the status LED blinks GREEN, then the battery is properly
charging. If the status LED is still blinking RED, the battery is
defective and needs to be replaced.
LED on charger
flashes red.
Malfunction in charger. Check the current at the power outlet with another tool. Make
sure that the outlet is not turned off.
Check that the charger contacts have not been shorted by deb-
ris or foreign material.
If the air temperature is above 100ºF or below 45ºF, move the
charger and battery pack to a room temperature location.
Have charger checked by Greenworks servicing dealer.
14 TECHNICAL DATA
Model 82BB12/ 82BBH12
Battery 72V MAX DC 12Ah 864Wh
Charger time
90 min. (Use 82DPC8A Charger)
180 min. (Use GC420 Charger)
180 min. (Use GC400 Charger)
15 LIMITED WARRANTY
Greenworks hereby warranties this product, to the original
purchaser with proof of purchase, 2 year commercial battery
warranty against defects in materials, parts or workmanship.
11
English EN

Greenworks, at its own discretion will repair or replace any
and all parts found to be defective, through normal use, free
of charge to the customer. This warranty is valid only for
units which have been used for personal or commercial use
and that have been maintained in accordance with the
instructions in the owners’ manual supplied with the product
from new.
2 YEAR LIMITED BATTERY WARRANTY
COVERAGE:
– Greenworks Commercial Battery Packs (GL 250, GL 400,
GL 500, GL 900, GLW300, GLW600, GL400BT, 82BB12,
82BBH12)
– 2 year from the date of purchase (non transferable)
WARRANTY EXCLUSIONS, LIMITATIONS AND
RIGHTS:
1. All warranties may not be transferred by the consumer to
any subsequent purchaser.
2. Parts or components not supplied by the warrantor, or
parts or components that have been modified.
3. Any failure resulting from the use of improper tools or
improper repair procedures.
4. Any failure resulting from the use of improper tools or
improper repair procedures.
5. Any failure or part that has become inoperative due to
accident, impact, abuse, misuse, neglect, mishandling,
dulling of cutting edges, or failure to operate the product
in accordance with the information provided in the
instruction manual supplied with the product.
6. Normal deterioration of the exterior due to use or
exposure, and any repairs made necessary by normal
wear, improper maintenance, improper lubrication,
improper storage, dirt, abrasives, impact, moisture, water,
rain, snow, rust, corrosion, varnish, or other similar
conditions.
7. The unit, if it has not been operated and/or maintained in
accordance with the owner's manual.
8. Improper voltage for electric products and batteries that
have been exposed to temperatures beyond those
specified in the product’s instruction manual, batteries
that have not been properly charged or batteries that have
reached their useful life.
GREENWORKS HELPLINE:
Warranty service is available by calling our toll-free helpline,
at 1-855-470-4267.
TRANSPORTATION CHARGES:
Transportation charges for the movement of any power
equipment unit or attachment are the responsibility of the
purchaser. It is the purchaser’s responsibility to pay
transportation charges for any part submitted for replacement
under this warranty unless such return is requested in writing
by Greenworks.
Greenworks Tools
PO Box 1238
Mooresville, NC 28115
12
English
EN

1 Description.......................................14
2 Aperçu.............................................. 14
3 Instructions de sécurité
importantes...................................... 14
4 Notes de sécurité et précautions.....14
5 La plage de température
ambiante recommandée :................15
6 Symboles figurant sur la
machine............................................ 15
7 Niveaux de risques...........................15
8 Proposition 65..................................15
9 Élimination des batteries sans
danger pour l'environnement.........16
10 Installation....................................... 16
10.1 Raccordez l’adaptateur.................................... 16
10.2 Chargez la batterie à dos..................................16
10.3 Enfilez le sac à dos.......................................... 17
10.4 Réglez le harnais du sac à dos......................... 17
10.5 Installez la batterie à dos................................. 18
11 Utilisation.........................................18
11.1 DEL sur batterie...............................................18
11.2 Signal sonore................................................... 18
11.3 Réglez la hauteur............................................. 18
11.4 Connexion à l’application (pour les
batteries équipées de Bluetooth)......................19
12 Entretien...........................................19
12.1 Nettoyez la machine........................................ 19
12.2 Entreposez la machine.....................................19
13 Dépannage........................................20
14 Données techniques......................... 22
15 Garantie limitée...............................22
13
Français
FR

1 DESCRIPTION
2 APERÇU
REMARQUE
Pour 82BB12 (2936202), seuls la batterie à dos (1), le câble
(5) et l’adaptateur (6) sont inclus. Pour 82BBH12
(2946602), tous les éléments énumérés ci-dessous sont
inclus.
1Batterie à dos
2Poignée de transport
3Bandoulières
4Ceinture de hanche/
taille*
5Câble
6Adaptateur
7Plaque de support du
taille-bordures
3 INSTRUCTIONS DE SÉCURITÉ
IMPORTANTES
Pour l'utilisation adéquate, l'entretien et le rangement de cette
batterie, il est d'une importance capitale de lire et de
comprendre les instructions de ce manuel.
Pour éviter de graves blessures, le risque d'incendie,
d'explosion et le danger d'électrocution :
• Si la batterie est fissurée ou endommagée, NE l'insérez
PAS dans le chargeur. Remplacez-la par une nouvelle
batterie.
• Chargez la batterie uniquement avec le chargeur
recommandé.
• Ne tentez pas de court-circuiter les pôles de la batterie.
AVERTISSEMENT
Si vous recevez le liquide de la batterie dans les yeux,
rincez immédiatement à l'eau claire durant au moins 15
minutes. Appelez immédiatement un médecin. N'exposez
pas la batterie à la pluie ou à des conditions humides. Ne
plongez pas l'outil, la batterie ou le chargeur dans l'eau ou
tout autre liquide.
• Ne laissez pas la batterie ou le chargeur s'échauffer. S'ils
sont chauds, laissez-les refroidir. Rechargez uniquement à
température ambiante.
• Ne laissez pas la batterie au soleil ou dans un
environnement chaud. Maintenez à température ambiante.
• Rangez dans un environnement ombragé, frais et sec. Si
la batterie n’a pas été chargée pendant une période
prolongée, chargez-la pendant au moins deux (2) heures
tous les deux (2) mois.
• La batterie peut présenter une légère fuite en cas
d'utilisation ou de température extrêmes. Si le joint
externe est endommagé et que le liquide entre en contact
avec votre peau :
- Utilisez du savon et de l'eau pour vous laver
immédiatement.
- Neutralisez avec du jus de citron, du vinaigre ou un
autre liquide doux.
• Si le liquide atteint vos yeux, suivez les instructions ci-
dessous et appelez un médecin.
• Veuillez vérifier avant utilisation si la tension de sortie et
le courant du chargeur de la batterie sont compatibles
avec la batterie.
• Utilisez un emballage protecteur lors du transport de la
batterie.
• Maniez avec précaution.
• Maintenez éloigné de l'humidité et du feu.
• Retirez la batterie de l'outil électrique avant d'effectuer
des réglages, de changer des accessoires ou de ranger la
machine. De telles mesures de sécurité préventives
réduisent le risque d'un démarrage accidentel de la
machine.
• Rechargez uniquement avec les chargeurs spécifiés par le
fabricant. Un chargeur adapté à un type de batterie peut
créer un risque d'incendie lorsqu'il est utilisé avec une
autre batterie.
• MISE EN GARDE - Cette machine n'est pas destinée à
être utilisée par des personnes ayant des capacités
physiques, sensorielles ou mentales réduites ou un
manque d'expérience et de connaissances, à moins
qu'elles n'aient reçu une supervision ou des instructions
concernant son utilisation par une personne responsable
de leur sécurité. Les enfants doivent être surveillés pour
s'assurer qu'ils ne jouent pas avec l'appareil.
4 NOTES DE SÉCURITÉ ET
PRÉCAUTIONS
• Ne démontez pas la batterie.
• Maintenez hors de portée des enfants.
• N’exposez pas la batterie à l’eau ou au sel.
• Entreposez la batterie dans un endroit frais et sec.
• Ne laissez pas la batterie dans des endroits aux
températures élevées, tels que près d'un feu, d'un
chauffage, etc.
• N'inversez pas le pôle positif et le pôle négatif de la
batterie.
14
Français
FR

• Lorsque la batterie n'est pas utilisée, éloignez-la des
autres objets métalliques, comme des attaches trombones,
des pièces de monnaie, des clés, des clous, des vis ou
autres petits objets métalliques qui peuvent établir une
connexion d'une borne à une autre. Le court-circuitage
des bornes de la batterie peut provoquer des brûlures ou
un incendie.
• Ne frappez pas la batterie, ne la cognez pas et ne marchez
dessus.
• Ne soudez pas directement la batterie ou ne percez pas la
batterie avec des clous ou d'autres outils pointus.
• Si la batterie fuit et que du liquide atteint vos yeux, ne
vous frottez pas les yeux. Rincez abondamment à l’eau
pendant au moins 15 minutes.
• Arrêtez immédiatement l’utilisation de la batterie, si,
lorsque vous l’utilisez, de celle-ci émane une odeur
inhabituelle, si elle est chaude, si elle change de couleur,
de forme, ou semble anormale de toute autre façon.
5 LA PLAGE DE TEMPÉRATURE
AMBIANTE RECOMMANDÉE :
ARTICLE TEMPÉRATURE
Plage de tem-
pérature de re-
chargement de
la batterie
41 ˚F(5 ˚C)~125,6 ˚F(52 ˚C)
Plage de tem-
pérature d’en-
treposage de la
batterie
1 an : 32 ˚F(0 ˚C)~73 ˚F(23 ˚C)
3 mois : 32 ˚F(0 ˚C)~113 ˚F(45 ˚C)
1 mois : 32 ˚F(0 ˚C)~140 ˚F(60 ˚C)
Plage de tem-
pérature de dé-
chargement de
la batterie
6,8 ˚F(-14 ˚C)~149 ˚F(65 ˚C)
6 SYMBOLES FIGURANT SUR
LA MACHINE
Certains des symboles suivants peuvent être utilisés sur cet
outil. Veuillez les étudier et apprendre leur signification. Une
bonne interprétation de ces symboles vous permettra de
mieux utiliser l'outil et de manière plus sécuritaire.
Symbole Explication
V Voltage
W Puissance
Courant direct
Lisez tous les avertissements de sécurité et
les instructions.
Précautions destinées à assurer la sécurité.
7 NIVEAUX DE RISQUES
Les termes de mise en garde suivants et leur signification ont
pour but d'expliquer les niveaux de risques associés à
l'utilisation de ce produit.
SYM-
BOLE
SIGNAL SIGNIFICATION
DANGER Indique une situation danger-
euse imminente qui, si elle
n’est pas évitée, peut entraîner
la mort ou des blessures
graves.
AVERTISSE-
MENT
Indique une situation poten-
tiellement dangereuse qui, si
elle n’est pas évitée, peut en-
traîner la mort ou des bles-
sures graves.
MISE EN
GARDE
Indique une situation poten-
tiellement dangereuse qui, si
elle n'est pas évitée, pourrait
causer des blessures mineures
ou modérées.
MISE EN
GARDE
(Sans symbole d’alerte de sé-
curité) indique une situation
pouvant entraîner des dom-
mages matériels.
8 PROPOSITION 65
AVERTISSEMENT
Ce produit contient un produit chimique connu dans l'état
de Californie comme étant une cause de cancer, de
malformations congénitales ou d'autres problèmes de
reproduction. Certaines poussières produites par le ponçage
mécanique, le sciage, le meulage, le perçage et d'autres
activités de construction contiennent des produits chimiques
connus pour causer le cancer, des malformations
congénitales ou d'autres problèmes de reproduction. Voici
quelques exemples de ces produits chimiques :
• Plomb provenant de peintures à base de plomb;
• Silice cristalline provenant de briques, de ciment et
d'autres produits de maçonnerie;
• Arsenic et chrome provenant de bois traité
chimiquement.
Votre risque d'exposition à ces produits chimiques varie
selon la fréquence à laquelle vous faites ce type de travail.
Pour réduire votre exposition à ces produits chimiques,
travaillez dans un endroit bien ventilé et utilisez un
équipement de sécurité approuvé, comme des masques anti-
poussière spécialement conçus pour filtrer les particules
microscopiques.
15
Français
FR

9 ÉLIMINATION DES
BATTERIES SANS DANGER
POUR L'ENVIRONNEMENT
AVERTISSEMENT
Si la batterie se fend ou se brise, avec ou sans fuites, ne la
rechargez pas et ne l'utilisez pas. Jetez-la et remplacez-la
par une nouvelle batterie. N’ESSAYEZ PAS DE LA
RÉPARER! Pour prévenir les blessures et les risques
d'incendie, d'explosion ou de choc électrique, et pour éviter
tout dommage à l'environnement :
• Recouvrez les pôles de la batterie avec du ruban adhésif
épais.
• N'essayez PAS d'enlever ou de détruire les composants
de la batterie.
• N'essayez PAS d'ouvrir ou de réparer la batterie.
• En cas de fuite, les électrolytes rejetés sont corrosifs et
toxiques. NE laissez PAS entrer la solution dans les
yeux ou en contact avec la peau et ne l’avalez pas.
• NE jetez PAS vos batteries usagées dans votre poubelle
à ordures ménagères.
• N’incinérez PAS les batteries.
• NE les mettez PAS dans un endroit où ils feront partie
d’un site d’enfouissement de déchets ou d’un flux de
déchets solides municipaux.
• Emmenez-les dans un centre de recyclage ou
d'élimination certifié.
10 INSTALLATION
10.1 RACCORDEZ L’ADAPTATEUR
347
56
1. Branchez la fiche (1) dans la prise (2).
2. Tournez la fiche (1) dans le sens des aiguilles d’une
montre pour la fixer.
3. Branchez la fiche (3) dans la prise (4).
4. Tournez la fiche (3) dans le sens des aiguilles d’une
montre pour la fixer.
REMARQUE
Tirez sur le bouton de verrouillage (5) pour libérer la fiche
du câble.
10.2 CHARGEZ LA BATTERIE À DOS
1. Branchez l’extrémité de l’adaptateur à la batterie à dos.
2. Connectez l’autre extrémité de l’adaptateur à la batterie à
dos.
3. Branchez le chargeur dans une prise électrique CA.
16
Français
FR

10.3 ENFILEZ LE SAC À DOS
1. La plaque dorsale est attachée à la ceinture de hanche par
la poche arrière.
2. Les bretelles sont attachées aux anneaux en D à l’arrière
de la ceinture de hanche.
10.4 RÉGLEZ LE HARNAIS DU SAC À
DOS
10.4.1 INSTALLEZ LE HARNAIS
• Tirez les extrémités des sangles vers le bas pour serrer le
harnais.
• Soulevez les languettes des tendeurs pour desserrer les
sangles.
• Fermez et verrouillez la fixation à blocage rapide en la
poussant l'une contre l'autre.
• Serrez les crochets pour ouvrir la fixation à blocage
rapide.
10.4.2 RETIREZ LE HARNAIS
• Ouvrez les fixations à blocage rapide de la ceinture et de
la sangle de poitrine.
• Desserrez les sangles du harnais en soulevant les tendeurs
coulissants, puis enlevez la batterie.
AVERTISSEMENT
En cas de danger imminent, la batterie doit être rapidement
retirée. La ceinture et la sangle de poitrine doivent être
détachées avant de jeter la batterie au sol.
10.4.3 ENFILEZ LA BANDOULIÈRE
1
4
33
2
1. Ajustez et attachez la ceinture (1) de manière à ce qu’elle
repose confortablement sur vos hanches.
2. Faites passer l’extrémité de la ceinture dans la boucle (2).
REMARQUE
Ne laissez pas la sangle pendre.
3. Réglez les sangles du harnais (3) à la bonne longueur.
4. Réglez et serrez la sangle de poitrine (4) à la bonne
longueur.
REMARQUE
Le rembourrage dorsal doit s'ajuster fermement et
solidement contre votre dos.
17
Français
FR

10.5 INSTALLEZ LA BATTERIE À DOS
1. Insérez la batterie à dos dans la plaque arrière (la batterie
se glisse dans le compartiment).
2. Poussez doucement sur la batterie à dos jusqu’à ce qu’elle
s’enclenche.
11 UTILISATION
ATTENTION
Chargez dans un endroit bien aéré. Évitez d'obstruer les
orifices d'aération du chargeur. Gardez-les dégagés pour
permettre une bonne ventilation.
11.1 DEL SUR BATTERIE
Appuyez sur le bouton de mise en marche (8) pour activer les
DEL. L’affichage (9) s’éteint automatiquement après
5 secondes. Le signal sonore doit retentir brièvement lorsque
vous appuyez sur la touche (pour confirmer la fonction) - voir
aussi « Signal acoustique ».
REMARQUE
L’écran (13) indique la capacité de la batterie.
Si l’indicateur d’erreur à DEL (10) s’allume en continu ou
clignote, l’affichage (9) affiche le code d’erreur comme ci-
dessous :
E0 Défaillance GOS
E1 Surintensité (décharge)/(charge)
E2 Défaut de communication (avec chargeur ou out-
ils externes)
E3 Surtension de la cellule
E4 Basse tension de la cellule
E5 Mauvaise consistance de la cellule
E6 Des appareils externes utilisent de l’énergie
HI Surchauffe de la batterie
Lo Basse température de la batterie
11.2 SIGNAL SONORE
REMARQUE
Ce signal est activé en appuyant sur le bouton (8) sur la
batterie.
A Bip court Le signal sonore marche
comme prévu.
B Un bip court
toutes les 10 sec-
ondes
La capacité de la batterie est
inférieure à 20 %.
C Un bip court à in-
tervalle de 0,5 sec-
onde
Dysfonctionnement de la
batterie.
11.3 RÉGLEZ LA HAUTEUR
REMARQUE
Pour obtenir une version numérique du manuel d’utilisation
ou plus d’informations sur le produit, numérisez le code QR
(12) à l’arrière du harnais.
REMARQUE
Le bouton de verrouillage (14) sert à libérer la batterie à
dos.
1. Poussez le bouton de verrouillage (13) vers l’intérieur.
2. Tout en appuyant sur le bouton de verrouillage (13),
déplacez le bouton de verrouillage (13) vers le haut ou
vers le bas pour régler la hauteur.
18
Français
FR

3. Relâchez le bouton de verrouillage (13) une fois que la
batterie est réglée à la hauteur désirée.
11.4 CONNEXION À L’APPLICATION
(POUR LES BATTERIES ÉQUIPÉES
DE BLUETOOTH)
Cette application permet le verrouillage/déverrouillage à
distance de la batterie et comprend une fonction de
localisation de la batterie, le numéro de série de la batterie, le
micrologiciel de la batterie, l’indication de la température de
la batterie, un chargeur de batterie, un mode réparation et des
mises à jour du micrologiciel.
• L'Application est régie par des modalités distinctes qui
peuvent être consultées dans l'application mobile.
Téléchargez l’application à :
https://appinstallation.globetools.systems?
brand=greenworks
APP ( Android,IOS)
• Suivez les instructions de l’application pour créer votre
compte.
REMARQUE
Si le temps de connexion est supérieur à 30 secondes,
veuillez appuyer sur le bouton d’indicateur de batterie pour
réactiver la batterie.
12 ENTRETIEN
ATTENTION
Évitez que les liquides de freins, l'essence et les matériaux à
base de pétrole ne viennent en contact avec les pièces en
plastique. Les produits chimiques peuvent endommager le
plastique et le rendre inutilisable.
ATTENTION
N'utilisez pas de solvants ou de détergents puissants sur le
boîtier ou les composants en plastique.
AVERTISSEMENT
Retirez le bloc-batterie de la machine avant l’entretien.
12.1 NETTOYEZ LA MACHINE
• Nettoyez la poussière et la saleté sur la batterie à l’aide
d’un chiffon sec ou une brosse douce et sèche.
• N’utilisez pas de solvants ou de détergents agressifs pour
nettoyer la batterie. Ils pourraient endommager le boîtier
en polymère et d’autres composants.
• Ne vaporisez pas la batterie avec de l’eau.
12.2 ENTREPOSEZ LA MACHINE
• Retirez le cordon de raccordement de l’outil électrique ou
de l’adaptateur.
• Retirez l’adaptateur de l’outil électrique ou du chargeur.
• Entreposez la batterie à l’intérieur dans un endroit sec et
sûr auquel les enfants ou d’autres utilisateurs non
autorisés ne peuvent accéder.
• N’entreposez jamais la batterie dans un environnement
humide ou corrosif ou dans des conditions qui pourraient
entraîner la corrosion de ses composants métalliques.
• N’entreposez jamais la batterie branchée sur l’adaptateur
ou l’outil électrique.
• N’entreposez jamais la batterie dans un récipient
métallique ou dans un récipient contenant des objets
métalliques (par exemple, des trombones, des clous, des
pièces de monnaie, des clés).
19
Français
FR

13 DÉPANNAGE
Problème Cause Solution
L’outil électrique
ne démarre pas
après la mise sous
tension.
Il n'y a pas de contact électrique entre
l'outil électrique et la batterie.
Retirez l’adaptateur, vérifiez les contacts et réinsérez l’adapta-
teur.
La batterie est faible (un bip toutes les 10
secondes).
Rechargez la batterie.
Batterie trop chaude / trop froide (la DEL
indique HI (haut) ou LO (faible), émet
un bip continu).
Laissez la batterie se refroidir à une température entre 10 à
40 °C (50 à 104 °F). Laissez la batterie se réchauffer lente-
ment.
Dysfonctionnement de la batterie (le
DEL affichera le code de dysfonctionne-
ment tel que E0,E1,E2,E3,E4,E5,E6).
Débranchez la batterie de l'outil électrique, retirez-la de votre
dos, examinez la batterie et contactez immédiatement votre
concessionnaire GREENWORKS.
Si la batterie émet de la fumée, chauffe, dégage une odeur, fait
du bruit ou montre des signes de déformation, débranchez-la
de l'outil électrique, enlevez-la de votre dos, posez-la au sol et
éloignez-vous d'elle immédiatement à une distance sécuritaire.
Tenez les enfants et les animaux éloignés de la zone de travail.
Gardez la batterie à l’écart des matériaux combustibles.
Problème électromagnétique ou dysfonc-
tionnement de la machine.
Retirez l’adaptateur de l’outil électrique, ensuite réinsérez-le.
Allumez l'outil électrique - s'il ne fonctionne toujours pas, c'est
qu'il est défectueux. Il doit être vérifié par un concessionnaire
de Greenworks.
Humidité dans l'outil électrique et (ou) la
batterie.
Laissez la batterie de l’électrique sécher.
L’outil électrique
ne démarre pas
après la mise sous
tension.
La batterie ou les composants électriques
sont trop chaud.
Retirez l’adaptateur de l’outil électrique, laissez la batterie et
l’outil électrique se refroidir.
Dysfonctionnement électrique et électro-
magnétique.
Retirez l’adaptateur et réinsérez-le de nouveau.
Dysfonctionnement de la batterie (le
DEL affichera le code de dysfonctionne-
ment tel que E0,E1,E2,E3,E4,E5,E6).
Débranchez la batterie de l'outil électrique, retirez-la de votre
dos, examinez la batterie et contactez immédiatement votre
concessionnaire de Greenworks.
Si la batterie émet de la fumée, chauffe, dégage une odeur, fait
du bruit ou montre des signes de déformation, débranchez-la
de l'outil électrique, enlevez-la de votre dos, posez-la au sol et
éloignez-vous d'elle immédiatement à une distance sécuritaire.
Tenez les enfants et les animaux éloignés de la zone de travail.
Gardez la batterie à l’écart des matériaux combustibles.
Le temps de fonc-
tionnement est trop
court.
La batterie n’est pas complètement char-
gée.
Rechargez la batterie.
La batterie a atteint ou dépassée sa durée
de vie utile.
Remplacez-la par une nouvelle batterie.
20
Français
FR
This manual suits for next models
3
Table of contents
Languages:
Other GreenWorks Camera Accessories manuals

GreenWorks
GreenWorks BAG719 User manual

GreenWorks
GreenWorks GL 200 User manual

GreenWorks
GreenWorks 29717 User manual

GreenWorks
GreenWorks L-300 User manual

GreenWorks
GreenWorks G24B2 User manual

GreenWorks
GreenWorks BAF735 User manual

GreenWorks
GreenWorks BAM704 User manual

GreenWorks
GreenWorks BAM704 User manual

GreenWorks
GreenWorks BAB740 User manual

GreenWorks
GreenWorks GLW300 User manual