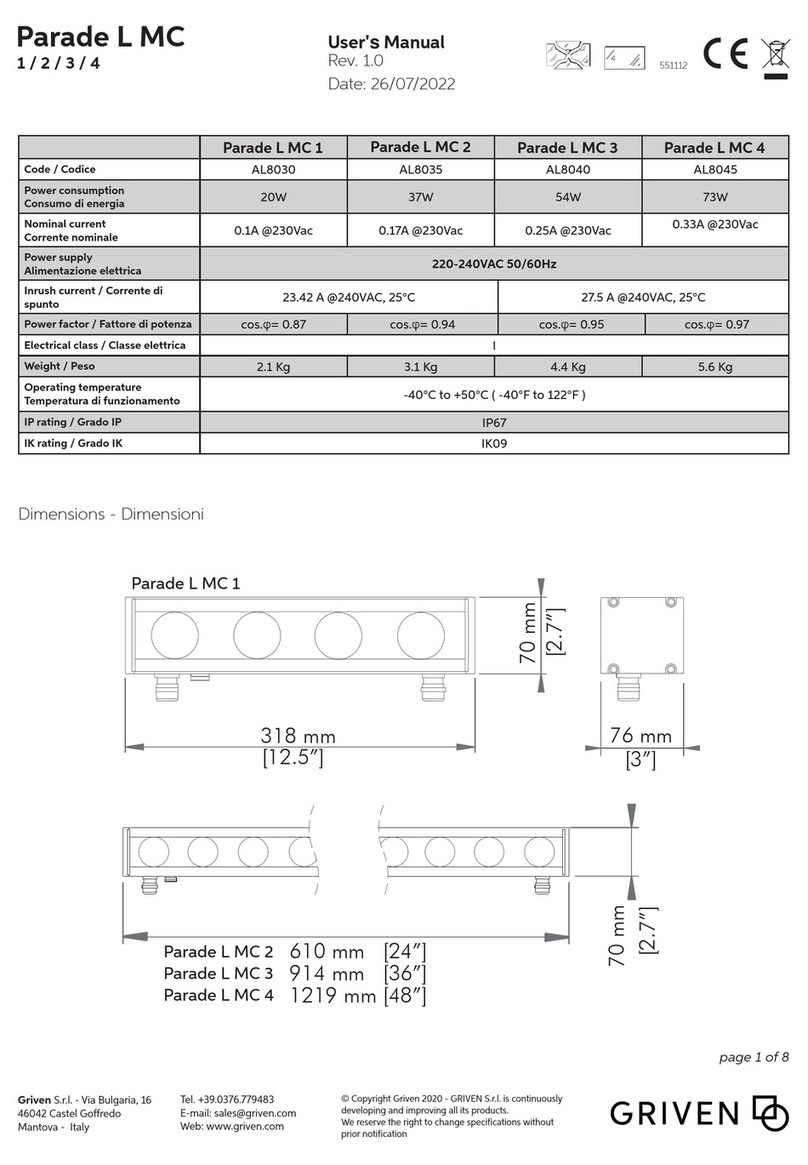
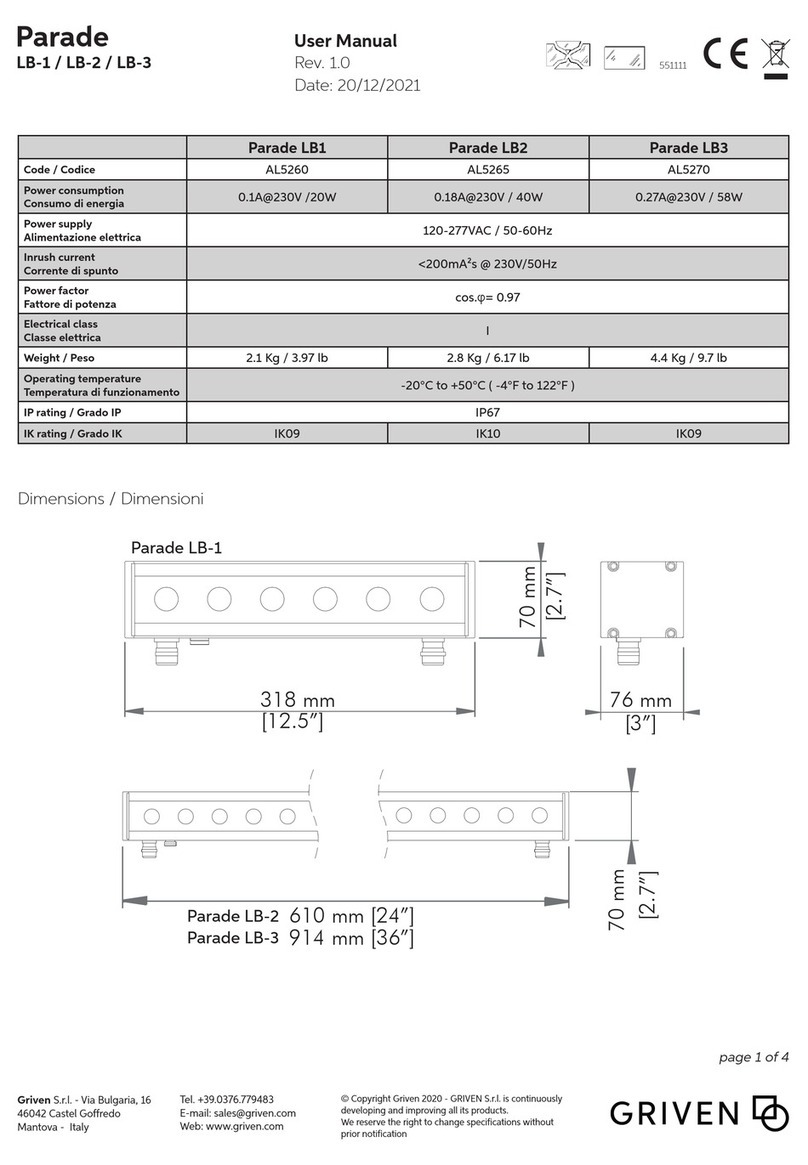
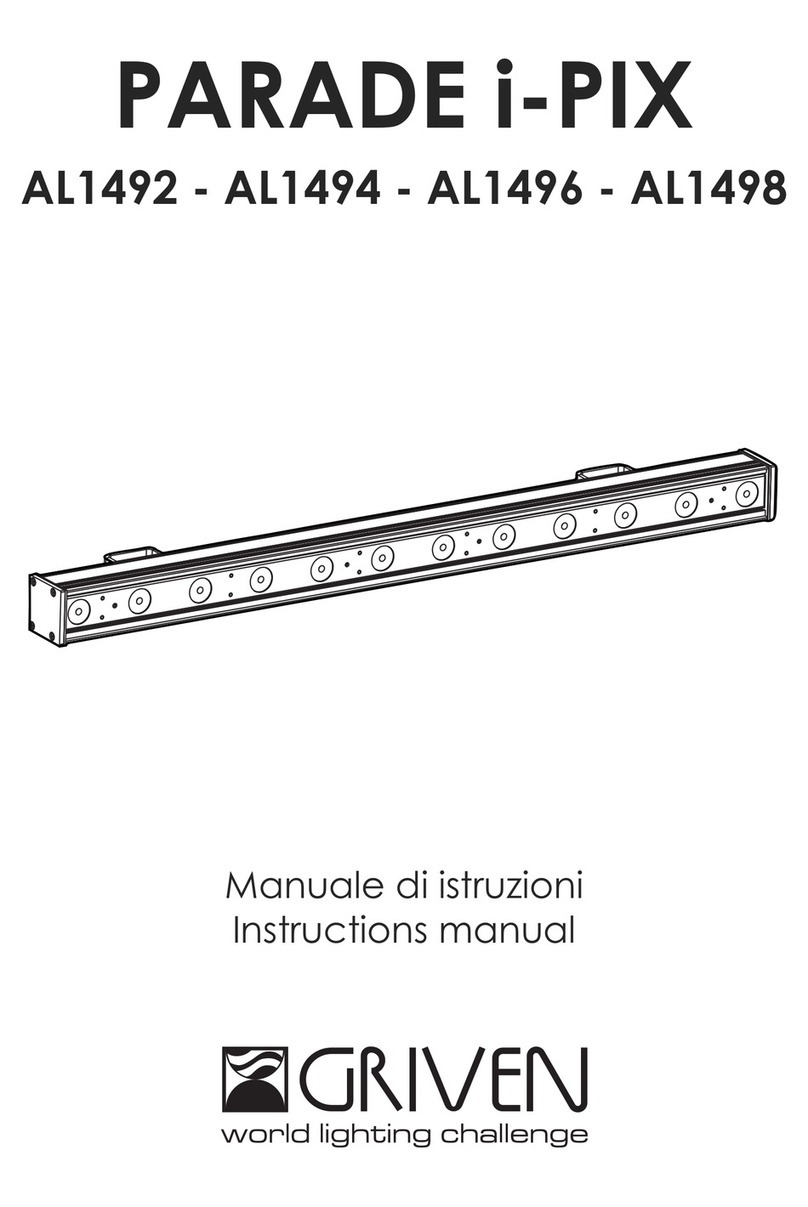
Griven Graph-i-Dot AL4700 User manual

Graph-i-Dot User Manual
Griven S.r.l. - Via Bulgaria, 16
46042 Castel Goffredo
Mantova - Italy
© Copyright Griven 2019 - Griven reserves the right to make
changes to this product and related instructions at any time
without prior notice and such changes shall be effective
immediatly.
Tel. +39.0376.779483
Fax +39.0376.779682
E-mail: [email protected]
Web: www.griven.com
AL4700
Rev. 1.00
Date: 11/01/2019
page 1 of 12
Size
Weight / Peso 50 g. ( 1.76 oz) each Graph-i-Dot
Housing / Corpo proiettore Transparent plastic
IK rating / classe IK IK10
IP rating / grado IP IP68 max 20 m.
Ambient temp./ Temperatura ambientale -30°C to 50°C ( -22°F to122°F)
Power supply / Alimentazione External PSU
Power / Potenza massima 1, 44 W
Electrical class / Classe elettrica III
Control / Sistema di controllo USITT DMX-512
Channels / Canali 3
Color range / Colori 6 medium output full color LEDs RGB or Dynamic White or Cold White or Warm White
Optics/ Ottiche na
551073

AL4700 Graph-i-Dot - Rev. 1.00
page 2 of 12
551073
- This product must be installed in accordance with applicable national and local electrical and construction codes by a person familiar
withthe construction and operation of the product and the hazards involved. Failure to comply with the following installation instructions
may result in death or serious injury.
Questo prodotto deve essere installato secondo le normative locali, da personale specializzato. La mancata osservanza delle istruzioni di
installazione può portare a situazioni di pericolo all’incolumità della persone.
- Do not stare at the operating light source.
Non ssare la sorgente luminosa durante il suo funzionamento.
- The xture might be damaged by excess voltage. The installation of an overvoltage protection device on the electrical system may
reduce the risk of damage.
Apparecchiatura sensibile alle sovratensioni. L’installazione di un dispositivo di protezione delle sovratensioni sull’impianto elettrico atte-
nua l’intensità di questi fenomeni proteggendo gli apparecchi dal rischio che vengano danneggiati.
- The use of an adequate magnetothermic switch along the power supply line is recommended.
E’ consigliato l’uso di un adeguato interruttore magnetotermico/dierenziale sulla linea di alimentazione.
- Connect the xtures to each other only when disconnected from mains.
Collegare tra loro i proiettori solo quando nessuno di essi è collegato alla rete elettrica.
- Never leave cables and connectors unconnected or unprotected for long periods.
Non lasciare mai per lungo tempo agli agenti atmosferici cavi e connettori non collegati o non protetti.
- Disconnect power before installing or servicing to avoid electrical shock.
Togliere l’alimentazione prima di eettuare qualsiasi operazione all’interno dell’apparecchiatura.
- Disconnect power before any connection operation.
Togliere l’alimentazione prima di eettuare qualsiasi operazione di connessione tra gli apparecchi.
- Check voltage and frequency before powering the xture. Do not exceed xture specied voltage.
Prima di connettere l’apparecchio alla rete elettrica, vericate la compatibilità di tensione e frequenza.
- Do not handle the unit with wet hands or in wet environments.
Non maneggiate il prodotto con mani bagnate o in presenza di acqua.
- Apply to qualied sta for any maintenance service not described in this instructions manual.
Rivolgersi ad un tecnico qualicato per qualsiasi operazione di manutenzione ordinaria non descritta nel presente manuale.
- Do not exceed the maximum quantity of xtures per line in order to avoid power surges.
Non superare il numero massimo specicato di apparecchi per linea per evitare pericolori sovraccarichi di corrente.
- Before powering the unit, ensure to use cables and connectors with proper section and length, according to its power consumption.
Prima di eettuare le connessioni vericare la portata dei cavi / connettori e la lunghezza dei cavi tenendo conto dell’assorbimento del
prodotto.
- Fix the projector by using screws, hooks or other adequate supports that can bear its weight.
Fissare il proiettore con viti, ganci o altri supporti in grado di sostenerne il peso.
Important notices / Avvertimenti importanti
AL4700 Graph-i-Dot - Rev. 1.00
page 3 of 12
551073
WARNING ! xing and connecting operations must mandatorily be carried out by qualied personnel only !
ATTENZIONE ! le operazioni di installazione e connessione devono obbligatoriamente essere eseguite solo da per-
sonale specializzato !
WARNING ! Ensure power supply is o before connecting or disconnecting xtures !
ATTENZIONE ! Assicurarsi che l’alimentazione sia disattivata prima di collegare o scollegare i proiettori!
Connecting Graph-i-Dot to the Start line Kit ( AL4703 ).
FROM DMX
CONTROLLER
2
DATA +
DATA -
COMMON
A
B
-GND
+VCC
AD
N.C.
N.C.
N.C.
4
1
L=30mm
L=8mm
L=30mm
L=8mm
3

AL4700 Graph-i-Dot - Rev. 1.00
page 4 of 12
551073
Connecting Graph-i-Dot to the Power supply ( KIT AL4704 ).
GND
A
B
AD
+VCC
GND
A
B
AD
+VCC
GND
A
B
AD
+VCC
GND
A
B
AD
+VCC
GREEN TIP
RED TIP
RED TIP
24VCC from PSU
GREEN TIP
GREEN TIP
1
2
1
2
the internal ring must melt
the sleeve
must shrink
and adhere to
the cables
IN ORDER TO GUARANTEE IP67 FEATURES:
4,50
4,50
4,50
13,69 13,69
41,94
Description :
Revision :
Scale :
Code :
Weight :
Note :
http://www.griven.com
1:1
SHEET 1 OF 1
Description :
Revision :
Scale :
Code :
Weight :
Note :
http://www.griven.com
Copyright
©
2017 , GRIVEN S.r.l. World Lighting Challenge
-
1:1
SHEET 1 OF 1
The kit contains:
- 1 2 halves plastic enclosure with holes for eventual xing.
- 3 IP67 thermo-shrinking terminal caps ( Green tip).
- 2 IP67 thermo-shrinking terminal caps ( Red tip).

AL4700 Graph-i-Dot - Rev. 1.00
page 5 of 12
551073
Typical system diagram:
Graph-i-Dot chain
110~266 VAC 50/60Hz
110~266 VAC 50/60Hz
DMX CONTROLLER AL4703 Start Line kit
AL4704
Power joint Kit
AL4705
Joint Kit
AL4706
Terminator cap
AL4704
Power joint Kit
AL4702
Electronic
Driver
AL4702
Electronic
Driver

AL4700 Graph-i-Dot - Rev. 1.00
page 6 of 12
551073
GND
A
B
AD
+VCC
GND
A
B
AD
+VCC
GND
A
B
AD
+VCC
GND
A
B
AD
+VCC
GREEN TIP
RED TIP
RED TIP
24VCC from PSU
GREEN TIP
GREEN TIP
1
2
1
2
the internal ring must melt
the sleeve
must shrink
and adhere to
the cables
IN ORDER TO GUARANTEE IP67 FEATURES:
GND
A
B
AD
+VCC
GND
A
B
AD
+VCC
GND
A
B
AD
+VCC
GND
A
B
AD
+VCC
GREEN TIP
RED TIP
RED TIP
24VCC from PSU
GREEN TIP
GREEN TIP
1
2
1
2
the internal ring must melt
the sleeve
must shrink
and adhere to
the cables
IN ORDER TO GUARANTEE IP67 FEATURES:
Place with care the cables into the lower half of the enclosure; x the joint caps in order to take up as little less space as
possible.
Put the upper half over the lower half of the enclosure, press until the lock of the clips. If you feel high resistance, do not force
but check the accomodation of the cables inside.
GND
A
B
AD
+VCC
GND
A
B
AD
+VCC
GND
A
B
AD
+VCC
GND
A
B
AD
+VCC
GREEN TIP
RED TIP
RED TIP
24VCC from PSU
GREEN TIP
GREEN TIP
1
2
1
2
the internal ring must melt
the sleeve
must shrink
and adhere to
the cables
IN ORDER TO GUARANTEE IP67 FEATURES:

AL4700 Graph-i-Dot - Rev. 1.00
page 7 of 12
551073
SILICONE RTV
Insert the end of the at cable inside the lower half of the terminal enclosure, ll with silicone RTV and then close the enclosu-
re with the other half. Let it dry before xing it on to a surface.
Replacing a faulty Graph-i-Dot ( KIT AL4705 ).
GND
A
B
AD
+VCC
GND
A
B
AD
+VCC
GND
A
B
AD
+VCC
GND
A
B
AD
+VCC
Remove the faulty Dot, saving the more cable lenght possible.
Split the cables and strip the ends of the cables. WARNING ! in order to respect the original distance between the single
dots we reccomend to carefully take the adequate measurements and eventually correct cable lenghts before proceeding in
making the joints.

AL4700 Graph-i-Dot - Rev. 1.00
page 8 of 12
551073
GND
A
B
AD
+VCC
GND
A
B
AD
+VCC
GND
A
B
AD
+VCC
GND
A
B
AD
+VCC
GND
A
B
AD
+VCC
GND
A
B
AD
+VCC
GND
A
B
AD
+VCC
GND
A
B
AD
+VCC
Lay down the joint into the lower half of the enclosure. Put the upper half over the lower half of the enclosure, press
until the lock of the clips.
GND
A
B
AD
+VCC
GND
A
B
AD
+VCC
GND
A
B
AD
+VCC
GND
A
B
AD
+VCC
Put, before soldering each joint, the thermo shrinking sleeves, solder all the joints, cover them with the sleeves then make
them adhere to the cables by blowing hot air coming from a thermoblower. PAY ATTENTION TO THE POLARITIES before this
last operation.

AL4700 Graph-i-Dot - Rev. 1.00
page 9 of 12
551073
Addressing the Graph-I-Dot chain.
In order to address each Dot of the chain with its DMX address it is required the Control set addressing item AL4707
MODE
+
-
MODE
MODE
+MODE
MODE
MODE +MODE
-
+
MODE
manually lights up pixels one by one
automatically lights up pixels one by one
+ &- vary the scrolling’s speed.
MODE
MODE +saves settings.
If the test conrmed the correct operation,
in order to close the procedure press
ON
It sets the max number of channels
it sets the number of channels of
each Dot.
eg: RGB=3 channels
GND A B W
GND
A
B
N.C.
Connect the beginning of the chain to the Control set
addressing AL4707as shown in the picture aside.

AL4700 Graph-i-Dot - Rev. 1.00
page 10 of 12
551073
M4 X 12 screws
MAX Ø SCREWS 4 mm
M4 X 12 screws
MAX Ø SCREWS 4 mm
44 mm
44 mm
MAX Ø SCREWS 4 mm
44 mm
44 mm
MAX Ø SCREWS 4 mm
Installation directions
Installation on a surface
Installation on a surface by using optional accessory AL4708

AL4700 Graph-i-Dot - Rev. 1.00
page 11 of 12
551073
28 mm
M4 X 12 screws
Installation on a rope by using optional accessory AL4708
28 mm
M4 X 12 screws

AL4700 Graph-i-Dot - Rev. 1.00
page 12 of 12
551073
Table of contents
Other Griven Dj Equipment manuals

Griven
Griven Manta User manual

Griven
Griven Parade L MC 1 User manual

Griven
Griven Jupiter B User manual

Griven
Griven Parade LB1 User manual

Griven
Griven PARADE i-PIX User manual

Griven
Griven Jasper AL4360 User manual

Griven
Griven GR0632 User manual

Griven
Griven ACROBAT PE 575 Manual

Griven
Griven Graph-i-Core AL2115 User manual

Griven
Griven Jasper MK2 User manual
Popular Dj Equipment manuals by other brands

MJ LED LIGHTNING
MJ LED LIGHTNING MJ-1006B user manual

BoomToneDJ
BoomToneDJ LED PAR 7x10W 5in1 user manual

Creative Lighting Solutions
Creative Lighting Solutions CLS Zense manual

chinavasion
chinavasion CVLC-G570 user manual

Squareled
Squareled Funky Bee user manual

Faderfox
Faderfox Solid Control DJ44 user manual