Growers SOLUTION DAKOTA User manual

Dakota Instruction
Manual
Before assembling your
greenhouse please read all
instructions, while watching the
instructional video.
This manual includes instructions for ALL add-
ons that you can purchase with your greenhouse.
For additional assistance call 1(866)928-3390
Table of Contents
Greenhouse Instructions Page 2
End Wall Kits
Page 4
Roll-Up Side
Page 6
Page 8
Spin Handle Page 9
Wind Bracing
Page 10
Wind Strapping

Page 2
Figure 4.1
Figure 4.2
Figure 2.1
Figure 3.1
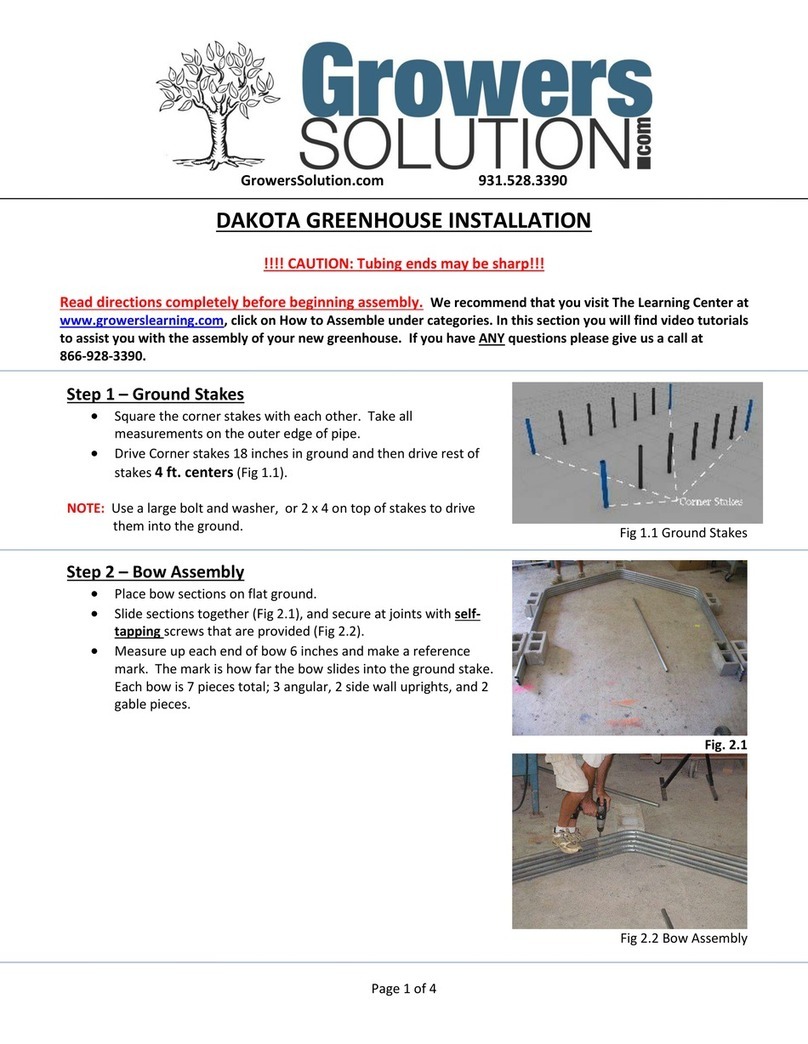
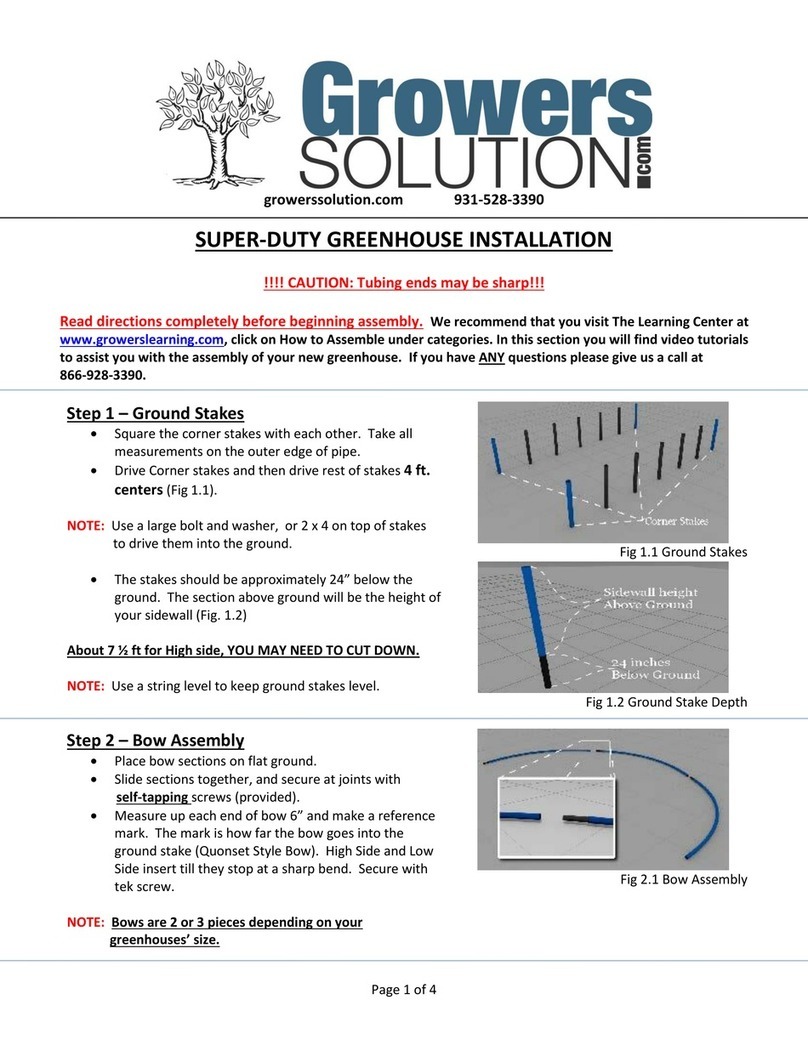
DAKOTA GREENHOUSE INSTRUCTIONS
!!!! CAUTION: Tubing ends may be sharp!!!
Step 1 – Ensure all components are accounted for.
•Lay out all bundles and open all boxes to compare labeled pieces to
the packing sheet you received.
•Check for any concealed damage or missing components, please,
contact us immediately if either is discovered
.
Step 2 - Squaring Greenhouse
•
•
Begin by choosing fairly level ground, or if needed by leveling the site in
preparation.
Use the "How to Square your green house" worksheet included to
determine the measurement to square your particular greenhouse.
• Set the first two ground stakes by measuring your width outside to outside of
the ground stake.
•Use levels to keep ground stake plum when driving.
•When pulling the length and diagonal measurement, set the last two ground
stakes on the inside of where the two tapes meet. Figure 2.1
Step 3 - Ground Stakes
•Standard depth of ground stake is 18".
•Measure 6" on the four corner stakes once you have squared them. Figure 3.1
•Tie a string to the pipe and run it around the exterior at your
marks, ensuring the line is tight.
•Mark the ground every 4' on center below the line.
•Drive remaining stakes on your 4' marks, ensure the stakes just touch the
string and plum side to side.
•Once all the stakes are driven to depth, mark all stakes at the height of the line
and cut off the excess material.
•Once the ground stakes are set and trimmed it is advised to drill a 1/8th
hole near ground level to allow moisture out to avoid the stake splitting.
Step 4 - Bows
•Place the bow pieces on a relatively flat area. Figure 4.1
•The 8', 10', and 12' kits have a three piece bow, all three pieces have a
bend. The 16', and 20' kits have a five piece bow two of which are
straight pieces, two straight pieces go between the peak and sidewall
pieces. Insert the swedged (crimped) end into the saw cut end.
Connect at the joint with 2 tek screws; ensure the screws are driven so
that they will not snag the film as it goes over the top. Figure 4.2
•Stand the bow upright and insert into the ground stake.

Step 4 - Bows continued
•Secure in the ground stake with 2 tek screws per joint.
•Ensure on the first and last bow that the tek screws are
underneath the bows, facing the inside of the green house.
Step 5 - Purlin
•** All Dakota houses get 3 runs of purlin, the additional
2 mounted at10 and 2 o'clock.**
•Test fit the purlin on the inside of the ground stakes from first to
last. Lay flush to the outside of the first ground stake ( not
protruding past the end). Mark your purlin at the center of each
ground stake. Fig 5.1
•Assemble 2 pieces of purlin at a time. Using 2 tek screws per
joint.
•
•
Start hanging the purlin by using the 1" two-hole strap to suspend
the pipe from first bow. Drive an additional tek screw through the
center of the two-hole strap directly to the purlin. Figure 5.2
When installing, align the bow with the reference mark on the
purlin. Use the purlin clamps on all interior bows. Drive a tek screw
through the clamp to the bow to keep it in place. Figure 5.3
•Once the purlin is assembled and suspended, cut any excess pipe
flush with the first and last bow.
Step 6- Base and Head Boards
•2"x6"x16' pressure treated lumber is suggested. (Not included in kit)
•
•
•Begin with head board by ensuring the bottom of the board is
42" from the top of the ground stake.
•Mount timbers with corner bracket to first and last ground stake.
Figure 6.3
Use the 1" two hole straps to attach to the ground stake for all
others. Drive a tek screw through the two hole strap to secure to
stake. Figure 6.4
•Repeat the test fitting and trimming for the base boards.
•To ensure even spacing, measure the vertical gap between the head
and base board on first stake. Use this measurement down the
length of the house.
** Note: Refer to End Wall Instructions for
the end wall base boards.** Page 3
Figure 5.2
Figure 5.3
Fig 5.1
Figure 6.1
Figure 6.2
Figure 6.3 Figure 6.4
Line the lumber down the exterior of the green house, beginning
flush with the first bow.
Trim where necessary to ensure the ends meet at the ground stake.
Figure 6.1 Cut excess board flush with the last ground-stake.
Figure 6.2

• Refer to Endwall Section of this manual.
Step 7 -Truss and Gusset Only on 16' kits.
•All truss and gusset mounting is done with tension bands. Be sure to secure the bands with a tek screw through the
band into the bow material.
•For the gusset bracing measure 52" for the 16' house, 42" for the 20' house, from the top of the groundstake up
the side wall. Mount one end of the gusset at that point using a tension band. The other end of your gusset will
attach to the peak side of the bow, measurement is not important here as the gusset is a fixed length.
•Next mount the truss with tension bands on both sides of the peak.
•Again, as the truss is a fixed length, exact measurement is not of concern. Ensuring the truss is level will be the most
important part.
•20' kits have two additional truss braces. Measure 50" from each end of the truss for your mounting location.
These will mount diagonally from the truss to either side of the peak at an outward angle.
Step 8 – End Walls
WIND BRACING for 40’ or Longer Houses
Page 4

Step 9 – Wire Lock
Step 10 – Film Installation
•Be aware of the wind when preparing to install film on your green house. Try to pick a mild weather day.
•Locate the film for the ends of the green house. Next gather 3 pieces of wiggle wire ( you will use these
to hold film in place).
•Stretch the end film over the first and last bow and attach the film using the wire. You can adjust the film
by removing wiggle wire and reinstalling.
•Roll the main film out along the length of the green house. Pull the film across the house and attach on
one end. Go to other end and pull tight. You may need to go back and adjust again. Once in place secure
with wiggle wire entirely.
NOTE: Plastic film normally has a 12” or larger overhang on all sides.
Figure 7.1 Figure 7.2
•Lay your wire base down the length of the house.
•By using either a 1/8" drill bit or tekscrew, pre-drill the aluminum base for the wood
screws.
•Start the wire base 1 1/2" in from the end of the board. This leaves room for the base
that goes over the first and last bow. Figure 7.1
•Mount the top of the base flush with the top of the head board.
•To mount the base to the end bows start by pre-drilling only the sections that attach on
the head boards.
•Overlap the base on the head board. Slowly bend the base over the board and secure to
the bow and the ground stake with tekscrews every 18". Figure 7.2
•Repeat on opposite side so that the base meets in the middle of the bow.
Page 5
Only for 16' and 20' kits.
•Install Hoop Felt on all bows prior to film installation (EXCEPT FOR THE FIRST
AND LAST BOW). Cut felt in approximatley 24” length. Apply directly to bow on
peak and corners.

Page 6
DAKOTA END WALL INSTRUCTIONS
Your end wall uprights may require trimming for proper fit due to the unknown grade of your land.
These instructions are for a 36” storm door and rough in for door is 36.5”, for any other sized doors
adjust your measurements accordingly.
36” Door
•The number of uprights on the size of the house you
purchase includes door frame uprights. This is for 36”
door opening. (Table A)
Step 1
•(Figure 2.1)
Step 2
• From the center, mark 18.5” to the left and right of that point.
This gives you the door frame size. (Fig 2.1)
Step 3
• Drive a 1” ground stake in each of these two points. This is where your storm door
will be. (Figure 3.1).
Step 4 -THIS STEP IS ONLY FOR 20' DAKOTA GREENHOUSE
• From that point if you have another upright measure 48” over and drive another 1”
ground stake.(Fig 4.1).
Step 5
• Measure the distance between the base of these ground stakes and peak of the bow where
they will be connecting (Fig 5.1).
Step 6
•If needed cut your square uprights to meet these measurements.Slide square
uprights over the ground stakes with pre-drilled side at the top.(Fig 6.1).
Step 7
• Attach tension bands over the bow and into the square uprights (Figure 7.1).
8 ft. to 16 ft. 20 ft.
2 uprights 4 uprights
Table A
Figure 3.1
Figure 2.1
Figure 4.1
Figure 5.1
Figure 6.1
Figure 7.1
On the front end wall, measure to find the center of the house.

Page 7
Step 8
• Insert bolts through tension bands and square upright;(tighten completely
after the door is installed). (Fig 8.1)
Step 9
•On the inside of the house place one self-tapping tek screw through the
tension band securing it to the bow.(Fig 9.1).
Step 10 - ONLY ON 20' DAKOTA GREENHOUSE
•You may install end braces at 60” (Fig 10.1).
Step 11
• Using tek screws, install header with corner braces.(Fig 11.1)
Step 12
•Follow previous steps for the second end wall. However, header & upright spacing can be adjusted
to accommodate a fan or vent if you choose to install one.
Step 13
• Do not install door header for storm door until door is in place. When using a storm
door you will use the frame of the door to seal the end film. (Fig 13.1) Cut the film
opening and place a 2"x4" face down in the opening. Pull the cut film towards the
inside of the greenhouse. Set the door in the opening and secure with a couple tek
screws just to hold it in position. Remove the 2"x4" from under the door and check
the operation. If the door opens freely then finish installing tek screws. Install the
door header and trim film around the opening.
Step 14
•
(Fig 14.1). Continue to install using same meth-
Figure 8.1
Figure 9.1
Figure 11.1
Figure 10.1
Figure 13.1
Figure 14.1
Install baseboards. You should measure from the corner stake to first metal upright. Then
cut the board to fit, using the L bracket.

Page 8
ROLL UP SIDE INSTRUCTIONS
Step 1
Step 2
Step 3
Fig 1.1) with two
• A
tek screws.
• Lay pipe on top of bottom board and attach thebottom pipe
clamps (Fig 2.1). Snap them evenly spaced along the pipe
making sure that you have the film snug at the base.
Figure 1.1
Figure 2.1
• Now take the black strapping and mount to head board and base board at
each bow / ground stake (Fig 3.4). Make sure to pull strapping tightly (Fig
3.3) from the head board to the base board. Be sure to double fold ends of
strapping (Fig 3.2) where screw goes through . Use the fender washer to
reinforce strapping so it will not pull through (Fig 3.1).
NOTE: Pipe should stick out 1' from end-wall (Fig 3.5).
Figure 3.4
Figure 3.3
Figure 3.2
Figure 3.1
Fig 3.5
**WHEN ROLL UP SIDES ARE DOWN YOU MUST WIRE THE ENDS SHUT.**

Page 9
Step 5
Step 6
•Insert the handles into the end of the roll up pipes with
the handles laying towards the center of the greenhouse.
Secure with two tek screws. Fig 5.1
•To hold up your side use a piece of strapping on each end and
loop under the handle and secure to the greenhouse (Fig 6.1).
During cold weather, remember that you will just roll the
sidewalls down and the weight of the pipe sitting on top of the
bottom board and the strapping will hold the film firmly in place.
Figure 6.1
Figure 5.1
Step 4
SPIN HANDLE INSTRUCTIONS
Step 1
• Slip small sleeve over the bolt. (Fig 1.1)
Step 2
Step 3
Figure 1.1
Figure 3.1
• Slip large sleeve over small sleeve on bolt.
• Insert thru pre-drilled hole. Attach nut and tighten. (Fig 3.1)

WIND STRAPPING INSTRUCTIONS
Step 1
•The best way to throw your wind strapping over the green
Fig 1.1) and
throw over the greenhouse.
Step 2
•Place wind strapping between the first and second bow and then
between the next to last and the last bow. With the remaining wind
strapping equally space your strapping the length of your green
house. Strapping should be placed between the hoops. (Fig. 2.1)
Step 3
• When attaching strapping to your base or head board, fold over twice for
strength (Fig 3.1). Use a washer and wood screw to attach (Fig 3.2).
Figure 1.1
Figure 2.1
Figure 3.1 Figure 3.2
Please feel free to call us with additional questions, 866.928.3390.
Additional Information Concerning Weather
During windy, stormy, or winter conditions it is mandatory to roll sides down and wire lock ends. If you fail to
do this, it may result in greenhouse damage due to wind uplift. If you are expecting severe snow (4”plus)you
should brush snow off of the greenhouse. Feel free to call for more explanation, 866-928-3390.
LIMITATION OF WARRANTY: Grower’s Solution, LLC makes no warranty either expressed or implied, as to any matter in connection with the sale or use of goods or services offered nor does the company
manufacturer, the buyer shall look solely to the manufacturer for redress of the manufacturer’s warranty.
or representation, expressed or implied, except that all products conform to the description of the label. We are not responsible for damage or failure because of any recommendations given by us or our
personnel
Page 10
Note: Strapping is only required every other bow.
Other manuals for DAKOTA
1
Table of contents
Other Growers SOLUTION Greenhouse Kit manuals
Popular Greenhouse Kit manuals by other brands

G-Tools
G-Tools Cloner installation instructions

Palram
Palram Snap & Grow 6x8 + 4 Extension manual

FarmTek
FarmTek Growers supply GrowSpan Gothic Pro instruction manual

GrowSpan
GrowSpan PB01700R6 Assembly instructions

Greenhouse Style
Greenhouse Style Pride of the Pacific Series instructions

Exaco
Exaco HOKLARTHERM Riga XL 5 Assembly instructions