GRS 850 Turbo Handpiece User manual

850
Ultra High-Speed Rotary Handpiece
NON-LUBE AIR TURBINE
90 DAY WARRANTY
INTRODUCTION
The GRS 850 Turbo Handpiece uses
regular friction grip burs. The rotor
spindle uses a non-lube bearing
and requires no further lubrication.
Work on porcelain, wood and other
materials completely free of the
problems associated with use of
lubricating oils. Turbine exhaust from
the nose of this handpeice helps
keep the workpiece clear of debris.
SPECIFICATIONS
RECOMMENDED AIR PRESSURE:
30-35 psi max. (2.5kg/cm2) [0.2-0.25MPa]
SPEED: 320,000 rpm
AIR FLOW: 1.34 CFM (38 l / min)
HANDPIECE DIMENSIONS:
Approx. 5/8” dia. X 5 1/8” long
(16.6mm dia. X 130mm long)
HANDPIECE WEIGHT: 2.5 oz. (70.8g)
Specifications may change without notice.
Complete Ultra 850
Rotary System with On/
Off Foot Control
850 High-Speed Rotary
Handpiece shown
attached to a GraverMach
EASY-TO-REMOVE BUR
SIMPLY TURN RELEASE RING
There are a few things the 850 needs to
work properly, a clean air supply of 30 - 35
psi at 1.34 CFM, regulator/air filter, and
a on/off air switch. We recommend a foot
switch for working convenience and safety.
fig. 1:
1 #004-762 Air Regulator/Filter
(not included)
2 Short Hose Connector
3 #004-863 GRS Foot Switch
(not included)
1
2
3
fig. 1

fig. 2
fig. 3
Included with the handpiece
are two air hose clamps. Use
these to position your hose in a
user friendly way. We suggest
working with the tool first to discover the
best placement of the clamps and hose.
HOOK-UP
(fig. 1) Attach the short hose with coupler
(included) to the foot switch. Connect
handpiece hose to the short hose coupler.
Attach hose to the handpiece by slipping
hose clamp ring over the air hose and
position it close to the end (fig. 2). Forcibly
insert the tube and clamp ring over the
barb connector of the handpiece. (fig. 3).
Connect the hose between the switch
and the air regulator/filter. Attach your
air supply to the regulator/filter. You are
ready to test the handpiece.
INSERTING BUR
Insert bur into chuck and press (fig. 4-5).
You will feel it “pop” into place when it’s
properly seated. Use the bur push-in tool
(fig. 4) that came with the handpiece to
install a pointed bur. This will keep the
point from bending or breaking. Press in
other burs on a wood or plastic surface
(fig. 5).
REMOVING BUR
To release bur, turn the Chuck Release
Ring as shown in Fig 6. until you feel it
push the bur outward. Then remove bur
with your finger tips.
IMPORTANT: ALL THAT IS REQUIRED
TO REMOVE A BUR IS TO TURN THE
RELEASE RING. DO NOT REMOVE
CHUCK OR ROTOR NUT.
ATTENTION
GraverMach, GraverMaxSC,
GraverMax or GraverMate users:
Attach handpiece to auxiliary air output. It
is designed to operate at a maximum of
35 psi (2.4 bar). Stop the rotary handpiece
by turning the auxiliary knob until the air is
shut OFF. For frequent ON / OFF usage,
we recommend adding a GRS foot switch
in the air line.
Bur pops loose
Use push-in tool for
pointed burs.
fig. 4
fig. 5
Press bur into
chuck until you
feel it seat.
fig. 6
Release ring

OLD CHUCK REMOVAL
& REPLACEMENT
Insert a bur or dummy bur and remove
the cartridge. Hold the rotor with two fin-
gers as shown in fig. 7, place the wrench
on the rotor nut and loosen by turning
counterclockwise. When the rotor nut
is loose, carefully push out the chuck
from the back of cartridge (fig. 8) with
the shank of a bur. This will push out the
guide-bush and the chuck.
NEW CHUCK INSTALLATION
Insert a bur into a new chuck and push
it into the rotor shaft (fig. 9). Mount the
guide-bush on the bur (fig. 10) making
sure the longer part of the guide-bush is
facing the rotor. Attach the rotor nut and
tighten with the wrench provided (fig. 11).
PREVENTING DAMAGE
1. The recommended air pressure is
30 - 35 psi (0.25MPa) [2.5kg/cm2].
Higher air pressure may lead to
bearing failure.
2. Requires NO Lubrication. Oil will
damage handpiece.
3. Remove all lubricant from air
regulators or systems with lubricators
in line. Lubricant will damage the
handpiece.
4. Clean moisture condensation and
dirt from your air filter bowl and filter
element frequently.
5. The turbine cartridge should be
securely tightened with the enclosed
Cartridge Wrench.
6. When using a rotary handpiece,
use light pressure and allow the
bur to do the work. Excessive
fig. 7 NOTE: The guide-bush
is a very small part, be
careful not to lose it.
• Cleantheinsideof
rotor shaft with oil
spray after the
removal of chuck
ROTOR
NUT
fig. 10
GUIDE-BUSH #022-908
fig. 11
GUIDE-BUSH
ROTOR NUT #022-909
fig. 9 BUR
CHUCK #022-365
fig. 8 GUIDE-BUSH
CHUCK #022-365 BUR
BUR END
CARTRIDGE
pressure and/or the use of dull burs
will lead to premature failure of the
cartridge bearing and is not covered
by the 90 day warranty.
7. When carborundum or white point
is used, use it carefully. If worn
irregularly, do not use it. Dress it for
concentricity before use. Follow the
manufacture’s instructions.
8. Wear safety eye protection.
REPLACEMENT PARTS AND ACCESSORIES
4 #022-174 850 Handpiece Cartridge with Chuck
5 #022-365 Chuck ONLY
6 #004-762 Air Filter-Regulator (as shown)
#004-863 GRS On / Off Foot Control
(3 on front of instructions)
7 #004-862 Ultra 850 Stand Assembly (as shown)
#004-511 Carbide Bur Set (6 Piece Bur Set)
#004-512 Diamond & Stone Bur Set
(4 Diamond, 2 Stone)
7
6
5
4

Glendo Corporation
900 Overlander Road
P.O. Box 1153
Emporia, KS 66801 USA
1-800-835-3519
Fax: 620-343-9640
Tel: 620-343-1084
e-mail: [email protected]
www.grstools.com
LIT# 132
BUR CHECK LIST
• USEONLY.062”dia.(1.6mm)
shank burs.
• DoNOTusebrokenordamagedburs.
You may damage the handpiece or
yourself.
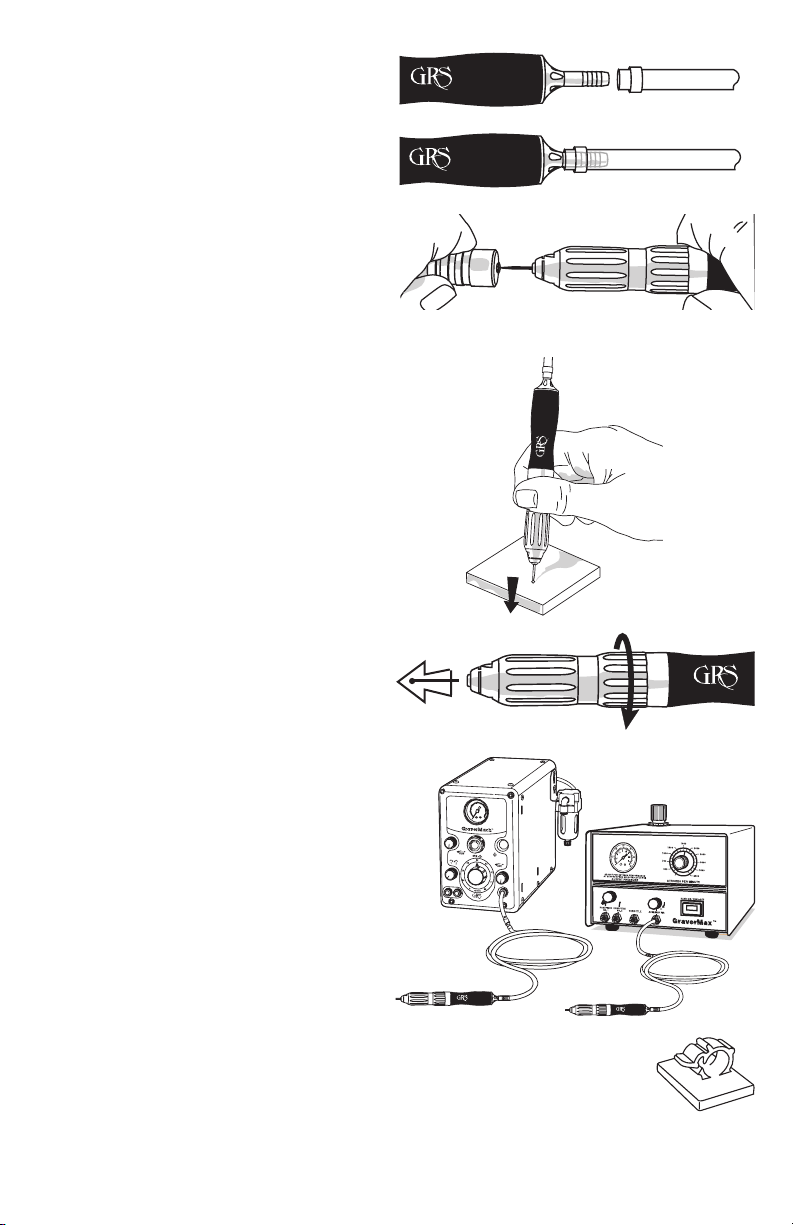
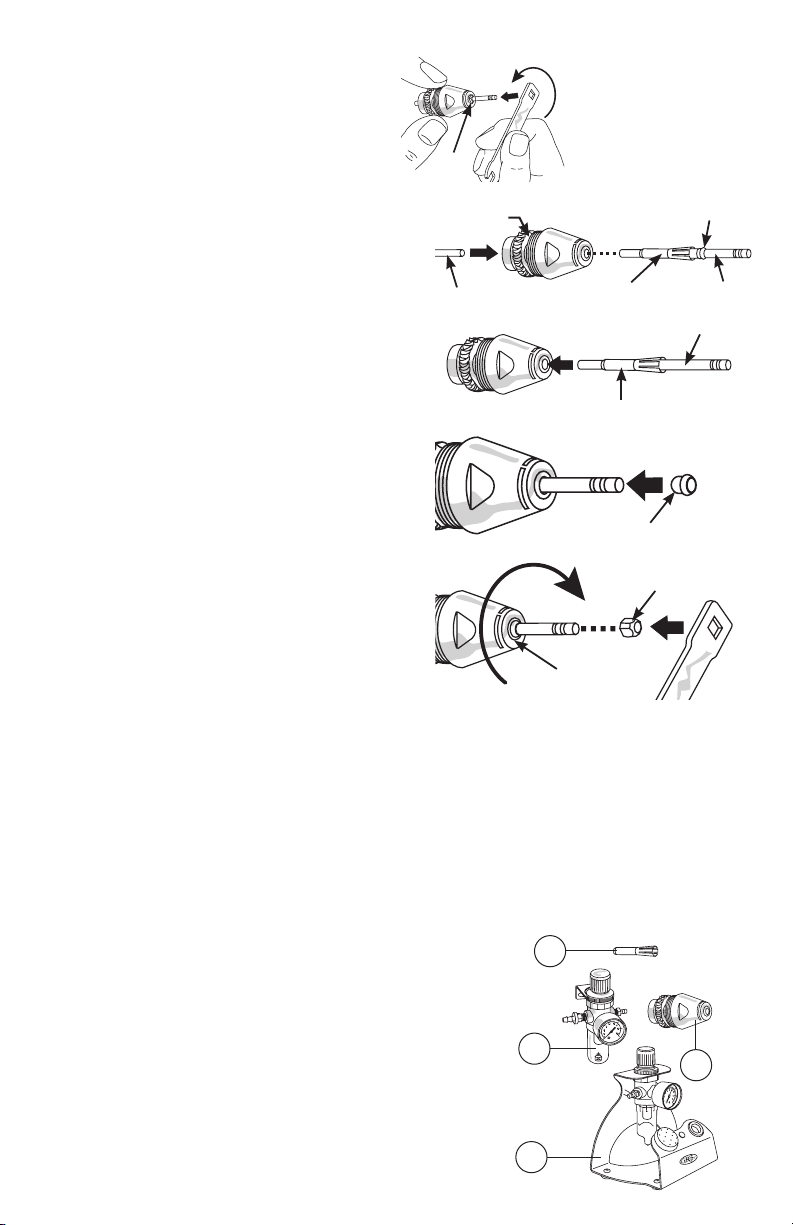
• Before use make sure the bur is properly
seated in the chuck. Press the bur
into the chuck until you feel a slight
“pop.” The bur is then seated. (See
INSERTING BUR fig. 4 - 5)
• Toremoveburturnreleaseringuntil
you feel the bur push outward. (See
REMOVING BUR fig. 6)
• WEARSAFETYEYEGLASSES
LONG-TERM WEAR SYMPTOMS
• BURDOESNOTSEATPROPERLY
If bur is loose after proper seating
procedure is followed, you probably
need a new chuck (collet) #022-365
You may try other brands of burs.
Manufacturing tolerances vary on
shank diameters with budget brands
of burs. Use only quality dental burs.
• ROTARYPOWERISERRATICOR
STOPSCOMPLETELYWHENLIGHT
PRESSURE IS APPLIED
Assuming the air line is clear of
moisture / oil and the turbine is
not clogged, you may need a new
handpiece cartridge, #022-174.
USAGE HINTS
Our customers who use the NSK air tool
get a very long service life out of them. We
have discovered over the 10 or so years
that we have supplied this product to the
engraving industry, if you do not exceed
32-35psi, and use a light touch to allow
the sharp burr to remove the material
(do not force it into the material) they go
for years on a single cartridge. Several
issues have been discovered when using
this handpiece in engraving and jewelry
that go beyond its original design that was
intended for the dental industry.
1. Do not force the bur to cut, use
light wiping motions when removing
background material or cutting a
pattern during layout of a design.
2. Always use a sharp bur, when it
becomes dull, do not push it harder
to make it cut, replace it. This is
especially true when working in steel
or other alloys and hard woods.
3. Do not allow the handpiece to fall onto
a hard surface such as a floor or table
top. This pushes the front and rear
bearings out of position and will cause
very rapid failure.
4. Always gently press the handpiece
against a piece of plastic or hard wood
when seating a burr in the collet. Just
like dropping the handpiece on a hard
surface, these are precision instruments
and must be handled as such.
5. NSK recommends the user remove and
clean the collet every 40 hours of use
with alcohol and a q-tip.
NSK warranties it’s air handpieces for 90
days. This does not include failures due to
misuse or miss-application.
Other GRS Engraver manuals