Grundig DVD-P 7644 User manual

PROTABLE
DVD PLAYER
DVD-P 7644
ENGLISH


Content
A. Introduction .................................................... 1
B. Cautions and Warnings ................................... 1
C. Contents ........................................................ 4
D. Powering and installation ................................ 6
E. Controls, Indicators, and Connectors ................ 7
F. Loading and Playing a Disc .............................. 8
G. Setup............................................................. 9
H. Basic Operation ............................................. 15
I. Menu ............................................................. 16
J. Display............................................................ 16
K. Playing Audio CDS ......................................... 20
L. Playing MP3 Discs ......................................... 22
M. Playing JPG file ............................................ 24
N. Connecting to a TV or another monitor ............ 25
O.Technical Data / Specifications........................ 26
P. Rechargeable Battery Installation and Use ...... 26
Q. Troubleshooting ............................................ 29

- 1 -
A. Introduction
Thank you for choosing this GRUNDIG water resistant portable
DVD player. The unit is designed to perform in both wet and dry
environments. You no longer need to worry about bringing your
entertainment with you; rain and splashes from the kids at the pool
are no match for the GRUNDIG DVD-P 7644 Portable DVDPlayer!
The unit applies the latest state of the art electronics and is
designed for use in hotels, offices or your home. The unit is
constructed to provide years of reliable, trouble-free service, and is
compact so that you can take it with you anywhere and is de-
signed for quick and easy installation. Please read the entire in-
structionmanualsuppliedwith thisproduct priorto using.The docu-
mentation will assist you in installing the system properly to ob-
tain the best equipment performance. Please save this manual for
later use.
B. Cautions and Warnings
1. Placement
Do not place the set on an unstable cart, stand, tripod, bracket
or table to prevent it from falling. Keep the unit away from strong
magnets, heat sources, direct sunlight, excessive dust. If the
unit is brought directly from a cold to a warm location, moisture
may condense inside the unit. When you move it from a cold to
a warm location, wait for about one hour before operating the
unit, or remove the disc and leave the unit turned on until the
moisture evaporates.
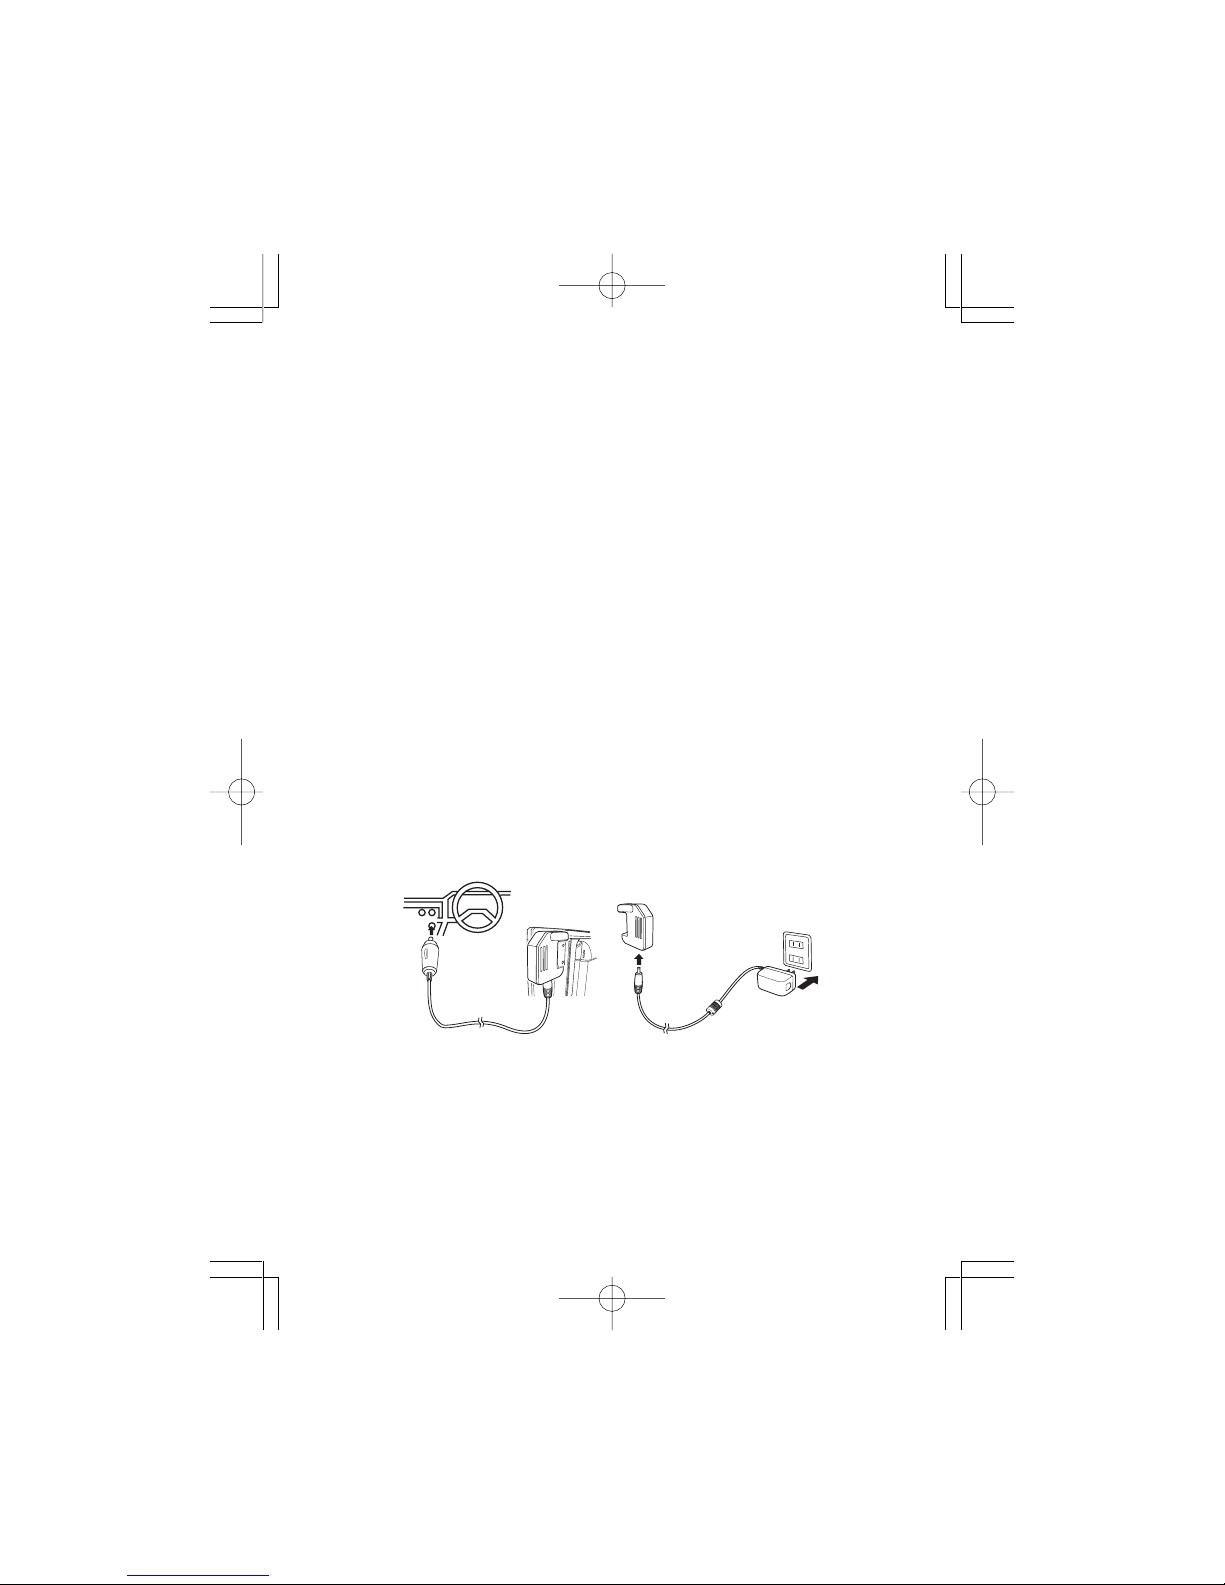
2. Installation
Ensure that the 7” portable DVD player is installed in accor-
dance with the instructions and illustrations provided in this
manual. Please see page 28 for instructions on installing the
battery.
3. Caution
Do not place anything heavy on the unit. To ensure proper
ventilationand proper

- 2 -
operation, never cover or block the slots and openings with a
cloth or other material. Keep the unit away from an open flame
such as fire, candle etc. It is hazardous to replace the battery
incorrectly. Replace the battery only with the same or equiva-
lent type, in order to protect the environment, please dispose
the battery properly. Do not use the unit in temperatures higher
than 95 degrees Fahrenheit or 35 degrees Celsius.
4.Disassemble
Do not attempt to disassemble the cabinet. There is a risk of
electricshock and/orexposuretoLaserRadiation. Contactquali-
fied service personnel if your system needs repair.
5. Cleaning Unit
When cleaning, make sure the system is unplugged from the
power source. Do not use liquid cleaners or aerosol cleaners.
Use a cloth lightly dampened with water for cleaning the exte-
rior of the system only.
6.Disc
Donotuse irregularlyshaped discs suchas heart orstar-shaped
discs as they may cause the unit to malfunction. Do not stick
paper, tape or glue on the disc. Do not expose the disc to direct
sunlightor heatsources.Donottouch thesurface ofdisc.Handle
the disc by its edge. Clean the disc by wiping the disc from the
center out with a cleaning cloth. Remove the disc from the unit
and store it in its case after playing. Some playback operations
of discs may be intentionally fixed by software producers. Since
this unit plays discs according to the disc contents the soft-
ware producers designed, some playback features may not be
available. Also refer to the instructions supplied with the discs.

- 3 -
7. Water Resistance
The unit is designed to perform in wet environments. Water
resistan does not mean water proof. Complete submersion in
water will damage the unit. In order to function correctly in wet
environments, these guidlines MUST be followed:
a. The DC Power ReceptacleAdaptor must be removed from
the unit.
b The DVD cover must be closed and the cover latch must be in
the locked position. (A positive snap sound will be felt/heard)
8. Regional Coding
Your DVD player has been given region code 4, DVDs with
other regional codes can not be played
Notice:
1.This Product incorporates copyright protection technology that is
protected by method claims of certain U.S. Patents and other intel-
lectual property rights owned by Macrovision Corporation and other
rights owners. Use of this copyright protection technology must be
authorized by Macrovision Corporation, and is intended for home and
other limited viewing uses only unless otherwise authorized by
Macrovision Corporation. Reverse engineering or disassembly is
prohibited.
2. Apparatus Claims of U.S. Patent Nos. 4,631,603; 4,577,216; 4,
819,098 and 4,907,093 licensed for limited viewing uses only.

- 4 -
C. Packaging Contents
1. DVD-P7644 7" Water Resistant DVD Portable Player
2. Remote Control
3. 1 Lithium battery 3V CR2025 for remote control
4. DC Jack Connector

- 5 -
5. Rechargeable battery
6. Car adapter for power supply in the vehicle
7.Audio-Video cable
8. Mains adapter
9. Operating manual

- 6 -
D: Powering and installation (Refer to figure 1)
1. Powering the system indoors
You can operate the DVD player using the main adapter sup-
pliedorwith the rechargeablebattery supplied.If theDVDplayer
is supplied with a voltage from the mains adapter and the player
turns to power on,the battery charge function will automatically
switch off.
Note:Before connecting or disconnecting the mains adapter, turn
POWER OFF of DVD player. Only use the main adapter supplied,
using another mains adapter can cause the device to malfunction
and may also result in damage to the unit. If you do not require
the mains adapter, pull out the plug from the wall socket.
a. Insert the plug of the mains adapter cable into the
input socket >> DC 9V IN<< of DC connector on the DVD
player
b. Insert the mains adapter plug into the wall socket
2. Powering the system in a car
Plug one end of the cigarette lighter adapter into the input socket
>> DC 9V IN<< of DC connector on the DVD Player, then plug the
other end into the cigarette lighter socket.
Figure 1 diagram
Note:If you are not going to use the portable DVD Player for an
extended period, you should unplug the power source.

- 7 -
E. Controls, Indicators, and Connectors
1. Unit View (Refer to Figure 2)
Figure 2
1) Charge Indicator LED
2) Power LED
3) Power On/Off Botton
4) Volume Up/Down Control
5) Brightness Up/Down Control
6) Speaker
7) Play Button
8) Stop Button
9) Next Button
10) Previous Button
11) Remote Control Sensor
12) Picture mode Button
(4:3 or 16:9)
13) Slide Handle
14) DC Input contacts
15) Backcover clasp
16)Backcover
17) Jack cover
18)Headphone
19)AV OUT
20)AV IN

- 8 -
2. Remote Control View (Refer to Figure 3)
1) Display Button
2) Angle Button
3) Subtitle Button
4) Audio Button
5) Zoom Button
6) UP/DOWN/LEFT/RIGHT/
ENTER Buttons
7) Return Button
8) A-B Button
9) Forward Button
10) Reverse Button
11) Slow Button
12) Stop Button
13) Numeric Keypad
14) Setup Button
15) Menu Button
16) Repeat Button
17) SKIP- (Previous) Button
18) SKIP+(Next) Button
19) Play Button Figure 3
20) Pause Button
F. Loading and Playing a Disc
a. Press >> POWER ON/OFF << on the device to turn on the DVD
Player
b. Open the disc tray by switching “OPEN”, and place a disc into
the tray with the label side facing up.
c. Close the tray, the unit will automatically load the disc and start
playing DVD.
d. Press BRIGHTNESS and VOLUME to adjust the LCD’s bright-
ness and the DVD player’s volume.
e. To stop playing a disc, press STOP.

- 9 -
G. Setup
1. General Setup Page
1)With no disc inside the player, press ‘SETUP’ to display the Main
screen of the Setup Menu on the screen and “General Setup Page”
appears.At the same time, “ ” is highlighted. Press ‘SETUP’ again
to exit the Setup Menu and the unit will resume it’s last playback
mode.
Main Setup Menu Screen
2)Press the ENTER button, “TV Display” is highlighted.
3) Press the or button to select the other menus in general
setup page.
4) Press to enter the sub menu.
5) Press the or button to select the sub menu and press the
ENTER to confirm your selection.
6) Repeat steps 3-5 for other menus.

- 10 -
a) TV Display
* Normal/PS: When the player outputs signal to a normal TV, a
normal picture is shown on the full screen.
* Normal/LB: When the player outputs signal to a normal TV, a
normal picture is shown on the screen with a black strip at both
the top and bottom of the screen.
* Wide: When the player outputs signal to a wide screen TV, a
wide picture is shown on the full screen.
b)TV TYPE
* PAL : The player output signal to the screen is PAL.
* NTSC: The player output signal to the screen is NTSC.
C)Angle Mark
* On: The screen will show the angle mark icon. (*If an angle option
is available).
* Off: The screen will not display the Angle Mark
NOTE: Not all discs contain above features. The above features
are disc dependent.
d)OSDlanguage
* English.:The set up menu will be displayed with English..
* Japanese:The set up menu will be displayed with Japanese
e) Screen Saver
*On: Enables screen saver
*NOTE: The DVD player will enter the Screen Saver mode after
approximatelyfiveminutesifthesameimageremainson thescreen.
*Off: Disables screen saver (off)
f) Last Memory
*On: The unit will return to the last position on the disc.
*Off: The unit will not return to the last position on the disc.
Note: The Last position memory function only effect when OPEN
operation andAV In/Out switching.

- 11 -
2.Video Quality Setup
1)In Setup menu, Press the or button to select “Video Quality
Setup”and ishighlighted.PressENTERto enterthevideo quality
setup page.
2)Press the ENTER button, “Brightness” is highlighted.
3)Press the or button to select the other menus in video quality
setup page.
4) Press to enter the sub menu.
5) Press the or button to adjust the quantity and press the
ENTER to confirm your selection.
6) Repeat steps 3-5 for other menus.
Note: Press to return the previous menu.
a) Brightness b) Contrast
c) Hue d) Saturation

- 12 -
3. Password
In Setup menu, Press the or button to select “Password Setup
Page”and ishighlighted. PressENTERto enterthe password page.
Password Setup Page Screen Display
Press ENTER twice to enter the Password Change Page. Input
the Old Password or the Default Password, the New Password,
and the Confirmed New Password. Press ENTER to confirm the
change.
Password Change Page Screen Display
Note: The default password is 3308.
4. Preference Page
1) In Setup menu, Press the or button to select “Preference
Page”and is highlighted. Press ENTER to enter the preference
page.
2)Press the ENTER button, “Audio” is highlighted.

- 13 -
3)Press the or button to select the other menus in preference
page.
4) Press to enter the sub menu.
Preference Audio Language
5) Press the or button to select the sub menu and press the
ENTER to confirm your selection.
6) Repeat steps 3-5 for other menus.
Note: Press to return the previous menu.
a)Audio
b) Subtitle
c) Disc Menu
Note: Language and subtitle selection is only available for discs
that are recorded in the above listed languages. If the selected
language is not available, the player will play and display on the
screen the original recorded language contained in the disc.

- 14 -
d) Select ‘Parental’ using the UP/DOWN button, then press RIGHT to
enter the submenu.
Parental Preference Screen Display
Select the parental level you desire using the UP/DOWN button for
discs with lock-out function or multiple rating levels. These are
listedfromthe lowest level(1 Kid Safe)to the highestlevel(8Adult).
Press ENTER and input 4 digit password, then press ENTER again
to confirm the parental level setting.
NOTE: The level of 8Adult is the factory default.
e) Select ‘Default’ using the UP/DOWN button, then press RIGHT to
enter the submenu. Press ENTER to make the setting return to
the factoryset mode.
NOTE: The parental setting is not affected by the default reset
function.
Loading Factory Setting
NOTE: The Default Password is 3308. This password is always
effective even after you have selected your own password and
changed it. To avoid the possibility of others using the default
password to set the parental level and change the password, we
suggest you put this manual in a location not reachable by children
in your home. Some discs can be limited depending on the age of
users while some discs cannot.

- 15 -
POWER
OPEN
PLAY
SLOW
PAUSE
STOP
NEXT
PREVIOUS
FORWARD
REVERSE
LEFT/RIGHT/UP/DOWN
ENTER
NUMBERS
MENU
REPEAT
A-B
DISPLAY
ANGLE
SUBTITLE
AUDIO
ZOOM
SETUP
Turn the unit on/off
Remove/load the disc
Start Play/Execute item or setting
Play at 1/2, 1/4, 1/8 or 1/16 times speed
Still Picture
(1 time) Stop at the present playing point /
(2 times) Stop playing
Go to the next chapter, track or scene
during play back
Go back to the previous chapter, track or
scene during play back
Scan forward at 2, 4, 8,16 or 32 times speed
Scan backward at 2, 4, 8, 16 or 32 times
speed
UsedforMenu Navigation
Execute item or confirm setting
Select item or setting
Display the main menu of the disc
Repeat playing title, chapter, or track
Repeat a specific portion from pointAto
point B of the disc
Display information (title, chapter, track,
time, etc.).
Change the viewing angles on the scene
Select the subtitle language and turn it
on/off
Select the audio language
Enlarge an image to 2, 3, or 4 times the
original size.
Display the setup menu to select and set
items, and exit the setup menu.
H. Basic Operation

- 16 -
I. Menu
A DVD is divided into sections called titles and chapters. When
you play a DVD, a root menu of the disc will appear on the screen
of your TV or Monitor. The contents of the menu vary from disc to
disc. Press MENU during playback to display the menu. Some
DVDs only allow you to select disc playback options using the
DVD root menu.
J. Display
1. PLAYING TIME AND REMAINING TIME
a. During playback press the ‘DISPLAY’ button to display the
current Title Number (1), the total Number of Titles (2), the
current Chapter Number (3), the total Number of Chapters (4),
and the Playing elapsed Time for the title (5). The heading will
disappear automatically after 3 seconds if DISPLAY button is
not pressed.
Title, Chapter Number, and Time Screen Display
b. Press ‘DISPLAY’ constantly to choose the options below cir-
cularly.
Title Elapsed: The elapsed time of the title
Title Remain: The remaining time of the title
Chapter Elapsed: The elapsed time of the chapter
Chapter Remain: The remaining time of the chapter
Display Off: The DVD’s time Information will not be displayed.
Title Elapsed
Title Remain
Chapter Elapsed
Chapter Remain
Display Off

- 17 -
2.ANGLE
During playback of a disc, press ‘ANGLE’ to display the available
angles for discs containing multi-angles*, with the current angle
number (1) and the total number of angles (2) displaying. Press
‘ANGLE’ to select another angle, then press again to exit and re-
turn to the normal viewing angle. The angle display will disappear
automatically if the ‘ANGLE’ button is not pressed again within 3
seconds.
*NOTE: Not all discs contain this feature.
Angle Screen Display
3. SUBTITLE
During disc playback press ‘SUBTITLE’ to select the subtitle lan-
guage you desire*, with the current Subtitle Language Number (1)
and the total Number of Subtitle Languages (2) displayed. If there
are multiple languages press ‘SUBTITLE’ again to select another
subtitle language.To turn subtitles OFF, press the ‘SUBTITLE’ but-
ton until ‘Subtitle Off’ is displayed. The Subtitle display will disap-
pear automatically if the ‘SUBTITLE’ button is not pressed again
within 3 seconds.
Subtitle Screen Display
* Some DVDs only allow access to this function through the DVD
menu
Table of contents
Other Grundig Portable DVD Player manuals

Grundig
Grundig DVD-P 7000 User manual

Grundig
Grundig DVD-P 7850 User manual

Grundig
Grundig DVD-P 8600/2 User manual

Grundig
Grundig DVD-P 7850 User manual

Grundig
Grundig DVD-P 7600 User manual

Grundig
Grundig DVD-P 7000 User manual

Grundig
Grundig GMK9600 User manual

Grundig
Grundig DVD-P 8600 User manual

Grundig
Grundig DVD-P 6200 User manual

Grundig
Grundig DVD-P 7600 User manual