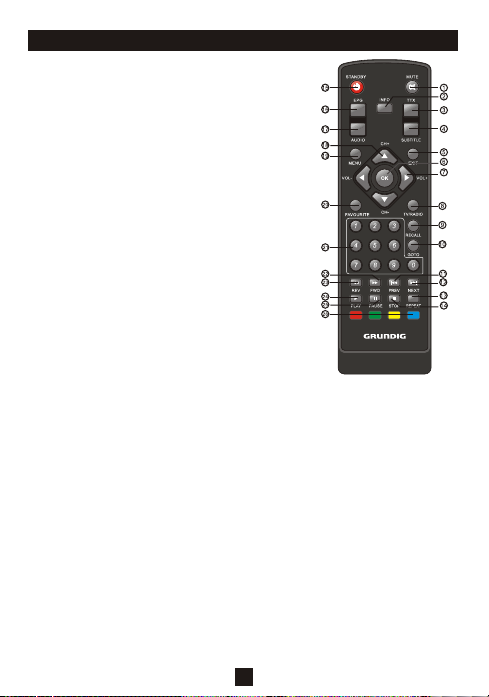
Grundig GSTB3106HD User manual

INSTRUCTION MANUAL
Toll Free Warranty and Service: 1800509 394
The Gold TechnicalSupport Line: 1902 215259
(Charges will apply at$2.95 per minute forgold
technical support only)
GSTB3106HD
High Definition
Digital Set Top Box

Important Safety Instructions
The symbol indicates thatdangerous voltages constituting arisk of electric
shock are present within this unit.
The symbol indicates that there are important operating andmaintenance
instructions in the literatureaccompanying this unit.
This symbol indicates that this product incorporates double insulation
between hazardous mains voltage and user accessible parts.when
servicing use only identical replacement parts.
1
Please note there areno user serviceable parts in thisunit.
Do not remove thecover or back forany reason. Refer allservicing to qualified
Grundig Service agent.
Do not expose theunit to rain ormoisture, to prevent fireor electric shock hazards.
Do not expose theunit to any liquidor water (dripping orsplashing) and no objects
filled with water, such as vases,should be placed onthe unit.
Keep the product awayfrom direct sunlight andany heat sources suchas radiators
or stoves.
Do not block anyof the ventilation openings.The openings on theunit are provided
for ventilation. The openingsshould never be blockedby placing your producton a
cushion, sofa or othersimilar surface.
Do not place theproduct on unstable cart, stand,tripod, bracket or table.The unit
may fall, resulting inpossible damage or injury.
Only use the ACadapter included with product.Using any other adapterwill void
your warranty.
Unplug the power fromthe outlet when theunit is not inuse.
Only use attachments/accessories specifiedprovided by the manufacturer.
This marking indicates thatthis product should notbe disposed with other
household wastes. To prevent possible harmto the environment orhuman
health from uncontrolled wastedisposal, recycle it responsiblyto promote
the sustainable reuse ofmaterial resources. Contact yourretailer where the
product was purchased.

Thank you for buying this Grundig product, which is designed to give you many
years of trouble-free service.
You may already be familiar with using a similar unit, but please take time to
read these instructions. They are designed to familiarise you with the unit s
many features and to ensure you get the very best from your purchase.
Safety is important
Your safety and the safety of others is important. Please therefore, ensure you
read the Safety Instructions before you operate this unit.
Warranty
In the unlikely event that your product fails to work normally, please call the
below Grundig warranty number for support.
Australia
Grundig Warranty: 1800 509 394
New Zealand
Grundig Warranty: 0800 450 259
Introduction
2

About the Set Top Box
This Set Top Box Receiver allows you to access Digital TV
Channels and Radio Broadcasts on your TV set. Its digital reception
covers VHF & UHF band. Digital TV eliminates noise and interference
and offers high quality video and audio.
An easy to use on-screen installation guide is provided. In addition,
a fully featured Remote Control is included that offers you access
to every feature with a simple press of a button.
Main Features
Package Contents
Before installation, please check the items of the package.
The package should contain the following items:
~Set Top Box x1 pc
~Remote Control x1 pc
~AAA Battery for the Remote Control x1 pair
~Instruction Manual x1 pc
~Composite RCA Cable x1 pc
Receives All High Definition Digital Free to Air Channels
HDMI Output
Upscaling to 1080i
Easy Menu System
Automatic/Manual Channel Search
Parental Lock Control
EPG (Manufacturers Electronic Program Guide)
Teletext
RF In/Loop Through
Component / Video / Digital Audio via Coaxial Output
Full Function Remote Control
3

Table ofContents
Front and Rear Panel ...................................................................................... 5
Remote Control..............................................................................................6
Connections..................................................................................................8
First Time Installation......................................................................................9
Troubleshooting.............................................................................................16
Technical Specifications.................................................................................17
Warranty......................................................................................................18
4

Front and Rear Panel
1. Front panel
2. Rear panel
1. STANDBY INDICATOR:Displays when the unit is in Power mode and Standby mode.
The indicator will show as green when the unit is on and red when in standby.
2. REMOTE CONTROL SENSOR: Receives the signal from your remote control.
3. USB Input: The USB Input allows the unit to receive software upgrades via USB.
23
1
1. RF IN: This socket allows you to connectyour external aerial.
2. RF LOOP THROUGH:This socket allows you toconnect to your RF signalvia your
TV or other video device.
3. COAXIAL: This socket allows you toconnect the Set Top Box to on yoursurround
sound system.
4. HDMI OUT:This socket allows you touse your HDMI cable fora premium high
definition connection.
5.VIDEO: This socket allows you to connectyour Set TopBox via Composite Video
Signal.
6.AUDIO L/R: This socket allows you toconnect your Set Top Box to receive theAudio
L/R signal.
7. POWER INPUT:This socket is where youconnect your main power tothe unit.
1234576
5

Remote Control
1. MUTE: Press the Mute Buttonto cut the soundonly. Press
again to turn soundon.
2. INFO: Press the Info Buttonto display the program
information.
3. TTX: Press the TTX Buttonto enter the Teletext Menu.
4. SUBTITLE: Press the Subtitles Buttonto turn on the program
subtitle and press repeatedlyto scroll through thelanguages
offered.
5. EXIT:Press the Exit Buttonto Exit any Menu.
6. OK: Press the OK Buttonto confirms any menu selectionsor
settings changes.
7. RIGHT/LEFT NAVIGATEBUTTONS: Press the Right/Left
Navigate Buttons to scrollthrough the menu/settings options.
Press the Right/Left NavigateButtons to adjust thevolume.
8. TV/RADIO: Press the TV/RadioButton to switch betweenTV
and Radio modes.
9. RECALL: Press the RecallButton to return to thelast
channel you were watching.
10. GOTO: Press the GOTO Buttonto view the playtimeof media
you are watching.
11. PREV: Press the PrevButton to skip backwardsto the
previous track during play.
12. NEXT:Press the Next Buttonto skip forwards to thenext
track during play.
13. REPEAT: Press the RepeatButton to Repeat Play.
14. STOP: Press the Stop Buttonto stop media play.
15. STANDBY: Press the Standby Buttonto turn the unit onor off.
6
16. EPG(Manufacturers Electronic ProgramGuide): Press the EPG Buttonto enter the EPG
Menu for detailed programinformation and guide.
17. AUDIO: Press the Audio Buttonto select the AudioLanguage or Audio Mode.
18. UP/DOWN NAVIGATEBUTTONS: Press the Up/Down NavigateButtons to scroll through
the menu and settingoptions or to scrollthrough the channel list.
19. MENU: Press the Menu Buttonto enter the MainMenu.
20. FAVOURITE:Press the FavouriteButton to enter theFavourite Menu.
21. NUMERIC BUTTONS:Press the Numeric Buttonsto change the channeldirectly or enter
your password or settinginformation.
22. FWD: Press the FWD Buttonto fast forward play inmedia mode.
23. REV: Press the REV Buttonto rewind play inmedia mode.
24. PLAY:Press the Play Buttonto start or resume media play.
25. PAUSE:Press the PauseButton to pause playin media mode.
26. COLOUR BUTTONS:Press the Colour Buttonsto operate different functionsin the teletext
mode.

Installing the Batteries
Remove the battery coverfrom the Remote Control and put 2xAAAsize batteries inside
the compartment.
The diagram inside the Battery Compartment shows the correct way to install the
batteries.
1.Open the cover 2.Install batteries 3.Close the cover
Using the Remote Control
To use the Remote Control, point it towards the front of the Digital Set Top Box. The
Remote Control has a range of up to 7 metres fromthe Set Top Box at anangle of up to
60 degrees.
The Remote Controlwill not operate ifits path is blocked.
Sunlight or very brightlight will decrease thesensitivity of the Remote
Control.
7

TV
TV Aerial
VCR
Amplifier
Coaxial Cable
Coaxial Power Adaptor
Connections
Caution: Make sure to checkthe voltage specification ofthe wall outlet isthe same
rating with the receiver. Toprevent the risk ofelectric shock, do notopen the cover or
the back of thereceiver.
Note: 1.When connecting the receiver to other equipment, e.g., TV, VCR and amplifier,
make sure to refer to relevant user manual for instruction. Also, make sure you
disconnect all the equipments from the mains supply before connecting.
2. No video output from CVBS if HDMI output is connected to TV.
VIDEO IN
YELLOW
(Audio)
(Video)
8

First Time Installation
After all connections have been made properly and power is connected,
switch on the TV and the Set Top Box. When using the receiver for the
first time or after you have conducted a restore to Factory Default the
Installation Guide willappear on your TV screen.
(1) Select [OSD Language] and press the RIGHT/LEFT Navigate Buttons to select
your desired language
(2) Select [Country] andpress the RIGHT/LEFT NavigateButtons to select Australia
(3) Select [Channel Search]and press the RIGHTor OK Button confirmand begin the
automatic channel search
(4) Once the automatic channel search is complete, the first channel in the list will
appear on screen andyou can now watchTV.
Basic Operation
Program Settings
To access the Main Menu, press the MENU Button and then select [Program] to
adjust the program settings. Press the OK or RIGHT to confirm any adjustments.
Press the EXITbutton to exit theMenu.
Program Edit
In the Program Menu, you can edit the program settings. To edit your program
preferences (lock, skip, favourite,move or delete), youwill need to enterthe Program
Edit Menu. This Menu requires a password to access. Enter the default password
'000000'.
9

Setting Favourite Programs
The Favourite function in the program settings allows you to create a shortlist of favourite programs
that you can easily access.
To set aTV program or radiostation to your favouriteslist, please follow thebelow:
1. Tune your TV to the program you wish to add to your favourites list and then press the Favourite
Button on your Remote Control. A heart-shaped symbol will appear next to the program in the
programs list and is nowmarked as a favourite.
2. Repeat step oneto select and set moreprograms.
3. To confirmand exit the Menu,press the Exit Button.
If you have incorrectly set a program to your favourite list press the Favourite Button again and the
selection will be disabled andthe heart-shaped symbol will disappear.
Viewing Favourite Program
1. Press the FavouriteButton and the FavouriteMenu will appear.
2. Press the Up/DownNavigate Buttons to scroll throughyour Favourite Programs.
3. Press the OKButton to select andplay your favourite program.
Deleting a TV or RadioProgram
1. Press the FavouriteButton and the FavouriteMenu will appear.
2. Press the Up/DownNavigate Buttons to scroll throughyour Favourite Programs.
3. When you have foundthe program you wish todelete, press the Blue Buttonon your remote control
and the program and heart-shaped symbolwill be removed.
4. Press the OKButton to confirm.
Setting a TV orRadio Program to Skip
1. Tune yourTV to the program youwish to skip and thenpress the Green Button onyour remote control.
A skip symbol willbe displayed next tothe program in theprogram list.
2. Repeat step oneto select and set moreprograms.
3. To confirmand exit the Menu, pressthe Exit Button
If you have incorrectly set a program to skip, press the Green Button again and the selection will be
disabled and the skip symbolwill disappear.
Moving a TV or RadioProgram
1. In your channel list select the program you wish to move and then press the Red Button on your
remote control. A movesymbol will appear nextto the program.
2. Press the Up/DownNavigate Buttons to movethe selected program.
3. Press OK toconfirm.
4. Repeat the abovesteps to move more channels.
Locking a TV orRadio Program
As apart of the parental lockfunction, you can lock aselected program to restrict itfrom being viewed
by children. Tolock a particular program follow thebelow steps:
1. Tune your TV to the program you wish to lock and then press the Yellow Button on your remote
control. A lock-shaped symbol willbe displayed next to theprogram in the program listand it is now
locked.
2. Repeat step oneto select and lock moreprograms.
3. To confirmand exit the menu,press the EXIT Button.
4. Press the Yellow Button again todisable the locked program.
5. To viewa locked program, you will be require to enter either the defaultpassword '000000' or your
last set password.
Sorting your Channel List
The Sort function in the programsettings allows you to arrangethe program list in yourdesired order.
[LCN] - Sort the channels inascending order
[Name] - Sort the channels inalphabetical order
[Service ID] - Sort the channels accordingto the station
[ONID] - Sort the channels accordingto ONID
LCN (Logical channel number)
You can setthat Channel list toautomatically be arrange by LCD.Select this option inthe program menu
to set it to onor off.
10

Picture Setting
To accessthe Picture Menu, pressMenu Button then selectthe [Picture] sub-menu. The
Picture menu allows youto adjust the pictureand video settings. Pressthe Up/Down
Navigate Buttons to selectan option and pressthe Right/Left Navigate Buttons toadjust
that setting. Press theExit Button to exitthe menu.
Aspect Ratio
The Aspect Ratio allowsyou to set theTV screen display. Youcan choose between either
4:3 PanScan, 4:3Letter Box,16:9 Widescreen orAuto.
Resolution
The Resolution allows you change the picturequality. You may want toadjust this setting
if you are havingissues with your TVpicture image. You can choose between;480i, 480P,
576i, 576P, 720P and 1080I(1080I is the highdefinition resolution, make sureit is
selected if you haveconnected the TV viaa HDMI cable.
TV format
The TV format refersto your the systemby which your SetTop Boxreceives its TV signal.
Channel Search
If you wish toconduct a channel searchyour will need togo to the ChannelSearch Menu.
Press the Menu Buttonand then select [SearchChannel] option. The ChannelSearch
Menu allows you toselect what type ofsearch you would liketo conduct. Press the
Right/Left Navigate Buttons to selectthe Channel Search optionyou wish to use.Press
the OK Button toconfirm and press theExit Button to exit.
Auto Search
In the Channel SearchMenu you can selectAuto Search, which meansthe TV will
automatically search and storeall available channels.
1. Select the [AutoSearch] option and pressthe OK or RightNavigate Button to conduct
an Automatic Channel Search.
2. Tocancel the channel search,press the Exit Button.
11

Manual Search
In the Channel SearchMenu you can selectManual Search, which meansyou can
manually select the channelsyou wish to searchfor and store inthe channel list. You
can use this optionto add new channelsto the channel listwith out replacing thewhole
list.
1. Select the [ManualSearch] option and pressthe OK or RightNavigate Button to
begin.
2. Once in theManual Search option, pressthe Right/Left Navigate Buttons toselect
the channel frequency ofthe channel you wishto find and store.
3. Press theOK Button to thenscan for the frequencyselected. When the channelis
found it will beadded to the channellist.
Country
In the Channel SearchMenu you can changeyour country of residence.
Antenna Power
In the Channel SearchMenu you can turnsetting on or off if you have anexternal
antenna connected.
Time Menu
To accessthe Time Menu, pressthe Menu Button andthen select the [Time]option.
The Time Menu allowsyou to adjust thetime settings. Pressthe Up/Down Navigate
Buttons to select adesired option and thenpress the Right/Left NavigateButtons to
adjust the setting. Press the OK Buttonto confirm and theExit to exit themenu.
Time offset
In the Time Menuyou can set theTime offset to autoor manual. Manual willallow you to
adjust the GMT offsettime.
Country Region
In the Time Menuyou must set yourCountry Region when the[Time Offset] is setto
Auto.
Time Zone
In the Time Menuyou must set theTime Zone Offset when[Time Offset] is setto Manual.
12

Sleep
In the Time Menuyou can set theSet TopBox Sleep Time. Ifthe Sleep Time ison the Set Top
Box will turn off afterthe set number ofhours. When the SetTop Boxhas been on forthe set
number of hours apop up message willtell you that theSet TopBox will now turn tostandby.
You can setthe Sleep Time toup. Press the StandbyButton to exit sleep/ auto-off mode.
Option
To accessthe Option Menu, pressthe MENU Button andthen select the [Option]Menu. The
Option Menu allows youto adjust the OSDLanguage, Subtitle Language andAudio Language
settings. Toselect an option inthe Option Menu pressthe Right/Left Navigate Buttons to
adjust. Press the ExitButton to exit theMenu.
OSD Language
In the Option Menuyou can select andadjust the OSD Language.
Audio Language
In the Option Menuyou can select yourpreferred audio language. If thelanguage is not
available, the default programlanguage will be used.
Subtitle Language
In the Option Menuyou can select yourselect the preferred subtitle language.
Digital Audio
In the Option Menuyou can select yourdigital audio connection.
System Setting
To accessthe System Setting Menu,press the Menu Buttonand then select [System]Menu.
The System Settings Menuallows you to adjustand view the SystemSettings. Press the
Right/Left Navigate Button to adjustthe settings. Press theExit Button to exitat any time.
Parental Guidance
In the System SettingMenu you can restrictaccess to channels thatare unsuitable for
children. Torestrict/lock undesirable channels youwill need to entereither the default
password 000000' or your own password.
Set Password
To setor change the passwordfor locked programs. Enteryour old password orthe default
password '000000'. Youwill then be askedto enter the newpassword and then confirm byre-
entererig your new password.Once it is confirmed, pressthe Exit Button toexit the Menu.13
'
13

Factory Default
In the System SettingMenu you can selectthe Factory Default optionto conduct a
settings reset. In theMain Menu, select [Factory Default] and thenpress OK or Right
to select. You will then needto enter your passwordor the default password'000000'
to gain access tothis section. Press theOK Button to confirm.Conducting a Factory
Reset will delete allpreset channels and settings.
Information
In the System SettingMenu you can selectthe Information option toview the model,
hardware and software information.
USB is primarily forSoftware Upgrade, however itdoes support movie playback.
To accessthe USB Menu, pressthe MENU Button andselect [USB] using the
Right/Left Navigate Buttons. TheUSB Menu allows youto play Music, Photoand
Multimedia files. It cansupport AVI, WMA, JPEG andBMP formats. The unitwill only
support USB device with FAT32 filesystem. It will notsupport NTFS file system.
Multimedia: When a USBdevice is connected, youcan select from theMusic, Photo
or Movie using theRight/Left Navigate Buttons andthe OK Button. Ifa USB device is
not connected, the warningmessage "No USB deviceis Found" willappear.
14

Troubleshooting
15
Problem Potential Reasons What to do
No picture
No Picture
No Sound
The Remote Control is
not responding
Power isn't connected
Power is not on
Video Cables not connected
Picture Settings are incorrect
Audio Cables are not
connected
Mute function is on
There are obstructions between
the remote control and the
sensor
Connect the power
Switch on the power
Ensure Video Cables are
connected properly
Conduct a Factory Reset to
clear all Settings
Connect the Audio Cables
as outlined
Turn off muteby pressing Mute
Button again or byincreasing
the volume
Replace the batteries
Move any obstructions between
the remote control andthe
sensor and ensure youfollow
the remote instructions
The Batteries are dead

Technical Specifications
Item Sub Item Parameter
Tuner
Video
Audio
Power
Input Frequency
RF Input level
IF Bandwidth
Modulation
Decoder Format
Output Format
Output Port
Decoder Format
Audio output
Voltage
Power
170~230MHz
470~860MHz
-25~-78dBm
7MHz and 8MHz
QPSK,16QAM,64QAM
MPEG2 MP@ML
576P , 720P, 1080i, 4:3 and16:9
HDMI,
MPEG-1 (layer1&2)
Digital audio: S/PDIF
DC 5V Supply
Max 8W
16
MPEG4 MP@ML

Warranty
17

PO BOX 6287,
SILVERWATER NSW 1811
www.Grundig.net.au
Table of contents
Other Grundig Set-top Box manuals

Grundig
Grundig GSTB3111BR User manual

Grundig
Grundig GSTB3110DVD User manual

Grundig
Grundig GSTB3105HD User manual

Grundig
Grundig GSTB4101FVE User manual

Grundig
Grundig GUD1600TS1G User manual

Grundig
Grundig freeview GSTB4100FV User manual

Grundig
Grundig GSTB3103HD User manual

Grundig
Grundig GUD1500 User manual