GSC 301025000 User manual

Ref.: 301025000
RADIADOR CONVECTOR INTELIGENTE
ES
WIFI CONVECTOR RADIATOR
EN
CONVECTEUR À RADIATEUR WIFI
FR
Referencia /
Item Potencia /
Power Cable /
Cord Área cobertura /
Coverage area Color /
Colour Medida / Size Voltaje /
Voltage
301025000 1500W 1.45M. 20-25M2Blanco 760x245x457mm 220-240V
RADIADOR CONVETOR WIFI
PT

PARTES DEL CALEFACTOR
1. Panel de control y pantalla
digital
2. Interruptor
3. Salida de aire caliente
4. Patas
5. Rueda
DATOS TÉCNICOS
Voltage : 220-240V~
Frequency: 50/60Hz
Electric power(W): 1500W
HEATER PARTS
1. Control panel and digital display
2. Main power switch
3. Warm air outlet
4.Feet
5.Wheel
TECHNICAL DATA
Voltage: 220-240V ~
Frequency: 50/60Hz
Electric power (W): 1500W
PIÈCES DE CHAUFFAGE
1. Panneau de commande et
affichage numérique
2. Interrupteur d’alimentation
principal
3. Sortie d’air chaud
4 pieds
5. Roue
DONNÉES TECHNIQUES
Tension: 220-240V ~
Fréquence: 50/60Hz
Puissance électrique (W): 1500W
PARTES DEL CALEFACTOR
1. Panneau de commande et
affichage numérique
2. Interrupteur d’alimentation
principal
3. Sortie d’air chaud
4 pieds
5. Roue
DATOS TÉCNICOS
Voltage : 220-240V~
Frequency: 550/60Hz
Electric power(W): 1500W


ES
4 | www.garsaco.com
PRECAUCIONES
SEGURIDAD
- No usar el calefactor
con un programador,
temporizador o cual-
quier otro dispositivo
que active el calefactor
de forma automática.
- No utilizar el calefac-
tor si ha caído.
- No utilizar si el cale-
factor presenta daños
visible.
- Utilizar el calefactor
en posición horizontal
y sobre una superficie
estabale, o fijar a una
pared, si procede.
ATENCIÓN: Para re-
ducir el riesgo de fue-
go, mantener tejidos,
cortinas o cualquier
otro material inflama-
ble a una distancia
mínima de 1 metro de
la salida del aire.
ATENCIÓN: No utilizar
este calefactor en ha-
bitaciones pequeñas
cuando éstas estén
ocupadas por per-
sonas que no sean
capaces de abando-
nar la estancia por
si mismas, excepto
en el caso que estén
bajo constante su-
pervisión.
1.El producto es solo
para uso doméstico.
2.El artículo debe
usarse solo según lo
previsto.
3.Revisar el artículo
antes de usarlo. No
enciender el calen-
tador con defectos o
el cable dañado.
4.Está prohibido
colocar el artículo en
agua.
5.Conectar el artícu-
lo solo a una fuente
de CA.
6.El dispositivo debe
conectarse al mismo

ES
www.garsaco.com | 5
voltaje que se indica en
la etiqueta de clasifica-
ción y el paquete.
7.El calentador solo se
puede enchufar en un
enchufe con conexión a
tierra.
8.No utilizar una fuen-
te de alimentación no
estándar.
9.Antes de enchufar el
calentador, asegurarse
de que esté apagado.
10.No utilizar el artículo
al aire libre.
11.Protejer el producto
de los impactos de las
esquinas afiladas, alta
humedad.
12.No tocar el calen-
tador con las manos
mojadas.
13.Si hay agua en la su-
perficie del calentador,
desconectarlo inmedia-
tamente.
14.Si el calentador cae
al agua, desconectarlo
inmediatamente. Está
prohibido meter las
manos en el agua.
15.Antes del próxi-
mo uso, el artículo
debe ser revisado
por un especialista.
16.Siempre des-
conectar el artículo
después de su uso,
antes de limpiarlo o
si encuentra defec-
tos.
17.El calentador no
puede ser transpor-
tado por el cable.
18.Cuando apague
el calentador, man-
tener la mano en el
enchufe y tire de él,
no tire del cable.
19.No enrollar el
cable alrededor del
aparato después de
cada uso.
20.Aplane sua-
vemente el cable
cuando no use el
calentador.
21.El cable solo se

ES
6 | www.garsaco.com
puede cambiar en el
centro de servicio.
22.Para la reparación
solo se pueden utili-
zar repuestos origina-
les.
23.Este electrodo-
méstico no está
diseñado para que
lo utilicen personas
(incluidos niños) con
capacidades físicas,
sensoriales o metáli-
cas reducidas, o con
falta de experiencia
y conocimiento, a
menos que hayan
recibido supervisión
o instrucciones sobre
el uso del electro-
doméstico por una
persona responsable
de su seguridad.
INSTRUCCIONES
DE SEGURIDAD
1. El aparato debe
conectarse al mismo
voltaje que se indica
en la etiqueta de clasi-
ficación.
2. No enchufar el
artículo antes de que
no esté montado en
la pared o colocado
sobre las ruedas.
3. No cubrir el artículo
cuando esté en funcio-
namiento.
4. Evitar colocar ob-
jetos extraños en las
rejillas de ventilación.
5. Está prohibido tirar y
doblar el cable.
INTRODUCCIÓN
Gracias por la compra nuestro producto de calidad. Utilizar cuidadosamente y de acuerdo con las ins-
trucciones que figuran a continuación. Por favor leer y guardar estas instrucciones para futura referencia.

ES
www.garsaco.com | 7
INTRODUCCIÓN
Gracias por la compra nuestro producto de calidad. Utilizar cuidadosamente y de acuerdo con las ins-
trucciones que figuran a continuación. Por favor leer y guardar estas instrucciones para futura referencia.
ANTES DE USAR
1. Sacar el calentador de la caja.
2. Retirar el material de embalaje.
3. Compruebar las piezas de instalación.
INSTALACIÓN
1. Los calefactores convectores de panel deben
montarse en la pared. Algunos elementos también
se pueden colocar con pies y ruedas.
2. Montar los pies en el zócalo de acuerdo con el
esquema G1.
3. Para el esquema de estudio de montaje en
pared G2.
a. Desinstalar el soporte del cuerpo, ver la imagen 1
b. Taladrar los agujeros en cada lado de la pared,
luego insertar los tacos de plástico, fijar el soporte
en la pared con un tornillo, ver la imagen 2.
c. Colocar el calentador en la posición adecuada
y asegúrese de que los orificios se alineen con el
soporte.
d. Aprietar el tornillo en la parte superior del soporte
para que quede firme, ver la imagen 4
4. Prestar atención a la posición del convector con
respecto a otros objetos.
5. Está prohibido colocar artículos debajo del
enchufe.
6. El convector tiene un grado de protección IP24.
7. Si coloca el artículo en el baño, evite la entrada de
agua en la superficie.
G1
G2
USO DEL ARTÍCULO
1. Colocar el calentador sobre una superficie plana
y estable.
2. Poner el botón del termostato en la posición de
apagado.
3. Enchufar el calentador.
4.Girar el dial del termostato en el sentido de las
agujas del reloj o en sentido contrario, ajustar la
temperatura requerida. Para calentar rápidamente
la habitación, colocar el dial del termostato en el
nivel máximo.
Tan pronto como se alcance la temperatura re-
querida, girar el dial del termostato en sentido
antihorario hasta escuchar un clic. Los elementos
calefactores se apagarán. La luz indicadora tam-
bién se apagará.
5. El convector se encenderá automáticamente
cuando la temperatura baje y se apagará auto-
máticamente cuando la temperatura aumente. Se
mantiene la agradable temperatura ambiente.
6. Si el aparato no se utiliza durante mucho tiempo,
apagarlo con el interruptor de encendido y desen-
chufarlo.
¡Atención! ¡No cubrir el producto! El convector no
debe colocarse bajo la ducha o en la piscina.

ES
8 | www.garsaco.com
CÓMO USAR
Enchufar el aparato en una toma de corriente
adecuada. Encender el aparato presionando
el interruptor principal. Se escuchará un pitido
y, mientras tanto, la temperatura ambiente se
mostrará en la pantalla. Presionar el botón on
de encendido, el calentador se encenderá.
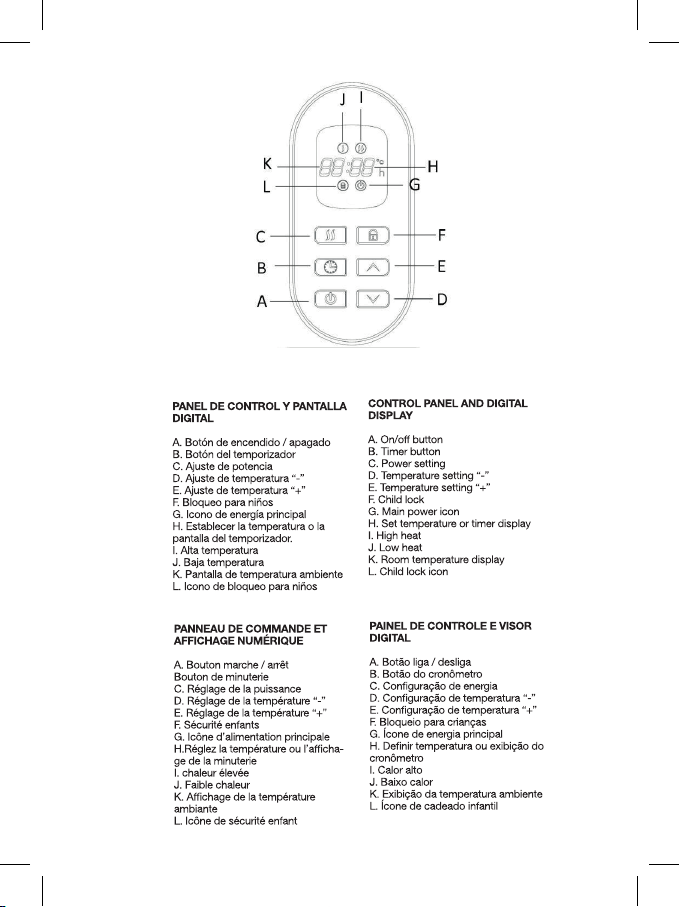
1. Ajuste de potencia. Presionar el botón ajuste
de potencia para elegir la potencia deseada,
se muestra: nombre de la calefacción baja,
media y alta.
2. Ajustar la temperatura. Presionar el botón
temperatura baja o temperatura alta para
configurar la temperatura deseada de 16ºCa
40ºC. Cuando llegue establece la temperatura
deseada, parpadeará unos segundos y luego
se mostrará en la pantalla.
3. Ajustar la hora. Presionar el botón de
temporizador para configurar el tiempo de
trabajo deseado de 0h a 24h. El tiempo de
trabajo establecido parpadeará unos segundos
y luego mostrará la temperatura establecida
nuevamente. El aparato se apagará automáti-
camente cuando se acabe el tiempo.
4. Bloqueo para niños. Mantener presionado
el botón de bloqueo para niños hasta que se
escuche un pitido, la función de bloqueo para
niños está activada. Mantener presionado el
botón de bloqueo para niños nuevamente
hasta que se escuche un pitido, la función de
bloqueo para niños se cancelará.
5. Apagar. Presionar el botón ON/ OFF
nuevamente para apagar el aparato. Luego,
apagar el interruptor de alimentación principal
y desenchufar el aparato.
SISTEMA DE SEGURIDAD
1. El aparato tiene un sistema de seguridad
que apaga automáticamente la unidad cuando
se sobrecalienta.
2. Si se produce un sobrecalentamiento,
apagar el aparato, retirar el enchufe de la toma
de corriente y dejar que se enfríe durante
al menos 30 minutos. Colocar el enchufe y
enciender el calentador.
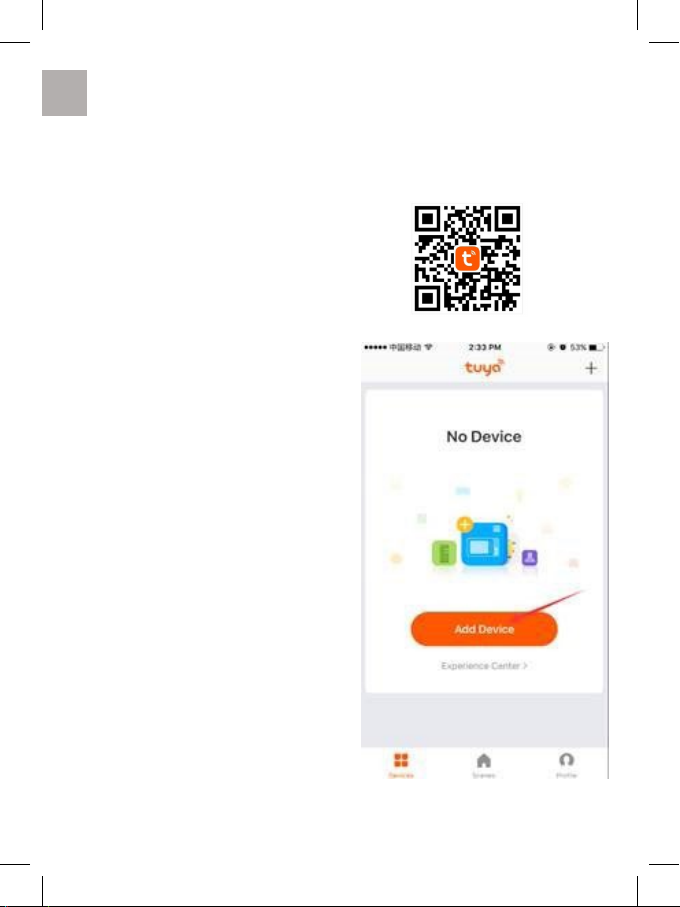
CONEXIÓN POR WIFI
1. Utilizar el teléfono para escanear el código
QR a continuación buscar “Tuya Smart” o
descargar la aplicación e instalar la aplicación.
2. Seleccionar el código de país, ingresar el
número de teléfono y hacer clic en “Obtener”
para recibir un mensaje que contiene la verifi-
cación del código.
3. Ingresar el código de verificación en el mensaje y
“Iniciar sesión” para iniciar sesión en la aplicación.
4. Enciender el producto y asegurarse de que esté
en un entorno cubierto por WIFI. La luz indicadora
parpadeará rápidamente. Si la luz indicadora no
parpadea rápidamente, presione el botón “” durante
5 segundos y el producto tendrá un sonido “bi”,
luego ir a la aplicación, tocar “agregar dispositivo” en
la parte inferior, como se muestra en la imagen.

ES
www.garsaco.com | 9
A) Elejir “Calefactor”, como se muestra en la
imagen 2.
B) Presionar el “indicador de confirmación” la luz
indicadora en el dispositivo parpadea rápidamen-
te, como se muestra en la imagen 3.
C) Ingresar la contraseña de WIFI y luego confirmar,
como se muestra en la imagen 4.
D) Esperar a que la APLICACIÓN se conecte con el
dispositivo hasta que se conecte con éxito, como se
muestra en la imagen 5.

ES
10 | www.garsaco.com
USAR POR WIFI
Puede utilizer el dispositivo por móvil en un
entorno WIFI o 4G LTE, como se muestra en la
imagen 6.
Seleccionar el botón “Temporizador semanal”
para usar:
A) Presionar el botón “Agregar temporizador”,
como se muestra en la imagen 7.
B) Puede elegir el temporizador semanal y lo que
desee, tener en cuenta que debe mantener la tem-
peratura establecida más alta que la temperatura
actual cuando está encendido, como se muestra
en la imagen 8.
C) Presionar el botón “Guardar” en la esquina supe-
rior derecha, para guardar esto durante se utiliza el
temporizador semanal “detener o iniciar”, como se
muestra en la imagen 9.

ES
www.garsaco.com | 11
NOTA
ANOMALÍAS & REPARACIÓN
1. En caso de avería llevar el aparato a su servi-
cio técnico de asistencia.
2. No intentar desmontarlo o repararlo si no es
una persona cualificada.
3. Si la conexión de red se encuentra dañada
debe ser sustituida de manera inmediata.
¡PRECAUCIÓN!
Este aparato puede ser utilizado por niños de 8
años y mayores y las personas con capacidades
físicas, sensoriales o mentales reducidas o falta de
experiencia y conocimiento si han sido supervisa-
dos o instruidos acerca del uso del aparato de una
manera segura y comprenden los peligros involu-
crados. Los niños no deben jugar con el aparato.
La limpieza y mantenimiento no serán realizadas por
los niños sin supervisión.
ELIMINACIÓN CORRECTA DEL PRO-
DUCTO. Esta marca indica que este
producto no debe eliminarse junto con
otros residuos domésticos en toda la UE.
Para evitar los posibles daños al medio ambiente
o a la salud humana que representa la eliminación
incontrolada de residuos, reciclar correctamente
para promover la reutilización sostenible de re-
cursos materiales. Para devolver su dispositivo
usado, utilice los sistemas de devolución y reco-
gida o póngase en contacto con el establecimien-
to donde se adquirió el producto. Ellos pueden
recoger este producto para el reciclaje seguro
ambiental.
Para evitar sobrecalentamientos, no
cubrir el aparato de calefacción.
No utilizar este calefactor en las proximidades de una
bañera, ducha o piscina.
Los niños menores de 3 años deben mantenerse fuera
del alcance del aparato a menos que sean continua-
mente supervisados.
Los niños menores de 3 años y menores de 8 años
deben sólo encender / apagar el aparato siempre que
éste haya sido colocado o instalado en su posición
de funcionamiento normal y prevista y que sean su-
pervisados o hayan recibido instrucciones relativas al
uso del aparato de una forma segura y entiendan los
riesgos que el aparato tiene. Los niños desde 3 años
y menores de 8 no deben enchufar, regular y limpiar
el aparato o realizar operaciones de mantenimiento.
No debe colocarse el calefactor debajo de una toma
de corriente.
PRECAUCIÓN: Algunas partes de este producto
pueden ponerse muy calientes y causar quemaduras.
Debe ponerse atención particular cuando los niños y
las personas vulnerables estén presentes.
LIMPIEZA Y MANTENIMIENTO
La limpieza y el mantenimiento a realizar por el
usuario no deben realizarlos niños sin supervisión.
Para maximizar la eficiencia del calefactor limpiar
regularmente.
1. Colocar los interruptores de alimentación en la po-
sición “OFF”, desenchufar y dejar que el calefactor
se enfríe.
2. Limpiar las superficies con un paño suave y hú-
medo. No usar detergentes o abrasivos ya que esto
podría rayar la superficie.
3. Asegurarse de que las rejillas estén libres de polvo,
ya que esto reducirá el flujo de aire. El polvo acu-
mulado puede eliminarse con un paño suave o una
aspiradora.
4. Dejar que la superficie se seque completamente
antes de volver a usar el calentador.
D) Configurar el siguiente el temporizador semanal
de “parada o inicio”.
E) Presionar el botón ”atrás” en la esquina
superior izquierda, para verificar el registro que
se configuró.
F) Tocar el registro durante mucho tiempo, puede

ES
12 | www.garsaco.com
Este producto es apto únicamente para espacios bien asilados o para uso ocasional.
Ref.: 301025000
Partida Símbolo Valor Unid. Partida Unid.
Potencia calorífica Tipo de aportación de calor, unicamente para los aparatos
de calefacción local eléctricos de acumulación (seleccio-
nar uno)
Potencia calorífi-
ca nominal
Pnom 2.0 Kw Control manual de la carga de calor, con termostato
integrado NA
Potencia calorífica
mín. (indicativa)
Pmin 0.001 Kw Control manual de la carga de calor con respuesta a la
temperatura interior o exterior
NA
Potencia calorífica
máx. (continuada)
Pmax,c 2.0 Kw Control electrónico de la carga de calor con respuesta
a la temperatura interior o exterior NA
Consumo auxiliar de electricidad Potencia calorífica asistida por ventiladores NA
A potencia calorífi-
ca nominal
elmax 0Kw Tipo de control de potencia calorífica/de temperatura
interior (seleccionar uno)
A potencia calorífi-
ca mínima
elmin 0Kw Potencia calorífica de un solo nivel, sin control de
temperatura interior
No
En modo espera elSB 0.001 Kw Dos o más niveles manuales, sin control de tempe-
ratura interior No
Con control de temperatura interior mediante termos-
tato mecánico
No
Control electrónico de temperatura interior Sí
Control electrónico de temperatura interior y tempo-
rizador diario
No
Control electrónico de temperatura interior y tempo-
rizador semanal Sí
Otras opciones de control (pueden seleccionarse varias)
Control de temperatura interior con detección de
presencia No
Control de temperatura interior con detección de
ventanas abiertas No
Con opción de control a distancia Sí
Con control de puesta en marcha adaptable No
Con limitación de tiempo de funcionamiento No
Con sensor de lámpara negra No
Información
de contacto Garsaco Import S.L. // www.garsaco.com
Pol. Ind. Molí d’En Llop. C/Corts Valencianes 10. 12549 Betxí (Castellón) SPAIN.

EN
www.garsaco.com | 13
PRECAUTIONS
SECURITY
1. Do not use the
heater with a pro-
grammer, timer, or
any other device that
automatically activa-
tes the heater.
2. Do not use the
heater if it has been
dropped.
3. Do not use if the
heater shows visible
damage.
4. Use the heater
horizontally and on a
stable surface, or fix
a wall, if applicable.
ATTENTION: To
reduce the risk of fire,
keep fabrics, curtains
or any other flam-
mable material at a
minimum distance of
1 meter from the air
outlet.
ATTENTION: Do not
use this heater in
small rooms when
they are occupied
by people who are
not able to leave the
room by themsel-
ves, except in cases
where they are under
constant supervi-
sion.
1. The product is for
household use only
2. The item should
be used only as in-
tended
3. Check item care-
fully before use. Do
not switch on heater
with defects or da-
maged cord.
4. Placing of the
item in water is forbi-
dden.
5. Plug in the item
only to AC source.
6. The appliance
should be connec-
ted to the same

EN
14 | www.garsaco.com
voltage as pointed on
the rating label and
package
7. The heater could
be plugged in only
grounded socket.
8. Do not use
non-standard power
supply.
9. Before plug in the
heater, make sure that
it is switched off.
10. Do not use item
outdoors.
1. Protect the product
from impacts of the
sharp corners, high
humidity.
11. Do not touch hea-
ter with wet hands.
12. If there is water
on the surface of the
heater, plug it out im-
mediately.
13. If the heater falls
in water, plug it out
immediately. It is
forbidden to put
hands in the water.
14. Before next use
the item should be
checked by specia-
list.
15. Always plug the
item out after use,
before cleaning
or if you find the
defects.
16. The heater
can’t be carried by
the cord.
17. When you
switch off the hea-
ter keep your hand
on the plug and
pull it, do not pull
the cord.
18. Do not wrap
the cord around the
appliance after the
use.
19. Flatten smoo-
thly the cord when
you do not use the
heater.

EN
www.garsaco.com | 15
20. The cord could
be changed only in
service center.
21. Only original
spare parts could be
used for repair.
22. This appliance is
not intended for use
by persons(including
children) with redu-
ced physical,sensory
or metal capabilities,
or lack of experien-
ce and knowledge,
unless they have
been given super-
vision or instruction
concerning use of
the appliance by a
person responsible
for their safety.
Safety instructions
23. The appliance
should be connected
to the same voltage
as pointed on the
rating label and pac-
kage.
24. Do not plug the
item in before its not
wall mounted or set
on castors.
25. Do not cover the
item when it is ope-
rating.
26. Avoid placing
foreign objects in air
vents.
27. It is forbidden
to pull and twist the
cord.

EN
16 | www.garsaco.com
BEFORE USE
1. Take the heater out of the box
2. Remove the packing material
3. Check the installation parts.
INSTALATION
- The panel convector heaters should be wall moun-
ted. Some items can be also stand with feet.
- Mount feet on the baseboard in accordance with
scheme G1.
- For wall mounting study scheme G2.
A.Uninstall the bracket from the body,see the
image1
B. Drill the holes at each sides on the wall,then insert
the plastic expanded plugs within fix the bracket in
the wall with screw,see the image2
C.Fit the heater into suitable position ensuing that
the holes align with bracket.see image3
D.Tight the screw on the top of bracket to catch
steady,see image4.
- Pay attention to the position of the convector with
regard to other objects. - It is forbidden to place item
under the socket.
- The convecto r has got IP24 degree of protection
- If you place item in bathroom, avoid ingress of
water on the surface.
G1
G2
USE OF THE ITEM
- Place the heater on flat stable surface
- Switch thermostat knob in off position
- Plug the heater in
- By turning the handle of thermostat clockwise or
counter clockwise set the required temperature.
For fast heating of the room set the thermostat
handle at maximum level.
As soon as required temperature will be reached,
turn thermostat handle counter clockwise until you
hear click. The heating elements will switch off. In-
dicator light will be also off.
- Convector will automatically switch on when
temperatures decreases and it will automatically
switch off when temperature increases. The com-
fortable ambient temperature is maintained.
- If the appliance is not used for a long time--switch
it off with power switch and plug the item out
- Attention! Do not cover the product! Convector
should not be place under shower or in swimming
pool
INTRODUCTION
Thank you for the purchase of our quality product. Used carefully and in accordance with the instructions set
out below. Please read and keep these instructions for future reference.

EN
www.garsaco.com | 17
OPERATION
Plug the appliance into an appropriate
electrical outlet. Turn on the appliance by
pressing the main power switch. A beep sound
will be heard, and at the meantime the room
temperature shows in the display. Press ON/
OFF button, the heater is turn on.
1. Power setting. Press power setting button
to choose your desired power, low head is on
display: behalf of low heating; the hight head is
on display , behalf of high heating.
2. Temperature setting. Press temperature “+”
setting button or temperature “-” to set the
desired temperature from 16ºCto 40ºC. When
it reach you set your desired temperature, it
will flash a few seconds, and then shows in
the display.
3. Time setting. Press timer button set the
desired working time from 0h to 24h. The set
working time will flash a few seconds, and
then shows the set temperature again. The
appliance will shut itself off automatically when
the time is up.
4. Child lock. Long press the child lock button
until a beep sound is heard, the child lock
function is activated.
Long press the child lock button again until a
beep sound is heard, the child lock function
is cancel.
5. Turn off. Press ON/OFF button again to turn
off the appliance. Then, turn off the main power
switch and unplug the appliance.
SAFETY SYSTEM
- The appliance has a safety system which
automatically switches off the unit when
overheated.
- If overheating occurs, switch off the applian-
ce, remove the plug from the socket, and let it
cool down for at least 30 minutes. Put the plug
in the socket and switch on the heater.
CONNECTION BY WIFI
1.Use your phone to scan the QR code below
or search “Tuya Smart” in
Application on market to download and install
the App.
2.Select your country code, enter the cellphone
number and tap “Get” to get a message
containing verification on code.
3.Enter the verification on code in the message and
tap“Login” to login the App.
4.Switch on the product and make sure the product
is in WIFI covered environment. The indicator light
will rapidly blinks. If the indicator light do no rapidly
blinks, please press “ ” button for 5 seconds and the
product will have “bi” sound, then go to the App,
tap “add device” at the bottom, as shown in the
picture 1.

EN
18 | www.garsaco.com
A) Choose “Heater”,as shown in pic 2.
B)Press the “confirm indicator rapidly blinks” when
the indicating light on device rapidly blinks,as
shown in pic 3.
C) Input password of WIFI and then confirm,as
shown in pic 4.
D)Wait for the APP to connect with the device until it
is connected succesfully as shown in pic 5.

EN
www.garsaco.com | 19
UOperation by WIFI
1.U can operate the device by mobile under
WIFI or 4G LTE environment, as shown in the
picture 6.
2.Select “Weekly timer” button to operation:
A) Press the “Add timer”,as shown in pic 7.
B) U can choose the weekly and timer what u
want,pls note that u must keep the set temperature
higher the currently temperate when ON the power
,as shown in pic 8.
C) Press the “Save”button in top right corner,to save
this during “stop or start” weekly timer operation,,as
shown in pic 9.

EN
20 | www.garsaco.com
NOTA
FAULTS
Take the appliance to an authorised tecnhical
support service if problems arise. Do not try to
dismantle or repair withut assistance, as this
may be dangerous. If the connection to the
mains has been damaged, it must be replaced
and you should proceed as you would in case
of damage
CAUTION!
This appliance can be used by children aged from
8 years and above and persons with reduced
physical, sensory or mental capabilities or lack of
experience and knowledge if they have been given
supervision or instruction concerning use of the
appliance in a safe way and understand the hazards
involved. Children shall not play with the appliance.
Cleaning and user maintenance shall not be made
by children without supervision.
CORRECT DISPOSAL OF THIS PRO-
DUCT . This marking indicates that this
product should not be disposed with other
household wastes throughout the EU.
To prevent possible harm to the environment or hu-
man health from uncontrolled waste disposal, recy-
cle it responsibly to promote the sustainable reuse
of material resources. To return your used device,
please use the return and collection systems or con-
tact the retailer where the product was purchased.
They can take this product for environmental safe
recycling.
To avoid overheating, do not cover the
heating appliance.
Do not use the heating appliance in the immediate
vicinity of a bath, shower or pool.
Children under 3 years of age should be out of reach
unless they are continuously supervised.
Children under 3 years of age and under 8 years old
should be monitored / turned off as long as it has been
installed or installed in its normal operating position
and has been supervised or received instructions on
how to use the device safely and understand the risks
that the device has. Children from 3 years of age and
children under 8 should not be plugged in, regulate
and clean the appliance or maintenance operations.
It should not be placed immediately under a power
outlet base.
CAUTION: Some parts of this product may get very
hot and cause burns. Special attention must be paid
when children and vulnerable people are present.
CLEANING
Cleaning and maintenance to be carried out by the
user must not be carried out by children without
supervision.
To maximize the efficiency of the heater, clean regu-
larly.
1. Set the power switches to the “OFF” position,
unplug and let the heater cool down.
2. Clean the surfaces with a soft, damp cloth. Do not
use detergents or abrasives as this could scratch the
surface.
3. Make sure the grates are free of dust, as this will re-
duce air flow. The accumulated dust can be removed
with a soft cloth or a vacuum cleaner.
4. Let the surface dry completely before using the
heater again.
D) Once again operation to set the next during
“stop or start” weekly timer.
E) Press the”back”button in top left corner,to
check the record what u set.
F) Long time touch the record,u can make choice
to cancel.
Table of contents
Languages:
Other GSC Heater manuals