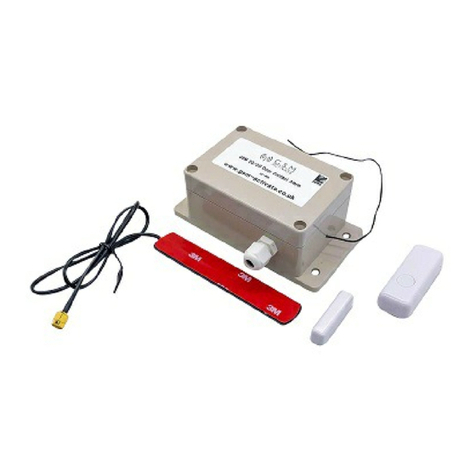
GSM Activate GSM PT100 User manual

MODEL GSM PT100
GSM PT100
Temperature Alarm
Monitors - 100 to +100 degrees centigrade
Page 1

Product Information
The GSM PT100 Temperature Alarm is an independent sensor alarm compatible with 4G. It has
temperature monitoring, mains failure monitoring as well as 24 hour battery back up.
Specification
● GSM Frequency: Quadband Frequency 850/900/1800/1900/2100 Mhz
● 4G Bands : B1 -B5, B7 - B8, B12 - B14, B18 - B20, B25 , B26, B28 , B66, B71
● Power Supply Voltage: 9 - 24 volts DC - 240v AC option available
● Current Used in Standby Mode: 35 Milliamps
● Max Current: Up to 2 Amps
● Standard 2G, 3G, or 4G Simcard
● No Landline Required
● Dimensions - L170 x W120 x H60mm
● Weight - 360 grams
● Operating Temperature: -10…+40°C
● Signal Strength Function
● Stay Active Simcard Function
● Watchdog and Self Repair Function
● 1- 10 Amp Relay Outputs
● Temperature Reading by Text Message
● Temperature Alarm Controller
● Temperature Parameters minus 100 to plus 100 degrees
● Mains Failure and Restore Alarm
● Battery Backup for up to 24 hours standby
Page 2
www.gsm-activate.co.uk - 01273462380 - [email protected]

PCB Reference
IMPORTANT - PLEASE READ
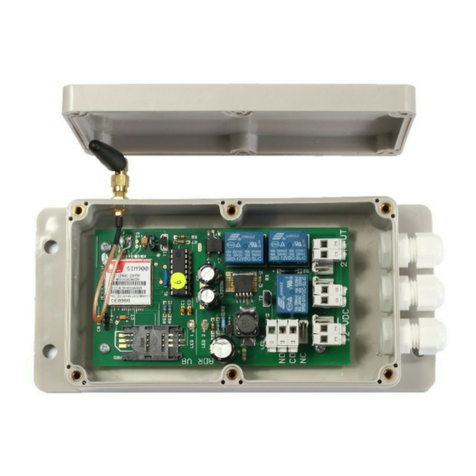
Please make sure you disconnect the power when you fit the simcard. Then slide the
simcard into the holder making sure that the clipped corner of the simcard lines up with the
clipped corner of the simcard holder as seen in the image above.
Signal LED (blue) The blue LED flashes once per second indicating a signal has been found.
Ready LED (green) The green LED will come on when the unit is ready for operation.
Charger LED (red) The red LED indicates that the battery is in charging mode.
Battery Switch - push on to turn battery backup on (battery only charges with battery switch on)
Dipswitch
The dialler can work on 2G, 3G & 4G networks. The module works worldwide with all
simcards (see page 3 for applicable bands). You can choose which frequency the unit will
use at the start by using the dipswitch combinations below
1 - Dipswitch 1 Set to OFF & Dipswitch 2 Set to OFF = Unit boots up in 2G
2 - Dipswitch 1 Set to ON & Dipswitch 2 Set to OFF = Unit boots up in 3G
3 - Dipswitch 1 Set to ON & Dipswitch 2 Set to ON = Unit boots up in 4G
Figure 1
www.gsm-activate.co.uk - 01273462380 - [email protected]
Page 3

Installing your Simcard
New SIM cards will need registering before they can be used. Full details of how this is done
can normally be found in the SIM card pack. It will normally require that the SIM card is inserted
into a mobile phone, a number dialled and instructions followed. While the SIM is in the mobile
phone it would be a good time to disable call diverts, ring back and to disable features such as
voicemail and text alerts.
The Auto Dialler has a built in “sim active function” which keeps track of the unit’s activity. If
there has been no usage for 6 weeks, it will send a text message to a preset recorded number
to keep the simcard active. This then eliminates the problems of sims being shut down if they
are unused for 3 months.
Activate and put credit on your simcard and disable voicemail using the following codes
Vodaphone: call 1210 Tesco call 2915
T-Mobile: call 222 O2 call 1760
Orange: call 4502 Giff Gaff call 1626
EE - send the text message command VM OFF to 150
ENSURE THE UNIT IS POWERED DOWN AND BATTERY TURNED OFF BEFORE
INSERTING THE SIMCARD.
1: Slide back the sim door and lift it up.
2: Slide the simcard in to the door ensuring that the clipped corner of the simcard lines
up with the clipped corner of the simcard holder.
3: Close the sim door.
4: Slide the sim door to lock the simcard in place.
Connect 9 through to 24 volts DC to the input connector as per figure 1 (page 3). Once power
has been applied (referring to figure 1) the blue network LED light will flash once every second.
Once a signal has been found the green LED will come on and stay on indicating the unit is now
ready for use.
Signal Strength
Signal strength can be checked by sending the text command #SIGNAL#
The unit will reply back with a score from 1 - 30. Anything less than a score of 10 will make
the unit unreliable.
NOTE - We recommend doing a signal strength on 2G, 3G, and 4G (see diagram page 4) to
see which frequency is strongest and then using the strongest frequency.
NOTE - If using Giff Gaff simcards please disable balance notifications in your Giff Gaff account
Page 4
www.gsm-activate.co.uk - 01273462380 - [email protected]

Page 5
SIM Active Function
Our GSM Auto Dialler comes with a SIM Active function meaning that it will send a message
every six weeks to a preprogrammed number we at GSM Activate own to prevent the SIM card
being shut down due to inactivity.
www.gsm-activate.co.uk - 01273462380 - [email protected]
Programming the Contact Numbers
After inserting your simcard into the Auto Dialler turn the unit on and wait until you see the
GREEN LED is on. This will indicate the you have a mobile signal and the unit is ready for
use.
You will now need to send a text with the contact numbers (maximum 5 contact numbers).
To avoid confusion we have colour coded the (#) hash and (=) equals symbols.
Example (hash) (1,2,3,4 or 5) (equals) (phone number) (hash)
#1=07123456789# send this as a text to the simcard number in the unit for contact no:1
#2=07234567891# send this as a text to the simcard number in the unit for contact no:2
#3=07345678912# send this as a text to the simcard number in the unit for contact no:3
#4=07456789123# send this as a text to the simcard number in the unit for contact no:4
#5=07345678912# send this as a text to the simcard number in the unit for contact no:5
Please exchange the mobile numbers for your contact numbers
If you wish to cancel a number follow this example
Example: (hash) (1,2,3,4 or 5) (equals) (DELETE) (hash)
#2=DELETE# This deletes contact number 2
#3=DELETE# This deletes contact number 3
#4=DELETE# This deletes contact number 4
#5=DELETE# This deletes contact number 5
* Note you cannot delete contact number 1, you can only overwrite it by programming
a new number

How to Use the Relay Output
The 4G Auto Dialler Plus has one relay outputs which can be used to switch on external
devices such as lighting, sirens etc…
Activation by SMS Text Message
By texting the unit you can turn the relay ON or OFF . Below, are examples on how to do this.
#REL=ON# This will Latch on relay
#REL=OFF# This will Latch off relay
After each operation the unit will reply with the Relay Status
Automatic Relay Triggering by Temperature
The relay will trigger in when the temperature is outside of the set parameters , and will turn
off when temperature falls back inside the temperature parameters (see page 8)
Page 6
www.gsm-activate.co.uk - 01273462380 - [email protected]
Telephone Call Alerts
The Auto Dialler can be programmed to send you a telephone call after each text alarm has been
sent.
You will receive approximately three ring tones. The unit will then hang up automatically. This is
to prevent call charges being incurred.
To set the call alert to ON please send the text message
#CALL=ON#
The unit will relay back with “CALL ON”
If the call function has been set to ON you will receive a text message and shortly after
a phone
call.
To disarm the call alerts please send the text message
#CALL=OFF#

Page 7
Mains Failure Alarm
By connecting to the mains power or a 9/24 volt power supply the Temperature Alarm can act
as a mains failure alarm. It will monitor the power connected to the power input and send a text
message alert if the power is disconnected.
When the power is disconnected for a period of 4 minutes, you will receive the text message
alert POWER LOSS. When the power is restored you will receive the text message alert
POWER RESTORED.
Battery Backup
When power has been disconnected the unit will revert to the onboard battery backup. The
battery back will operate the alarm for up to 24 hours before it will need to be recharged
by connecting power back to the input.
NOTE - The battery will only work when the battery is switched on. If you do not switch the
battery switch on then the battery backup will not work. Please refer to PCB reference on
page 3
www.gsm-activate.co.uk - 01273462380 - [email protected]

Page 8
Controlling The Temperature
The Microprocessor will scan the temperature parameters every 3 minutes. When the
temperature goes outside of the temperature parameters this will generate a text alarm sent
to the users indicating the current temperature. When the temperature returns into the
temperature parameters, a text will be generated to let users know temperature is normal.
Relay Temperature Trigger
The relay will latch on when the temperature has gone outside of the parameters. When the
temperature returns inside the parameters, the relay will turn off - this can be used to trigger a
siren / lighting etc. Please be aware of any conflicts this may cause if you are already using
the relay as an independently activated relay.
Text Commands for Temperature Settings
#+09*20# This will save the parameter settings for plus 9 degrees to plus 20 degrees
#-10*20# This will save the parameter settings for minus 10 degrees to minus 20 degrees
You will receive the text acknowledgment indicating your chosen parameters
Eg, 15*20 for parameters of +15° to +20° (for positive numbers) OR
-15° to -25° (for negative numbers)
Important - Please Read You can not mix minus and plus temperatures. Please only use +
or - symbols.
#START# This will start the temperature reading / temperature alarm
#STOP# This will stop the temperature reading / temperature alarm
You will get the text acknowledgment “Monitoring Started” or “Monitoring Stopped”
Important Please Read - In the event of a power loss the unit will remember if it was in stop
or start mode
www.gsm-activate.co.uk - 01273462380 - [email protected]

CONTINUED…..
If you want to get a current temperature reading send the text
#READ=TEMP# This will give you a current temperature reading
If you want to check the parameters that have been set send the text
#READ=PARAMETERS# This will give you the current parameter settings
Important Installer Notes
● When installing the aerial antenna cable please ensure that the cable leaves the box by the
shortest possible route and is not coiled up and left inside the box
● Do not stick the aerial onto any metal surface. This will degrade the signal strength
received.
● Please remove all voicemail functions from the simcard before installing it into the Auto
Dialler Plus. All major UK network voicemail removal codes are shown on page 5
● Before commissioning, please ensure the signal strength is sufficient by sending the text
message #SIGNAL#
●We strongly recommend you need a score of at least 10 for a good signal. Also try the signal
using 2G, 3G & 4G via dipswitch 1 & 2 and using the strongest signal strength.
● If you do not receive a good signal, please reposition the aerial antenna to improve the
signal strength or alternatively change the network provider as signal strength can vary
between providers.
www.gsm-activate.co.uk - 01273462380 - [email protected]
Page 9

Quick Reference
For more technical support please browse the FAQ’s on our website www.gsm-activate.co.uk or
alternatively email our technical support team at tec[email protected] and we will
reply or call back within 24 hours Monday - Friday.
Page 13
27/09/21 - GD
Table of contents
Other GSM Activate Security System manuals
GSM Activate
GSM Activate 2G RF PIR User manual

GSM Activate
GSM Activate ECO-BEAM User manual

GSM Activate
GSM Activate e-CO Series User manual

GSM Activate
GSM Activate AD-SD User manual

GSM Activate
GSM Activate ADRV11 User manual
GSM Activate
GSM Activate 3G RF DOOR User manual

GSM Activate
GSM Activate GSM 4G AUTO DIALLER PLUS User manual

GSM Activate
GSM Activate 2G RF BEAM User manual

GSM Activate
GSM Activate ECO Series User manual
GSM Activate
GSM Activate ECO-BEAM User manual