Guild CAP110D-12 User manual

GUILD
12V CORDLESS INFLATOR
Instruction Manual
Important - Please readthese instructions fully before operating or maintaining your Guild cordless inflator
Theseinstructions contain important information that will help you get the best from your Guild
cordless inflator,ensuring it remains safe to operate.
If you need help orhave damaged ormissing parts, call the Customer Helpline on
After Sales Support
CAP110D-12
0345 640 0800
UK/Ireland 0345 640 0800

1
Contents
Safety Information.....................................................................................................2
In The Box..................................................................................................................7
Accessories................................................................................................................7
Operating Instructions...............................................................................................8
Customer Helpline 0345 640 0800
Maintenance .............................................................................................................10
Trouble Shooting......................................................................................................11
Technical Data ..............................................................................................................11
Environment.............................................................................................................12
Guarantee.................................................................................................................13

2
Safety Information
Important - Please read these instructions fully before starting assembly
Warning Symbols
The following warning symbols appear throughout this assembly manual and
indicate the appropriate safety measures you should take when assembling and
operating the cordless inflator.
To reduce the risk of injury, Please read the instruction manual
Warning
Wear ear protection
Wear eye protection
Wear dust mask
Double insulation
Indoor use only
Do not expose to rain or water
Do not burn
Li-ion battery. This product has been marked with a symbol relating to ‘separate
collection’ for all battery packs and battery pack. It will then be recycled or
dismantled in order to reduce the impact on the environment. Battery packs can be
hazardous for the environment and for human health since they contain hazardous
substances.
Avoid using tool in temperature of 45°C or more.
Li-Ion Li-Ion
Customer Helpline 0345 640 0800
max45°C

:
3
Customer Helpline 0345 640 0800
GENERAL POWER TOOL SAFETY WARNINGS
Safety Information

Customer Helpline
4
Safety Information
GENERAL POWER TOOL SAFETY WARNINGS
0345 640 0800

§
§
§
8Bar (116PSI).
§
§
§
§
§
§
§
§
§
§
§
§
§
§
§
§
§
§
§
§
§
§
0.2-8bar (3.0-116PSI) +/- 0.05bar (1.0PSI).
§
§
Tool
§
§
§
5
Customer Helpline 0345 640 0800
Safety Information
ADDITIONAL SAFETY INSTRUCTIONS

Customer Helpline
6
Safety Information
§
§
§
§
§
§
§
§
§
§
o
o
ADDITIONAL SAFETY INSTRUCTIONS FOR BATTERIES AND CHARGERS
0345 640 0800
45
60
60
“Environment”.
§

7
Customer Helpline 0345 640 0800
In The Box
Accessories
Battery Pack (1.3 Ah Li-ion)
Charger (3-5 hours)
12V Car Power Supply
Airbed nozzle
Ball needle
1pc
1pc
1pc
1pc
1pc
Pneumatic Hose
Hose Storage Area
Digital Pressure Gauge
Charger
Airbed Nozzle
Ball Needle
12V Car Power Supply
Car Power Supply Release Button
Battery Pack
Air Chuck
Battery Pack Release Button
LED Light
Lock Button
On/Off Switch
12V Car Power Supply Plug
2
6
5
4
3
1
7
8
9
10
11
12
13
14
15
BAR
2.40
2
6
5
3
1
7
9
10
11
8
4
13
12
14
15

Customer Helpline
8
Operating Instructions
The appliance is intended for inflating car and bicycle tyres and inflatable items for games, sport and
leisure, but not for pumping up inflatable items with a larger volume, such as inflatable boats and very
large air beds.
The appliance is not intended for professional use.
Note: Charge at room temperature. The ambient temperature must be between 0°C and 45°C.
Note: Do not charge if the charger's cord or plug is damaged. Charging with a damaged cord may
result in fire or electrical shock. If the charge is damaged in any way, have it repaired by a qualified
seviceman.
Note: Do not short circuit the terminal of the battery. Take care that metal such as paper clips, nail,
the sides of matal tools boxes, etc, which cause a short circuit in your battery. Extremely high
temperatures and fire can result.
Note: Improperly attached hoses or accessories can become detached under pressure and cause
serious injury.Possible air leaks can cause faulty pressure readings. Make sure all connections are
tightly secured.
Charge the battery with the charger
Connect the charger to the household power socket.
Connect the outlet socket of the charger to the battery
charging port A. The battery will start to charge.
The battery indicator lights( 3 blue LEDs) at the rear
of the battery pack will twinkle while the battery is
being charged. They will gradually (from left to right)
be lighted.
The three blue LED lights will be lit stably, when the
battery is fully charged.
A
4
4
4
9
11
A
0345 640 0800
Battery Capacity Status
30%
70%
100%
9
11
Install and remove battery pack
To install: Align the ribs on the battery pack with the
grooves in the battery ports. Slide the battery pack
in the tools base until in locks (click) in place.
Make sure the latch on the battery pack snaps into
place and that the battery pack is secured in the tool
before operating.
To remove: Pushing the battery pack release button
at the front of the battery pack to release the battery
pack and remove it from the tool.
9

9
Customer Helpline 0345 640 0800
Operating Instructions
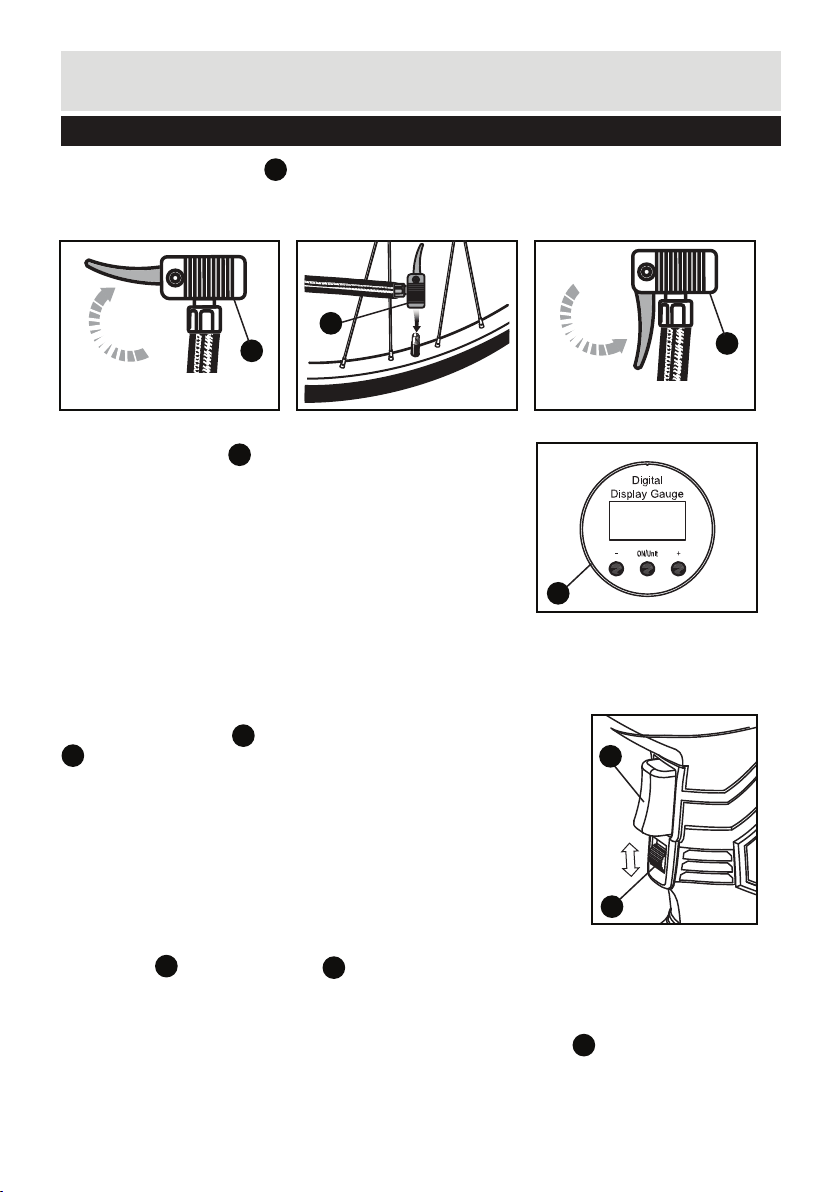
Lock and unlock air chuck
Before inflating, make air chuck clamp in unlocked position. Then put on the tire valve and lock the
air chuck.
Start inflating
Press the On/Off switch to start inflating. (If the lock button
is in upper position, slide it down.)
When the pressure reaches the pre-set pressure value, the
tool will stop inflating
Note: To reset the tire pressure measurement unit, press the
"On/Unit" button to reselect after setting pre-set pressure value.
Note: The digital pressure gauge records the last pre-set
measurement unit and value.
Note: After the inflator has reached the pre-set pressure valve,
the digital gauge will go out after 30 seconds, and the tool will
turn off automatically.
Lock button : The On/Off switch can be locked in the On position. To do so, slide the lock on
upwards, while pressing the On/Off switch, then release the On/Off switch while keeping the lock
on button in it’s upper (lock) position. The device can be inflating by continuous mode.
This is convenient when inflator has to inflate for an extended period of time.
To stop continuous mode, push the On/Off switch once. The lock button will turn back to its
unlock (lower) position.
Air chuck clamp in unlocked position Air chuck clamp in locked position
13
14
BAR
2.40
3
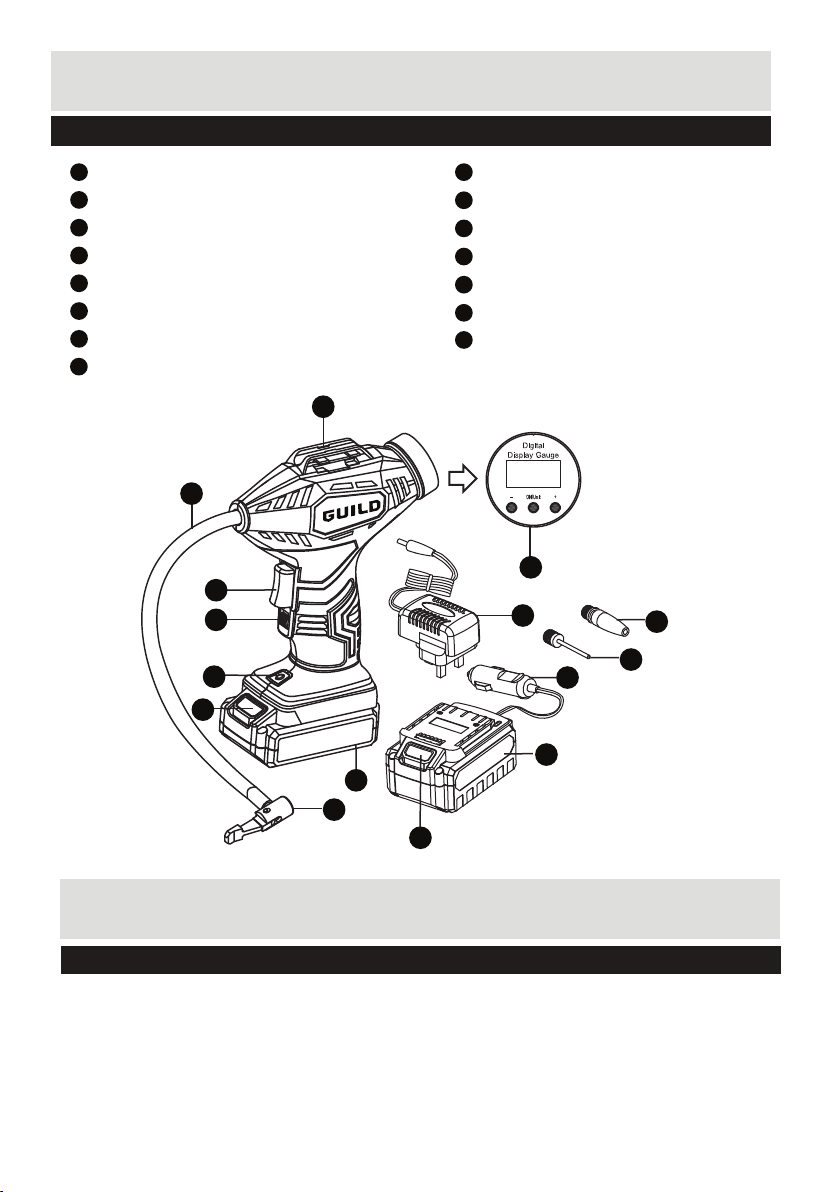
Digital Display Gauge
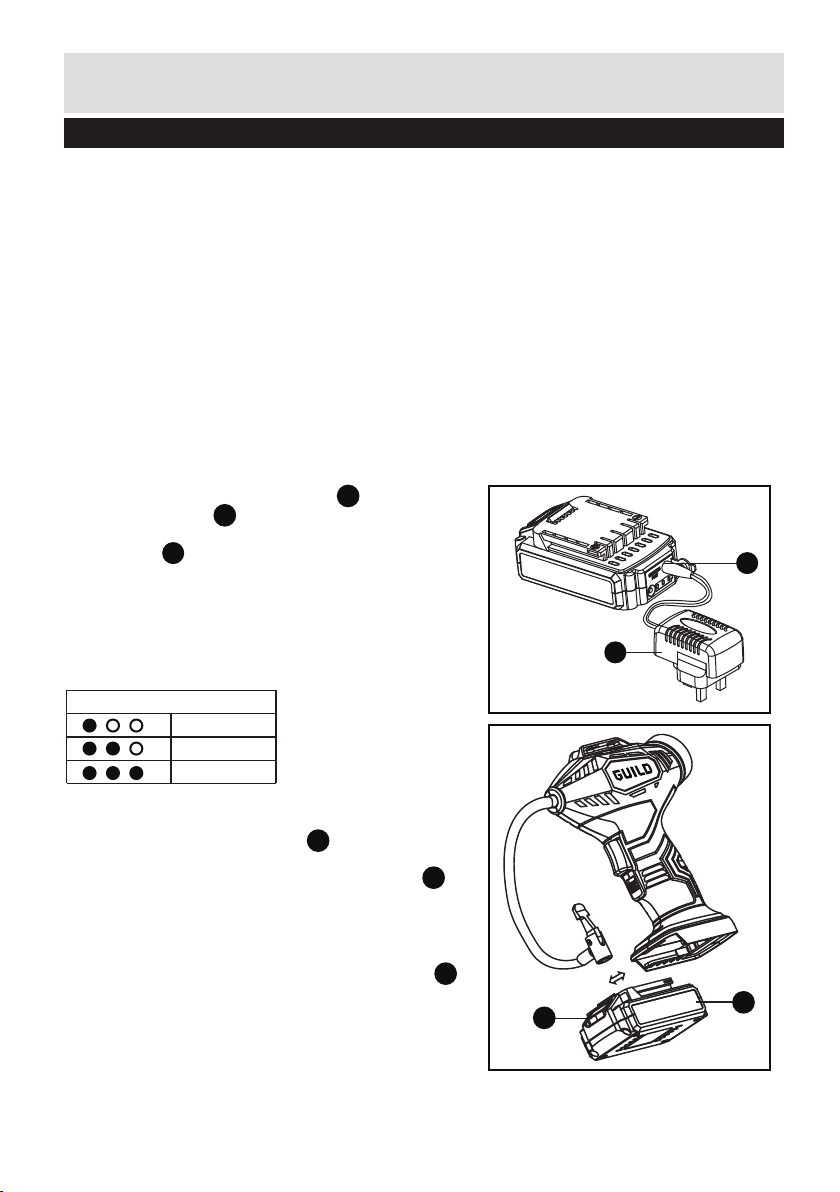
Press the "On/unit" button on the digital display gauge
at the rear of the machine to read the current tire pressure
Press the "On/unit" button again to select tire pressure
measurement unit. (PSI, KPA, BAR & KG/CM.)
Press the "+" or "-" button to adjust the pre-set tire pressure
to the required tire pressure.
The pressure gauge on the inflator is for reference only and
may not reflect exact values.( range /accuracy is 0.2-8bar
(3.0-116.PSI) +/- 0.05bar (1.0PSI). To reduce the risk of
overinflation, use a second pressure gauge during inflation
(from time to time).
3
13
14
10
13
14
13
10 10
10

§
§
§
Customer Helpline
10
Operating Instructions
Maintenance
11
11
Install and remove 12V car power supply
Unravel cord before use.
To install: Make sure the latch on the 12V car power supply
snaps into place and that it is secured in the tool before
operating, which is same as battery pack installation.
Connect the 12V car power supply plug into your car
cigarette lighter
When ready to use, always power your car on to avoid the
car battery running low.
To remove: Push the release button to release the car
power supply and remove it from the tools.
Note: Always run a vehicle outdoors.
Install and remove accessories
1. Position the air chuck in the unlock position
2. Position the rear end of the accessory (airbed nozzle and
ball needle) into the opening
3. Clamp the end of the air chuck down onto the threaded
part of the accessory by pressing the air chuck down
until it stops.
Note: The airbed nozzle can be used on smaller pinch
valves to inflate small items like children's toys, which usually
require the user to inflate them by blowing air into them.
The ball needle can be used to inflate any type of sports ball or any other items that requires an
inflation sport all needle. Wet needle with water to aid insertion will be better.
Note: When inflating items of 10PSI or less, inflate in short bursts and check after each burst by feel
or with a calibrated measuring device to determine accurate pressure.
Note: Pressure required for most sports balls is too low for an accurate reading on gauge.
6
5
10
7
8
15
10
10
7
15
8
7
0345 640 0800
5
6

11
Customer Helpline 0345 640 0800
Trouble Shooting
1. If the tool can not work, make sure the battery pack has power. If battery has run out of power,
please give enough time for battery pack to recharge properly. If the tool can not work with full
charged battery, clean battery contacts on tool, reinsert the battery pack according to its shape
(it should only fit one way), and press firmly until the battery pack locks in place.
2. If the tool can not work, check the car power supply plug if it's connect well with car cigarette lighter.
3. If a fault can not be rectified return the tool to an authorized dealer for repair.
Technical Data
Technical Data Table
NOISE
A weighted sound pressure LpA : 79dB(A)
A weighted sound power LwA : 88dB(A)
KpA & KwA=3.0dB(A)
Wear ear protection when sound pressure is over: 80dB(A)
VIBRATION
Vibration total values (triax vector sum) determined according to EN 60745:
Inflating Vibration emission value ah
= 2.1m/s2
Uncertainty K = 1.5 m/s²
Model number
CAP110D-12
Model number
EBS0090A-1400400AB
Model number
CD304-12-BL
Motor voltage
12 V
Max. Pressure
8bar (116PSI)
Pressure range / accuracy
Weight (including battery and car plug)
1.22 kg
Car power supply cord length
2.7 m
Battery pack
Cordless Inflator
Type
Li-ion
Rated voltage
12V
Capacity
1300mAh
Charger
Input
100-240V ~50/60Hz
Output
14 V 0.4 A
Charging time
3-5 hours
0.2 - 8bar (3.0-116PSI) +/- 0.05bar (1.0PSI)

Customer Helpline
12
Technical Data
Environment
STORAGE
§
§
§
§
The declared vibration total value may be used for comparing one tool with another, and may
also be used in a preliminary assessment of exposure.
WARNING: The vibration emission value during actual use of the power tool can differ from the
declared value depending on the ways in which the tool is used dependant on the following
examples and other variations on how the tool is used:
How the tool is used and the materials being inflating.
The tool being in good condition and well maintained
The use the correct accessory for the tool and ensuring it is sharp and in good condition.
The tightness of the grip on the handles and if any anti vibration accessories are used.
And the tool is being used as intended by its design and these instructions.
This tool may cause hand-arm vibration syndrome if its use is not adequately
managed.
VIBRATION
WARNING: To be accurate, an estimation of exposure level in the actual conditionsof use should
also take account of all parts of the operating cycle such as thetimes when the tool is switched off
and when it is running idle but not actually doing the job.
This may significantly reduce the exposure level over the total working period.
Helping to minimize your vibration exposure risk.
Maintain this tool in accordance with these instructions and keep well lubricated (where appropriate).
If the tool is to be used regularly then invest in anti vibration accessories.
Avoid using tools in temperatures of 45℃or more.
Plan your work schedule to spread any high vibration tool use across a number of days.
0345 640 0800

Customer Helpline
13
0345 640 0800
This product is selected for DOMESTIC USE ONLY and not for business use.
This product is guaranteed against manufacturing defects for a period of 24 months. This does not
cover the product where the fault is due to misuse, abuse, use in contravention of the instructions,
or where the product has been the subject of unauthorised modi cations or alterations, or has been
the subject of commercial use. In the event of a problem with the product within the guarantee
period please return it to your nearest store. If the item is shown to have an inherent defect present
at the time of sale, the store will provide you with a replacement. Your statutory rights remain
unaffected.
Guarantee
Table of contents
Other Guild Power Tools manuals