Gumotex SEAWAVE User manual

Kormidlo pro člun SEAWAVE 2 – 3
Příručka uživatele
Kormidlo na čln SEAWAVE 4 – 5
Používateľská príručka
SEAWAVE boat rudder 6 – 7
User‘s Guide
Steuer für das Boot SEAWAVE 8 – 9
Benutzerhandbuch
Gouvernail pour bateau SEAWAVE 10 – 11
Manuel d’utilisateur
Timón para la lancha SEAWAVE 12 – 13
Manual de usuario
Timone per canotto SEAWAVE 14 – 15
Istruzioni per l‘uso
Roer voor de boot SEAWAVE 16 – 17
Gebruikershandleiding
Ster do kajaka SEAWAVE 18 – 19
Podręcznik użytkownika
Kormány SEAWAVE csónakhoz 20 – 21
Felhasználói útmutató
Руль для лодки вSEAWAVE
22 – 23
Инструкция для пользователя
(CZ)
(SK)
(GB)
(D)
(F)
(E)
(I)
(NL)
(PL)
(H)
(RUS)
www.gumotex.cz
Kormidlo pro člun SEAWAVE

2
Vážený zákazníku,
tato příručka Vás má seznámit s montáží a použí-
váním kormidla, které se dodává jako příslušenství
k nafukovacímu člunu Seawave. Obsahuje podrobný
popis celého kormidlového systému, informace o jeho
ovládání a údržbě. Příručku uživatele si prosím přečtěte
před použitím kormidla. Pokud budete mít problém
s instalací nebo používáním kormidla, obraťte se na
Vašeho prodejce.
Uložte prosím tuto příručku na bezpečném místě
a předejte ji novému majiteli, pokud plavidlo s kor-
midlem prodáte.
Rejstřík:
1. Technický popis
2. Pokyny k instalaci kormidla
3. Ovládání kormidla
4. Demontáž kormidla
5. Ošetřování a skladování
6. Záruční podmínky
7. Způsob likvidace výrobku
8. Způsob likvidace obalu
1. kormidlo
2. závitové oko s maticí
3. zvedací lanko
4. karabina
5. pedál
6. ovládací lanko
7. šroub s vnitřním šestihranem
8. popruh
9. úchyt nožní opěrky s žebříčkem
10. pásek suchého zipu
11. konzola (+ základna se šestihranem)
12. podložka
13. šroub
14. čep s pojistným kroužkem
15. brzda
Sestavení kormidla
Po vyjmutí kormidla (1) z krabice vložte přiložená
závitová oka (2) do krajních otvorů a zajistěte je
maticí M5 (k utažení můžete využít otvor na kon-
zoly kormidla). Do závitových ok (2) a na konec
zvedacího lanka (3) navlečte karabiny (4).
Sestavení ovládání
Pedály s ovládacími lanky (5) připevněte k úchy-
tům pomocí šroubů s vnitřním šestihranem (7)
a zajistěte pomocí matic M6 (k utažení použijte
přiložený klíč).
Desku s pedály, viz obr. č. 2, vložte do člunu
a popruh (8) protáhněte žebříčkem (9) na dně
místo nožní opěrky.
Kormidlo pro člun SEAWAVE
Příručka uživatele
1. Technický popis
2. Pokyny k instalaci kormidla –
viz obr. č. 1
Verze 1/2017
[CZ]
Obr. č. 1
Obr. č. 2
3
2
1
6414
11 12 13
6
5
7
8
9

3
Připevnění kormidla na člun
Před prvním použitím kormidla je nutno přilepit na zadní
palubu pásek suchého zipu (10), viz obr. č. 3. Pro do-
konalé provedení spoje, musí být lepený povrch suchý,
čistý a odmaštěný acetonem.
Pod zadní palubu člunu vložte základnu (11) a šestihran
protáhněte vylévacím otvorem. Z vnější strany přiložte
konzoly (11), podložku (12) a dotáhněte pomocí zajišťo-
vacího šroubu (13). Z čepu kormidla vytáhněte pojistný
kroužek (14). Čep vložte do otvoru a zajistěte pomocí po-
jistného kroužku. Ovládací lanka (6) od pedálů protáhně-
te D-kroužky uvnitř člunu a otvory v zadní palubě, vložte
do karabin (4) a pomocí zkracovaček nastavte potřebnou
délku (v případě instalace na dvoumístnou verzi vytvořte
na lankách zkracovací uzel tak, aby zkracovačky byly
přístupné v prostoru sezení). Brzdou (15) zvedacího
mechanismu protáhněte lanko (3) viz obr. č. 4. Přiložený
mechanismus přišněrováním upevněte mezi D-kroužky
na kokpit člunu. Připevněte karabinu zvedacího lanka ke
zvedacímu mechanismu, viz obr. č. 4 a pomocí zkraco-
vačky nastavte potřebnou délku lanka.
Kormidlo usnadňuje ovládání kajaku zejména ve větru
nebo ve vlnách. U dvoumístného kajaku ovládá kor-
midlo osoba sedící vzadu. Kormidlo se ovládá tlakem
vždy jednoho chodidla na pedál a povolením tlaku dru-
hého chodidla. Síla se přenáší prostřednictvím lanek
na vahadlo kormidla a dochází k jeho otáčení. Zvednutí
listu kormidla se provádí stlačením brzdy zvedacího
mechanismu a tahem vpřed. Stlačením brzdy zveda-
cího mechanismu a tahem vzad se kormidlo spustí do
pracovní polohy.
3. Ovládání kormidla
Obr. č. 3
Obr. č. 4
Před sbalením kajaku je nutné demontovat kormidlo.
Vyhákněte ovládací lanka z karabin. Odepněte karabi-
nu ze zvedacího mechanismu. Ovládací lanka s pedály
ponechte v kajaku. Demontujte uchycení kormidla.
Kormidlo nemá žádné zvláštní nároky na údržbu. Po
každém znečištění, po použití ve slané vodě a před
uskladněním omyjte kormidlo vlažnou vodou s pří-
davkem mýdla nebo saponátu. Kovové části ošetřete
konzervačním tukem. Opotřebené nebo poškozené
části, zejména lanka, vyměňte. Kormidlo přepravujte a
skladujte vždy odděleně od kajaku. Při každé montáži
kormidla na kajak zkontrolujte dotažení šroubů.
Záruční doba je 24 měsíců a počítá se od data prodeje.
Výrobce poskytuje bezplatnou opravu nebo náhradu za
vady materiálového charakteru.
Záruční i pozáruční opravy zajišťuje výrobce:
Gumotex, a.s., Mládežnická 3062/3a, 69075 Břeclav
Karton – recyklace dle symbolů uvedených na obalu.
Folie PE-LD (nízkohustotní rozvětvený polyethylén) -
recyklace dle symbolů uvedených na obalu.
Skládkováním na skládkách komunálního odpadu.
4. Demontáž kormidla
5. Ošetřování a skladování
6. Záruční podmínky
8. Způsob likvidace obalu
7. Způsob likvidace výrobku
UPOZORNĚNÍ
V mělké voděnebo při vyplouvání
a přistávání hrozí nebezpečí zlome-
ní listu kormidla.
V takovém případěvždy zvedněte
list kormidla do horní pozice.
10
4
3
15

4
3
2
1
6414
11 12 13
6
5
7
8
9
Vážený zákazník,
táto príručka Vás má oboznámiť s montážou a pou-
žívaním kormidla, ktoré sa dodáva ako príslušenstvo
k nafukovaciemu člnu Seawave. Obsahuje podrobný
opis celého kormidlového systému, informácie o jeho
ovládaní a údržbe. Príručku používateľa si, prosím, pre-
čítajte pred použitím kormidla. Ak budete mať problém
s inštaláciou alebo používaním kormidla, obráťte sa na
svojho predajcu.
Uložte si túto príručku na bezpečnom mieste
a v prípade predaja plavidla s kormidlom ju odo-
vzdajte novému majiteľovi.
Register:
1. Technický opis
2. Pokyny na inštaláciu kormidla
3. Ovládanie kormidla
4. Demontáž kormidla
5. Ošetrovanie a skladovanie
6. Záručné podmienky
7. Spôsob likvidácie výrobku
8. Spôsob likvidácie obalu
1. kormidlo
2. závitové oko s maticou
3. zdvíhacie lanko
4. karabínka
5. pedál
6. ovládacie lanko
7. skrutka s vnútorným šesťhranom
8. popruh
9. úchytka nožnej opierky s rebríčkom
10. pásik suchého zipsu
11. konzola (+ základňa so šesťhranom)
12. podložka
13. skrutka
14. čap s poistným krúžkom
15. brzda
Zostavenie kormidla
Po vybratí kormidla (1) zo škatule vložte prilože-
né závitové oká (2) do krajných otvorov a zaistite
ich maticou M5 (na utiahnutie môžete využiť
otvor na konzoly kormidla). Do závitových ôk
(2) a na koniec zdvíhacieho lanka (3) navlečte
karabínky (4).
Zostavenie ovládania
Pedále s ovládacími lankami (5) pripevnite
k úchytkám pomocou skrutiek s vnútorným
šesťhranom (7) a zaistite pomocou matíc M6 (na
utiahnutie použite priložený kľúč).
Dosku s pedálmi, pozri obr. č. 2, vložte do člna
a popruh (8) pretiahnite rebríčkom (9) na dne na
miesto nožnej opierky.
Kormidlo na čln SEAWAVE
Používateľská príručka
1. Technický opis
2. Pokyny na inštaláciu kormidla –
pozri obr. č. 1
Verzia 1/2017
[SK]
Obr. č. 1
Obr. č. 2

5
10
4
3
15
Pripevnenie kormidla na čln
Pred prvým použitím kormidla je nutné prilepiť na zadnú
palubu pásik suchého zipsu (10), pozri obr. č. 3. Aby bolo
spojenie dokonalé, musí byť lepený povrch suchý, čistý a
odmastený acetónom.
Pod zadnú palubu člna vložte základňu (11) a šesťhran
pretiahnite vylievacím otvorom. Z vonkajšej strany
priložte konzoly (11), podložku (12) a dotiahnite pomocou
zaisťovacej skrutky (13). Z čapu kormidla vytiahnite
poistný krúžok (14). Čap vložte do otvoru a zaistite po-
mocou poistného krúžku. Ovládacie lanká (6) od pedálov
pretiahnite D-krúžkami vnútri člna a otvormi v zadnej
palube, vložte do karabínok (4) a pomocou skracovačiek
nastavte potrebnú dĺžku (v prípade inštalácie na dvoj-
miestnu verziu vytvorte na lankách skracovací uzol tak,
aby boli skracovačky prístupné v priestore na sedenie).
Brzdou (15) zdvíhacieho mechanizmu pretiahnite lanko
(3), pozri obr. č. 4. Priložený mechanizmus prišnurova-
ním upevnite medzi D-krúžky na kokpit člna. Karabínku
zdvíhacieho lanka pripevnite k zdvíhaciemu mechaniz-
mu, pozri obr. č. 4, a pomocou skracovačky nastavte
potrebnú dĺžku lanka.
Kormidlo uľahčuje ovládanie kajaka najmä vo vetre
alebo vlnách. Pri dvojmiestnom kajaku ovláda kormidlo
osoba, ktorá sedí vzadu. Kormidlo sa ovláda tlakom
vždy jedného chodidla na pedál a povolením tlaku
druhého chodidla. Sila sa prenáša prostredníctvom
laniek na vahadlo kormidla, čím sa vahadlo otáča.
List kormidla sa zdvíha stlačením brzdy zdvíhacieho
mechanizmu a ťahom vpred. Stlačením brzdy zdvíha-
cieho mechanizmu a ťahom vzad sa kormidlo spustí do
pracovnej polohy.
3. Ovládanie kormidla
Pred zbalením kajaka je nutné demontovať kormidlo.
Vyháknite ovládacie lanká z karabínok. Odopnite ka-
rabínku zo zdvíhacieho mechanizmu. Ovládacie lanká
s pedálmi nechajte v kajaku. Demontujte uchytenie
kormidla.
Kormidlo nemá žiadne zvláštne nároky na údržbu. Po
každom znečistení, po použití v slanej vode a pred
uskladnením umyte kormidlo vlažnou vodou s prídav-
kom mydla alebo saponátu. Kovové časti ošetrite kon-
zervačným tukom. Opotrebené alebo poškodené časti,
najmä lanká, vymeňte. Kormidlo prepravujte a skladujte
vždy oddelene od kajaka. Pri každej montáži kormidla
na kajak skontrolujte dotiahnutie skrutiek.
Záručná lehota je 24 mesiacov a počíta sa od dátumu
predaja.
Výrobca poskytuje bezplatnú opravu alebo náhradu za
chyby materiálového charakteru.
Záručné a pozáručné opravy zaisťuje výrobca:
Gumotex, a. s., Mládežnická 3062/3a, 69075 Břeclav
Kartón – recyklácia podľa symbolov uvedených na
obale.
Fólia PE-LD (rozvetvený polyetylén s nízkou hustotou)
– recyklácia podľa symbolov uvedených na obale.
Skládkovaním na skládkach komunálneho odpadu.
4. Demontáž kormidla
5. Ošetrovanie a skladovanie
6. Záručné podmienky
8. Spôsob likvidácie obalu
7. Spôsob likvidácie výrobku
UPOZORNENIE
V plytkej vode alebo pri vyplávaní
a pristávaní hrozí nebezpečenstvo
zlomenia listu kormidla.
V takom prípade vždy zdvihnite list
kormidla do hornej polohy.
Obr. č. 3
Obr. č. 4

6
3
2
1
6414
11 12 13
6
5
7
8
9
Dear customer,
This guide will teach you how to install and operate the
rudder, which is available as an accessory to the infl at-
able Seawave boat. It contains a detailed description
of the whole rudder system and information about its
operation and maintenance. Please read this User‘s
Guide carefully before using the rudder. If you have
any trouble installing or using the rudder, contact your
dealer.
Please keep this manual in a safe place and give
it to the new owner if you sell the boat with the
rudder.
Index
1. Technical description
2. Instructions for installing the rudder
3. Operating the rudder
4. Disassembly of the rudder
5. Maintenance and storage
6. Warranty conditions
7. Disposal of the product
8. Disposal of the packaging
1. Rudder
2. Threaded lug with nut
3. Lifting cable
4. Snap hook
5. Pedal
6. Control cable
7. Allen screw
8. Strap
9. Grip of the foot rest with slots
10. Velcro strap
11. Bracket (+ base with hexagon)
12. Washer
13. Screw
14. Pin with circlip
15. Brake
Assembling the rudder
After removing the rudder (1) from the box, insert
the supplied threaded lugs (2) in the outer holes
and secure with nut M5 (you can use the hole for
the rudder brackets). Slide the snap hooks (4) in
the threaded lugs (2) and at the end of the lifting
cable (3).
Assembling the control system
Attach the pedals with control cables (5) to the
grips using the Allen screws (7) and the nuts M6
(use the supplied wrench for tightening).
Insert the plate with pedals, see Fig. No. 2, into
the boat, and slide the strap (8) through the slots
(9) at the bottom, instead of the footrest.
SEAWAVE boat rudder
User‘s Guide
1. Technical description
2. Instructions for installing
the rudder - see Fig. No. 1
Version 1/2017
[GB]
Fig. No. 1
Fig. No. 2

7
10
4
3
15
Attaching the rudder on the boat
Before the fi rst use of the rudder, a strip of Velcro
(10) must be glued to the rear deck - see Fig. 3. For a
perfect joint, the glued surface must be dry, clean and
degreased with acetone.
Insert base (11) under the rear deck of the boat, and
slide the hexagon through the discharge hole. From the
outside, attach the bracket (11) and washer (12), and
tighten with the locking screw (13). Pull the locking ring
(14) out of the rudder pin. Insert the pin into the hole
and secure with retaining ring. Control cables (6) of the
pedals are now guided through the D-rings inside the
boat and through the holes in the aft deck, and then into
the snap hooks (4); set the length using the adjusting
piece (if installed on the two-seat version, make a knot
to shorten the cords so that the adjusting pieces are ac-
cessible from the seats). Now guide the lifting cable (3)
through the brake (15) of the lifting mechanism - see Fig.
4. The mechanism needs to be fastened between the
D-rings on the boat cockpit. Attach the snap hook of the
lifting cable to the lifting mechanism, see Fig. No. 4, and
set the required cable length using the adjusting piece.
The rudder facilitates control of the kayak especially
in the wind or waves. In a tandem kayak the person in
the back steers. Operate the rudder by pressing with
one foot against the pedal and releasing the other foot.
Power is transmitted by the cables to the rudder rocker
arm to rotate the rudder. The rudder blade can be raised
by pressing the brake of the lifting mechanism and
pulling forward. When pressing the brake of the lifting
mechanism and pulling back, the rudder is lowered to its
working position.
3. Operating the rudder
Before collapsing the kayak, it is necessary to remove
the rudder. Unhook the control cables off the snap
hooks. Unclip the snap hook from the lifting mechanism.
The control cables and pedals can be left in the kayak.
Remove the rudder mounting system.
The rudder has no special maintenance requirements.
When contaminated, after contact with salt water and
before storing, wash the rudder in lukewarm water with
a spot of soap or detergent. Use grease to protect the
metal parts. Worn out or damaged parts, especially the
cable, should be replaced. Rudder should always be
transported and stored separately from the kayak. When
assembling the rudder in the kayak, always check if the
screws are securely tightened.
The warranty period is 24 months starting from the
date of sale.
The manufacturer provides free repair or replacement
for material defects.
Warranty and post warranty repairs are provided by the
manufacturer: GUMOTEX, a.s., Mládežnická 3062/3a,
69075 Břeclav.
Cardboard - recycle in accordance with the symbols on
the packaging.
PE-LD foil (low-density branched polyethylene) - recy-
cle in accordance with the symbols on the packaging.
The product can be disposed of as communal waste.
4. Disassembly of the rudder
5. Maintenance and storage
6. Warranty conditions
8. Disposal of the packaging
7. Disposal of the product
WARNING
The rudder blade can be damaged
in shallow water or when launch-
ing the boat or approaching the
shore.
Always lift the rudder blade to the
top position in these situations.
Fig. No. 4
Fig. No. 3

8
Sehr geehrter Kunde,
dieses Handbuch soll Sie mit der Montage und der
Verwendung des Steuers, welches als Zubehör zum
Schlauchboot Seawave geliefert wird, bekannt machen.
Es enthält die ausführliche Beschreibung des ganzen
Steuersystems, Informationen über seine Betätigung
und Wartung. Lesen Sie bitte das Benutzerhandbuch,
bevor Sie das Steuer verwenden. Sollten Sie ein
Problem mit der Installation oder der Verwendung des
Steuers haben, wenden Sie sich an Ihren Händler.
Bewahren Sie dieses Handbuch an einem sicheren
Platz auf und übergeben Sie es dem neuen Besit-
zer, wenn Sie das Wasserfahrzeug mit dem Steuer
verkaufen.
Verzeichnis:
1. Technische Beschreibung
2. Anweisungen zur Installation des Steuers
3. Steuerbetätigung
4. Demontage des Steuers
5. Wartung und Lagerung
6. Garantiebedingungen
7. Entsorgung des Produktes
8. Entsorgung der Verpackung
1. Steuer
2. Gewindeöse mit Mutter
3. Hubseil
4. Karabinerhaken
5. Pedal
6. Betätigungskabel
7. Innensechskantschraube
8. Gurt
9. Aufnahme der Fußstütze mit der Leiter
10. Band mit Klettverschluss
11. Konsole (+ Basis mit dem Sechskant)
12. Scheibe
13. Schraube
14. Bolzen mit dem Sicherungsring
15. Bremse
Zusammenstellung des Steuers
Nach dem Herausnehmen des Steuers (1) aus der
Schachtel legen Sie die beiliegenden Gewindeösen (2)
in die Randbohrungen ein und sichern Sie diese mit der
Mutter M5 (zum Festziehen können Sie die Bohrung
auf der Konsole des Steuers nutzen). Stecken Sie in die
Gewindeösen (2) und auf das Ende des Hubseils (3) die
Karabinerhaken (4) auf.
Zusammenstellung des Betätigungsmechanismus
Die Pedale mit Betätigungskabeln (5) befestigen Sie zu
Aufnahmen mittels der Innensechskantschrauben (7)
und sichern Sie diese mittels der Muttern M6 (verwen-
den Sie zum Festziehen den beiliegenden Schlüssel).
Die Platte mit den Pedalen, siehe Abb. Nr. 2, legen
Sie ins Boot ein, und ziehen Sie den Gurt (8) durch die
Leiter (9) auf dem Boden statt der Fußstütze durch.
Steuer für das Boot SEAWAVE
Benutzerhandbuch
1. Technische Beschreibung
2. Anweisungen zur Installation
des Steuers – siehe Abb. Nr. 1
Version 1/2017
[D]
Abb. Nr. 1
Abb. Nr. 2
10
Abb. Nr. 3
3
2
1
6414
11 12 13
6
5
7
8
9

9
4
3
15
Befestigung des Steuers am Boot
Vor dem ersten Einsatz des Steuers ist es nötig, auf den
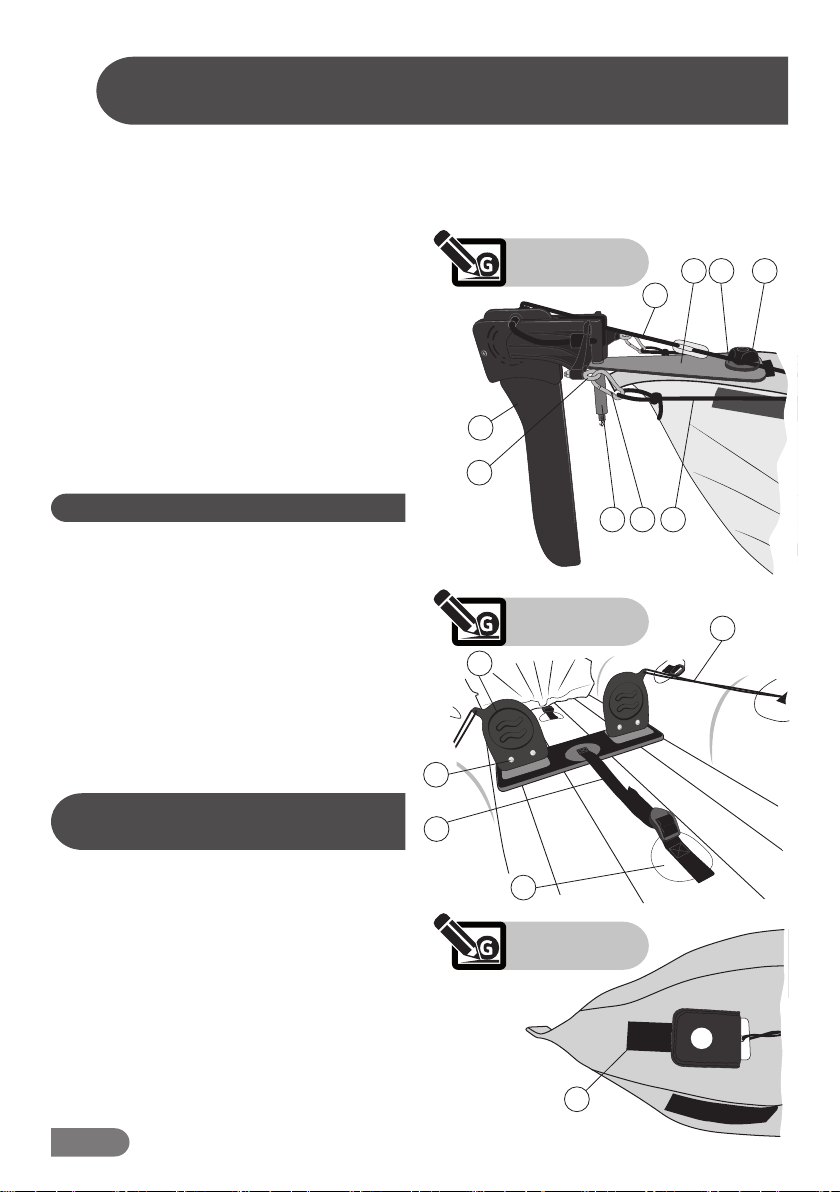
hinteren Bord das Band mit Kletterverschluss (10) aufzu-
kleben, siehe Abb. Nr. 3. Um eine perfekte Verbindung
herzustellen, muss die zu klebende Oberfl äche trocken,
sauber und mit Azeton entfettet werden.
Unter den hinteren Bord des Bootes legen Sie die
Basis (11) ein und ziehen Sie den Sechskant durch das
Ausgussloch durch. Von der Außenseite legen Sie die
Konsole (11), die Scheibe (12) an und ziehen Sie diese
mittels der Feststellschraube (13) nach. Ziehen Sie aus
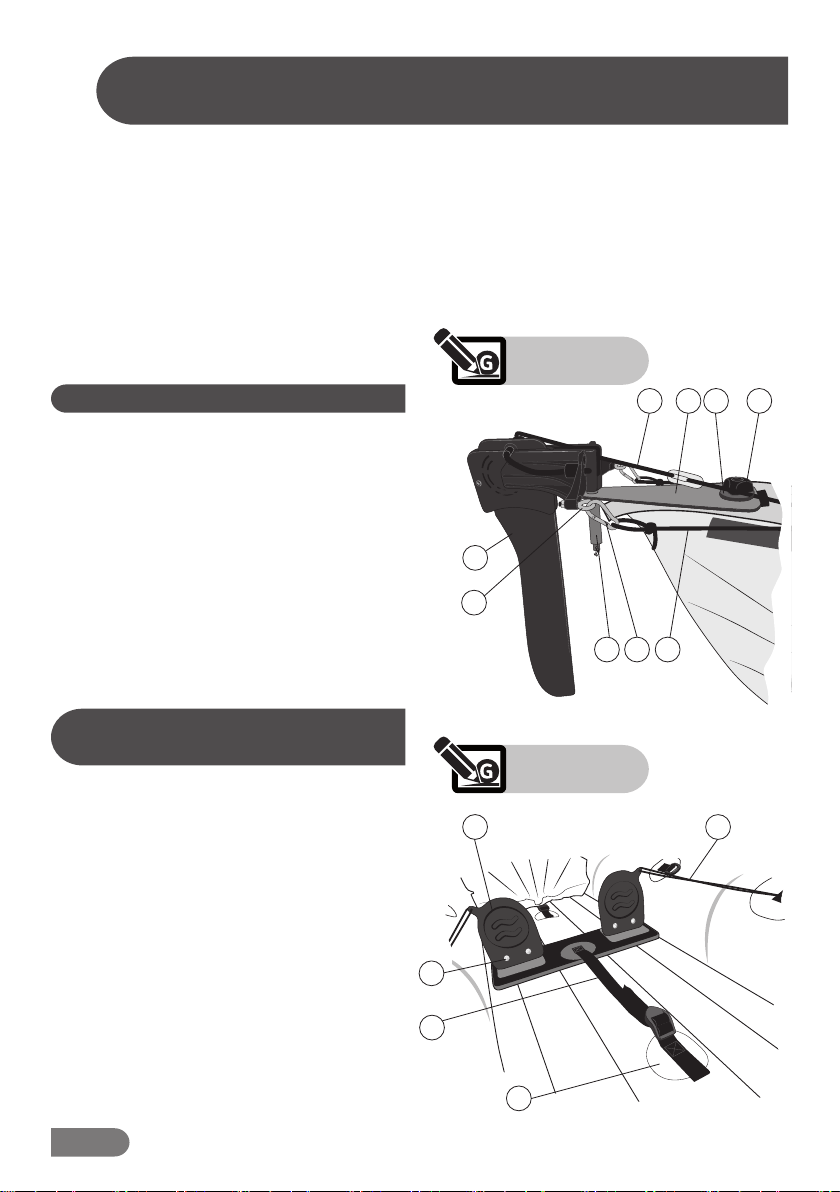
dem Bolzen des Steuers den Sicherungsring (14) heraus.
Legen Sie den Bolzen in die Bohrung ein und sichern Sie
ihn mittels des Sicherungsrings. Die Betätigungskabel (6)
der Pedale ziehen Sie durch die D-Ringe im Inneren des
Bootes und durch die Bohrungen im hinteren Bord durch,
legen Sie diese in die Karabinerhaken (4) ein und mittels
der Seilverkürzer stellen Sie die notwendige Länge ein
(im Fall der Installation auf die Zweisitzversion machen
Sie an den Kabeln so einen Knoten zum Verkürzen, dass
die Seilverkürzer im Sitzraum zugänglich sind). Ziehen
Sie das Seil (3) durch die Bremse (15) des Hubmechanis-
mus durch, siehe Abb. Nr. 4. Den angelegten Mechanis-
mus befestigen Sie durch das Festbinden zwischen den
D-Ringen auf dem Cockpit des Boots. Befestigen Sie
den Karabinerhaken des Hubseils am Hubmechanismus,
siehe Abb. Nr. 4 und mittels des Seilverkürzers stellen Sie
die notwendige Seillänge ein.
Das Steuer erleichtert die Steuerung des Boots beson-
ders im Wind oder beim Wellengang. Der Zweier-Kajak
wird von der hinten sitzenden Person gesteuert. Das
Steuer wird immer durch den Druck von einem Fuß gegen
das Pedal und durch das Lösen des Drucks des anderen
Fußes betätigt. Die Kraft wird mittels der Seile auf die
Schwinge des Steuers übertragen und es kommt zu sei-
ner Drehbewegung. Das Anheben des Steuerfl ügels wird
durch das Drücken der Bremse des Hubmechanismus
und durch den Zug nach vorne durchgeführt. Durch das
Drücken des Hubmechanismus und durch den Zug nach
hinten wird das Steuer in die Arbeitsstellung herunterge-
lassen.
3. Steuerbetätigung
Bevor das Boot zusammengepackt wird, ist es nötig, das
Steuer zu demontieren. Haken Sie die Betätigungskabel
aus dem Karabinerhaken aus. Schnallen Sie den Karabi-
nerhaken vom Hubmechanismus ab. Die Betätigungska-
bel mit Pedalen lassen Sie im Boot. Demontieren Sie die
Halterung des Steuers.
Das Steuer hat keine besonderen Wartungsansprüche.
Nach jeder Verschmutzung, nach dem Gebrauch im Salz-
wasser und vor der Einlagerung waschen Sie das Steuer
mit lauwarmem Wasser unter Zugabe von der Seife oder
von Reinigungsmittel ab. Behandeln Sie die Metallteile
mit einem Korrosionsschutzfett. Tauschen Sie verschlis-
sene oder beschädigte Teile, besonders die Seile, aus.
Transportieren und lagern Sie das Steuer immer getrennt
vom Boot. Bei jeder Montage des Steuers auf das Boot
kontrollieren Sie das Festziehen der Schrauben.
Die Garantiefrist beträgt 24 Monate und sie beginnt ab
dem Verkaufsdatum zu laufen.
Der Hersteller gewährt eine kostenlose Reparatur oder
den kostenlosen Ersatz für Materialmängel.
Die Garantie- und Nachgarantiereparaturen wer-
den vom Hersteller sichergestellt: Gumotex, a.s.,
Mládežnická 3062/3a, 69075 Břeclav
Karton – Recycling nach den auf der Verpackung ange-
führten Symbolen.
Folie PE-LD (niederdichtes verzweigtes Polyethylen)
- Recycling nach den auf der Verpackung angeführten
Symbolen.
Durch das Ablagern auf Deponien mit Kommunalab-
fällen
4. Demontage des Steuers
5. Wartung und Lagerung
6. Garantiebedingungen
8. Entsorgung der Verpackung
7. Entsorgung des Produktes
HINWEIS
Im Flachwasser oder bei der Aus-
fahrt und bei der Landung besteht
die Gefahr, dass der Steuerflügel
gebrochen wird.
In einem solchen Fall heben Sie im-
mer den Steuerflügel in die obere
Stellung an.
Abb. Nr. 4

10
3
2
1
6414
11 12 13
6
5
7
8
9
Cher client,
Ce manuel d’utilisateur est élaboré pour vous aider à
monter et à utiliser le gouvernail, livré comme acces-
soire au bateau gonfl able Seawave. Il contient une
description détaillée de l’ensemble du mécanisme de
gouvernail, des informations liées à sa commande et
son entretien. Veuillez lire ce manuel d’utilisateur avant
d’utiliser le gouvernail. N’hésitez pas à vous adresser à
votre vendeur en cas de diffi culté liée à l’installation ou
à l’utilisation du gouvernail.
Veuillez garder ce manuel d’utilisateur dans un
endroit sûr. En cas de vente du bateau équipé d’un
gouvernail, veuillez transmettre ce manuel d’utili-
sateur au nouveau propriétaire.
Registre:
1. Description technique
2. Notice d’installation du gouvernail
3. Commande du gouvernail
4. Démontage du gouvernail
5. Entretien et entreposage
6. Conditions de garantie
7. Mode de liquidation du produit
8. Mode de liquidation de l’emballage
1. gouvernail
2. œillet fi leté écrou
3. câble de levage
4. mousqueton
5. pédale
6. câble de commande
7. vis à empreinte hexagonale
8. sangle
9. attache repose-pied à échelle
10. ruban auto-agrippant
11. console (+ plateforme à hexagone)
12. cale
13. vis
14. axe à bague de blocage
15. frein
Montage du gouvernail
Après avoir déballé le gouvernail (1) de la boîte,
posez les œillets fi letés (2) dans les orifi ces
extrêmes et sécurisez-les à l’aide d’un écrou
M5 (vous pouvez passer par l’orifi ce de la
console du gouvernail pour le serrer). Montez les
mousquetons (4) dans les œillets fi letés (2) et à
l’extrémité du câble de levage (3).
Montage du mécanisme de commande
Fixez les pédales dotées de câbles de com-
mande (5) sur les plaques de fi xation à l’aide de
vis à empreinte hexagonale (7) et sécurisez-les
à l’aide d’écrous M6 (utilisez la clé jointe pour
leur serrage).
Posez le panneau à pédales (voir la fi g. 2) dans
le bateau et faites passer la sangle (8) dans
l’échelle (9) au fond normalement destinée à un
repose-pied.
Gouvernail pour bateau SEAWAVE
Manuel d’utilisateur
1. Description technique
2. Notice d’installation
du gouvernail – voir figure 1
Version 1/2017
[F]
Figure 1
Figure 2

11
10
4
3
15
Fixation du gouvernail au bateau
Il est nécessaire de coller un ruban auto-agrippant (10)
au pont arrière avant la première utilisation du gouvernail
(voir la fi g. 3). Pour garantir un collage parfait, la surface
à coller doit être sèche, propre et dégraissée à l’acétone.
Installez la plateforme (11) au-dessous du pont arrière
du bateau et faites passer l’hexagone par l’orifi ce de
vidange. Installez les consoles (11) et la cale (12) du côté
extérieur et serrez-les à l’aide d’une vis de blocage (13).
Retirez la bague de blocage (14) de l’axe de gouvernail.
Posez l’axe dans l’orifi ce et sécurisez-le à l’aide de la
bague de blocage. Faites passer les câbles de com-
mande (6) dans les bagues en D à l’intérieur du bateau
et dans les orifi ces à l’arrière du pont, posez-les dans
les mousquetons (4) et réglez-en la longueur nécessaire
à l’aide d’un raccourcisseur (en cas d’installation sur un
biplace, faites des nœuds de raccourcissement sur les
câbles de sorte que les raccourcisseurs soient acces-
sibles dans l’espace sièges). Faites passer le câble (3)
dans le frein (15) du mécanisme de levage (voir la fi g. 4).
Lacez le mécanisme entre les bagues en D au cockpit
du bateau. Fixez le mousqueton du câble de levage au
mécanisme de levage (voir la fi g. 4) et réglez la longueur
nécessaire du câble à l’aide d’un raccourcisseur.
Le gouvernail facilite le pilotage du kayak notamment
dans le vent ou dans les vagues. En cas de kayak
double, la personne assise à l’arrière commande le
gouvernail. Le gouvernail est commandé par l’appui d’un
pied sur la pédale et par la diminution de la pression de
l’autre pied. La puissance est transmise par les câbles
sur le palonnier du gouvernail qui tourne en consé-
quence. La lame de gouvernail se lève par un appui sur
le frein du mécanisme de levage et par un mouvement
en avant. En appuyant sur le frein du mécanisme de
levage et en faisant un mouvement en arrière, le gouver-
nail descend dans la position de travail.
3. Commande du gouvernail
Il est nécessaire de démonter le gouvernail avant de
plier le kayak. Décrochez les câbles de commande des
mousquetons. Démontez le mousqueton du mécanisme
de levage. Laissez les câbles de commande et les
pédales dans le kayak. Démontez le système de fi xation
du gouvernail.
Le gouvernail ne nécessite aucun entretien spécifi que.
Lavez le gouvernail avec de l’eau tiède contenant du
savon ou un détergent après toute pollution ou utilisation
dans de l’eau salée ou avant de mettre le gouvernail
au dépôt. Protégez les parties métalliques de graisse.
Changez les parties usées ou abîmées, notamment les
câbles. Transportez et entreposez le gouvernail toujours
séparément du kayak. Contrôlez le serrage des vis lors
de chaque installation du gouvernail sur le kayak.
La durée de garantie est de 24 mois, à compter de la
date de vente du produit.
Le fabricant garantit une réparation gratuite ou un rem-
placement pour toute défaillance de matière.
Toutes les réparations sous ou hors garantie sont
assurées par le fabricant Gumotex, S.A., Mládežnická
3062/3a, 69075 Břeclav.
Carton : recyclage conformément aux symboles fi gu-
rant sur l’emballage.
Feuille PE-LD (polyéthylène basse densité) : recyclage
conformément aux symboles fi gurant sur l’emballage.
Mise au dépôt d’ordures ménagères.
4. Démontage du gouvernail
5. Maintenance et entreposage
6. Conditions de garantie
8. Mode de liquidation
de l’emballage
7. Mode de liquidation du produit
AVERTISSEMENT
Danger de rupture de la lame de
gouvernail dans l’eau peu profonde
ou au démarrage ou à l’arrêt du
bateau. Dans un tel cas, levez tou-
jours la lame de gouvernail dans la
position supérieure.
Figure 4
Figure 3

12
3
2
1
6414
11 12 13
6
5
7
8
9
Estimado cliente
El presente manual le debe instruir sobre el montaje
y uso del timón que se suministra como accesorio de
la lancha neumática Seawave. Incluye la descripción
detallada de todo el sistema de timón, la información
sobre su manejo y mantenimiento. Le rogamos que lea
el manual de usuario antes de usar el timón. En el caso
de que usted tenga algún problema con la instalación
o uso del timón, póngase en contacto con la tienda
donde lo ha comprado.
Le rogamos que guarde este manual en un lugar
seguro y se lo entregue al nuevo propietario si
vende la lancha con el timón.
Índice:
1. Descripción técnica
2. Instrucciones de instalación del timón
3. Manejo del timón
4. Desmontaje del timón
5. Mantenimiento y almacenamiento
6. Condiciones de garantía
7. Cómo desechar el producto
8. Cómo desechar el embalaje
1. timón
2. cáncamo con tuerca
3. cable de elevación
4. gancho
5. pedal
6. cuerda de manejo
7. tornillo con hexágono interior
8. correa
9. fi jador para reposapiés con escalerilla
10. cinta de velcro
11. consola (y base con hexágono)
12. arandela
13. tornillo
14. pivote con anillo de seguridad
15. freno
Ensamblaje del timón
Después de sacar el timón (1) de la caja, inserte
los cáncamos adjuntos (2) en los agujeros
extremos y asegúrelos con la tuerca M5 (usted
puede aprovechar el agujero en la consola del
timón para el apriete). Meta los ganchos (4) en
los cáncamos (2) y al extremo de la cuerda de
elevación (3).
Ensamblaje del mando
Fije los pedales con cables de manejo (5) a los
fi jadores mediante los tornillos con hexágono
interior (7) y asegúrelos mediante las tuercas M6
(use la llave adjunta para el apriete).
Inserte el panel con pedales (ver la fi g. 2) en la
lancha y pase la correa (8) por la escalerilla (9)
en el fondo en vez del reposapiés.
Timón para la lancha SEAWAVE
Manual de usuario
1. Descripción técnica
2. Instrucciones de instalación
del timón (ver la fig. 1)
Version 1/2017
[E]
Fig. 1
Fig. 2

13
10
4
3
15
Sujeción del timón a la lancha
Antes del primer uso del timón, es necesario pegar la
cinta de velcro (10) en la popa (ver fi g. 3). Para una unión
perfecta, la superfi cie a pegar debe estar seca, limpia y
desengrasada con acetona.
Ponga la base (11) por debajo de la popa de la lancha
y pase el hexágono por el imbornal. Desde la parte
exterior ponga las consolas (11), la arandela (12) y
apriete mediante el tornillo de seguridad (13). Saque el
anillo de seguridad del pivote del timón (14). Inserte el
pivote en el agujero y asegúrelo mediante el anillo de
seguridad. Pase los cables de manejo (6) de los pedales
por los anillos semicirculares dentro de la lancha y por
los agujeros de la popa, inserte en los ganchos (4) y
mediante nudos acortadores ajuste la longitud necesaria
(en el caso de la instalación en la versión de dos plazas,
haga en los cables un nudo acortador de manera que
los nudos estén accesibles en la zona de los asientos).
Pase el cable (3) por el freno (15) del mecanismo
elevador (ver fi g. 4). Fije el mecanismo adjunto, atándolo
entre los anillos semicirculares, en la zona del timón de
la lancha. Fije el gancho del cable de elevación al meca-
nismo elevador (ver fi g. 4) y ajuste la longitud necesaria
del cable mediante un nudo acortador.
El timón facilita el manejo del kayak, sobre todo si hay
viento u olas. En el kayak de dos plazas la persona que
está sentada detrás maneja el timón. El timón se maneja
pisando con un pie el pedal y liberando la presión del
otro pie. La fuerza se transmite a través de los cables al
balancín del timón y de esta manera tiene lugar su giro.
La elevación de la paleta del timón se realiza apretando
el freno del mecanismo elevador y tirando hacia adelan-
te. Apretando el freno del mecanismo elevador y tirando
hacia atrás, el timón baja a la posición de trabajo.
3. Manejo del timón
Antes de enrollar el kayak, es necesario desmontar el
timón. Desenganche los cables de manejo de los gan-
chos. Desconecte el gancho del mecanismo elevador.
Deje los cables de manejo con los pedales en el kayak.
Desmonte la sujeción del timón.
El timón no necesita ningún requisito especial para su
mantenimiento. Después de cada ensuciado, después
de usarlo en agua salada y antes del almacenamiento,
lave el timón con agua templada con jabón o detergente.
Trate las partes terminales con grasa de conservación.
Cambie las partes desgastadas o dañadas, sobre todo
los cables. Transporte y almacene el timón siempre
separado del kayak. Durante cada montaje del timón al
kayak, compruebe el apriete de los tornillos.
El plazo de garantía es de 24 meses y se cuenta a
partir de la fecha de venta.
El fabricante proporciona la reparación o sustitución
gratuita por los defectos de carácter material.
Las reparaciones de garantía y de posgarantía
están aseguradas por el fabricante: Gumotex, a.s.,
Mládežnická 3062/3a, 69075 Břeclav
Cartón: reciclaje de acuerdo con los símbolos indica-
dos en el embalaje.
Película de PE-LD (polietileno de baja densidad ramifi -
cado): reciclaje de acuerdo con los símbolos indicados
en el embalaje.
Depositándolo en el vertedero de residuos comunita-
rios.
4. Desmontaje del timón
5. Mantenimiento y almacenamiento
6. Condiciones de garantía
8. Cómo desechar el embalaje
7. Cómo desechar el producto
ADVERTENCIA
En aguas poco profundas o durante
la leva y el abordaje, existe el ries-
go de rotura de la paleta del timón.
En tal caso siempre eleve la paleta
del timón a la posición superior.
Fig. 4
Fig. 3

14
3
2
1
6414
11 12 13
6
5
7
8
9
Gentile cliente,
Lo scopo delle presenti istruzioni è quello di fornire
indicazioni per il montaggio e l‘utilizzo del timone, for-
nito come accessorio del canotto gonfi abile Seawave.
Contengono la descrizione dettagliata di tutto il timone
e le informazioni sull‘utilizzo e la manutenzione. La
preghiamo di leggere le istruzioni per l‘uso prima dell‘u-
tilizzo del timone. In caso di problemi con l‘installazione
o l‘utilizzo del timone, la preghiamo di rivolgersi al Suo
rivenditore.
Le istruzioni per l‘uso devono essere conservate in
un luogo sicuro e in caso di vendita devono essere
consegnate al nuovo proprietario.
Indice:
1. Descrizione tecnica
2. Istruzioni per l‘installazione del timone
3. Comando del timone
4. Smontaggio del timone
5. Manutenzione e stoccaggio
6. Condizioni di garanzia
7. Modalità di smaltimento del prodotto
8. Modalità di smaltimento dell‘imballo
1. timone
2. vite ad occhiello con dado
3. fune di sollevamento
4. moschettone
5. pedale
6. fune di comando
7. vite con esagono incassato
8. cinghia
9. attacco del poggiapiedi con scaletta
10. fascetta a strappo
11. mensola (+ base con vite esagonale)
12. rondella
13. vite
14. perno con anello di sicurezza
15. freno
Smontaggio del timone
Dopo aver estratto il timone (1) dalla scatola,
inserire le viti ad occhiello (2) nei fori esterni e
bloccare con il dado M5 (per serrare è possibile
utilizzare il foro sulla mensola del timone). Inse-
rire i moschettoni (4) nelle viti ad occhiello (2) e
nell’estremità della fune di sollevamento (3).
Montaggio del dispositivo di comando
Fissare i pedali con le funi di comando (5) agli
attacchi utilizzando le viti con esagono incassato
(7), quindi bloccare con i dadi M6 (per serrare
utilizzare la chiave in dotazione).
Inserire nel canotto la piastra con i pedali, vede-
re fi g. n. 2, passare la cinghia (8) attraverso la
scaletta (9) sul fondo al posto del poggiapiedi.
Timone per canotto SEAWAVE
Istruzioni per l‘uso
1. Descrizione tecnica
2. Istruzioni per l‘installazione
del timone – vedere fig. n. 1
Versione 1/2017
[I]
Fig. n. 1
Fig. n. 2

15
10
4
3
15
7. Modalità di smaltimento
del prodotto
8. Modalità di smaltimento
dell‘imballo
Fissaggio del timone sul canotto
Prima del primo utilizzo del timone è necessario
attaccare sul ponte posteriore la fascetta a strappo (10),
vedere fi g. n. 3. Per una corretta adesione, la superfi cie
di contatto deve essere asciutta, pulita e sgrassata con
acetone. Inserire la base (11) sotto il ponte posteriore e
passare la vite esagonale attraverso il foro di scarico.
Applicare dall’esterno la mensola (11) e la rondella (12),
quindi stringere con la vite di bloccaggio (13). Estrarre
l’anello di sicurezza dal perno del timone (14). Inserire
il perno nel foro e bloccare con l’anello di sicurezza.
Passare le funi di comando (6) dei pedali attraverso gli
anelli a D all’interno del canotto e i fori sul ponte supe-
riore, inserire nei moschettoni (4) e, utilizzando attrezzi
di accorciamento, regolare alla lunghezza desiderata (in
caso di installazione sulla versione biposto, eseguire un
nodo di accorciamento sulle funi, in modo da rendere
gli attrezzi di accorciamento accessibili dalla posizione
dei sedili). Passare la fune (3) attraverso il freno (15) del
meccanismo di sollevamento, vedere fi g. n. 4. Legare il
meccanismo in dotazione tra i gli anelli a D sulla plancia
di pilotaggio del canotto. Fissare il moschettone della
fune di sollevamento al meccanismo di sollevamento,
vedere fi g. n. 4, e, utilizzando attrezzi di accorciamento,
regolare la fune alla lunghezza desiderata.
Il timone serve per facilitare la guida del kayak soprattut-
to in caso di vento o tra le onde. Nel kayak a due posti il
timone viene manovrato dalla persona seduta nella parte
posteriore. Il timone si comanda premendo il pedale
con un piede mentre l‘altro lo rilascia. La forza viene
trasmessa attraverso le funi sul bilanciere del timone,
generandone rotazione. La pala del timone si alza
premendo sul freno del meccanismo di sollevamento e
tirando in avanti. Premendo il freno del meccanismo di
sollevamento e tirando all‘indietro, il timone scende in
posizione di lavoro.
3. Comando del timone
Prima di imballare il kayak è necessario smontare il
timone. Sganciare le funi di sollevamento dai moschet-
toni. Sganciare il moschettone dal meccanismo di
sollevamento. Lasciare nel kayak le funi di comando con
i pedali. Smontare l‘attacco del timone.
Il timone non richiede nessuna manutenzione particola-
re. In caso di imbrattamento, di utilizzo in acqua salata
e prima dello stoccaggio, lavare il timone con acqua tie-
pida e sapone o detergente. Trattare le parti metalliche
con grasso protettivo. Le parti usurate o danneggiate,
soprattutto le funi, devono essere sostituite. Il timone
deve essere trasportato e stoccato sempre separata-
mente dal kayak. Durante ogni montaggio del timone sul
kayak, controllare il serraggio delle viti.
La durata della garanzia è di 24 mesi e decorre dalla
data della vendita.
Il produttore garantisce la riparazione o la sostituzione
gratuita in caso di difetti del materiale.
Le riparazioni nel periodo di garanzia e dopo la scaden-
za della garanzia sono fornite dal produttore:
Gumotex, a.s., Mládežnická 3062/3a, 69075 Břeclav
Cartone – riciclaggio secondo i simboli indicati sull‘im-
ballo.
Pellicola LDPE (polietilene a bassa densità) - riciclag-
gio secondo i simboli indicati sull‘imballo.
Deposito nelle discariche di rifi uti urbani.
4. Smontaggio del timone
5. Manutenzione e stoccaggio
6. Condizioni di garanzia
AVVERTENZA
In acqua bassa o nei momenti di
partenza o attracco c‘è il rischio di
rottura della pala del timone.
In questi casi la pala del timone
deve essere sempre sollevata nella
posizione alta.
Fig. n. 4
Fig. n. 3

16
3
2
1
6414
11 12 13
6
5
7
8
9
Geachte klant,
In deze handleiding maakt u kennis met installatie en
gebruik van een roer dat als optie bij de opblaasbare
boot Seawave geleverd wordt. Deze handleiding bevat
een gedetailleerde beschrijving van het roersysteem en
informatie over de bediening en het onderhoud ervan.
Gelieve de gebruikershandleiding vóór gebruik te lezen.
Indien u bij de installatie of het gebruik problemen
ondervindt, wendt u zich dan tot uw verkoper.
Bewaar deze handleiding op een veilige plaats en
geef hem door aan een eventuele nieuwe eigenaar
in het geval u uw boot met roer verkoopt.
Inhoud:
1. Technische beschrijving
2. Installatie-instructies van het roer
3. Bediening van het roer
4. Ontmanteling van het roer
5. Onderhoud en opslag
6. Garantievoorwaarden
7. Hergebruik van het product
8. Hergebruik van de verpakking
1. roer
2. schroefoog met moer
3. hijskoord
4. karabijn
5. pedaal
6. bedieningskabel
7. inbusschroef
8. riem
9. bevestiging van de voetsteun met een gesp
10. klittenband
11. beugel (basis met zeshoek)
12. onderlegger
13. schroef
14. pin met borgring
15. rem
Montage van het roer
Nadat u het roer (1) uit te doos hebt gehaald,
steek de bijgevoegde schroefogen (2) in de
zijgaten en zet ze vast met een moer M5 (om
de moeren aan te trekken kunt u de opening op
de beugel van het roer gebruiken). Bevestig de
musketons (4) aan de schroefogen (2) en aan het
einde van het hijskoord (3).
Montage van de bediening
Bevestig de pedalen (5) met bedieningskabels in
de houders met behulp van de inbusschroeven
(7) en zet ze vast met moeren M6 (gebruik
de bijgevoegde sleutel om de moeren aan te
trekken).
Leg de plaat met pedalen in de boot (zie afb. nr.
2) en steek de riem (8) door de gesp (9) op de
bodem in plaats van de voetsteun.
Roer voor de boot SEAWAVE
Gebruikershandleiding
1. Technische beschrijving
2. Installatie-instructies voor het
roer - zie afb. nr. 1
Versie 1/2017
[NL]
Afb. nr. 1
Afb. nr. 2

17
10
4
3
15
Bevestiging van het roer aan de boot
Voor het eerste gebruik van het roer moet u op het
achterdek het klittenband (10) vastplakken, zie afb. nr. 3.
Voor een perfecte afdichting dient het oppervlak droog,
schoon en vetvrij te zijn. Leg de basis (11) onder het
achterdek en duw de inbusschroef in de afvoeropening.
Bevestig aan de buitenkant de beugels (11), onderlegger
(12) en trek aan met behulp van een borgschroef (13).
Haal de borgring uit de pin (14) van het roer. Steek de pin
in de opening en maak vast met behulp van de borgring.
Rijg de bedieningskabels (6) van de pedalen door de
D-ringen aan de binnenkant van de boot en door de
openingen in het achterdek, zet ze vast in de musketons
(4) en stel de gewenste lengte in (in het geval van
installatie op de tweezits versie dient u in de koorden een
knoop te maken, zodat de kabels ingekort worden en
bereikbaar zijn vanuit de zitplaatsen). Rijg het hijskoord
(3) door de rem (15) van het hijsmechanisme, zie afb.
nr. 4. Bind het bijgevoegde mechanisme vast tussen de
D-ringen op de cockpit van de boot. Maak de musketon
van de hijskabel vast aan het hijsmechanisme (zie afb.
nr. 4) en stel de gewenste lengte van de kabel in.
Het roer vergemakkelijkt de bediening van de kajak en
dat vooral bij wind of in golven. Bij een tweepersoons
kajak wordt het roer bediend door degene die achterin
zit. Het roer wordt bediend door telkens met één voet
druk op het pedaal te zetten en tegelijkertijd het pedaal
met de andere voet te lossen. De kracht wordt met
behulp van de kabels naar het roer overgebracht en
zo wordt het roer gedraaid. Het hijsen van het roerblad
wordt bereikt door het indrukken van de rem van het
hijsmechanisme en het naar voren trekken. Door het
indrukken van de rem van het hijsmechanisme en het
naar achteren trekken wordt het roer in werkstand
neergelaten.
3. Bediening van het roer
Alvorens de kajak ingepakt wordt, moet het roer
ontmanteld worden. Haal de bedieningskabels uit de
musketons. Klik de musketon van het hijsmechanisme
los. Laat de bedieningskabels en pedalen in de kajak
liggen. Ontmantel de bevestiging van het roer.
Het roer behoeft geen speciaal onderhoud. Was het
roer na elke verontreiniging, na elk gebruik in zoutwater
of voordat u het opbergt, met lauw water met zeep of
wasmiddel. Metalen stukken dienen met vet behandeld
te worden. Versleten of beschadigde onderdelen, vooral
kabels, dienen vervangen te worden. Bewaar en berg
het roer telkens los van de kajak op. Bij elke installatie
van het roer op de kajak dient u de schroefverbindingen
te controleren.
De garantieperiode bedraagt 24 maanden en begint te
lopen vanaf de datum van verkoop.
De producent biedt gratis herstel of vervanging aan bij
materiaalgebreken.
Zowel reparaties onder de garantie als reparaties
na verloop van de garantie worden door de fabrikant
uitgevoerd: Gumotex, a.s., Mládežnická 3062/3a,
69075 Břeclav
Karton - recyclage aan de hand van de symbolen op de
verpakking.
PE-LD folie (polyetheen met lage dichtheid) -
hergebruik aan de hand van de symbolen
op de verpakking.
Product afl everen als grofvuil bij afvalinzamelplaatsen.
4. Ontmanteling van het roer
5. Onderhoud en opslag
6. Garantievoorwaarden
8. Hergebruik van de verpakking
7. Hergebruik van het product
OPGELET
In ondiep water of bij het uitvaren of
aanmeren kan het roerblad breken.
Daarom moet in deze gevallen het
roerblad in de bovenste positie
gehesen worden.
Afb. nr. 3
Afb. nr. 4

18
3
2
1
6414
11 12 13
6
5
7
8
9
Szanowny Kliencie,
Celem niniejszego podręcznika jest zapoznanie
użytkownika z montażem i używaniem steru, który jest
dostarczany jako wyposażenie dodatkowe do kajaka
dmuchanego Seawave. Zawiera on szczegółowy opis
całego systemu steru, informacje o jego obsłudze
i utrzymaniu. Prosimy o przeczytanie podręcznika
użytkownika przed użyciem steru. W razie problemów
z instalacją lub użytkowaniem steru prosimy zwrócić się
do sprzedawcy.
Prosimy o ułożenie niniejszego podręcznika w
bezpiecznym miejscu i przekazanie go nowemu
właścicielowi wraz ze sprzedanym kajakiem.
Indeks:
1. Opis techniczny
2. Instrukcja instalacji steru
3. Obsługa steru
4. Demontaż steru
5. Utrzymanie i przechowywanie
6. Warunki gwarancji
7. Sposób likwidacji wyrobu
8. Sposób likwidacji opakowania
1. ster
2. oko gwintowe z nakrętką
3. linka do podnoszenia
4. karabinek
5. pedał
6. linka sterownicza
7. śruba z sześciokątem wewnętrznym
8. popręg
9. uchwyt podnóżka z drabinką
10. pasek rzepa
11. konsola (+ podstawa z sześciokątem)
12. podkładka
13. śruba
14. czop z pierścieniem zabezpieczającym
15. hamulec
Zestawienie steru
Po wyjęciu steru (1) z kartonu włożyć załączone
oka gwintowane (2) w skrajne otwory i zabez-
pieczyć je nakrętką M5 (do dokręcenia można
wykorzystać otwór na konsole steru). Do ok
gwintowanych (2) i na koniec linki do podnosze-
nia (3) nawlec karabinki (4).
Zestawienie mechanizmu sterowniczego
Pedały z linkami sterowniczymi (5) umocować
do uchwytów z pomocą śrub z sześciokątem
wewnętrznym (7) i zabezpieczyć nakrętkami M6
(do dokręcenia użyć załączonego klucza).
Płytę z pedałami, patrz Rys. nr 2, włożyć do ka-
jaka, natomiast popręg (8) przeciągnąć drabinką
(9) na dnie zamiast podnóżka.
Ster do kajaka SEAWAVE
Podręcznik użytkownika
1. Opis techniczny
2. Instrukcja instalacji steru –
patrz Rys. nr 1
Wydanie 1/2017
[PL]
Rys. nr 1
Rys. nr 2

19
10
4
3
15
Umocowanie steru do kajaka
Przed pierwszym użyciem steru jest konieczne przy-
lepienie do pokładu rufowego rzepa (10), patrz Rys. nr
3. W celu dokładnego przyklejenia klejona powierzch-
nia musi być sucha, czysta i odtłuszczona acetonem.
Pod pokład rufowy włożyć podstawę (11) a sześciokąt
przełożyć przez otwór odpływowy. Z zewnętrznej
strony przyłożyć konsole (11), podkładkę (12) i dokręcić
śrubę zabezpieczającą (13). Z czopu steru wyciągnąć
pierścień zabezpieczający (14). Czop włożyć w otwór
i zabezpieczyć pierścieniem zabezpieczającym. Linki
sterownicze (6) od pedałów przełożyć przez pierście-
nie D wewnątrz kajaka i otwory w pokładzie rufowym,
włożyć w karabinki (4) i z pomocą klamer regulacyjnych
nastawić potrzebną długość (w razie instalacji do wersji
dwuosobowej związać na linkach węzeł skracający tak,
aby klamry były dostępne w miejscu, w którym siedzi
załoga). Przez hamulec (15) mechanizmu podnoszenia
przełożyć linkę (3) patrz Rys. nr 4. Załączony mecha-
nizm przysznurować między pierścieniami D do kokpitu
kajaka. Umocować karabinek linki do podnoszenia,
patrz Rys. nr 4 i z pomocą klamry regulacyjnej nastawić
potrzebną długość linki.
Ster ułatwia kierowanie kajakiem zwłaszcza na wietrze
i falach. W przypadku kajaka dwuosobowego ster
obsługuje osoba siedząca z tyłu. Ster obsługuje się na-
ciskając zawsze jedną stopą na pedał i zwalniając drugą
stopą drugi pedał. Siła jest przenoszona linkami na wa-
hadło steru i następuje jego obrót. Płetwę steru podnosi
się naciskając hamulec mechanizmu do podnoszenia
i ciągnąc do przodu. Do pozycji roboczej opuszcza się
naciskając hamulec mechanizmu do podnoszenia i
ciągnąc do tyłu.
3. Obsługa steru
Przed zapakowaniem kajaka jest konieczne zdemonto-
wanie steru. Odczepić linki sterownicze od karabinków.
Odpiąć karabinek z mechanizmu do podnoszenia. Linki
sterownicze z pedałami zostawić w kajaku. Zdemonto-
wać mocowanie steru.
Ster nie wymaga specjalnego utrzymania. Po każdym
zanieczyszczeniu, po użyciu w słonej wodzie i przed
ułożeniem do przechowywania umyć ster letnią wodą
z mydłem lub środkiem do mycia. Metalowe części
zakonserwować smarem konserwacyjnym. Zużyte lub
uszkodzone części, zwłaszcza linki, wymienić. Ster
transportować i przechowywać zawsze oddzielnie od
kajaka. Po każdym montażu steru na kajak skontrolo-
wać dokręcenie śrub.
Okres gwarancji wynosi 24 miesiące i liczy się od daty
sprzedaży.
Producent zapewnia bezpłatną naprawę lub wymianę w
razie wad materiałowych.
Naprawy gwarancyjne i pogwarancyjne zapewnia
producent: Gumotex, a.s., Mládežnická 3062/3a, 69075
Břeclav
Karton – recykling według symboli podanych na opa-
kowaniu.
Folia PE-LD (polietylen niskiej gęstości) – recykling
według symboli podanych na opakowaniu.
Wspólnie z odpadem komunalnym.
4. Demontażsteru
5. Utrzymanie i składanie
6. Warunki gwarancji
8. Sposób likwidacji opakowania
7. Sposób likwidacji wyrobu
UWAGA
W płytkiej wodzie lub podczas
odbijania i przybijania do brzegu
grozi niebezpieczeństwo złamania
płetwy steru.
W takim przypadku zawsze należy
podnieść płetwęsteru do górnej
pozycji.
Rys. nr 4
Rys. nr 3

20
3
2
1
6414
11 12 13
6
5
7
8
9
Tisztelt Ügyfelünk!
Ez az útmutató ismerteti Önnel a Seawave felfújható
csónakhoz tartozékként szállított kormány szerelését
és használatát. Tartalmazza a teljes kormányrendszer
részletes leírását, valamint a kezelésére és karban-
tartására vonatkozó információkat. Kérjük, a kormány
használata előtt olvassa el az útmutatót! Amennyiben
problémája lenne a kormány szerelésével vagy haszná-
latával, forduljon az Eladóhoz!
Kérjük, egy biztonságos helyen őrizze meg ezt az
útmutatót, és adja át az új tulajdonosnak, amennyi-
ben a csónakot, a kormánnyal együtt eladja!
Jegyzék:
1. Műszaki leírás
2. A kormány szerelési útmutatója
3. A kormány kezelése
4. A kormány eltávolítása
5. Ápolás és tárolás
6. Garanciális feltételek
7. A termék megsemmisítése
8. A csomagolás megsemmisítése
1. kormány
2. szemescsavar anyával
3. emelőkötél
4. karabiner
5. pedál
6. kezelőkötél
7. imbuszcsavar
8. heveder
9. létrás lábtámasz-rögzítő
10. tépőzár-szalag
11. konzol (+ alaplap, hatszöggel)
12. alátét
13. csavar
14. biztosítókarikás csapszeg
15. fék
A kormány összeállítása
A kormány (1) dobozból történt kiemelése után,
helyezze be a mellékelt szemescsavarokat (2)
a szélső nyílásokba, és M5-ös anyával rögzítse
azokat (a meghúzáshoz használhatja a kormány-
konzol nyílásokat.) A szemescsavarokba (2) és
az emelőkötél (3) végére fűzze be a karabine-
reket (4).
A kezelőszervek összeállítása
A pedálokat, a kezelőzsinórokkal együtt (5),
az imbuszcsavarok (7) segítségével erősítse
a tartókhoz, és biztosítsa az M6-os anyákkal
(meghúzásukhoz, használja a mellékelt kulcsot).
A pedáldeszkát - ld. 2. ábra – helyezze be a csó-
nakba, és a hevedert (8) húzza keresztül a létrán
(9), a fenéken, a lábtámasz helyett.
Kormány SEAWAVE csónakhoz
Felhasználói útmutató
1. Műszaki leírás
2. A kormány szerelési útmutatója -
ld. 1. ábra
Változat 1/2017
[H]
1. ábra
2. ábra
Other manuals for SEAWAVE
4
Table of contents
Languages:
Other Gumotex Boating Equipment manuals
Popular Boating Equipment manuals by other brands

YAK-POWER
YAK-POWER YP-RP5WR installation instructions

Econo Lift
Econo Lift 4500 Parts, Assembly and Installation Guide

Roswell
Roswell Moomba A3 Tower Care, maintenance, operation

HydroHoist
HydroHoist HarborHoist HH-4400 installation manual

Taco Marine
Taco Marine GS-400 Pro Series Installation instruction guide

Reborn
Reborn Launch Wakeboard Tower Polished installation guide