STEP 1 - Open the unit by using either your backup keys
or current access code and locate the learn button on
the interior roof of the unit.
STEP 2 - Use steps (3-7) in the Programming section to
change your current combination.
STEP 3 - Now you have successfully reprogramed your
safe. Test your access code to confirm that your unit has
been propery programmed.
STEP 4 - Your safe is now ready for use.
Resetting Passcode
Safety Features
Entering an invalid access code triggers the Tamper
Detect Feature.
STEP 1 - Press and hold down buttons 2 and 3 for five
seconds to initiate the tamper detect indicator.
STEP 2 - If tampering has been detected, the keypad
backlighting will remain red until buttons 2 and 3 are
released.
STEP 3 - If tampering was not detected, the keypad
backlighting will remain green until buttons 2 and 3 are
released.
Tamper Detection
STEP 1 - When you enter the correct access code and
the battery is low, the keypad backlighting will flash
red and beep six times. If the battery in the unit is
completely depleted, you will hear only a light humming
sound.
STEP2- Replace your battery by using steps in section
labeled “Battery Installation”.
*The low battery indicator only operates when you
are in the process of opening your unit.
Low Battery Warning
Indicator
After six incorrect entries the Security Sleep Mode
Feature will be triggered and will lockout any new
keypad entries for two minutes. When Security Sleep
Mode is active and a button is pressed the keypad
backlighting will flash red and the unit will beep three
times.
Security Sleep Mode
4
To verify if the Security Sleep Mode is deactivated, wait
two minutes and then test your unit by solwly typing in
your passcode. If the keypad backlighting flashes green
your passcode has been accepted and the unit will
open. If the keypad backlighting flashes red, your
passcode is incorrect and you will need to try again. If
you have forgotten or lost your passcode, please follow
the “Programming” instructions. Your backup key will
be required if reprogramming is needed.
The interior courtesy light feature becomes activated
for five seconds after every time the safe door opens.
This feature allows you to have a clear view of the
interior and all the safe contents.
Internal Courtesy Light
Drawer Removal and
Instalation
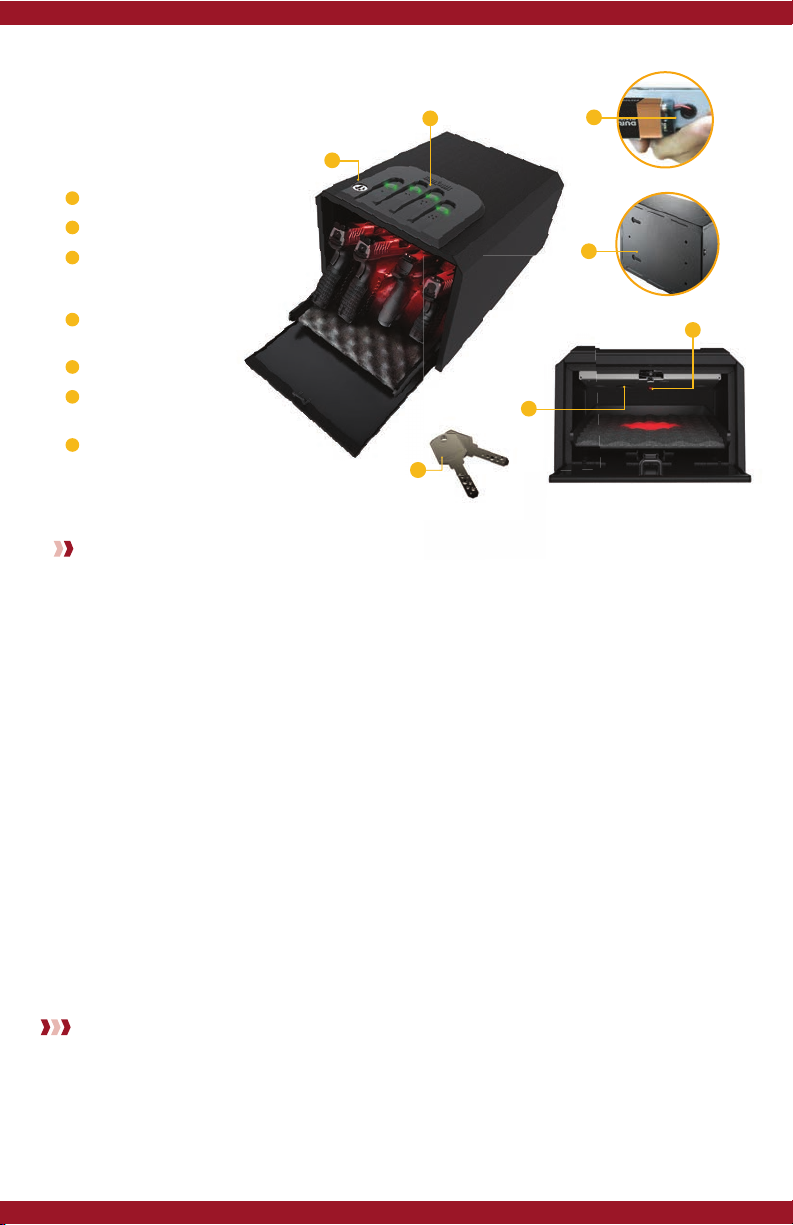
STEP 1 - Open the unit by using either your backup keys
or current access code.
STEP 2 - Identify plastic lever visible through the slot near
the center of the drawer.
STEP 3 - Move lever to opposite side of the slot and hold
in this position.
STEP 4 - While holding lever in position, pull the drawer
away from the unit.
STEP 1 - Locate slide attached underneath the drawer.
STEP 2 - Locate slide component inside the GunVault unit.
STEP 3 - With spring pointed toward the back of GunVault
unit, align and insert slide underneath the drawer into
slide assembly inside of the unit until a click is heard.
STEP 4 - The click will indicate drawer is secured and in
correct position; with the safe empty of guns and or
valuables, verify correct installation by testing drawer’s
motion.
Removal
Installation