HAEMMERLIN ECM 125 CP User manual

Instructions for use - Mixer ..............................................1
Anleitung - Betonmischer ...................................................7
Mode d’emploi - Bétonniere .............................................13
Manuale - Beton ...............................................................19
РУКОВОДСТВО ПО СБОРКЕ - БЕТОНОСМЕСИТЕЛЬ ........25
GB
D
F
I
РУС
125 CP/CF
165 CP/CF
190 CP/CF
RRR
HAEMMERLIN SAS - B.P. 30045 - 67701 Saverne Cedex - France
Tel. + 33 (0)3 88 01 85 00 - Fax: + 33 (0) 88 71 18 01
E-mail: [email protected] - www.haemmerlin.com
R
HAEMMERLIN SAS - B.P. 30045 - 67701 Saverne Cedex - France
Tel. + 33 (0)3 88 01 85 00 - Fax: + 33 (0) 88 71 18 01
E-mail: [email protected] - www.haemmerlin.com
strictes.

ATTENTION! Before you open the housing, unplug the mixer. Do not start
the mixer before the engine housing cover is mounted on the housing with the
screws intended for that purpose.
ATTENTION!
Unplug the mixer before any maintenance or repairs.
ATTENTION!
Never grease the crown gear.
Before you start the mixer, read carefully the instructions for use. Be sure that
you have fully understood these instructions!
PURPOSE OF THE MIXER
It is forbidden to use this mixer in a way other than described in these INSTRUCTIONS FOR USE.
It is forbidden to use this mixer to mix combustible or explosive materials or foodstuffs.
- WE MUST EMPHASIZE -
THAT THE USER ALONE WILL BE LIABLE FOR
ANY CONSEQUENCES AND DAMAGE CAUSED
BY THE NON-OBSERVANCE OF THESE INSTRUCTIONS FOR USE
OR ANY IMPROPER USE!!!
RESTRICTIONS
In spite of the purpose and proper use and design of the mixer, there is still a certain risk when using the mixer.
- The danger of a power failure, if improper connecting wires are used.
- Damage which can result in certain parts of the mixer or the whole mixer being charged with power.
- The danger resulting from the rotating parts of the engine or the drum. In particular if the safety device of the
contact between the crown gear of the engine and the crown gear of the drum is removed or damaged
intentionally or unintentionally.
- The risks mentioned above can be minimized if the user observes these “INSTRUCTIONS FOR USE”, the
“SAFETY INSTRUCTIONS” and the “PURPOSE OF THE MIXER”.
SAFETY INSTRUCTIONS
PAY ATTENTION TO THE FOLLOWING INSTRUCTIONS. BY READING CAREFULLY
AND OBSERVING THESE INSTRUCTIONS, THE REQUIREMENTS FOR YOUR SAFETY
AND THE SAFETY OF OTHERS WILL BE MET.
Observe these instructions and the safety regulations in the WORK AREA of the mixer.
LEGEND OF THE SIMBOL
1
GB
You have just bought a new mixer produced by Haemmerlin. warrants you that you have made a
good choice, because we have achieved an enviable quality of production, control during the phases, assembly
and final control. The construction of our mixer complies with the strict European regulations
Haemmerlin
DEAR CUSTOMER
ATTENTION!
Read these instructions for use before you start the mixer!
Please observe these instructions in order to preserve your mixer
in a good working condition for years.
This mixer has been designed for mixing concrete and mortar both for
professional and non-professional purposes
Set up the mixer on a solid, level base only. The work area near the mixer must be clean in order to avoid
any fall of the user or other persons on the mixer. Make sure that there is enough light in the work area near
the mixer. Keep third parties away from the work area. Children under 16 are not allowed to use the mixer.
Only use the mixer for the functions described in “PURPOSE OF THE MIXER”. Do not alter the mixer or
any parts of the mixer. Defective or damaged parts must be replaced by original parts. Use the mixer only if
the mechanical and electrical safety devices are undamaged. All warnings and safety instructions on the
mixer must be clearly visible and undamaged.
The mixer is not intended for road transport or towing. It is intended for transport on a vehicle or trailer.
On a construction site it can only be moved manually.
Do not reach into the mixing drum with your hand or any tool when it is rotating.
ROTATING PARTS!
ATTENTION: DANGER!
MAKE SURE TO PULL OUT THE PLUG BEFORE:
-moving or transport,
-cleaning, maintenance or repair work,
-opening the engine housing.
WARNING!
Protection Class II will be preserved only if original parts are used for repairs
and if insulation distances remain unchanged.
When working with concrete or additives, make sure that there is no excessive dust. Wear
personal safety equipment (clothes, gloves, goggles and dust protection mask), when
filling or emptying the mixing drum.
ELECTRICAL SAFETY
DANGER FOR LIFE IN CASE OF NON-OBSERVANCE OF THESE INSTRUCTIONS!
The connecting cable must comply with IEC 245-4 1980 (DIN 57 282) and be marked H 07 RN-F, or a
comparable model. The cross-section of wires must be at least 3 x 1.5 mm2. This cross-section is sufficient
for a connecting cable of a length of at least 25 m. For cables longer than 25 m, the cross-section must be
at least 3 x 2.5 mm2. Cables must be protected against mechanical damage and against spraying water.
Check the cable before use: it must fulfill the two conditions mentioned above. Never use a damaged or
non-compliant connecting cable in any circumstances whatsoever. When laying the connecting cable,
make sure that it is not crushed or bent. Also make sure that there are no foreign parts or impurities on the
contacts in order to avoid a short-circuit. Never use provisional electrical connections. Never bridge over
the safety devices or put them out of operation. Only a licensed electrician, who is obliged to observe the
regulations in force, is authorized to make all repairs on electrical connections. Only the manufacturer or
qualified technician can repair the electrical parts.
Thanks to its protective insulation, the mixer can be hooked up directly to a household socket. No special
socket is necessary for use on a construction site. An ordinary socket (230 V) protected with a 10 A fuse is
sufficient. The mixer can only be used if the engine housing and its elements are mounted as indicated.
The protection class will be preserved only if original parts are used for repairs and if insulation distances
remain unchanged.
GB
2
Do not fill or empty the mixing drum when the drum is rotating (when the engine
is running). Observe the direction of rotation of the mixing drum. SEE THE
INDICATION on the mixing drum!

POSITIONS ON THE ADJUSTING DISC
1. mortar
2. concrete
3. emptying - cleaning
4. transport
ADDITIONAL SAFETY RESTRICTIONS
START UP
READ ALL SAFETY INSTRUCTIONS
SETTING UP TH EMIXER
To set up the mixer, see the instructions for assembly. Set the mixer on a solid, level base. The mixer can tip
if the mixer is set up on a slope. Check that the mixer is stable. When setting up the mixer, make sure that
the mixing drum cannot be emptied by accident.
SWITCHING THE MIXER ON AND OFF
DO NOT FORGET!!
To make sure that all the prescribed and mentioned safety instructions have been observed and that all the
parts have been mounted properly. To read and make sure that you understand and remember the safety
instructions. The on/off switch of the mixer is located in the same housing as the socket. It is mounted on
the housing which contains the engine. The switch is protected against spraying water. In case of power
failure, the engine of the mixer stops automatically. Press the switch again to restart the mixer.
ENGINE PROTECTION
In case of overload, the engine will overheat. Before restarting the engine by pressing the switch, you need
to wait for the engine to cool off.
USING THE MIXER
To make concrete or mortar, the mixing drum
must be locked in a specific position. Only the
proper mixer setting ensures optimal mixing
results and smooth operation of the mixer
MIXING CONCRETE AND MORTAR
Positioning mechanism with
rotating lever and brake.
DURING THE ROTATION, HOLD THE ROTATING LEVER
1. Pull the rotating lever to unblock the drum in a vertical position.
2. Select one of the mixing positions (for concrete or mortar) by rotating the lever.
IT IS FORBIDDEN TO START UP THE MIXER WHEN THE DRUM IS FULL.
BEFORE THE START UP, CHECK IF THE DRUM IS EMPTY OR FULL. IF
NECESSARY, EMPTY THE DRUM. ROTATE THE DRUM TO THE EMPTYING
POSITION, AND THEN PRESS THE SWITCH TO START THE ROTATION OF THE
DRUM.
3
GB
Fill or empty the mixing drum only when the engine is running or when the drum is rotating.
Check that the mixer is stable.
Procedure to make concrete or mortar
1. Pour in water and base material (gravel, sand).
2. Add the binding agent (cement, lye).
3. Repeat steps 1 and 2 until you reach the required quantity.
4. Mix the materials until you reach a homogenous mix.
Consult a professional to check the exact quantities of base material, binding agent and water that are
necessary to obtain a mix of quality.
1. Unlock the rotating mechanism by pulling the lever in your direction.
2. Gently rotate the drum by pulling the lever.
3. Lock the drum in the emptying position so that the mix does not get out to abruptly.
4. Repeat the emptying procedure.
TRANSPORT
Unplug the mixer before any
STORAGE
Observe these instructions for use in order to extend the service life of your mixer
and to ensure its smooth running in the future. Once cleaned, set obligatorily the
mixing drum in position 4 (see the instructions for transport). Store the mixer in a dry
and ventilated place. If you do not have the intention to use the mixer in the near
future, you should release the driving belt (engine belt). To release the belt, release
the connecting screws which maintain the engine housing approximately 2 cm
upwards. By doing so, you will extend the service life of your mixer. When releasing
the belt, make sure that the belt does not fall as a result of an excessive lifting of the
engine housing upwards. To tighten the belt, proceed conversely. Release the
connecting screws which maintain the engine housing. Press more strongly and
push the engine housing downwards. Tighten the screws. Make sure that the mixing
drum rotates a little harder. If it is not the case, then the belt is not tightened enough.
If the mixing drum rotates easily, then the belt has fallen from the pulley. In such
case, remove the cap of the housing and replace the belt. Make sure that the belt is
properly placed on the engine shaft. Otherwise, the belt will fall again from the pulley
and will be damaged. This would result in reducing considerably the service life of
the belt which could probably brake. (See the safety instructions to open the
housing, and the legend of the symbols.)
CLEANING
ADDITIONAL SAFETY WARNINGS
Pull the plug each time before cleaning.
Cleaning forbidden, especially with water, as long as the cap of the
engine housing has not been placed back.
Switch off the mixer and pull the plug if you have to touch the mixer with your hands or any tool for the
purpose of cleaning. Do not switch on the mixer during cleaning. Do not expose the engine housing
(engine) and the switch to direct water jet. This also applies to the ventilation apertures to cool the engine.
With the rotating lever rotate the mixer into position 3. Clean obligatorily after each use. To clean the inside
of the mixing drum, use a scraper and a metallic brush, and rinse with water jet. Remove immediately all
concrete or mortar residues on the crown gears.
4
HRGB
EMPTYING THE MIXING DRUM
HOLD THE ROTATING LEVER TIGHTLY DURING THE ROTATION
CLEANING

MAINTENANCE
The mixer has been designed and manufactured in such a way that it does not need any particular
maintenance. NEVER GREASE THE CROWN GEARS!!!! Observe the INSTRUCTIONS on the control
of the operation of the mixer which are given in the INSTRUCTIONS on safety and operation, use and
storage. Make sure that the mixing drum is rotating slowly. Check that the screws are properly tightened.
REPAIRS
Always pull the plug before any repair work
Switch off the mixer by pulling the plug. Never switch on the mixer during any repair work. If it is necessary
to remove or switch off any safety devices, they must be remounted upon completion of the repair work.
Only the manufacturer or authorized technician may repair electrical parts. Use only original spare parts.
PROBLEM
MALFUNCTIONS
POSSIBLE CAUSE REMEDY
No power. Defective cables. The
thermostat is not connected. The engine
is overloaded. The ventilation apertures
are obstructed or considerably reduced.
Foreign part in the conduct or mechanical
deformation of the conduct.
Check the fuse. Check the cable
(electrician).
Let the engine cool down. Check the
ventilation apertures (obstructed or
deformed).
The engine starts up
(hums) but the mixing
drum does not rotate.
The engine does
not start up.
The crown gear is blocked. The belt is not
tightened enough. The belt is broken. The
elastic pin on the small crown gear is
broken. The elastic pin on the pulley is
broken. Defective condenser.
Switch off the mixer. Pull the plug. Tighten
the pulley. Check the pin on the small
crown gear. Replace it, if necessary.
Remove the cap of the engine housing.
Check the belt and the pin of the pulley.
Replace them, if necessary. If the mixing
drum still does not rotate, call an expert
(defective condenser).
1.
2.
3.
4.
5.
6.
7.
8.
9.
10.
SPARE PARTS
01
01
02
01
01
01
01
02
01
01
Mixing drum
Small crown gear
Engine bearing
Eletrical engine
Engine housing
Pulley
Belt
Pin Ř6x40
Drume frame
Mixer frame
6006 (2RSR)
TEHNICAL DATA
11.
12.
13.
14.
15.
16.
17.
01
01
02
02
01
01
01
Support with leg
Suport for wheels
Wheel
Drum bearing
Lever set
Spring
Plastic handle ¨25 cm
6003 (2RSR)
5
GB
Engine
Type of the mixer
Protection Class
Type of protection
Theoretical volume of filling
Sound level (LPA)
Weight approximately:
Dimensions AxBxC (cm)
Article No.
Certificate :
P1=700W/S1=(6-25%)ED230V/50Hz/2,6A 2700 min-1
*P1=850W/S1=(6-25%)ED230V/50Hz/3,9A 2720min-1
125LS/LP 165LS/LP *190LS/LP
II II II
IP44 IP44 IP44
125L 150L 170L
75 dB(A) 75dB(A) 75dB(A)
58kg 58,5kg/65,5kg 61,5kg/68,5kg
114x72x134 122x79x135,5 122x79x143,5
106001/106002 106011/106012 106016/106017
RWTUW GS 03024 RWTUW GS 0324
6

Sehr geehrter Käufer,
Sie haben einen neuen Mischer für Beton und Mörtel gekauft. garantiert Ihnen die Richtigkeit Ihrer
Entscheidung, da wir folgendes erreicht haben: Beneidenswerte Ausführungsqualität, Kontrolle, Montage und
Endkontrolle.
Haemmerlin
EG-Konformitätserklärung
In der gelieferten Ausführung folgenden einschlägigen Bestimmungen entspricht:EG-Richtlinie Maschinen
98/37/EG und prEN 12151 Stand 12/98.
Der Freifallmischer ist zum Mischen von Beton und Mörtel für Heim und Profiarbeiten bestimmt.
Angewendete harmonisierte Normen sind EN 292-1 und EN 292-2, sowie EN-60204-1.
D.Miholjac, Croatien:25/09/2001
ACHTUNG!
Vor Inbetriebnahme Bedienungsanleitung lesen
ACHTUNG!Vor dem Öffnen der Verkleidung Netzstecker ziehen! Der Mischer darf nur mit
vollständig geschlossener Verkleidung betrieben werden!
ACHTUNG!
Vor Wartungs- und Reparaturarbeiten Netzstecker ziehen!
ACHTUNG!
Auf keinen Fall die Zahnräder schmieren!
Bitte lesen Sie die nachfolgenden Hinweise sorgfältig, damit Ihr Gerät jahrelang funktionieren kann.
Vor Inbetriebnahme unbedingt diese Betriebsanleitung durchlesen. Sie müssen sicher sein, alle angegebenen Hinweise
beachtet und verstanden zu haben!
BESTIMMUNGSGEMÄSSER GEBRAUCH
Der Mischer ist zum mischen von Beton und Mörtel für Heim und Profiarbeiten bestimmt
Es ist verboten, den Betonmischer auf die Art und Weise zu gebrauchen, die nicht in diesen Hinweisen
beschrieben ist. Es ist verboten, den Betonmischer zum Mischen von explosiven und brennbaren Stoffen,
sowie im Lebensmittelbereich, zu gebrauchen.
RESTRISIKEN!!!!
Trotz bestimmungsgemäßem Gebrauch und Einhaltung aller Sicherheitsbestimmungen, können aufgrund der durch den
Verwendungszweck bestimmter Konstruktion, noch Restrisiken bestehen. Gefährdung durch Strom, bei Verwendung
nicht ordnungsgemäßer Anschlussleitung. Beschädigung, die zur Folge spannungsführende Teile oder des Mischers
selbst haben können. Gefährdung durch die rotierenden und umlaufenden Teile oder der Trommel selbst. Besonders,
wenn es zu unordnungsgemäßen Betriebs-, Wartungs- und Instandsetzugsmassnahmen kommt. Aufgeführte Restrisiken
können auf ein Minimum gebracht werden, wenn der Benutzer sich an die aufgeführten „Sicherheitshinweise“ und
„bestimmungsgemäße Verwendung“ hält.
-WIR BETONEN-
BEI NICHTEINHALTUNG VON BESTIMMUNGSGEMÄSSEM GEBRAUCH DES MISCHERS, TRÄGT
DER BENUTZER ALLEIN DAS RISIKO
SICHERCHEITSHINWEISE
ACHTUNG GEFAHR!
UNBEDINGT NETZSTECKER ZIEHEN VOR:
•Versetzung und Transport.
•Reinigungs-, Wartungs- und Instandsetzungsarbeiten.
•Öffnen des Motorgehäuses, wo sich der Elektromotor befindet.
D
7
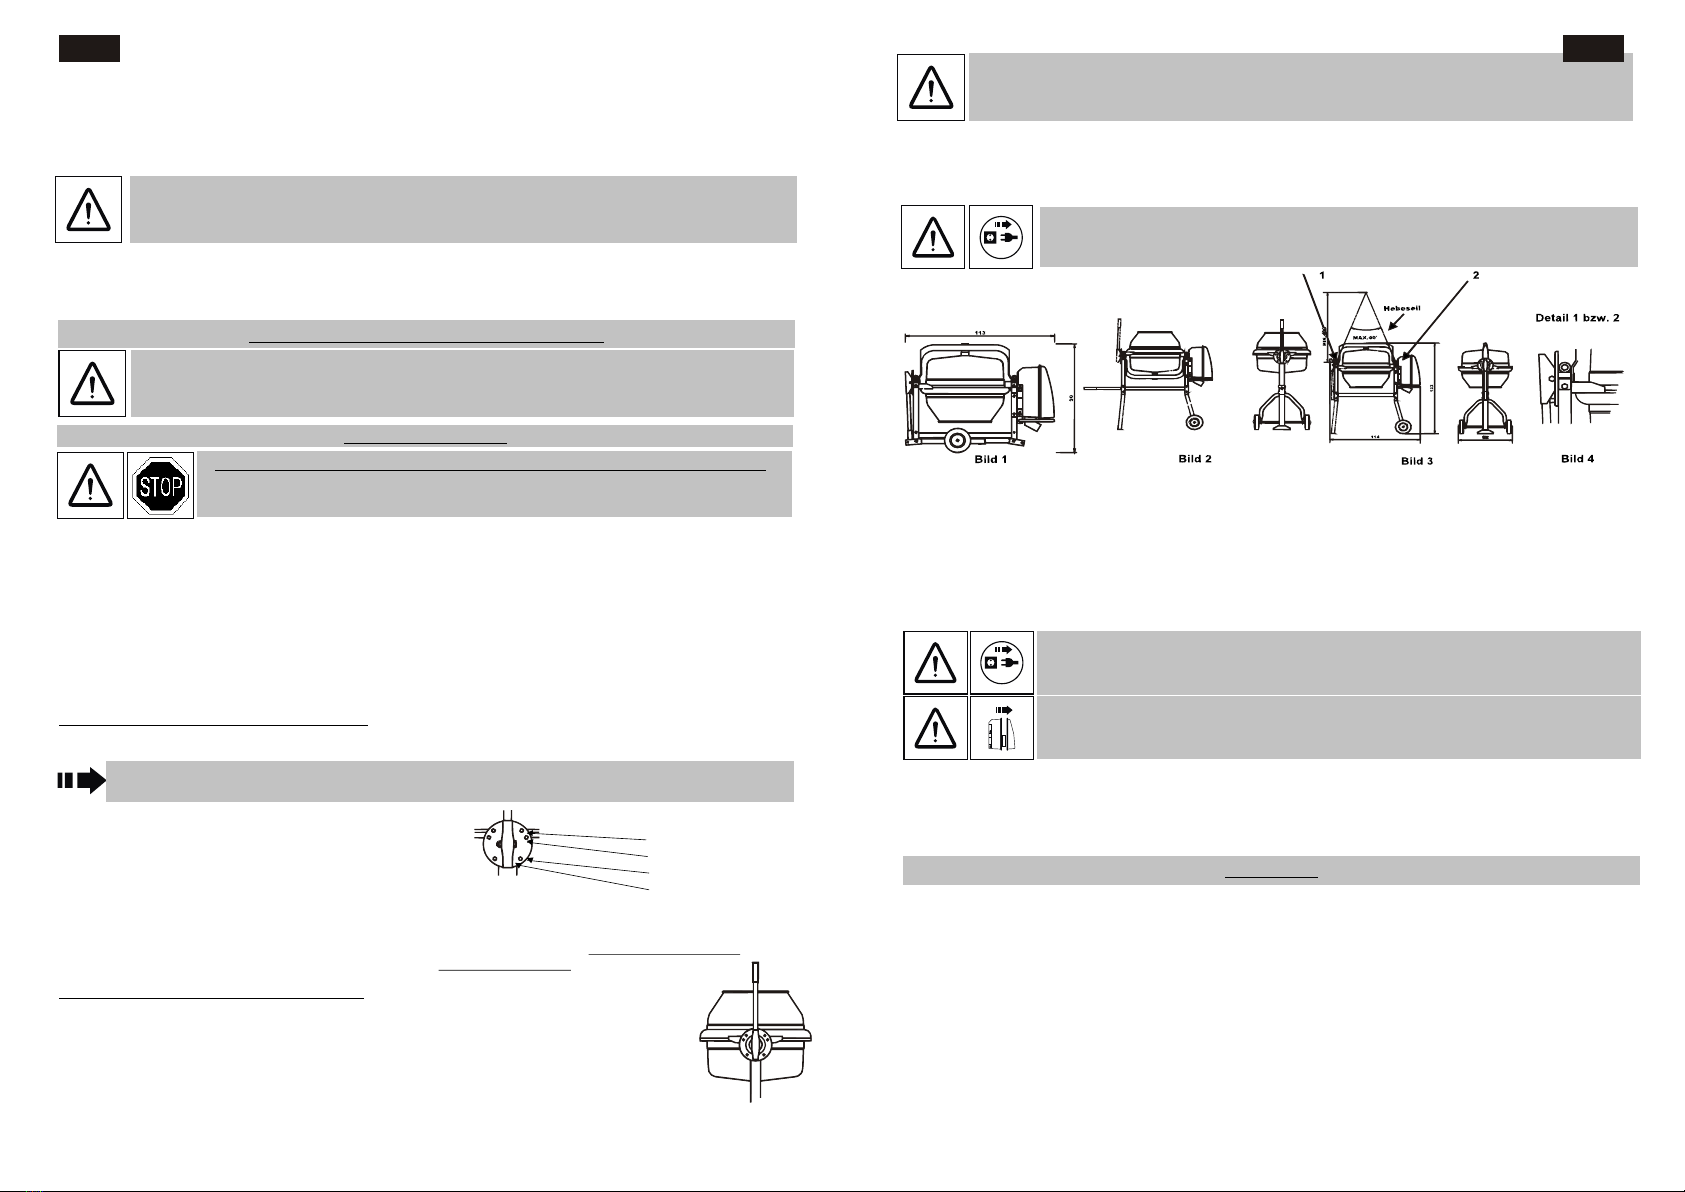
·Es ist verboten mit Händen oder anderen Werkzeugen in die laufende
Mischtrommel zu greifen!
ROTIERENDE MISCHWERKTEILE!
Füllen und Entleeren nur bei laufendem Motor der Mischtrommel. Drehrichtung der Trommel beachten.
SIEHE BEZEICHNUNG AN DER TROMMEL!
BEACHTEN SIE DIESE HINWEISE. DURCH AUFMERKSAMES LESEN UND EINHALTUNG DER
ANGEGEBENEN HINWEISE. SCHÜTZEN SIE SICH SELBST UND ANDERE VOR MÖGLICHEN
GEFAHREN. Im ARBEITSBEREICH des Mischers unbedingt die SICERHEITSVORSCHRIFTEN beachten.
Bei Benutzung von Zement od. Zusätzen aufpassen, dass es nicht zu all zu großer Staubentwicklung
kommt. Beim Füllen und Entleeren der Mischtrommel persönliche Schutzarbeitskleidung tragen.
(Schutzhandschuhe, Schutzbrille, und Staubschutzmaske.
MECHANISCHE SICERHEITSEINRICHTUNGEN
1.Der Betonmischer ist so konstruktiv ausgeführt, dass keine Quetschung oder Verbrennung des Körper beim
Arbeitsvorgang wie folgt er folgen kann:
• Beim Füllen und Entleeren
• Bei rotierender Trommel im Arbeitsvorgang und bei rotierender Trommel im Leerlauf
• Beim Ausschalten des Motors,
• Bei transportieren, oder heben des Mischers wegen Versetzung mit dem Kran es besteht
keine Gefahr von Teilen des Mischers wegen Manipulation,
• Alle Schrauben sind gegen das Aufdrehen von Sechskantmuttern mit Klemmteil (DIN
985) und Unterliegscheibe gesichert,
2. Antriebsgehäuse und Steckdose sind zusätzlich gesichert mit Stahlrohr, dass am Gehäuse angeschweißt
ist; es ist auch vor Fall und Schlag vom Fremdkörper gesichert.
3. Schwenkmechanismus ist so konstruiert, das er immer die Stellung „geschlossen“ sichert. Damit wird ein
sicheres Betrieb gesichert (Mörtelherstellung, Wartung, Leerung, Transport). Im Fall, dass die Trommel in eine
Zwischenstellung gerät, wird in eine festgelegten Stellung automatisch bringen.
D
8
ELEKTRISCHE SICHERHEITEINRICHTUNGEN
BEI NICHTBEACHTUNG DIESER HINWEISE BESTEHT
LEBENSGEFAHR!
ACHTUNG!
Sutzisolierte Maschine Schutzklasse II bleibt nur erhalten, wenn bei Reparatur
Originalisolierstoffteile verwendet und Isolationsabstände nicht verändert werden.
Ausführung der Anschlussleitung muss ausgeführt sein nach IEC 245-4:1980 (DIN 57 282) mit dem Kennzeichen H 07 RN-
F oder gleichwertige Bauarten. Aderquerschnitt mindestens 3x1,5 mm˛ bis Max. 25 m Länge. Ab dieser Länge
Aderquerschnitt min. 3x2,5 mm˛. Der Kabel muss in erschwerten Bedingungen widerstandfähig sein, auf mechanische
Fehler und voll spritzwassergeschützt sein. Kabel muss vor jedem Gebrauch durchgesehen werden und ersten zwei
Punkten voll entsprechen. Niemals defekte Kabel verwenden.
Beim Verlegen des Kabels darauf achten, dass er nicht gequetscht und stark geknickt ist, sowie an den Steckdosen kein
Kurzschluss durch Fremdkörper oder Erde entstehen kann. Keine provisorischen Elektroanschlüsse verwenden.
Schutzeinrichtungen niemals überbrücken, oder auf andere Art und Weise außer Betrieb setzen. Reparaturen an
Elektroanschlüssen darf nur ein Elektrofachmann ausführen, der verpflicht ist, sich an vorgeschriebene Normen zu halten.
Reparaturen an Elektroteilen dürfen nur Hersteller oder die dafür ermächtige Firma ausführen. Bei Stromausfall schaltet
sich die Maschine automatisch ab. Zum Wiedereinschalten die Schaltertaste betätigen.
MOTORSCHUTZ
Der Motor ist mit dem automatischen Bimetalltemperaturschalter ausgerüstet. Bei Überlastung des Motors kommt es zu
seiner Überhitzung. In diesem Fall kommt es durch den Bimetalltemperaturschalter zum selbstständigem Ausschalten des
Motors. Vor dem wiedereinschalten, sollte mit Hilfe der Schaltertaste eine Abkühlpause eingelegt werden.
Dass alle vorgeschriebenen Schutzmassnahmen erfüllt und Teile vorschriftsmäßig montiert sind. Dass die
Sicherheitshinweise durchgelesen, verstanden und gemerkt worden sind. Der Ein-und Ausschalter befindet sich im
gleichen Gehäuse wie der Stecker. Dieselben sind an das Motorhaus angeschlossen, wo sich der Elektromotor befindet.
Die Schaltertaste ist von Spritzwasser geschützt. Bei Stromausfall schaltet sich die Maschine automatisch ab. Zum
Wiedereinschalten die Schaltertaste betätigen.

ZUSÄTZLICHE SICHERHEITSHINWEISE
• Dass alle vorgeschriebenen Schutzmassnahmen erfüllt und Teile vorschriftsmäßig montiert sind.
• Dass die Sicherheitshinweise durchgelesen, verstanden und gemerkt worden sind.
• Der Ein-und Ausschalter befindet sich im gleichen Gehäuse wie der Stecker. Dieselben sind an das Motorhaus
angeschlossen, wo sich der Elektromotor befindet. Die Schaltertaste ist von Spritzwasser geschützt
VORBEREITUNG FÜR INBETRIEBNAHME
ALLE SICHERHEITS HINWEISE DURCHLESEN
INBETRIEBNAHME
ES IST VERBOTEN, DEN MISCHER ENSCHALTEN, WENN DIE TROMMEL VOLL IST.
VOR INBETRIEBNAHME ÜBERPRÜFEN OB DIE TROMMEL LEER ODER VOLL IST!
• Den Mischer nur auf festen und ebenen Untergrund aufstellen. Falls Rutschgefahr durch unebenen Untergrund besteht,
dann besteht Kippgefahr
• Den Arbeitsbereich um den Mischer sauber halten, dass es nicht zum Fall von Personen kommt. Es ist für ausreichende
Lichtverhältnisse zu sorgen.
• Den Arbeitsbereich des Mischers vor Zutritt des Dritten absichern.
• Jugendliche unter 16 Jahren dürfen den Betonmischer nicht bedienen.
• Mischer nur für die unter „bestimmungsgemäßer Gebrauch“ aufgeführten Arbeiten einsetzen.
• Mischer oder Teile des Mischers nicht verändern. Defekte bzw. beschädigte Teile am Mischer nur mit Originalteilen
ersetzen. Inbetriebnahme des Mischers nur mit vollständigen und bestätigten Schutzvorrichtungen erlaubt. Alle Gefahren-
und Sicherheitshinweise müssen am Mischer gut sichtbar und unversehrt sein.
Die Standfestigkeit des Mischers überprüfen. Beim Aufstellen des Mischers darauf achten, dass es nicht zum
unvorhergesehenen Entleeren der Mischertrommel kommt.
DIE HERSTELLUNG VON BETON UND MÖRTEL
Für Beton und Mörtelherstellung muss die Mischtrommel in die dafür vorgesehne Mischstellung eingerastet stehen. Nur
die richtige Mischstellung sichert beste Mischergebnisse und gewährleistet einen störungsfreien Arbeitsablauf.
Füllen und Entleeren nur bei laufendem Motor der Mischtrommel. Drehrichtung der Trommel beachten.
SIEHE BEZEICHNUNG AN DER TROMMEL!
Schwenkvorrichtung mit Stellscheibe für Feststellung und
Schwenkung der Mischtrommel.
BEI BEDARF DIE TROMMEL AUSLEEREN. DIE TROMMEL
IN SCHWENKSTELLUNG (3) NEIGEN, MIT BETÄTIGUNG
AUF SCHALTERTASTE DIE ROTATION EINLEITEN.
STELLHEBEL BEIM SCHWENKEN GUT FESTHALTEN
Lösen sie die Schwenkvorrichtung.-Mit drehen
des Hebels nehmen Sie die Mischpositionen
(Beton oder Mörtel) ein. DER POSITIONEN AUF
DIE STELLSCHEIBE
1.Mörtel
2.Beton
3.Entleerungs-Reinigung
4. Transport
9
D
Trotz bestimmungsgemäßem Gebrauch und Einhaltung aller Sicherheitsbestimmungen, können aufgrund der durch den
Verwendungszweck bestimmter Konstruktion, noch Restrisiken bestehen. Gefährdung durch Strom, bei Verwendung
nicht ordnungsgemäßer Anschlussleitung. Beschädigung, die zur Folge spannungsführende Teile oder des Mischers
selbst haben können. Gefährdung durch die rotierenden und umlaufenden Teile oder der Trommel selbst. Besonders,
wenn es zu unordnungsgemäßen Betriebs-, Wartungs- und Instandsetzugsmassnahmen kommt. Aufgeführte Restrisiken
können auf ein Minimum gebracht werden, wenn der Benutzer sich an die aufgeführten „Sicherheitshinweise“ und
„bestimmungsgemäße Verwendung“ hält.
Der Herstellungsvorgang für Beton bzw. Mörtel
1.Wasser und Grundstoffe einfüllen (Sand, Kies oder...
2. Bindemittel zugeben.
3. Schritte 1 und 2 wiederholen, bis das erforderliche Mischverhältnis erreicht ist.
4. Material so lange mischen, bis ein homogenes Mischgut erreicht ist. Das Wasser zugeben.
Für genaue Mengen an Grund- und Bindematerial, sowie Wassermenge um homogenes
Mischgut zu bekommen, holen Sie sich den Rat eines Fachmanns.
BEIM ENTLEEREN DER MISCHTROMMEL
DEN SCHWENKHEBEL GUT FESTHALTEN
Füllen und entleeren der Mischertrommel nur bei laufendem Motor bzw. rotierenden Trommel.
Standstabilität der Mischer überprüfen.
Schwenkhebel durch zu sich ziehen entriegeln. Mischtrommel langsam kippen, mit Hilfe des Hebels. Mischtrommel in
Entleerungsposition bringen. Entleerungsvorgang wiederholen.
ACHTUNG!!!
Vor jedem Transport Netzstecker ziehen.
TRANSPORTHINWEISE
Der Betonmischer ist nicht für Straßentransport vorgesehen. Der Mischer muss im entsprechenden Wagen transportiert
werden; auf der Baustelle im Handzug fahren oder mit Kran versetzen.
-Vorbereitung des Mischers zum Transport od. Versetzung:
(In beiden Fällen den Schwenkhebel in Position 4 auf Stellscheibe bringen.)
Den Mischer in Stellung (Bild 1,2,3,4) bringen und dann mit entsprechenden transportieren.
Zum Versetzen des Mischers auf der Baustelle mit Hilfe des Krans es ist nötig, denselben auf dafür vorgesehen Stellen
einhacken ( sehen Sie Bezeichnung 1 und 2 auf Bild 3 und 4.) Das Hebeseil muss für eine Tragmasse von 200 kg
vorgesehen sein. Die Art des Hebens muss nach geltenden Vorschriften ausgeführt werden, die für Baustellen u. solche
Lasten gelten.
REINIGUNG
Vor jeder Reinigung Netzstecker ziehen..
Nicht mit Wasser reinigen, wenn das Antriebsgehäuse geöffnet ist.
Die Mischtrommel mit Hilfe des Schwenkhebels in Position 3 bringen. Mischer ausschalten und Netzstecker ziehen, wenn
Reinigungsarbeiten ein direktes Handanlegen, oder auch mit Hilfsmitteln erfordert. Zum Reinigen des Trommelinneren,
Spachtel und Drahtbrüste benutzen und mit Wasserstrahlen ausspülen. Beton und Mörtelreste am Zahnkranz sofort
entfernen. Während der Reinigungsarbeiten die Maschine nicht betrieben Motorgehäuse und den Schalter nicht mit
Wasserstrahlen abspritzen. Dasselbe gilt für Zu-und Abluftöffnungen zur Kühlung des Motors
WARTUNG
Der Mischer ist so konstruiert, dass er keine besondere Wartung braucht. Trommel und Antriebswelle haben
Kugellagerungen mit Dauerschmierung und sind vor Spritzwasser geschützt. ZAHNKRANZ NIEMALS SCHMIEREN!!!
Zur Werterhaltung, des Mischers wie unter „ Sicherheits-rund Funktionshinweise“ sowie „Transport und Lagerung“
beschrieben behandeln.
Um die Lebensdauer ihres Mischers zu verlängern und ein einwandfreies Bedienen zu erhalten, sollten sie sich an die
folgenden Hinweise halten. Nach der Reinigung, die Mischtrommel in Position Nr.: 4 stellen (siehe Transporthinweise. Den
Mischer im trockenen und luftigen Raum lagern. Wenn Sie ihren Mischer längere Zeit nicht benutzen werden, ist es nötig,
den Antriebsriemen zu entspannen durch. Lösen Sie der Schrauben und langsames Anheben des Gehäuses der
Antriebsvorrichtung für ca. 2mm haben Sie den Riemen entlastet. Bei diesem Entspannen des
10
D
Antriebsriemens, müssen Sie darauf achten, dass Sie das Gehäuse der Antriebsvorrichtung nicht zu stark anheben, da der
Riemen sonst fallen könnte. Falls es doch passiert, mußen Sie das Gehäuse ganz anheben und Riemen richtig anstellen.
Achten Sie auf guten Sitz des Riemens sonst kann es zu Beschädigungen kommen.

Vor jeder Reinigung Netzstecker ziehen.
REPARATUR
Maschine ausschalten und Netzstecker ziehen. Während Reparaturarbeiten die Maschine nicht betreiben. Wegen
Reparaturarbeiten entfernte Schutzvorrichtungen müssen unbedingt wieder ordnungsgemäß angebracht werden.
Reparaturarbeiten an elektrischen Teilen der Maschine, haben durch den Hersteller bzw. von ihm benannte Firmen, zu
erfolgen. Nur Original-Ersatzteile verwenden.
BETRIEBSSTÖRUNGEN
Störung Mögliche Ursache Beseitigung
Motor läuft nicht
Motor brummt, aber die
Trommel dreht sich
nicht.
Netzspannung fehlt. Anschlusskabel
defekt. Motor überlastet. Motor bekommt
wenig Luft. Abluftöffnung zu klein. Fremde
Körper in der Zugluftöffnung, oder die
Kanäle sind mechanisch deformiert.
Zahnrad blockiert. Riemen nicht genug
gespannt. Riemen gebrochen. Spanstift
am Zahnrad gebrochen. Spanstift an
Riemenscheibe gebrochen Kondensator
defekt.
Absicherung überprüfen, Kabel überprüfen
(Fachmann), Motor abkühlen lassen,
Abluftkanale kontrollieren (verschmutzt oder
deformiert.
Maschine abschalten. Netzstecker ziehen.
Riemen anspannen. Kontrolle der Riemen
Spanstifts (beide. Bei Bedarf auswechseln.
Wenn die Trommel sich weiter hin nicht dreht,
Service rufen.
ERSATZ TEILE
1.
2.
3.
4.
5.
6.
7.
8.
9.
10.
11.
12.
13.
14.
15.
16.
17.
18.
19.
20.
01
01
01
01
01
02
01
01
01
02
01
01
01
01
02
02
01
01
01
01
Trommel mit Achse und Zahnrad komplett
Kasten für Antriebsvorrichtung zweiteilig
Kleines Zahnrad
Einphasenelektromotor
Ritzwelle
Betriebslager
Stecker mit Schalter
Riemenscheibe
Riemen
Spanstift elastisch
Trommelrahmen
Mischerrahmen
Fußraster
Radstütze
Rad, Tragkraft 1000 N (100 kg)
Trommellager
Schwenkhebel
Feder
Transportgriff
Kunststoffgriff
0,125 mł (125 l); Zahnrad Kunstsoff
Kunststoff
Z=12
P1=700 W
S1= (6-25%) ED;IP 00
Ř17
6003 (2RSR)
Tripus: KSWA23.R1; Art.nr. :20P0352
Ř150
Hutchinson: Poly V PJ 660
Ř6x40; DIN 7346
6006 (2RSR)
Verzinkt
Kunststoff
Kunststoff
11
D
TECHNISCHE ANGABEN:
Motor
Type
Schutzklasse
Schutzart
Volume
Arbeitsplatzbezogener Schalldruckpegel
Masse
Abmessungen montieren AxBxC (cm)
P1=700W/S1=(6-25%)ED230V/50Hz/2,6A 2700 min-1
*P1=850W/S1=(6-25%)ED230V/50Hz/3,9A 2720min-1
125LS/LP 165LS/LP *190LS/LP
II II II
IP44 IP44 IP44
125L 150L 170L
75 dB(A) 75dB(A) 75dB(A)
58kg 58,5kg/65,5kg 61,5kg/68,5kg
114x72x134 122x79x135,5 122x79x143,5
106001/106002 106011/106012 106016/106017
RWTUW GS 03024 RWTUW GS 0324
12

FF
13 14
Haemmerlin
Haemmerlin

15
F F
16

17
F
18

19
I I
20
Avete appena acquistato una nuova betoniera fabbricata da Haemmerlin.
Haemmerlin vi garantisce l'integrità dei suoi prodotti, poiché hanno raggiunto una qualità invidiabile di fabbricazione, di
controllo nel corso delle fasi intermedie, d'assemblaggio e di controllo finale.
Attenzione\
prima dell'utilizzo, leggere le istruzioni per l'uso
Significato dei simboli
attenzione
prima di aprire la cassa, staccate la presa di corrente. Mettete la betoniera in marcia soltanto
quando il coperchio del quadro motore è montato sulla cassa per mezzo delle apposite viti.
Attenzione
prima di procedere a lavori di manutenzione o a riparazione o pulizia, staccare la
betoniera della presa di alimentazione
Attenzione
non lubrificate mai alcun ingranaggio.
Vi preghiamo di tenere in particolare conto di questi avvertimenti per mantenere la vostra betoniera in buone
condizioni d'uso per molti anni.
Prima della messa in servizio, si prega di leggere attentamente le istruzioni relative alla
messa in moto della betoniera.
La betoniera è stata fabbricata per la preparazione di calcestruzzo e di malta ad uso dei privati e per uso professionale.
E' vietato utilizzare la betoniera per mescolare materie infiammabili o esplosive o ingredienti destinati all'alimentazione.
Modalità d'uso della betoniera
Si fa divieto di impiegare la macchina in condizioni o per un uso diverso da quanto indicato nel presente
manuale. La Haemmerlin s.a.s. non può essere ritenuta responsabile per guasti, inconvenienti od
infortuni dovuti alla non ottemperanza a questo divieto.
Teniamo a sottolineare
che l'utente sarà il solo responsabile di tutte le conseguenze e danni causati dall'inosservanza di
queste istruzioni per l'uso sull'impiego di betoniera.
Restrizioni
Esistono dei rischi, oltre a quanto sopraccitato, in occasione dell'utilizzo della betoniera, che sono:
il pericolo di guasto nell'impianto elettrico a causa di cavi d'alimentazione non adeguati
dei danni che, causati da un sovraccarico elettrico, possono colpire alcune parti di betoniera o tutta la
betoniera.
il pericolo , che rappresentano le parti rotatorie del motore o del tamburo, in particolare, se la protezione tra
l'ingranaggio del motore e l'ingranaggio del tamburo viene ritirata, danneggiata o tolta intenzionalmente o
non. I pericoli citati possono essere ridotti se l'utente rispetta le "istruzioni di lavoro", le "norme di sicurezza" e
Norme di sicurezza
Fate attenzione alle norme seguenti mediante una lettura attenta ed il rispetto di queste norme
che soddisferanno tutte le condizioni necessarie alla vostra sicurezza ed alla sicurezza di terzi.
Rispettate le istruzioni e le norme di sicurezza nello spazio di lavoro della betoniera.
Quando lavorate con cemento o additivi, garantite che non ci sia polvere eccessiva. Indossate appositi
dispositivi di protezione (abiti, guanti, occhiali e maschera di protezione contro la polvere) quando riempite
e svuotate il bicchiere della betoniera.
Posizionate la betoniera soltanto su una superficie di lavoro orizzontale e piatta. Lo spazio di lavoro intorno alla betoniera
deve essere pulito per evitare la caduta dell'utente o di terzi sulla betoniera. È necessario garantire un'illuminazione
sufficiente nello spazio di lavoro attorno alla betoniera. Proibire l'accesso allo spazio di lavoro ai terzi. I minori di 16 anni
non sono autorizzati ad utilizzare la betoniera. La betoniera non può essere utilizzata se non conformemente a quanto
descritto nel capitolo “uso della betoniera”. Non modificate la betoniera o i componenti della stessa. Le parti difettose o
danneggiate devono essere sostituite con pezzi originali. La betoniera può essere utilizzata soltanto se tutte le protezioni
meccaniche ed elettriche sono intatte. Tutti gli avvertimenti del pericolo e le norme di sicurezza che si trovano sulla
betoniera devono essere ben visibili ed integri.
è vietato toccare il bicchiere in rotazione o introdurvi attrezzi mentre la macchina è in moto
Pezzi in rotazione!
riempire o svuotare il bicchiere quando quest'ultimo è in rotazione (motore in marcia).
osservare il senso di rotazione del bicchiere. Vedere l'indicazione sul bicchiere!
La betoniera non è destinata al trasporto su strada o trainato. È destinata al trasporto su veicolo o rimorchio. Può
essere mossa sul cantiere soltanto manualmente attenzione pericolo!
assicurarsi di aver ritirato la scheda elettrica in caso di:
spostamento ed di trasporto
pulizia, manutenzione o riparazioni
prima di aprire il quadro del motore.
Avvertimento!
La classe di protezione 2 è preservata soltanto se, per le riparazioni, vengono utilizzati pezzi di
ricambio originali e se le distanze d'isolamento restano invariate.
Grazie al suo modo d'isolamento, la betoniera può essere collegata direttamente ad una presa di corrente ordinaria -
una presa di corrente distinta non è necessario per un utilizzo su cantiere. È sufficiente una presa di corrente ordinaria
(230v) protetta da un fusibile di 10A. La betoniera può essere utilizzata soltanto se la cassa del motore ed i suoi elementi
vengano assemblati come indicato. La classe di protezione 2 è preservata soltanto se, per le riparazioni, vengono
utilizzati pezzi di ricambio originali e se le distanze d'isolamento restano invariate.
sicurezza elettrica
pericolo di morte in caso di non rispetto di queste norme!
il cavo d'allacciamento deve essere conforme a IEC 245-4 1980 (DIN 57 282) e portare la dicitura H07 F, o essere un
modello comparabile. La superficie d'intersezione dei fili elettrici deve essere almeno di 3*1.5mm2. Quest'intersezione è
sufficiente per un cavo d'allacciamento minore di 25m di lunghezza. Per i cavi con lunghezza ai 25 mt, l'intersezione deve
essere almeno di 3*2.5mm2.I cavi devono essere protetti contro i danni meccanici ed essere interamente impermeabili.
L'integrità, del cavo deve essere verificata prima di qualsiasi utilizzo e deve soddisfare le due condizioni citate.
Un cavo d'allacciamento danneggiato o non conforme non deve mai essere utilizzato in nessuna circostanza qualsiasi
essa sia. Durante la posa del cavo d'allacciamento garantite anche che non ci sia nessun corpo estraneo o impurità sui
contatti della scheda per evitare un cortocircuito. Non utilizzate collegamenti elettrici improvvisati. Non staccate mai i
dispositivi di sicurezza e non li mettete mai fuori servizio. Solo un elettricista qualificato, che è obbligato a rispettare le
regolamentazioni in vigore, è autorizzato ad effettuare le riparazioni di tutti i collegamenti elettrici. Solo il fabbricante o un
tecnico qualificato possono procedere alla riparazione degli pezzi elettriche.

21 22
Messa in moto
leggere tutte le norme di sicurezza
impianto della betoniera.
Per l'assemblaggio della betoniera, vedere le istruzioni d'assemblaggio. Porre la betoniera su una superficie solida, piana
ed orizzontale. in caso del pericolo di scivolo della betoniera a causa di una superficie in pendenza, la betoniera rischia il
ribaltamento. Verificare la stabilità di betoniera. Nel momento della messa in moto della betoniera, garantite che il
bicchiere della betoniera non si svuoti incidentalmente.
Allacciamento ed interruzione della betoniera.
non dimenticate!!
Di garantirvi che tutte le norme di sicurezza prescritte e citate siano rispettate e che tutte i pezzi siano stati correttamente
montati. Leggere e garantirsi di aver bene compreso e memorizzato le norme di sicurezza. Il commutatore di
arresto/messa in moto della betoniera è situato nella stessa cassa della presa ed è installato nella cassa che contiene il
motore elettrico. Il commutatore è protetto contro gli spruzzi d'acqua. In caso di guasto di corrente, il motore della
betoniera si ferma automaticamente. Premere il commutatore nuovamente per rimettere la betoniera in marcia.
Protezione del motore
in caso di sovraccarico del motore, interviene un dispositivo che evita il surriscaldamento del motore. Prima di rimetterlo in
moto mediante il commutatore è necessario attendere che il motore si raffreddi.
funzionamento della betoniera
fabbricazione di cemento e di malta
Per la fabbricazione di calcestruzzo o di malta il bicchiere
deve essere messo nella posizione prevista a tal fine.
Solo queste posizioni di lavoro possono garantire la
qualità ottimale del miscelamento ed il funzionamento
regolare di betoniera.
Meccanismo di posizionamento con
leva di blocco e di oscillazione.
è vietato mettere la betoniera in moto quando il bicchiere è pieno. Prima della messa in servizio verificate
che il bicchiere sia vuoto. Equilibrate il bicchiere per metterlo in posizione di rovesciamento del materiale
quindi premete sul commutatore per far partire la rotazione del bicchiere.
tenete ben salda la leva del meccanismo in caso di oscillazione.
1.tirate la leva del meccanismo per sbloccare il bicchiere in posizione verticale
2.scegliete una delle posizioni di miscelazione (calcestruzzo o malta) facendo oscillare la leva.
posizioni sul disco del posizionatore
1. malta
2. calcestruzzo
3. rovesciamento - pulizia
4. trasporto
Restrizioni complementari di sicurezza
Riempite e svuotate il bicchiere della betoniera solo quando il motore è in moto o quando il bicchiere è in
rotazione. Verificate la stabilità della betoniera.
Procedura per la preparazione di calcestruzzo o di malta
1. versare l'acqua ed il materiale di base (ghiaia, sabbia).
2. Aggiungere l'agente legante (cemento o calce). ripetere le fasi 1 e 2 fino al conseguimento della qualità
auspicata.
3. Mescolare i materiali fino allo conseguimento di una massa omogenea.
Rivolgetevi ad un professionista dell'edilizia per verificare le quantità esatte di materiale di base e di agente
legante nonché la quantità d'acqua necessaria per ottenere una massa di qualità.
Rovesciamento del bicchiere della betoniera.
Tenete salda la leva del meccanismo in caso di oscillazione
1. sbloccate il meccanismo di oscillazione tirando la leva verso di voi
2. equilibrare delicatamente il bicchiere per mezzo dell'apposita leva
3. mettere il bicchiere in posizione di rovesciamento in modo che il composto non esca bruscamente a causa di una posizione
troppo accentuata
4. ripetete la procedura di rovesciamento
Trasporto
Staccare la presa di corrente della betoniera prima di qualsiasi trasporto
Stoccaggio dopo l'uso
Dovete rispettare queste istruzioni per l'uso per prolungare la durata della vostra betoniera e
per assicurare un buon utilizzo in futuro. Dopo la pulizia dovete obbligatoriamente mettere il
bicchiere della betoniera in posizione 4 (vedere le istruzioni relative al trasporto). Sistemate
la betoniera in un posto secco ed areato. Se non avete l'intenzione di utilizzare la betoniera
per un certo periodo di tempo, dovete allentare la cinghia di trasmissione (cinghia motore).
Per allentare la cinghia, allentate le viti di collegamento che uniscono il quadro del motore ed
il telaio della betoniera e alzate leggermente di circa 2cm il quadro del motore verso l'alto, per
prolungare così la durata della vostra betoniera. In occasione dell'allentamento della cinghia
fate attenzione che la cinghia non cada a causa di un sollevamento eccessivo della quadro
motore verso l'alto.
La procedura di tiraggio (frenatura) della cinghia si esegue all'inverso. Dovete rilasciare le viti
di collegamento che mantengono il quadro del motore. Sostenendolo, spingete il quadro del
motore verso il basso. Stringete le viti. Garantite che il bicchiere giri un poco più difficilmente.
Se il bicchiere gira eccessivamente, significa che la cinghia è caduta dalla puleggia. Dovete
allora togliere il coperchio del quadro e rimettere la cinghia a posto garantendo che la cinghia
sia correttamente posizionata sull'albero del motore elettrico. In caso contrario, la cinghia
cadrà di nuovo dalla puleggia e sarà danneggiata. Questo causerà una diminuzione
considerevole della durata della cinghia, e potrebbe probabilmente rompersi. (Vedere le
norme di sicurezza al momento dell'apertura della cassa e la spiegazione dei simboli).
Pulizia:
Avvertimenti complementari di sicurezza
staccate la scheda della presa d'alimentazione prima della pulizia.
È vietato procedere alla pulizia, in particolare con acqua, qualora il coperchio del motore
non sia al suo posto.
Arrestate la betoniera premendo il commutatore, staccate la scheda della presa d'alimentazione quando dovete pulire la
betoniera.
non mettete la betoniera in marcia durante la pulizia, non esporre a getti d'acqua diretti le parti elettriche quali il quadro
del motore (il motore) ed il commutatore. Questo riguarda anche gli i fori d'arrivo e d'uscita d'aria per il raffreddamento
del motore.
Pulizia
Con l'aiuto della leva di oscillazione, mettete il bicchiere della betoniera in posizione 3. La pulizia è obbligatoria dopo ogni
utilizzo. Per pulire l'interno del bicchiere, utilizzate una spatola ed una spazzola metalliche risciacquando con un getto
d'acqua. Eliminate immediatamente i resti di calcestruzzo o di malta sulle ruote d'ingranaggio.
I I

1.
2.
3.
4.
5.
6.
7.
8.
9.
10.
01
01
02
01
01
01
01
02
01
01
11.
12.
13.
14.
15.
16.
17.
01
01
02
02
01
01
01
23
I
P1=700W/S1=(6-25%)ED230V/50Hz/2,6A 2700 min-1
*P1=850W/S1=(6-25%)ED230V/50Hz/3,9A 2720min-1
125LS/LP 165LS/LP *190LS/LP
II II II
IP44 IP44 IP44
125L 150L 170L
75 dB(A) 75dB(A) 75dB(A)
58kg 58,5kg/65,5kg 61,5kg/68,5kg
114x72x134 122x79x135,5 122x79x143,5
106001/106002 106011/106012 106016/106017
RWTUW GS 03024 RWTUW GS 0324
24
Manutenzione.
La betoniera è stata concepita e fabbricata di modo che non richieda misure particolari di manutenzione. Non lubrificate
mai gli ingranaggi!!! Dovete rispettare le istruzioni relative al controllo del funzionamento della betoniera che sono
scritte nel libretto delle istruzioni relative alle norme di sicurezza e di funzionamento, d'utilizzo e di stoccaggio.Garantite
che il bicchiere della betoniera giri lentamente. Verificate che le viti siano strette.
Riparazioni
Staccate sempre la scheda della presa d'alimentazione prima di procedere alle riparazioni.
Mettere la betoniera fuori servizio staccando la scheda dalla presa di alimentazione. La betoniera non deve mai essere
messa in moto durante le riparazioni. Qualora fosse necessario togliere o mettere fuori servizio i dispositivi di sicurezza,
questi devono essere rimessi in servizio a lavori completati. Le riparazioni delle parti elettriche possono essere fate
soltanto dal fabbricante o da un riparatore autorizzato. Utilizzate solo parti di ricambio originali.
il motore non va
cause possibili
problema
assenza di corrente. Cavi d'allacciamento
difettosi. Termostato non collegato. Motore
sovraccaricato. I condotti d'aerazione chiusi o
considerevolmente ridotti. Corpo estraneo nel
condotto o deformazione meccanica del
condotto.
Guasti
rimedio:
controllare il fusibile. controllare il cavo . Lasciar
raffreddare il motore. controllare i condotti d'aria
(otturati o deformati).
il motore funziona ma il
bicchiere non gira
ruota d'ingranaggio bloccata. Cinghia non
abbastanza stretta. Rottura della cinghia.
Rottura del gancio sulla piccola ruota
d'ingranaggio. Rottura del gancio sulla
puleggia.
Condensatore difettoso.
Staccare la betoniera. Staccare la scheda della
presa d'alimentazione. Stringere la puleggia.
Controllare il gancio sulla piccola ruota
d'ingranaggio. Sostituire se necessario. Togliere
il coperchio del quadro motore. controllare il
gancio della puleggia. Procedere alla
sostituzione se necessario. Se il bicchiere non
gira ancora, rivolgersi ad un riparatore
Pezzi di ricambio
Bicchiere
Piccola ruota d'ingranaggio
Sostegno per motore 6003 (2rsr)
Motore elettrico
Quadro del motore elettrico
Pulegge
Cinghie
Gancio 6*40
Telaio del bicchiere
Telaio della betoniera
Appoggio con piede
Appoggio per ruote
Ruota
Sostegno tamburo 6003 (2rsr).
Struttura dell'impugnatura
Molla
Manico di plastica 25cm
Motore
Classe di protezione
Tipo di protezione
Volume
Livello di rumorosità (lpa)
Peso circa
Dimensioni a*b*c (cm)
Codice articolo
Certificato
Informazione Tecniche
dichiarazione di conformità. Haemmerlin sas certifica che la betoniera
125…. è conforme alla norma EN/60/204 di Luglio 1992, alla Direttiva Europea n°89/392/CEE del 14/16/89, modificata dalla direttiva
n°91/368/CEE del 22/07/93 ed alla Direttiva Europea 2000/14/CE

25
РУС
26
ВНИМАНИЕ!
Перед подключением агрегата изучите инструкцию.
ВНИМАНИЕ!
Перед вскрытием защитного кожуха отключите бетоносмеситель от источника
электрического тока. Не запускайте бетоносмеситель в работу, не убедившись, что
защитный кожух надежно закреплен винтами, поставляемыми для этого в комплекте.
ВНИМАНИЕ!
Прежде чем приступать к профилактическим и ремонтным работам, отключите
бетоносмеситель от источника электрического тока.
ВНИМАНИЕ!
Ни в коем случае не наносите смазку на рабочий венец бетоносмесителя.
Следует строго следовать данным предупреждениям, с тем чтобы продлить срок эксплуатации
изделия на долгие годы.
Перед запуском бетоносмесителя в работу внимательно изучите инструкцию по
работе изделия.
Убедитесь, что Вы правильно поняли все положения инструкций!
ЭКСПЛУАТАЦИЯ БЕТОНОСМЕСИТЕЛЯ
Данный бетоносмеситель предназначен для приготовления бетона и раствора в бытовых и
профессиональных целях.
Запрещается пользоваться бетоносмесителем в целях, отличных от тех, которые предусматривает данное
РУКОВОДСТВО. Запрещается использовать бетоносмеситель для смешивания взрывоопасных и
воспламеняющихся веществ, или ингредиентов пищевого назначения.
ОБРАЩАЕМ ВАШЕ ВНИМАНИЕ
ЧТО ПОЛЬЗОВАТЕЛЬ НЕСЕТ ПОЛНУЮ ОТВЕТСТВЕННОСТЬ ЗА ЛЮБЫЕ ПОСЛЕДСТВИЯ И УЩЕРБ,
ВЫЗВАННЫЕ ВСЛЕДСТВИЕ НЕСОБЛЮДЕНИЯ ДАННОЙ ИНСТРУКЦИИ ПО ИСПОЛЬЗОВАНИЮ
БЕТОНОСМЕСИТЕЛЯ И ЗАПРЕЩЕННОМУ ИСПОЛЬЗОВАНИЮ!!!
ОГРАНИЧЕНИЯ
Помимо предписаний настоящего руководства, указаний по использованию бетоносмесителя и описания конструкции, существует,
тем не менее, угроза здоровью пользователя в процессе эксплуатации бетоносмесителя.
Опасность замыкания электротока вследствие использования ненадлежащего подводящего кабеля.
Ущерб вследствие нахождения под электрической нагрузкой некоторых частей бетоносмесителя или целого
бетоносмесителя.
Опасность, которую представляют движущиеся части и механизмы двигателя или бака, особенно если защита венца
бака снята или повреждена умышленно или случайно. Указанные опасности могут быть сведены к минимуму, если
пользователь соблюдает «РАБОЧИЕ ИНСТРУКЦИИ», «ТЕХНИКУ БЕЗОПАСНОСТИ» и «ЭКСПЛУАТАЦИЮ
БЕТОНОСМЕСИТЕЛЯ».
ТЕХНИКА БЕЗОПАСНОСТИ
ОБРАТИТЕ ВНИМАНИЕ НА ДАННЫЕ ТРЕБОВАНИЯ, ИХ ИЗУЧЕНИЕ И СОБЛЮДЕНИЕ
ЯВЛЯЮТСЯ НАДЕЖНОЙ ГАРАНТИЕЙ ВАШЕЙ БЕЗОПАСНОСТИ И БЕЗОПАСНОСТИ
ДРУГИХ ЛИЦ.
Соблюдайте инструкции и правила техники безопасности в РАБОЧЕЙ ЗОНЕ бетоносмесителя.
В процессе работы с цементом или смесью исключайте возникновение чрезмерного запыления.
Пользуйтесь средствами защиты (рабочая одежда, перчатки, очки и респиратор) во время
наполнения и разгрузки бака.
Устанавливайте бетоносмеситель только на горизонтальную и ровную рабочую поверхность. Рабочая зона в пределах
бетоносмесителя должна быть очищена, с тем чтобы исключить падение пользователя или других лиц на
бетоносмеситель. Необходимо обеспечить рабочую зону вокруг бетоносмесителя достаточным количеством света.
Запрещается нахождение в пределах работающего бетоносмесителя посторонних лиц. Запрещается пользоваться
бетоносмесителем лицам моложе 16 лет. Бетоносмеситель может подвергаться использованию, если он выполняет
требования, описанные выше в пункте «ЭКСПЛУАТАЦИЯ БЕТОНОСМЕСИТЕЛЯ». Не вносите изменения в конструкцию
бетоносмесителя и его частей. Бракованные или поврежденные части должны быть заменены оригинальными частями.
Бетоносмесителем можно пользоваться только в том случае, если исправны все защитные части механических и
электрических схем. Все предостережения об опасности и предупреждения о соблюдении техники безопасности,
нанесенные на корпус бетоносмесителя, должны быть сохранены и хорошо видимы.
Запрещается дотрагиваться до бака в состоянии вращения и засовывать какой-
либо инструмент внутрь подвижного бака!
ПОДВИЖНЫЕ ЧАСТИ!
Заполняйте или выгружайте бак, только когда он находится в состоянии вращения (при
рабочем двигателе). Следите за направлением вращения бака. СМОТРИТЕ ОБОЗНАЧЕНИЕ на
баке!
Бетоносмеситель не предназначен для непосредственной транспортировки по дороге или
прицепом. Он может перевозиться только внутри транспортного средства. На строительной площадке он
может быть перемещен только вручную.
ВНИМАНИЕ! ОПАСНОСТЬ!
УДОСТОВЕРЬТЕСЬ, ЧТО ВЫ ОТСОЕДИНИЛИ ЭЛЕКТРИЧЕСКИЙ КАБЕЛЬ:
- - при перемещении и транспортировке,
- перед чисткой, техобслуживанием или ремонтом,
- перед открытием кожуха электродвигателя.
ВНИМАНИЕ!
Класс электрической безопасности II действителен, если только при ремонте
используются оригинальные запчасти, и сохранены начальные дистанции при
изоляции.
Благодаря своему классу изоляции бетоносмеситель может быть подключен к обычной бытовой розетке. На
строительной площадке нет надобности применять специальную розетку, достаточно бытовой розетки (230В) с
плавким предохранителем в 10А. Бетоносмеситель допускается эксплуатировать, только если группа
электродвигателя и его элементы собраны в соответствии с инструкцией по сборке. Класс электрической
безопасности действителен в случае, если при ремонте используются оригинальные запчасти, и сохранены
изначальные дистанции в изоляции.
ЭЛЕКТРИЧЕСКАЯ БЕЗОПАСНОСТЬ
ОПАСНОСТЬ ДЛЯ ЖИЗНИ ПРИ НЕСОБЛЮДЕНИИ ДАННЫХ ТРЕБОВАНИЙ!
Подводной кабель должен соответствовать европейским требованиям IEC245-4 1980 (DIN 57 282) и иметь
обозначение H07 RN-F, или аналогичное ему. Сечение электрических жил должно быть по меньшей мере 3 х 1,5
мм. Это сечение достаточно для рабочего кабеля длиной до 25 м. Кабель должен быть защищен от
механического повреждения, а изоляция полностью исключать попадание влаги внутрь него. Кабель должен
проходить проверку на соответствие данным требованиям перед каждым включением бетоносмесителя.
Поврежденный или несоответствующий кабель не должен быть использован ни в коем случае. При
подсоединении кабеля убедитесь, что он нигде не защемлен или не перекручен. С тем чтобы избежать короткого
замыкания, проверьте чистоту контактов и отсутствие посторонних предметов между ними. Не пользуйтесь
самодельными розетками или штепселями. Никогда не отключайте и не снимайте защиту. Ремонт оборудования
электрического подсоединения может производить только профессиональный электрик с соответствующей
квалификацией. Ремонт электрических частей может производить только производитель или
специализированный технолог.
Вы только что приобрели бетоносмеситель ЭММЕРЛЕН. ЭММЕРЛЕН гарантирует качество своих изделий,
изготовленных в строгом соответствии с технологией, жесткими стандартами производства, монтажа и
контроля. Конструкция наших бетоносмесителей соответствует строгим европейским требованиям.
Уважаемый покупатель,
РУС
ЛЕГЕНДА

27 28
ПОДКЛЮЧЕНИЕ
ИЗУЧИТЕ ВСЕ ПРАВИЛА ТЕХНИКИ БЕЗОПАСНОСТИ
УСТАНОВКИ БЕТОНОСМЕСИТЕЛЯ
Для монтажа бетоносмесителя пользуйтесь инструкцией по сборке. Установите бетоносмеситель на ровную
горизонтальную устойчивую поверхность. Опасное проскальзывание бетоносмесителя из-за чрезмерного угла
наклона поверхности может привести к его опрокидыванию. Убедитесь в устойчивости бетоносмесителя. Во
время запуска бетоносмесителя, следите за тем, чтобы загрузочный бак случайно не опорожнился.
ПОДКЛЮЧЕНИЕ И ОТКЛЮЧЕНИЕ БЕТОНОСМЕСИТЕЛЯ
ПОМНИТЕ ОБ ЭТОМ!
Вам необходимо самим тщательно следить за соблюдением правил техники безопасности и правильной
сборкой бетоносмесителя. Следует удостовериться, что Вы изучили и запомнили все правила техники
безопасности. Выключатель бетоносмесителя находится на том же корпусе, что и розетка. Он установлен на
корпусе, под которым находится электродвигатель. Выключатель защищен от попадания внутрь него брызг
воды. В случае возникновения короткого замыкания двигатель бетоносмесителя остановится автоматически.
Для того чтобы снова запустить двигателя, нажмите на кнопку выключателя.
ЗАЩИТА ДВИГАТЕЛЯ
В случае перегрузки двигателя сработает реле защиты от перегрева. Прежде чем снова запустить двигатель,
необходимо дождаться охлаждения двигателя.
РАБОТА БЕТОНОСМЕСИТЕЛЯ
Для приготовления бетона или раствора бак должен
быть приведен в соответствующее положение.
Только эти рабочие позиции могут обеспечить
оптимальное качество замеса и нормальную работу
бетоносмесителя.
Механизм наклона с рычагом
стопора и наклона.
ЗАПРЕЩАЕТСЯ ЗАПУСКАТЬ БЕТОНОСМЕСИТЕЛЬ С ПОЛНЫМ БАКОМ
ПРЕЖДЕ ЧЕМ ЗАПУСТИТЬ ДВИГАТЕЛЬ, ПРОВЕРЬТЕ БАК НА СОСТОЯНИЕ ЗАПОЛНЕНИЯ.
ЕСЛИ НЕОБХОДИМО, ВЫГРУЗИТЕ БАК. НАКЛОНИТЕ БАК В ПОЛОЖЕНИЕ ВЫГРУЗА,
ЗАТЕМ ЗАПУСТИТЕ ДВИГАТЕЛЬ, С ТЕМ ЧТОБЫ ПРИВЕСТИ БАК В СОСТОЯНИЕ
ВРАЩЕНИЯ.
ХОРОШО УДЕРЖИВАЙТЕ РУЛЬ ВО ВРЕМЯ НАКЛОНА.
1.Потяните руль на себя, чтобы снять поворотное устройство бака со стопора.
2.Выберите одну из позиций замеса (бетон или раствор), повернув руль.
ПОЗИЦИИ НА ПОВОРОТНОМ ДИСКЕ
1. раствор
2. бетон
3. опорожнение
4. транспортировка
ДОПОЛНИТЕЛЬНЫЕ ОГРАНИЧЕНИЯ ПО БЕЗОПАСНОСТИ
Наполняйте и выгружайте бак бетоносмесителя только при запущенном двигателе и вращающемся
баке. Следите за устойчивостью бетоносмесителя.
Процедура приготовления бетона и раствора
1. Налейте воды и засыпьте базовые ингредиенты (щебень, песок)
2. Добавьте связующие ингредиенты (цемент, известь)
3. Повторите операции 1 и 2 до получения оптимального состава
4. Производите замес до получения однородной массы.
Обратитесь к специалистам в области строительства, с тем чтобы получить точные пропорции базовых и
связующих ингредиентов, а также необходимого количества воды для получения качественного замеса.
ВЫГРУЗКА БАКА БЕТОНОСМЕСИТЕЛЯ
ХОРОШО УДЕРЖИВАЙТЕ РУЛЬ ВО ВРЕМЯ НАКЛОНА БАКА
1. Отпустите стопор бака, потянув руль на себя.
2. Медленно наклоняйте бак при помощи руля.
3. Установите бак в положение выгрузки, не допуская при этом резкого опрокидывания
4. Повторите процедуру выгрузки
ТРАНСПОРТИРОВКА
Прежде чем производить транспортировку, обесточьте бетоносмеситель.
ХРАНЕНИЕ
Вы должны соблюдать данные правила, чтобы продлить срок работы Вашего
бетоносмесителя и обеспечить его надежную работу в будущем. После чистки Вы
должны обязательно привести бак в положение 4 (см. пункт «РАБОТА
БЕТОНОСМЕСИТЕЛЯ»). Храните бетоносмеситель в сухом, проветриваемом месте.
Если Вы не намереваетесь пользоваться бетоносмесителем в ближайшее время,
ослабьте приводящий ремень (ремень двигателя). Для ослабления ремня, ослабьте
винты, соединяющие моторную группу со станиной, и слегка приподнимите (на 2 см)
моторную группу. Таким образом, Вы продлите срок службы бетоносмесителя. Не
тяните моторную группу вверх с чрезмерным усилием, иначе ремень сожжет выпасть.
Натяжение приводящего ремня представляет собой обратный процесс. Ослабьте
винты, которые удерживают моторную группу. Приложите небольшое усилие книзу на
моторную группу. Затяните винты. Убедитесь, что бак стал поворачиваться с большим
усилием. В этом случае ремень имеет достаточное натяжение. Если бак
проворачивается без усилия, это означает, что ремень соскочил со шкива. Для его
установки Вам необходимо снять крышку моторной группы и надеть ремень.
Убедитесь, что ремень находится на приводе электродвигателя. В противном случае
ремень соскочит при работающем двигателе и может быть поврежден. При этом срок
службы ремня, даже если и не разорвется, существенно сократится (см. правила
безопасности, указанные в символах, при открытии корпуса моторной группы).
ЧИСТКА
ДОПОЛНИТЕЛЬНЫЕ ПРЕДУПРЕЖДЕНИЯ О СОБЛЮДЕНИИ БЕЗОПАСНОСТИ
Прежде чем производить какую-либо чистку бетоносмесителя, отключите
его от источника тока
Запрещается производить чистку бетоносмесителя, особенно его промывку,
при снятой крышке корпуса двигателя.
Прежде чем производить чистку бетоносмесителя руками или с помощью инструмента, остановите
бетоносмеситель, нажав на выключатель, и отсоедините штепсель от розетки. Не запускайте
бетоносмеситель в работу во время его чистки. Не подвергайте корпус двигателя (двигатель) и выключатель
прямому попаданию воды. Это также касается отверстий охлаждения двигателя на корпусе моторной группы.
ЧИСТКА
При помощи руля наклоните бак в положение 3. Чистку необходимо производить после каждого пользования
бетоносмесителем. Для чистки внутренней поверхности бака пользуйтесь шпателем и металлической щеткой, а
также водой для смыва свободных частиц. Бетон или цемент, попавший на части приводящего механизма,
следует незамедлительно удалить.
РУС РУС

1.
2.
3.
4.
5.
6.
7.
8.
9.
10.
01
01
02
01
01
01
01
02
01
01
11.
12.
13.
14.
15.
16.
17.
01
01
02
02
01
01
01
29
P1=700W/S1=(6-25%)ED230V/50Hz/2,6A 2700 min-1
*P1=850W/S1=(6-25%)ED230V/50Hz/3,9A 2720min-1
125LS/LP 165LS/LP *190LS/LP
II II II
IP44 IP44 IP44
125л 150л 170л
75 дБ(A) 75дБ(A) 75дБ(A)
58 кг 58,5кг/65,5кг 61,5кг/68,5кг
114x72x134 122x79x135,5 122x79x143,5
106001/106002 106011/106012 106016/106017
RWTUW GS 03024 RWTUW GS 0324
УХОД
Конструкция бетоносмесителя изготовлена таким образом, что не требует особого ухода. НИКОГДА НЕ
СМАЗЫВАЙТЕ ПРИВОДЯЩИЕ ШЕСТЕРНИ! Вы должны соблюдать ИНСТРУКЦИИ в отношении контроля
работы бетоносмесителя, которые приведены в ИНСТРУКЦИЯХ по технике безопасности, работе
бетоносмесителя, эксплуатации и хранению. Следите, чтобы бак бетоносмесителя вращался медленно.
Проверяйте надежность крепления всех болтов.
РЕМОНТ
Прежде чем приступать к ремонту, убедитесь, что подводящий
электропровод отсоединен от розетки.
Отсоедините электрический провод бетоносмесителя от розетки. Запрещается включать бетоносмеситель во
время проведения ремонтных работ. Если во время ремонтных работ была необходимость отключения средств
защиты, то по их окончанию все защитные средства должны быть снова установлены в полном объеме. Ремонт
электрических частей может проводиться только производителей или сервисным центром, одобренным
производителем. Используйте для замены только оригинальные запчасти.
СБОИ В РАБОТЕ
Сбой Возможные причины Устранение
Двигатель не работает
Двигатель работает
(слышен гул), но бак не
крутится.
Нет питания.
Неисправен подводящий кабель.
Не подключен термостат.
Перегрев двигателя.
Полностью или частично забиты вентиляционные
отверстия на корпусе моторной группы.
Инородное тело в приводящем механизме или
поврежден приводящий механизм.
Проверьте плавкий предохранитель.
Проверьте кабель (для экспертов).
Охладите двигатель.
Проверьте вентиляционные отверстия на
корпусе моторной группы.
Заблокирована ведущая шестерня.
Недостаточное натяжение приводящего
ремня.
Обрыв ремня.
Обрыв пластикового шплинта на шестерне
мотора.
Обрыв пластикового шплинта на шкиве.
Неисправен конденсатор.
Выключите бетоносмеситель. Отсоедините
бетоносмеситель от источника питания.
Зажмите шплинт шкива. Проверьте шплинт
шестерни двигателя. Произведите замену,
если необходимо. Снимите крышку моторной
группы. Проверьте ремень и шплинт шкива.
Замените неисправные части. Если бак не
вращается, обратитесь в сервисный центр
(неисправен конденсатор).
ЗАПАСНЫЕ ЧАСТИ
ТЕХНИЧЕСКАЯ ИНФОРМАЦИЯ
РУС
Бак
Шестерня двигателя
Держатель двигателя 6003 (2RSR)
Электродвигатель
Крышка моторной группы
Шкив
Приводной ремень
Шплинт ø6х40
Рама бака
Рама бетоносмесителя
Держатель с ногой
Держатель для колес
Колесо
Держатель бака 6003 (2RSR)
Рулевая группа
Пружина
Пластиковая ручка 25 см
Двигатель
Тип
Класс защиты
Тип защиты
Объем
Уровень шума
Вес
Размеры длина L x B x H
Артикул
Сертификат
СЕ
Декларация соответствия
ЭММЕРЛЕН подтверждает, что бетоносмесители
ЕСМ 125 СP/CF - 165 CP/CF - 190 CP/CF
соответствуют стандарту EN/60/204 от июля 1992 год, Европейской Директиве N
89/392/CEE от 14.16.89 ??, которая изменена Директивами N 91/368/CEE от 20.06.91,
93/44/CEE от 14.06.93 и 93/68/CEE от 22.07.93, а также Европейской Директиве
2000/14/CE.
РУС
This manual suits for next models
5
Table of contents
Languages:
Other HAEMMERLIN Tools manuals