EN 14
Product main functions and useful tips
Symbol Description Suggestions
Multi-level
Preset: 165°C
Range: 50-230°C
IDEAL FOR: pastries, biscuits, cakes, stued and braised.
Use this function to cook dierent foods at the same time on one or
more shelf positions. Heat is distributed better and penetrates food
better, reducing both preheating and cooking times. Aromas are not
mixed. Allow about 10 minutes extra when cooking dierent foods
together.
Eco Multilevel
Preset: 165°C
Range: 50-230°C
This mode is intended to save energy. Ideal for frozen or precooked
food, and small portions-meals. The preheat time is very short and
cooking tends to be slower. It is not recommended for heavy loads
e.g. large portions or big meal preparation.
Grill
Preset: 230°C
Range: 50-230°C
IDEAL FOR: grilled meat, sh, vegetables.
This function uses only the top heating element, and the grill level
can be adjusted.Use with the door closed.Place white meats at a
distance from the grill.
Multi-level + Grill
Preset: 210°C
Range: 50-230°C
IDEAL FOR: gratin and crispy food.
This functions combines the benets of multi-level cooking, with its
capability to evenly cooking multi-layer recipes and thick pieces of
food, and grill, to gently crisp the external surface
Grill + Fan
Preset: 165°C
Range: 50-230°C
IDEAL FOR: whole pieces of meat (roasts).
The top heating element is used with the fan circulating the air insi-
de the oven. Ideal for cooking thick food items, whole pieces such as
roast pork, poultry, etc.
• Turn the food over halfway through cooking.
WARNINGS:
• Make sure that the food is not too close to the grill.
• Preheating is necessary for red meats but not for white meats.
OVEN COOKING
Symbol Description Suggestions
Steam Pure
Preset: 100°C
Range:40-100°C
By way of radial ventilation, the steam is distributed to ensure the food
is evenly heated and cooked. This holds the advantage of being able
to cook on the three dierent levels at the same time, taking care to
insert the more “full-bodied” food on the higher level, and less dense
foods such as vegetables on the lower levels (from the rst to the third).
NOTE: During steam cooking, always place the lower stainless steel
tray underneath the perforated cooking container, to collect any food
scraps or condensate that may eventually fall.
Steam Warm
Preset: 130°C
Range: 70-130°C
During regeneration, the cooking chamber is heated with steam
and warm air, which allows rapid and consistent heating of the food
without drying it. Based on the type of food being reheated, this pro-
gramme oers the possibility to modify the temperature inside the
oven so as to manage this function as you please. This type of func-
tion is therefore particularly suitable for:
• Heating pre-cooked food from 70°C to 130°C;
• Preparing ready and semi-ready meals, frozen foods from 70°C
to 130°C
NOTE: For these types of meals, remember to insert suitable dishes
in the oven (not made from synthetic or similar materials) and to posi-
tion them above the grill, making sure to remove any lids.
Steam Crisper
Preset: 165°C
Range: 50-230°C
This type of cooking is called “professional cooking” because the food
being cooked is placed into a cold chamber that has not been preheated.
After starting the oven, the food is initially exposed to steam (or
“steamed”). After a short period of exposure to the steam, depending
on the lling volume and therefore on the size of the food being cooked,
the appliance automatically moves on to the second warm air phase.
This type of function is particularly suited to large meat and seafood
dishes for example; large sized bread loaves made from white or whole-
meal our, with yeast or yeast dough at 190°C until 210°C, as well as lled
and hollow pu pastry, whether fresh or frozen from 190°C to 210°C.
NOTE: For best results when running two consecutive “professional
cooking” programmes, the oven must be cooled before inserting the
second dish.
STEAM COOKING
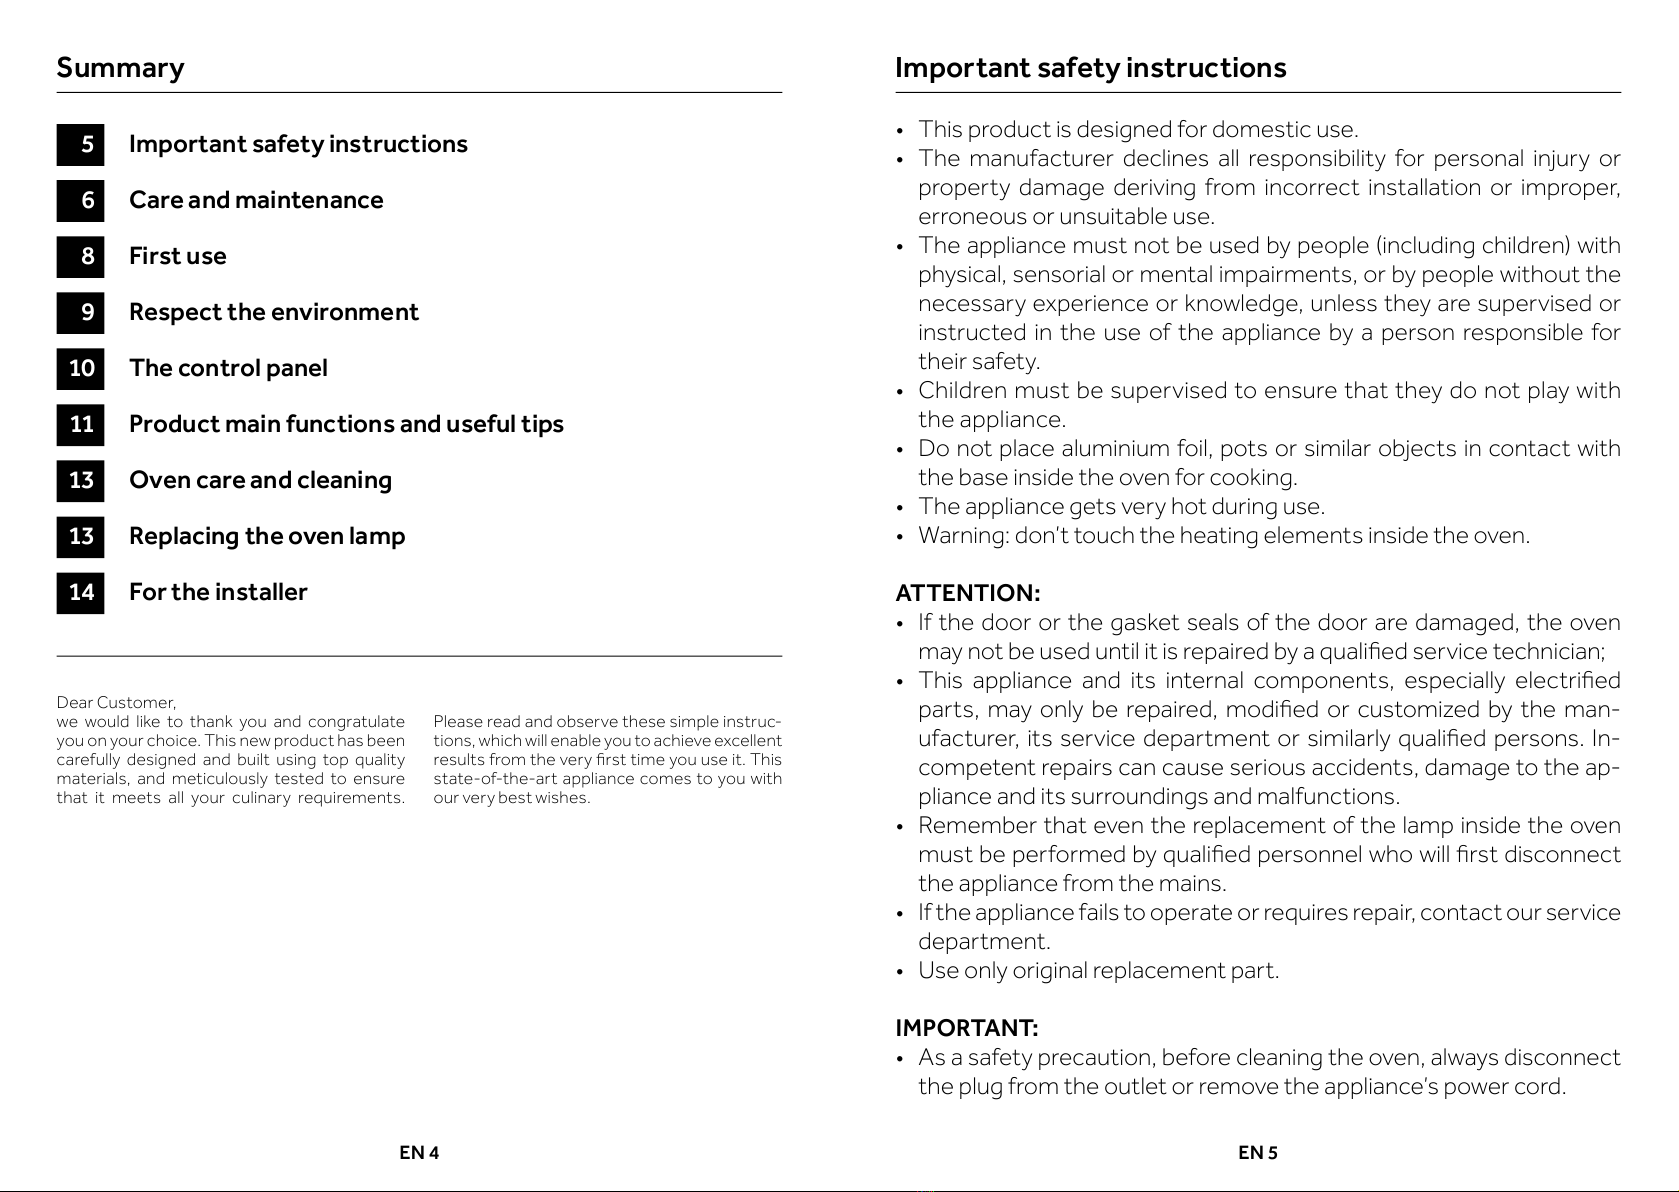
USEFUL TIPS
When using the steam oven, always start with
the oven cold. Using steam in a hot oven (im-
mediately after traditional cooking) is not rec-
ommended because the benets of cooking
with steam will be cancelled out.
For steam cooking try to use the perforated
stainless steel tray together with the lower
stainless steel drip tray as much as possible.
The rst, resting with its support on the at
grill, allows the steam to fully cook the food
while draining everything released by the food
during cooking through the holes.
The second, lower tray, slid under the grill on its
guides, will collect the drippings and keep the
oven chamber cleaner.
When done cooking, the support of the perfo-
rated tray can be used as a support to keep the
hot tray o of the counter while you remove
the food you just cooked.
ATTENTION: Before using any steam func-
tions, the water container must be lled.
NOTE: The steam functions will not start un-
til the door is closed. If the door is open, the
message CLOSE THE DOOR will be shown on
the display.
EN 15
Product main functions and useful tips
Symbol Description Suggestions
Multi-level
Preset: 165°C
Range: 50-230°C
IDEAL FOR: pastries, biscuits, cakes, stued and braised.
Use this function to cook dierent foods at the same time on one or
more shelf positions. Heat is distributed better and penetrates food
better, reducing both preheating and cooking times. Aromas are not
mixed. Allow about 10 minutes extra when cooking dierent foods
together.
Eco Multilevel
Preset: 165°C
Range: 50-230°C
This mode is intended to save energy. Ideal for frozen or precooked
food, and small portions-meals. The preheat time is very short and
cooking tends to be slower. It is not recommended for heavy loads
e.g. large portions or big meal preparation.
Grill
Preset: 230°C
Range: 50-230°C
IDEAL FOR: grilled meat, sh, vegetables.
This function uses only the top heating element, and the grill level
can be adjusted.Use with the door closed.Place white meats at a
distance from the grill.
Multi-level + Grill
Preset: 210°C
Range: 50-230°C
IDEAL FOR: gratin and crispy food.
This functions combines the benets of multi-level cooking, with its
capability to evenly cooking multi-layer recipes and thick pieces of
food, and grill, to gently crisp the external surface
Grill + Fan
Preset: 165°C
Range: 50-230°C
IDEAL FOR: whole pieces of meat (roasts).
The top heating element is used with the fan circulating the air insi-
de the oven. Ideal for cooking thick food items, whole pieces such as
roast pork, poultry, etc.
• Turn the food over halfway through cooking.
WARNINGS:
• Make sure that the food is not too close to the grill.
• Preheating is necessary for red meats but not for white meats.
OVEN COOKING
Symbol Description Suggestions
Steam Pure
Preset: 100°C
Range:40-100°C
By way of radial ventilation, the steam is distributed to ensure the food
is evenly heated and cooked. This holds the advantage of being able
to cook on the three dierent levels at the same time, taking care to
insert the more “full-bodied” food on the higher level, and less dense
foods such as vegetables on the lower levels (from the rst to the third).
NOTE: During steam cooking, always place the lower stainless steel
tray underneath the perforated cooking container, to collect any food
scraps or condensate that may eventually fall.
Steam Warm
Preset: 130°C
Range: 70-130°C
During regeneration, the cooking chamber is heated with steam
and warm air, which allows rapid and consistent heating of the food
without drying it. Based on the type of food being reheated, this pro-
gramme oers the possibility to modify the temperature inside the
oven so as to manage this function as you please. This type of func-
tion is therefore particularly suitable for:
• Heating pre-cooked food from 70°C to 130°C;
• Preparing ready and semi-ready meals, frozen foods from 70°C
to 130°C
NOTE: For these types of meals, remember to insert suitable dishes
in the oven (not made from synthetic or similar materials) and to posi-
tion them above the grill, making sure to remove any lids.
Steam Crisper
Preset: 165°C
Range: 50-230°C
This type of cooking is called “professional cooking” because the food
being cooked is placed into a cold chamber that has not been preheated.
After starting the oven, the food is initially exposed to steam (or
“steamed”). After a short period of exposure to the steam, depending
on the lling volume and therefore on the size of the food being cooked,
the appliance automatically moves on to the second warm air phase.
This type of function is particularly suited to large meat and seafood
dishes for example; large sized bread loaves made from white or whole-
meal our, with yeast or yeast dough at 190°C until 210°C, as well as lled
and hollow pu pastry, whether fresh or frozen from 190°C to 210°C.
NOTE: For best results when running two consecutive “professional
cooking” programmes, the oven must be cooled before inserting the
second dish.
STEAM COOKING
USEFUL TIPS
When using the steam oven, always start with
the oven cold. Using steam in a hot oven (im-
mediately after traditional cooking) is not rec-
ommended because the benets of cooking
with steam will be cancelled out.
For steam cooking try to use the perforated
stainless steel tray together with the lower
stainless steel drip tray as much as possible.
The rst, resting with its support on the at
grill, allows the steam to fully cook the food
while draining everything released by the food
during cooking through the holes.
The second, lower tray, slid under the grill on its
guides, will collect the drippings and keep the
oven chamber cleaner.
When done cooking, the support of the perfo-
rated tray can be used as a support to keep the
hot tray o of the counter while you remove
the food you just cooked.
ATTENTION: Before using any steam func-
tions, the water container must be lled.
NOTE: The steam functions will not start un-
til the door is closed. If the door is open, the
message CLOSE THE DOOR will be shown on
the display.