Haier 1509-A User manual

USER'S MANUAL
LCD TV RECEIVER
Please read thismanual carefully before
using your televisionand keep thismanual
In a goodplace for futurereference.
MODEL:
L1509-A, L15A09A, L1510A-A,
L15A10A, L1709-A, L17A09A,
L1909-A, L19A09A, L1910A-A,
L19A10A, L1510B-A, L15A10B,
L1910B-A, L19A10B, L1911W-A,
L19A11W, L2011W-A, L20A11W
L2009-1,L20A09A


To users:
Thank you for using our LCD-TV.
Before connecting the LCD-TV and turning the power on, please
read this book carefully. Please keep this book for later use. When it
was loss of function by electrostatic shock, please switch the on/off
button for restoring the function.
CONTENT
Safety Notice Items...................................................................................
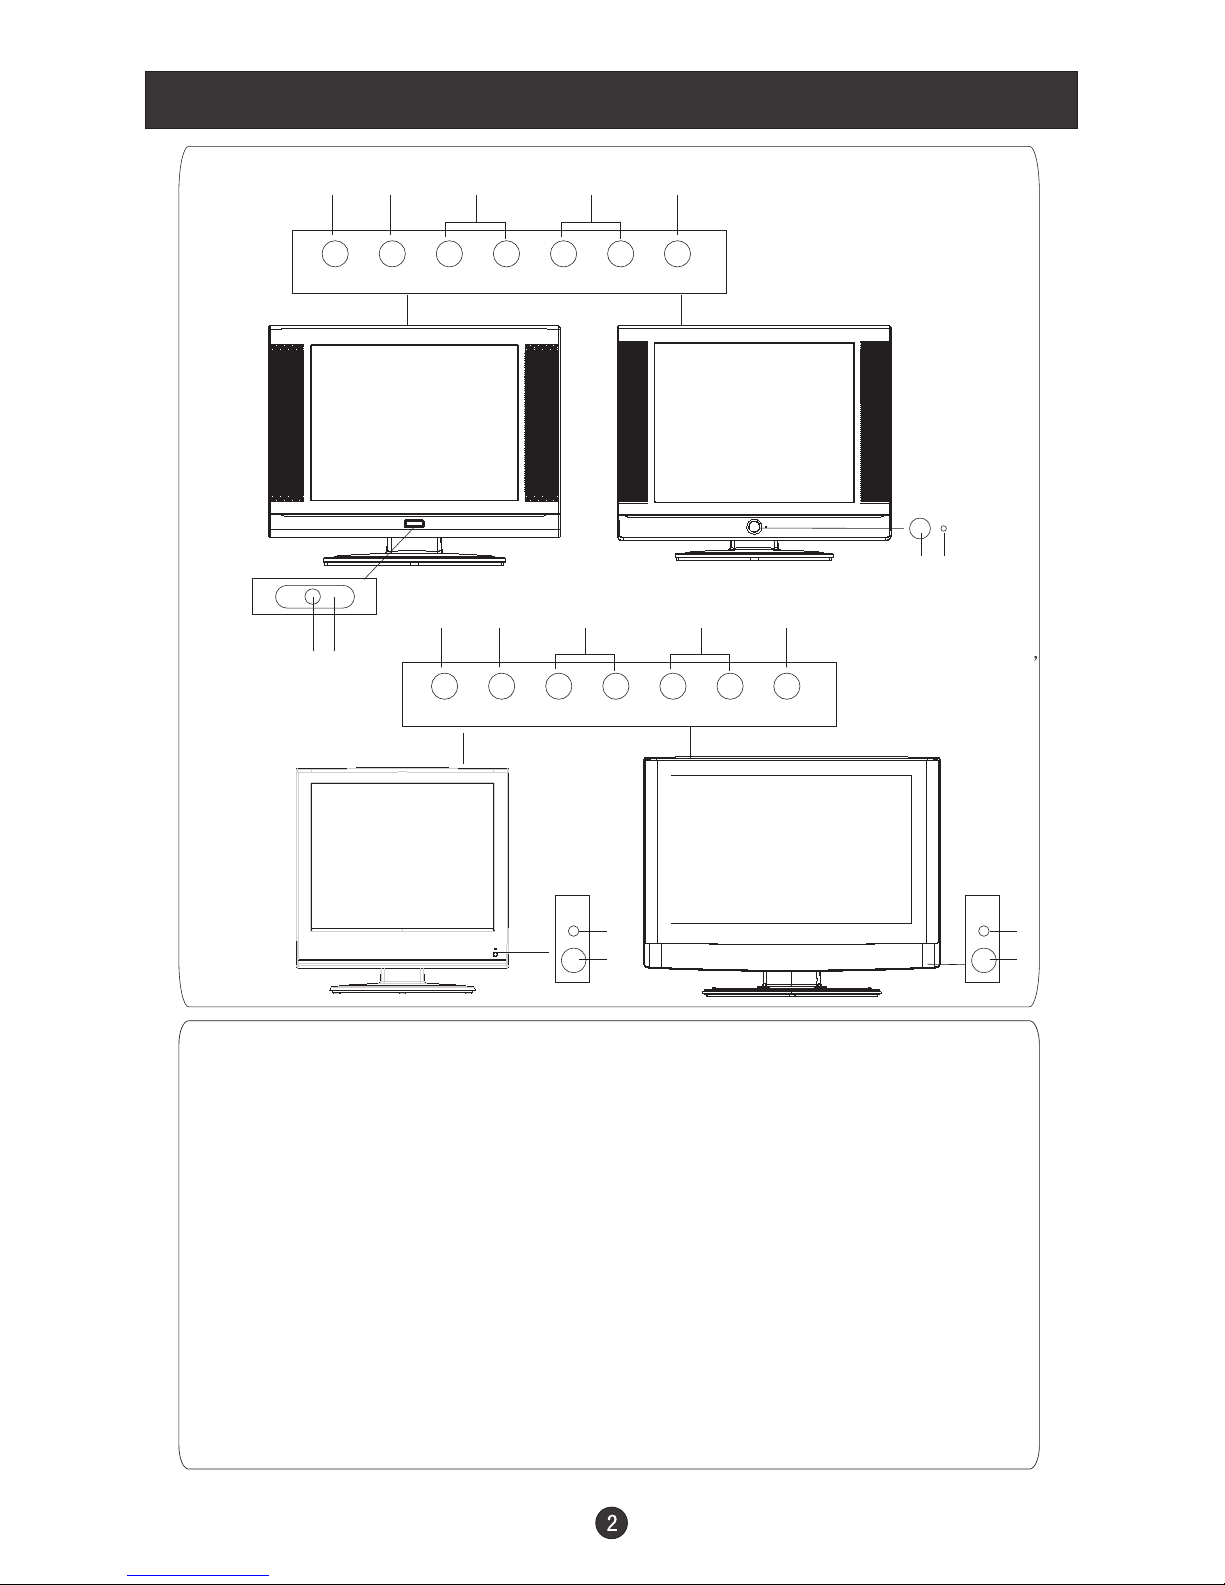
Front Panel Controls..................................................................................
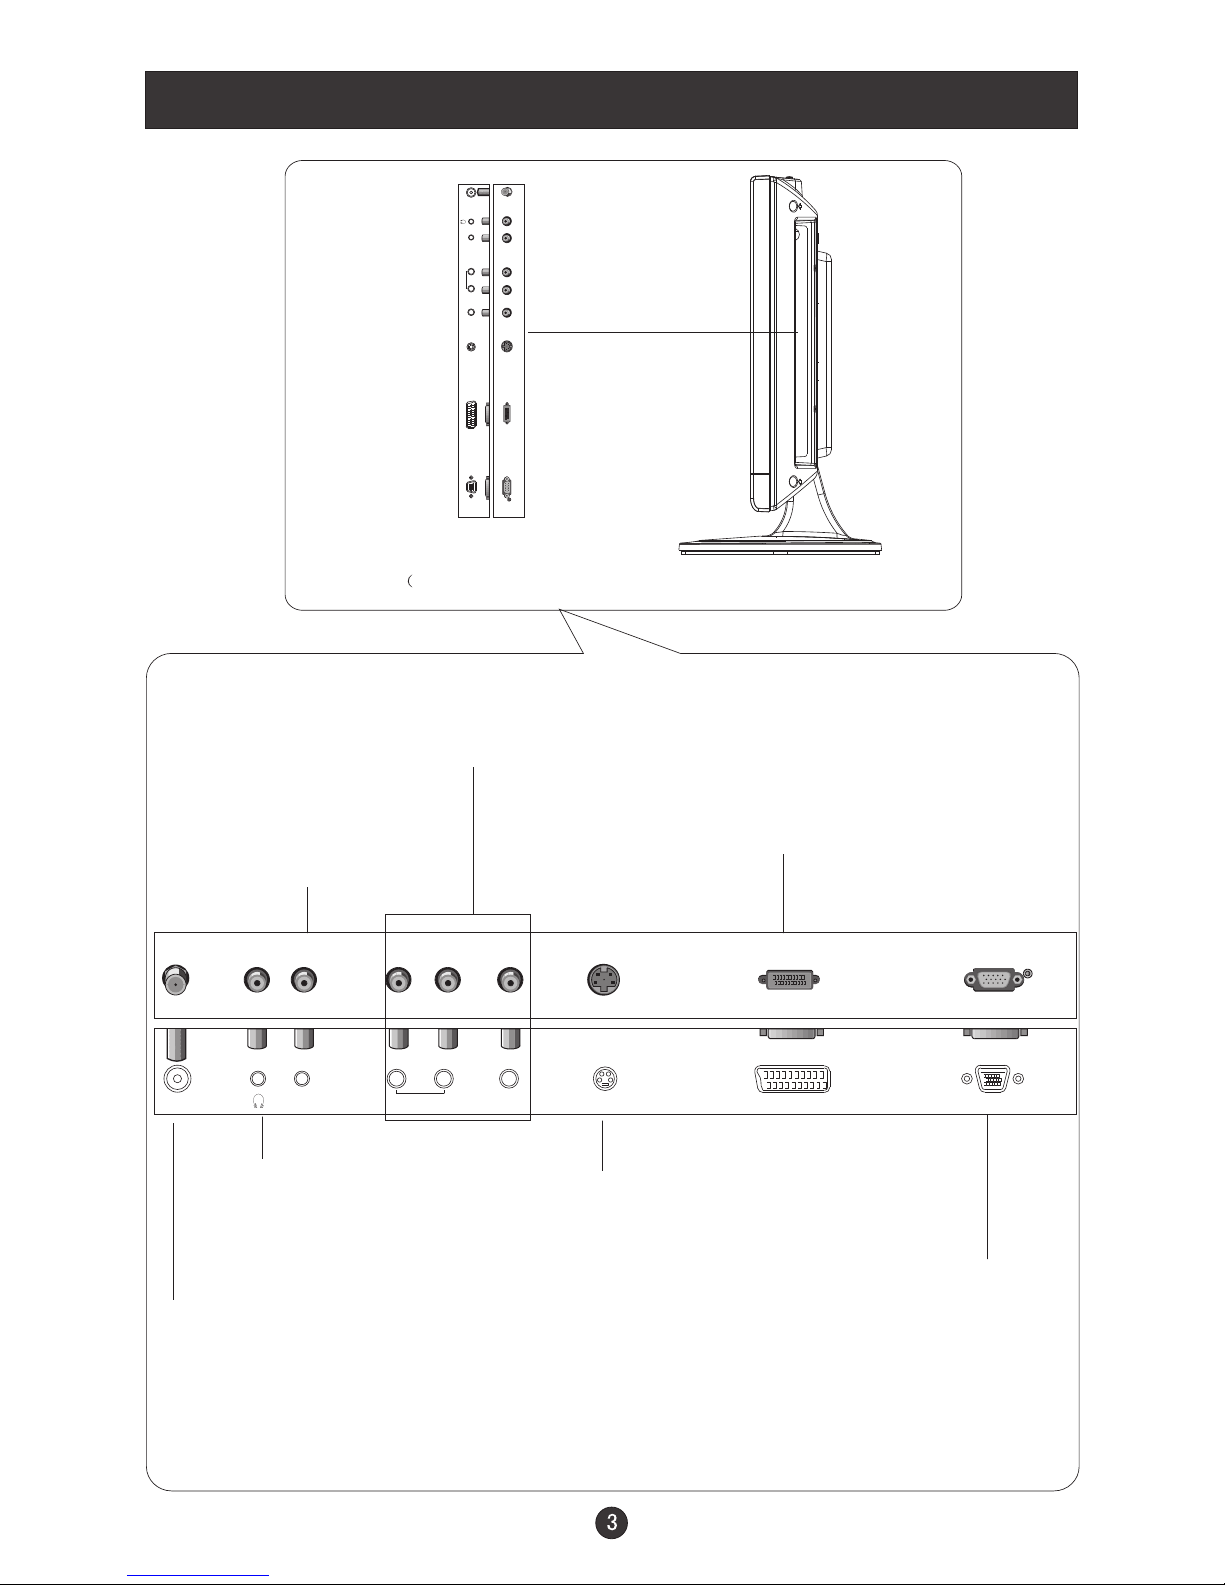
Connection Options...................................................................................
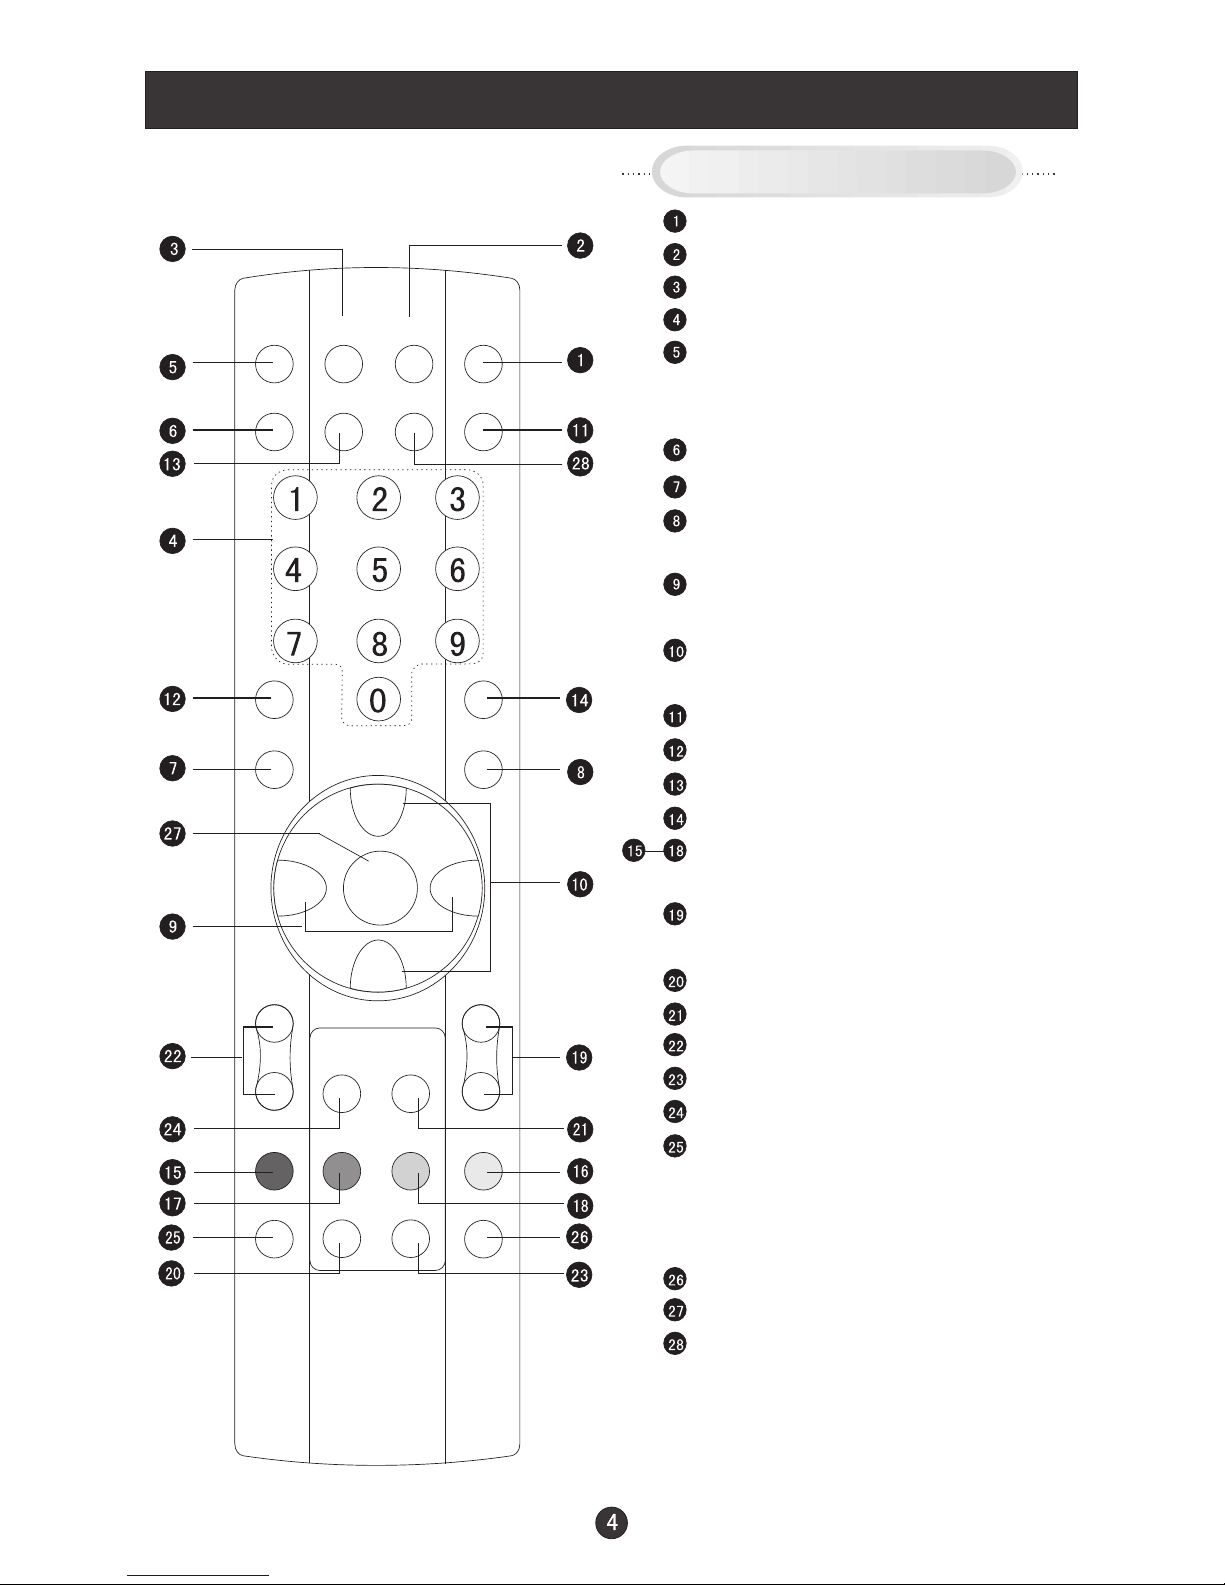
Remote Control Key Functions...................................................................
Remote Control ..................................................................................
Installing Batteries..................................................................................
Connection Instructions.............................................................................
Grounding..............................................................................................
External equipment Connections..............................................................
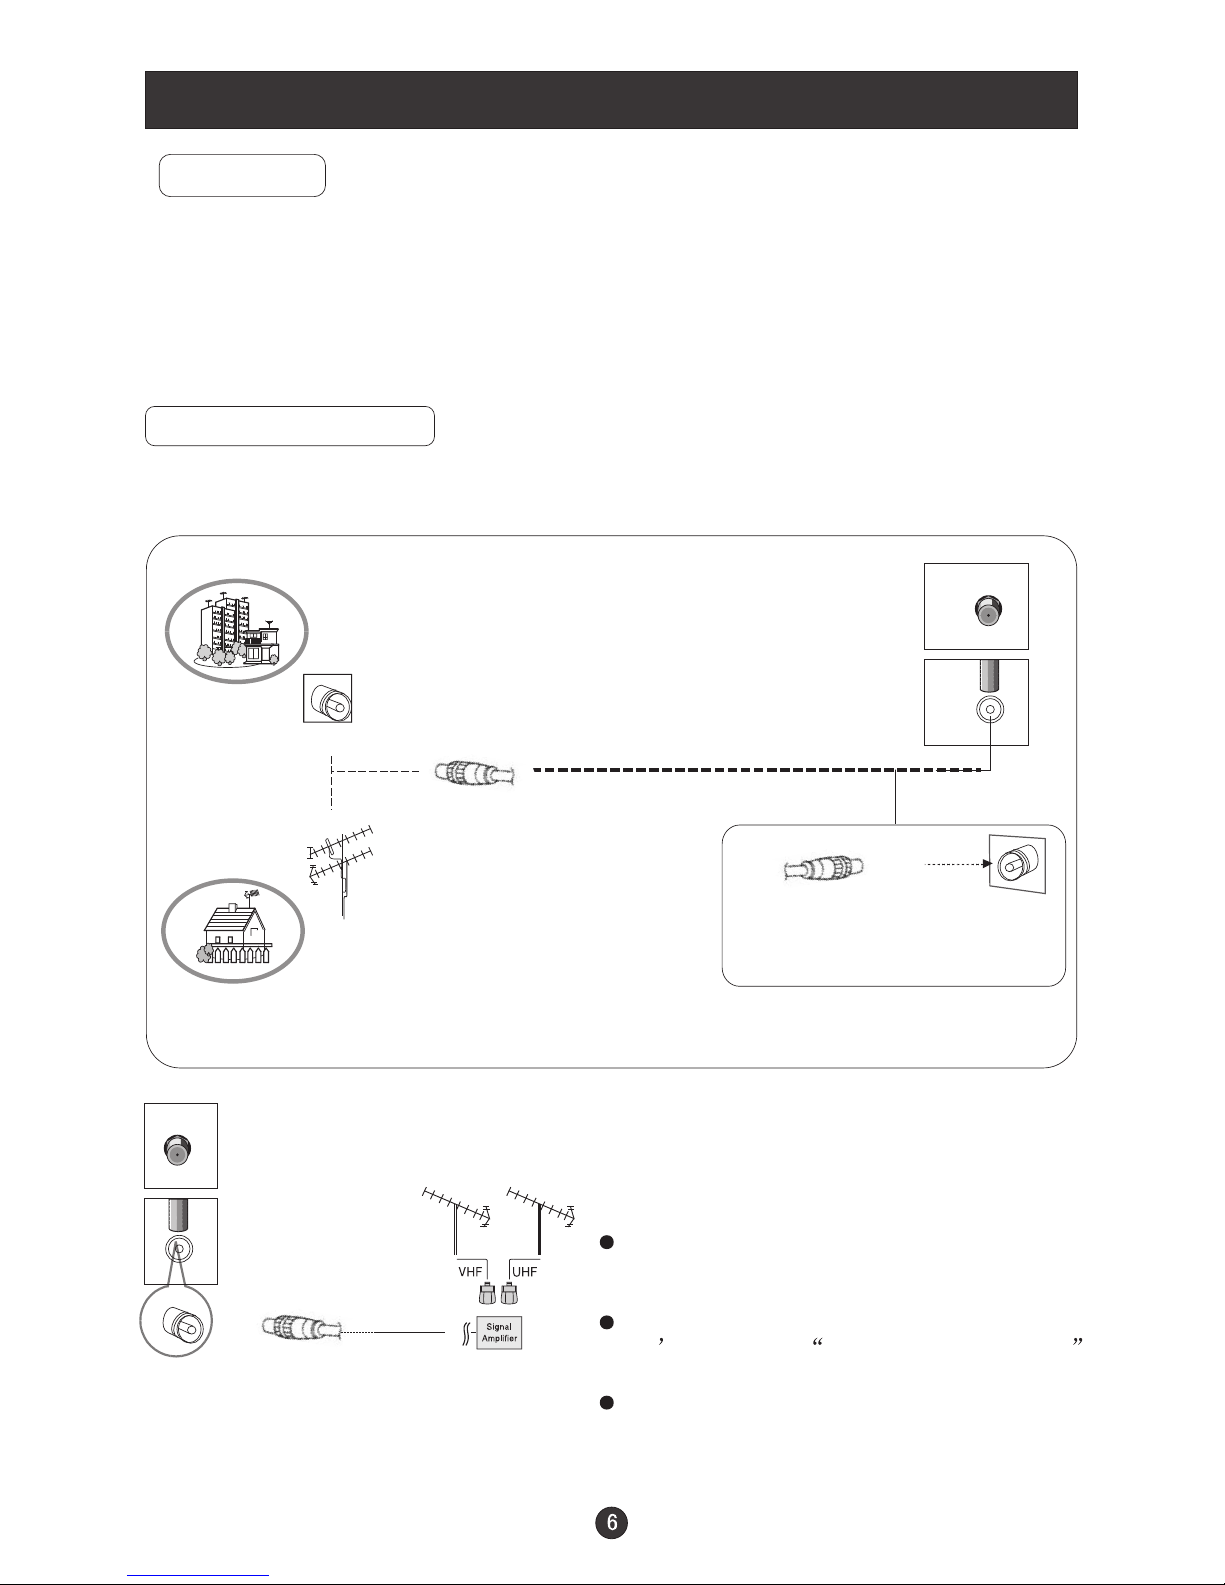
Antenna Connection.............................................................................
PC Setup.............................................................................................
VCR Setup...........................................................................................
Cable TV Setup....................................................................................
External AV Source Setup......................................................................
Basic Operating Instructions.......................................................................
Turn on the LCD-TV.................................................................................
Audio Control..........................................................................................
Mute......................................................................................................
Select the TV Channel You Want...............................................................
Picture Mode...........................................................................................
Menu Operations.......................................................................................
Picture Menu Options...............................................................................
Picture Menu Options Continued...............................................................
Audio Menu Options................................................................................
Audio Menu Options Continued................................................................
Function Menu Options.............................................................................
Function Menu Options Continued.............................................................
Adjust Menu Options................................................................................
Tuning Menu Options..............................................................................
Tuning Menu Options Continued..............................................................
TELE TEXT...............................................................................................
Troubleshooting Guide...............................................................................
Specifications...........................................................................................
1
2
3
4
5
5
6
6
6
6
7
8
9
9
10
10
10
10
11
11
12
12
13
13
14
15
16
16
17
18
19
21
22

Safety Notice Items
Incorrect usage will cause fire or electric shock. To prevent this, please do
as required when you are installing, using and cleaning this machine. To insure
your safety and extend the life-span of LCD-TV, please read the following items
carefully before using:
lPlease read and understand all the instructions before operation;
lPlease keep the book for later use;
lPlease comply with the warning instructions on the machine and in this book
strictly;
lPlease comply with the instructions provided;
lPlease do not use additional devices that are not recommended by
manufacturer:
lBefore operation, please make sure that the operating voltage of your unit is
normal;
lDo not placethe unit on unstable, dusty andhumid places;
lNever put theunit in direct sunlight or nearheat sources;
lAllow enough space for proper ventilation;
lPlease keep water away from the LCD-TV . If water comes in contact with the
LCD-TV, disconnect the power cord from the power source, then wipe the set
with a dry soft cloth;
lDo not remove the back cover. If services were need, please refer to qualified
Personnel

Front Panel Controls
Control Panel Function
1. Power supplyswitch
2.TV/AV Select the inputsignals: SCART/PC/AV/SV/TV
3. MENU Press to select the main menu
4. VOL- Volume down/ Left orientation to adjustthe item in the OSD
VOL+ Volume up / Right orientation to adjust the item/Press to enter
5. CH- TV channel down / to select the item in the menu
CH+ TV channel up / to select the item in the menu
6. Power indicator
Illuminates red in standby mode, illuminates green when the display is
turned on
7.Remote Sensor Receivingremote control sends the infrared remote
signal.
67
TV/AV MENU VOL- VOL+ CH- CH+ POWER
23451
6
7
L2011W-A, L20A11W
L1911W-A,L19A11W
L1510A-A, L15A10A,L1910A-A
L19A10A
TV/AV MENU VOL- VOL+ CH- CH+ POWER
23451
6
7
L1510B-A,L15A10B.
L1910B-A, L19A10B
6
7
L1509-A, L15A09A,
L1709-A, L17A09A,
L1909-A, L19A09A,
L2009-A,L20A09A,

AV Input
Connect audio/video
output from an external
device to thesejacks
VGA Input
Connect to theVGA
15PIN analog output
connector of thePC
display card forPC
display purpose
S-Video Input
Connect S-Video out
from an S-Video device
to the jacks.
Antenna Input
Connect cable or
antenna signals to
the TV, either direc-
tly or through your
cable box.
Connection Options
Earphone port
PC Audio Input
Connect the PC output
connector from aPC to
the audio inputport
SCART
Connect to the DVD/
VCR/broadcasting
receiver or other
equipment
The figure is just for reference, please see the real.
And the AC power supply switch is on the back of the set)
ANT IN AUDIO IN
R L
VIDEO IN S-VIDEO TV SCART VGA IN
PC AUDIO IN
ANT IN AUDIO
R L
VIDEO IN S-VIDEO SCART VGA IN
PC AUDIO IN
V

Remote Control Key Functions
When using the remote control, aim it
towards the remotesensor on the TV
Stand By
MUTE
Display current input signal information
TV channel number select
Set time to change the TV into the
standby status after a period of preset
time.(time is 240/180/120/90/60/45/30/15/off)
NICAM/A2 Stereo select
EXIT
Quick TV channel switch(return to the
last channel)
Volume down/up Left/right orientation to
adjust the item in the OSD
TV channel up/down or select the item
of the menu
Select SCART/PC/AV/SV/TV
Select picture mode
PC system select
Select sound mode
Correspond to the differently colored
subjects
Switch to the Teletext with text mode/turn
off Teletext and switch to TV mode
Hold on or off for current page display
Switch to the Teletext with mix mode
Request index page
Change display size
Sub coded page access
While in normal TV mode only, pressing
the button TIME will display the teletext
time in the top right corner for a few
seconds.(only available in teletext mode)
Reveal or hidden the hidden words
Press to select the main menu
Auto adjust (PC mode)
Buttons on the remote control
P+
P-
V- V+
SLEEP DISPLAY MUTE POWER
NICAM PC AUTOAD TV/AV
PSM
OK Q.VIEW
MENU
INDEX TEXT
TIME HOLD SIZE REVEAL
SUBCODE MIX
SSM

Remote Control
Installing Batteries
3
2
1
1.Slide open thecover of the battery compartment on the back ofthe remote
control.
2.Load two 5#alkaline batteries in the compartment. (plus and minus poles to
respective mark)
3.Replace the coverof the battery compartment.
Precautions
Make sure that there is no
obstacle between theremote
controller and televisionset.
As strong light may interfere the
signals, change yourposition to
operate the remote controller if
the television cannot be turned
on or off as youexpect.
Keep the remote controller
away from heat source or
humid area toensure
effective performance of
the remote controller.
Make sure that two 5# 1.5V alkaline
batteries are loaded. The batteries
must be of the same type. The batteries
must be located properly. The batteries
are not rechargeable.

Connection Instructions
Ensure that you connect the grounding / earth wire to prevent possible
electric shock. If grounding methods are not possible, have a qualified
electrician install a separate circuit breaker. Do not try to ground the
unit by connectingit to telephone wires, lighteningrods, or gaspipes.
Grounding
External Equipment Connections
Antenna Connection
- Antenna or Cable Service with a Cable Box Connections
- For optimum picture quality, adjust antenna direction if needed.
Multi-family Dwellings/Apartments
(Connect to wallantenna socket)
wall antenna
socket
VHF antenna
UHF antenna
outdoor
antenna
Single-family Dwellings /Houses
(Connect to walljack for outdoorantenna)
Be careful notto bend thebronze
wire when connectingthe antenna.
To improve picture quality in a poor
signal area, purchase and install a
signal amplifier.
If the antenna needs to be split for two
TV s, install a 2-Way Signal Splitter
in the connections.
If the antenna is not installed properly,
contact your dealer for assistance.
NOTE: All cables shown are not included with the TV
RF coaxial wire(75 ohm)
ANT IN
ANT IN

Connection Instructions
You can use your LCD-TV as a monitor for your personal computer using a VGA
cable (not supplied).
PC Setup
Connection and use steps:
1.Read the userguide supplied with
your computer and ensure that it has
a VGAconnector;
2.Make sure that the power of the LCD
-TV and thePC are off;
3.Connect a Dtype 15-pin VGAinterface
cable ( not supplied ) to the VGA video
interface connector on the PC. Then
connect the other end to the VGA video
interface connector on the back of the
LCD-TV.Tighten the screwson the VGA
connectors once they are firmly
connected;
4.Turn on the power of the LCD-TV first ,
and then turn on the power of the PC;
5.Press the TV/AV button to set the video
input mode ofthe LCD-TV to PC-RGB;
6.Check the image on your TV. There may be noise associated with the resolution,
vertical pattern, contrast or brightness in PC mode. If noise is present, change
the PC mode to another resolution, change the refresh rate to another rate or
adjust the brightness and contrast on the menu until the picture is clear. If the
refresh rate of the PC graphic card can not be changed,change the PC graphic
card or consult the manufacturer of the PC graphic card.
VGA IN
Frame frequency (Hz)Line frequency (Khz)
VGA
SVGA
XGA
640*480 31.5KHz 60Hz
800*600 37.9KHz 60Hz
1024*768 48.4KHz 60Hz
Resolution
Mode Resolution

Connection Instructions
VCR Setup
Connection and use steps:
1.Read the user guide supplied with your AV devices and ensure that it has
Composite or S-Video connectors;
2.Make sure that the power of the LCD-TV and the AV device are off;
.Turn on the power of the LCD-TV first ;
and then turn on the power of the AV
device;
4.Press the TV/AV button to set the video
input mode of the LCD-TV to S-VIDEO
mode or AV mode.
Connection Option 1
Set VCR output switch to 3 or 4 and then
tune TV to the same channel number.
Connection Option 2
1. Connect the audio and video cables from
the VCR's output jacks to the TV input jacks,
as shown in the figure.
When connecting the TV to VCR, match
the jack colors (Video = yellow, Audio
Left = white,and Audio Right = red).
If you connect an S-VIDEO output from
VCR to the S-VIDEO input, the picture
quality is improved; compared to conne-
cting a regular VCR to the Video input.
2. Insert a video tape into the VCR and press
PLAY on the VCR. (Refer to the VCR owner s
manual.)
3
- To avoid picture noise (interference), leave an adequate distance between the
VCR and TV
.
VCR
1
2

Connection Instructions
Cable TV Setup
- After subscribing to a cable TV service from a local provider you can watch cable
TV programming. The TV cannot display TV programming unless a TV tuner
device or cableTV converter box is connected to the TV.
- For furtherinformation regarding cable TV service, contact your local cable TV
service provider(s).
Connection Option 1
1. Select 3or 4 with channel switch on cable
box.
2. Tunethe TV channel to thesame selected
output channel oncable box.
3. Select channelsat the cable box or with
the cable boxremote control.
Connection Option 2
1. Connect theaudio and video cables from
the Cable Box'soutput jacks to the TV
input jacks, asshown in the figure.When
connecting the TV to a Cable Box, match
the jack colors
(Video = yellow, Audio Left = white, and
Audio Right= red).
2. Select theinput source by using the TV/AV
button on theremote control.
3. Select yourdesired channel with the
remote control forcable box.
External AV Source Setup
How to connect
Connect the audioand video cables from
the external equipment'soutput jacks to the
TV input jacks,as shown in the figure.
When connecting theTV to external equip-
ment, match thejack colors (Video = yellow,
Audio Left =white, and Audio Right = red).
How to use
1. Select theinput source by using the TV/AV
button on theremote control.
2. Operate thecorresponding external equi-
pment. Refer toexternal equipment ope-
rating guide.

Basic Operating Instructions
Turn on the LCD-TV
Switch on the power button on the back of the set and the TV
will in standby mode. When the POWER button on theremote
control is pressed and the LCD-TV is turned on, the indicator
light on the front of the LCD-TV changes from red to green.
When the LCD-TV is turned off using the POWER button, the
LCD-TVwill go into standby mode and the indicator light turns
red.
Note:
The display of the input mode
will disappear inabout 8 seconds.
Switch AmongDifferent Inputs: TV / SCART / PC / AV / SV
Each time you press the TV/AV button, TV, SCART , PC, AV, SV, will appear on
the screen in the order.
Note:
The display of the input mode will disappear in about 8 seconds.
Audio Control
1.Press the V+ button to increase the volume. Anumber will appear on
screen indicating the volume level.
2.Press the V- button to decrease the volume. A number will appear on
screen indicating the volume level.
Mute
1.Press the MUTE button to mute the sound temporarily. A mute icon
appears on the screen.
2.Press the MUTE button again or V+/V- to restore the sound.
The mute icon disappears.
P+
P-
V- V+
SLEEP DISPLAY MUTE POWER
NICAM PC AUTOAD TV/AV
PSM .SSM
OK Q.VIEW
MENU
INDEX TEXT
TIME HOLD SIZE REVEAL
SUBCODE MIX
The display willappear on the screen when theTV is turned on the first
time:
AUTO SEARCH SELECTCOUNTRY
AUTO FRANCE
EXIT
Press V+/- or P+/- to select the option and menu to confirm.
If AUTO is selected, the search will start in auto system( PAL BG/DK/I)
If FRANCE is selected, the search will start twice( PAL BG/DK/I and SECAM L/L )
If EXIT is selected, the display will disappear.

Basic Operating Instructions
Select the TV Channel You Want
You can use the number keys on the remote control to directly select TV
channels.
The LCD-TV can store up to 100 channels , and you can press the keys on the
remote control or on the panel to make a selection.
Picture Mode
Press PSM button on the remote control for menu display . For desired mode as
follows:
PERSONAL STANDARD MILD FRESH
1.Press the relevant key on the remote control if you want to choose any channel
from 0 to 9. for example: if you want to choose channel 8, just press the key
number 0 and 8.
Note: You must press 0 first and then the other numbers from 0 to 9 if you want
To choose channels from 0 to 9)
2.If you want to choose a channel bigger than 9, please enter the two digits of the
channel number you want to watch within 3 seconds. for example: select
channel 16

Menu Operations
Picture Menu Options
1. Press MENU button to display the main menu, and V+/V-to select the
main menu .
2. Press P+/P- to scroll through the options
3. Press V+/V- buttons to make changes tothe parameters
4. Press the OK button to exit the menu
* In thismanual, the OSD (On Screen Display) may be differentfrom your TV s
because it is just an example to help you with the TVoperation.
Press TV/AV to select the input source,and the menu in the different source is
different .
Picture quality can be adjusted for any input separately .
The picture qualityon the screen can be adjusted as follows:
1. Press MENU button and V+/V- until the following menu appears
on the screen.
PC MENU
TV/AV/SV/SCART MENU
PICTURE
BRIGHTNESS
CONTRAST
SHARPNESS
SATURATION
HUE
PICTURE
BRIGHTNESS
CONTRAST
SHARPNESS
COLOR TEMP.
30
Note: Sign ontop of the menu in this manual may be different from the real
30
30
2
COLD
50
50
2
50
50 Only available inNTSC system

Menu Operations
2. Press P+/P- button to enter the picture menuand to go up and downto
select the desired option .
3.Press V+/V- button to increase and decrease the level to adjust the
selected option toyour preference .
4. Repeat step 2 and step 3 until desired picture quality has been achieved .
Function:
BRIGHTNESS :Adjust the brightness of the picture . By increasing the level, it
will add more light to dark parts of the picture and by decreasing the level ,it will
add more dark to light parts of the picture.
CONTRAST : Adjust the contrast of the picture . The image becomes higher as
the number increase.
SHARPNESS : Adjust the amount of the detail enhancement , the image
sharpness rises as the number increases (By increasing the level, it will show
cleaner and clearerimages and by decreasing the level, it will make picture
smoother).
SATURATION : Press V+/V- to adjust the color
HUE :Adjust the tone of the picture. Appear and be adjusted only under NTSC
mode
COLOR TEMP. : Press to select the color temperature from WARM/NORMAL/
COLD .
Picture Menu Options continued
Audio Menu Options
Sound can beadjusted for any input as follows:
1. Press MENU and V+/V- button until the following menu appears on
the screen
VOLUME
BALANCE
BASS
TREBLE
AUDIO MODE
AVL
AUDIO
50
50
50
50
VOICE
OFF

Menu Operations
Audio Menu Options continued
You can adjust sound options to the levels you prefer.
2. Press P+/P- button to enter the audio menu and to go up and down to
select the desired option .
3.Press V+/V- button to increase and decrease the level to adjust the
selected option toyour preference .
4. Repeat step 2 and step 3 until desired sound quality has been achieved .
Function :
VOLUME :Adjust the volume of your TV
BALANCE : Adjust the balance of the audio output from left to right . When
indication value of balance increases toward +50 , sound of the left speaker
becomes weaker . When indication value of balance decreases toward -50 ,
sound of the right speaker become weaker .
BASS : Adjust the bass of the sound . Can only be adjust under PERSONAL mode .
TREBLE : Adjust the treble of thesound . Can only be adjustunder PERSONAL
mode .
AUDIO MODE : Press V+/V- to select among PERSONAL, VOICE, MUSIC and
THEATRE .
AVL: Automatic Volume Limit Control reduces the effect of the large volume by
the same volume of all the channels .

Menu Operations
Function Menu Options
Menu Language Selection:
The menus canbe shown on the screen inthe selected language. First select
your language.
1.
2. Press P+/P- button to select LANGUAGE.
3. Press V+/V- button to select your desired language.
From this point on, the on-screen menus will be shown in the language of your
choice.
Press MENU and V+/V- button until the following menu appears on the screen
INPUT SOURCE TV
LANGUAGE ENGLISH
TXT LANGUAGE PAN EUROPEAN
TXT EAST/WEST EAST
DISPLAY MODE 4:3
BLUE SCREEN ON
RESET
FUNCTION
1. Press MENU button and V+/V- until the following menu appears
on the screen.
2. Press P+/P- button to enter the function menuand to go up and downto
select the desired option .
3.Press V+/V- button to increase and decrease the level to adjust the
selected option toyour preference .
4. Repeat step 2 and step 3 until desired picture quality has been achieved .
Functions:
1. INPUT SOURCE : Displaycurrent mode . There are PC ,AV , SV ,TV ,
SCART to display .
INPUT SOURCE TV
LANGUAGE ENGLISH
TXT LANGUAGE PAN EUROPEAN
TXT EAST/WEST EAST
DISPLAY MODE 4:3
BLUE SCREEN ON
RESET
FUNCTION
Only available for11W series

Menu Operations
Function Menu Options Continued
2. TXT LANGUAGE: To switch the teletext languages.
3. TXT EAST/WEST: To select EASTor WEST .
4.DISPLAY MODE: To select the display mode between 4:3 and FULLSCREEN
5.BLUE SCREEN:To set On, the screen will be in blue screen after 3 seconds
if there is no signal.
6. RESET : Press V+ to reset some settings to the factory default .
Adjust Menu Options
1. Press MENU and V+/V- button until the following menu appears on the
screen
ADJUST
AUTO SYNC.
PHASE
CLOCK
H POSITION
V POSITION
Note: This menu is only appearsin PC mode .
2. Press P+/P- button to enter the adjust menuand to go up and down to
select the desired option .
3.Press V+/V- button to increase and decrease the level to adjust the
selected option toyour preference .
4. Repeat step2 and step 3 until desired quality has beenachieved ..
Functions:
AUTO SYNC : Is opted for adjustmentof picture locationfrequency and phase
parameters .
PHASE : Removes any horizontal distortion and clears or sharpness the displayed
characters .
CLOCK :Adjust the TFT-LCD to match the PC input source
H-POSITION : Picture horizontal adjust
V-POSITION : Picture vertical position adjust .
50
50
50
50

Menu Operations
Tuning Menu Options
1. Press MENU and V+/V- button until the following menu appears on the
screen
Note: This menu is only appearsin TV mode .
2. Press P+/P- button to enter the tuning menuand to go up and downto
select the desired option .
3.Press V+/V- button to increase and decrease the level to adjust the
selected option toyour preference .
4. Repeat step2 and step 3 until desiredquality has been achieved ..
Functions:
1. CHANNEL : Press V+/V- to change the TV channel .
2.COLOR SYSTEM : Select the TV color system from AUTO,PAL,SECAM.
3.SOUND SYSTEM : Select the TV standard system from DK,I,L/L',BG
4. SKIP : If you want skip a channel , press V+/V- to select ON , and this
channel will beskip next time when you press P+/P- . But you can press
digits button toselect the channel . If you want torestore the channel , select
OFF.
5. AFC: Auto frequence control .Select ON to improve the image quality .
6. FINE TUNE : If the image received isnot very good , you canpress P+/P-
to select FINE TUNE item in menu . Then , press V+/V- button to adjust
and improve theimage quality .
CHANNEL 1
COLOR SYSTEM AUTO
SOUND SYSTEM DK
SKIP OFF
AFC ON
FINE TUNE
EXCHANGE
MANUAL SEARCH
AUTO SEARCH
TUNING
143.65MHZ
This manual suits for next models
20
Table of contents
Other Haier TV Receiver manuals

Haier
Haier 29F9D-P User manual

Haier
Haier L39Z10A User manual

Haier
Haier 21FA11-AM User manual

Haier
Haier 21F6D User manual

Haier
Haier 34F9K-P User manual

Haier
Haier LT15T1WW User manual

Haier
Haier LET19C400F User manual

Haier
Haier LE46D10F User manual

Haier
Haier LET32C550HF User manual

Haier
Haier LET22T1000F User manual

Haier
Haier 51B3Y-N User manual

Haier
Haier 21F3A User manual

Haier
Haier 29F9K User manual

Haier
Haier L3D42D25N User manual

Haier
Haier LET32T1000HFM User manual

Haier
Haier LEY19T1000H User manual

Haier
Haier L22A11W User manual

Haier
Haier L19A11W User manual

Haier
Haier 21F3A User manual

Haier
Haier LT19Z6 User manual