Haier HEWFT36BXB User manual

Installation and User Manual
Instructions d’installation et
Guide de l’utilisateur
Instrucciones de instalación y
Manual del usuario
HEWFT36BXB
Thermoelectric Wine Cellar
Cave à vin à thermoélectrique
Bodega termoeléctrico
Part # 0570001150 REV A


TABLE OF CONTENTS
WINE CELLAR SAFETY .......................................................................... 2
Proper Disposal of Your Old Refrigerated Appliance ................................ 3
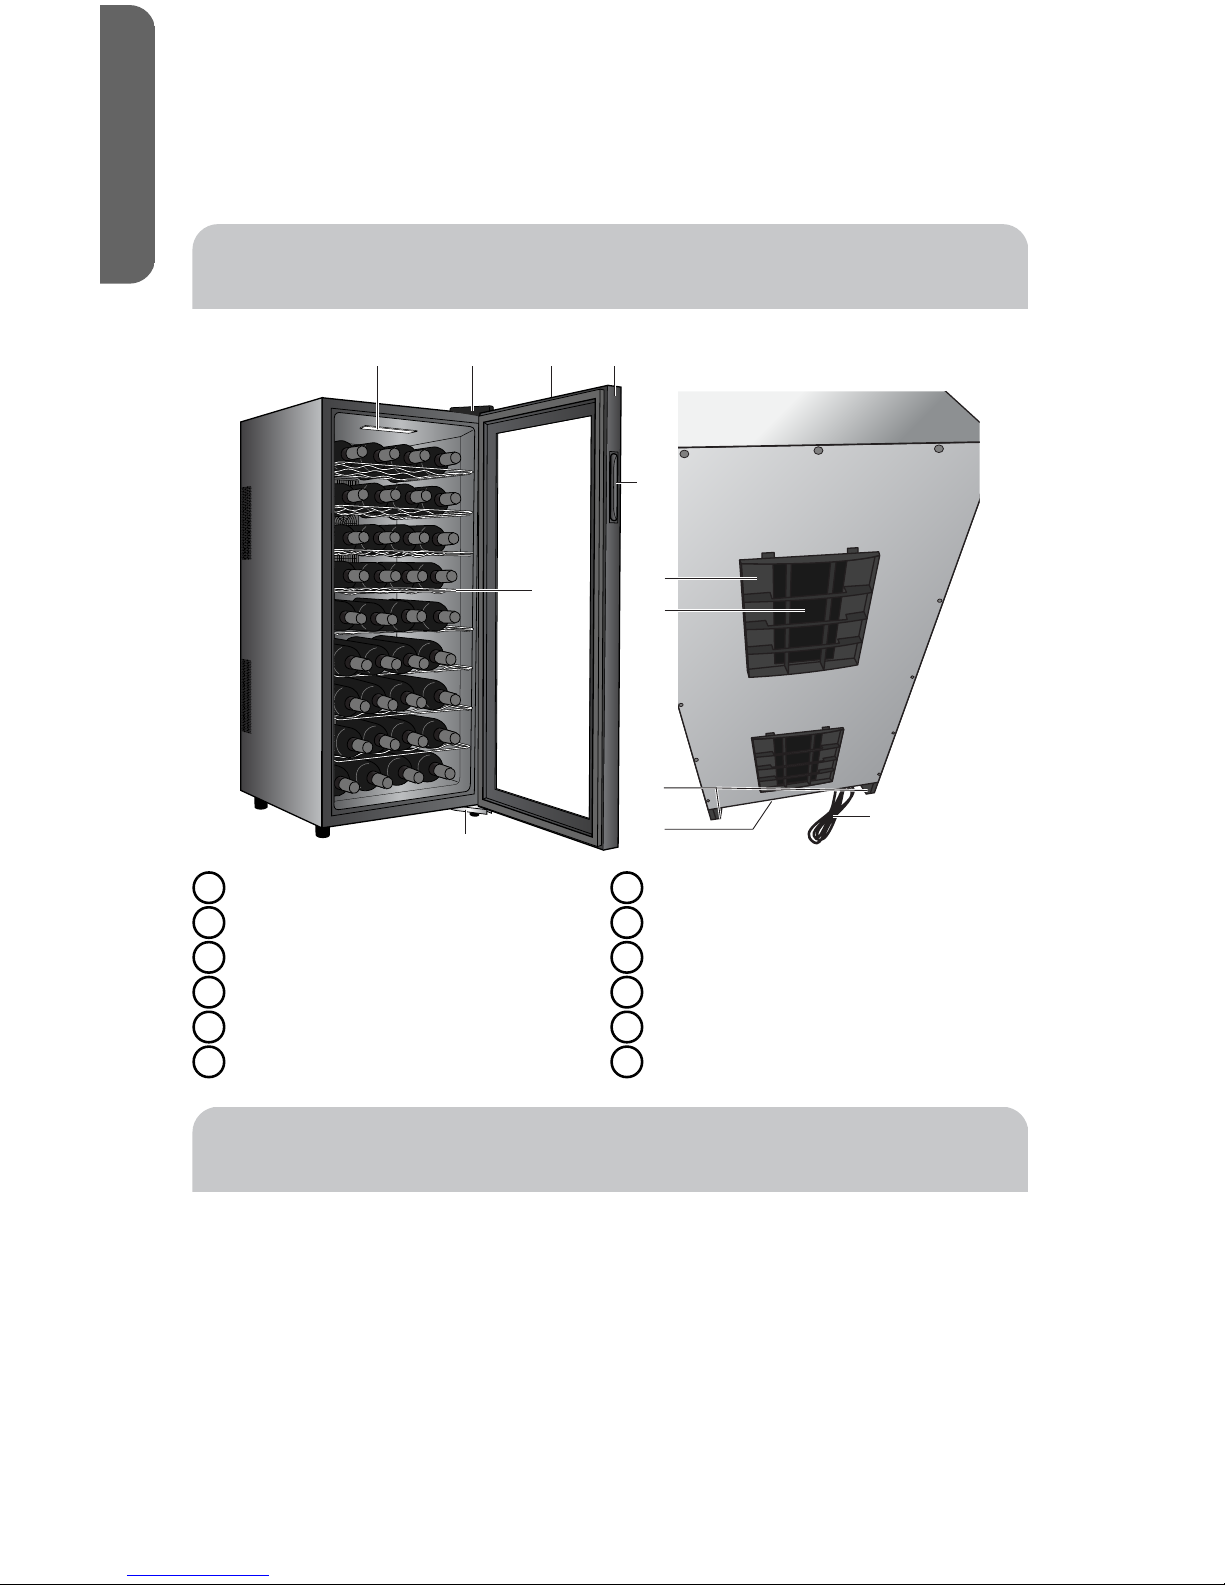
PARTS AND FEATURES ......................................................................... 4
INSTALLATION REQUIREMENTS ............................................................. 4
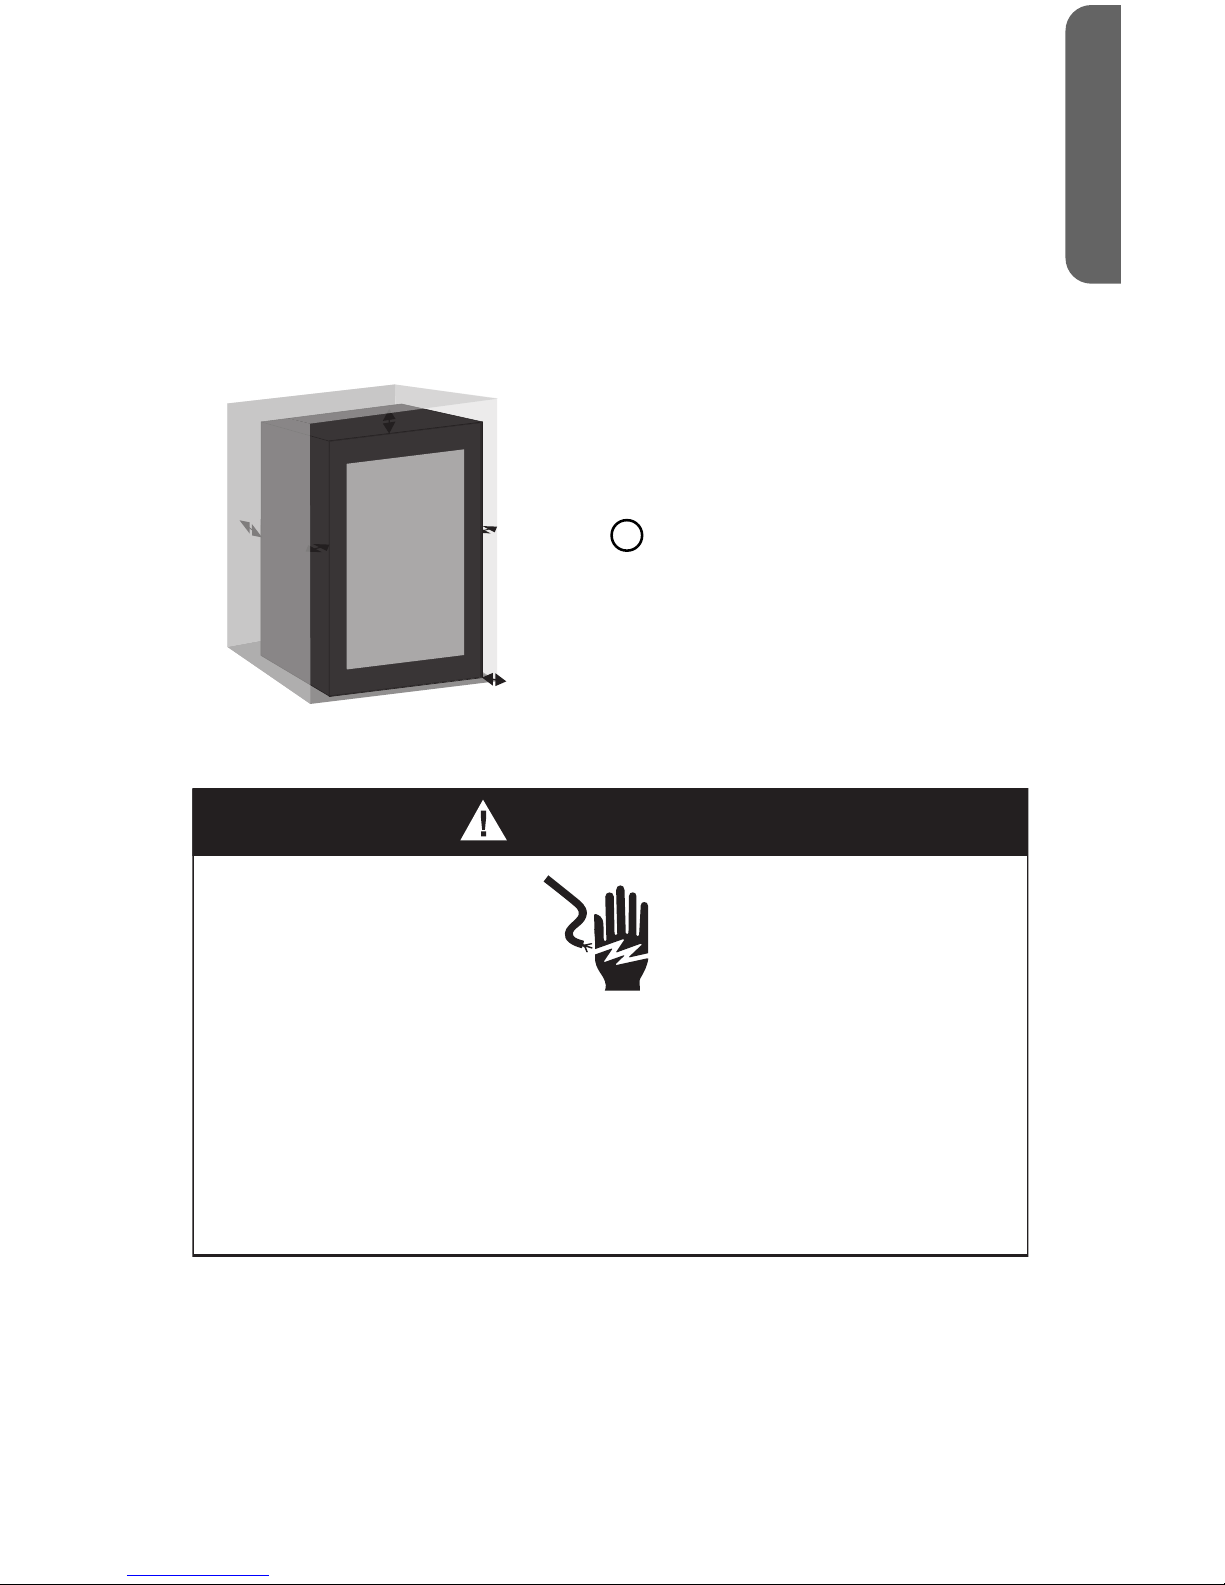
Location Requirements ................................................................... 4
Electrical Requirements .................................................................. 5
INSTALLATION INSTRUCTIONS ............................................................. 6
Step 1 - Unpack Wine Cellar ............................................................. 6
Step 2 - Make Electrical Connection ................................................... 6
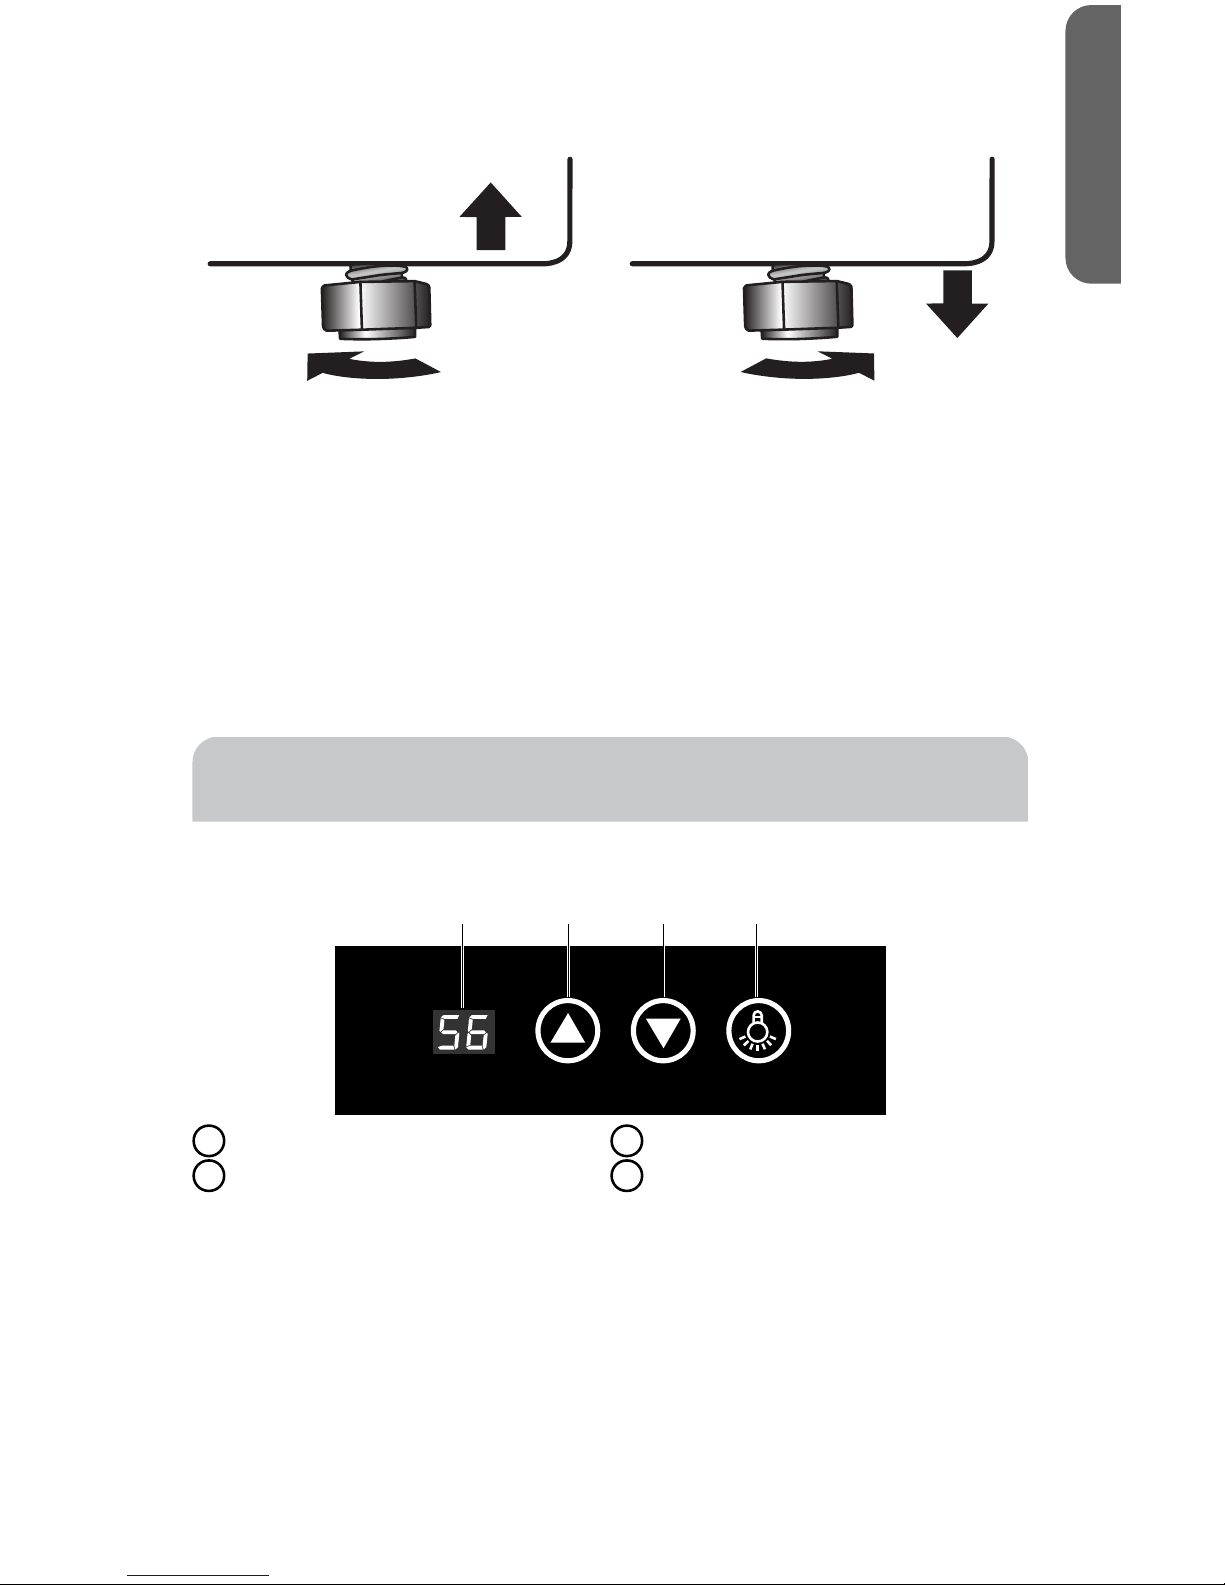
Step 3 - Level Wine Cellar ................................................................ 6
Step 4 - Align Door ......................................................................... 7
CONTROL PANEL AND FEATURES ........................................................... 7
Control Panel ................................................................................ 7
Features ...................................................................................... 7
WINE CELLAR USE ............................................................................... 8
WINE CELLAR CARE ............................................................................. 9
Cleaning ...................................................................................... 9
Power Interruptions ..................................................................... 10
TROUBLESHOOTING .......................................................................... 10
Operation .................................................................................. 10
Temperature and Moisture ............................................................. 11
LIMITED WARRANTY ........................................................................... 11
RECORD KEEPING .............................................................................. 13
1
ENGLISH

WINE CELLAR SAFETY
Your safety and the safety of others are very important.
We have provided many important safety messages in this manual and
on your appliance. Always read and obey all safety messages.
DANGER
WARNING
CAUTION
This is the safety alert symbol.
This symbol alerts you to potential hazards that can
kill or hurt you and others. All safety messages will
follow the safety alert symbol and either the word
“DANGER,” “WARNING” or “CAUTION.”
These words mean:
An imminently hazardous situation. You
could be killed or seriously injured if you
don’t immediately follow instructions.
A potentially hazardous situation
which, if not avoided, could result in
death or serious bodily injury.
A potentially hazardous situation
which, if not avoided, may result in
moderate or minor injury.
All safety messages will tell you what the potential hazard is, tell you
how to reduce the chance of injury, and tell you what can happen if the
instructions are not followed.
IMPORTANT SAFETY
INSTRUCTIONS
WARNING: To reduce the risk of re, electrical shock, injury to
persons, or damage when using the wine cellar, follow basic
precautions, including the following:
•Use this appliance only for its intended purpose as described in this
user manual.
•This wine cellar must be properly installed in accordance with the
installation instructions before it is used. See grounding instructions
in the installation section.
•Disconnect power before servicing.
•Replace all parts and panels before operating.
•Do not repair or replace any part of the appliance unless specically
recommended in the manual. All other servicing should be referred to
a qualied technician.
•Plug into a grounded 3 prong outlet.
•Do not remove ground prong.
2
ENGLISH

IMPORTANT SAFETY
INSTRUCTIONS
•Do not use an adapter.
•Do not use an extension cord.
•Do not store foods in wine cellar. Interior temperature may not be
cool enough to prevent spoilage or the temperature may cause
bacteria growth.
•Use nonammable cleaner.
•Keep ammable materials and vapors, such as gasoline, away from
wine cellar.
•This wine cellar should not be recessed or installed in an enclosed
cabinet. It is designed for free-standing installation only.
•Cabinet edges along stamp/cut-out areas may be sharp. Avoid
placing hands, ngers or other appendages near these areas.
•If your wine cellar is not being used, remove the door. This will reduce
the possibility of danger to children.
•Use two or more people to move and install wine cellar.
READ AND SAVE THESE
INSTRUCTIONS
State of California Proposition 65 Warnings:
WARNING: This product contains one or more chemicals known to the
State of California to cause cancer.
WARNING: This product contains one or more chemicals known to the
State of California to cause birth defects or other reproductive harm.
PROPER DISPOSAL OF YOUR OLD REFRIGERATED
APPLIANCE
WARNING
Suffocation Hazard
Remove door or drawer(s) from your old refrigerated appliance.
Failure to do so can result in death or brain damage.
IMPORTANT: Child entrapment and suocation are not problems of the past.
A junked or abandoned refrigerated appliance is still dangerous – even if it will
sit for “just a few days.” If you are getting rid of your old refrigerated appliance,
please follow these instructions to help prevent accidents.
3
ENGLISH

Before You Throw Away Your Old Refrigerated Appliance:
•Remove the door(s) or drawer(s).
•Leave the shelves in place so that children may not easily climb inside.
PARTS AND FEATURES
a b c d
e
g
h
i
j
k
l
f
AInterior Light
BHinge Cover
CControl Panel
DDoor Frame
ERecessed Handle
FWine Racks
GFan Filter
HCooling Fan
ILeveling Legs
JDrip Tray
KBottom HInge
LPower Supply Cord
INSTALLATION REQUIREMENTS
LOCATION REQUIREMENTS
•Do not install your wine cellar in any location that is not properly insulated or
heated e.g. garage etc. Your wine cellar was not designed to operate in
temperature settings below 55°F (13°C).
•When the room temperature is colder than the control set temperature, the
wine cellar cooling will not operate until the room temperature becomes warmer
than the set temperature.
•Select a suitable location for the wine cellar on a hard even surface away from
direct sunlight or heat source e.g. radiators, baseboard heaters, cooking
appliances etc. Any oor unevenness should be corrected with the leveling legs
located on the front and rear corners of the wine cellar.
4
ENGLISH

•To minimize the risk of rusting, leakage and insulation damage, avoid placing the
wine cellar in a place where heavy moisture is present. Do not directly apply
water onto or into the unit.
•Your wine cellar is designed for freestanding installation only. It is not designed
for a built-in installation.
RECOMMENDED CLEARANCES
To ensure the wine cellar operates at optimum eciency, you should install it in a
location where there is proper air circulation and electrical connections.
The recommended clearances around the wine cellar:
2"
(5 cm) 2"
(5 cm)
4" (10 cm)
a
2"
(5 cm)
AAllow enough space to open
the door 120°
ELECTRICAL REQUIREMENTS
WARNING
Electrical Shock Hazard
Plug into a grounded 3 prong outlet.
Do not remove the ground prong from the power cord plug.
Do not use an adapter.
Do not use an extension cord.
Failure to do so can result in death, fire or electrical shock.
Before you move your wine cellar into its nal location, it is important to make sure
you have the proper electrical connection.
Recommended Grounding Method
A 115 volt, AC only 15-amp fused, grounded electrical supply is required. It is
recommended that a separate circuit serving only your beverage center be
provided.
Use an outlet that cannot be turned o by a switch.
Do not use an extension cord.
5
ENGLISH

INSTALLATION INSTRUCTIONS
STEP 1 - UNPACK WINE CELLAR
WARNING
Excessive Weight Hazard
Use two or more people to move and install wine cellar.
Failure to do so can result in back or other injury.
1. Remove all packaging material. This includes the foam base and all adhesive
tape holding the wine cellar accessories inside and outside.
2. Inspect and remove any remains of packing, tape or printed materials before
turning on the wine cellar.
3. Dispose of/recycle all packaging materials.
STEP 2 - MAKE ELECTRICAL CONNECTION
WARNING
Electrical Shock Hazard
Plug into a grounded 3 prong outlet.
Do not remove the ground prong from the power cord plug.
Do not use an adapter.
Do not use an extension cord.
Failure to do so can result in death, fire or electrical shock.
1. Move the wine cellar to your desired location.
2. Plug into a grounded 3 prong outlet.
STEP 3 - LEVEL WINE CELLAR
The wine cellar has four leveling legs, one leveling leg in each corner.
After placing your wine cellar in the desired location, make sure that it is level from
front to back and side to side.
•The leveling legs can be adjusted by turning them clockwise to raise or
counterclockwise to lower.
NOTE: The wine cellar door will close easier when the front leveling legs are
extended.
6
ENGLISH

Raise Lower
STEP 4 - ALIGN DOOR
1. Using a at-blade screwdriver, gently insert the blade under the top hinge cover
and pry up to remove.
2. Gently move wires aside.
3. Using a Phillips-head screwdriver, loosen the three top hinge screws.
4. Adjust the door and then tighten the screws.
5. Replace the top hinge cover by rst aligning the back of the cover with the back
of the hinge, and then pressing down rmly on the front of the hinge cover until
it snaps into place.
6. Adjust bottom hinge, if necessary.
CONTROL PANEL AND FEATURES
CONTROL PANEL
ab c d
ALED Temperature Dispay
BTemperature Increase Button
CTemperature Decrease Button
DInterior Light Button
FEATURES
THERMOELECTRIC COOLING
Thermoelectric (also referred to as semiconductor) wine cellars oer high reliability
and low maintenance while precisely maintaining the set temperature for storing
wine.
Because thermoelectric wine cellars do not use a compressor for cooling there is
minimal noise and vibration. In addition to being extremely quiet, the lack of
vibration will keep bubbles from forming in stored wine.
Thermoelectric technology is environmentally friendly, because no CFC, HCFC, or
HCF-type refrigerants are involved in the cooling process.
7
ENGLISH

INTERIOR LIGHTS
IMPORTANT: Your wine cellar is equipped with LED lighting. These lights are
designed to last for the life of your wine cellar. However, if the light stops
operating, please contact a qualied technician for replacement.
During normal operation it is best for the light to remain o.
To Turn On/O the Light:
•Press the Light button on the control panel.
WINE RACKS
Each wine rack can hold up to four bottles of wine.
WINE CELLAR USE
TEMPERATURE CONTROL
NOTE:
•When rst plugged in, the LED will display the room temperature. Then, the
internal temperature will appear in the display.
•Wait at least 30 minutes to allow the wine cellar to acclimatize before
making any temperature adjustments.
Set the control to the desired temperature within the range of 50°F to 66°F (10°C to
19°C).
To Adjust the Temperature:
•Press the Up Arrow - Increase
•Press the Down Arrow - Decrease
IMPORTANT:
•The actual internal temperature in a thermoelectric wine cellar is dependent
on the room temperature. You can set the temperature within the range,
but the wine cellar may not reach the preset temperature.
•The wine cellar will not operate if the room temperature is colder than the
wine cellar set temperature. Cooling will begin when the room temperature
becomes warmer than the wine cooler set temperature.
8
ENGLISH

WINE CELLAR CARE
CLEANING
WARNING
Electrical Shock Hazard
Disconnect power before cleaning.
Failure to do so can result in death or electrical shock.
1. Unplug or disconnect power.
2. Prepare a cleaning solution of 3-4 tablespoons of baking soda mixed with warm
water. Use sponge or soft cloth, dampened with the cleaning solution, to wipe
down your wine cellar.
IMPORTANT: Do not use harsh chemicals, abrasives, ammonia, chlorine
bleach, concentrated detergents, solvents or metal scouring pads. SOME
of these chemicals may dissolve, damage and/or discolor your wine cellar.
Before using cleaning products, always read and follow manufacturer’s
instructions and warnings to avoid personal injury or product damage.
3. Rinse with clean warm water and dry with a soft cloth.
4. Plug in or reconnect power.
5. Reset the temperature to the desired setting.
DOOR GASKETS
Gaskets must be kept clean and pliable to assure a proper seal.
•Clean door gaskets every 3 months with solution of baking soda and warm water.
•Petroleum jelly applied lightly to the hinge-side gasket will keep the gasket
pliable and assure a good seal.
EXTERNAL FAN FILTER
Over time dirt, dust and hair will collect on the fan lter causing the cooling system
to not function properly. To maintain optimum cooling and product longevity,
remove and clean the fan lter at least once every 6 months.
1. Unplug or disconnect power.
2. Press downward on the two tabs on the top to release the fan lter from the
cabinet back.
3. Clean the fan lter.
There are two eective methods to clean the external fan lter:
•Use a vacuum cleaner hose to suction the dirt, dust and hair from the lter.
OR
9
ENGLISH

•Hand wash with warm, soapy water. Rinse well and allow lter to air dry
completely before reinstalling.
4. Replace the fan lter into the cabinet back.
5. Plug in or reconnect power.
POWER INTERRUPTIONS
In the event of a power outage due to a thunderstorm or other cause, unplug the
wine cellar from the electrical outlet. When power has been restored, replug power
cord to AC outlet.
TROUBLESHOOTING
First try the solutions suggested here to possibly avoid the cost of a service call.
OPERATION
PROBLEM POSSIBLE CAUSE(S) SOLUTION
Wine cellar does
not operate Wine cellar is unplugged. Plug into a grounded 3 prong
outlet.
Circuit breaker tripped or
fuse blown Reset/Turn on circuit breaker
or replace fuse.
Wine cellar light
does not come
on
Wine cellar is unplugged. Plug into a grounded 3 prong
outlet.
LED light is burned out. Contact a qualied technician
to replace the burned out LED.
Wine cellar runs
too frequently Room is warm and/or
humid. This is normal to maintain
constant temperature during
high temperature, humid days.
Door opened frequently or
left ajar. Limit door openings. Check for
items keeping the door from
closing completely.
The door gasket is not
sealing properly. Check gasket for proper seal.
Clean gasket if needed.
The fan lter is blocked. Clean the fan lter. See
“Cleaning.”
Operating noise Your wine cellar has exterior
fans to maintain the set
cooling temperature during
periods of warm room
temperature or heavy use.
It is normal to occasionally
hear air circulation sounds.
Wine cellar door
does not shut
properly
Wine cellar is not level. Level wine cellar. See “Level
Wine Cellar.”
Door is blocked open. Check for and adjust bottles or
shelves that are keeping the
door from closing completely.
10
ENGLISH

TEMPERATURE AND MOISTURE
PROBLEM POSSIBLE CAUSE(S) SOLUTION
Wine is too
warm Door opened frequently or
left ajar. Limit door openings. Check for
items keeping the door from
closing completely.
Wine was added recently. Allow time for recently added
wine to reach desired
temperature.
The door gasket is not
sealing properly. Clean the door gasket. See
“Cleaning.”
Temperature control is not
set to the appropriate
temperature.
Adjust the temperature
control to a colder setting.
Fan lter is dirty. Clean the fan lter. See
“Cleaning.”
Wine is too cold The temperature control is
set too low. Adjust the temperature to the
next warmer setting; allow
24 hours to adjust.
Moisture build
up on interior
or exterior of
the wine cellar
High humidity This is normal during times of
high humidity. Dry surface and
adjust temperature to slightly
colder setting.
Door opened frequently or
left ajar. Limit door openings. Check for
items keeping the door from
closing completely.
The door gasket is not
sealing properly. Clean the door gasket. See
“Cleaning.”
FOR MORE HELP, VISIT HAIERAMERICA.COM OR CALL THE CONSUMER HELP
LINE AT 1-877-337-3639.
LIMITED WARRANTY
IN-HOME SERVICE
FULL TWO YEAR WARRANTY
For 24 months from the date of original
retail purchase, Haier will repair or
replace any part free of charge including
labor that fails due to a defect in
materials or workmanship.
Haier may replace or repair at their sole
discretion any part, subsystem including
the entire product.
Product must be accessible, without
encumbrance and installed properly to
receive warranty repair service.
LIMITED WARRANTY
NOTE: This warranty commences
on the date the item was
purchased, and the original
purchase receipt must be
presented to the authorized
service representative before
warranty repairs are rendered.
Exceptions: Commercial Use Warranty
90 days labor from date of original
purchase
90 days parts from date of original
purchase
No other warranty applies.
11
ENGLISH

FOR WARRANTY SERVICE
All service must be performed by a Haier
authorized service center. For the name
and telephone number of the nearest
authorized service center, please call
1-877-337-3639.
Before calling please have available the
following information:
Model number and serial number of your
appliance. The name and address of the
dealer you purchased the unit from and
the date of purchase.
A clear description of the problem.
A proof of purchase (sales receipt).
This warranty covers carry-in
appliance services within the
contiguous United States and Canada
and where available in Alaska, Hawaii
and Puerto Rico.
What is not covered by this warranty:
Replacement or repair of household
fuses, circuit breakers, wiring or
plumbing.
A product whose original serial number
has been removed or altered.
Any service charges not specically
identied as normal such as normal
service area or hours.
Damage incurred in shipping.
Damage caused by improper installation
or maintenance.
Damage from misuse, abuse accident,
re, ood, or acts of nature.
Damage from service other than an
authorized Haier dealer or service
center.
Damage from incorrect electrical
current, voltage or supply.
Damage resulting from any product
modication, alteration or adjustment
not authorized by Haier.
Adjustment of consumer operated
controls as identied in the owner’s
manual.
Hoses, knobs, lint trays and all
attachments, accessories and
disposable parts.
Labor, service transportation, and
shipping charges for the removal and
replacement of defective parts beyond
the initial 24-month period.
Damage from other than normal
household use.
Any transportation and shipping
charges.
THIS LIMITED WARRANTY IS GIVEN IN
LIEU OF ALL OTHER WARRANTIES,
EXPRESSED OR IMPLIED, INCLUDING
BUT NOT LIMITED TO, THE
WARRANTIES OF MERCHANTABILITY
AND FITNESS FOR A PARTICULAR
PURPOSE
The remedy provided in this warranty is
exclusive and is granted in lieu of all
other remedies.
This warranty does not cover incidental
or consequential damages, so the above
limitations may not apply to you. Some
states do not allow limitations on how
long an implied warranty lasts, so the
above limitations may not apply to you.
This warranty gives you specic legal
rights, and you may have other rights,
which vary from state to state.
Haier America
Wayne, NJ 07470
12
ENGLISH

RECORD KEEPING
Thank you for purchasing this Haier product.
This user manual will help you get the best
performance from your new wine cellar.
For future reference, record the model number,
serial number, and the date of purchase. The
model/serial number plate is located on the
inside frame of the wine cellar.
Staple your proof of purchase to this manual to
aid in obtaining warranty service if needed.
_________________________
Model number
_________________________
Serial number
_________________________
Date of purchase
13
ENGLISH

TABLE DES MATIÈRES
SÉCURITÉ DU CONGÉLATEUR ............................................................... 15
Mise au rebut de votre vieil appareil réfrigéré ...................................... 16
PIÈCES ET CARACTÉRISTIQUES ............................................................ 17
EXIGENCES D'INSTALLATION ............................................................... 17
Exigences d’emplacement ............................................................. 17
Spécications électriques .............................................................. 18
INSTRUCTIONS D'INSTALLATION .......................................................... 19
Étape 1 - Déballage de la cave à vin .................................................. 19
Étape 2 - Raccordement électrique .................................................. 19
Étape 3 - Réglage de l’aplomb de la cave à vin ...................................... 20
Étape 4 - Alignement de la porte ..................................................... 20
TABLEAU DE COMMANDE ET FONCTIONS .............................................. 21
Tableau de commande .................................................................. 21
Caractéristiques ......................................................................... 21
UTILISATION DE LA CAVE À VIN ............................................................ 22
ENTRETIEN DE LA CAVE À VIN .............................................................. 22
Nettoyage ................................................................................. 22
Pannes de courant ....................................................................... 23
DÉPANNAGE ..................................................................................... 24
Funcionamiento .......................................................................... 24
Température et humidité ............................................................... 25
GARANTIE LIMITÉE ............................................................................. 25
DOCUMENTS À CONSERVER ................................................................ 27
14
FRANÇAIS

SÉCURITÉ DU CONGÉLATEUR
Votre sécurité et celle des autres est très importante.
DANGER
AVERTISSEMENT
ATTENTION
Voici le symbole d’alerte de sécurité.
Ce symbole d’alerte de sécurité vous signale les
dangers potentiels de décès et de blessures graves à
vous et à d’autres. Tous les messages de sécurité
suivront le symbole d’alerte de sécurité et le mot
“DANGER”, “AVERTISSEMENT” ou “ATTENTION”.
Ces mots signifient :
Une situation de danger
imminent. Vous courez le risque
d’un décès ou de blessures
graves si vous ne suivez pas
immédiatement les instructions.
Une situation potentiellement
dangereuse qui, si vous ne
l’évitez pas, peut provoquer la
mort ou des blessures graves.
Une situation potentiellement
dangereuse qui, si vous ne
l’évitez pas, peut entraîner des
blessures légères à modérées.
Tous les messages de sécurité vous diront quel est le danger potentiel
et comment réduire le risque de blessure et ce qui peut se produire en
cas de non-respect des instructions.
Nous donnons de nombreux messages de sécurité importants dans ce
manuel et sur votre appareil ménager. Assurez-vous de toujours lire
tous les messages de sécurité et de vous y conformer.
IMPORTANTES
INSTRUCTIONS DE SÉCURITÉ
AVERTISSEMENT : An de réduire le risque d’incendie, de choc
électrique, de blessures corporelles ou de dommage lors de
l’utilisation de la cave à vin, il convient d’observer certaines
précautions fondamentales, notamment :
•Utiliser cet appareil uniquement dans le but auquel il est destiné et tel
que décrit dans le présent manuel d’utilisation.
•Avant utilisation, cette cave à vin doit être correctement installée
conformément aux instructions d’installation. Voir les instructions de
mise à la terre incluses dans les instructions d’installation.
•Déconnecter la source de courant électrique avant l’entretien.
•Replacer pièces et panneaux avant de faire la mise en marche.
15
FRANÇAIS

IMPORTANTES
INSTRUCTIONS DE SÉCURITÉ
•Ne réparer ni remplacer aucune pièce de l’appareil sans
recommandation spécique du manuel. Toutes les autres tâches
d’entretien doivent être eectuées par un technicien qualié.
•Brancher sur une prise à 3 alvéoles reliée à la terre.
•Ne pas enlever la prise de liaison à la terre.
•Ne pas utiliser d’adaptateur.
•Ne pas utiliser de rallonge.
•Ne pas entreposer d’aliments dans la cave à vin. La température
intérieure n’est peut-être pas susamment fraîche pour empêcher
les aliments de s’abîmer, ou la température peut causer la
prolifération de bactéries.
•Utiliser un produit de nettoyage ininammable.
•Garder les matières et les vapeurs inammables, telles que l’essence,
loin de la cave à vin.
•La cave à vin ne doit pas être encastrée ou installée dans un placard
fermé. Elle est conçue uniquement pour être utilisée d’une manière
autoportante.
•Les bords de la caisse et les zones comportant un code
d’identication ou des découpes peuvent être tranchants. Garder les
mains, les doigts ou autres appendices éloignés de ces zones.
•Si la cave à vin n’est pas utilisée, ôter la porte. Cela réduira la
possibilité de danger pour les enfants.
•Déplacer et installer la cave à vin à l’aide d’au moins 2 personnes.
LIRE ET CONSERVER CES
INSTRUCTIONS
MISE AU REBUT DE VOTRE VIEIL APPAREIL RÉFRIGÉRÉ
Risque de suffoquer
Ôter la porte ou le(s) tiroir(s) de votre vieil appareil réfrigéré.
Le non-respect de cette instruction peut causer un décès ou des
lésions cérébrales.
AVERTISSEMENT
IMPORTANT : Le problème des enfants pouvant se retrouver coincés et
suoquer n’est pas un problème du passé. Un appareil réfrigéré jeté ou
abandonné est encore dangereux, même s’il est laissé abandonné pendant
“quelques jours seulement”. Si vous vous débarrassez de votre vieil appareil
réfrigéré, veuillez suivre les instructions suivantes pour aider à éviter les
accidents.
16
FRANÇAIS

Avant de jeter votre vieil appareil réfrigéré :
•Ôter le(s) porte(s) ou le(s) tiroir(s).
•Laisser les tablettes en place de sorte que les enfants ne puissent pas y pénétrer
facilement.
PIÈCES ET CARACTÉRISTIQUES
a b c d
e
g
h
i
j
k
l
f
ALampe intérieure
BCouvre charnière
CTableau de commande
DCadre de la porte
EPoignée encastrée
FCasiers à vin
GFiltre du ventilateur
HVentilateur de refroidissement
IPieds de nivellement
JPlateau d'égouttement
KCharnière inférieure
LCordon d’alimentation électrique
EXIGENCES D'INSTALLATION
EXIGENCES D’EMPLACEMENT
•Ne pas installer la cave à vin dans un endroit incorrectement isolé ou chaué (p.
ex. garage, etc). La cave à vin n’a pas été conçu pour fonctionner à des
températures inférieures à 55 °F (13 °C).
•Lorsque la température ambiante est inférieure à la température réglée par la
commande, la cave à vin ne fonctionnera pas tant que la température ambiante
ne sera pas supérieure à la température réglée.
17
FRANÇAIS

•Choisir un emplacement approprié pour la cave à vin, sur une surface dure et
homogène, à l’abri de la lumière directe du soleil ou d’une source de chaleur (p.
ex. radiateurs, plinthes chauantes, appareils de cuisson, etc.) Toute irrégularité
du plancher doit être corrigée au moyen des pieds de nivellement situés sur les
coins inférieurs avant et arrière la cave à vin.
•Pour minimiser tout risque de rouille, de fuite ou d'endommagement de
l'isolation, éviter d'installer la cave à vin dans un endroit très humide. Ne pas
mettre de l'eau directement sur ou dans l'appareil.
•La cave à vin est conçue uniquement pour être utilisée d’une manière
autoportante. Elle n’est pas conçue pour une installation encastrée.
DISTANCES DE DÉGAGEMENT RECOMMANDÉES
Pour vous assurer que la cave à vin fonctionne à son ecacité optimale, il doit être
installé dans un endroit avec une circulation d’air et des raccordements électriques
appropriés.
Distances de dégagement recommandées autour de la cave à vin :
2"
(5 cm) 2"
(5 cm)
4" (10 cm)
a
2"
(5 cm)
ALaisser susamment d'espace pour
pouvoir ouvrir la porte à 120°.
SPÉCIFICATIONS ÉLECTRIQUES
Risque de choc électrique
Brancher sur une prise à 3 alvéoles reliée à la terre.
Ne pas enlever la broche de liaison à la terre du cordon d'alimentation.
Ne pas utiliser un adaptateur.
Ne pas utiliser un câble de rallonge.
Le non-respect de cette instruction pourrait causer un décès, un
incendie ou un choc électrique.
AVERTISSEMENT
Avant de déplacer la cave à vin à son emplacement nal, il est important de vous
assurer d’avoir le raccordement électrique approprié.
18
FRANÇAIS
Table of contents
Languages:
Other Haier Wine Cooler manuals

Haier
Haier AWCE50ARS User manual

Haier
Haier JC-110GD User manual

Haier
Haier WS53GDA User manual

Haier
Haier HWS33GG User manual

Haier
Haier HVR035 User manual

Haier
Haier JC-82G User manual

Haier
Haier HVW18 Service User manual

Haier
Haier WC200GS User manual

Haier
Haier HWVFM032 - 08-06 User manual

Haier
Haier WS GA Series User manual

Haier
Haier HWS33GG User manual

Haier
Haier HVD060E-4S User manual

Haier
Haier HWS79GDG User manual

Haier
Haier JC-164G User manual

Haier
Haier HBF110G User manual

Haier
Haier JC-82G User manual

Haier
Haier HVC24B User manual

Haier
Haier WINE BANK 60 User manual

Haier
Haier HVW12A - 04-05 User manual

Haier
Haier HVR036ALL User manual