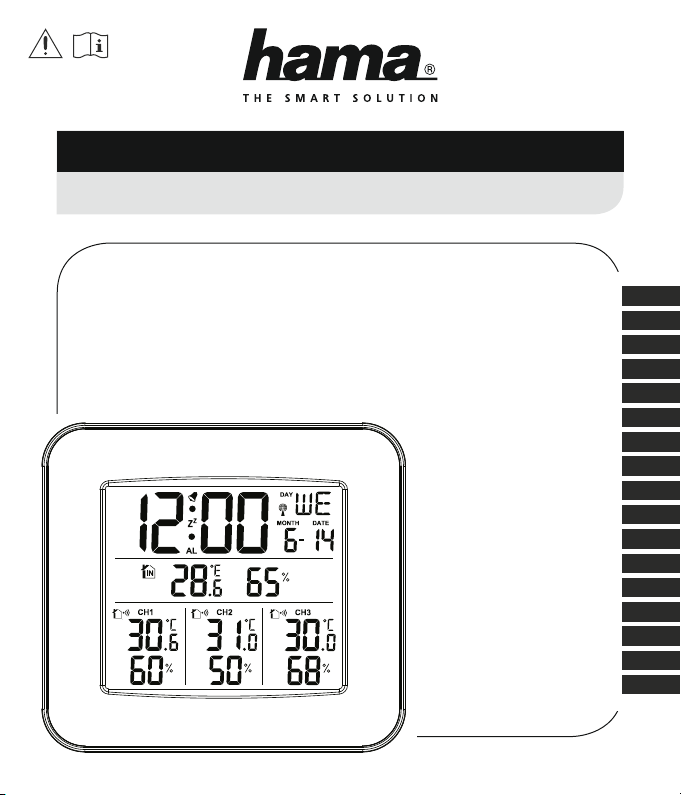
Hama EWS-Trio User manual

Weather Station EWS-Trio
Wetterstation
E
F
D
GB
Operating Instructions
Bedienungsanleitung
Mode d‘emploi
Instrucciones de uso
Руководство по эксплуатации
Istruzioni per l‘uso
Gebruiksaanwijzing
Οδηγίες χρήσης
Instrukcja obsługi
Használati útmutató
Návod kpoužití
Návod na použitie
Manual de instruções
Manual de utilizare
Bruksanvisning
Käyttöohje
Работна инструкция
RUS
I
NL
GR
PL
H
CZ
SK
P
RO
S
FIN
BG
00186311
00136293

A B
1
17
18
5
19
6 7
3
20
21
42
14 15
11109 138 12
16

2
GOperating instruction
Controls and Displays
ABase station
1. Time
2. Room temperature
3. Day of the week +date +calendar month DCF
signal radio symbol
4. Room humidity
5. Outdoor temperature/outdoor humidity channel 1
(CH1), low battery level display for measuring
station 1
6. Outdoor temperature/outdoor humidity channel 2
(CH2), low battery level display for measuring
station 2
7. Outdoor temperature/outdoor humidity channel 3
(CH3), low battery level display for measuring
station 3
8. ALARM button =displaying/setting/deactivating/
activating the alarm functions
9. CH button =manual search for asignal from the
measuring station/channel selection
10. SNZ/LIGHT button =temporarily interrupts the
alarm (snooze)/activates the backlight
11. SET button =settings/conrms the setting
12. UP button =increases the current set value/recalls
the saved maximum/minimum values (MAX/MIN)
13. Down button =decreases the current set value/
toggles between °C and °F /activates/deactivates
manual DCF radio signal reception
14. +16. Fold-out bases
15. Battery compartment
BMeasuring station
17. Transmission indicator light
18. TX button =manual connection to the base
station
19. Recess for wall mounting
20. Slide switch =selects channel 1, 2or3
21. Battery compartment
Thank you for choosing aHama product.
Take your time and read the following instructions and
information completely.Please keep these instructions in a
safe place for futurereference. If you sell the device, please
pass these operating instructions on to the new owner.
1. Explanation of Warning Symbols and Notes
Warning
This symbol is used to indicate safety instructions or to
draw your attention to specichazards and risks.
Note
This symbol is used to indicate additional information or
important notes.
2. Package Contents
•Trio weather station (base station for indoors)
•3measuring stations for outdoors
•3AAA batteries
•6AAbatteries
•These operating instructions
3. Safety Notes
•The product is intended for private, non-commercial use
only.
•Do not operate the product outside the power limits given
in the specications.
•Do not use the product in moist environments and avoid
splashes.
•Do not use the product in the immediate vicinity of heaters
or other heat sources or in direct sunlight.
•Do not use the product in areas wherethe use of electronic
devices is not permitted.
•Do not place the product near interference elds, metal
frames, computers, TVs, etc. Electronic devices and window
frames can negatively affect the product’sfunctionality.
•Do not drop the product and do not expose it to any major
shocks.
•Do not open the device or continue to operate it if it
becomes damaged.
•Do not attempt to service or repair the product yourself.

3
Leave any and all service work to qualied experts.
•Keep the packaging material out of the reach of children
due to the risk of suffocation.
•Dispose of packaging material immediately according to
locally applicable regulations.
•Do not modify the product in any way.Doing so voids the
warranty.
•Use the product for its intended purpose only.
•Protect the product from dirt, moistureand overheating,
and only use it in adry environment
•Keep this product, as all electrical products, out of the
reach of children!
•Use the item only in moderate climatic conditions.
Warning –Batteries
•When inserting batteries, note the correct polarity (+
and -markings) and insert the batteries accordingly.
Failuretodosocould result in the batteries leaking or
exploding.
•Only use batteries (or rechargeable batteries) that match
the specied type.
•Beforeyou insert the batteries, clean the battery
contacts and the polar contacts.
•Do not allow children to change batteries without
supervision.
•Do not mix old and new batteries or batteries of a
different type or make.
•Remove the batteries from products that arenot being
used for an extended period (unless these arebeing kept
ready for an emergency).
•Do not short-circuit batteries.
•Do not charge batteries.
•Do not throw batteries in a re.
•Keep batteries out of the reach of children.
•Never open, damage or swallow batteries or allow
them to enter the environment. They can contain toxic,
environmentally harmful heavy metals.
•Immediately remove and dispose of dead batteries from
the product.
•Avoid storing, charging or using the device in extreme
temperatures and extremely low atmospheric pressure
(for example, at high altitudes).
4. Getting started
Note
Beforeuse, make surethat you insert the batteries in the
measuring station rst and then in the base station.
4.1 Measuring station
•Open the batterycompartment (21) and insert two
AA batteries with the correct polarity into the battery
compartment.
•Use the slideswitch (20) to select the channel that the
respective measuring station is to use for transmission.
Each of the three measuring stations must use adifferent
channel!
•Close the battery compartment.
4.2 Base station
•Open the batterycompartment (15) and insert three
AAA batteries with the correct polarity into the battery
compartment.
•Then close the battery compartment cover.
4.3 Replacing the batteries
Note –Replacing the batteries
•Note that the stations have to be resynchronised each
time after you change the batteries in the measuring or
base station.
•To do this, remove the batteries from the other station
and then reinsert them, or change them as required.
Measuring station
•If the symbol is displayed on the basis station in the
measurement values area of one of the three measuring
stations (5/6/7), replace the two AA batteries of the
affected measuring station with two new ones.
•Open the battery compartment (21), remove and properly
dispose of the depleted batteries, and insert two new AAA
batteries with the correct polarity.Then close the battery
compartment cover.

4
Base station
•If the symbol is displayed on the base station in the
indoor values area (2), replace the three AAA batteries in
the base station with three new ones.
•Open the battery compartment (15), remove and properly
dispose of the dead batteries and insert three new AAA
batteries with the correct polarity.Then close the battery
compartment cover.
5. Installation
Note –Installation
•We recommend initially placing the base station and
measuring station(s) in the intended locations without
installing them and making all the settings described in
6. Operation.
•Only install the stations once the appropriate settings
have been made and astable wireless connection is
established.
Note
•The wireless transmission range between the measuring
and base stations is up to 50 minopen spaces.
•Beforeinstallation, ensurethat wireless transmission
will not be disrupted by interference or obstacles like
buildings, trees, vehicles, high-voltage lines, etc.
•Beforethe nal installation, ensurethat thereis
sucient reception between the intended installation
locations.
•When installing the measuring station, ensurethat it is
protected from direct sunlight and rain.
•The international standardheight for measuring air
temperatureis1.25 m(4ft) above ground.
Warning
•Buy special or suitable installation material from a
specialised dealer for wall-mounting.
•Ensurethat no faulty or damaged parts areinstalled.
•Never apply force during installation. This could damage
the product.
•Beforeinstallation, ensurethat the chosen wall is
suitable for the weight to be mounted, and make sure
that thereare no electrical wires, water,gas or other
lines at the installation site on the wall.
•Do not mount the product above locations where
persons might linger.
5.1 Base station
•Use the base to position the base station on alevel
surface.
5.2 Measuring station
•Youcan also position the measuring station on alevel
outdoor surface.
•We recommend installing the measuring station securely
on an outdoor wall using the opening (19).
6. Operation
6.1 Connection to the measuring station
After you have inserted the batteries, the base station
automatically searches for aconnection to the three
measuring stations and performs initial setup.
Note
•Remember that each of the three measuring stations
must use adifferent channel.
•Initial setup takes approximately 3minutes.
•During the connection attempt, the measuring station
radio symbol will ash.
•Do not press any buttons during setup. Otherwise,
values may not be transmitted correctly and thereisa
risk of value errors and inaccuracies.
•The process is completed when the indoor (2/4) and
outdoor (5/6/7) measurement data is displayed.
•If asignal from the measuring station is still not received,
select one of the three channels by pressing the CH button
(9). Then hold the CH button (9) for approximately 3
seconds to start the manual search for the signal.
•Press the TX button (18) on the desired measuring station
to initiate the transmission of asignal that can be received
by the base station.

5
6.2 Basic and manual settings
Automatic setting using the DCF signal (radio-
controlled clock)
•When the base station has been switched on for the rst
time and successful transmission has been established
between the base station and the measuring station, the
clock will automatically search for the DCF signal. During
the search, the radio symbol for DCF reception ashes.
Display (8) Searching for the DCF signal
Display ashing
Active
Displayed continuously
Successful –signal is being received
Not displayed Deactivated
•If the station still does not receive asignal, press and hold
the DOWN button (13) until the radio symbol begins to
ash, to start the manual search for the DCF signal.
Note –Time settings
•The search process takes about 3minutes. If the search
fails, it ends and is repeated at the next clock hour.The
radio symbol ( )goes out.
•It is not possible to manually set the time and date
during the search for the DCF signal.
•The clock automatically continues to search for the DCF
signal on adaily basis (between 1amand 5am) to
correct any deviations.
•If the signal is received successfully,the manually set
time and date areoverwritten.
•Press and hold the DOWN button (13) again for
approximately 3seconds to stop the manual search.
Note –Summer time
•The clock automatically switches to summer time.
Manual settings
Note
•Hold the UP button (12) or the DOWN button (13) to
select the values faster.
•Press the SET button (11) to make the following settings
in order:
•Time zone
•Year
•Calendar month
•Date
•Hour
•Minute
•12/24-hour format
•To select individual values, press the UP button (12) or the
DOWN button (13) and conrm each selection by pressing
the SET button (11).
•Press the SET button (11) to adopt the set value displayed
and to skip.
•If you do not make an entry for 20 seconds, you
automatically exit the setting mode.
Note –Time zone
•The DCF signal can be received over long distances, but
always transmits the current Central European Time in
Germany.Please note that for countries with adifferent
time zone, you must set the time difference manually.
•If you areinMoscow,for example, the time is 3hours
later than in Germany.This means that you should
set +3 for the time zone. The clock then sets the time
automatically to 3hours ahead after receiving the DCF
signal or according to the manually set time.

6
Celsius /Fahrenheit
•Press the DOWN button (13) to switch between °C and °F
for the temperaturedisplay.
6.3 Alarm
Alarm mode AL is displayed between the hours and minutes
of the time display.
•Press the ALARM button (8) once to call up alarm mode.
•Press and hold the ALARM button (8) for approximately
3seconds to set the alarm time. The hours display begins
to ash.
•Press the UP button (12) or the DOWN button (13)
to select the hour for the alarm time and conrm your
selection by pressing the ALARM button (8). The minutes
display begins to ash.
•Repeat the process to set the minutes for the alarm time.
•If you do not make an entry for approximately 5seconds,
you automatically exit the setting mode.
•Press the DOWN button (13) to activate or deactivate
the alarm. An active alarm is displayed by the alarm
symbol ( ). The alarm symbol goes out when the alarm
is deactivated.
•If the alarm is triggered, the alarm symbol ( )will begin
to ash and an alarm will sound.
•Press any button (except the SNZ/LIGHT button (10)) to
stop the alarm. Otherwise, it will stop automatically after
2minutes.
Note –Snooze function a
•While the alarm signal is sounding, press the SNZ/
LIGHT button (10) to activate the snooze function. The
alarm symbol ( )will start to ash on the display.The
alarm signal will stop for 5minutes, after which it will
sound again.
•Press any button (except the SNZ/LIGHT button) to stop
the snooze function and the alarm.
6.4 Maximum and minimum temperature and
humidity values
The base station automatically stores the maximum and
minimum outdoor/indoor temperatureand humidity values.
•Repeatedly press the UP button (12) to switch the
display between the current temperatureand humidity,
maximum temperatureand humidity (MAX) and minimum
temperatureand humidity (MIN).
6.5 Backlight
•Press the SNZ/LIGHT button (10) to light up the display
for approximately 5seconds.
7. Care and Maintenance
•Only clean this product with aslightly damp, lint-free cloth
and do not use aggressive cleaning agents.
•Make surethat water does not get into the product.
8. Warranty Disclaimer
Hama GmbH &CoKGassumes no liability and provides no
warranty for damage resulting from improper installation/
mounting, improper use of the product or from failureto
observe the operating instructions and/or safety notes.

7
10. Recycling Information
Note on environmental protection:
After the implementation of the European Directive
2012/19/EU and 2006/66/EU in the national legal
system, the following applies: Electric and
electronic devices as well as batteries must not be
disposed of with household waste. Consumers are
obliged by law to return electrical and electronic devices as
well as batteries at the end of their service lives to the public
collecting points set up for this purpose or point of sale.
Details to this aredened by the national law of the
respective country.This symbol on the product, the
instruction manual or the package indicates that aproduct is
subject to these regulations. By recycling, reusing the
materials or other forms of utilising old devices/batteries, you
aremaking an important contribution to protecting our
environment.
11. Declaration of Conformity
Hereby,Hama GmbH &CoKGdeclares that the
radio equipment type [00136293, 00186311] is in
compliance with Directive 2014/53/EU.The full text
of the EU declaration of conformity is available at the
following internet address: www.hama.com ->00136293,
00186311-> Downloads.
Frequency band(s) 433 MHz
Maximum radio-frequency power
transmitted
9,419 mW
9. Technical Data
Base station Measuring station
Power supply
4.5 V
3x AAA batteries 3.0 V
2xAAbatteries
We recommend using AA lithium batteries for
the outdoor sensors when outdoor
temperatures arebelow 0°C/32°F.
Measuring range:
Temperature
Humidity 0°C –+50°C /32°F –+122°F
10 –99% -40°C –+70°C /-40°F –+158°F
20% –95%
Measurement increments:
Temperature
Humidity 0.1°C/ 0.2°F
1% 0.1°C/ 0.2°F
1%
Radio-controlled DCF clock YesNo
Thermometer YesYes
Hygrometer YesYes
Alarm function YesNo
Max. number of measuring stations 3
Range ≤30 m

8
DBedienungsanleitung
Bedienungselemente und Anzeigen
ABasisstation
1. Uhrzeit
2. Raumtemperatur
3. Wochentag +Datum +Kalendermonat
Funksymbol DCF Signal
4. Raumluftfeuchtigkeit
5. Außentemperatur/Außenluftfeuchtigkeit Kanal 1
(CH1), Anzeige für niedrigen Batteriestand
Messstation 1
6. Außentemperatur/Außenluftfeuchtigkeit Kanal 2
(CH2), Anzeige für niedrigen Batteriestand
Messstation 2
7. Außentemperatur/Außenluftfeuchtigkeit Kanal 3
(CH3), Anzeige für niedrigen Batteriestand
Messstation 3
8. ALARM-Taste =Anzeige/ Einstellung/
Deaktivierung/ Aktivierung der Alarmfunktionen
9. CH-Taste =Manuelle Suche nach Signal der
Messstation/Kanalauswahl
10. SNZ/LIGHT-Taste =(Snooze) Unterbrechung des
Wecksignals /Aktivierung Hintergrundbeleuchtung
11. SET-Taste =Einstellungen /Bestätigung des
Einstellungswerts
12. UP-Taste =Erhöhung des aktuellen
Einstellungswertes/ Abruf der gespeicherten
Höchst-/ Tiefstwerte (MAX/MIN)
13. Down-Taste= Verringerung des aktuellen
Einstellungswertes /Wechsel zwischen °C und
°F /Aktivierung/ Deaktivierung manueller DCF
Funksignal Empfang
14. +16. AusklappbareStandfüße
15. Batteriefach
BMessstation
17. Kontrollleuchte Übertragung
18. TX-Taste =Manuelle Verbindung mit der
Basisstation
19. Aussparung für Wandmontage
20. Schiebeschalter =Kanalauswahl 1,2 oder 3
21. Batteriefach
Vielen Dank, dass Sie sich für ein Hama Produkt entschieden
haben! Nehmen Sie sich Zeit und lesen Sie die folgenden
Anweisungen und Hinweise zunächst ganz durch. Bewahren
Sie diese Bedienungsanleitung anschließend an einem
sicheren Ort auf,umbei Bedarf darin nachschlagen zu
können. Sollten Sie das Gerät veräußern, geben Sie diese
Bedienungsanleitung an den neuen Eigentümer weiter.
1. Erklärung von Warnsymbolen und Hinweisen
Warnung
Wirdverwendet, um Sicherheitshinweise zu kennzeichnen
oder um Aufmerksamkeit auf besondereGefahren und
Risiken zu lenken.
Hinweis
Wirdverwendet, um zusätzlich Informationen oder
wichtige Hinweise zu kennzeichnen.
2. Packungsinhalt
•Wetterstation Trio (Basisstation für den Innenraum)
•3Messstationen für den Außenbereich
•3AAA-Batterien
•6AA-Batterien
•diese Bedienungsanleitung
3. Sicherheitshinweise
•Das Produkt ist für den privaten, nicht-gewerblichen
Haushaltsgebrauch vorgesehen.
•Betreiben Sie das Produkt nicht außerhalb seiner in den
technischen Daten angegebenen Leistungsgrenzen.
•Verwenden Sie das Produkt nicht in einer feuchten
Umgebung und vermeiden Sie Spritzwasser.
•Betreiben Sie das Produkt nicht in unmittelbarer Nähe
der Heizung, anderer Hitzequellen oder in direkter
Sonneneinstrahlung.
•Benutzen Sie das Produkt nicht in Bereichen, in denen
elektronische Produkte nicht erlaubt sind.
•Positionieren Sie das Produkt nicht in der Nähe von
Störfeldern, Metallrahmen, Computern und Fernsehern etc.
Elektronische Geräte sowie Fensterrahmen beeinträchtigen
die Funktion des Produktes negativ.

9
•Lassen Sie das Produkt nicht fallen und setzen Sie es
keinen heftigen Erschütterungen aus.
•Öffnen Sie das Produkt nicht und betreiben Sie es bei
Beschädigungen nicht weiter.
•Versuchen Sie nicht, das Produkt selbst zu warten oder zu
reparieren. Überlassen Sie jegliche Wartungsarbeit dem
zuständigen Fachpersonal.
•Halten Sie Kinder unbedingt von dem Verpackungsmaterial
fern, es besteht Erstickungsgefahr.
•Entsorgen Sie das Verpackungsmaterial sofort gemäß den
örtlich gültigen Entsorgungsvorschriften.
•Nehmen Sie keine Veränderungen am Produkt vor.
Dadurch verlieren Sie jegliche Gewährleistungsansprüche.
•Verwenden Sie das Produkt ausschließlich für den dazu
vorgesehenen Zweck.
•Schützen Sie das Produkt vor Schmutz, Feuchtigkeit und
Überhitzung und verwenden Sie es nur in trockenen
Umgebungen.
•Dieses Produkt gehört, wie alle elektrischen Produkte, nicht
in Kinderhände!
•Verwenden Sie den Artikel nur unter moderaten
klimatischen Bedingungen.
Warnung -Batterien
•Beachten Sie unbedingt die korrekte Polarität
(Beschriftung +und -) der Batterien und legen Sie
diese entsprechend ein. Bei Nichtbeachtung besteht
die Gefahr des Auslaufens oder einer Explosion der
Batterien.
•Verwenden Sie ausschließlich Akkus (oder Batterien), die
dem angegebenen Typentsprechen.
•Reinigen Sie vor dem Einlegen der Batterien die
Batteriekontakte und die Gegenkontakte.
•Gestatten Sie Kindern nicht ohne Aufsicht das Wechseln
von Batterien.
•Mischen Sie alte und neue Batterien nicht, sowie
Batterien unterschiedlichen Typs oder Herstellers.
•Entfernen Sie Batterien aus Produkten, die längereZeit
nicht benutzt werden (außer diese werden für einen
Notfall bereit gehalten).
•Schließen Sie die Batterien nicht kurz.
•Laden Sie Batterien nicht.
•Werfen Sie Batterien nicht ins Feuer.
•Entfernen und entsorgen Sie verbrauchte Batterien
unverzüglich aus dem Produkt.
•Vermeiden Sie Lagerung, Laden und Benutzung bei
extremen Temperaturen und extrem niedrigem Luftdruck
(wie z.B. in großen Höhen).
•Bewahren Sie Batterien außerhalb der Reichweite von
Kindern auf.
•Batterien nie öffnen, beschädigen, verschlucken oder
in die Umwelt gelangen lassen. Sie können giftige und
umweltschädliche Schwermetalle enthalten.
4.
Inbetriebnahme
Hinweis
Beachten Sie, dass Sie bei der Inbetriebnahme immer
zuerst die Batterien in die Messstation, und dann in die
Basisstation einlegen.
4.1 Messstation
•Öffnen Sie das Batteriefach (21) und legen Sie 2AA
Batterien polrichtig ein.
•Wählen Sie mit dem Schiebeschalter (20) den Kanal
aus, auf dem die jeweilige Messstation senden soll. Jede
der 3Messstationen muss einen anderen Kanal nutzen!
•Schließen Sie die Batteriefachabdeckung anschließend.
4.2 Basisstation
•Öffnen Sie das Batteriefach (15) und legen Sie 3AAA
Batterien polrichtig ein.
•Schließen Sie die Batteriefachabdeckung anschließend.
4.3 Batterien wechseln
Hinweis –Batteriewechsel
•Beachten Sie, dass nach jedem Batteriewechsel an
Mess- oder Basisstation eine neue Synchronisation
erfolgen muss.
•Nehmen Sie dazu die Batterien der anderen Station
heraus und setzen sie erneut ein oder wechseln Sie diese
bei Bedarf ebenfalls aus.

10
Messstation
•Wenn das Symbol auf der Basisstation im Bereich der
Messwerte einer der drei Messstationen (5/6/7) angezeigt
wird, ersetzen Sie die 2AA-Batterien der betroffenen
Messstation durch 2entsprechende neue Batterien.
•Öffnen Sie das Batteriefach (21), entnehmen und
entsorgen Sie die verbrauchten Batterien und legen Sie
2neue AAA-Batterien polrichtig ein. Schließen Sie die
Batteriefachabdeckung anschließend.
Basisstation
•Wenn das Symbol auf der Basisstation im Bereich der
Innenraumwerte (2) angezeigt wird, ersetzen Sie die 3
AAA-Batterien in der Basisstation durch 3entsprechende
neue Batterien.
•Öffnen Sie das Batteriefach (15), entnehmen und
entsorgen Sie die verbrauchten Batterien und legen Sie
3neue AA Batterien polrichtig ein. Schließen Sie die
Batteriefachabdeckung anschließend.
5. Montage
Hinweis –Montage
•Es wirdempfohlen, die Basis- und Messstation(en)
zunächst an den gewünschten Aufstellorten ohne
Montage zu platzieren und alle Einstellungen -wie in 6.
Betrieb beschrieben –vorzunehmen.
•Montieren Sie erst nach korrekter Einstellung und
stabiler Funkverbindung die Station/en.
Hinweis
•Die Reichweite der Funkübertragung zwischen der Mess-
und Basisstation beträgt im freien Gelände bis zu 50 m.
•Achten Sie vor der Montage darauf,dass die
Funkübertragung nicht durch Störsignale oder
Hindernisse wie Gebäude, Bäume, Fahrzeuge,
Hochspannungsleitungen, u.a. beeinusst wird.
•Stellen Sie vor der endgültigen Montage sicher,dass
zwischen den gewünschten Aufstellorten ausreichender
Empfang besteht.
•Achten Sie bei der Montage der Messstation darauf,
dass diese vor direkter Sonne und Regen geschützt
positioniert ist.
•Die internationale Standardhöhe für die Messung der
Lufttemperatur beträgt 1,25 m(4ft) über Grund.
Warnung
•Besorgen Sie sich spezielles bzw.geeignetes
Montagematerial im Fachhandel für die Montage an der
vorgesehenen Wand.
•Stellen Sie sicher,dass keine fehlerhaften oder
beschädigten Teile montiert werden.
•Wenden Sie bei der Montage niemals Gewalt oder hohe
Kräfte an. Diese können das Produkt beschädigen.
•Prüfen Sie vor Montage die Eignung der vorgesehenen
Wand für das anzubringende Gewicht und vergewissern
Sie sich, dass sich an der Montagestelle in der Wand
keine elektrischen Leitungen, Wasser-, Gas- oder
sonstige Leitungen benden.
•Montieren Sie das Produkt nicht an Orten, unter denen
sich Personen aufhalten könnten.
5.1 Basisstation
•Stellen Sie die Basisstation mithilfe des Standfußes auf
einer ebenen Fläche auf.
5.2 Messstation
•Die Messstation können Sie ebenfalls auf einer ebenen
Fläche im Außenbereich aufstellen.
•Es wirdempfohlen, die Messstation sicher und fest
an einer Außenwand mithilfe der Aussparung (19) zu
montieren.
6. Betrieb
6.1 Verbindung zur Messstation
Nach dem Einlegen der Batterien sucht die Basisstation
automatisch nach einer Verbindung zu den 3Messstationen
und führt die Ersteinrichtung durch.
Hinweis
•Beachten Sie stets, dass jede der 3Messstationen einen
anderen Kanal nutzt.
•Die Ersteinrichtung dauert ca. 3Minuten.
•Während des Verbindungsversuchs blinkt das
Funksymbol Messstation auf.

11
•Vermeiden Sie in dieser Zeit jegliche Betätigung der
Tasten! Andernfalls können Fehler und Ungenauigkeiten
bei den Werten und deren Übertragung entstehen.
•Der Vorgang ist beendet, sobald die Messdaten für
Innen- (2/4) und Außenbereich (5/6/7) angezeigt
werden.
•Wirdwiederholt kein Signal von der Messstation
empfangen, wählen Sie durch Drücken der CH-Taste (9)
einen der drei Kanäle aus. Anschließend die CH-Taste
(9) für ca. 3Sekunden gedrückt halten, um die manuelle
Suche nach dem Signal zu starten.
•Drücken Sie anschließend die TX-Taste (18) an der
gewünschten Messstation, um diese ein Signal ausstrahlen
zu lassen, das von der Basisstation empfangen werden
kann.
6.2 Grundeinstellungen und manuelle Einstellungen
Automatische Einstellung nach DCF-Signal (Funkuhr)
•Nach dem ersten Einschalten der Basisstation und
erfolgreicher Übertragung zwischen Basis- und
Messstation, beginnt die Uhr automatisch die Suche nach
dem DCF-Signal. Während des Suchvorgangs blinkt das
Funksymbol für den DCF-Empfang.
Anzeige (8) Suche nach DCF-Signal
Blinkende Anzeige
Aktiv
Dauerhafte Anzeige
Erfolgreich –Signal wirdempfangen
Keine Anzeige Inaktiv
•Wirdwiederholt kein Signal empfangen, drücken und
halten Sie die DOWN -Taste (13), bis das Funksymbol zu
blinken beginnt, um die manuelle Suche nach dem DCF-
Signal zu starten.
Hinweis –Uhrzeiteinstellung
•Der Suchvorgang dauert etwa 3Minuten. Falls dieser
fehlschlägt, wirddie Suche beendet und zur nächsten
vollen Stunde wiederholt. Das Funksymbol ( )erlischt.
•Eine manuelle Einstellung von Uhrzeit und Datum ist
während des Suche nach dem DCF-Signal nicht möglich.
•Die Uhr sucht automatisch weiterhin täglich (zwischen
01:00 Uhr und 05:00 Uhr) nach dem DCF-Signal, um
mögliche Abweichungen zu korrigieren.
•Bei erfolgreichem Signalempfang werden die manuell
eingestellte Uhrzeit und das Datum überschrieben.
•Drücken und halten Sie die DOWN -Taste (13) erneut
für ca. 3Sekunden, um den manuellen Suchvorgang zu
beenden.
Hinweis –Sommerzeit
•Die Uhrzeit stellt sich automatisch auf die Sommerzeit
um.
Manuelle Einstellungen
Hinweis
•Halten Sie die UP -Taste (12) oder die DOWN -Taste (13)
gedrückt, um die Werte schneller auswählen zu können.
•Drücken Sie die SET-Taste (11), um folgende Einstellungen
nacheinander vorzunehmen:
•Zeitzone
•Jahr
•Kalendermonat
•Datum
•Stunde
•Minute
•12/24-Stunden-Format
•Drücken Sie zum Auswählen der einzelnen Werte die UP-
Taste (12) oder die DOWN-Taste (13) und bestätigen Sie
die jeweilige Auswahl durch Drücken der SET-Taste (11).
•Drücken Sie direkt die SET-Taste (11), um den angezeigten
Einstellungswert zu übernehmen und zu überspringen.
•Erfolgt 20 Sekunden keine Eingabe, wirdder
Einstellungsmodus automatisch verlassen.

12
Hinweis –Zeitzone
•Das DCF-Signal kann weitläugempfangen werden,
entspricht jedoch immer der MEZ, die in Deutschland
gilt. Beachten Sie daher,dass Sie in Ländern mit anderer
Zeitzone die Zeitverschiebung manuell einstellen
müssen.
•Benden Sie sich z.B. in Moskau, ist es dort bereits 3
Stunden später als in Deutschland. Stellen Sie daher bei
der Zeitzone +3 ein. Die Uhr stellt sich dann immer nach
Empfang des DCF-Signals bzw.inBezug auf die manuell
eingestellte Uhrzeit automatisch 3Stunden weiter.
Celsius /Fahrenheit
•Drücken Sie die DOWN-Taste (13), um bei der
Temperaturanzeige zwischen °C und °F zu wechseln.
6.3 Wecker (Alarm)
Der Alarmmodus AL wirdzwischen den Stunden und den
Minuten der Zeitanzeige angezeigt.
•Drücken Sie die ALARM-Taste (8) einmal, um den
Alarmmodus aufzurufen.
•Drücken und halten Sie die ALARM-Taste (8) für
ca. 3Sekunden, um die Weckzeit einzustellen. Die
Stundenanzeige beginnt zu blinken.
•Drücken Sie die UP-Taste (12) oder die DOWN-Taste (13),
um die Stunden der Weckzeit auszuwählen und bestätigen
Sie die Auswahl durch Drücken der ALARM-Taste (8). Die
Minutenanzeige beginnt zu blinken.
•Wiederholen Sie diesen Vorgang für die Minuten der
Weckzeit.
•Erfolgt ca. 5Sekunden keine Eingabe, wirdder
Einstellungsmodus automatisch verlassen.
•Drücken Sie die DOWN-Taste (13), um den Alarm
zu aktivieren oder zu deaktivieren. Der aktive Alarm
wirddurch das Alarmsymbol ( )angezeigt. Bei
der Deaktivierung des aktiven Alarms erlischt das
Alarmsymbol.
•Wirdder Wecker entsprechend ausgelöst, beginnt das
Alarmsymbol ( )zublinken und ein Wecksignal ertönt.
•Drücken Sie eine beliebige Taste (außer die SNZ/LIGHT-
Taste (10)), um den Alarm zu beenden. Andernfalls endet
dieser automatisch nach 2Minuten.
Hinweis –Schlummerfunktion
•Drücken Sie während des Wecksignals die SNZ/LIGHT-
Taste (10), um die Schlummerfunktion zu aktivieren. Auf
dem Display beginnt das Alarmsymbol ( )zublinken.
Das Wecksignal wirdfür 5Minuten unterbrochen und
dann erneut ausgelöst.
•Drücken Sie eine beliebige Taste (außer die SNZ/LIGHT-
Taste), um die Schlummerfunktion und damit den Alarm
zu beenden.
6.4 Höchst- und Tiefstwerte der Temperatur und
Luftfeuchtigkeit
Die Basisstation speichert die Höchst- und Tiefstwerte
der Temperatur sowie der Luftfeuchtigkeit im Außen- und
Raumbereich automatisch ab.
•Drücken Sie wiederholt die UP-Taste (12), um zwischen
der Anzeige von aktueller Temperatur und Luftfeuchtigkeit,
höchster Temperatur und Luftfeuchtigkeit (MAX) und
niedrigster Temperatur und Luftfeuchtigkeit (MIN) zu
wechseln.
6.5 Hintergrundbeleuchtung
•Drücken Sie die SNZ/LIGHT-Taste (10), wirddas Display
für ca. 5Sekunden beleuchtet.
7. Wartung und Pflege
•Reinigen Sie dieses Produkt nur mit einem fusselfreien,
leicht feuchten Tuch und verwenden Sie keine aggressiven
Reiniger.
•Achten Sie darauf,dass kein Wasser in das Produkt
eindringt.
8. Haftungsausschluss
Die Hama GmbH &CoKGübernimmt keinerlei Haftung
oder Gewährleistung für Schäden, die aus unsachgemäßer
Installation, Montage und unsachgemäßem Gebrauch
des Produktes oder einer Nichtbeachtung der
Bedienungsanleitung und/oder der Sicherheitshinweise
resultieren.

13
10. Entsorgungshinweise
Hinweis zum Umweltschutz:
Ab dem Zeitpunkt der Umsetzung der europäischen
Richtlinien 2012/19/EU und 2006/66/EG in
nationales Recht gilt folgendes: Elektrische und
elektronische Geräte sowie Batterien dürfen nicht
mit dem Hausmüll entsorgt werden. Der
Verbraucher ist gesetzlich verpichtet, elektrische und
elektronische Geräte sowie Batterien am Ende ihrer
Lebensdauer an den dafür eingerichteten, öffentlichen
Sammelstellen oder an die Verkaufsstelle zurückzugeben.
Einzelheiten dazu regelt das jeweilige Landesrecht. Das
Symbol auf dem Produkt, der Gebrauchsanleitung oder der
Verpackung weist auf diese Bestimmungen hin. Mit der
Wiederverwertung, der stoichen Verwertung oder anderen
Formen der Verwertung von Altgeräten/Batterien leisten Sie
einen wichtigen Beitrag zum Schutz unserer Umwelt.
11. Konformitätserklärung
Hiermit erklärt die Hama GmbH &CoKG, dass der
Funkanlagentyp [00136293, 00186311] der
Richtlinie 2014/53/EU entspricht. Der vollständige
Text der EU-Konformitätserklärung ist unter der folgenden
Internetadresse verfügbar:
www.hama.com ->00136293, 00186311-> Downloads.
Frequenzband/Frequenzbänder 433 MHz
Abgestrahlte maximale
Sendeleistung
9,419 mW
9. Technische Daten
Basisstation Außensensor
Stromversorgung
4,5 V
3x AAA Batterie 3,0 V
2xAA Batterie
Bei Außentemperaturen unterhalb von 0°C/
32°F werden für die Außensensoren Lithium-
Batterien der Größe AA empfohlen.
Messbereich:
Temperatur
Luftfeuchtigkeit 0°C –+50°C /32°F –+122°F
10 –99% -40°C –+70°C /-40°F –+158°F
20% –95%
Messschritte:
Temperatur
Luftfeuchtigkeit 0,1°C/ 0,2°F
1% 0,1°C/ 0,2°F
1%
DCF-Funkuhr Ja Nein
Thermometer Ja Ja
Hygrometer Ja Ja
Weckfunktion Ja Nein
Max. Anzahl Messstationen 3
Reichweite ≤30 m

14
FMode d‘emploi
Éléments de commande et d'affichage
AStation de base
22. Heure
23. Températureambiante
24. Icône radio signal DCF jour de la semaine +date +
mois calendaire
25. Humidité de l’air ambiant
26. Températureextérieure/humidité de l’air extérieur
du canal 1(CH1), achage de piles faibles pour la
station de mesure1
27. Températureextérieure/humidité de l’air extérieur
du canal 2(CH2), achage de piles faibles pour la
station de mesure2
28. Températureextérieure/humidité de l’air extérieur
du canal 3(CH3), achage de piles faibles pour la
station de mesure3
29. Touche ALARME =achage /réglage /
désactivation/activation des fonctions d’alarme
30. Touche CH =recherche manuelle du signal de la
station de mesure/sélection du canal
31. Touche SNZ/LIGHT =interruption de la sonnerie
de réveil (snooze) /allumage du rétroéclairage
32. Touche SET =réglages /conrmation de la valeur
sélectionnée
33. Touche UP =augmentation de la valeur en cours
de réglage /consultation des valeurs maximales /
minimales en mémoire(MAX/MIN)
34. Touche Down =diminution de la valeur en
cours de réglage /commutation entre°Cet°F/
activation/désactivation de la réception manuelle
du signal radio DCF
35. +16. Pieds support escamotables
36. Compartiment àpiles
BStation de mesure
17. Témoin de contrôle transmission
18. Touche TX =connexion manuelle avec la station
de base
19. Fente pour installation murale
20. Sélecteur =sélection du canal 1, 2ou3
21. Compartiment àpiles
Nous vous remercions d’avoir choisi un produit Hama.
Veuillez prendreletemps de lirel‘ensemble des remarques et
consignes suivantes. Veuillez conserver ce mode d‘emploi à
portée de main andepouvoir le consulter en cas de besoin.
Transmettez-le au nouveau propriétaireavec l’appareil le cas
échéant.
1. Explication des symboles d‘avertissement et des
remarques
Avertissement
Ce symbole est utilisé pour indiquer des consignes de
sécurité ou pour attirer votreattention sur des dangers et
risques particuliers.
Remarque
Ce symbole est utilisé pour indiquer des informations
supplémentaires ou des remarques importantes.
2. Contenu de l‘emballage
•Station météo Trio (station de base pour l’intérieur)
•3stations de mesurepour l’extérieur
•3piles LR03/AAA
•6piles LR6/AA
•Mode d'emploi
3.
Consignes de sécurité
•Ce produit est destiné àune installation domestique non
commerciale.
•N‘utilisez pas le produit en dehors des limites de puissance
indiquées dans les caractéristiques techniques.
•N‘utilisez pas le produit dans un environnement humide et
évitez toute projection d‘eau.
•Évitez d’utiliser le produit àproximité immédiate d‘un
chauffage, d’autres sources de chaleur ou exposé aux
rayons directs du soleil.
•N‘utilisez pas le produit dans les zones dans lesquelles
l‘utilisation d‘appareils électroniques est interdite.
•Ne placez pas le produit àproximité de champs parasites,
de cadres métalliques, d‘ordinateurs, de téléviseurs, etc.
Les appareils électroniques ainsi que les cadres de fenêtre
ont une inuence négative sur le fonctionnement du

15
produit.
•Protégez le produit des secousses violentes et évitez tout
choc ou toute chute.
•Ne tentez pas d‘ouvrir le produit en cas de détérioration et
cessez de l’utiliser.
•Ne tentez pas de réparer l’appareil vous-même ni
d’effectuer des travaux d’entretien. Déléguez tous travaux
d‘entretien àdes techniciens qualiés.
•Tenez les emballages d‘appareils hors de portée des
enfants, risque d‘étouffement.
•Recyclez les matériaux d’emballage conformément aux
prescriptions locales en vigueur.
•N’apportez aucune modication àl’appareil. Des
modications vous feraient perdrevos droits de garantie.
•Utilisez le produit exclusivement conformément àsa
destination.
•Protégez le produit de toute saleté, humidité, surchauffe et
utilisez-le uniquement dans des environnements secs.
•Cet appareil, comme tout appareil électrique, doit être
gardé hors de portée des enfants !
•Utilisez l’article uniquement dans des conditions
climatiques modérées.
Avertissement concernant les piles
•Respectez impérativement la polarité de la pile
(marquage +et-)lors de l‘insertion dans le boîtier ;
risques d‘écoulement et d‘explosion des piles si tel n‘est
pas le cas.
•Utilisez exclusivement des batteries (ou des piles) du
type indiqué.
•Avant d‘insérer les piles, nettoyez-en les contacts, ainsi
que les contacts d‘accouplement.
•N‘autorisez pas àdes enfants de remplacer les piles d‘un
appareil sans surveillance.
•N’utilisez pas simultanément des piles usagées et des
piles neuves ou des piles de différents types.
•Retirez les piles des produits que vous ne comptez pas
utiliser pendant un certain temps (à l‘exception des
produits d‘alarme en veille).
•Ne court-circuitez pas les piles.
•Ne tentez pas de recharger les piles.
•Ne jetez pas de piles au feu.
•Conservez les piles hors de portée des enfants.
•Ne tentez pas d‘ouvrir les piles, faites attention ànepas
les endommager,les jeter dans l’environnement et àce
que des petits enfants ne les avalent pas. Les piles sont
susceptibles de contenir des métaux lourds toxiques et
nocifs pour l‘environnement.
•Retirez les piles usagées immédiatement du produit pour
les recycler.
•Évitez de stocker,charger et utiliser le produit àdes
températures extrêmes et àune pression atmosphérique
extrêmement basse (à haute altitude, par exemple).
4.
Mise en service
Remarque
Lors de la premièremise en service, insérez tout d’abord
les piles dans la station de mesure, puis dans la station
de base.
4.1 Station de mesure
•Ouvrez le compartimentàpiles (21) et insérez deux
piles LR6/AA en respectant les indications de polarité.
•Sélectionnez le canal d’émission de la station de mesure
concernée àl’aide du sélecteur (20). Chacune des 3
stations de mesuredoit utiliser un canal différent.
•Refermez le couvercle du compartiment àpiles.
4.2 Station de base
•Ouvrez le compartimentàpiles (15) et insérez trois
piles LR03/AAA en respectant les indications de polarité.
•Refermez le couvercle du compartiment àpiles.
4.3 Remplacement des piles
Remarque concernant le remplacement
des piles
•Veuillez noter qu‘après chaque remplacement de piles
de la station de base ou de la station de mesure, vous
devrez effectuer une nouvelle synchronisation der
stations.
•Lors de cette synchronisation, extrayez également les
piles de la station qui continuait àfonctionner,puis
réinsérez-les ou remplacez ces dernières.

16
Station de mesure
•Remplacez les deux piles LR6/AA de la station de mesure
concernée par deux nouvelles piles du même type lorsque
l’icône apparaît àl’écran de la station de base, dans
la zone des valeurs mesurées de l’une des trois stations de
mesure(5/6/7).
•Ouvrez le compartiment àpiles (21), retirez et éliminez les
piles déchargées, puis insérez deux nouvelles piles LR03/
AAA en respectant les indications de polarité. Refermez le
couvercle du compartiment àpiles.
Station de base
•Remplacez les trois piles LR03/AAA de la station de base
par trois nouvelles piles du même type lorsque le symbole
apparaît àl’écran de la station de base, dans la zone
des valeurs pour l’intérieur (2).
•Ouvrez le compartiment àpiles (15), retirez et éliminez
les piles usagées, puis insérez 3nouvelles piles LR03/
AAA en respectant les indications de polarité. Refermez le
couvercle du compartiment àpiles.
5. Installation
Remarque concernant l'installation
•Nous vous recommandons de positionner la station
de base et la/les station(s) de mesureaux endroits
envisagés sans effectuer le montage, puis d'effectuer
tous les réglages décrits au chapitre
6. Fonctionnement.
•Procédez àl'installation de la/des station(s) après avoir
effectué les réglages et après réception d’une connexion
radio stable.
Remarque
•La portée de la transmission radio entrelastation de
base et la station de mesureest de 50 mdans un espace
dégagé.
•Veuillez contrôler,avant l‘installation, que la portée
radio ne soit pas altérée par des interférences ou des
obstacles tels que bâtiments, arbres, véhicules, lignes
haute tension, etc.
•Veuillez contrôler,avant l‘installation dénitive, la bonne
qualité de la transmission entreles deux stations.
•Veuillez également protéger les stations de
l‘ensoleillement direct et de la pluie lors de l‘installation.
•La hauteur standardinternationale de mesuredela
températuredel‘air est de 1,25 m(4ft) au-dessus du sol.
Avertissement
•En vue de l‘installation, procurez-vous le matériel
d‘installation adéquat pour le mur concerné dans un
commerce spécialisé.
•Veuillez contrôler que l‘emballage ne contienne aucune
pièce erronée ni endommagée.
•N‘appliquez en aucun cas une force excessive lors
de l‘installation. Une force excessive est susceptible
d‘endommager le produit.
•Avant l‘installation, vériez que le mur prévu pour
recevoir le produit dispose d‘une force portante
susante et qu‘aucune conduite d‘électricité, d‘eau, de
gaz ni aucune autreconduite ne passe dans cette partie
de la cloison.
•N‘installez pas le produit àunendroit où des personnes
sont susceptibles de se tenir.
5.1 Station de base
•Placez la station de base sur une surface plane àl‘aide
de son pied.
5.2 Station de mesure
•Vous pouvez également placer la station de mesureà
l‘extérieur,sur une surface plane, àl‘aide de son pied.
•Nous vous recommandons d‘installer solidement la station
de mesureàune paroi extérieureàl’aide de l’encoche
(19).
6. Fonctionnement
6.1 Connexion àlastation de mesure
La station de base recherche automatiquement une
connexion aux trois stations de mesureaprès avoir inséré les
piles et effectue la conguration initiale.

17
Remarque
•Veillez àceque chacune des trois stations de mesure
utilise un canal différent.
•La conguration initiale dureenviron 3minutes.
•L'icône radio de la station de mesure clignote
pendant la tentative de connexion.
•N'appuyez sur aucune touche pendant cette phase ;
des erreurs, des mesures inexactes ou une mauvaise
transmission pourraient en résulter.
•La conguration est terminée dès que les valeurs
mesurées pour la zone intérieure(2/4) et pour la zone
extérieure(5/6/7) apparaissent àl'écran.
•En cas de plusieurs échecs de réception du signal par la
station de la mesure, sélectionnez l’un des trois canaux à
l’aide de la touche CH (9). Appuyez ensuite sur la touche
CH (9) pendant environ 3secondes andelancer une
recherche manuelle du signal.
•Appuyez ensuite sur la touche TX (18) de la station de
mesuresouhaitée anque celle-ci émette un signal
pouvant êtrereçu par la station de base.
6.2 Réglages de base et paramétrage manuel
Réglage automatique sur la base du signal DCF
(horloge radiopilotée)
•L'horloge recherche automatiquement le signal DCF après
la premièremise sous tension de la station de base et en
présence d’une bonne transmission entrelastation de
base et la station de mesure. L’icône radio de réception
DCF clignote pendant la recherche.
Achage (8) Recherche du signal DCF
Achage clignotant
Recherche active
Achage permanent
Recherche aboutie –
Signal en cours de réception
Aucun achage Inactif
•En cas de plusieurs échecs de réception du signal, appuyez
sur la touche DOWN (13) et maintenez-la enfoncée
jusqu’au clignotement de l’icône radio andelancer une
recherche manuelle du signal horaireDCF.
Remarque concernant le réglage de l'heure
•Cette recherche dureenviron 3minutes. En cas d'échec
de détection du signal, la station recommence à
rechercher le signal àl'heurepleine suivante. L’icône
radio ( )s’éteint.
•Il n’est pas possible de régler manuellement l’heureetla
date pendant la recherche du signal DCF.
•L’horloge continue automatiquement àrechercher
quotidiennement le signal DCF (entre1h00 et 5h00) an
de corriger d’éventuelles divergences.
•Les réglages manuels de l'heureetdeladate seront
corrigés dès que la station reçoit correctement le signal
radio.
•Appuyez ànouveau sur la touche DOWN (13) et
maintenez-la enfoncée pendant environ 3secondes ande
mettre nàlarecherche manuelle.
Remarque concernant l'heured'été
La station s'adapte automatiquement àl'heured'été.
Réglages manuels
Remarque
Maintenez la touche UP (12) ou DOWN (13) enfoncée an
de fairedéler rapidement les chiffres.
•Appuyez sur la touche SET (11) pour procéder
successivement aux réglages suivants :
•Fuseau horaire
•Année
•Mois calendaire
•Date
•Heure
•Minute
•Format horaire12/24 heures
•Appuyez sur la touche UP (12) ou DOWN (13) ande
sélectionner les différentes valeurs, puis conrmez votre
sélection en appuyant sur la touche SET (11).

18
•Appuyez directement sur la touche SET (11) and’adopter
la valeur achée et passer au réglage suivant.
•Le mode de paramétrage s'interrompt automatiquement
si vous n'appuyez sur aucune touche pendant plus de 20
secondes.
Remarque concernant les fuseaux horaires
•Il est possible de recevoir le signal DCF àgrande distance ;
ce signal correspond toutefois toujours àl'heureenvigueur
en Allemagne. Veuillez donc noter que vous devrez régler
manuellement un décalage horairedans les pays situés
dans un autrefuseau horaire.
•Si vous vous trouvez, par exemple àMoscou, le décalage
horaireentreMoscou et l'Allemagne est de 3heures
(l'heuredeMoscou est en avance). Réglez donc le
fuseau horairesur +3. La station s'adapteraalors
automatiquement àl'heurecaptée par le signal horaireDCF
(ou àl'heureréglée manuellement) et lui ajoutera3heures.
Celsius /Fahrenheit
•Appuyez sur la touche DOWN (13) andesélectionner
l’achage de la températureendegrés Celsius (°C) ou
Fahrenheit (°F).
6.3 Réveil (alarme)
AL apparaît àl’écran, entrel’achage des heures et des
minutes, lorsque le mode Alarme est activé.
•Appuyez une fois sur la touche ALARM (8) ande
sélectionner le mode Alarme.
•Appuyez sur la touche ALARM (8) pendant environ 3
secondes anderégler l’heurederéveil. Les chiffres de
l'heure se mettentàclignoter.
•Appuyez sur la touche UP (12) ou DOWN (13) an
de sélectionner l'heurederéveil, puis conrmez votre
sélection en appuyant sur la touche ALARM (8). Les
chiffres des minutes se mettent àclignoter.
•Répétez cette procédurepour les minutes de l'heurede
réveil.
•Le mode de paramétrage s'interrompt automatiquement
si vous n'appuyez sur aucune touche pendant plus de 5
secondes.
•Appuyez sur la touche DOWN (13) and’activer ou de
désactiver l’alarme. L’alarme active est signalée par l’icône
d’alarme ( ). L’icône d’alarme s’éteint lorsque vous
désactivez une alarme activée.
•Lors du déclenchement du réveil, l'icône d'alarme ( )se
met àclignoter et un signal sonoreretentit.
•Appuyez sur n'importe quelle touche (à part la touche
SNZ/LIGHT (10)) and'arrêter l'alarme. L'alarme
s'arrêterasinon automatiquement au bout de 2minutes.
Remarque concernant la fonction de
répétition de l'alarme
•Appuyez sur la touche SNZ /LIGHT (10) pendant la
sonnerie du réveil and'activer la fonction de répétition
de l’alarme. L’icône d’alarme ( )semet àclignoter à
l’écran. L’alarme s'interrompt pendant 5minutes, puis
retentit ànouveau.
•Appuyez sur n'importe quelle touche (à part la touche
SNZ /LIGHT) and'arrêter la fonction de répétition de
l’alarme, et donc l'alarme.
6.4 Valeurs maximales et minimales de température
et d'humidité de l'air
La station de base garde automatiquement en mémoireles
valeurs minimales et maximales de la températureetde
l'humidité de l'air àl'extérieur et àl'intérieur.
•Appuyez plusieurs fois sur la touche UP (12) andepasser
de l’achage de la températureetdel’humidité de l’air
actuelles àl’achage de la températureetdel’humidité
de l’air minimales (MIN) et maximales (MAX).
6.5 Rétroéclairage
•Appuyez sur la touche SNZ/LIGHT (10) and'allumer
l'écran pendant environ 5secondes.
7. Soins et entretien
•Nettoyez la balance uniquement àl’aide d’un chiffon non
breux légèrement humide ;évitez tout détergent agressif.
•Veillez àcequ’aucun liquide ne pénètredans le produit.
8. Exclusion de garantie
La société Hama GmbH &CoKGdécline toute responsabilité
en cas de dommages provoqués par une installation, un
montage ou une utilisation non conformes du produit ou
encoreprovoqués par un non respect des consignes du mode
d‘emploi et/ou des consignes de sécurité.

19
10. Consignes de recyclage
Remarques concernant la protection de
l´environnement :
Conformément àladirective européenne 2012/19/
EU et 2006/66/CE, et and‘atteindreuncertain
nombred‘objectifs en matièredeprotection de
l‘environnement, les règles suivantes doivent être
appliquées: Les appareils électriques et
électroniques ainsi que les batteries ne doivent pas être
éliminés avec les déchets ménagers. Le pictogramme “picto”
présent sur le produit, son manuel d‘utilisation ou son
emballage indique que le produit est soumis àcette
réglementation. Le consommateur doit retourner le produit/la
batterie usagé(e) aux points de collecte prévus àcet effet. Il
peut aussi les remettreàunrevendeur.Enpermettant le
recyclage des produits et des batteries, le consommateur
contribueraainsi àlaprotection de notreenvironnement.
C‘est un geste écologique.
11. Déclaration de conformité
Le soussigné, Hama GmbH &CoKG, déclareque
l‘équipement radioélectrique du type [00136293,
00186311] est conforme àladirective 2014/53/UE.
Le texte complet de la déclaration UE de conformité est
disponible àl‘adresse internet suivante:
www.hama.com ->00136293, 00186311-> Downloads.
Bandes de fréquences 433 MHz
Puissance de radiofréquence
maximale
9,419 mW
9. Caractéristiques techniques
Station de base Capteur extérieur
Alimentation en électricité
4,5 V
3piles LR03/AAA 3,0 V
2piles LR6/AA
En présence de températures extérieures
inférieures à0°C /32°F, nous vous
recommandons d’utiliser des piles LR6/AA
au lithium pour les capteurs extérieurs.
Plage de mesure:
Température
Humidité de l'air 0°C –+50°C /32°F –+122°F
10 –99% -40°C –+70°C /-40°F –+158°F
20% –95%
Incréments de mesure:
Température
Humidité de l'air 0.1°C/ 0.2°F
1% 0.1°C/ 0.2°F
1%
Horloge radio-pilotée DCF Oui Non
ThermomètreOui Oui
HygromètreOui Oui
Fonction de réveil Oui Non
Nombremaxi de stations de mesure3
Portée ≤30 m
Other manuals for EWS-Trio
3
This manual suits for next models
2
Table of contents
Languages:
Other Hama Weather Station manuals
Popular Weather Station manuals by other brands

La Crosse Technology
La Crosse Technology 308-1415 instruction manual

MOBILE-ALERTS
MOBILE-ALERTS MA10006 instruction manual

La Crosse Technology
La Crosse Technology 308-1711BLV2 Faqs

Emos
Emos E8670 manual

Oregon Scientific
Oregon Scientific Magic BA2000 user manual

Elsner
Elsner Suntracer KNX sl Installation and adjustment