manuals.online logo
Brands
  1. Home
  2. •
  3. Brands
  4. •
  5. HAMPTON BAY
  6. •
  7. Spotlight
  8. •
  9. HAMPTON BAY 0045-0BZ-01FJ User manual

HAMPTON BAY 0045-0BZ-01FJ User manual

HAMPTONBAY.com
Please contact 1-855-HD-HAMPTON for further assistance.
Installation
1 CHOOSING THE RIGHT LOCATION
□Your solar lights should be installed in an area that gets DIRECT SUNLIGHT. Your solar lights
will produce more hours of operation when installed in an area which is free from cover,
shade, or shadowing.
2 ATTACHING THE GROUND
STAKE
□Align the ground stake (C) to the
screw (B) on the solar top housing
(A).
□Tighten the screw (B) using a
clockwise motion.
A
C
B
3 TURNING THE SWITCH TO “AUTO”
□Put the switch, located under the solar
panel, to the AUTO position.
“AUTO/OFF”
Switch
4 INSERTING THE SPOTLIGHT
INTO THE GROUND
□Push the spotlight into the
ground. Do not push down on the
solar panel as this could damage
the light.
CAUTION: Do not use hammer.
If ground is hard, use water to soften.
A
5 YOUR SPOTLIGHT IS READY!
□The more sunlight received during the
day, the longer the light will operate
that night. Therefore, operating times
will vary by specific location, daily
weather conditions, and season.
Safety Information
Please note the following important safety notes:
1. The ground stake is sharp. Handle with care to avoid injury.
2. Clean the solar panel with a damp cloth. Do not use any chemicals or abrasives.
3. Keep the solar panel free of dirt and debris.
4. Do not dispose of battery in fire. Dispose of batteries in accordance all local, state and
federal regulations.
WARNING: Do not use hammer. If ground is
hard, use water to soften.
DANGER: Ground stake is sharp. Handle with
care.
IMPORTANT: Dispose of batteries in accordance
with all local, state and federal regulations.
PACKAGE CONTENTS
Use and Care Guide
Solar Powered LED
Bronze Spotlight
Item #1001 486 696
Model #0045-0BZ-01FJ
Part Description Quantity
A Solar Top Housing 1
B Screw 1
C Ground Stake 1
|
|
|
|
|
|
|
|
|
|
|
|
|
|
|
|
|
|
|
A
B
C
HAMPTONBAY.com
Please contact 1-855-HD-HAMPTON for further assistance.
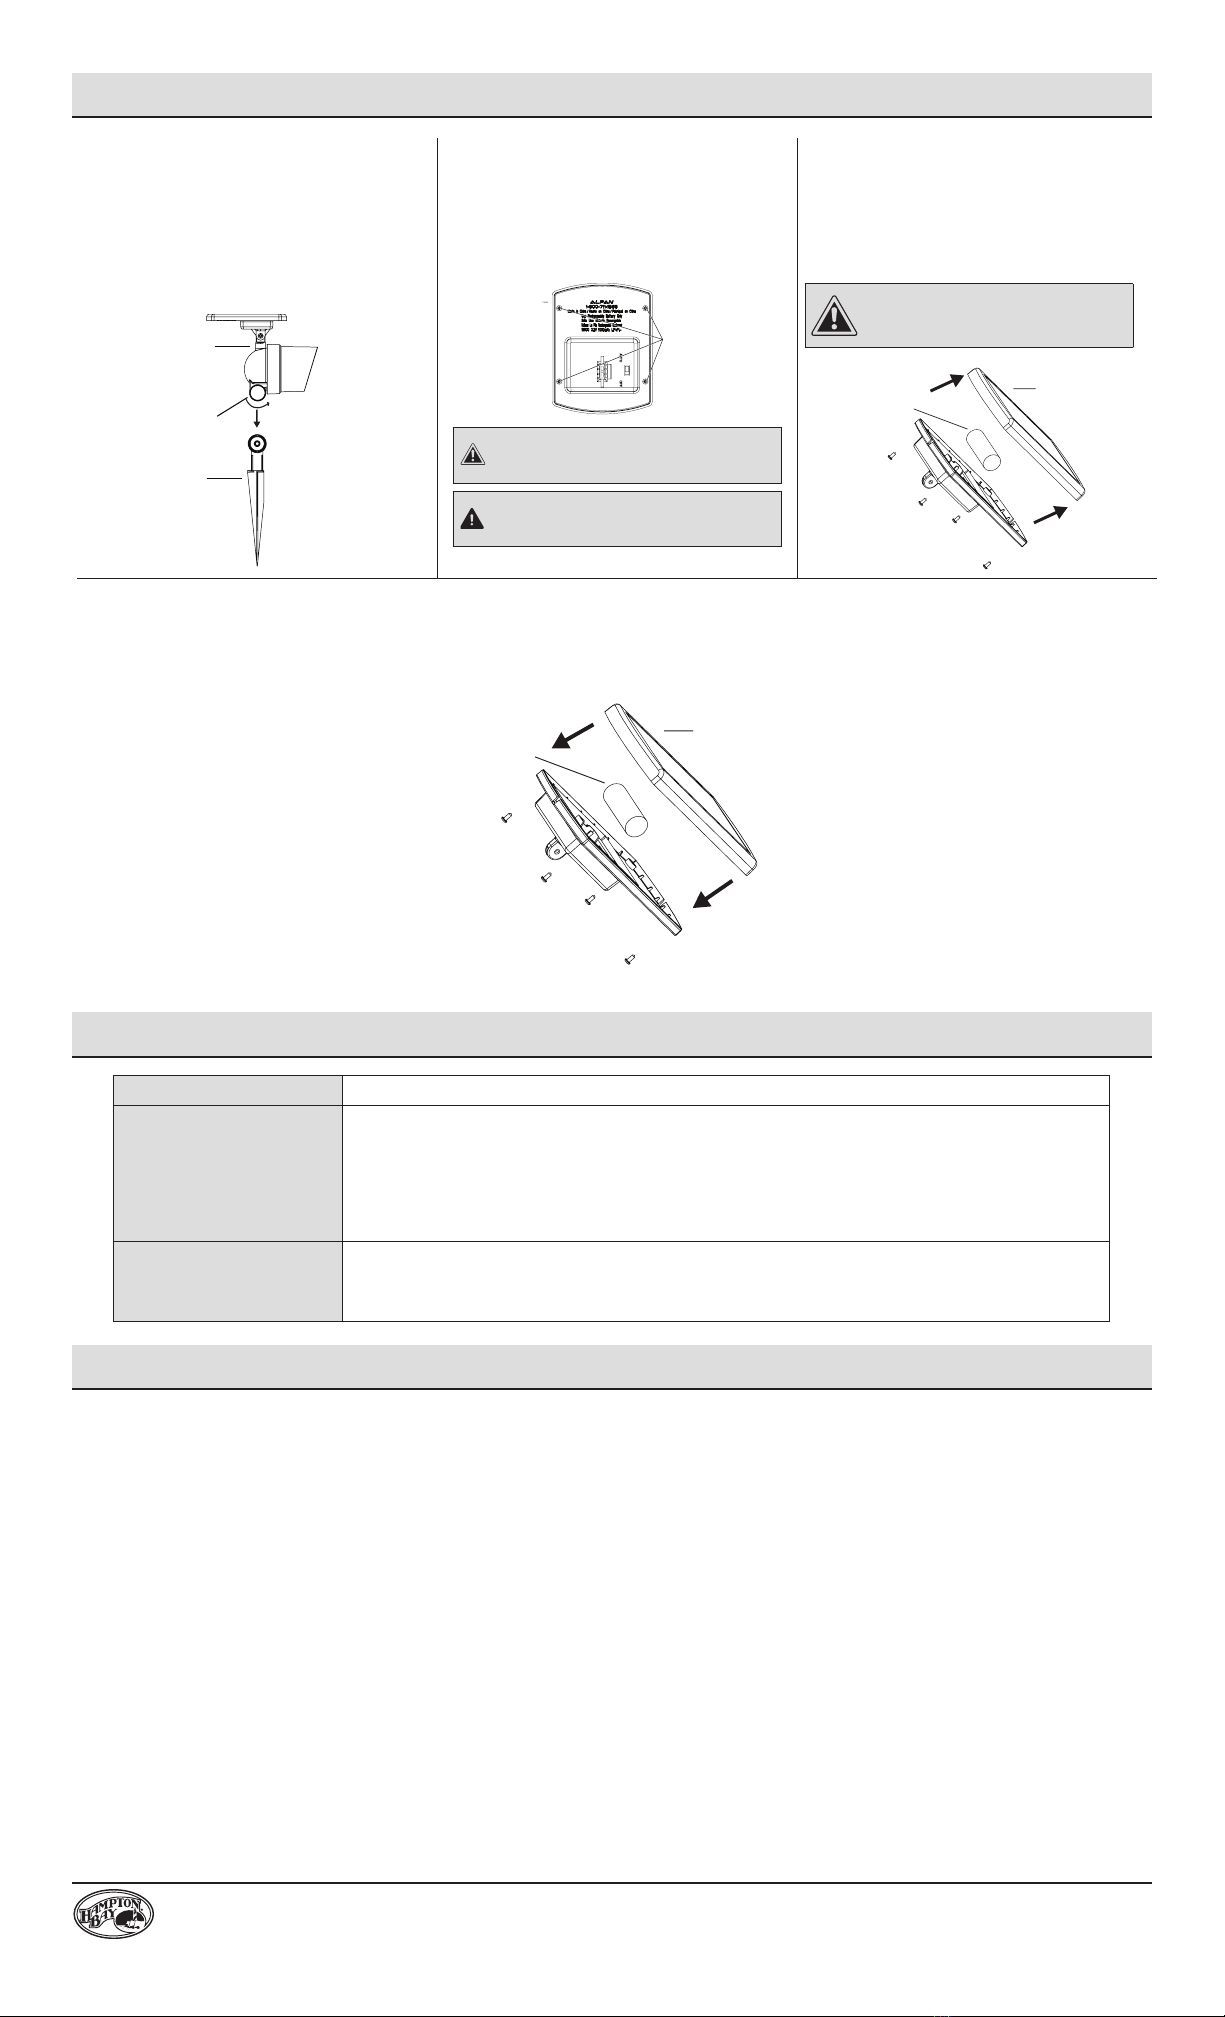
Replacing the Battery
1 REPLACING THE BATTERY
□Remove the solar top assembly
(A) from the ground stake (C) by
loosening the screw (B) with a
counterclockwise motion.
A
C
B
2 REPLACING THE BATTERY
(CONTINUED)
□Remove the screws from the
bottom of the solar panel (A) using a
screwdriver (not included.)
A
SCREWS
CAUTION: Dispose of battery in accordance
with local, state and federal regulations.
DANGER: Do not dispose of battery in fire.
3 REPLACING THE BATTERY
(CONTINUED)
□Remove the battery cover (1) on the
bottom of the solar panel.
□Remove the battery.
NOTE: Use only Lithium Phosphate
18500 (3.2V 1000mAh) rechargeable
batteries.
Battery
1
4 REPLACING THE BATTERY (CONTINUED)
□Replace the battery, paying attention to match the correct polarity.
□Reattach the battery cover (1).
Battery
1
Troubleshooting
Problem Solution
Light stops working after a
period of working properly: -The battery is not adequately charged. Place the unit in direct sunlight for three sunny days.
-The lights are located in an area that does not provide enough sunlight. If a tree, house, or other object
is shading the solar light, move the light to a sunnier location. Also note that lighting times will always be
shorter on overcast days.
-The light level is too high for the solar spotlight to turn on. The solar spotlight is designed to turn on when
it is dark outside. Make sure the solar top housing is not under any direct light source when testing.
-The battery may be weak or can no longer produce a charge. Replace the battery.
The light only operates for a
short duration in the evening: -The lights are located in an area that does not provide enough sunlight. If a tree, house, or other object
is shading the solar light, move the light to a sunnier location. Also note that lighting times will always be
shorter on overcast days.
-The battery may be weak or can no longer produce a charge. Replace the battery.
Manufacturer’s Limited Two-Year Warranty
WHAT IS COVERED
Manufacturer. warrants this product to be free for two (2) years against any defects that are due to faulty materials or workmanship. Manufacturer shall promptly correct such
defects by repair or replacement, at its option. This warranty covers only product defects and shall expire one year after the date of purchase by the original purchaser. Proof
of Purchase (Sales Receipt) is required.
WHAT IS NOT COVERED
This warranty does not apply to (1) bulbs and batteries or (2) defects caused by and resulting from misuse, neglect, accident or improper operation, maintenance, storage,
transportation handling of the product. The warranty does not cover any transportation costs for return of the product or for reshipment of any repaired or replaced product,
or cost associated with installation, removal or reinstallation of the product. This warranty extends to the original purchaser only and is not transferable or assignable to
subsequent purchasers. This warranty does not cover surface scratches or weathering as this is considered normal wear.
Manufacturer shall have no responsibility for damage to persons or property or other loss or injury resulting from a defect in the product or from improper use or installation.
UNDER NO CIRCUMSTANCES SHALL MANUFACTURER BE LIABLE SPECIAL OR CONSEQUENTIAL DAMAGES. ANY WARRANTIES IMPLIED BY LAW, INCLUDING THOSE OF
MERCHANTABILITY AND CIRCUMSTANCES SHALL MANUFACTURER BE LIABLE SPECIAL OR CONSEQUENTIAL DAMAGES. ANY WARRANTIES IMPLIED BY LAW, INCLUDING THOSE
OF MERCHANTABILITY AND warranty exceed the cost of repair or replacing such defective product, and Manufacturer’s maximum liability under any warranty is in lieu of all
other warranties expressed or implied.
Some states do not allow the exclusion or limitation of special or consequential damages or allow limitations on how long an implied warranty lasts, so the above limitation
may not apply to you. This warranty gives you specific legal rights, and you may have rights that vary from state to state. If you feel you have a claim under this warranty,
contact consumer service for advice on handling the claim. Written notice of any defects must be given to Manufacturer upon discovery.

This manual suits for next models

1

Other HAMPTON BAY Spotlight manuals

HAMPTON BAY 93400 User manual

HAMPTON BAY

HAMPTON BAY 93400 User manual

HAMPTON BAY 10238 User manual

HAMPTON BAY

HAMPTON BAY 10238 User manual

HAMPTON BAY 79718 User manual

HAMPTON BAY

HAMPTON BAY 79718 User manual

HAMPTON BAY 91950 User manual

HAMPTON BAY

HAMPTON BAY 91950 User manual

HAMPTON BAY L08557-BK User manual

HAMPTON BAY

HAMPTON BAY L08557-BK User manual

HAMPTON BAY 19274-002 User manual

HAMPTON BAY

HAMPTON BAY 19274-002 User manual

HAMPTON BAY 326882 User manual

HAMPTON BAY

HAMPTON BAY 326882 User manual

Popular Spotlight manuals by other brands

Perel EHS120D user manual

Perel

Perel EHS120D user manual

Briloner MAL 3075 Mounting instructions

Briloner

Briloner MAL 3075 Mounting instructions

Ledino LED-FLAHP1003D quick start guide

Ledino

Ledino LED-FLAHP1003D quick start guide

ADB Warp M 5090 instruction manual

ADB

ADB Warp M 5090 instruction manual

NANLITE P-100 user manual

NANLITE

NANLITE P-100 user manual

Chauvet Intimidator Spot LED 250 user manual

Chauvet

Chauvet Intimidator Spot LED 250 user manual

OWIM LUVARNOLUX Series Assembly, operating and safety instructions

OWIM

OWIM LUVARNOLUX Series Assembly, operating and safety instructions

Philips Ledino 57915/48/16 Specifications

Philips

Philips Ledino 57915/48/16 Specifications

Foto Walser walimexpro instruction manual

Foto Walser

Foto Walser walimexpro instruction manual

Robert Juliat SULLY 650SX Series quick start guide

Robert Juliat

Robert Juliat SULLY 650SX Series quick start guide

NEBO NEB-LSP-0013 Use and care guide

NEBO

NEBO NEB-LSP-0013 Use and care guide

Black & Decker SL3WAKB instruction manual

Black & Decker

Black & Decker SL3WAKB instruction manual

Unilamp VOLGA 7411-O-2-561-91 installation manual

Unilamp

Unilamp VOLGA 7411-O-2-561-91 installation manual

Larson Electronics GL-3610-S-E Instruction guide

Larson Electronics

Larson Electronics GL-3610-S-E Instruction guide

DTS MINI BRICK ARC user manual

DTS

DTS MINI BRICK ARC user manual

Vinga Solus II 25W vit quick start guide

Vinga

Vinga Solus II 25W vit quick start guide

Ignition 2bright Pint FC150 IP user manual

Ignition

Ignition 2bright Pint FC150 IP user manual

GLP YPOC PRO 250 instruction manual

GLP

GLP YPOC PRO 250 instruction manual

manuals.online logo
manuals.online logoBrands
  • About & Mission
  • Contact us
  • Privacy Policy
  • Terms and Conditions

Copyright 2025 Manuals.Online. All Rights Reserved.