Hanson Petit Terraillon User manual

TERRAILLON FRANCE & HEADQUARTERS
B.P. 73 - 78 403 CHATOU CEDEX - FRANCE
SERVICE CONSOMMATEURS : 0 826 88 1789
SERVICECONSOMMA[email protected]
SERVICE APRÈS VENTE :
TERRAILLON CHEZ MGF LOGISTIQUE
ZI D’EPLUCHES - RUE DES PRÉAUX
95310 ST OUEN - L’AUMÔNE
HANSON (UK) LTD
81A MARLOWES - HEMEL HEMPSTEAD
HERTFORDSHIRE, HP1 1LF - UK
TERRAILLON DEUTSCHLAND GMBH
GEHLENGRABEN 2
D-22415 HAMBURG
TERRAILLON SPA
VIALE SARCA 45
MILANO - ITALY
TEL: + 39 02 66114199
TERRAILLON ASIA PACIFIC LTD
4/F, EASTERN CENTRE
1065 KING’S ROAD
QUARRY BAY - HONG KONG
TEL: + 852 2960 7288
WWW.TERRAILLON.COM
Not_Sterilisation.qxd 8/03/06 13:14 Page 1

STÉRILISATEUR VAPEUR MICRO-ONDES
STÉRILISATEUR VAPEUR MICRO-ONDES
................p 5
MICROWAVE STEAM STERILIZER
............................p 8
MIKROWELLEN-DAMPFSTERILISATOR
..................p 11
STERILIZZATORE A VAPORE PER FORNO
A MICROONDE
..................................................p 14
ESTERILIZADOR DE VAPOR MICROONDAS
............p 17
STOOMSTERILISATOR
VOOR DE MICROGOLFOVEN
................................p 20
Not_Sterilisation.qxd 8/03/06 13:14 Page 1

3
Not_Sterilisation.qxd 8/03/06 13:14 Page 2

3
Cher Client,
Vous venez d’acquérir ce produit Terraillon et nous
vous en remercions. Nous vous en souhaitons un
excellent usage et afin d’en obtenir pleine satisfaction,
nous vous recommandons de lire attentivement cette
notice d’utilisation.
Dear customer,
We thank you for buying a Terraillon product. We
hope it proves entirely satisfactory and recommend
you read this instruction leaflet carefully.
Lieber Kunde,
Wir möchten uns bei Ihnen für Ihr Vertrauen bedan-
ken, dass Sie uns mit dem Kauf dieses Terraillon-
Produkts entgegengebracht haben. Damit der
Betrieb des Geräts zu Ihrer vollen Zufriedenheit
erfolgt, empfehlen wir, diese Bedienungsanleitung
zunächst aufmerksam durchzulesen.
Caro cliente,
La ringraziamo per aver acquistato questo prodotto
Terraillon. La preghiamo di leggere molto attenta-
mente questo foglietto illustrativo al fine di poter
utilizzare al meglio questo articolo e di poterne essere
pienamente soddisfatto.
Estimado cliente,
Usted acaba de adquirir este producto Terraillon y
se lo agradecemos. Le deseamos un excelente
uso y con el fin de estar plenamente satisfecho, le
recomendamos que lea detenidamente este manual
de uso.
Beste klant,
Wij danken u voor uw aankoop van dit Terraillon-
product. Wij hopen dat u het optimaal zal kunnen
gebruiken. Daarom raden wij u ook aan deze hand-
leiding aandachtig te lezen.
Not_Sterilisation.qxd 8/03/06 13:14 Page 3

STÉRILISATEUR VAPEUR MICRO-ONDES
5
a) les opercules anti-fuite
se positionnent
dans les fentes.
b) les tétines se placent
dans les parties creuses
du panier.
c) les bagues de serrage
doivent être positionnées
autour des tétines
(mais sans les toucher).
Le stérilisateur vapeur micro-ondes Petit Terraillon
permet une stérilisation simple, rapide et efficace
des biberons et accessoires. Il ne nécessite pas
l’emploi de produits chimiques.
A LIRE AVANT UTILISATION
• Utiliser sur une surface plane.
• Ne pas laisser le stérilisateur près d’une source de
chaleur telle qu’un radiateur, une fenêtre exposée
au soleil…
• Garder le stérilisateur hors de portée des enfants
car il contient de l’eau très chaude pendant et
après l’opération de stérilisation.
• S’assurer que les produits à stériliser sont com-
patibles avec la stérilisation au micro-ondes.
• Avec un four combiné, ne pas utiliser la fonction
grill et vérifier que le four est bien froid.
• Ne jamais mettre d’objet en métal dans le micro-
ondes.
• Ne jamais utiliser de produit détergent ou corrosif
pour nettoyer le stérilisateur micro-ondes.
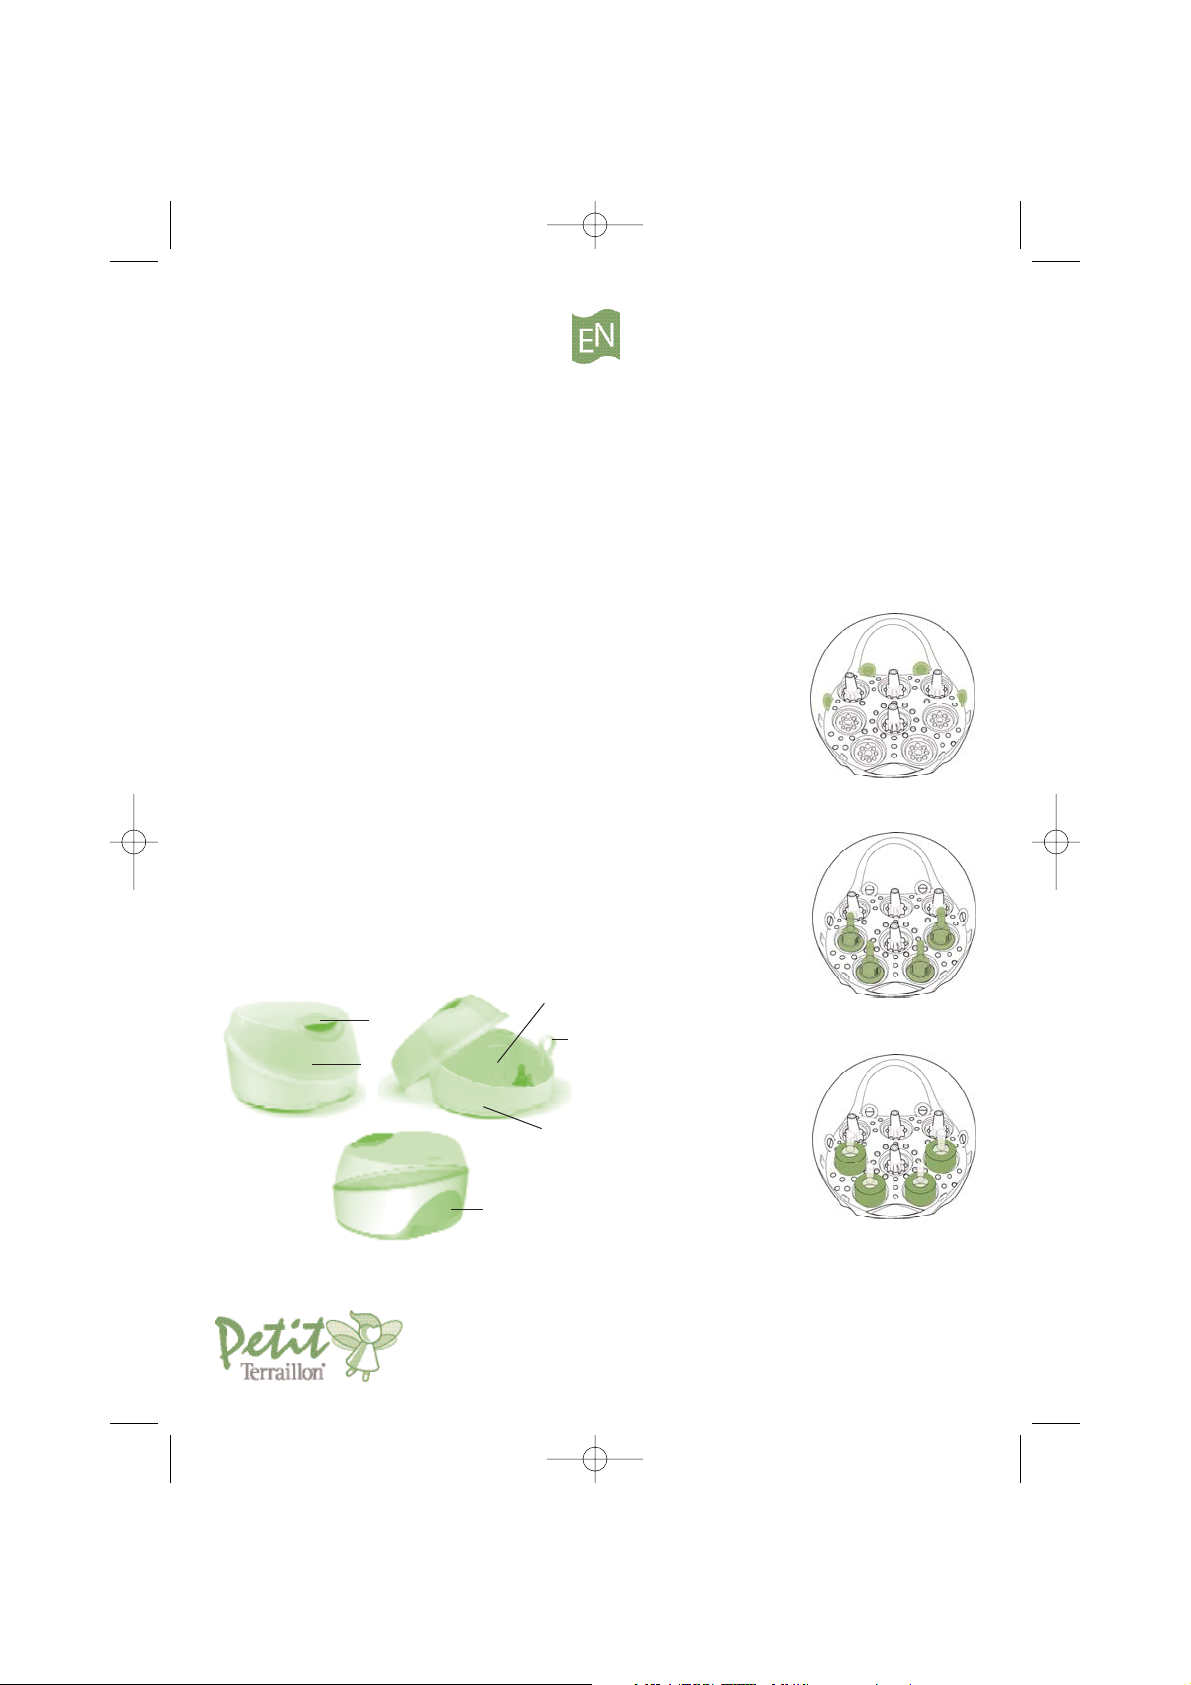
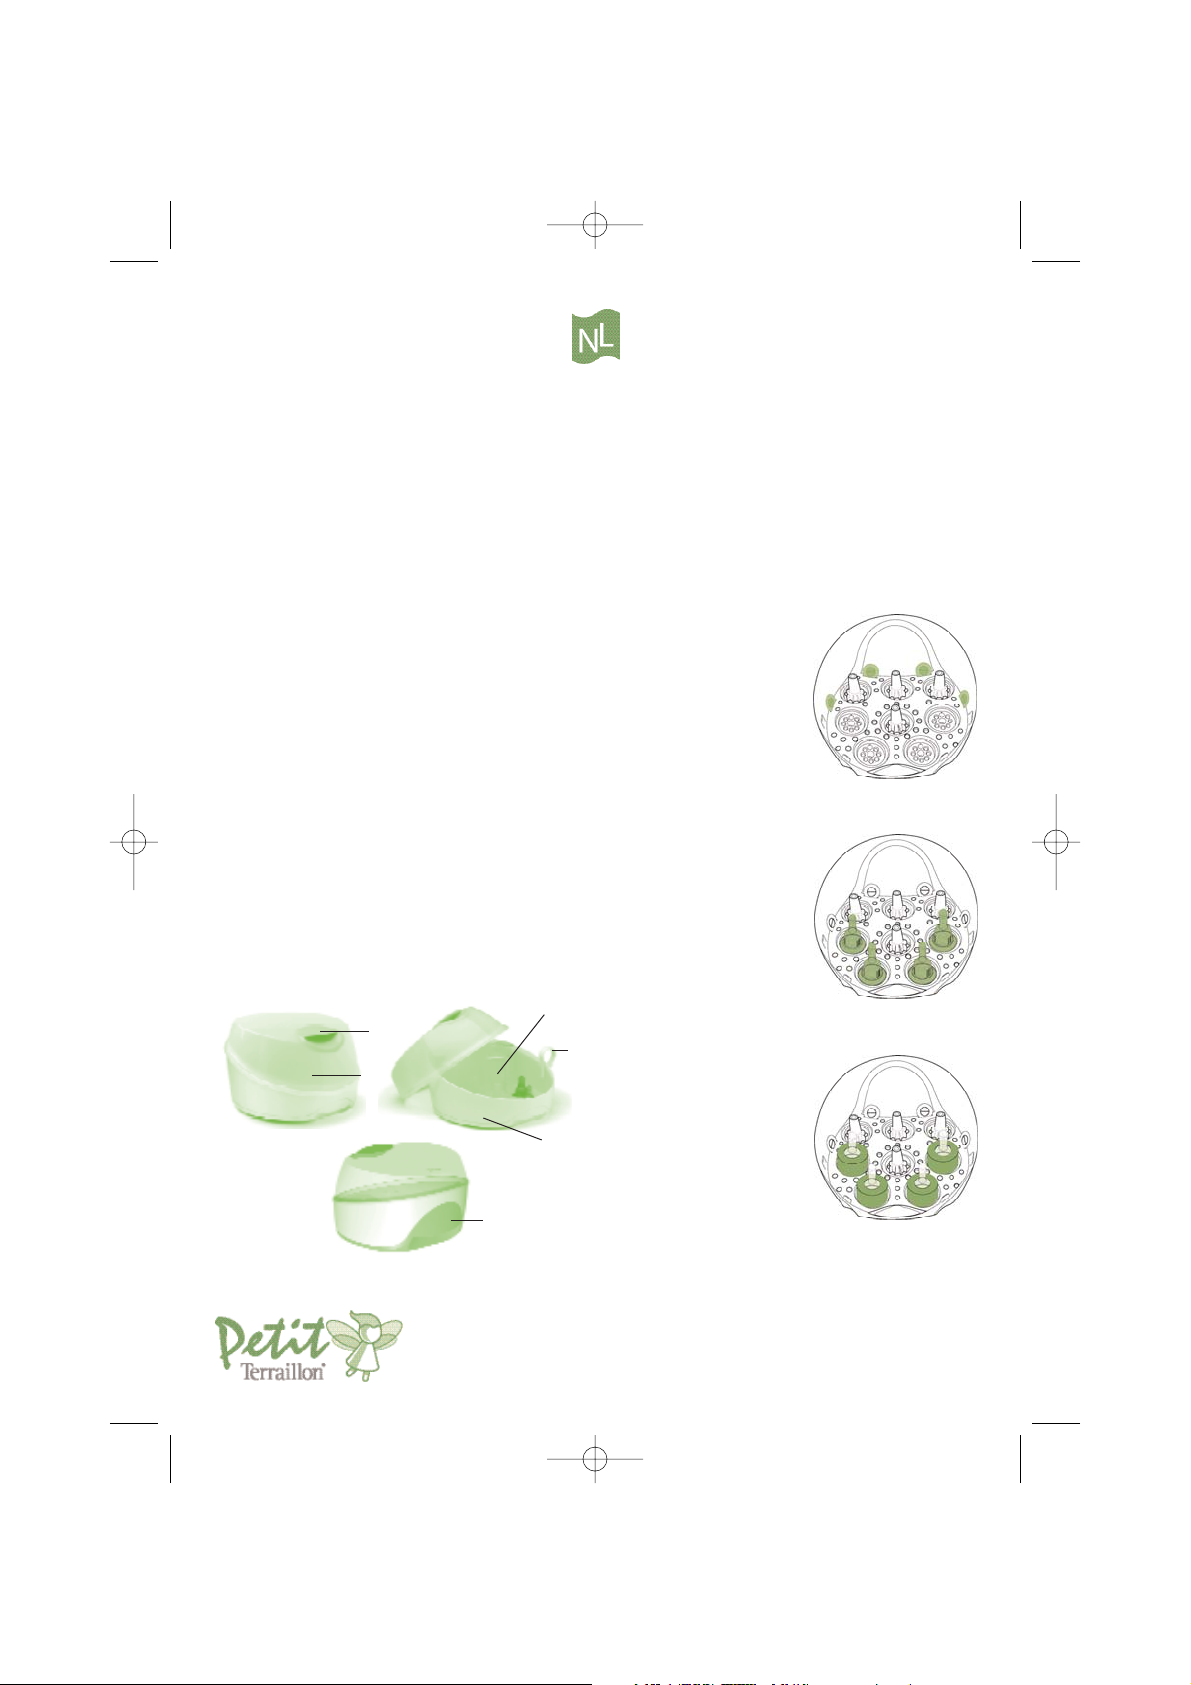
DESCRIPTION DU PRODUIT
a. couvercle
b. poignée du couvercle
c. bac de stérilisation
d. poignée du bac de stérilisation
e. panier à biberons et accessoires
f. pince à tétines
Les biberons et accessoires présentés sur les
schémas ne sont pas inclus.
COMMENT UTILISER LE STERILISATEUR
VAPEUR MICRO-ONDES
1. Avant la stérilisation, tous les biberons et acces-
soires doivent être minutieusement lavés et rincés.
2. Soulever le couvercle du stérilisateur.
3. Placer les accessoires dans les emplacements
réservés à cet effet.
d
f
b
a
c
e
Not_Sterilisation.qxd 8/03/06 13:14 Page 5

STÉRILISATEUR VAPEUR MICRO-ONDES
6
4. Verser 200 ml d’eau dans le bac.
5. Fermer le bac de stérilisation avec le couvercle
6. Placer le stérilisateur dans le four à micro-ondes
à puissance maximum (environ 800 à 1000W)
pendant 8mn.
7. Démarrer le four à micro-ondes pour commencer
la stérilisation.
8. Une fois les 8mn écoulées, retirer le stérilisateur
du four à micro-ondes à l’aide des poignées
conçues à cet effet. Pour éviter tout risque de
brûlure lors de la manipulation, vous pouvez
laisser refroidir le stérilisateur micro-ondes 2 mn
avant de le sortir du four.
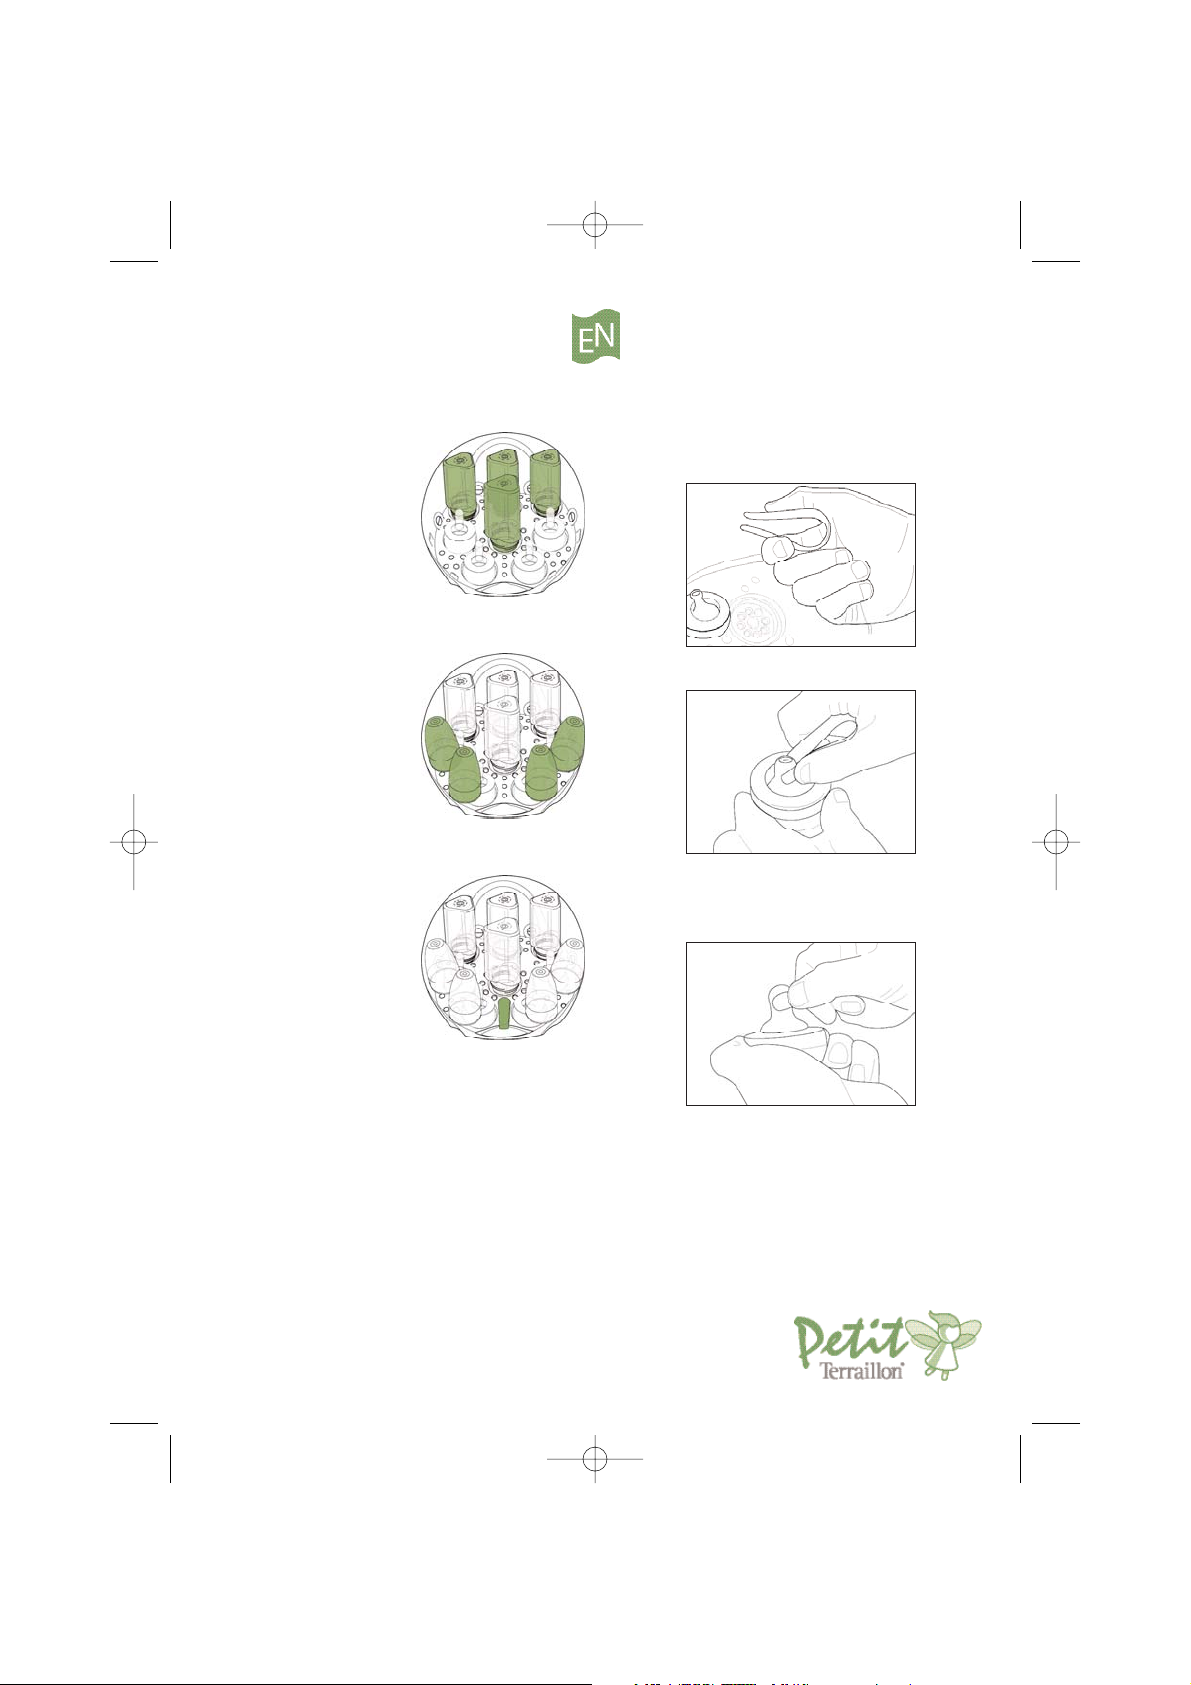
9. Soulever le couvercle doucement. Utiliser la pince
à tétines pour sortir les accessoires comme indiqué
sur le schéma.
Tenir la pince de cette façon.
Serrer l’extrémité de la tétine avec la pince tout en
maintenant la bague de l’autre main afin que vos
mains ne soient pas en contact avec la tétine après
la stérilisation.
Tirer fermement la tétine dans son logement.
d) placer les biberons
à l’envers sur les tiges.
e) les capuchons se
suspendent sur
les accroches au bord
du panier.
f) enfin, placer la pince
dans son logement
(trou à l’avant).
Not_Sterilisation.qxd 8/03/06 13:14 Page 6

STÉRILISATEUR VAPEUR MICRO-ONDES
7
PRECAUTIONS D’EMPLOI
ATTENTION, l’eau utilisée pour le stérilisateur
chauffe à plus de 100°C. Afin d’éviter tout risque de
brûlure, manipuler le stérilisateur avec précaution.
• Il est important de toujours respecter le volume
d’eau recommandé pour ne pas altérer la qualité
de la stérilisation.
• Ne jamais utiliser de produits chimiques pour stériliser
les biberons avec le stérilisateur vapeur micro-ondes.
• Il est important de respecter le temps de stérilisation
recommandé.
ENTRETIEN
• Utiliser un chiffon humide doux pour nettoyer
l’intérieur et l’extérieur du stérilisateur
• Pour éliminer les éventuels dépôts de calcaire, verser
250ml de vinaigre blanc dans le bac et laisser agir.
Rincer abondamment et essuyer avec un chiffon
humide doux.
GARANTIE
Ce produit est garanti 2 ans contre les défauts de
matériaux et de fabrication. Pendant cette période,
de tels défauts seront réparés gratuitement (la preuve
d’achat devra être présentée en cas de réclamation
sous garantie). Cette garantie ne couvre pas les dom-
mages résultant d’accidents, de mauvaise utilisation
ou de négligence. En cas de réclamation, veuillez
contacter en premier lieu le magasin où vous avez
effectué votre achat.
Not_Sterilisation.qxd 8/03/06 13:14 Page 7
d
f
b
a
c
e
MICROWAVE STEAM STERILIZER
8
The Petit Terraillon microwave steam sterilizer steri-
lizes feeding bottles and attachments easily, fast and
effectively without the use of chemical products.
PLEASE READ BEFORE USING
• Always use on a flat surface
• Do not expose the sterilizer to a source of heat such
as a radiator or sun shining through a window…
• Keep the sterilizer out of the reach of children
during and after the sterilizing process as it
contains very hot water.
• Make sure the products you intend to sterilize are
suited to microwave sterilization.
• If your microwave oven also combines with an
ordinary oven, never use the grill and make sure
the oven is cold before using.
• Never put metal objects in a microwave oven.
• Never use detergent or corrosive substances to
clean your microwave sterilizer.
DESCRIPTION OF PRODUCT
a. lid
b. lid handles
c. sterilizing bowl
d. handles of sterilizing bowl
e. basket for feeding bottles and attachments
f. tongs for teats
The feeding bottles and attachments in the diagram
are not included.
HOW TO USE THE MICROWAVE STEAM
STERILIZER
1. Carefully wash and rinse feeding bottles and
attachments before sterilizing.
2. Lift the sterilizer lid.
3. Place the attachments in the specially designed
compartments.
a) place no-leak sealing
discs in the slots.
b) place teats in the hollows
of the basket.
c) place screw tops on top of
the teats (but make sure
they don't touch).
Not_Sterilisation.qxd 8/03/06 13:14 Page 8
MICROWAVE STEAM STERILIZER
9
4. Pour 200 ml water into the bowl.
5. Put the lid on the sterilizing bowl.
6. Place the sterilizer in the microwave oven at
maximum power (approx. 800 to 1,000 W) for 8
minutes.
7. Turn on the microwave oven to begin sterilization.
8. When the 8 minutes have elapsed, remove the
sterilizer from the microwave oven using the
specially designed handles. To avoid all risk of
burning when handling, leave the sterilizer to
cool for 2 minutes before removing from the
microwave oven.
9. Gently remove the lid. Use the teat tongs to
remove attachments as shown in diagram.
Hold tongs as indicated here.
Grip the nipple of the teat with the tongs while hol-
ding the screw top with the other hand so that your
hands do not come into contact with the sterilized
teats.
Pull the teat firmly into place in the screw top.
d) position bottles upside
down on the upright
stems.
e) hang caps on the hooks
on the sides of the basket.
f) finally, place the tongs
in their compartment
(the hole in front).
Not_Sterilisation.qxd 8/03/06 13:14 Page 9

MICROWAVE STEAM STERILIZER
10
PRECAUTIONS TO BE TAKEN
WHEN USING
CAUTION : the water used in the sterilizer reaches
temperatures in excess of 100°C (212°F). To avoid
all risk of burning, handle the sterilizer with care.
• It is important to use the recommended quantity of
water so as not to hinder the appliance's sterilizing
capacity.
• Never use chemical products to sterilize bottles in
your microwave steam sterilizer.
• It is important not to alter the recommended time
of sterilization.
CARING FOR YOUR APPLIANCE
• Use a soft damp cloth to clean the sterilizer inside
and out.
• To remove possible traces of limescale, pour 250
ml of clear vinegar into the bowl and leave until
limescale has dissolved. Rinse carefully and dry
with a soft damp cloth.
WARRANTY
This product has a 2-year warranty against defective
material and workmanship. During this period, such
defects shall be repaired free of charge (proof of pur-
chase should be presented whenever you have a
complaint during the warranty period). This warranty
does not cover damage caused by accidents,
misuse or negligence. In case of complaint, please
contact the shop from which you bought the appliance
before contacting anyone else.
Not_Sterilisation.qxd 8/03/06 13:14 Page 10
d
f
b
a
c
e
MIKROWELLEN-DAMPFSTERILISATOR
11
Mit dem Mikrowellen-Dampfsterilisator Petit
Terraillon
lassen sich Flaschen und Zubehör einfach,
schnell und effizient sterilisieren. Für diesen
Sterilisator sind keine chemischen Stoffe erforderlich.
VOR DEM GEBRAUCH DURCHLESEN
• Den Sterilisator auf eine ebene Fläche stellen.
• Den Sterilisator nicht in der Nähe einer
Wärmequelle, wie etwa eines Heizkörper, eines
Fensters mit Sonnenexposition usw. lassen.
• Der Sterilisator darf nicht in die Hände von Kindern
gelangen, weil er während und nach dem
Sterilisierungsvorgang sehr heißes Wasser enthält.
• Achten Sie darauf, dass sich die zu sterilisieren-
den Gegenstände auch wirklich für die
Mikrowellensterilisierung eignen.
• Bei einem Kombi-Mikrowellenherd nicht die
Grillfunktion verwenden und sicherstellen, dass
der Mikrowellenherd kalt ist.
• Nicht Gegenstände aus Metall in den
Mikrowellenherd stellen.
• Für die Reinigung des Mikrowellen-Sterilisators
nie Reinigungsmittel oder korrosive Mittel ver-
wenden.
PRODUKTBESCHREIBUNG
a. Deckel
b. Deckelgriff
c. Sterilisierungsbehälter
d. Griff des Sterilisierungsbehälters
e. Korb für Flaschen und Zubehör
f. Saugerzange
Die Flaschen und das Zubehör, die in den
Abbildungen dargestellt werden, sind nicht im
Lieferumfang enthalten.
GEBRAUCH DES MIKROWELLEN-
DAMPFSTERILISATORS
1. Vor der Sterilisierung müssen alle Flaschen und
Zubehörelemente gründlich gewaschen und gespült
werden.
2. Den Deckel des Sterilisators anheben.
3. Die Zubehörelemente in die dafür vorgesehenen
Aufnahmevorrichtungen stellen.
a) Die Abdichtungen
in die Schlitze einsetzen.
b) Die Sauger
in die Korbaussparungen
setzen.
c) Die Ringe müssen um
die Sauger gelegt werden
(ohne sie dabei zu
berühren).
Not_Sterilisation.qxd 8/03/06 13:14 Page 11

MIKROWELLEN-DAMPFSTERILISATOR
12
4. 200 ml Wasser in den Behälter schütten.
5. Den Sterilisierungsbehälter mit dem Deckel
schließen.
6. Den Sterilisator in die Mikrowelle stellen und auf
8 Minuten und maximale Leistung einstellen (ca.
800 bis 1000 W).
7. Den Mikrowellenherd starten, um mit der
Sterilisierung zu beginnen.
8. Nach 8-minütigem Betrieb den Sterilisator mit
Hilfe der dafür vorgesehenen Griffe aus dem
Mikrowellenherd nehmen. Um beim Umgang
sämtliche Verbrennungsgefahren zu vermeiden,
können Sie den Mikrowellen-Sterilisator 2
Minuten abkühlen lassen, bevor Sie ihn heraus-
nehmen.
9. Den Deckel vorsichtig anheben. Mit der
Saugerzange das Zubehör herausnehmen, wie in
der Abbildung sichtbar.
Die Zange dabei so halten.
Das Ende des Saugers mit der Zange aufnehmen
und dabei den Ring mit der anderen Hand festhalten,
um nach der Sterilisierung den Kontakt zwischen
Sauger und Hand zu vermeiden.
Den Sauger fest in seine Aussparung setzen.
d) Die Flaschen umgekehrt
auf die Schäfte setzen.
e) Die Verschlusskappen
werden auf die
Aufhängvorrichtungen
am Korbrand gesetzt.
f) Schließlich die Zange
in ihre Aussparung legen
(vordere Aussparung).
Not_Sterilisation.qxd 8/03/06 13:14 Page 12

MIKROWELLEN-DAMPFSTERILISATOR
13
VORSICHTSMASSNAHMEN
BEI DER ANWENDUNG
ACHTUNG! Das Wasser im Sterilisator wird auf
über 100 °C erhitzt. Um jegliches Verbrühungsrisiko
zu vermeiden, muss der Sterilisator vorsichtig
gehandhabt werden.
• Wichtig ist, dass immer die empfohlene Wasser-
menge verwendet wird, um eine gleich bleibende
Sterilisierungsqualität zu erhalten.
• Für die Sterilisierung von Flaschen mit dem
Mikrowellen-Dampfsterilisator nie chemische
Substanzen verwenden.
• Es ist wichtig, die empfohlene Sterilisierungszeit
einzuhalten.
WARTUNG
• Für die Reinigung innen und außen des Sterilisators
ein weiches feuchtes Tuch verwenden.
• Für die Entfernung eventueller Kalkablagerungen
250 ml weißen Essig in den Behälter schütten und
wirken lassen. Großzügig spülen und mit einem
weichen feuchten Tuch trocken wischen.
GARANTIE
Für dieses Produkt wird eine Garantie von 2 Jahren
auf Material- und Herstellungsfehler gewährt. In
diesem Zeitraum werden Mängel kostenlos besei-
tigt (der Kaufbeleg muss bei einer Reklamation
im Rahmen der Garantie vorgelegt werden).
Beschädigungen, die durch Unfälle, unsachgemäße
Verwendung oder durch Nachlässigkeit verursacht
wurden, sind von dieser Garantie ausgeschlossen.
Bei Reklamationen setzen Sie sich bitte zuerst mit
dem Geschäft in Verbindung, in dem Sie das
Produkt gekauft haben.
Not_Sterilisation.qxd 8/03/06 13:14 Page 13

STERILIZZATORE A VAPORE PER FORNO A MICROONDE
14
d
f
b
a
c
e
Lo sterilizzatore a vapore per forno a microonde Petit
Terraillon
permette una sterilizzazione semplice, rapi-
da ed efficace dei biberon e degli accessori. Non
necessita dell’impiego di prodotti chimici.
DA LEGGERE PRIMA DELL’USO
• Utilizzare su una superficie piana.
• Non lasciate lo sterilizzatore nelle vicinanze di una
fonte di calore come termosifoni, finestre esposte
al sole…
• Tenete lo sterilizzatore fuori della portata dei
bimbi, poiché contiene acqua molto calda, sia
prima sia dopo l’operazione di sterilizzazione.
• Accertatevi che i prodotti da sterilizzare siano com-
patibili con la sterilizzazione al forno a microonde.
• Con un forno combinato, non utilizzate la funzione
grill ed accertatevi che il forno sia ben freddo.
• Non inserite mai oggetti di metallo nel forno a
microonde.
• Non utilizzate prodotti detergenti o corrosivi per la
pulizia dello sterilizzatore per forno a microonde.
DESCRIZIONE DEL PRODOTTO
a. coperchio
b. impugnatura del coperchio
c. bacinella di sterilizzazione
d. impugnatura della bacinella di sterilizzazione
e. cestello per biberon ed accessori
f. pinza per tettarelle
I biberon e gli accessori presentati sugli schemi non
sono inclusi.
COME UTILIZZARE LO STERILIZZATORE
A VAPORE PER FORNO A MICROONDE
1. Prima della sterilizzazione tutti i biberon e gli
accessori devono essere lavati ed asciugati con
estrema cura.
2. Sollevate il coperchio dello sterilizzatore.
3. Sistemate gli accessori negli alloggiamenti previsti
a tale scopo.
a) gli opercoli antiscappa-
mento vanno sistemati
nelle feritoie.
b) le tettarella vanno
sistemate nelle pari cave
del cestello.
c) le ghiere di serraggio
vanno sistemate intorno
alle tettarelle (ma senza
toccarle).
Not_Sterilisation.qxd 8/03/06 13:14 Page 14

STERILIZZATORE A VAPORE PER FORNO A MICROONDE
15
4. Versate 200 ml d’acqua nella bacinella.
5. Chiudete la bacinella di sterilizzazione con il
coperchio
6. Sistemate lo sterilizzatore nel forno a microonde
impostando la potenza massima (da 800 a
1000W) per 8 minuti.
7. Accendete il forno a microonde per dare inizio
alla sterilizzazione.
8. Allo scadere degli 8 minuti, togliete lo sterilizza-
tore dal forno a microonde con l’ausilio delle
impugnature create a questo scopo. Per evitare
rischi d’ustione durante la manipolazione, potete
lasciar raffreddare lo sterilizzatore per forno a
microonde per due minuti prima di estrarlo dal
forno.
9. Sollevare delicatamente il coperchio. Utilizzare la
pinza per tettarelle per estrarre gli accessori,
come indicato sullo schema.
Tenete la pinza in questo modo.
Stringete l’estremità della tettarella con la pinza
mentre tenete la ghiera nell’altra mano, per evitare
che le vostre mani vengano a contatto con la tetta-
rella dopo la sterilizzazione.
Tirate forte la tettarella nel suo alloggiamento.
d) sistemare i biberon
rovesciati sui bastoncini.
e) i cappucci vanno
appesi sui ganci sul
bordo del cestello.
f) sistemate infine la pinza
nel suo alloggiamento
(con il buco in avanti).
Not_Sterilisation.qxd 8/03/06 13:14 Page 15

STERILIZZATORE A VAPORE PER FORNO A MICROONDE
16
CAUTELE D’USO
ATTENZIONE, l’acqua utilizzata per lo sterilizzatore
è scaldata ad oltre 100°C. Per evitare ogni rischio
d’ustione maneggiate lo sterilizzatore con precau-
zione
• E’ importante rispettare sempre il volume d’acqua
indicato per non alterare la qualità della sterilizza-
zione.
• Non utilizzate mai prodotti chimici per sterilizzare i
biberon quando utilizzate lo sterilizzatore a vapore
per forno a microonde.
• E’ importante rispettare il tempo di sterilizzazione
indicato.
MANUTENZIONE
• Utilizzate un panno umido morbido per pulire
l’interno e l’esterno dello sterilizzatore
• Per togliere eventuali depositi di calcare, versate
250 ml d’aceto bianco nella bacinella e attendete
che faccia effetto. Sciacquate molto bene ed
asciugate con un panno umido morbido.
GARANZIA
Questo prodotto è garantito per 2 anni contro difetti
dei componenti e di fabbricazione. Durante questo
periodo, questi difetti saranno riparati gratuitamente
(lo scontrino d’acquisto deve essere esibito nel caso
la riparazione avvenga nel periodo di copertura della
garanzia). La garanzia non copre i danni derivanti da
incidenti, utilizzo improprio o negligenza. In caso di
reclamo siete pregati di rivolgervi in primo luogo al
negozio dove avete effettuato l’acquisto.
Not_Sterilisation.qxd 8/03/06 13:14 Page 16
ESTERILIZADOR DE VAPOR MICROONDAS
17
El esterilizador de vapor microondas Petit
Terraillon
permite una esterilización simple, rápida
y eficaz de los biberones y accesorios. No necesita
el uso de productos químicos.
A LEER ANTES DE SU UTILIZACIÓN
• Utilizar sobre una superficie plana
• No dejar el esterilizador cerca de una fuente de
calor tal como un radiador, una ventana expuesta
al sol…
• Guardar el esterilizador fuera del alcance de niños
ya que contiene agua muy caliente durante y
después de la operación de esterilización.
• Asegúrese de que los productos a esterilizar sean
compatibles con la esterilización en el microondas.
• Con un horno combinado, no utilizar la función
grill y verificar que el horno esté bien frío.
• No poner nunca un objeto metálico en el
microondas.
• No utilizar nunca productos detergentes o corro-
sivos para limpiar el esterilizador microondas.
DESCRIPCIÓN DEL PRODUCTO
a. tapa
b. asa de la tapa
c. cuba de esterilización
d. asa de la cuba de esterilización
e. cesta de biberones y accesorios
f. pinza de tetinas
Los biberones y accesorios presentados en los
esquemas no están incluidos.
COMO UTILIZAR EL ESTERILIZADOR
DE VAPOR MICROONDAS
1. Antes de la esterilización, todos los biberones y
accesorios deben ser cuidadosamente lavados y
enjuagados.
2. Levantar la tapa del esterilizador.
3. Colocar los accesorios en los emplazamientos
reservados a tal efecto.
d
f
b
a
c
e
a) los opérculos antifugas se
posicionan en las ranuras.
b) las tetinas se colocan
en las partes huecas
de la cesta.
c) los anillos de apriete
deben ser posicionados
alrededor de las tetinas
(pero sin tocarlos).
Not_Sterilisation.qxd 8/03/06 13:14 Page 17

ESTERILIZADOR DE VAPOR MICROONDAS
18
4. Verter 200 ml de agua en la cuba.
5. Cerrar la cuba de esterilización con la tapa
6. Colocar el esterilizador en el microondas a potencia
máxima (aproximadamente de 800 a 1000W)
durante 8 minutos.
7. Encender el microondas para empezar la esteri-
lización.
8. Una vez transcurridos los 8 minutos, retirar el
esterilizador del microondas utilizando las asas
diseñadas a tal efecto. Para evitar cualquier riesgo
de quemadura durante la manipulación, usted
puede dejar enfriar el esterilizador microondas
2 minutos antes de sacarlo del horno.
9. Levantar la tapa suavemente. Utilizar la pinza de
tetinas para sacar los accesorios como se indica
en el esquema.
Coger la pinza de la siguiente forma.
Apretar el extremo de la tetina con la pinza, mante-
niendo a la vez el anillo con la otra mano para evitar
tocar la tetina con las manos después de la
esterilización.
Tirar firmemente de la tetina en su alojamiento.
d) colocar los biberones
al revés sobre las varillas.
e) se suspenden los
capuchones sobre los
enganches al borde
de la cesta.
f) por último, colocar
la pinza en su alojamiento
(orificio delante).
Not_Sterilisation.qxd 8/03/06 13:14 Page 18

ESTERILIZADOR DE VAPOR MICROONDAS
19
PRECAUCIONES DE USO
ATENCIÓN, el agua utilizado para el esterilizador se
calienta a más de 100°C. A fin de evitar cualquier
riesgo de quemadura, manipular el esterilizador
con precaución.
• Es importante respetar siempre el volumen de
agua recomendado para no alterar la calidad de la
esterilización.
• No utilizar nunca productos químicos para esterilizar
los biberones con el esterilizador vapor microondas.
• Es importante respetar el tiempo de esterilización
recomendado.
MANTENIMIENTO
• Utilizar un trapo húmedo suave para limpiar el
interior y el exterior del esterilizador.
• Para eliminar los eventuales depósitos de cal,
verter 250ml de vinagre blanco en la cuba y dejar
actuar. Enjuagar abundantemente y limpiar con
un trapo húmedo suave.
GARANTÍA
Este producto está garantizado 2 años contra los
defectos de materiales y de fabricación. Durante
este periodo, estos defectos serán reparados
gratuitamente (la prueba de compra deberá ser
presentada en caso de reclamación bajo garantía).
Esta garantía no cubre los daños derivados de
accidentes, de mal uso o de negligencia. En caso
de reclamación, rogamos contacte en primer lugar
con el almacén donde usted ha realizado su compra.
Not_Sterilisation.qxd 8/03/06 13:14 Page 19
d
f
b
a
c
e
STOOMSTERILISATOR VOOR DE MICROGOLFOVEN
20
Met de stoomsterilisator voor de microgolfoven
Petit
Terraillon
steriliseert u eenvoudig, snel en
efficiënt zuigflessen en accessoires. Er zijn geen
chemische producten nodig.
TE LEZEN VOOR GEBRUIK
• Gebruiken op een vlak oppervlak
• De sterilisator niet bij een warmtebron laten staan
zoals een radiator, een venster blootgesteld aan
de zon…
• De sterilisator buiten het bereik van kinderen hou-
den want hij bevat zeer warm water tijdens en na
het steriliseren.
• Vergewis u ervan dat de te steriliseren producten
geschikt zijn voor sterilisatie in de microgolfoven.
• Bij een combinatieoven, de grill-functie niet gebrui-
ken en nagaan of de oven wel degelijk koud is.
• Nooit een metalen object in de microgolfoven
plaatsen.
• Nooit detergenten of schurende producten
gebruiken om de microgolfsterilisator te reinigen.
PRODUCTBESCHRIJVING
a. deksel
b. handvat van het deksel
c. sterilisatiebak
d. handvat van de sterilisatiebak
e. mandje voor zuigflessen en accessoires
f. fopspeentang
Los biberones y accesorios presentados en los
esquemas no están incluidos.
HOE DE STOOMSTERILISATOR
VOOR DE MICROGOLF GEBRUIKEN
1. Vóór het steriliseren moeten alle zuigflessen en
accessoires zorgvuldig worden gereinigd en
gespoeld.
2. Hef het deksel van de sterilisator op.
3. Plaats de accessoires op de daartoe voorziene
plaats.
a) de anti-lekdekseltjes
passen in de gleuven.
b) de spenen passen
in de holle gedeeltes
van het mandje.
c) de afsluitringen moeten
rond de spenen
worden geplaatst (maar
zonder deze aan te raken).
Not_Sterilisation.qxd 8/03/06 13:14 Page 20
Table of contents
Languages:
Other Hanson Laboratory Equipment manuals


Popular Laboratory Equipment manuals by other brands

BioLAB
BioLAB BIDP 100 Series Operation manual

Dosmatic
Dosmatic SUPERDOS 20 Installation & operating instructions

Thermo Scientific
Thermo Scientific Cryofuge 16 instruction manual

Terumo BCT
Terumo BCT Spectra Optia Apheresis System Operator's manual

VistaLab
VistaLab Ovation M Replacement manual

Retsch
Retsch Mixer Mill MM 500 nano manual

Science First
Science First Therm Bath III manual

Merck
Merck Millipore Auto2D quick start guide

Brunswick
Brunswick BIOFLO 3000 Guide to operations
 Light Engine instruction manual")
Lumencor
Lumencor SPECTRA III (L) Light Engine instruction manual

Dynojet
Dynojet POWER COMMANDER III installation instructions

Labnet
Labnet 25 operating instructions


