manuals.online logo
Brands
  1. Home
  2. •
  3. Brands
  4. •
  5. Happymodel
  6. •
  7. Drone
  8. •
  9. Happymodel Mobula7 HD DSMX User manual

Happymodel Mobula7 HD DSMX User manual

Binding procedure
Toggle the AUX1 Switch, the Green LED on Toggle the AUX1 Switch, the Green LED on
the Flight controller will getting to be solidthe Flight controller will getting to be solid
Toggle the AUX1 Switch, the Green LED on
the Flight controller will getting to be solid
Mobula7 HD brushless whoop Racing Drone DSMX/DSM2 version
Specifications
Brand Name: Happymodel
Item Name: Mobula7 HD 2-3S 75mm Brushless whoop drone
Wheelbase: 75mm
Size: 98mm*98mm* mm45
Weight: 72g(with Original 3s 300mah Lipo batter y )
Flight controller connection diagram
Package includes:
Item Name
Mobula7 V3 Frame
Option1: Crazybee F4FR V3.0 PRO FC built-in Frsky NON-EU RX
Option2: Crazybee F4FS V3.0 PRO FC built-in Flysky RX
Option3: Crazybee F4 V3.0 flight controller with External DSM2/DSMX receiver
Option4: Crazybee F4 V3.0 flight controller no RX version
EX1102 KV9000 Motor
40mm propeller(4cw+4ccw)
Caddx Tur tle v2+1080p 60fps DVR
Whoop_vtx 5.8G 40ch 25mw-200mw VTX
3S 11.4v 300mah 30C/60C battery
Propeller disassemble tool
Screwdriver
Qty
1
1
4
1
1
1
1
1
1
Arm/Disarm the Motor
1. The Default Arm/Disarm switch for is AUX1(Channel 5),and you can also customizeMobula7 HD
it with Betaflight Configurator.
3.The default channel map for Mobula7 HD DSM2/X version is TAER1234, please make sure
your transmitter is matched, otherwise it will can't be armed. Toggle the AUX1 Switch ,the
Green LED on the flight controller will getting to be solid, this indicates the motor was armed .
And also you can found “Armed” displayed on your FPV Goggles or the FPV Monitor. Please
make sure keep the Mobula7 HD level before arming .Be careful and enjoy your flight now !
Receiver configuration
We have configured the DSM2/DSMX receiver for the Mobula7 HD before shipping. If you
flashed the firmware ,Please setup as the following steps: Enable Serial_RX for UART2, then
select RX_SERIAL from the RECEIVER Mode and set the Serial Receiver Provider to be
Spektrum1024 for DSM2 radio and Spektrum2048 for DSMX Radio in Betaflight Configurator.
2.For most of Spektrum radio the default channel 5 is Gear switch and you can also customize
it. Use DX9 for example, Go to menu and select System setup ,then choose Channel ssign.
1.Plug the USB and connect to betaflight configurator, from the CLI tab type: "set
spektrum_sat_bind=9" for DSMX radio or "set spektrum_sat_bind=5" for DSM2 radio.
2.Type "save" and after Flight controller reboot then remove USB plug(=Power off the board)
3.Wait a second and reconnect the USB cable . After cold start the orange LED on the receiver
should start blinking and transmitter should be turned on while pressing the bind button.
4.After binding the orange LED on the receiver should be solid. Connect to Betaflight and use
receiver tab to test that satellite receiver is working correctly.
5.Final step is to go to CLI tab and type "set spektrum_sat_bind=0" and then type "save". This
must be done so that satellite receiver doen't go back to binding mode when the flight
controller is repowered again.
LED OFF---No RC Input Signal
LED Blinking Fast---In Binding Mode
LED getting to be Solid---Binding successful
or RC input signal connected
Orange LED
M1
M2
M3
M4
USB
LIPO+
GND
+5V output
GND
Video_in
Video_out
RX2
RX1
BOOT
BUZ-
BUZ+
GND
LIPO+
TX1
IRX1
LED
TX2
+5V output+5V output+5V output
GNDGNDGND
Video_in
Video_outVideo_outVideo_out
BUZ+
RX1
GND
LIPO+
IRX1
LED
TX2
Crazybee F4 V3.0 flight controller with External DSM2/DSMX receiver
Firmware update
Mixer type and ESC/motor protocol
Mobula7 HD brushless whoop Racing Drone DSMX/DSM2 version
VTX Bands and Channels setup
There are 3 ways to switch the vtx channels:
1.L ong press the switch button to change the Band of the VTX, shorter press the switch button to
change the channels of the VTX.
(Can't save ,it will lost the channel while re-power for the Mobula7 HD since the Smartaudio funciton enalbed)
2. Go to Betaflight CLI ,type the command:
Set vtx_band=3
Set vtx_channel=1
Set vtx_freq=5705
save
Notes: The vtx_freq should match the vtx_band and vtx_channle as the VTX Channel list shows.
For example, if you set vtx_freq=5732, you should set vtx_band=5 and vtx_channel=3
3.E nable Smartaudio for UART1, then move the stick of the transmitter (THR MID+YAW LEFT
+ PITCH UP) to enter OSD Menu, Enter to Features, then enter to VTX SA to set VTX Band and channel
Frequency and channel frequency table
8,7,6,5,4,3,2,1
1,2,3,4,5
Band LED
Channel LEDChannel LEDChannel LED
Black GND
Red +5V Input
Green smare Audio
Yellow Video_IN
Blue Video_out
200MW
100MW
25MW U.FL
Cam_IN
+5V out put
GND
Switch Button
CH
FR
Band1(A)
Band2(B)
Band3(E)
Band4(F)
Band5(R)
CH1
5865M
5733M
5705M
5740M
5658M
CH2
5845M
5752M
5685M
5760M
5695M
CH3
5825M
5771M
5665M
5780M
5732M
CH4
5805M
5790M
5665M
5800M
5769M
CH5
5785M
5809M
5885M
5820M
5806M
CH6
5765M
5828M
5905M
5840M
5843M
CH7
5745M
5847M
5905M
5860M
5880M
CH8
5725M
5866M
5905M
5880M
5917M
LED5 LED8
5917MHZ BAND5 CH8
Default PID setting
Fix the CW propeller onto the M1
and M4 motor (CW motors)
Fix the CCW propellers onto the M2
and M3 motor (CCW motors)
Props IN
1. Download New release Blhelisuite from:
https://www.mediafire.com/folder/dx6kfaasyo24l/BLHeliSuite
2. Connect the Crazybee F4 PRO flight controller to computer and power for it with battery
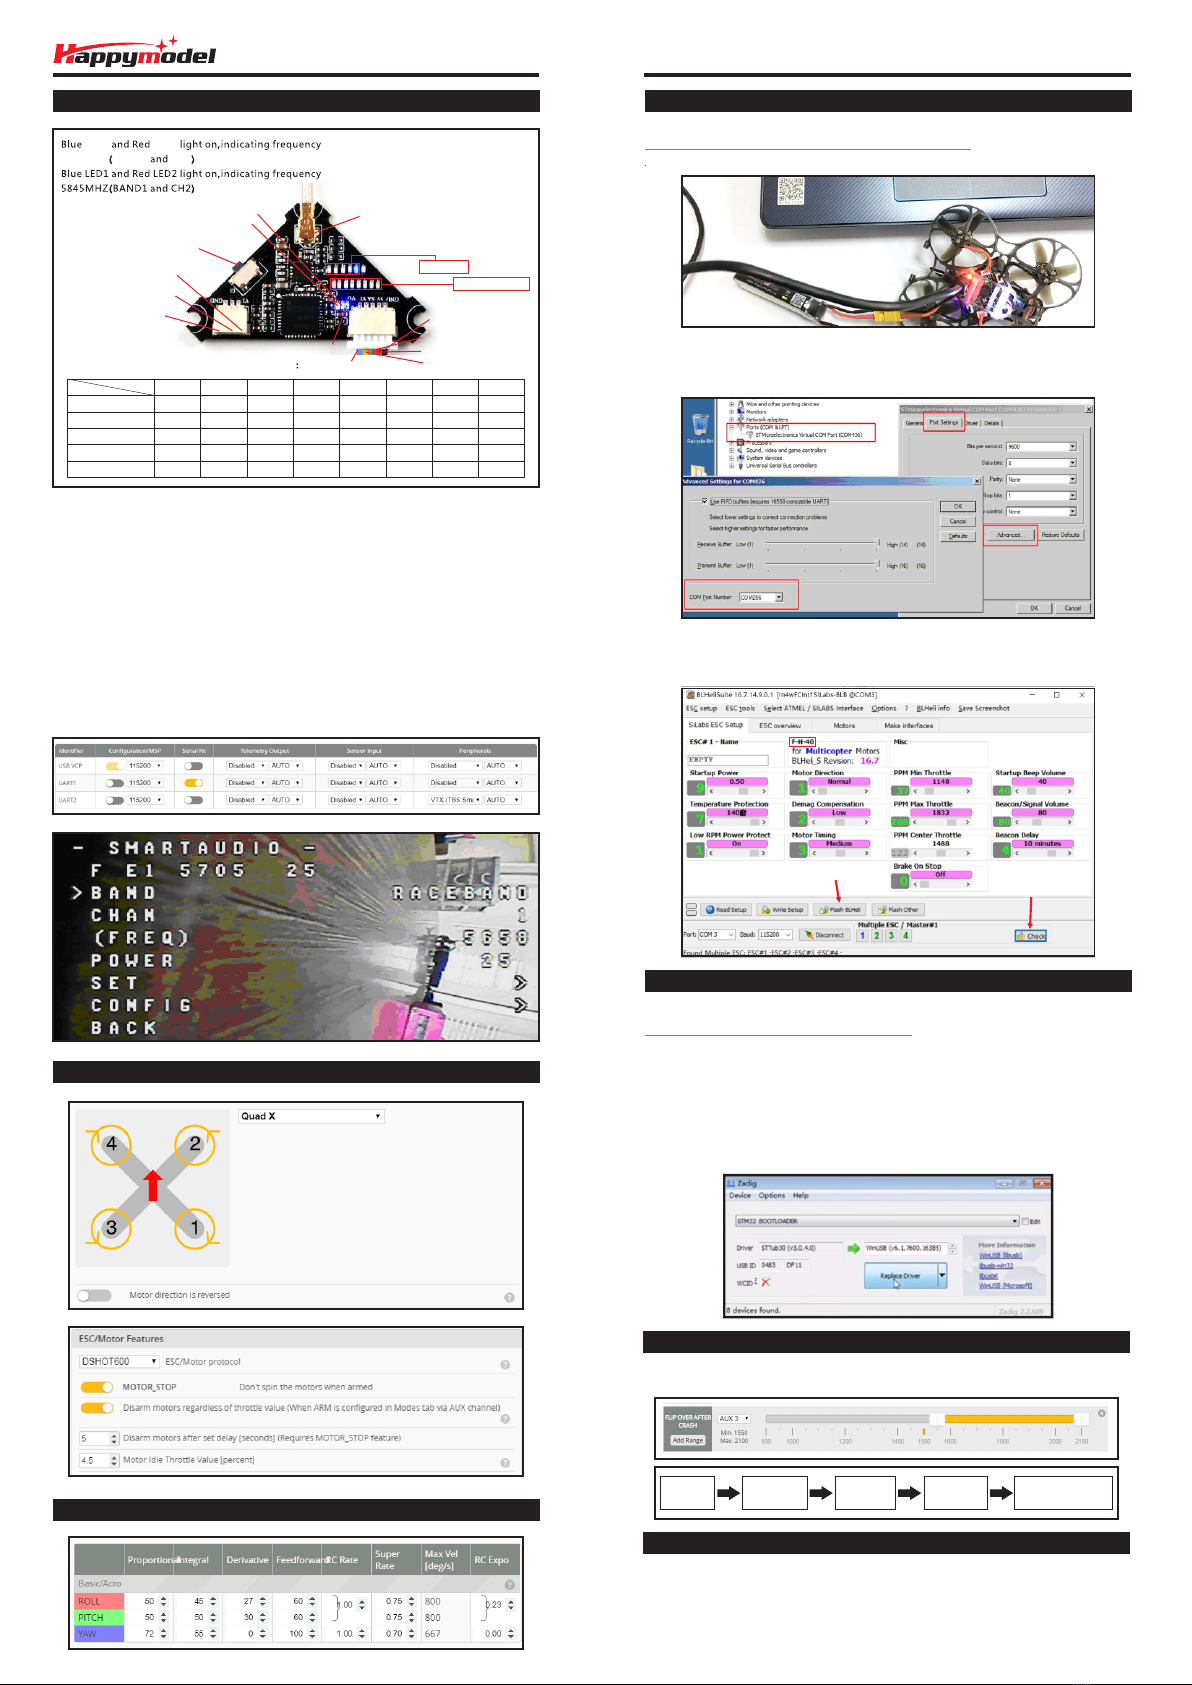
ESC Check and Flash firmware
3. Open the Device Manager of your computer, find the Ports, please make sure the Com port
Serial Number is under 255, otherwise it will can't connect to the BLHELISUITE. You can change
the port serial number like the bellowing step :
4. Open the BLHELISUITE, Select SILABS BLHeli Bootloader (Cleanflight) from the third tab on
the top side. Then Select the right Serial com port and Click connect. You can also Flash the
new release BLHeli_s firmware via the BLHEILISUITE, the firmware Target is “F-H-40”
Flight controller firmware update
1. Install latest STM32 Virtual COM Port Driver
http://www.st.com/web/en/catalog/tools/PF257938
2. Install STM BOOTLOAD Driver (STM Device in DFU MODE)
3. Open Betaflight configurator and choose firmware target “CrazybeeF4DX”,then select the
firmware version.
4. There are 2 ways to get in DFU Mode: 1). solder the boot pad and then plug USB to computer 2).
loading betaflight firmware and hit “flash”, then it will getting into DFU Mode automatically.
5. Open Zadig tools to replace the drivers from STM32 Bootloader to WINUSB Driver.
6. Reconnect the flight controller to the computer after replace driver done , and open
Betaflight Configurator, loading firmware and flash.
Set one channel of your radio transmitter to activate the Flip over function in the Mode tab of
Betaflight configurator.
“Flip over after crash” procedure
Crashed Disarm
The Quad
Activate
Flip over
Arm
The Quad
Move stick
to flip the Quad
Notes:
1. Add external Sbus RX---Connect SBUS wire to the IRX1 pad ---Enable Serial RX for
UART1---Choose serial_based receiver and Sbus protocol---TX2 could use for Smartaudio
2. Breath light meanings : If the single cell voltage > 3.6v , the LED turn to green color, if the
single cell voltage <3.3v the LED turn to red color .
3. No videos from Caddx turtle2 if just power from USB , need to connect the battery
Firmware target
Click check to see the
details of the 4in1 ESC
Flash firmware

Other manuals for Mobula7 HD DSMX

4

This manual suits for next models

1

Other Happymodel Drone manuals

Happymodel Mobula7 HD DSMX User manual

Happymodel

Happymodel Mobula7 HD DSMX User manual

Happymodel Mobula7 HD DSMX User manual

Happymodel

Happymodel Mobula7 HD DSMX User manual

Happymodel Mobula7 HD DSMX User manual

Happymodel

Happymodel Mobula7 HD DSMX User manual

Happymodel Mobula7 HD DSMX User manual

Happymodel

Happymodel Mobula7 HD DSMX User manual

Happymodel Snapper 6 FRSKY BNF User manual

Happymodel

Happymodel Snapper 6 FRSKY BNF User manual

Happymodel Snapper6 User manual

Happymodel

Happymodel Snapper6 User manual

Happymodel Larva X User manual

Happymodel

Happymodel Larva X User manual

Happymodel Mobula 7 1-2S Frsky User manual

Happymodel

Happymodel Mobula 7 1-2S Frsky User manual

Happymodel Crux35 User manual

Happymodel

Happymodel Crux35 User manual

Happymodel Mobula6 User manual

Happymodel

Happymodel Mobula6 User manual

Popular Drone manuals by other brands

Overmax X-bee user manual

Overmax

Overmax X-bee user manual

Steren DRON-005 manual

Steren

Steren DRON-005 manual

MS SKY PHANTOM user manual

MS

MS SKY PHANTOM user manual

SYMA X500Pro Instructions for use

SYMA

SYMA X500Pro Instructions for use

Brookstone FLIGHTFORCE user manual

Brookstone

Brookstone FLIGHTFORCE user manual

Beijing TT Aviation Technology TIANNONG M6E-X2 User instructions

Beijing TT Aviation Technology

Beijing TT Aviation Technology TIANNONG M6E-X2 User instructions

Geoscan Lite operating manual

Geoscan

Geoscan Lite operating manual

Flywoo FLYLENS 85 quick start guide

Flywoo

Flywoo FLYLENS 85 quick start guide

Protocol TERRACOPTER Pilot's handbook

Protocol

Protocol TERRACOPTER Pilot's handbook

Dragon Touch DK01 user manual

Dragon Touch

Dragon Touch DK01 user manual

Foxtech Baby Shark 260 VTOL user manual

Foxtech

Foxtech Baby Shark 260 VTOL user manual

Dragon Touch DF01 user manual

Dragon Touch

Dragon Touch DF01 user manual

R/Evolution Rezo instruction manual

R/Evolution

R/Evolution Rezo instruction manual

CFLY Faith2 Pro Operation manual

CFLY

CFLY Faith2 Pro Operation manual

Hot Wheels RC BLADEZ DRX DRONE ROTOR CROSS CAGE FIGHTER manual

Hot Wheels

Hot Wheels RC BLADEZ DRX DRONE ROTOR CROSS CAGE FIGHTER manual

CFLY FAITH 2 user manual

CFLY

CFLY FAITH 2 user manual

devention Scout X4 quick start guide

devention

devention Scout X4 quick start guide

Parrot ANAFI Ai user guide

Parrot

Parrot ANAFI Ai user guide

manuals.online logo
manuals.online logoBrands
  • About & Mission
  • Contact us
  • Privacy Policy
  • Terms and Conditions

Copyright 2025 Manuals.Online. All Rights Reserved.