manuals.online logo
Brands
  1. Home
  2. •
  3. Brands
  4. •
  5. Harken
  6. •
  7. Winch
  8. •
  9. Harken 59.2ST E/HY User manual

Harken 59.2ST E/HY User manual

59.2ST E/HY
Electric/Hydraulic Self-Tailing Winch
■Required Tools
Screwdriver
Plastic Head Hammer or Mallet
Small Knife
Brush
Rags
Solvent
Oil
Grease
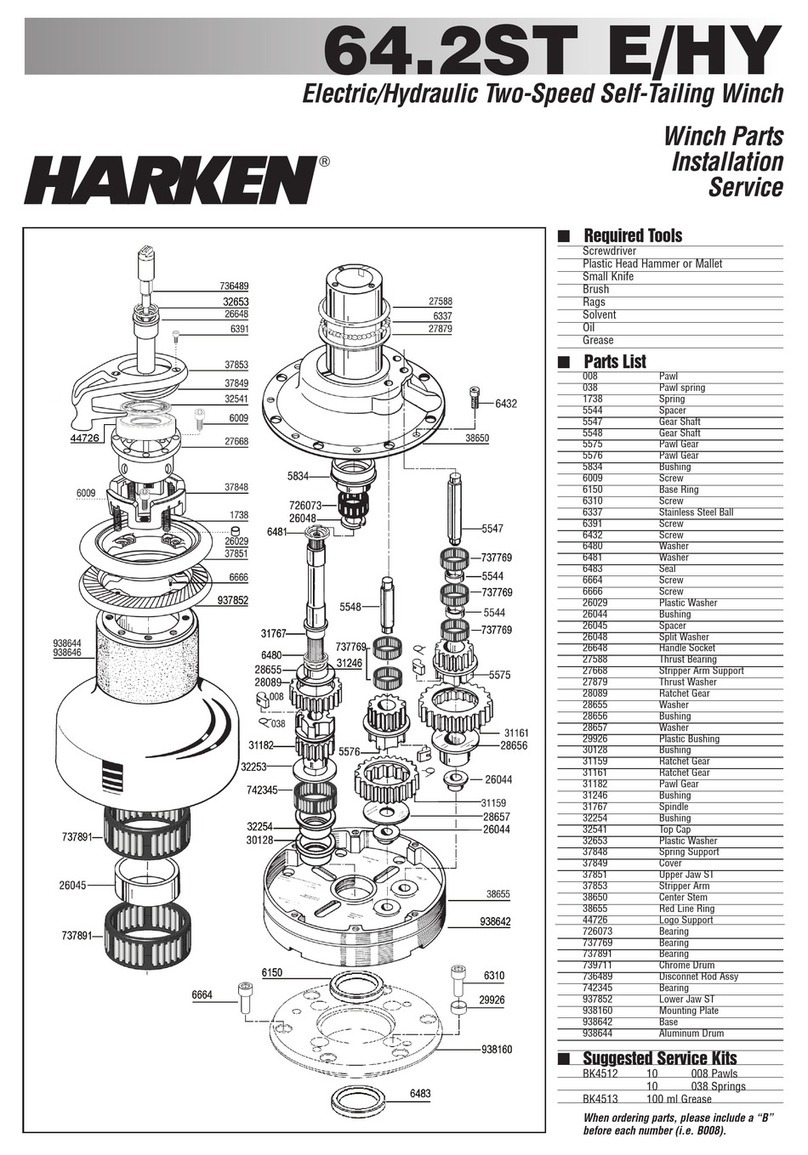
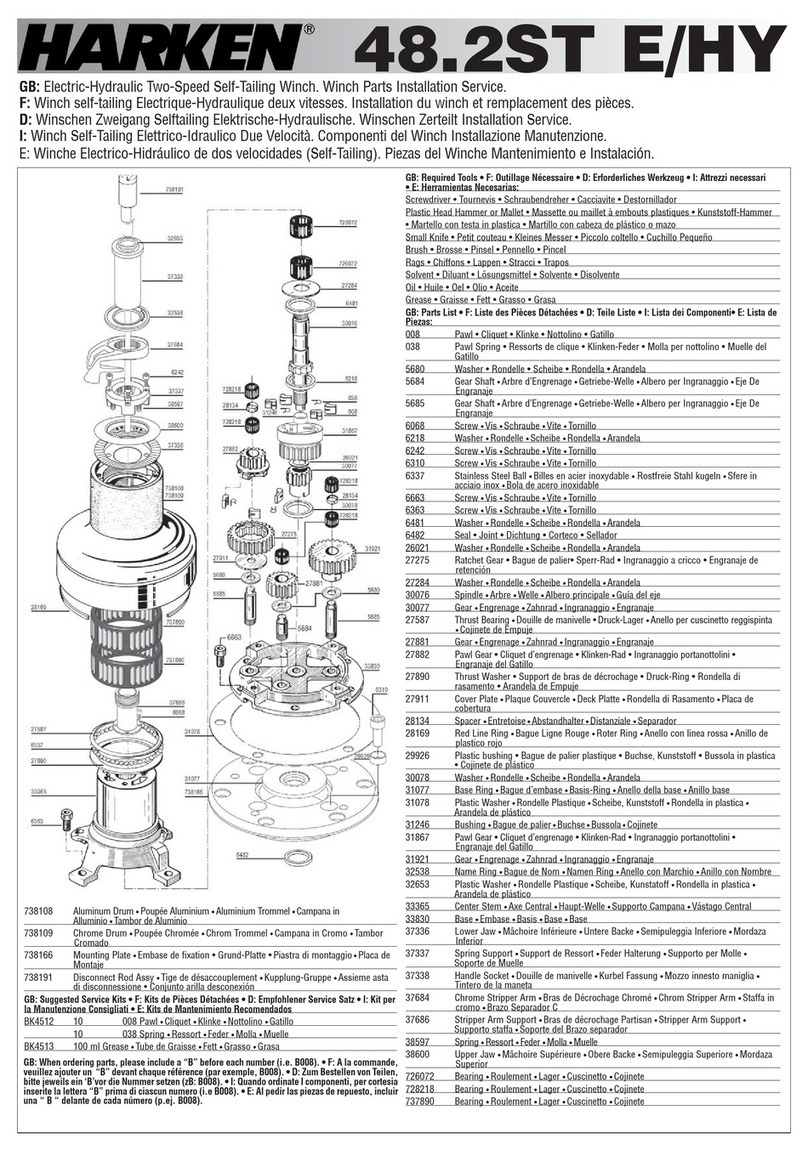
■Parts List
008 Pawl
038 Pawl Spring
1738 Spring
6009 Screw
6150 Base Ring
6310 Screw
6337 Stainless Steel Ball
6391 Screw
6432 Screw
6481 Washer
6483 Seal
6662 Screw
6666 Screw
26029 Plastic Washer
26044 Bushing
26048 Split Washer
26648 Handle Socket
27588 Thrust Bearing
27668 Stripper Arm Base
27879 Thrust Washer
28089 Ratchet Gear
28090 Ratchet Gear
28092 Ratchet Gear
28093 Pawl Gear
28094 Pawl Gear
28095 Pawl Gear
28097 Washer
28098 Washer
28099 Washer
28100 Gear Shaft
28101 Gear Shaft
28103 Washer
28134 Spacer
28136 Spindle Guide
29926 Plastic Bushing
30128 Bushing
30133 Spindle
31246 Bushing
32254 Bushing
32258 Gear
32653 Plastic Washer
37846 Upper Jaw ST
37848 Spring Support
37849 Cover
37850 Stripper Arm
38655 Red Line Ring
46010 Center Stem
44725 Logo Support
37847 Lower Jaw ST
45777 Top Cap
726073 Bearing
728218 Bearing
737892 Bearing
742345 Bearing
936488 Disconnect Rod Assy
938162 Mounting Plate
938680 Base
945459 Chrome Drum
■Suggested Service Kits
BK4512 10 008 Pawls
10 038 Springs
BK4513 100 ml Grease
When ordering parts, please include a
“B” before each number (i.e. B008).
Winch Parts
Installation
Service
1Remove Disconnect Rot and Handle Socket
Loosen disconnect rod using flethead screw driver as shown
below
Remove Disconnect Rod and handle cocket.
Disassemble Winch Before Installation
2Remove Stripper Arm and name Ring
Loosen the three (3) allen screws
Remove stripper arm
Remove Name Ring and black cover ring.
3Remove Drum Assembly
Loosen the four (4) allen screws inside the stripper arm support
Remove stripper arm support
Carefully lift off drum assembly, main bearings may remain inside
drum due to oil and grease
4Remove Housing
Loosen the six (6) allen screws holding the housing to the
alluminium base
Lift off housing.
5Remove Mounting Plate from Motor/Gearbox Assy
Loosen the four (4) allen screws
Lift off mounting plate:
6Drive Position
Place winch base on mounting plate, making sure fastener holes re
corresponding
Mark drive position.
Sheet entry angle
must be at least 8°.
Mount the Winch
7Determine Winch Location
Make sure there is clearance for Motor and Reduction Gearbox.
Drill an 127 mm hole through the deck.
8Position Drive Gear/Secure Mounting Base
Make sure Mounting Base sits flat on deck.
Position so Drive Gear aligns to sheet load (see Step 13)
Mark the six (6) mounting holes, drill deck.
Use bedding compound/sealant to prevent leakage.
Secure Mounting Base using five (5) 8 mm (B56) or 10 mm (B64
and up) countersunk screws.
9
Attach Motor/Gearbox Assembly to Mounting Base
Have another person below deck to position gearbox underneath winch.
12 IMPORTANT - Test Winch Operation
After winch is assembled, test operation in manual mode only,
before sailing. Important - use a lock-in winch handle.
Using a locking winch handle, check winch operation.
Disconnect rod must disconnect gearbox when lock-in
winch handle is inserted in Handle Socket.
11 Assemble Winch
Use steps 1 - 9 in reverse order to assemble winch.
10
Attach Winch
Tighten the six (6) bolts securing Winch to Mounting Base.
Use blue Loctite®on threads.
Use brush to lightly lubricate gear with grease
Position drive gear
where sheet enters
winch drum.
■Minimum/Maximum Line Diameter
Harken winches feature spring-loaded self-tailing jaws
which adjust automatically to the following line sizes:
Minimum
5
/
16
" (8 mm)
Maximum
1
/
2
" (12 mm)
■Positioning Stripper Arm
Loosen top Screw.
Remove Handle Socket.
Lift Stripper Arm and position as desired.
■Opening Winch
Remove top Screw.
Lift off Drum and Stripper Arm.
■Servicing Winch
Remove Pawls and Springs - service as below.
Remove Bearing, Gear Shaft and Gears.
Clean all parts except 37383 and 38598 with rag and solvent.
Important: Use freshwater only on parts 37383 and 38598
Use brush to lubricate all moving parts lightly with grease.
Replace Pawls and Springs and lubricate lightly with oil.
Assemble and close winch.
■Servicing Pawls
Catch Spring with knife and hold against Pawl.
Lift out Pawl. Clean and check for wear.
Place “straight leg” of Pawl Spring against Pawl.
Hold Spring closed and slip Pawl into Pawl Socket.
Lubricate Pawls using oil.
Service winch before the sailing season begins and once during
Clean all parts, except 37383
and 38598, with solvent.
Correct Incorrect
If ratchet gear is mounted
backwards, winch will slip.
Use a brush to spread a light,
even coat of grease.
Use knife to free captive Pawl
Spring. Insert Pawl Spring with straight leg
against Pawl. Use oil for lubrication.
Servicing Winch
Servicing Pawls
Pawl
Socket
13
127 mm
Wiring
1251 E. Wisconsin Ave., Pewaukee, WI 53072 USA • Tel: (262) 691-3320 • Fax: (262) 691-3008 • Web: www.harken.com • Email: [email protected]
Via della Cerca, 12/14, 22070 Lurago Marinone (CO) Italy • Tel: (39) 031.3523511 • Fax: (39) 031.3520031 • Web: www.harken.it • Email: [email protected]
Fasten electric control box containing solenoids to bulkhead or wall.
Install remote circuit breaker between power supply and electric
control box.
Locate pushbuttons in a convenient spot for easy winch operation.
Pushbutton wire size is #14.
Refer to wiring diagram for wire size and connection information.
Schematics Piping
control box
■Parts List
Pos. Q.ty Code Description
1 1 29505 Spacer
2 1 38149 Hydraulic motor support
3 1 30848 Hydraulic motor "OMR80
151-0721 alb.scan. 1"
4 1 6519 Ring
5 1 33045 Ring carrier
6 1 36475 Toothed coupling
7 1 32649 Spring
8 1 32936 Washer
9 2 6215 Washer D.13 UNI1751
10 2 6671 Screw M12x35 UNI5931
11 1 6353 Screw M8x16 UNI6109
12 1 36476 Hydro motor coupler
13 1 6660 Spring pin 6x36 DIN 1481
14 4 6277 Heli-coil M10x10
■Parts List
Pos. Q.ty Code Description
1 1 738156 Assy painted worm reduction
4 6208 Nut M6 UNI5588
4 6213 Washer D.6 ISO 7089
1 36461 Lower cover
4 36460 Screw stud M6 x 20
1 31279 Worm reduction unit VF49
1 38156 Support
4 6277 Heli-coil M10x10
2 1 36478 Shaft
3 1 6519 Ring
4 1 36479 Ring
5 1 33056 Spring
6 1 31074 Connecting coupling
7 1 6353 Screw M8x16 UNI6109
8 1 33043 Washer
9 1 6178 Spring pin 6x36 DIN 1481
10 1 6281 Key 8x7x35
11 1 831249 Electric Motor 12V 600W assy painted
1 31249 Electric motor 12V 600W 2800rpm
4 31281 Screw stud M6
4 6208 Nut M6 UNI5588
4 6213 Washer D.6 ISO 7089
11 1 831250 Electric Motor 24V 600W assy painted
1 31250 Electric motor 24V 600W 2800rpm
4 31281 Screw stud M6
4 6208 Nut M6 UNI5588
4 6213 Washer D.6 ISO 7089
10-04
WIRE SIZE CHART
(distance in meters from battery to winch and back battery)
34,6 6,1 7,6 9,1 12,2 15,2
Amps Section mm 2
5* 0,8 1 2 3 3 5 5
30 5 8 13 13 19 19 32
40 8 13 13 19 19 32 32
50 13 13 19 19 32 32 40
60 13 19 19 32 32 40 50
70 13 19 32 32 40 50 62
80 13 19 32 32 40 50 81
90 19 32 32 40 50 62 81
100 19 32 32 40 50 62 81
120 19 32 40 50 62 81 103
140 32 32 50 62 62 103 103
* Push buttons require 2 mm2 cable

Other Harken Winch manuals

Harken 200 User manual

Harken

Harken 200 User manual

Harken Performa Winch 40.2 STP Manual

Harken

Harken Performa Winch 40.2 STP Manual

Harken Carbon User manual

Harken

Harken Carbon User manual

Harken Performa Winch 40.2 PTP Manual

Harken

Harken Performa Winch 40.2 PTP Manual

Harken 53.2 User manual

Harken

Harken 53.2 User manual

Harken HighTailer IN171 User manual

Harken

Harken HighTailer IN171 User manual

Harken 53.2ST E/HY User manual

Harken

Harken 53.2ST E/HY User manual

Harken 40.2ST E User manual

Harken

Harken 40.2ST E User manual

Harken Performa Winch 35.2 STP Manual

Harken

Harken Performa Winch 35.2 STP Manual

Harken 46.2 PTBBB Manual

Harken

Harken 46.2 PTBBB Manual

Harken 46.2 Quick start guide

Harken

Harken 46.2 Quick start guide

Harken Powered Performa 60.3 STP E Manual

Harken

Harken Powered Performa 60.3 STP E Manual

Harken Top-Crank LokHead Rigging Winch 500 User manual

Harken

Harken Top-Crank LokHead Rigging Winch 500 User manual

Harken Radial Winch 70.2 ST Manual

Harken

Harken Radial Winch 70.2 ST Manual

Harken 40.2STAACCSH User manual

Harken

Harken 40.2STAACCSH User manual

Harken Radial Winch 40.2 PT BBB Manual

Harken

Harken Radial Winch 40.2 PT BBB Manual

Harken Powered Performa Manual

Harken

Harken Powered Performa Manual

Harken 44.2st Manual

Harken

Harken 44.2st Manual

Harken INLH500KIT.US User manual

Harken

Harken INLH500KIT.US User manual

Harken Riggers Winch 200 User manual

Harken

Harken Riggers Winch 200 User manual

Harken CLR 600 Manual

Harken

Harken CLR 600 Manual

Harken Performa 46.2 STP Manual

Harken

Harken Performa 46.2 STP Manual

Harken Performa 50.2 STP Manual

Harken

Harken Performa 50.2 STP Manual

Harken Performa Winch 80.3 STP Manual

Harken

Harken Performa Winch 80.3 STP Manual

Popular Winch manuals by other brands

haacon 1098 operating manual

haacon

haacon 1098 operating manual

Britpart PULLING POWER DB12000i Installation & operation manual

Britpart

Britpart PULLING POWER DB12000i Installation & operation manual

Ingersoll-Rand Liftstar LS2-600H Product Maintenance Information

Ingersoll-Rand

Ingersoll-Rand Liftstar LS2-600H Product Maintenance Information

GEBUWIN WW250 D/Ex Series operating instructions

GEBUWIN

GEBUWIN WW250 D/Ex Series operating instructions

Comeup Seal Gen2 12.5rs manual

Comeup

Comeup Seal Gen2 12.5rs manual

Dutton-Lainson DL1402A quick start guide

Dutton-Lainson

Dutton-Lainson DL1402A quick start guide

Grizzly H7604 instruction manual

Grizzly

Grizzly H7604 instruction manual

Comeup DP-10000 instruction manual

Comeup

Comeup DP-10000 instruction manual

Ingersoll-Rand LIFTSTAR Series Operation manual

Ingersoll-Rand

Ingersoll-Rand LIFTSTAR Series Operation manual

BRADEN CH SERIES Installation maintenance and service manual

BRADEN

BRADEN CH SERIES Installation maintenance and service manual

DRAGON WINCH DWM 12000 HD EN Operation manual

DRAGON WINCH

DRAGON WINCH DWM 12000 HD EN Operation manual

Quadratec Q11000s Operator's guide

Quadratec

Quadratec Q11000s Operator's guide

Ingersoll-Rand force 5 FA2 Parts, operation and maintenance manual

Ingersoll-Rand

Ingersoll-Rand force 5 FA2 Parts, operation and maintenance manual

HADEF 238/10MV Installation, Operating and Maintenance Instruction

HADEF

HADEF 238/10MV Installation, Operating and Maintenance Instruction

CSI X3500 Installation Manual & Safety Instructions

CSI

CSI X3500 Installation Manual & Safety Instructions

POWERWINCH RC23 owner's manual

POWERWINCH

POWERWINCH RC23 owner's manual

Champion Power Equipment C20049 owner's manual

Champion Power Equipment

Champion Power Equipment C20049 owner's manual

1st-Relief VERSACHOCK manual

1st-Relief

1st-Relief VERSACHOCK manual

manuals.online logo
manuals.online logoBrands
  • About & Mission
  • Contact us
  • Privacy Policy
  • Terms and Conditions

Copyright 2025 Manuals.Online. All Rights Reserved.