manuals.online logo
Brands
  1. Home
  2. •
  3. Brands
  4. •
  5. Hatco
  6. •
  7. Indoor Furnishing
  8. •
  9. Hatco Flav-R-Shield ED-20 User manual

Hatco Flav-R-Shield ED-20 User manual

© 2022 Hatco Corporation 1
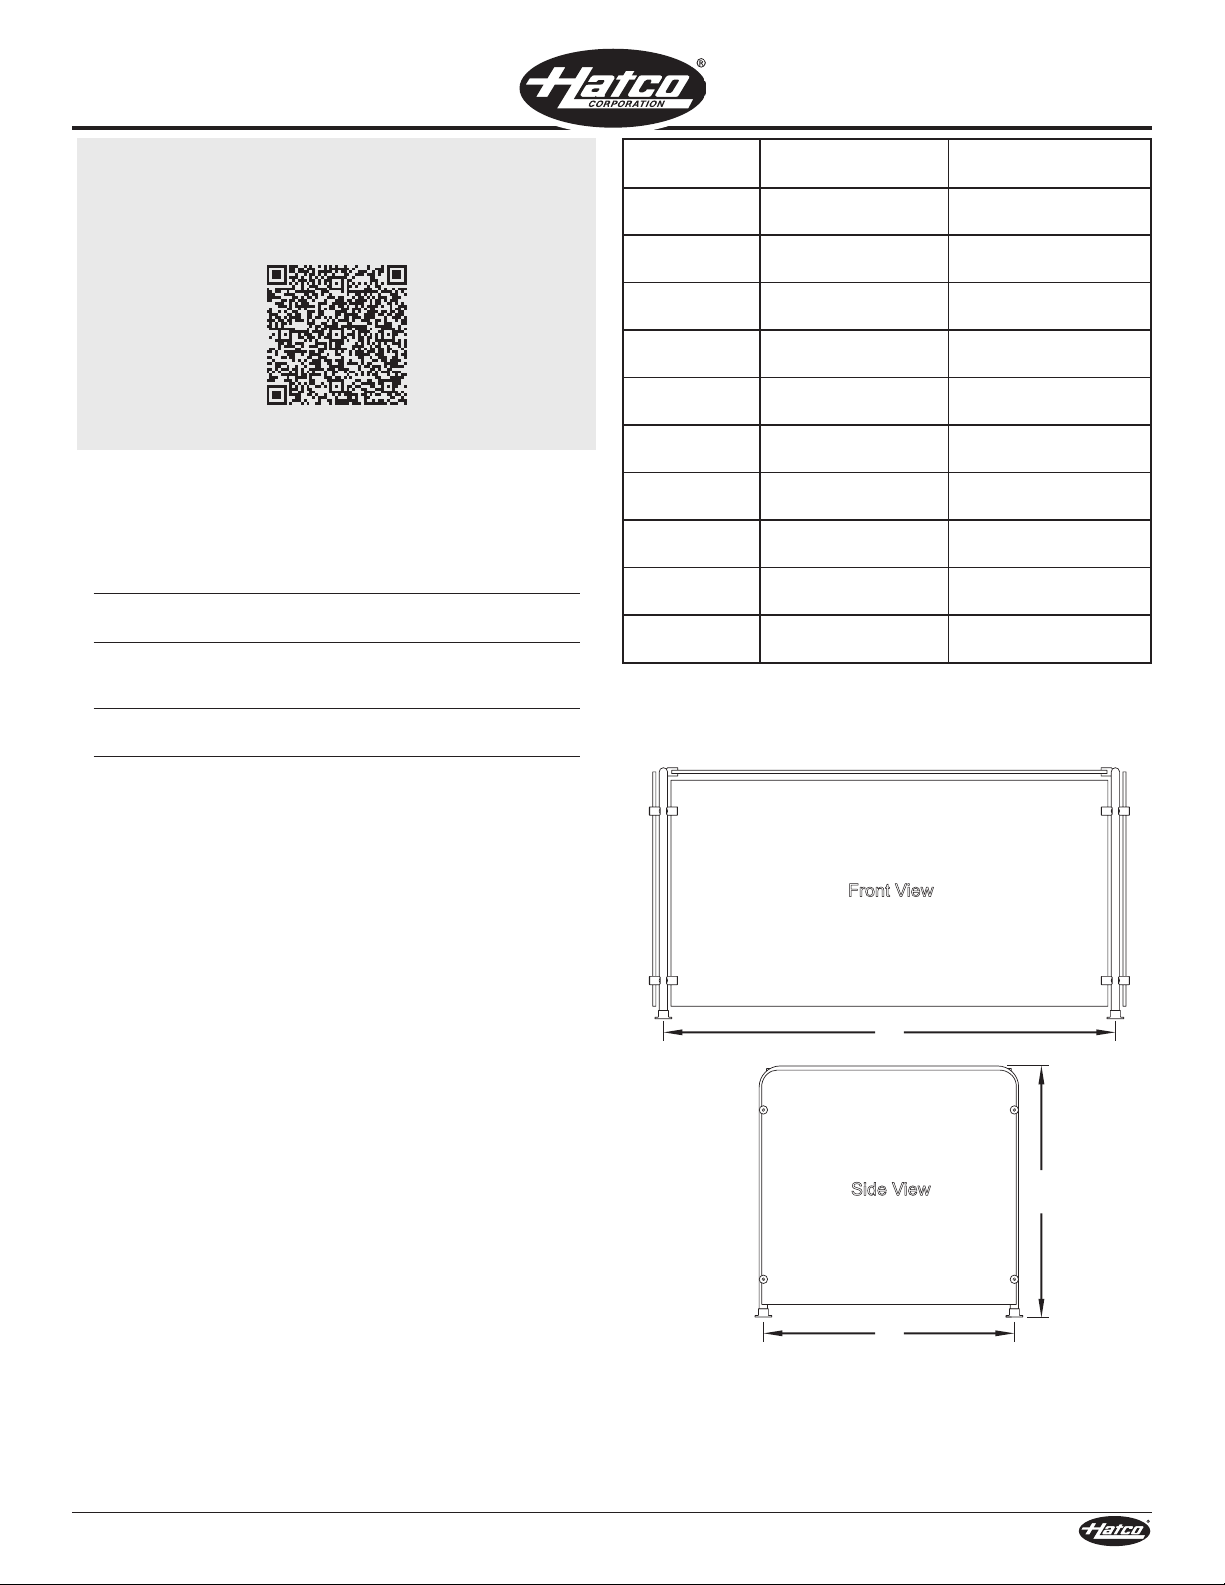
Item Number *
Width (A)
(post center to center)
Depth (B) †
(post center to center)
ED20-036xx 36″
(914 mm)
12″, 15″, or 18″
(305, 381, 457 mm)
ED20-048xx 48″
(1219 mm)
12″, 15″, or 18″
(305, 381, 457 mm)
ED20-060xx 60″
(1524 mm)
12″, 15″, or 18″
(305, 381, 457 mm)
ED20-072xx 72″
(1829 mm)
12″, 15″, or 18″
(305, 381, 457 mm)
ED20-084xx 84″
(2134 mm)
12″, 15″, or 18″
(305, 381, 457 mm)
ED20-096xx 96″
(2438 mm)
12″, 15″, or 18″
(305, 381, 457 mm)
ED20-108xx 108″
(2743 mm)
12″, 15″, or 18″
(305, 381, 457 mm)
ED20-120xx 120″
(3048 mm)
12″, 15″, or 18″
(305, 381, 457 mm)
ED20-132xx 132″
(3353 mm)
12″, 15″, or 18″
(305, 381, 457 mm)
ED20-144xx 144″
(3658 mm)
12″, 15″, or 18″
(305, 381, 457 mm)
*The “xx” at the end of the Item Numbers refers to the depth of the
sneeze guard. This will be “12”, “15”, or “18”, depending on the
unit ordered.
† NSF Standards require the use of 18″ End Panels for compliance.
A
B
18″
(457 mm)
4. Insert each Post Assembly into its corresponding Mounting
Flange. Make sure the posts are fully seated in the flanges.
5. Tighten the set screw on each Mounting Flange securely.
6. Slide each Flange Cover down onto its corresponding flange.
continued...
P/N 07.14.005.00-0622 [ED20_IG]
INSTALLATION GUIDE
Model ED-20 Full Service Sneeze Guards are available in ten
widths ranging from 36″–144″ (914–3658 mm) with a common
height of 18″ (457 mm). All of the widths can be configured in one
of three depths including 12″, 15″, or 18″ (305, 381, 457 mm).
For additional information regarding Model ED-20 sneeze
guards, scan the QR Code below:
https://www.hatcocorp.com/en/equipment/sneeze-guard-equipment/
full-service/flav-r-shield-full-service-pass-over-sneeze-guard-ed20
Important Safety Information
To avoid serious injury and damage to equipment or property, read
the following safety information before installing this equipment.
Do not attempt to assemble and install sneeze guards alone.
Installation of sneeze guards requires two or more people,
dependent upon unit.
Always wear proper protective eye wear when handling glass
sneeze guards.
Never spray cleaners directly onto sneeze guard surfaces.
Spray cleaner into non-abrasive cloth, and then wipe down
surfaces.
Do not place anything on top of sneeze guard. It is not designed
to be a weight-bearing component.
Use non-abrasive cleaners and cloths only. Abrasive cleaners
and cloths could scratch finish of unit, marring its appearance
and making it susceptible to soil accumulation. Use of abrasive
materials will void warranty.
Assembly and Installation
1. Unpack all components. Verify that the appropriate number of
the items below are present.
• Face Panel, 3/8″ Glass
• End Panel, 3/8″ Glass
• Top Shelf, 3/8″ Glass
• Post Assembly, 1″ Stainless Steel
• Hardware Packet (includes hex wrench for set screws)
2. Remove the Mounting Flanges from each Post Assembly.
a. Slide the Flange Cover up and off of the flange.
b. Using the included hex wrench, loosen the set screw on the
flange.
c. Slide the flange off of the post assembly.
3. Install the Mounting Flanges to the mounting surface.
a. Refer to the chart and illustration below to determine the
location of the flanges.
b. Position the flanges in the appropriate locations, and mark
the screw hole locations. IMPORTANT! Measure carefully,
and make sure the flanges remain square to each other as
well as the installation location.
c. Pre-drill the screw holes in the mounting surface.
d. Install the flanges using the appropriate, countersunk-style
fasteners for the mounting surface.
Flav-R-Shield™
Full Service Sneeze Guards
Model ED-20
© 2022 Hatco Corporation2
Cleaning/Maintenance
Clean the unit daily using non-abrasive cloths and cleaners.
• Always spray/apply cleaner to the cloth, then wipe down the
sneeze guard. Do not spray cleaner directly onto the sneeze
guard.
7. IMPORTANT! Refer to the “Securing the Glass” procedure on
this sheet before beginning installation of any glass panels.
8. Install the glass Face Panel by sliding it into the glass clips from
above. Secure the glass.
9. Install the glass Top Shelf by sliding it into the glass clips from
the front or back. Secure the glass.
10. Install each glass End Panel by sliding them into the glass clips
from above. Secure the glass.
NOTE: For NSF compliance, the bottom edge of all End Panels
can be positioned no higher than 1-1/2″ (38 mm) above the
installation surface.
Securing the Glass
All glass panels are attached to support posts using the same,
integrated glass clips. A nylon set screw on each glass clip secures
the glass panel in the clip.
Glass
Panel
Scuffed
Area
Nylon
Set Screw
Glass
Clip
Post Assembly
NOTE: During installation of all vertical
and angled glass panels,
Hatco strongly recommends
that an abraded surface be
created where the nylon set
screw contacts the glass.
This will create a strong bond
between the set screw and the
glass. Use 320-grit sandpaper
to scuff the glass where each
nylon set screw will contact
the glass.
Turn Nylon
set screw
1/4-turn
clockwise
after contact.
Turn Nylon
set screw
1/4-turn
clockwise
after contact.
Post Assembly
1. Abrade the surface of the glass
panel where each nylon set screw
will contact the glass.
2. Insert the glass panel into the
glass clips.
3. Carefully turn the nylon set screw
clockwise just until the screw
contacts the glass. Then, turn the
screw an additional 1/4-turn to
secure the glass.
24 Hour 7 Day Parts and Service
Assistance available in the United States
and Canada by calling 414-671-6350.
HATCO CORPORATION
P.O. Box 340500
Milwaukee, WI 53234-0500 U.S.A.
414-671-6350
[email protected]
www.hatcocorp.com

Other Hatco Indoor Furnishing manuals

Hatco DL-400 User manual

Hatco

Hatco DL-400 User manual

Hatco Flav-R-Shield EP5 User manual

Hatco

Hatco Flav-R-Shield EP5 User manual

Hatco Flav-R 2-Go F2G Series User manual

Hatco

Hatco Flav-R 2-Go F2G Series User manual

Hatco FTBX Series User manual

Hatco

Hatco FTBX Series User manual

Hatco HBGBHC Series User manual

Hatco

Hatco HBGBHC Series User manual

Hatco DL-400 User manual

Hatco

Hatco DL-400 User manual

Hatco DL-400 User manual

Hatco

Hatco DL-400 User manual

Hatco DL-400-SU Owner's manual

Hatco

Hatco DL-400-SU Owner's manual

Popular Indoor Furnishing manuals by other brands

World Market AUGUSTUS SKU-460705 Assembly instructions

World Market

World Market AUGUSTUS SKU-460705 Assembly instructions

Belleze 014-HG-30303 owner's manual

Belleze

Belleze 014-HG-30303 owner's manual

Fox Manhattan 7510041 quick start guide

Fox

Fox Manhattan 7510041 quick start guide

Studymate DEAKIN 3 DRAWER DESK JBDEAKIN Assembly instruction

Studymate

Studymate DEAKIN 3 DRAWER DESK JBDEAKIN Assembly instruction

URBAN OUTFITTERS 48142970 Assembly instructions

URBAN OUTFITTERS

URBAN OUTFITTERS 48142970 Assembly instructions

VIPACK ERIK ERBU1414 Assembly instructions

VIPACK

VIPACK ERIK ERBU1414 Assembly instructions

Home affaire Kaika LKZ 41332 manual

Home affaire

Home affaire Kaika LKZ 41332 manual

Whittier Wood Furniture McKenzie Alder 1555AEGACa Assembly instructions

Whittier Wood Furniture

Whittier Wood Furniture McKenzie Alder 1555AEGACa Assembly instructions

Arblu COLONNE Assembly instructions

Arblu

Arblu COLONNE Assembly instructions

Hülsta Diele Cima 61151L Assembly instruction

Hülsta

Hülsta Diele Cima 61151L Assembly instruction

VonHaus 3005097 quick start guide

VonHaus

VonHaus 3005097 quick start guide

Trinity TBFPGR-2408 owner's manual

Trinity

Trinity TBFPGR-2408 owner's manual

Core Products DALLAS DL908 manual

Core Products

Core Products DALLAS DL908 manual

Julian Bowen RAV017 Assembly instructions

Julian Bowen

Julian Bowen RAV017 Assembly instructions

drew & jonathan P306DJ271 Assembly instructions

drew & jonathan

drew & jonathan P306DJ271 Assembly instructions

Southern Enterprises Aspen EN824100TX Assembly instructions

Southern Enterprises

Southern Enterprises Aspen EN824100TX Assembly instructions

Coaster 506783 Assembly instructions

Coaster

Coaster 506783 Assembly instructions

Amisco 50524 manual

Amisco

Amisco 50524 manual

manuals.online logo
manuals.online logoBrands
  • About & Mission
  • Contact us
  • Privacy Policy
  • Terms and Conditions

Copyright 2025 Manuals.Online. All Rights Reserved.