HAUSSLER LUNA User manual

Operang Instrucons
LUNA
Pasta maker
Original Operang Instrucons

2
Contents
1 Welcome ... ........................................................................................................3
2 For your safety ...................................................................................................4
Symbol table............................................................................................................ 4
Intended use............................................................................................................ 4
Basic rules................................................................................................................ 4
Safety instrucons................................................................................................... 4
3 Product overview ...............................................................................................6
Product descripon................................................................................................. 6
4 Scope of delivery ................................................................................................7
Seng up appliance ................................................................................................ 8
First cleaning of the appliance................................................................................. 8
Connecng appliance .............................................................................................. 8
5 Making pasta .....................................................................................................9
Control panel........................................................................................................... 9
Pasta moulds ........................................................................................................... 9
Box mould ............................................................................................................... 9
Ingredients to be used........................................................................................... 10
Making pasta ......................................................................................................... 11
6 Things to know - Instrucons for making pasta .................................................14
Tips for making pasta ............................................................................................ 16
Three methods for storing moulds........................................................................ 17
7 Cleaning ...........................................................................................................18
Cleaning the appliance .......................................................................................... 18
Cleaning the pasta moulds .................................................................................... 19
8 Maintenance .................................................................................................... 20
9 Troubleshoong ...............................................................................................22
10 Disposal ...........................................................................................................23
11 For qualied personnel: Circuit diagram and parts list ......................................24
Circuit diagram ...................................................................................................... 24
Parts list ................................................................................................................. 26
12 Accessories ......................................................................................................28
13 EC Declaraon of conformity ............................................................................30
14 Warranty ..........................................................................................................32
15 For your notes ..................................................................................................33

3
1 Welcome ...
... to the world of everything having to do with grinding, kneading,
baking and making pasta!
Häussler stands for making it yourself. With our appliances, you will make wonderful
delicacies with incomparably good avour. Immerse yourself in the world of
everything having to do with grinding, kneading, baking and making pasta.
Häussler stands for uncompromising quality – Made in Germany. Decades of
experience and thousands of appliances delivered worldwide speak for themselves.
Häussler stands for customer service. Aer your purchase, we will provide you with
support without any ifs or buts. We want you to enjoy your appliance for a long me,
receive new ps me and again and discover fresh recipe ideas from us.
Now that you have chosen the LUNA pasta maker, you can make a variety of delicious
pastas yourself. With LUNA you can conjure up fresh spaghe, feuccine or even
pasta squares at the touch of a buon.
Have fun and lots of success every me.
Welcome ...

4
2 For your safety
Symbol table
Symbol descripon
⚠Danger symbol
Call for acon
iNote
Bullet point
Table 1: Symbol table
Intended use
The pasta maker complies with the spulated product-specic safety regulaons. The
pasta maker is intended exclusively for making pasta. Any other use shall be regarded
as not intended. Karl-Heinz Häussler GmbH shall not be liable for any property
damage or personal injury resulng from non-intended use. LUNA is not suitable for
connuous operaon.
Basic rules
Carefully read the Operang Instrucons before you use the appliance.
Follow the safety instrucons and warnings in the Operang Instrucons.
Operate the appliance only in perfect condion.
Keep the Operang Instrucons readily available near the appliance.
The appliance should only be passed on together with these Operang Instrucons.
Carry out a visual check before each use.
Safety instrucons
⚠Risk of death due to electric shock
Do not operate appliance if cable or power plug is damaged. Do not touch damaged
parts.
Contact qualied personnel if cable or power plug is damaged.
Open housing only when power plug is disconnected.
Maintenance work on electrical components must only be done by qualied pro-
fessionals.
For your safety

5
⚠Risk of injury due to heavy weight
Transport the appliance carefully due to its heavy weight.
Before liing make sure that the weight can be managed.
Set up appliance only on secure surface.
⚠Risk of crushing hands by rotang parts
Do not leave appliance unaended during operaon.
Set up appliance where it cannot be reached by children under 14 years of age.
Always supervise children during operaon.
Do not operate appliance with a defecve protecve cover or housing parts.
Do not operate appliance without protecve device and housing parts.
Do not reach into the appliance during operaon.
⚠Material damage due to improper cleaning
Do not clean appliance with a water jet or high-pressure washer.
Do not ll mixing container with water.
Do not clean pasta moulds with sharp and pointed objects.
⚠Material damage due to wrong pasta mould when mixing dough
Use box mould when mixing dough.
⚠Material damage due to improper set-up
Sucient work space must be kept clear around the appliance to ensure unimped-
ed work when using it.
The appliance must be set up so that the power cord plug can be disconnected at
any me.
For your safety

6
3 Product overview
Product descripon
You have acquired a pasta maker that is a very robust and powerful appliance. The
pasta maker is made of low-maintenance materials that are suitable for making food.
By using various pasta moulds (inserts), which you can purchase as accessories, you
can make a variety of dierent kinds of pasta. You can process heavy pasta dough for
wholemeal pastas and the like without any problem due to the sturdy design of the
container, agitator and pressing sha.
Technical data
Designaon Value
Max. capacity of the mixing container 0.5 kg
Max. hourly output 1.5 kg
Motor output 0.12 kW
Electrical connecon 230 V
External dimension, width 225 mm
External dimension, depth 230 mm
External dimension, height 360 mm
Weight 13 kg
Table 2: Technical data
Product overview
7
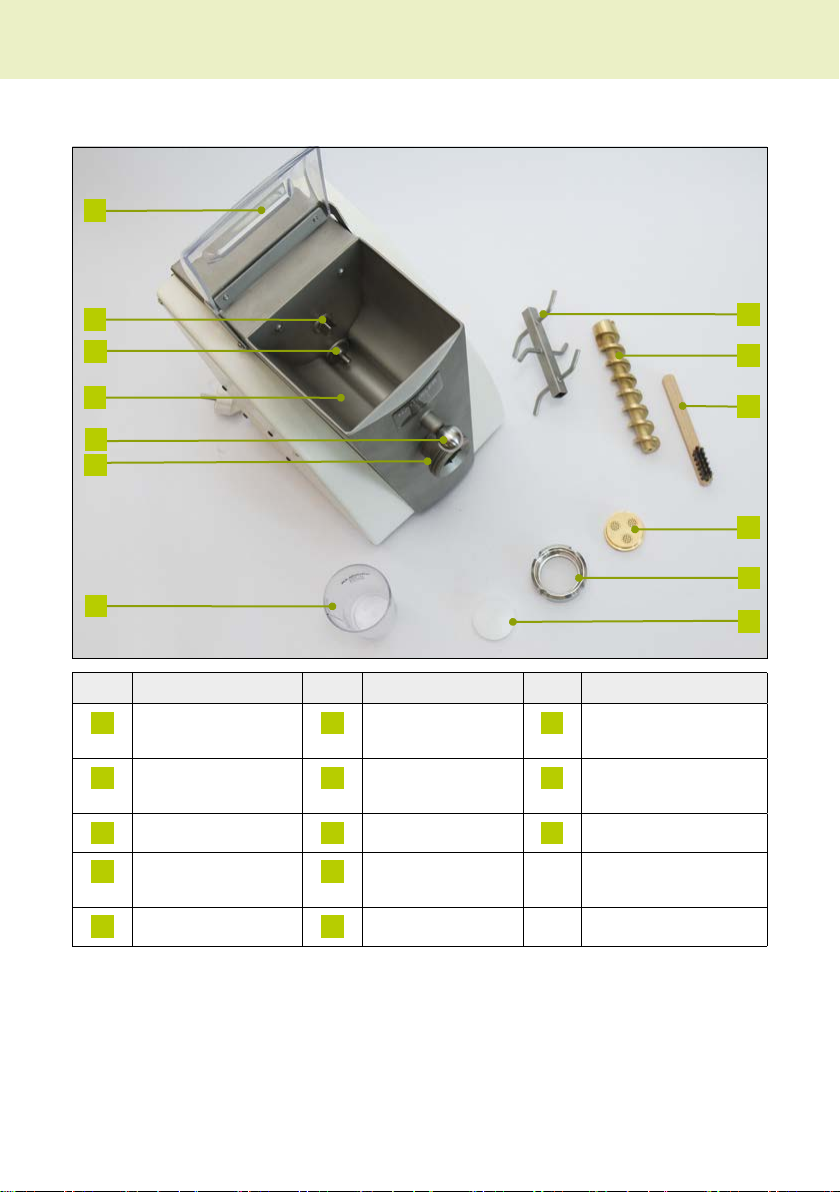
4 Scope of delivery
2
1
9
11
3
8
7
4
5
6
10
12
13
No. Designaon No. Designaon No. Designaon
1Mixing sha 6Box mould 11 Receptacle for
pressing sha
2Pressing sha 7Measuring cup 12 Receptacle for
mixing sha
3Cleaning brush 8Pressing collar 13 Protecve cover
4Pasta mould (of
your choice)
9Counterbearing
5Union nut 10 Mixing container
Table 3: Scope of delivery
Scope of delivery

8
Seng up appliance
Check the delivery for completeness with the help of table 3 “Scope of delivery”
on page 7.
Because of its heavy weight, li the appliance carefully and always place it on a
stable and at work surface.
iThe base frame with wheels from Häussler oers the ideal work surface. You can
nd the base frame at hp://shop.backdorf.de and in the Häussler catalogue.
Make sure that the inlet openings for the venlaon fan on the sides and base of
the appliance are not closed. Maintain a distance of a minimum of 5 cm to walls
and curtains.
Create sucient space for working with the appliance.
First cleaning of the appliance
iFor hygienic reasons, all parts that come in contact with dough must be disassem-
bled and cleaned before the inial use.
Clean all parts; see secon 7 “Cleaning” on page 18.
Connecng appliance
Check the appliance, the protecve cover, the cable and power plug for external
signs of damage. Do not operate a damaged appliance!
Plug the power plug into a power outlet.
Scope of delivery

9
5 Making pasta
Control panel
Buon Designaon
PRESS press
STOP stop
MIX mix
Table 4: Operang elements
Pasta moulds
iThe pasta moulds determine the shape of the respecve pasta product. There are a
large number of dierent shapes and designs for the LUNA pasta maker. A number
is engraved on each pasta mould, which can idenfy and dierenate the pasta
moulds.
iYou can nd all pasta moulds at hp://shop.backdorf.de and in the Häussler cata-
logue.
Box mould
iThe box mould is a plasc insert that is only used for mixing the pasta dough. The
box mould is also used when the appliance is not in use.
Making pasta

10
Ingredients to be used
Only use nely ground semolina.
iSemolina that is too coarse will aect the quality and pasta shape. Finer noodle
shapes (e.g., spirelli) will not be able to be formed. Häussler recommends a nely
ground SSSE semolina.
If you use dried herbs and spices as nely ground powder, subtract the amount
added from the semolina amount.
Chop fresh herbs very ne and without stems. Subtract the added amount from
the amount of semolina.
If you use food colouring in paste, purée or liquid form, subtract these from the
quanty of liquid.
iSemolina or ingredients that are too coarse can block up the mould and result in a
reducon of quality of the pasta.
Tip: Correct use of salt
Do not use any salt when making dough.
Add sucient salt to the pasta water.
What is the dierence between ne semolina and ne semolina SSSE?
Fine semolina is extracted from pure durum wheat and is used for making pasta and
products that require a ne structure.
Fine semolina SSSE is approximately on a par with semolina ne but has a higher min-
eral content. Semolina SSSE comes from the interior of the grain kernel. This is where
the yellow pigment content is the highest and the ash content the lowest. In addion,
the exposure to environmental toxins is also lowest in this semolina, since the shell of
the grain serves as protecon and the interior of the grain is opmally protected. Sem-
olina SSSE is therefore the highest quality semolina produced and is especially suited
for making high-quality pasta.
Making pasta

11
Making pasta
iTo idenfy parts, see table 3 on page 7.
Mixing dough
CAUTION
Material damage due to incorrect pasta mould
When mixing dough, loose semolina or our can end up in the pasta mould and
block or damage it.
Use box mould when mixing dough.
iLUNA is not suitable for connuous operaon. Aer two mixing sessions, a rest
period of approx. 2 hours should be maintained so that the motor can cool down. A
motor that is too warm can negavely aect the pasta making and the pasta itself.
iYou can recognize when the motor is too warm when there is condensaon on the
protecve cover.
Make sure that a box mould 6 is used and the union nut is ghtened hand ght.
Open the protecve cover 13.
Pour the ingredients for the pasta dough into the mixing container 10.
Close the protecve cover 13.
iThe appliance cannot be operated when the protecve cover is open.
Press the MIX buon.
iThe mixing sha mixes the dough into a homogeneous mass.
When the dough has reached the desired consistency, press the STOP buon.
iYou can nd informaon on the consistency of the dough in the “Things to know”
secon on pages 14-15.
Inserng pasta mould
Unscrew the union nut 5 on the pressing collar 8.
Remove the box mould 6.
Place the pasta mould 4 of your choice on the pressing collar 8.
iWhen you want to use the at pasta mould (no. 99) for making dough sheets: make
sure that the small pin for dividing the dough sheet is poinng upwards in the out-
let opening. This will make opening the dough sleeve easier. With the adjustable
at pasta mould, you will get a thicker dough sheet by ghtening the screw and a
thinner dough sheet by loosening the screw.
Making pasta

12
Screw the union nut 5 to the pressing collar 8 and ghten the union nut slightly.
iYou can nd ps for proper storage of the moulds in the “Things to know” secon
on page 15.
Pressing and cung pasta
Press the PRESS buon.
iThe dough is pressed with high pressure through the openings of the pasta mould.
The pasta mould is thereby warmed and improves the quality of the pasta.
Cut the pasta in the desired length with a knife or dough cuer.
Tip: Accelerang warming of the pasta mould
Briey place the pasta mould in warm water. This will
produce an excellent pasta quality aer a short inial
run.
Stopping the appliance
Press the STOP buon.
iMixing or pressing stops immediately.
iThe appliance also stops when the protecve cover is lied.
Changing the pasta mould while making pasta
Press the STOP buon.
Press the MIX buon and mix the dough for about ten seconds.
iThe pressure on the pressing collar is reduced, and the union nut can be loosened.
Press the STOP buon.
Unscrew the union nut 7 on the pressing collar 8.
Change the pasta mould.
Screw the union nut 7 to the pressing collar 8 and ghten the union nut slightly.
iNow you can connue pressing the pasta.
Processing pasta
Place the pasta into boiling water immediately aer pressing.
If you would like to store the pasta, place the pasta on a pasta rack and let the
pasta dry for about three days at room temperature; otherwise the noodles can
get mouldy.
Making pasta

13
Tip: Avoiding brile pasta
Do not dry the pasta too quickly or at too warm a tem-
perature, as otherwise it will become brile. The op-
mum temperature for drying pasta is approx. 16-18 °C.
Making pasta

14
6 Things to know - Instrucons for making pasta
Ingredients
for egg pasta
500 g semolina
4 eggs (approx. 200 g)
For pasta without egg
500 kg semolina
approx. 165 ml water
View from above into the LUNA pasta
maker with inserted mixing arm and
pressing spiral.
Weigh 500 g semolina and pour into the
pasta maker.
Fill the measuring cup to the 500 g mark
with egg and whisk. This is a guideline;
there can be deviaons (for pasta without
egg, provide approx. 165 ml of water).
Pour approx. 1/3 of the quanty of eggs/
water into the pasta maker. Close the
cover, switch on MIX and mix for approx.
1 minute.
Things to know - Instrucons for making pasta
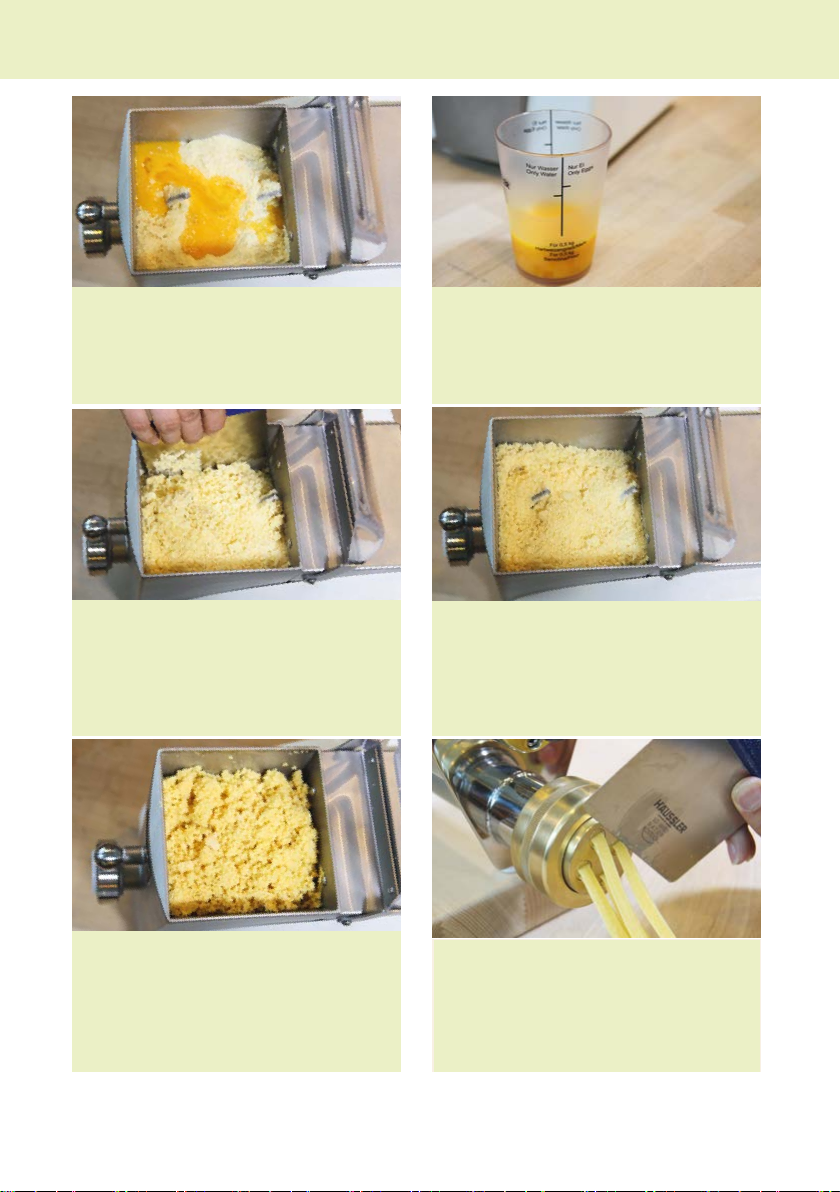
15
Pour approx. 1/3 of the quanty of eggs or
water into the pasta maker and mix again
for approx. 1 minute.
Now add the last third of eggs/water
to the pasta maker and mix for another
6-8 minutes. Pay aenon to the following
“dough photos”.
If necessary during the last mixing opera-
on, push the dough with a dough scraper
from the edges and sides into the middle,
since dry semolina or liquid egg collects
there.
Please note: If the dough looks like this, it
is sll too dry. In this case, add some egg/
water and connue to mix.
The perfect pasta dough!
The dough must be as coarse and crumbly
as shown in this photo.
The desired mould is now inserted, and
the pasta maker is switched to PRESS.
During the pressing process, cut the pasta
to the desired length with a dough scraper
or knife.
Things to know - Instrucons for making pasta

16
Tips for making pasta
1. Mixing process:
8 to 10 minutes for durum wheat semolina, 10 to 12 minutes for spelt semolina.
2. The semolina will slowly dry out during longer storage periods. That’s why the
required quanes of egg and water can vary somewhat.
3. If the dough is too dry, the pasta can barely be pressed out. The dough will
also be too light and tear. In this case, add some more egg/water. A few
tablespoons of egg or water are usually enough.
4. If the pasta cannot be pressed out and the dough wraps around the mixing
sha, it is too moist. Under these circumstances, you have to take out the bulk
of the dough from the pasta maker and divide it by hand into smaller porons.
Add these together with some our into the pasta maker and briey mix
everything well. Flour is more suitable here, since it can be mixed more easily
compared to semolina.
5. Before loosening the union nut, briey switch the pasta maker to MIX so that
the pressure is taken o the mould. If necessary, loosen with the mould key.
6. You can begin pressing aer mixing. Please note: the dough needs an inial
run; aer around 50-100 cm (depending on the mould), the pasta should be
perfect. Cut o the the inial secon and add to the mixing container. It will
be reused.
7. Remove the mould when the dough is pressed out and the pasta maker is
empty. Then switch the pasta maker to PRESS so that the residual dough is
pushed out from the pressing collar.
The front blade of the mixing sha must
point upwards so that the mixing sha can
be removed.
Our p: The pasta cuer (with an adapter
for LUNA), which is available as an
accessory can be used to simplify your
work.
Things to know - Instrucons for making pasta

17
Three methods for storing moulds
1. Leave the moulds in water, in a plasc container, for example. With me, the
dough will wash from the moulds by itself. Store the plasc container in the
fridge and change the water daily. Do not add any washing-up liquid or
vinegar to the water. With this method, the moulds will get a dark colour with
me. This is normal and does not aect their funcon. Bits of dough in the
mould are pressed out by the machine the next me you make pasta. The
bits of dough that have been pressed out are not used but disposed of
immediately.
2. Place the moulds immediately aer using them into the freezer, including the
residual dough contained in them. Before the next me you make pasta, take
the moulds out of the freezer and place them for at least 5 hours in cold
water. The residual dough in the mould will become so and can be pressed
out by the pasta maker. This dough is not used but rather disposed of
immediately.
3. Place the moulds in water for 1 to 2 days aer making pasta. The moulds can
then be cleaned out with compressed air. Clean the moulds with some water
and washing-up liquid. Then store the moulds dry.
Things to know - Instrucons for making pasta

18
7 Cleaning
iClean the appliance before the inial operaon and aer each use. Cleanliness is a
precondion for hygienic pasta making.
Cleaning the appliance
⚠WARNING
Risk of death by voltage of 230V/50Hz
Electric shock
Disconnect appliance from the power supply.
⚠CAUTION
Risk of crushing by rotang parts
Injuries to ngers and hands
Disconnect appliance from the power supply.
CAUTION
Material damage due to improper cleaning
Water can penetrate into the appliance and damage its inner workings.
Do not clean appliance with a water jet or high-pressure washer.
Do not ll mixing container with water.
iTo idenfy parts, see table 3 on page 7.
Disconnect power supply
Disconnect the power plug.
Disassemble mixing sha and pressing sha
Open the protecve cover 13.
Pull out the counterbearing 9.
Remove the mixing sha 1 from the mixing container. Make sure the front blade
of the mixing sha is facing upwards (photo on page 14).
Unscrew the union nut 5 on the pressing collar 8.
Remove the mould.
Pull the pressing sha 2 from the mixing collar 8.
Cleaning

19
Cleaning parts
Remove bits of dough on the union nut 5 and on the threads using the cleaning
brush 3.
Clean the mixing container 10 and pressing collar 8 with a moist cloth and house-
hold washing-up liquid.
Clean all other parts that come into contact with dough with hot water and a
household washing-up liquid or in a dishwasher.
Assemble mixing sha and pressing sha
Push the pressing sha 2 through the pressing collar 8 into the receptacle of the
pressing sha 11.
Insert the box mould 6 onto the pressing collar 8.
Screw the union nut 5 onto the pressing collar 8 and ghten the union nut 5
slightly.
Place the mixing sha 1 into the receptacle 12 in the mixing container and fasten
the mixing sha 1 with the counterbearing 9.
Close the protecve cover 13.
Cleaning the pasta moulds
iYou can nd informaon on storing the pasta moulds in secon 6 on page 15.
iYou can either clean and dry used pasta moulds or store them for later use without
a thorough cleaning.
Thoroughly cleaning pasta moulds
CAUTION
Material damage by sharp objects
Sharp objects can damage the Teon inserts of the pasta moulds.
Do not clean pasta moulds with sharp and pointed objects.
iPasta moulds are not dishwasher-safe.
Place the used pasta moulds in water so that the dough loosens.
Clean the pasta mould with clear running water.
If you want to completely remove the remaining bits of dough, clean the pasta
moulds with a steam jet, high-pressure washer or compressor (maximum 7 bar).
Then clean the moulds with water and household washing-up liquid.
Cleaning

20
8 Maintenance
⚠WARNING
Risk of death by voltage of 230V/50Hz
Electric shock
Disconnect appliance from the power supply before performing
maintenance work.
Maintenance work on electrical components must only be done by qualied
professionals.
⚠CAUTION
Risk of crushing by rotang parts
Injuries to ngers and hands
Disconnect appliance from the power supply.
Do not operate appliance without protecve device and housing parts.
Checking and adjusng the tension of the drive belt
iCheck the tension of the drive belt aer the rst 10 hours of operaon.
iAer the inial check of the drive belt, check it aer every 50 hours of operaon.
iYou will need a Philips screwdriver to remove and re-install the cover.
iFor adjusng the tension of the drive belt, you will need a spanner (open-jawed
spanner, jaw opening: 13 mm).
iMake sure that the appliance doesn’t p over during maintenance. Have a second
person secure the appliance, for example.
Disconnect power supply
Disconnect the power plug.
Maintenance
Table of contents


