Havensis BC-1224BBC User manual

Havensis Kullanım Kitapçığı Rev1.0.211222
0
DC DC CHARGER (BC-1224BBC)
User Manuel
*Havensis reserves the right to change the specifications in this manual without notice.

Havensis Kullanım Kitapçığı Rev1.0.211222
1
Contents
Contents.................................................................................................................................................1
Security Warnings ..................................................................................................................................2
Device Features......................................................................................................................................3
Alternator Charge mode ....................................................................................................................3
Bidirectional Charge Mode.................................................................................................................3
All Parameters Programmable .......................................................................................................3
Installation Steps....................................................................................................................................4
Mounting Instruction .........................................................................................................................4
Assembly Warnings ........................................................................................................................4
Cable and Fuse Connections ..............................................................................................................4
Menus and Settings................................................................................................................................5
Buttons...............................................................................................................................................5
Device LEDs ........................................................................................................................................5
Main Menu.........................................................................................................................................6
Settings Menu ....................................................................................................................................7
Bidirectional Settings Menu ...............................................................................................................9
Working Mode Setting .......................................................................................................................9
Charge Mode From Alternator .......................................................................................................9
Technicial Specifications.......................................................................................................................10
Product Dimensions .........................................................................................................................11
Warranty Certificate.............................................................................................................................12
Manufacturer ...............................................................................................................................12
Seller Company.............................................................................................................................12
Conditions Out of Warranty Coverage; ........................................................................................12
This manual contains important safety, installation and operating instructions for “DC DC CHARGER
and BIDIRECTION”.

Havensis Kullanım Kitapçığı Rev1.0.211222
2
Security Warnings
Do not operate your charger without reading and understanding the user manual. Install
your device according to the installation instructions in this manual. Havensis recommends having
the charger installed by a qualified professional.
The manufacturer accepts no liability for any damage in the following cases:
•Incorrect assembly or connection.
•Product damage caused by mechanical effects and overvoltage.
•Making changes to the product without the express consent of the manufacturer.
•Use for purposes other than those described in the user manual.
Pay attention to the following situations for your safety during installation.:
•Electric shock
•Fire danger
•İnjury
Warnings:
•Use the product only as intended..
•Isolate the installation area from moisture and liquids..
•Make sure that all connections to and from the product are correct.
•Before replacing the fuse, disconnect the device from the battery and the panel.
•Make sure the cables have sufficient cross-section.
•Lay cables in such a way that they are not damaged by doors, walls, or the hood.
•Connect the battery to the device first..
•Protect the positive lines with a fuse.
•Make sure the battery polarity is correct during connection.
•In case of fire, use a fire extinguisher suitable for electrical appliances.
•This product may only be repaired by qualified personnel. DO NOT disassemble or attempt to
repair the unit. Inadequate repairs can cause serious hazards..
•Always store and use the product out of the reach of children. Electrical devices are not toys.

Havensis Kullanım Kitapçığı Rev1.0.211222
3
Device Features
Alternator Charge mode
After the device fills the starter battery with the energy produced by the alternator, it ensures full
and safe charging of the batteries for a lifetime. Thanks to the 3-stage charging function and current
limitation, the battery voltage level can be adjusted and a constant current of up to 30 amps can be
passed regardless of the alternator voltage and current. The device can operate in every function as
12-24 volts. The boost mode feature can work on vehicles with a 12 volt starter battery for safety
purposes. For 24 volt starter batteries, contact the manufacturer.
Bidirectional Charge Mode
In Bidirectional Mode, the vehicle starter battery can be consumed for life. A current of up to 3 amps
can flow. For this reason, during long-term camping and stays, the battery is prevented from working
on its own or in the parking lot and remains fully charged.
The life of the caravan batteries is transferred to the starter battery with a voltage pulse from the sun
or the sun, the device lives alone regardless of the panel or size setting. It does not break the defense
and does not deplete the batteries in use within their lifetime battery expectations. In this way, both
battery groups are out of use.
The device has a bidirectional current limiting feature while charging.
In bidirectional charging mode, no more than 3 Amps of current is drawn from your battery for life,
even during cranking, it does not exceed 3 amps and protects your batteries against over-discharge
current for a lifetime.
All Parameters Programmable
• Battery charging algorithm (configurable)
• Compatible with All Alternators (including Euro5 and Euro6): Automatically detects engine
start/stop
• 3-stage adaptive charging algorithm: Bulk-Absorption-Float
• Absorption/equilibrium charging time for Lithium and Lead acid batteries is fixed and is 2 hours.
• All voltage levels and current limitations can be set on the screen.
• The engine detects that it is running and then starts charging the batteries and when the engine
stops, it stops charging, does not discharge/protect the starter battery.
• Device-independent control and adjustment can be made with the screen.
• All models are short-circuit protected and can be connected in parallel to increase output current
• Unlimited number of devices can be connected in parallel.
• High temperature protected
• No special tools required for installation. Installation can be done easily.
• Reverse Connection Input/Output Fuse (Replaceable)
Havensis Kullanım Kitapçığı Rev1.0.211222
4
Installation Steps
Mounting Instruction
When choosing a location for the device, make sure it is as close as possible to the battery
you are going to charge..
When positioning the device, a space of 15 cm from the bottom and top and 5 cm from the
sides should be left.
Assembly Warnings
•Don't reverse polarity. Reverse connections may cause injury or damage to the device.
•It must be installed on a flat and sufficiently solid surface..
•Do not expose to any heat source (such as direct sunlight or heating).
•It must be fixed so that it does not tip over or fall.
•It should be installed in a dry place protected from splashing water..
•It should be installed in a place protected from humidity.
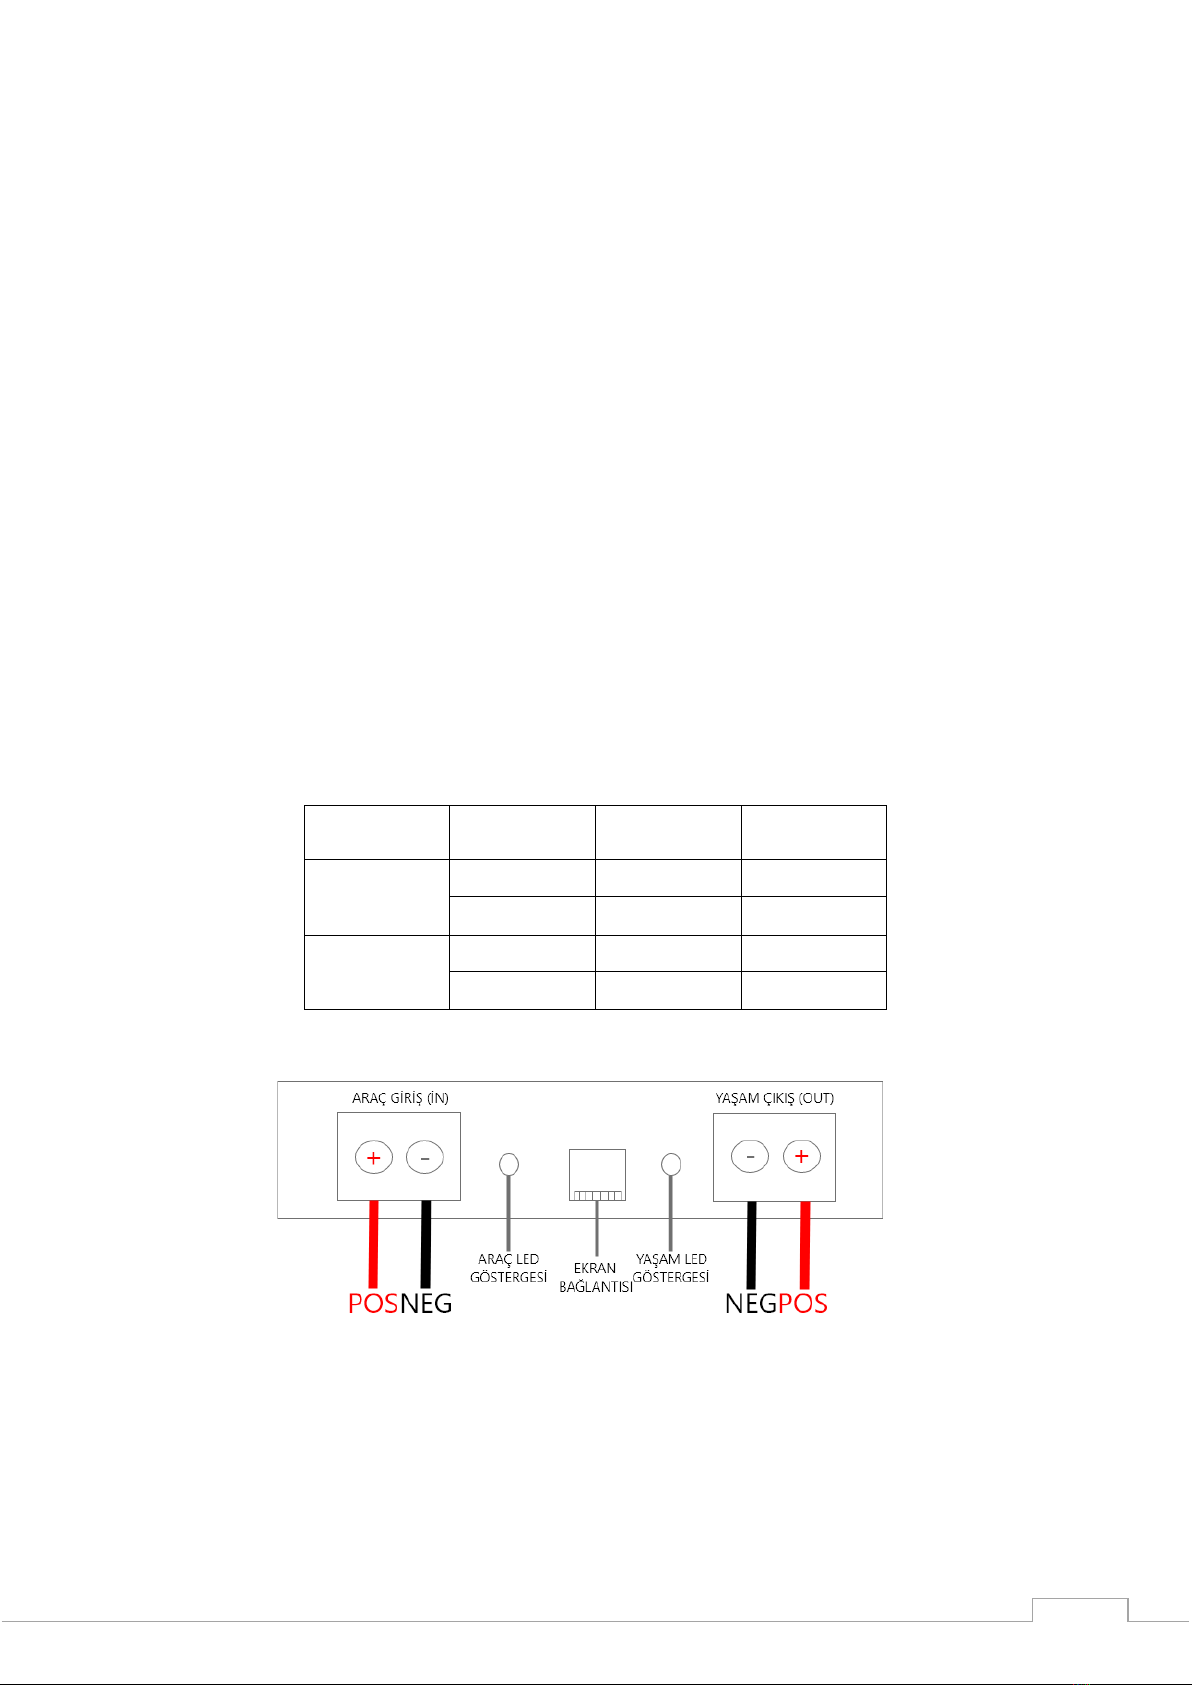
Cable and Fuse Connections
Tighten the nuts and bolts to the appropriate torque. Loose connections can cause
overheating. Choose an adequate cross section for the connecting cable. Do not use a common
chassis, pull a separate cable for each unit.
Use the following wire colors:
——RED: positive cable
——BLACK: negative cable
Description
Distance(m)
Section(mm2)
External
Fuse(A)
Life
Battery
1-5
6
40
5-10
10
40
Starter
Battery
1-5
6
40
1-10
10
40
Table of contents


