Haverland AsAp User manual

AsAp
www.haverland.com

www.haverland.com

ESPAÑOL
MANUAL DE INSTRUCCIONES
AsAp
Evaporativo portátil
(con función antimosquitos)

1- Asegúrese de que su suministro de electricidad sea 220-240v – 50Hz
2- Utilice el aparato solo como se describe en este manual. No se recomiendan otros
usos, ya que puede causar un incendio o una descarga eléctrica.
3- No use la unidad en áreas donde haya temperaturas extremas. No exponga la unidad
a la luz solar directa. Solamente para uso en interiores.
4- No use cables de extensión para evitar el sobrecalentamiento y el riesgo de incendio
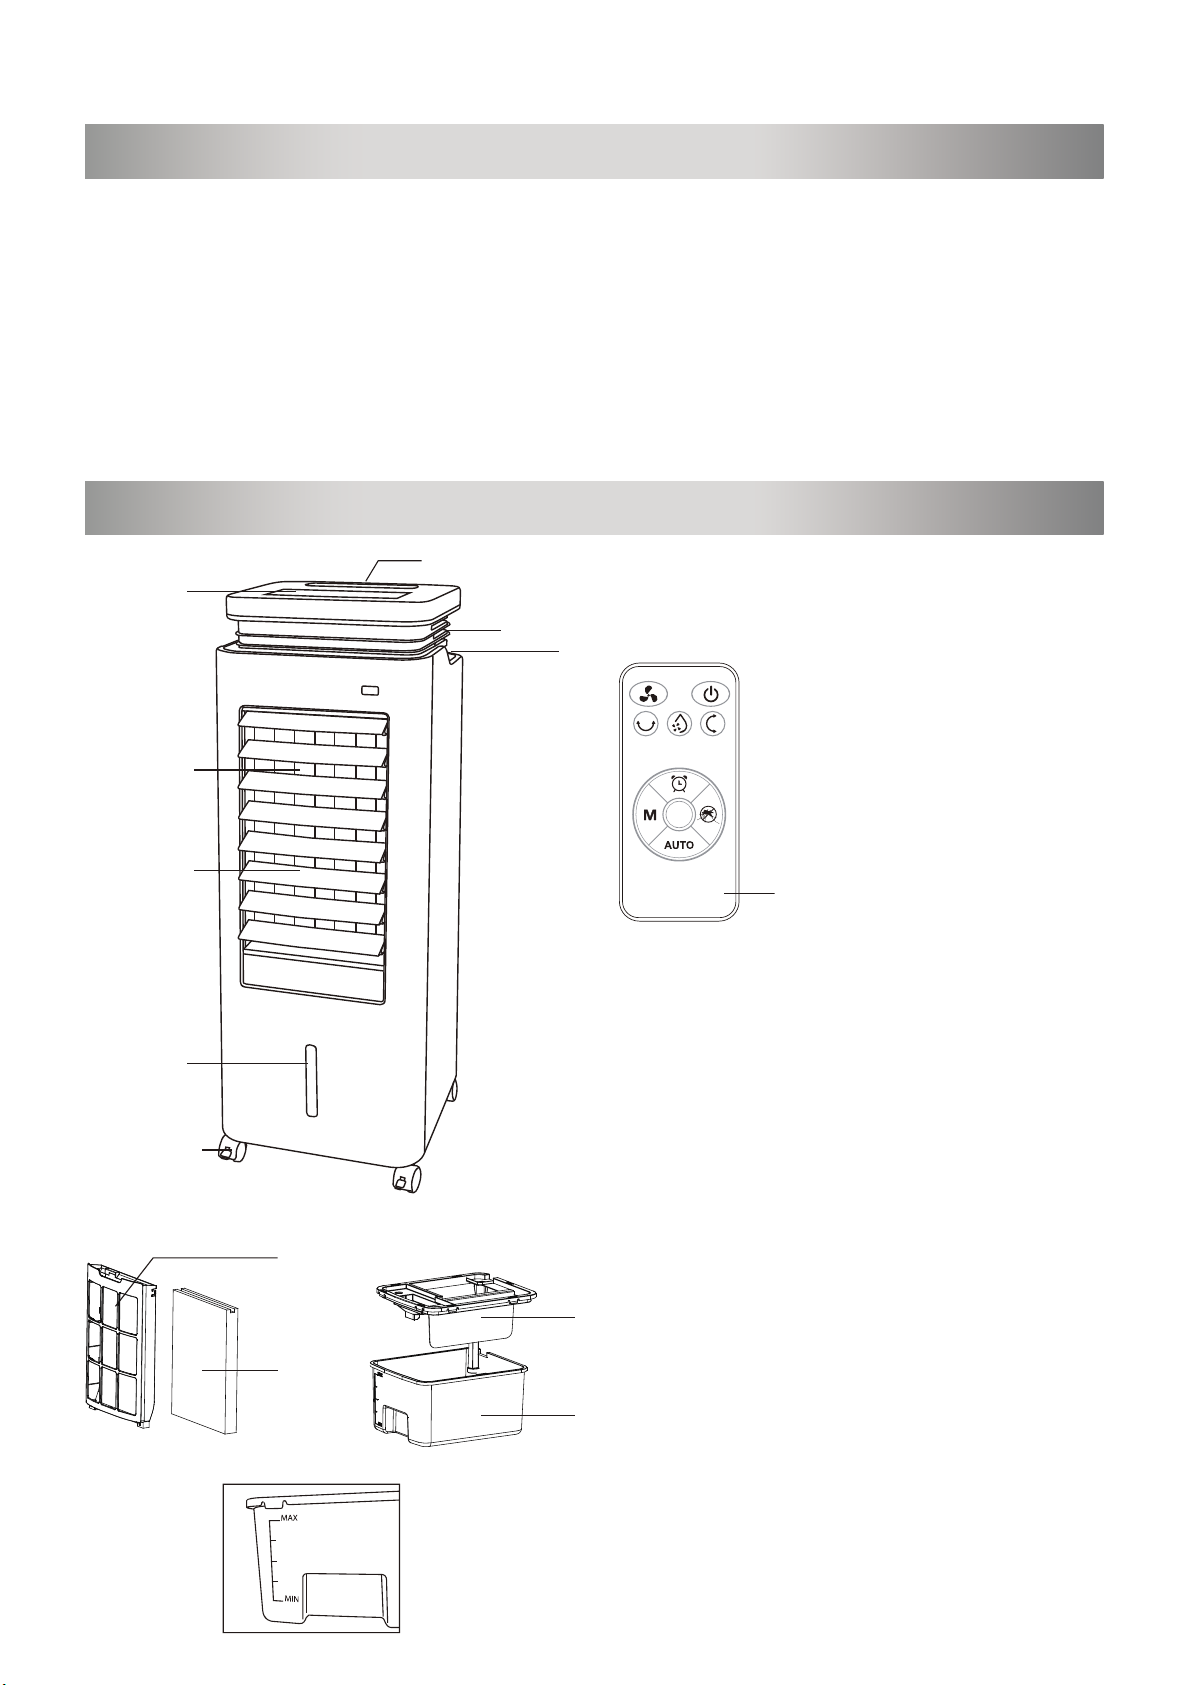
5- No supere el nivel máximo en el tanque de agua.
6- No lo mueva rápidamente si hay agua en el tanque de agua para evitar salpicaduras.
7- No coloque la unidad cerca de explosivos, hornos calientes o supercies calientes.
8- Sujete el enchufe para desconectarlo de la toma de corriente. Nunca tire del cable
de alimentación.
9- Por favor, no use la función “COOL” en un área cerrada con poca ventilación durante
mucho tiempo para evitar la humedad alta.
10- La unidad debe estar colocada en una supercie plana y resistente.
11- Este aparato no está pensado para ser usado por personas (incluidos niños) con
capacidades físicas reducidas, sensoriales o mentales, con poca experiencia o
conocimiento, al menos que estén bajo supervisión de una persona responsable de su
seguridad con las instrucciones de uso del aparato. Los niños deben ser supervisados
para asegurar que no juegan con el aparato.
- Los niños menores de 3 años deben mantenerse fuera del alcance del aparato a
menos que sean continuamente supervisados. Los niños desde 3 años y menores de
8 años deben sólo encender/apagar el aparato siempre que éste haya sido colocado o
instalado en su posición de funcionamiento normal prevista y que sean supervisados
o hayan recibido instrucciones relativas al uso del aparato de una forma segura y
entiendan los riesgos que el aparato tiene. - Los niños desde 3 años y menores de
8 años no deben enchufar, regular y limpiar el aparato o realizar operaciones de
mantenimiento.
- Este aparato puede ser usado por niños mayores de 8 años y por personas con
discapacidades físicas, sensoriales o mentales, o sin experiencia o conocimientos,
siempre y cuando hayan sido debidamente formados y sean supervisados por alguien
que entienda los riesgos.
12-Apague y desenchufe el evaporativo de la corriente antes de limpiarlo.
13- Si no va a usar la unidad por un tiempo prolongado, desenchúfela y vacíe el depósito.
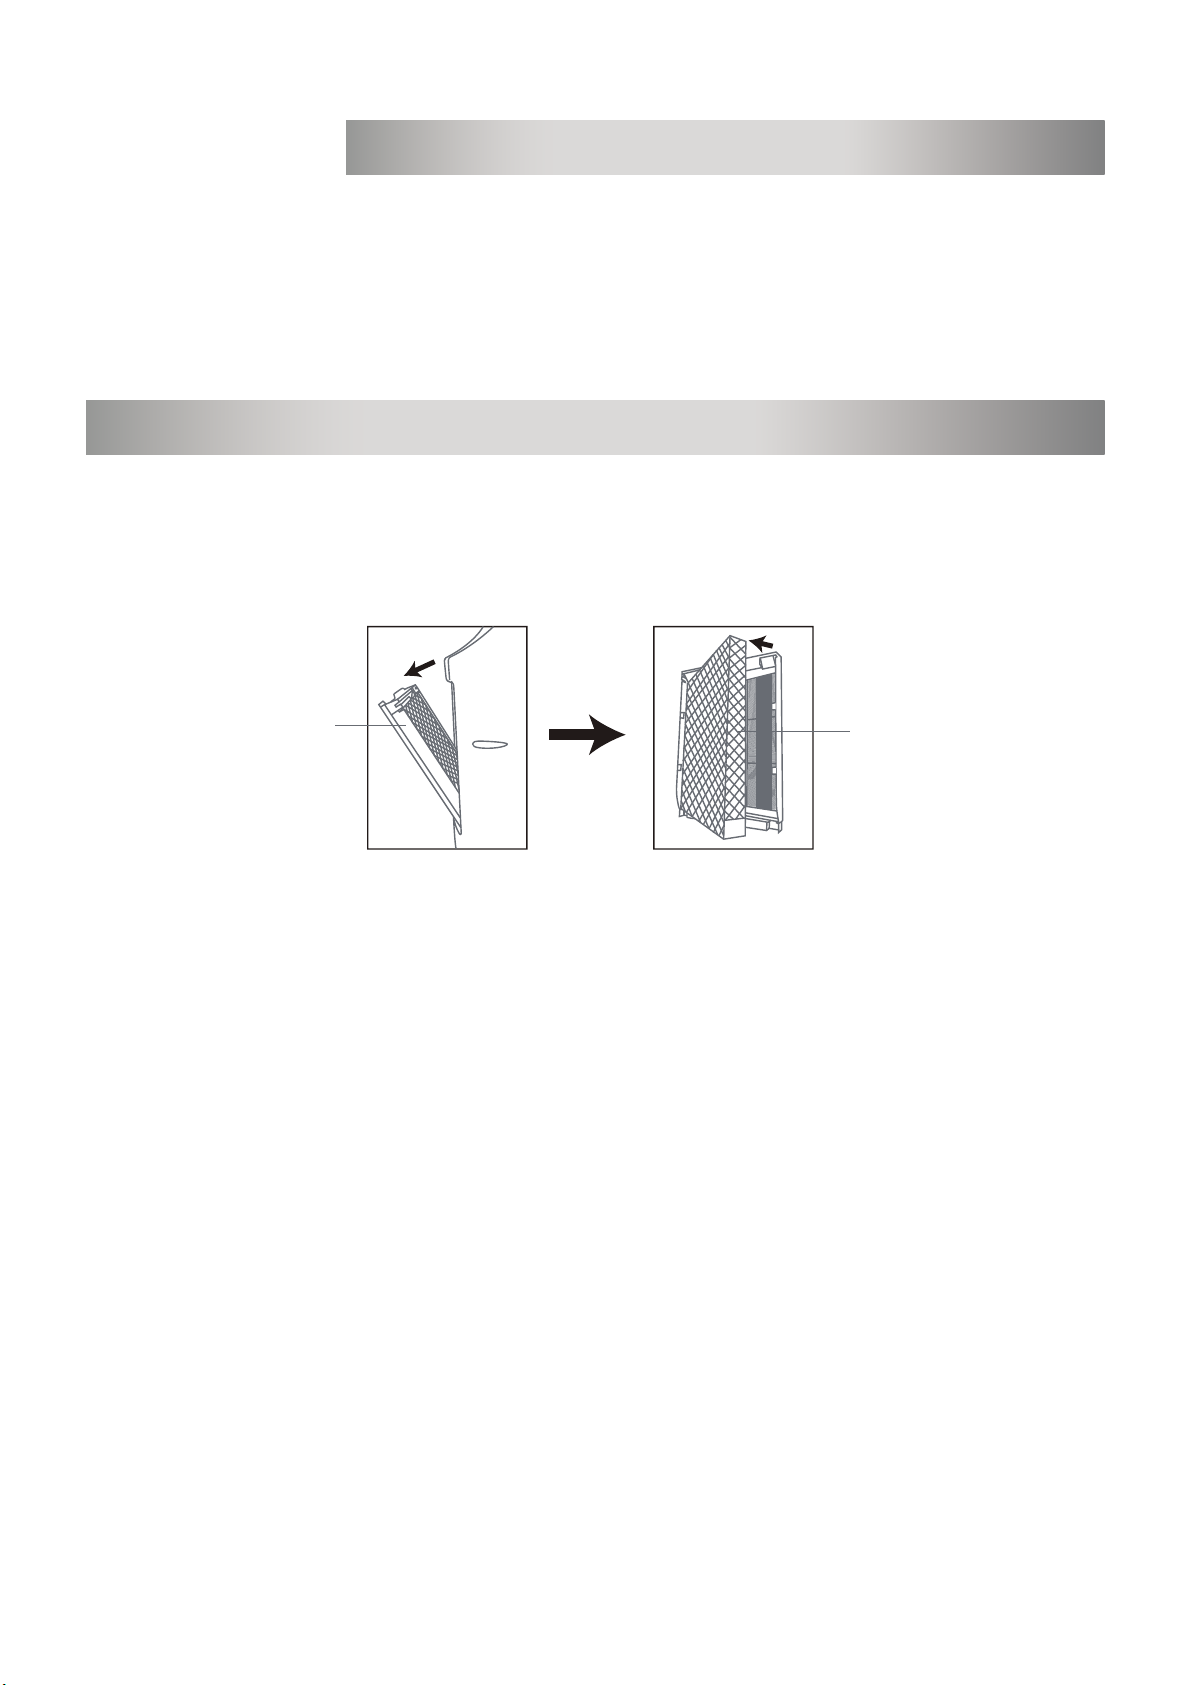
14- Cambie el agua regularmente para mantener el agua limpia.
15- Nunca sumerja la unidad ni el cable de alimentación ni el enchufe en el agua.
Para evitar el peligro de descarga eléctrica, desenchúfelo de la
corriente cuando no esté en uso y antes de limpiarlo. Si el cable
de alimentación está dañado, deje de usarlo inmediatamente y
llévelo al centro de servicio para su reparación.
Gracias por comprar el “Air Cooler- Mosquito Killer”. Lea estas instrucciones antes de usar
este producto por primera vez y guárdelo para su referencia.
- 1 -
MEDIDAS DE SEGURIDAD IMPORTANTES
NOTA:

1- Abra la caja y desembale el producto.
2- Es necesario sacar el tanque de agua para llenarlo.
3- Poner agua limpia hasta la señal MAX. Vuelva a colocar el tanque en su sitio y seque
cualquier resto de agua. Si tiene alguna dicultad para colocar el tanque en la posición
correcta, lea Limpieza y mantenimiento (pág. 7).
4- Para usar cubitos de hielo, abra el tanque e introdúzcalos en el interior del depósito
del agua.
5- Enchufe la unidad
PRIMER USO
1- Asa
2- Panel de control
3- Salida de aire fresco
4- Rejilla interior y exterior.
5- Indicador de nivel de agua
6- Ruedas
7- Filtro de polvo
8- Cortina de agua
9- Cubierta del tanque de agua
10- Tanque de agua
11- Indicador Max/Min
12- Entrada de aire sistema Antimosquitos
13- Bandeja de desechos de insectos
14- Mando a distancia
- 2 -
DESCRIPCIÓN PRODUCTO
1
2
3
4
5
6
7
9
8
10
11
12
13
14

- 3 -
PANEL DE MANDOS
Panel de control
Mando a distancia
No coloque cubitos de hielo en el depósito de agua cuando esté
lleno, ya que el agua podría desbordarse.
NOTA:

MODOS DE FUNCIONAMIENTO
- 4 -
1- Botón ON / OFF.
a) Presione el botón ON/OFF, la luz indicadora se encenderá y la unidad
comenzará a funcionar.
b) Presione el botón ON / OFF nuevamente para apagar la unidad.
2- Botón SPEED
Presione el botón SPEED para seleccionar la velocidad de aire:
a) Presionando sucesivamente la tecla SPEED y va cambiando la velocidad,
encendiéndose el piloto correspondiente.
3- Botón OSC
a) Presione el botón OSC para activar la oscilación de las rejillas.
b) Presionando se encenderá el piloto luminoso y la rejilla interior se moverá
de izquierda a derecha.
c) Si presionamos nuevamente se encenderá el piloto y la rejilla exterior se
moverá de arriba hacia abajo.
d) Con una nueva pulsación y se encenderán ambos pilotos y y ambas
rejillas se moverán simultáneamente.
e) Para detener la oscilación de las rejillas, vuelva a presionar el botón OSC.

- 5 -
MODO DE FUNCIONAMIENTO
4- Botón MODE
Presione el botón MODE para elegir entre Modo de reposo ( Sleep Mode), Modo
natural (Natural Mode) y Función BOOST.
Modo reposo: el enfriador funcionará a baja velocidad y se detendrá
durante 2 segundos en cada intervalo de 40 segundos.
Modo natural: el enfriador funcionará a alta velocidad durante 6 segundos,
velocidad media durante otros 6 segundos y velocidad baja durante 6
segundos. A continuación, parará durante 3 segundos.
Función BOOST: el enfriador funcionará a alta velocidad durante 20 minutos
y volverá al modo de espera automáticamente.
Con esta función activada, solo se podrán activar el botón MODE y el botón
ON / OFF. El resto de funciones quedan bloqueadas.
5- Botón TIMER OFF
a) Presione el botón TIMER para establecer el tiempo de programación
deseada entre 1 a 8 horas (puede ajustar 1 hora, 2 horas, 4 horas y 8 horas).
b) Presione el botón TIMER una vez para cambiar la conguración a la
siguiente franja horaria.
c) El evaporativo funciona continuamente si no hay una luz indicadora de
tiempo encendida.
6- Botón AUTO
Hay 2 programas en este modo.
a) Modo ECO.
El climatizador evaporativo regulará automáticamente la velocidade del
caudal del aire según la temperatura ambiente de la estancia.
b) Modo BABY.
El climatizador evaporativo funcionará en modo suave.

- 6 -
MODO DE FUNCIONAMIENTO
7- Función Antimosquitos
Antes de presionar la función para antimosquitos, verique que la bandeja de
desechos está correctamente instalada (FIG.1).
a) Si la bandeja de desechos no está instalada correctamente (FIG.2), esta
función no se puede activar y se escucharán 3 pitidos de aviso.
b) Una vez que se haya instalado correctamente la bandeja, presione el botón
Antimosquitos y después de 1 minuto, se activará la función.
c) Revise regularmente la bandeja de desechos para eliminar restos.
IMPORTANTE: APAGUE LA UNIDAD ANTES DE EXTRAER LA BANDEJA.
8-COOL
a) Asegúrese que el nivel del agua esté entre MAX y
MIN (FIG.3).
b) Presione el botón COOL. La luz indicadora de frío
se enciende y la unidad comenzará a bombear agua
disipando el aire al ambiente.
MANDO A DISTANCIA
a) Antes de usar el mando, quite el protector de
plástico de la pila.
b) Las funciones del mando funcionan igual que el
panel de control.
FIG.1 FIG.2
FIG.3

- 7 -
ANTES DE LIMPIAR EL APARATO, ASEGÚRESE de apagar y desconectar el enchufe para
evitar riesgo de descarga eléctrica.
Para prolongar la vida útil del producto y mantener el mejor rendimiento posible, se
recomienda limpiar la unidad con regularidad.
1- Limpieza general.
No utilice gasolina, disolventes u otros productos químicos para la limpieza y el
mantenimiento.
Use un paño suave para la limpieza.
2- Limpieza del ltro.
Retire el ltro de polvo y lávelo con agua corriente utilizando un cepillo suave o un
paño.
3- Limpieza del tanque de agua.
Retire el depósito de agua, tirando de él. Antes de que el tanque esté completamente
fuera, levántelo para liberar el localizador de la abrazadera debajo de él. Use un paño
húmedo con detergente neutro para la limpieza. Enjuague con agua corriente, seque y
vuelva a instalar el tanque.
4-Limpiar la bandeja de residuos de insectos.
Saque la bandeja. Despeje los residuos del interior y limpie la bandeja con detergente
neutro. Seque la bandeja antes de volver a instalarla.
Use detergente neutro y un paño suave para la limpieza.
LIMPIEZA Y MANTENIMIENTO
Filtro de polvo Cortina de agua
1- Rellene el depósito antes de usar la función de aire fresco. Si el
agua está en un nivel bajo o sin agua, esta función no se activará
hasta que se rellene de agua el tanque.
2- El evaporativo se puede utilizar sin agua como un ventilador
eléctrico normal sin usar el modo COOL.
NOTA:

- 8 -
SOLUCIÓN DE PROBLEMAS
1- El sistema de seguridad apagará la unidad si retira la cubierta
trasera mientras esté funcionando.
2- Para mantener un buen estado de humidicación y
puricación, limpie el ltro con frecuencia.
3- Nunca sumerja la unidad, el cable de alimentación ni el enchufe
en el agua
4- No intente reparar la unidad usted mismo. Lleve SIEMPRE el
aparato a un servicio técnico para su reparación.
NOTA:
FALLO POSIBLE CAUSA SOLUCIONES
No sale aire de la unidad
No hay electricidad.
No está conectado.
Alguna pieza puede estar dañada.
Compruebe que está enchufado a la
corriente eléctrica.
Presione MODE.
Llevar el aparato al servicio técnico.
La unidad no se puede apagar
No ha presionado el botón“ON / OFF”.
Ha saltado el dispositivo de seguridad.
Alguna pieza puede estar dañada.
Presione el botón “ON / OFF”para
apagar la unidad.
Compruebe que los ltros estén
colocados correctamente.
Llevar el aparato al servicio técnico.
El aparato tiene un ruido extraño
Algún objeto extraño se ha colado en
el interior.
El motor está dañado.
Retirar posibles objetos (si los hubiere).
Llevar el aparato al servicio técnico.
No funciona el modo COOL
(humidicador)
Bajo nivel o falta de agua en el
depósito.
La tubería interior del agua, se ha
podido soltar.
La bomba puede estar dañada.
Rellenar el depósito de agua.
Reconectar la tubería de agua.
Llevar la unidad al servicio técnico.
No oscilan las rejillas El motor está dañado. Llevar el aparato al servicio técnico.
El aire no sale frío
El ltro trasero puede estar obstruido
por el polvo.
No hay suciente agua.
Botón de aire frío no presionado.
Lavar el ltro trasero.
Añadir agua al depósito.
Presionar el botón COOL.
Sustituir ltro.
No funciona el modo Antimosquitos La bandeja de desechos no está
instalada. Saque la bandeja y vuelva a instalarla.

ESPECIFICACIONES
Importante:
Voltaje: 220-240 V - -50 Hz
Potencia: 60W
Capacidad del tanque de agua: 5,5 l
Dimensiones: 290 x 295 x 735 (mm)
Peso: 7,0 kg.
1- La unidad está diseñada para uso doméstico solamente.
2- Los usuarios comerciales o industriales no obtendrán la garantía
regular como se indica en los términos de la tarjeta de garantía.
3-Para sacar el máximo rendimiento de enfriamiento de la unidad,
deberá de sustituir el ltro anualmente o al comienzo de cada
campaña.
ALMACENAMIENTO
Siga las instrucciones que le mostramos a continuación para el almacenamiento del
aparato:
1- Desenchufe la unidad de la toma de corriente y enrolle el cable de alimentación en los
soportes horizontales traseros.
2- Vacíe el depósito.
3- Cubra el evaporativo con una tela na si no se va a usar en un período prolongado.
4- La unidad debe almacenarse en un lugar seco e inaccesible para los niños.
- 9 -

ENGLISH
INSTRUCTION MANUAL
AsAp
Portable Air Cooler
(with anti- mosquito function)

- 1 -
1-Make sure your electricity supply are 220-240v – 50Hz
2-Use the device only as described in this manual. Other uses are not recommended, as it
may cause re or electric shock.
3- Do not use the unit in extreme temperatura áreas. Do not expose the unit to the direct
sunlight. Only for indoor use.
4- Do not use extensión cord to avoid overheating or re risk.
5- Do not exceed the maximun level on the water tank
6- Do not move it quickly if there are wáter in the tank in order to avoid splaslh
7- Do not put he unit near explosives, hot oven or hot surfaces.
8- Hold the plug to disconnect it from the socket. Never pull on the power cord.
9- Please, do not use COOL function in a few ventilated closed área for a long time to
avoid high humidity.
10- The unit must be placed on a at and resistant surface.
11- This appliance is not intended to be used by people (included children) with reduced
physical, sensorial or mental abilities, with few experience or knowledge, unless
they are under the supervisión of a person responsible of their safety with the use
instructions of the appliance. Children should be supervised to ensure they do not
play with the device
- Children under 3 years of age should be kept out of the reach of the appliance unless
they are continuously supervised. Children from 3 years and under 8 years should
only turn on / o the device as long as it has been placed or installed in its normal
operating position and that they are supervised or have received instructions
regarding the use of the device in a safe manner and understand the risks that the
device has.
- Children from 3 years and under 8 years should not plug in, regulate or clean the
appliance or carry out maintenance operations.
- This device can be used by children over 8 years and for person with physical, sensorial
or mental disabilities or without experience or knowledge as long as they have been
properly trained and been supervised for someone who undestand the risks.
12- Switch o and plug o the air cooler before to clean it
13- If you are not going to use the device for a long time, please swith o it and empty
the tank.
14- Change the wáter regulary to kept clean the wáter.
15- Never immerse the unit, the power cord or rthe plug in wáter.
To avoid the danger of electric shock, unplug it from the mains
when it is not in use and before cleaning it.
If the power cord is damaged, stop using it immediately and take
it to the service center for repair.
Thank you for purchasing the “Air Cooler- Mosquito Killer”. Please, read this instructions
before use this product for the rst time and keep it for your reference.
IMPORTANT SAFETY INSTRUCTIONS
NOTE:

- 2 -
1- Open the box and unpack the product.
2- Necessary to remove the wáter tank to ll it.
3- Put clean wáter until MAX signal. Replace the wáter tank at its place and dry any piece
of wáter. If you have any diculty placing the tank in the correct positionm, please read
“cleaning and maintenance” (pag. 7)
4- To use ice cubes, open the tank and insert them inside the wáter tank
5- Plug in the unit
FIRST USE
1-Handle
2- Control panel
3- Cool air outlet
4- Iner and Outer louvre
5- Water level indicator
6- Caster
7- Dust lter
8- Water curtain
9- Water tank cover
10- Water tank
11- Max/Min Indicator
12- Air inlet for Mosquito-Killer
13- Insect waste tray
14- Remote control
PRODUCT DESCRIPTION
1
2
3
4
5
6
7
9
8
10
11
12
13
14

- 3 -
CONTROL PANEL
Control panel
Remote control
Do not put ice cubes in the water tank when it is full, as the water
could overow.
NOTE:

- 4 -
OPERATING MODES
1- ON / OFF Button.
a) Press the ON/OFF button. The indicator light comes on and the unit will start to
operate.
b) Press the ON/OFF button again to turn o the unit.
2- SPEED button
Press the SPEED button to select air speed:
a) Pressing the SPEED key successively, the speed changing and the
corresponding pilot is lighting on.
3 - OSC Button
a) Press the OSC button to activate the oscilation of the air louver.
b) Press once the button, the indicator light will be on and the inside louver
will move LEFT and RIGHT.
c) Press twice the button, the indicator light will be on, and the outside louver
will move UP and DOWN.
d) Press three times, both indicators lights and will be on and both louver
will move simultaneously.
e) To stop the oscillation, press again the OSC button.

- 5 -
OPERATING MODES
4- MODE Button
Press MODE button to choose Sleep Mode, Natural Mode and BOOST function.
Sleep mode: the air cooler will work at low speed in and stop for 2 second in
every 40 seconds interval.
Natural mode: the air cooler will work at high speed for 6 seconds, médium
speed for another 6 seconds and low speed for 6 seconds. Then, it will stpo
for 3 seconds.
BOOST Function: the air cooler will work at high speed for 20 minutes and
then, it will return to the standby mode automatically.
If this function is activated, only the MODE button and the ON/OFF button can
be activated. The rest of the functions will be blocked.
TIMER OFF Button
a) Press the TIMER button to set the desired programming time from 1 to 8
hours (you can set 1 hour, 2 hours, 4 hours and 8 hours).
b) Press the TIMER button once to change the setting to the next time slot.
c) The air cooler works continuously if there is not a time indicator light on.
6- AUTO Button
There are 2 programs in this mode.
a) ECO Mode.
The air cooler will automatically regulate the speed of the air ow according
to the ambient temperature of the room.
b) BABY Mode.
The air cooler will continue works at low wind speed.

- 6 -
OPERATING MODES
7- Mosquito killer function
Before pressing the mosquito killer function, please check the insect waste tray is
installed properly. (FIG.1).
a) If the waste tray is not installed correctly (FIG.2), this function can not be
activated and 3 warning beeps will be heard.
b) Once the tray is installed correctly, press the Anti-mosquito button and after
1 minute, the function will be activated.
c) Ckeck the insect waste tray regulary to eliminate the possible remains.
IMPORTANT: TURN OFF THE UNIT BEFORE REMOVING THE TRAY.
8-COOL
a) Make sure that the water level is between MAX
and MIN (FIG.3).
b) Press the COOL button. The cold indicator light
comes on and the unit will start pumping water
dissipating the air into the room.
REMOTE CONTROL
a) Before using the remote control, remove the
plastic protector from the battery.
b) The control functions works the same as the
control panel.
FIG.1 FIG.2
FIG.3

- 7 -
BEFORE CLEANING THE DEVICE, MAKE SURE to turn o and unplug the plug to avoid risk
of electric shock.
In order to prolong the life of the product and maintain the best possible performance, it
is recommended to clean the unit regularly.
1- General cleaning.
Do not use gasoline, solvents or other chemical products for cleaning and
maintenance.
Use a soft cloth for cleaning.
2- Filter cleaning.
Remove the dust lter and wash it under water using a soft brush or cloth.
3- Water tank cleaning.
Remove the water tank by pulling it. Before the tank is completely out, lift it up to
liberate the locator from the clamp below it. Use a wet cloth with neutral detergent for
cleaning. Rinse with water, dry o and instal the tank again.
4- Insect waste tray cleaning.
Take out the tray. Clear the waste inside and clean with neutral detergent. Dry o the
tray before reinstalling it.
CLEANING AND MAINTENANCE
Dust lter Water curtain
1- Fill the water tank before use Cool Air function. If the water is
at a low level or without water, this function will not activate until
the tank is lled with water.
2- The air cooler can be used without water as a normal electric
fan without using COOL mode.
NOTE:
Table of contents
Languages:
Other Haverland Air Conditioner manuals

Haverland
Haverland IGLU User manual

Haverland
Haverland CAsAp User manual

Haverland
Haverland WaD-20 User manual

Haverland
Haverland TAC-0919 User manual

Haverland
Haverland IGLU 2023 User manual

Haverland
Haverland TAC-0719 User manual

Haverland
Haverland TAC-0918 User manual

Haverland
Haverland BaE User manual

Haverland
Haverland TAC-0923WC Manual

Haverland
Haverland CAsAp WIFI User manual