manuals.online logo
Brands
  1. Home
  2. •
  3. Brands
  4. •
  5. Haworth
  6. •
  7. Indoor Furnishing
  8. •
  9. Haworth Hop Series User manual

Haworth Hop Series User manual

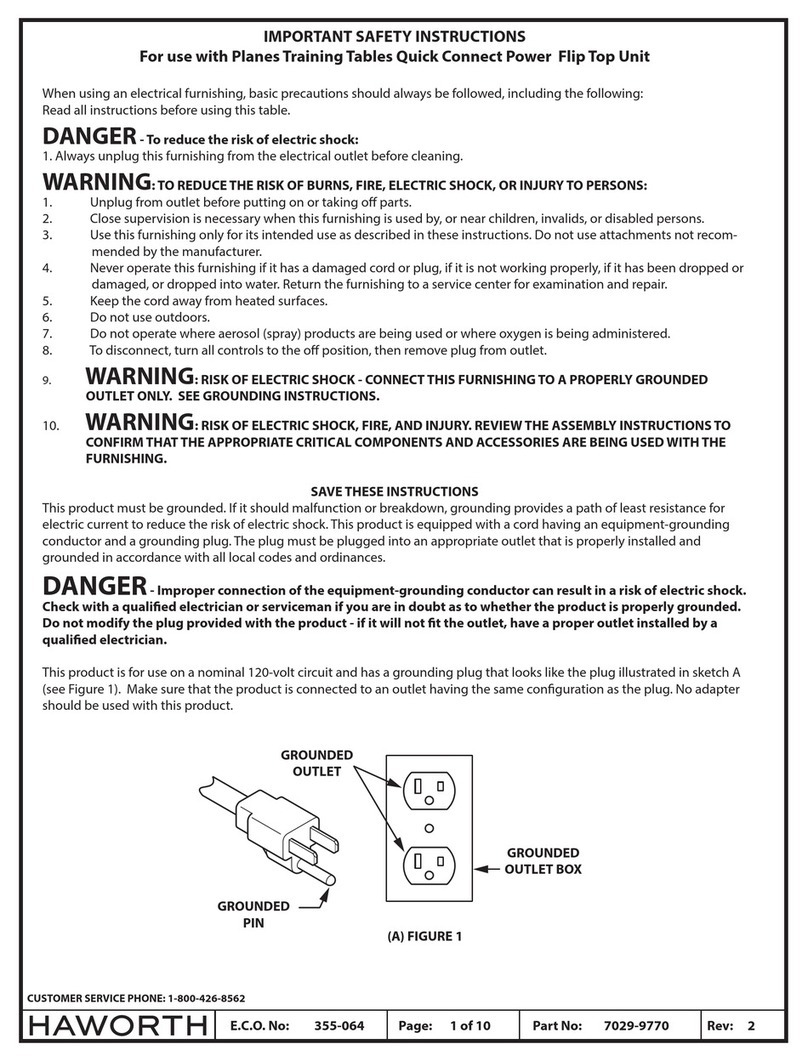
GROUNDED
OUTLET
GROUNDED
OUTLET BOX
GROUNDED
PIN
Max Static Load: 175 lbs
IMPORTANT SAFETY INSTRUCTIONS
For use with HOP Single Motor Electric Height Adjustable Tables
For Comercial Use Only
This product is conformed to UL962 certied to CAN/CSA C22.2 No. 68.
When using an electrical furnishing, basic precautions should always be followed, including the following:
Read all instructions before using this table.
DANGER- To reduce the risk of electric shock:
1. Always unplug this furnishing from the electrical outlet before cleaning.
WARNING- TO REDUCE THE RISK OF BURNS, FIRE, ELECTRIC SHOCK, OR INJURY TO PERSONS:
1. Unplug from outlet before putting on or taking o parts.
2. Close supervision is necessary when this furnishing is used by, or near children, invalids, or disabled persons.
3. Use this furnishing only for its intended use as described in these instructions. Do not use attachments not recom-
mended by the manufacturer.
4. Never operate this furnishing if it has a damaged cord or plug, if it is not working properly, if it has been dropped or
damaged, or dropped into water. Return the furnishing to a service center for examination and repair.
5. Keep the cord away from heated surfaces.
6. Do not use outdoors.
7. Do not operate where aerosol (spray) products are being used or where oxygen is being administered.
8. To disconnect, turn all controls to the o position, then remove plug from outlet.
9. WARNING: RISK OF ELECTRIC SHOCK - CONNECT THIS FURNISHING TO A PROPERLY GROUNDED
OUTLET ONLY. SEE GROUNDING INSTRUCTIONS.
SAVE THESE INSTRUCTIONS
This product must be grounded. If it should malfunction or breakdown, grounding provides a path of least resistance for
electric current to reduce the risk of electric shock. This product is equipped with a cord having an equipment-grounding
conductor and a grounding plug. The plug must be plugged into an appropriate outlet that is properly installed and
grounded in accordance with all local codes and ordinances.
DANGER- Improper connection of the equipment-grounding conductor can result in a risk of electric shock.
Check with a qualied electrician or serviceman if you are in doubt as to whether the product is properly grounded.
Do not modify the plug provided with the product - if it will not t the outlet, have a proper outlet installed by a
qualied electrician.
This product is for use on a nominal 120-volt circuit and has a grounding plug that looks like the plug illustrated in sketch A
(see Figure 1). Make sure that the product is connected to an outlet having the same conguration as the plug. No adapter
should be used with this product.
Rev:
Part No:
Page:
E.C.O. No:
CUSTOMER SERVICE PHONE: 1-800-426-8562
11 of 6245-598 6100-0011
Electrical Rating: 120V, 60Hz, 5A for 2 leg tables
Rev:
Part No:
Page:
E.C.O. No:
CUSTOMER SERVICE PHONE: 1-800-426-8562
12 of 6245-598 6100-0011
Tools Required
3mm &
5mm
Height Adjustable Tables
Installation Instructions
HOP®
FOR 2 LEG TABLES
S-28
S-28
E
F
H
S-26
S-12
S-26
B
S-26
S-26
S-24
S-27
S-24
G
D
E
J
Scale 1 : 1
011/2
1/4 1/4
C
A
F
K
L
G
S-26
B
S-25
M8 x 12mm
Button Head Screw
(S-24)
5mm
M2.9 x 19mm
Pan Head Screw
(S-25)
(S-28)
M6 x 35mm Socket Head Cap Screw
M4.8 x 19 Pan Head Screw
(S-26)
(S-27)
M6 X 8mm Socket Cap
RECTANGLE TOP WEDGE TOP INVERSE SWELL TOP
23”
23 OR 29”
52 - 70”
29”
58 - 70”
29”
58 - 70”
A
A
WORKSURFACES AVAILABLE - ORDERED SEPARATELY
A
#1 & #2
1
Rev:
Part No:
Page:
E.C.O. No:
CUSTOMER SERVICE PHONE: 1-800-426-8562
13 of 6245-598 6100-0011
1
2
3
S-27
S-27
J
Stretch cross channel (J) to align with pilot holes (N).
Tighten set screws (P).
N
N
G
L
Attach cross channel (J) to
legs (G) & (L).
B
S-24
S-24
Install top supports (B) to legs (G) & (L).
G
L
B
P
NOTE: Attach cross channel
(J) to work surface to align
stretcher.
3mm
S-26
2
1
3
M8 x 12mm
Button Head Screw
(S-24)
5mm
M4.8 x 19 Pan Head Screw
(S-26)
(S-27)
M6 X 8mm Socket Cap
Rev:
Part No:
Page:
E.C.O. No:
CUSTOMER SERVICE PHONE: 1-800-426-8562
14 of 6245-598 6100-0011
45
2
1
2
1
3
45
Attach feet (E).
E
Attach gear connector rod (K) to legs (C) and (L).
NOTE: Loosen set screws
(Q), slide gear connector
rod shaft until stopped by
snap ring (R). Tighen set
screws (Q).
NOTE: If there is back and
fourth movement once gear
connector rod is installed,
double check to make sure
both ends are fully inserted
and set screws tighened.
NOTE: Make sure both columns are at
the same height or at lowest position
before installing gear connector rod.
K
D
Q
NOTE: Fully seat gear
connector rod over shaft
in motor leg, tighten
both set screws (Q).
R
Q
3mm
E
F
S-28
Un-attach cross channel (J). Turn
cross channel/leg assembly upright.
J
S-26
6
(S-28)
M6 x 35mm Socket Head Cap Screw
M4.8 x 19 Pan Head Screw
(S-26)
Rev:
Part No:
Page:
E.C.O. No:
CUSTOMER SERVICE PHONE: 1-800-426-8562
15 of 6245-598 6100-0011
7Attach work surface.
Attach gear connector cover (H)
H
S-26
S-26
S-26
8
M4.8 x 19 Pan Head Screw
(S-26)
M4.8 x 19 Pan Head Screw
(S-26)
Rev:
Part No:
Page:
E.C.O. No:
CUSTOMER SERVICE PHONE: 1-800-426-8562
16 of 6245-598 6100-0011
Attach control box (C) and up/down handset (G). Reset table to lowest position.
S-26
C
G
S-25
Initial Reset
After assembly all electric tables must be calibrated to insure smooth and trouble free movement.
1. Lower the table to the lowest height by pressing the down arrow on the switch.
2. Press down again for 5 to 10 seconds after the table has reached the lowest position
NOTE: The table will readajust itself if needed.
Follow-up Calibration
1. Inform the user that the table should be recalibrated once every month by following the instruc-
tions above.
2. The table should also be recalibrated if jerky or uneven movement is noted.
10 Handset reset and calibration.
CAUTION
DO NOT PLUG POWER CORD
INTO WALL OUTLET UNTIL
LEG ASSEMBLIES AND
HANDSET ARE CONNECTED
TO CONTROL MODULE
9
M2.9 x 19mm
Pan Head Screw
(S-25)
M4.8 x 19 Pan Head Screw
(S-26)

Other Haworth Indoor Furnishing manuals

Haworth POPPY LOUNGE Installation instructions

Haworth

Haworth POPPY LOUNGE Installation instructions

Haworth Comforto 55 User manual

Haworth

Haworth Comforto 55 User manual

Haworth Improv Tag User manual

Haworth

Haworth Improv Tag User manual

Haworth Assure User manual

Haworth

Haworth Assure User manual

Haworth ALLWAYS User manual

Haworth

Haworth ALLWAYS User manual

Haworth Planes User manual

Haworth

Haworth Planes User manual

Haworth Eddy User manual

Haworth

Haworth Eddy User manual

Haworth 7029-9770 User manual

Haworth

Haworth 7029-9770 User manual

Haworth 7029-9770 User manual

Haworth

Haworth 7029-9770 User manual

Haworth Lyft User manual

Haworth

Haworth Lyft User manual

Haworth Aloha Active User manual

Haworth

Haworth Aloha Active User manual

Haworth Jive User manual

Haworth

Haworth Jive User manual

Haworth Upside User manual

Haworth

Haworth Upside User manual

Haworth Zody Assembly instructions

Haworth

Haworth Zody Assembly instructions

Haworth comforto SYSTEM X-99 User manual

Haworth

Haworth comforto SYSTEM X-99 User manual

Haworth Jive User manual

Haworth

Haworth Jive User manual

Haworth Zody II Guide

Haworth

Haworth Zody II Guide

Haworth Comforto System 77 User manual

Haworth

Haworth Comforto System 77 User manual

Haworth UPSIDE Series User manual

Haworth

Haworth UPSIDE Series User manual

Haworth Zody LX User manual

Haworth

Haworth Zody LX User manual

Haworth BELONG User manual

Haworth

Haworth BELONG User manual

Haworth ACTIVE COMPONENTS Security Drawer User manual

Haworth

Haworth ACTIVE COMPONENTS Security Drawer User manual

Haworth Hop TS User manual

Haworth

Haworth Hop TS User manual

Haworth CULTIVATE FLUSH User manual

Haworth

Haworth CULTIVATE FLUSH User manual

Popular Indoor Furnishing manuals by other brands

American Standard Williamsburg Pedestal Lavatory 0555.400 Specification sheet

American Standard

American Standard Williamsburg Pedestal Lavatory 0555.400 Specification sheet

Jula 434-037 installation instructions

Jula

Jula 434-037 installation instructions

Uplift Desk ACC067 quick start guide

Uplift Desk

Uplift Desk ACC067 quick start guide

Costway KC52264 user manual

Costway

Costway KC52264 user manual

FYC furniture 415–BSC–V Assembly instructions

FYC furniture

FYC furniture 415–BSC–V Assembly instructions

Accentrics Home DS-D475-701-1 Assembly instructions

Accentrics Home

Accentrics Home DS-D475-701-1 Assembly instructions

Strictly Beds & Bunks Memphis Bunk Bed Assembly instructions

Strictly Beds & Bunks

Strictly Beds & Bunks Memphis Bunk Bed Assembly instructions

Keter MONTERO SET Assembly instructions

Keter

Keter MONTERO SET Assembly instructions

Lightolier Lytecaster 374X specification

Lightolier

Lightolier Lytecaster 374X specification

Sonorous LB 1530 Assembly instructions

Sonorous

Sonorous LB 1530 Assembly instructions

Seconique ABBEY Assembly instructions

Seconique

Seconique ABBEY Assembly instructions

IMCAL HOME OPERA 2.2 Assembly instructions

IMCAL

IMCAL HOME OPERA 2.2 Assembly instructions

CARRARO 1066 manual

CARRARO

CARRARO 1066 manual

Article SEGATA Media Unit Assembly instructions

Article

Article SEGATA Media Unit Assembly instructions

Stanley H5CHSBK Use and care guide

Stanley

Stanley H5CHSBK Use and care guide

Happy Garden ALICE TBL05 quick start guide

Happy Garden

Happy Garden ALICE TBL05 quick start guide

Habitat Hester 804537 manual

Habitat

Habitat Hester 804537 manual

ApexDesk Little Soleil DX Assembly guide

ApexDesk

ApexDesk Little Soleil DX Assembly guide

manuals.online logo
manuals.online logoBrands
  • About & Mission
  • Contact us
  • Privacy Policy
  • Terms and Conditions

Copyright 2025 Manuals.Online. All Rights Reserved.