HDFury 4K Diva 18Gbps User manual
4K Diva 18Gbps
User Manual 4K Diva Rev 1.00

Disclaimer: 3rd party and/or custom firmware providing extra features are not covered in this manual.
2
4K Diva –User Manual

Disclaimer: 3rd party and/or custom firmware providing extra features are not covered in this manual.
3
4K Diva –User Manual
Table of content
Diva Overview ........................................................................................................................................... 5
Connecting Cables to Diva ........................................................................................................................ 6
Diva Power/Status OLED........................................................................................................................... 7
Diva Menu/Toggle Button......................................................................................................................... 8
Diva Info/Exit Button................................................................................................................................. 9
Diva Out1/Up Button .............................................................................................................................. 10
Diva Out0/Down Button ......................................................................................................................... 11
Help on Jack connections........................................................................................................................12
Help on AUDIO/CEC/ARC/eARC connections ......................................................................................... 13
Help on Ledstrip Installation...................................................................................................................14
Help on LAG Tester installation .............................................................................................................. 15
Diva OLED Menu ..................................................................................................................................... 16
Accessing Diva Web Server .....................................................................................................................18
Diva Web Server Top section..................................................................................................................19
Diva Web Server INFO Section................................................................................................................20
Diva Web Server EDID Section................................................................................................................21
List of Custom EDID available. ................................................................................................................22
Diva Web Server SCALER Section............................................................................................................ 26
Diva Web Server HDR/DV Section .......................................................................................................... 27
Diva Web Server OSD Section................................................................................................................. 31
Diva Web Server CEC/RS232 Section ...................................................................................................... 33
Diva Web Server MACROS Section ......................................................................................................... 35
Diva Web Server TOOLS Section .............................................................................................................36
Diva Web Server CONFIG Section ........................................................................................................... 38
Updating your Diva Firmware via web browser ..................................................................................... 41
CONFIG Export section of web server:.................................................................................................... 43
RS232 and IP/Telnet Command List........................................................................................................ 48
IR Code List.............................................................................................................................................. 60
FAQ........................................................................................................................................................102
Highlight Hardware Features:...............................................................................................................105
Highlight Video Features:...................................................................................................................... 106

Disclaimer: 3rd party and/or custom firmware providing extra features are not covered in this manual.
4
4K Diva –User Manual
Highlight Audio Features: ..................................................................................................................... 107
Highlight Convenience Features: ..........................................................................................................108
Highlight HDCP Features:...................................................................................................................... 109
Main Specifications...............................................................................................................................110
Supported Audio/Video Signals ............................................................................................................ 111
Technical Specifications ........................................................................................................................111
Certifications.........................................................................................................................................112
Pro Tips ................................................................................................................................................. 113
Disclaimer: 3rd party and/or custom firmware providing extra features are not covered in this manual.
5
4K Diva –User Manual
Diva Overview
Team HDfury would like to thank you personally for purchasing the 4K Diva!
This unique HDMI2.0b device supports up to 4 inputs for true full 4K60 4:4:4 600MHz 18Gbps bandwidth
signals. It will allow you to solve any HDCP error, extract full HDMI audio from HDMI sources and
ARC/eARC up to Atmos HBR over TrueHD from ARC and eARC TVs to feed older AVR and Matrix any
SD/HD/FHD/UHD/HDR/DV or PC signals up to 600MHz. Upscale to 4K or downscale to 1080p SDR any
channel individually, display relevant information on OLED/OSD, select between multiple edid banks for
each inputs. Inject, replace or translate HDR metadata and AVI infoframe. It is also capable of auto
switching any sources including X1X, ATV4K, Shield, etc… Based on incoming content type it can send
relevant RS232 commands to any RS232 controllable display. Control can be completed with IR codes,
push buttons on the unit, via IP or RS232 (MAC/WIN/Linux) or through embedded Webserver (for any
web browser based device such as MAC/WIN/Linux computer or Android/iOS phones, tablets and
others).
Additionally, Diva supports video responsive ambient light and LAG tester feature.

Disclaimer: 3rd party and/or custom firmware providing extra features are not covered in this manual.
6
4K Diva –User Manual
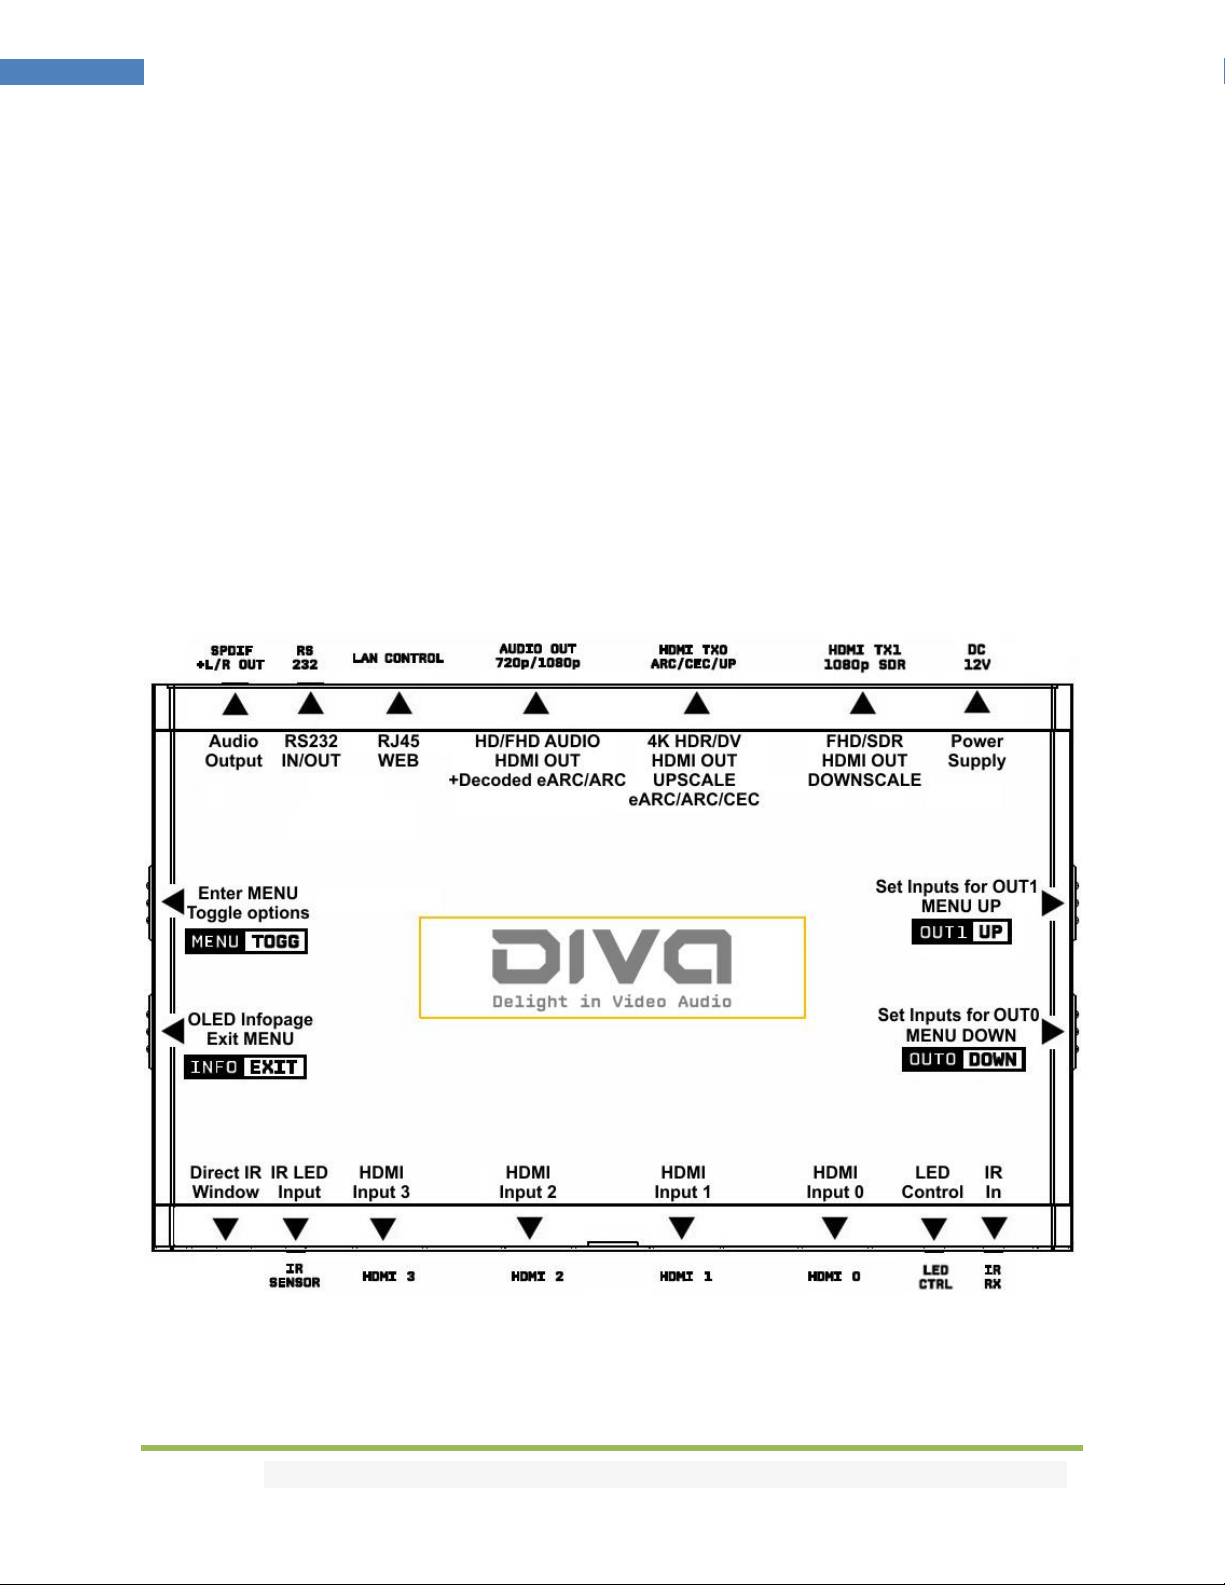
Connecting Cables to Diva
• Connect Power connector from Power supply (110-240V 1.2A IN & 12V 1A OUT).
• Connect a source via HDMI input cable to ANY HDMI input.
• Connect any other HDMI, sound, IR or RS232 cable that you might need (optional)
• HDMI cable must support 18Gbps if any 18Gbps source/sink is connected (except for TX1 & Audio Out)
•HDMI/HDCP 1.x devices must be connected to 1080p SDR Downscale TX1 Output
port.
•Make sure that you are using 600MHz certified or tested HDMI 4K cable if you
plan to set up a 4K60 4:4:4 8b/ 4K60 4:2:2 12b 600MHz/18Gbps link in your setup.
Disclaimer: 3rd party and/or custom firmware providing extra features are not covered in this manual.
7
4K Diva –User Manual
Diva Power/Status OLED
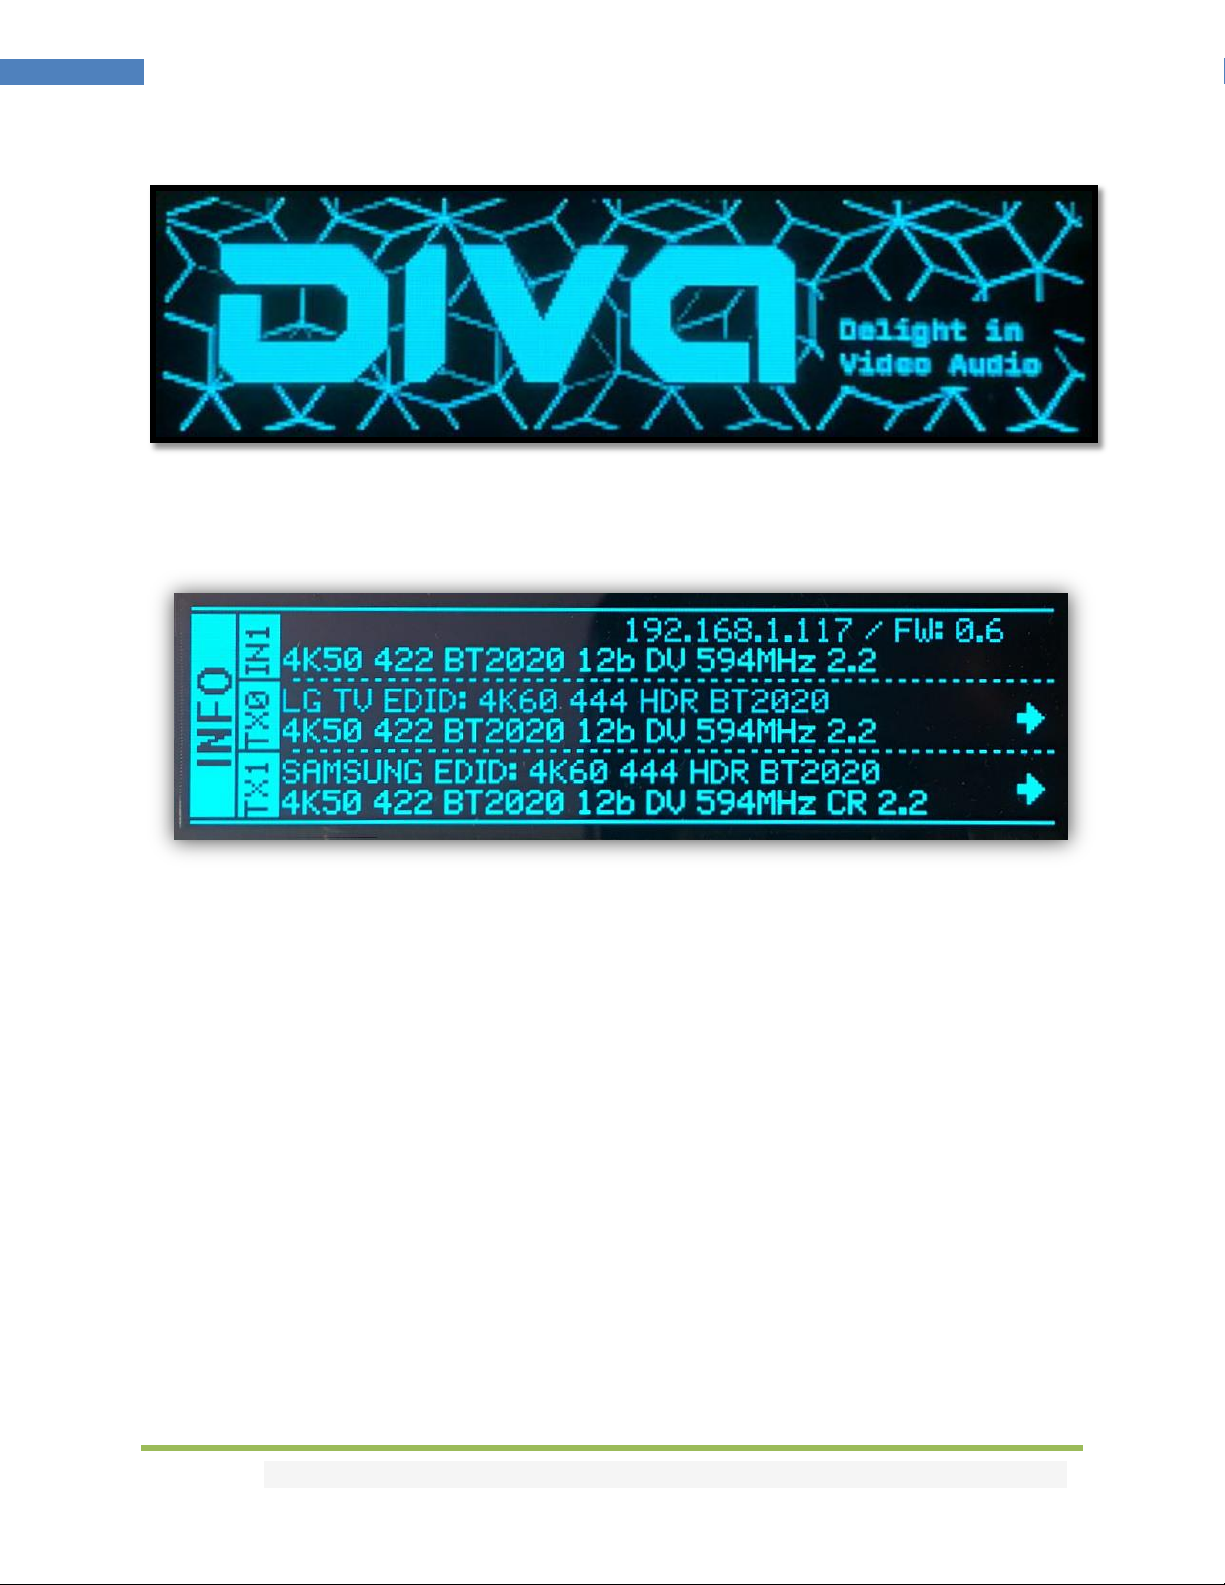
The Diva OLED will turn ON when power supply is applied; Diva Logo will be displayed followed by a
similar default infopage to the one represented below.
[192.168.1.117]: Diva IP address will be displayed here if LAN CONTROL RJ45 output is connected to
your LAN/WAN router/switcher. mDNS and other way are available if you cycle OLED infopage.
[FW: 0.6]: Firmware Version of Diva is reported here.
If any active input is connected, the default OLED infopage will indicate which input is active (IN1 on
above pic). Diva will process handshake with the active input and once completed the signal
information will be displayed. 4K50 4:2:2 BT2020 12b LLDV 594MHz 2.2 on above pic.
If any sink is connected at TX0 output, TX0 section of the default OLED infopage will report its EDID
name (LG TV on above pic) and its max supported resolution (4K60 4:4:4 8b BT2020 HDR on above pic)
on the first line. Second line will display the current signal going to it, the small arrow on the right
indicate if signal is upscaled ↑, Downscaled ↓or passing thru untouched →
[OLED OFF]: Insufficient power, OLED timer expired (default 30s) or OLED OFF. Use the Diva power
supply; press any button if OLED timer expired and make sure the OLED is ON (refer to p.58).
[OLED ON]: The Diva unit is receiving power and is ready to accept an HDMI signal.

Disclaimer: 3rd party and/or custom firmware providing extra features are not covered in this manual.
8
4K Diva –User Manual
Diva Menu/Toggle Button
The 4K Diva offers 2 functions per push button.
[MENU]Wake up from sleep/fade mode and/or Enter Diva OLED MENU.
[TOGG] When you are in Diva OLED MENU, the TOGGLE button allows you to change and cycle any
setting value.
Note: You can also control and change settings with IR codes, through IP Control or RS232 for
MAC/WIN/Linux or from the embedded Webserver for MAC/WIN/Linux PC or via Android/iOS
smartphone/tablet or any web browser based device.

Disclaimer: 3rd party and/or custom firmware providing extra features are not covered in this manual.
9
4K Diva –User Manual
Diva Info/Exit Button
The 4K Diva offers 2 functions per push button.
[INFO]Wake up from sleep/fade mode and/or Cycle OLED infopage: INFO > LAN INFO > HDR INFO > …
[EXIT] When you are in Diva OLED MENU, the EXIT button allows you to exit OLED MENU.
Note: You can also control and change settings with IR codes, through IP or RS232 for MAC/WIN/Linux
or from the embedded Webserver for MAC/WIN/Linux PC or via Android/iOS smartphone/tablet or any
web browser based device.
Disclaimer: 3rd party and/or custom firmware providing extra features are not covered in this manual.
10
4K Diva –User Manual
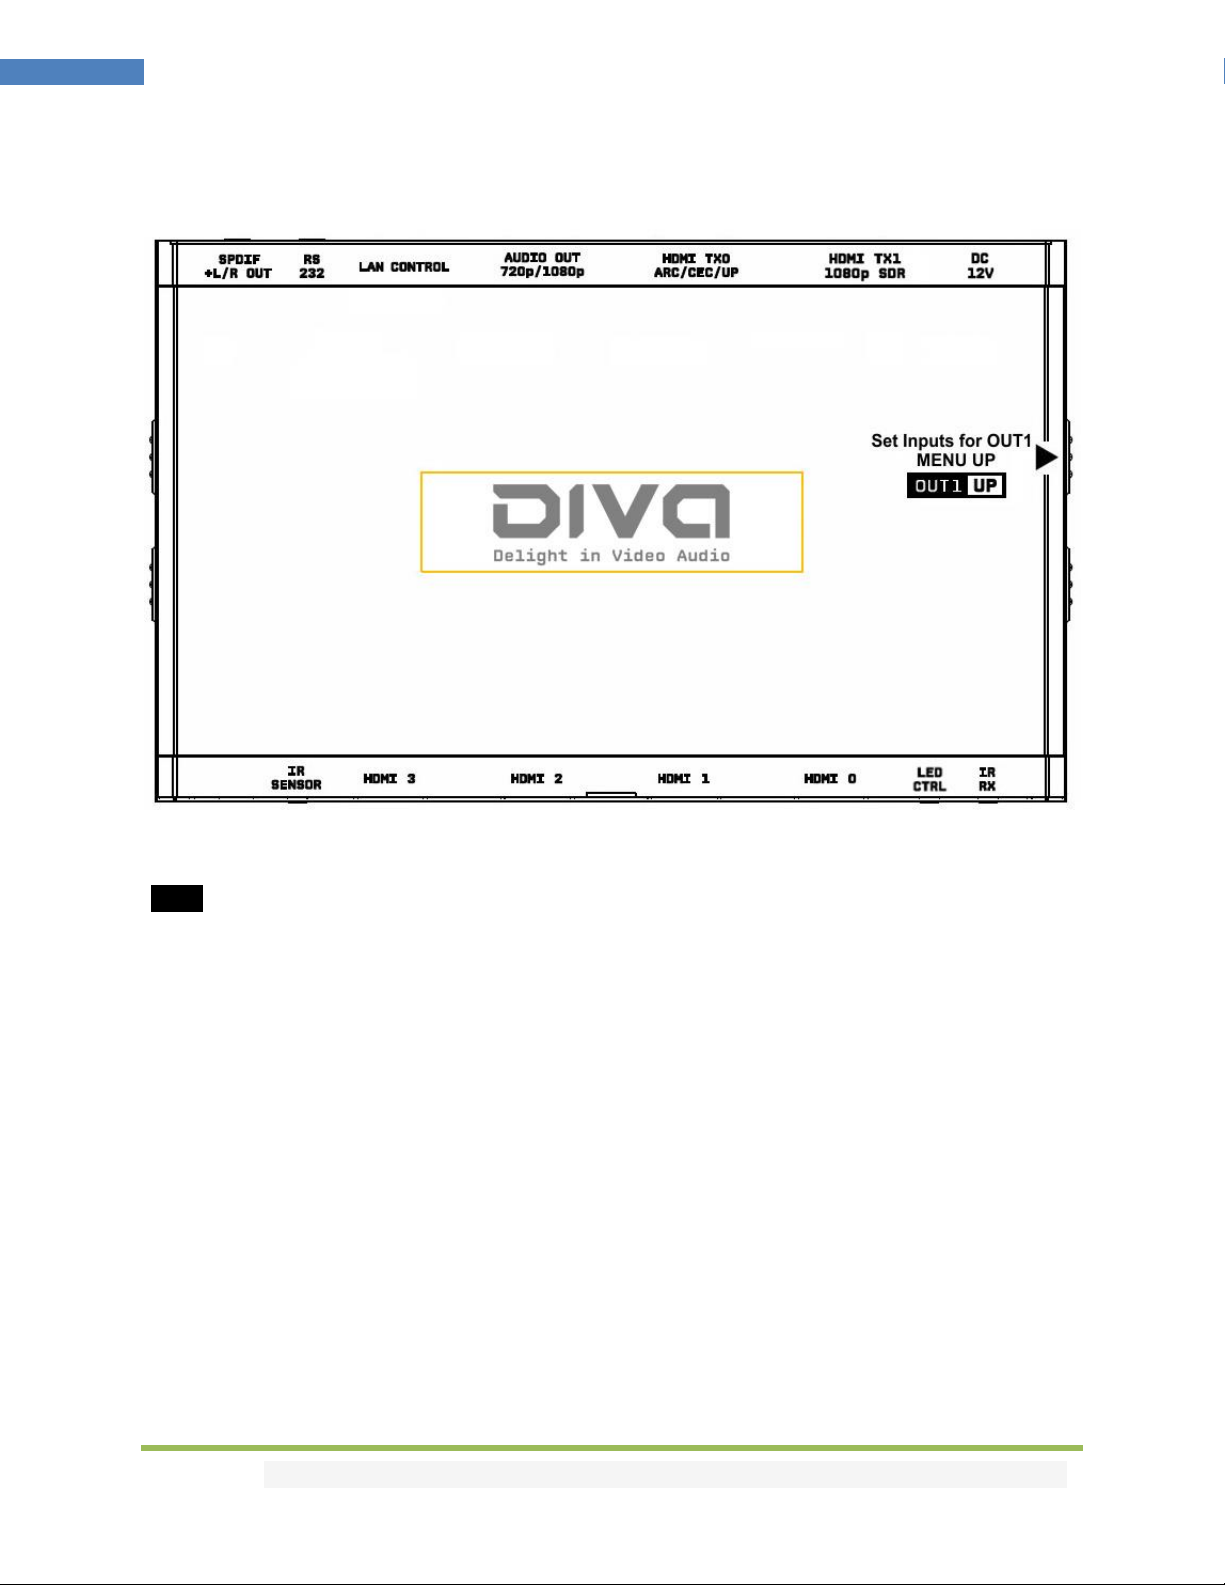
Diva Out1/Up Button
The 4K Diva offers 2 functions per push button.
[OUT1]Wake up from sleep/fade mode and/or set and switch active or inactive inputs for TX1 output.
[UP] When you are in Diva OLED MENU, the UP button allows you to navigate upward.
Diva OLED/OSD will report info for up to two active inputs in default Matrix mode.
Note: You can also control and change settings with IR codes, through IP or RS232 for MAC/WIN/Linux
or from the embedded Webserver for MAC/WIN/Linux PC or via Android/iOS smartphone/tablet or any
web browser based device.
Disclaimer: 3rd party and/or custom firmware providing extra features are not covered in this manual.
11
4K Diva –User Manual
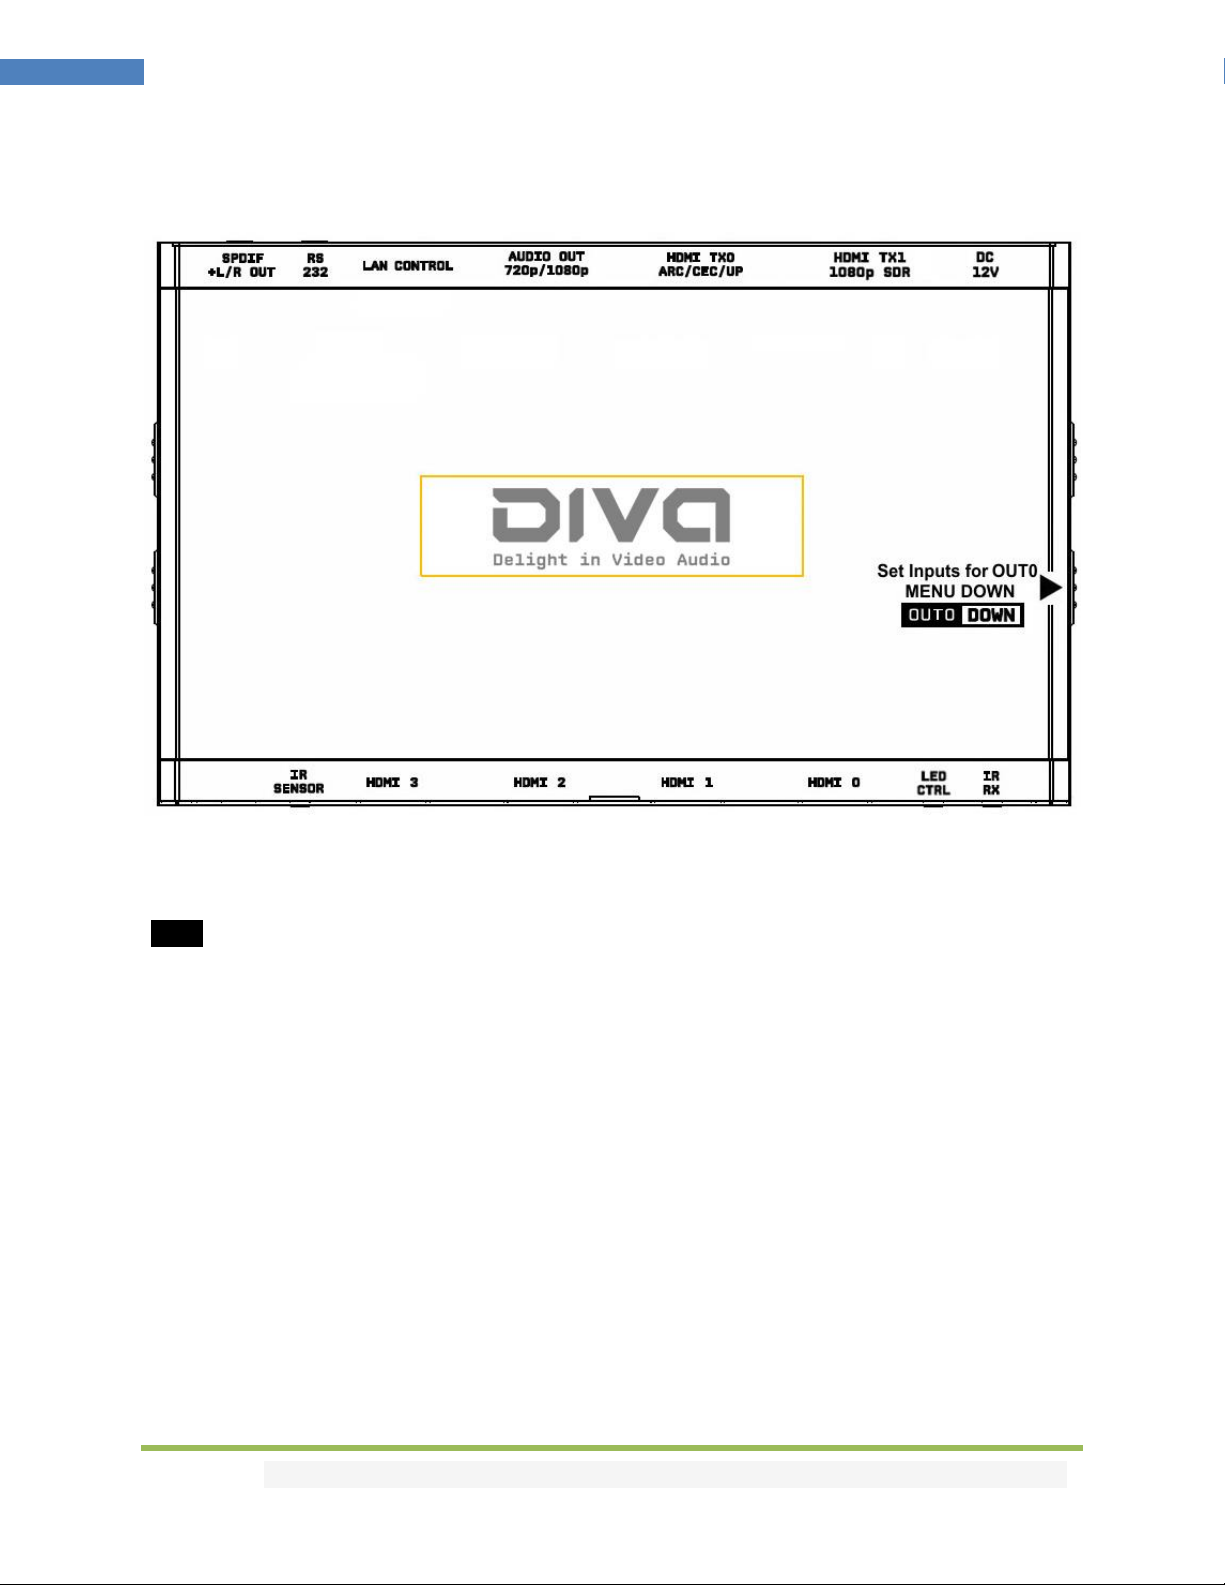
Diva Out0/Down Button
The 4K Diva offers 2 functions per push button.
[OUT0]Wake up from sleep/fade mode and/or set and switch active or inactive inputs for TX0 HDMI
output.
[DOWN] When you are in Diva OLED MENU, the DOWN button allows you to navigate downward.
Diva OLED/OSD will report info for up to two active inputs in default Matrix mode.
Note: You can also control and change settings with IR codes, through IP or RS232 for MAC/WIN/Linux
or from the embedded Webserver for MAC/WIN/Linux PC or via Android/iOS smartphone/tablet or any
web browser based device.

Disclaimer: 3rd party and/or custom firmware providing extra features are not covered in this manual.
12
4K Diva –User Manual
Help on Jack connections
LED CONTROL OUT
Connect to your Ledstrip kit for
ambient light, visual music or video
effect while playing any incoming
signals from any sources at Diva
inputs.
SPDIF or L/R Analog
OUT
Extract HDMI sound coming
from any source devices at
Diva inputs. SPDIF can also
output ARC from TX0
RS232 IN/OUT
Control Diva from
Mac/Win/Linux computer or
command any RS232 capable
display or equipment based
on incoming signal types.
INPUT IR
WINDOW
For local Diva Central
control. A system
controller will
connect an IR TX LED
on top here.
INPUT JACK
For a direct
connection from
system controller.
It does not use
LED/Light. For local
Diva Central
control.
BACK
FRONT
INPUT IR JACK
For an IR RX cable with LED
receiver. For Diva Central
control. Alternatively this
input can also be used for
Diva Input Lag tester (p.15).

Disclaimer: 3rd party and/or custom firmware providing extra features are not covered in this manual.
13
4K Diva –User Manual
Help on AUDIO/CEC/ARC/eARC connections
OLDER AVR/SINK
OUTPUT
Any 1080p HDR or SDR only
capable equipment can be
connected to this output and get
full HDMI sound and video.
Make sure the EDID presented by
Diva to the sources at inputs
reflects its audio capabilities.
FRONT
BACK
eARC LINK
Diva can extract up to Atmos HBR
over TrueHD from capable eARC TV
connected at TX0 and output it via
AUDIO OUT to feed any AVR input
capable of decoding such format.
HDMI AUDIO
OUTPUT
Self-generated 720p/1080p
video signal that can include
full audio from:
Any source devices at Diva
inputs, eARC or ARC from TX0.
SPDIF or L/R
Analog OUT
Extract HDMI sound
coming from any source
devices at Diva inputs.
SPDIF can also output ARC
from TX0.
No Audio format manipulation.
Diva cannot manipulate Audio and otherwise transform Audio format, what comes IN goes OUT untouched.
Therefor if you plan to extract STEREO, incoming signal from HDMI source at Diva inputs should be STEREO.
If incoming signal from HDMI inputs are superior to STEREO (ex ATMOS) then STEREO output cannot be used.
CEC Master is always TX0

Disclaimer: 3rd party and/or custom firmware providing extra features are not covered in this manual.
14
4K Diva –User Manual
Help on Ledstrip Installation
Always disconnect your TV from power supply during installation.
Make sure your TV backpanel is clean from any dust.
Start LEDstrip install at the bottom right of TV back panel and go up.
Make sure each segment of the LEDstrip is perfectly centered with the display side where it is applied.
Using the supplied Y cable, connect Power, Diva and LEDstrip all together.
Now simply turn ON any sources at Diva inputs and enjoy!
1. Connect to supplied 5V 4A Power adapter
2. Connect to Diva LED control input.
3. Connect to LEDstrip USB previously installed.
Note: You can extend USB power or LEDstrip connection
using standard USB cord & Diva LED Control can be
extended using any earphone 2.5mm jack extender
To calibrate and adjust your LEDstrip settings after
installation, please refer to LEDstrip section of the web
server.
If you need more help, you can refer to the below video:
LEDstrip Install Video on YouTube
Ambient Light works using TX1 ONLY.
In order to provide responsive Led Lighting to a display
connected at TX0 output, the active input going to TX0
must also be routed to TX1 (1 in replicated to 2 out)

Disclaimer: 3rd party and/or custom firmware providing extra features are not covered in this manual.
15
4K Diva –User Manual
Help on LAG Tester installation
1. Connect LAG tester to IR Sensor input (p.12)
2. Enable LAG test mode via webserver
3. Stick the LAG tester on the video boxed area.
START THE TEST AND WAIT OSD RESULTS
Note: LAG Tester cable can be extended using any
earphone 2.5mm jack extender
You can choose 3 different on screen locations to place
the LAG tester sensor and perform measurements.
Results are accurate up to 1 decimal.
If you need more help, you can refer to the below video:
Diva LAG Test Video on YouTube
LAG TEST works using TX1 output ONLY.
In order to test a display input lag for 4K HDR signal, you need to connect TX1 output back to a Diva input and route that Input to TX0
Diva scaling parameters should be set to default [Webserver > Scaling > AUTOSCALING Enabled].
AUTOSCALING Presets should be set to default one as well [AUTOSENSE selected and UPSCALING Enabled].
HDR > SDR Conversion for TX0 output should be disabled. [Webserver > Tools > Profile 0-OFF]

Disclaimer: 3rd party and/or custom firmware providing extra features are not covered in this manual.
16
4K Diva –User Manual
Diva OLED Menu
ANALOG TREBLE
0 [-10/+10]
ANALOG BASS
0 [-10/+10]
ANALOG VOLUME
0 [-30/+10]
DHCP
ON OFF
BAUD RATE
1-19200 2-57600 3-115200 4-9600
ARC HBR
ON OFF
CEC LA
0-VIDEO [0x0E] 1-AUDIO [0x05]
CEC
ON OFF
HDCP
AUTO 1.4
MUTE TX1 AUDIO
ON OFF
MUTE TX0 AUDIO
ON OFF
SCALE MODE
NONE AUTO CUSTOM
EDID ALGO
4-MAX ALL 0-NORMAL 1-MAX AUDIO PRIO TX0 PRIO TX1
EDID TABLE
EDID 0 EDID 1 EDID 2 EDID 3
EDID MODE
CUSTOM COPY TX1 COPY TX0 AUTOMIX FIXED
AUTOSWITCH PRIORITY
YES NO
AUTOSWITCH
YES NO
Press MENU once to enter
Diva OLED Menu.
Once you are in Diva OLED
Menu press the same menu
to TOGGLE choice
Once you are in the Diva
OLED Menu. Press the UP
button to navigate upward.
Once you are in the Diva OLED
Menu. Press DOWN button to
navigate downward
To EXIT the Diva OLED Menu.
Press EXIT button or let menu
idle for a while and it will EXIT
automatically.

Disclaimer: 3rd party and/or custom firmware providing extra features are not covered in this manual.
17
4K Diva –User Manual
[Autoswitch] : ON/OFF
[Autoswitch Priority]: ON/OFF
[EDID Mode]: Custom / Copy TX1/Copy TX0/Automix/Fixed
[EDID TABLE]: EDID 0/EDID 1/EDID 2/EDID 3
[EDID Algo]: 4-Max All / 0-Normal / 1-Max Audio / Prio TX0 / Prio TX1
[SCALE Mode]: None / Auto / Custom
[Mute TX0 Audio ]: ON / OFF
[Mute TX1 Audio]: ON / OFF
[HDCP]: AUTO / 1.4
[CEC]: ON / OFF
[CEC LA]: 0-Video [0x0E] / 1-Audio [0x05]
[ARC HBR]: ON/OFF
[Baud Rate]: 1-19200 / 2-57600 / 3-115200 / 0-9600
[DHCP] : ON/OFF
[Analog Volume] : 0 [-30 / +10]
[Analog Bass]: 0 [-10 / +10]
[Analog Treble]: 0 [-10 / +10]

Disclaimer: 3rd party and/or custom firmware providing extra features are not covered in this manual.
18
4K Diva –User Manual
Accessing Diva Web Server
It is mandatory for accessing Diva web server to have an Ethernet cable connected between LAN
CONTROL RJ45 connector and your local router or switcher.
By default Diva use DHCP to retrieve an assigned IP automatically. You can set static IP from the Diva
webserver config page.
In case you have setup a wrong Static IP and unit is not reachable anymore, you can set DHCP ON from
OLED menu to retrieve access via dynamically assigned IP again (as in default mode).
There is 3 ways of accessing the Diva web server:
1. Universal way through IP address:
Simply open up a web browser on any devices located on the same network than the Diva unit
and type in the IP address that appears on the Diva OLED directly in the address bar of your web
browser. (ex: 192.168.1.137)
2. Hostname access:
Instead of typing IP address directly, you can use the Hostname listed on Diva OLED LAN INFO
page (press INFO button to cycle OLED page till you see LAN INFO and Hostname listed).
Simply open up a web browser from any devices located on the same network than the Diva
unit and type in the Hostname that appears on the Diva OLED directly in the address bar of your
web browser. (ex: http://DIVA-XX/)
XX represents the 2 last digits of your Diva unit unique serial number.
3. mDNS access:
For iOS/MAC devices, you might want to use mDNS access. Retrieve the mDNS address from
Diva OLED LAN INFO page (press INFO button to cycle OLED page till you see LAN INFO and
mDNS address listed). Simply open up a web browser on any MAC/iOS devices located on the
same network than the Diva unit and type in the mDNS address that appears on the Diva OLED
directly in the address bar of your web browser. (ex: http://DIVA-XX.local/)
XX represents the 2 lasts digits of your Diva X unit unique serial number.
Please note that only IP address access is universal and should work across any web browser based
devices as long as they are located on the same network. Others methods should work just fine in many
cases but we cannot guarantee that they will always do, in case of issue accessing the webserver, please
use IP address.
Disclaimer: 3rd party and/or custom firmware providing extra features are not covered in this manual.
19
4K Diva –User Manual
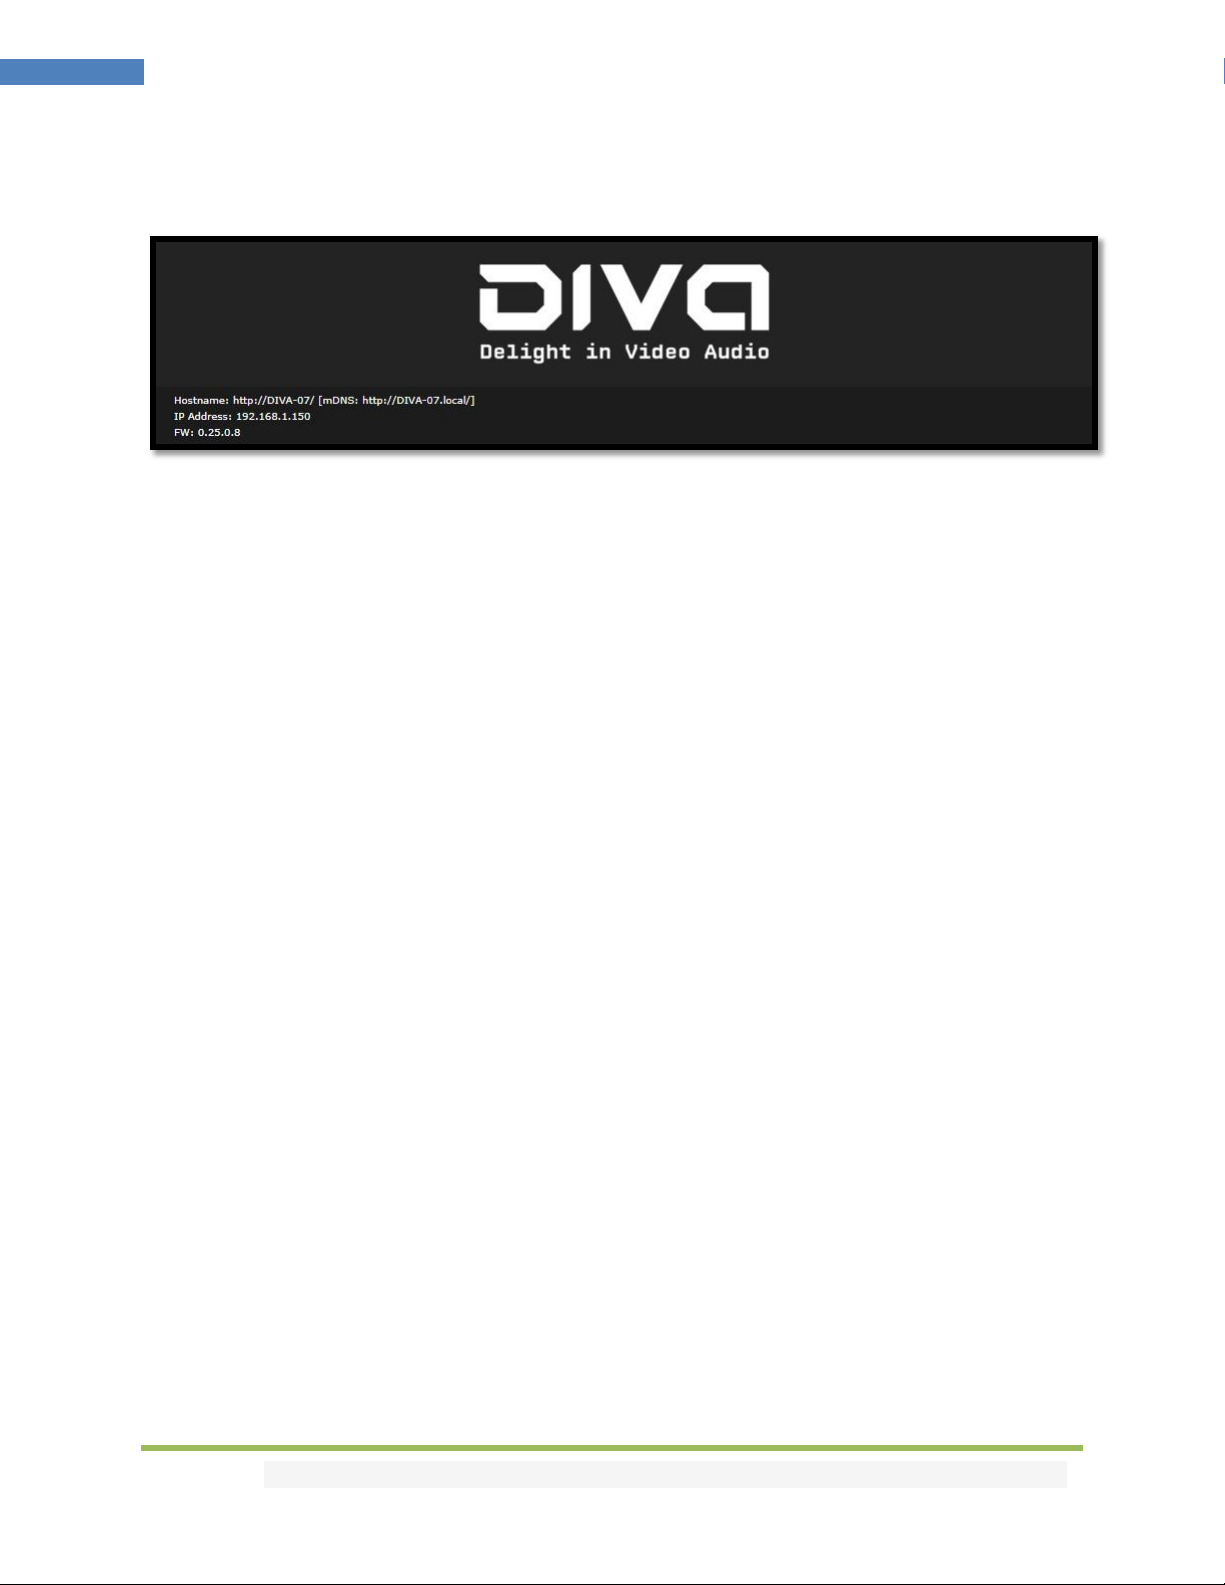
Diva Web Server Top section
Immediately upon accessing the webserver you will end up on the default INFO page with the above top
tier section displayed.
From that top tier section you will be able to retrieve the following information (also displayed on Diva
OLED default page and once you cycle info page with INFO button to reach LAN page info).
Hostname: Display Diva hostname for URL access
mDNS: Display Diva mDNS for URL access
IP Address: Display the current IP Address of the Diva
FW: Display the current FW running on the Diva. (ex MCU: 0.25 FPGA: 0.8)
Disclaimer: 3rd party and/or custom firmware providing extra features are not covered in this manual.
20
4K Diva –User Manual
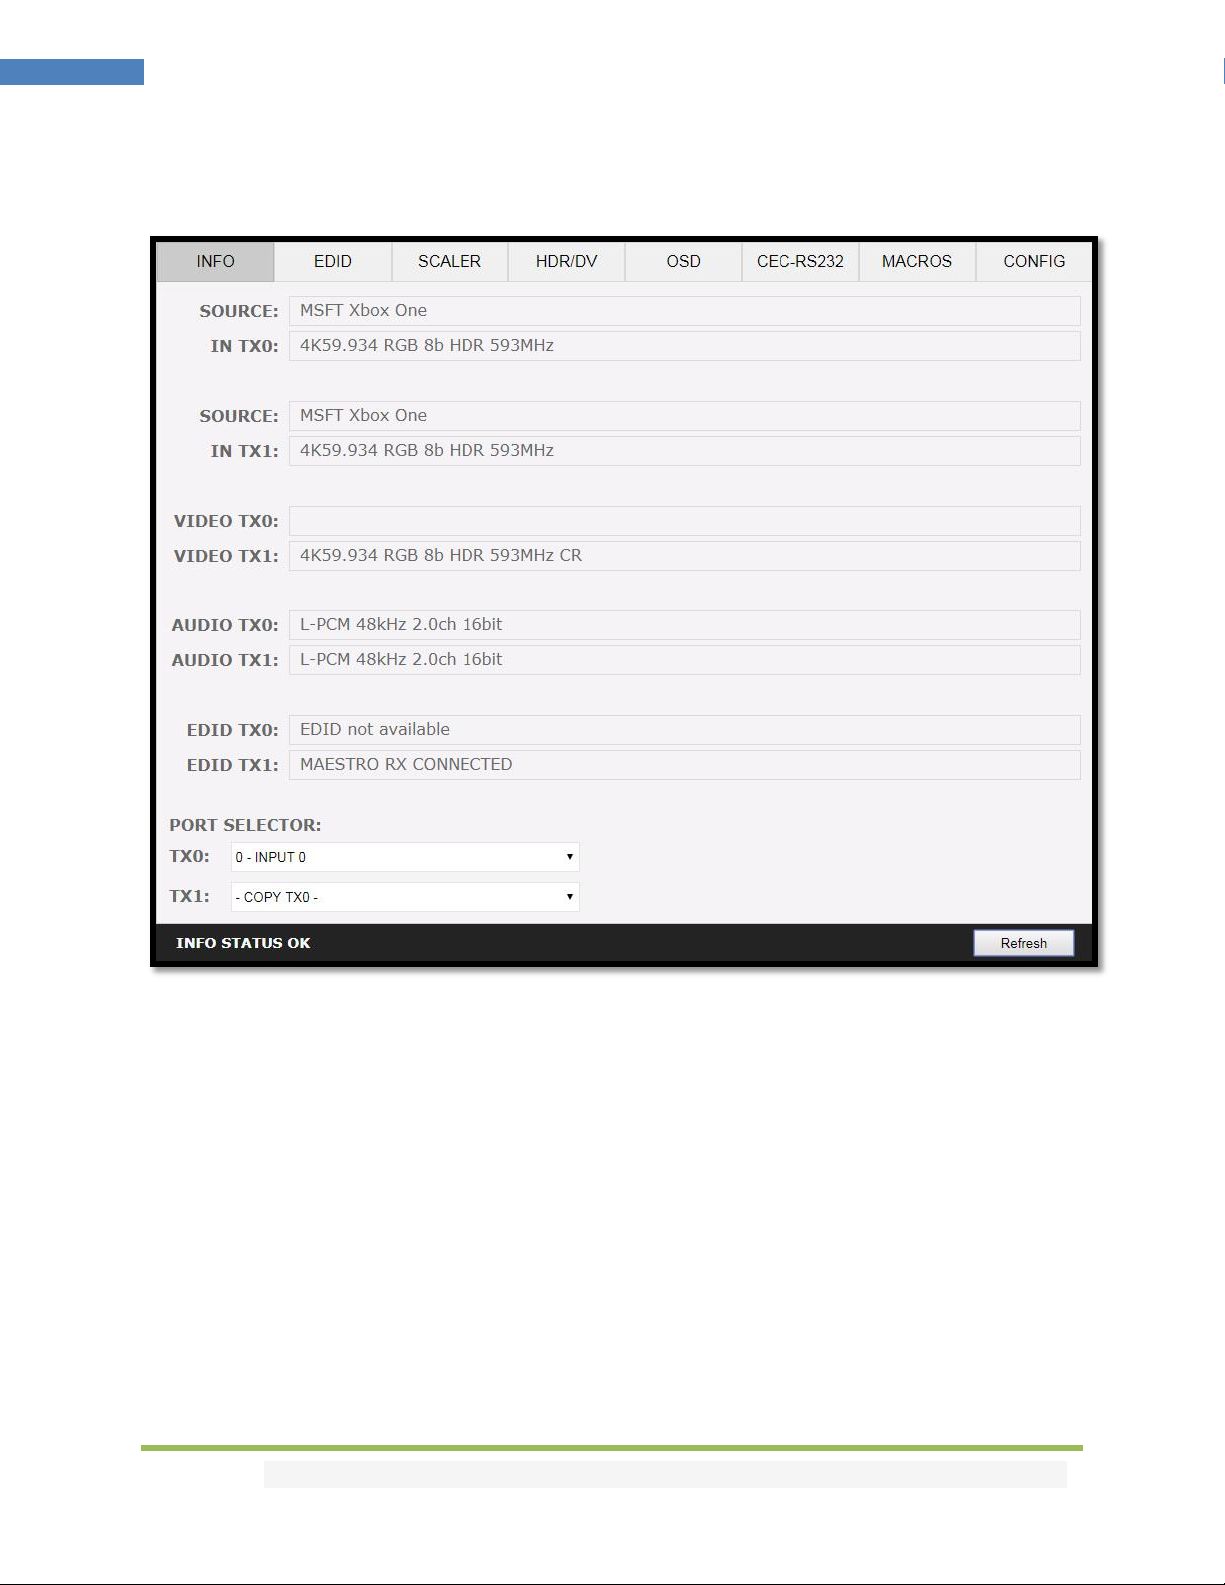
Diva Web Server INFO Section
SOURCE: When available, Display active source name currently outputting thru TX0 or TX1 output.
IN TX0/IN TX1: Display the source name original video signal going thru TX0 or TX1 output.
VIDEO TX0/TX1: Display the real video signal (if any operation on it) going out thru TX0 or TX1 output.
AUDIO TX0/TX1: Display the audio signal info going out thru TX0 or TX1 output.
EDID TX0/TX1: Display the EDID max capabilities of any connected sink at TX0 or TX1 output.
PORT SELECTOR: Allow you to select which input is routed to TX0 or TX1 output.
REFRESH: Refresh the current page.
Other manuals for 4K Diva 18Gbps
1
Table of contents
Other HDFury Media Converter manuals


Popular Media Converter manuals by other brands

Cabletech
Cabletech ZLA0857-3 owner's manual

Omnitron Systems
Omnitron Systems OmniConverter GPoE/SE user manual

SRS Light Design
SRS Light Design DST8-DIN Series instruction manual

ThinkRF
ThinkRF D2030 Programmer's guide

Transition Networks
Transition Networks SPOEB10 105 Series user guide

Actox
Actox ABE25X user manual


Dedicated Micros
Dedicated Micros DV-IP Decoder Setup guide

Cypress
Cypress DCT-9 Operation manual

Plextor
Plextor Convertx PX-M402U Installation and user manual

North Star
North Star Essentio operating manual

Korenix
Korenix JetCon 2301 V2 Series Quick installation guide

Lika
Lika Posicontrol IF55 LIN CB Series Mounting instructions