manuals.online logo
Brands
  1. Home
  2. •
  3. Brands
  4. •
  5. Healthcraft
  6. •
  7. Mobility Aid
  8. •
  9. Healthcraft Advantage-Rail AR-PT User manual

Healthcraft Advantage-Rail AR-PT User manual

HealthCraft Products Inc. 2790 Fenton Rd., Ottawa, Ontario, Canada, K1T 3T7
Copyright 2000, Specifications subject to change without notice.
INSTALLATION
INSTRUCTIONS
Model AR-PT
The
TM
Advantage-Rail
Read & understand these instructions prior to using
product. It is your responsibility to see that your
Advantage-Rail is properly assembled, installed,
operated, and cared for. Failure to follow these
instructions could result in injury.
The Advantage-Rail should only be installed in areas
where the floor is structurally sound. If you are not
equipped to undertake the outlined work we recommend
that you have your Advantage-Rail installed by a
qualified contractor. Floor plate(s) must be secured to
floor with fasteners appropriate to the floor material -
fasteners must be rated for at least 400lbs/188kg
retention force each (see within for recommendations).
Floor mount fasteners should be inspected monthly and
tightened if necessary. Maximum suggested user
weight of 250 lbs/113kg for steel handle model (AR-PT)
and 160 lbs/75kg for optional aluminum (lightweight)
handle (Model AR-PTA)
TM
TM
TM
CAUTION
RISK OF INJURY!
!
PORTABLE
We strongly recommend that you give thought as to the optimal
location of your Advantage-Rail before installation. HINT -
pre-assemble the Advantage-Rail without installing the
locking pin so that different rail heights and locations may be
tested. Next install the locking pin at the desired height to
determine the locking positions. In addition, the following
questions may help you to decide upon a location:
a. What motions will you be going through? (pulling up to
standing, lowering to sitting, transferring from chair to toilet,
etc.)
b. What is the most comfortable horizontal rail height for you -
30”, 32”, 34”, 36” or 38" ( 75, 80, 85, 90 or 95 cm?)
c. What is your strongest side/hand?
d. What is your complete transfer path? Will the location allow
for full support over most of your path of motion?
e. Will the rail be far enough away to allow you to stand
comfortably?
f. Does the Advantage-Rail line up with an appropriate
location of the floor in the proposed location (i.e. on floor joist,
on tile grout joint, etc)
g. Given a choice, is there a location that the floor plate would
be in a lower traffic area?
TM
TM
TM
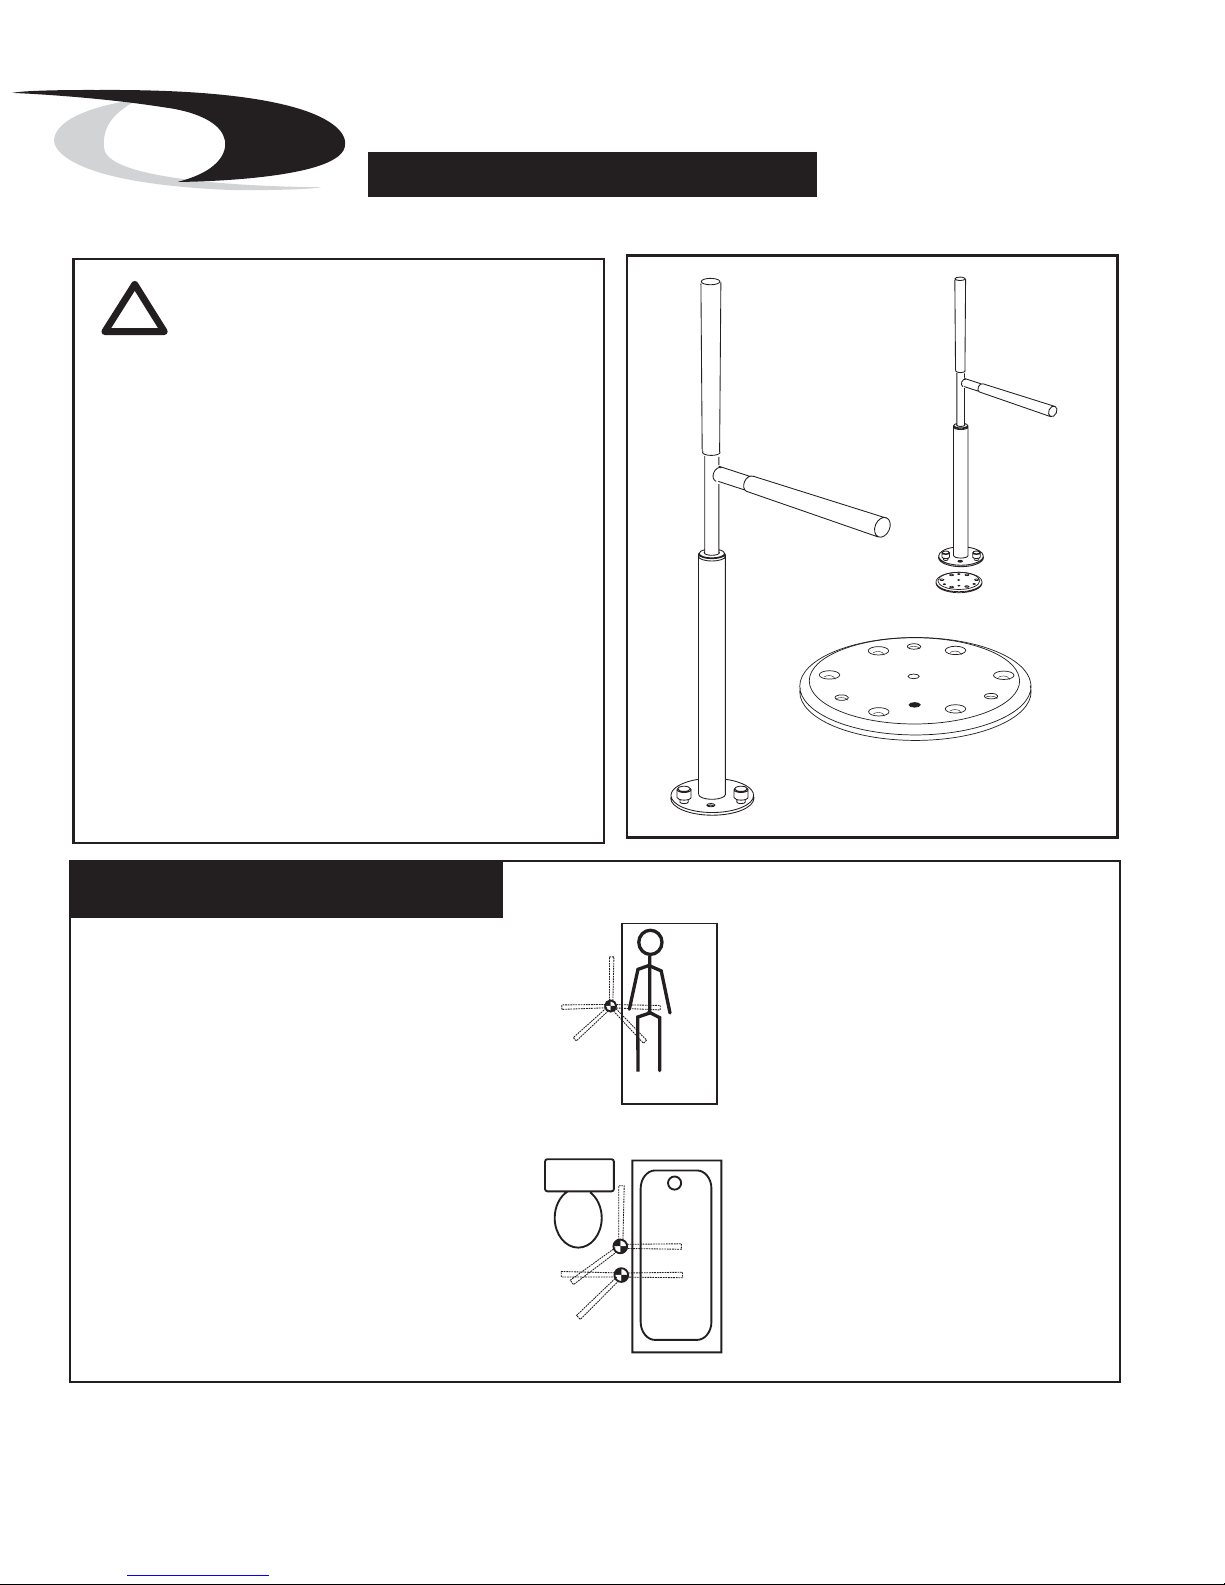
Locate unit adjacent to hip/belt line and as close
to bed as possible while allowing clearance for
bed coverings. Note that the orientation of the
floor plate will set the pivot locking positions of
the bar. As a suggestion, positions A and E are
good for moving in bed, B for pulling up to sitting,
C for pulling up to standing and D for transferring
out of bed.
Toilet
Bathtub
only
- suggested to locate unit between three to
ten inches forward of the knees and two to six
inches to side of knees when seated.
- locate base against tub, approximately half
way along its length. Note that the orientation of
the floorplate will set the pivot locking positions of
the bar. As a suggestion, positions B or D are
suitable for standing from toilet, C and F for
transferring into bathtub, E and D for transferring
out of bathtub.
Bed
Location Suggestions...
B
D
AC
F
E
A
B
C
E
D
Bathtub and/or Toilet
Installation NotesInstallation Notes
Advantage Rail
Portable Model
“Installs and
removes in
seconds”
Floor Plate
“Innovative Products for Independent Living”
ealth
H
TM
Craft
IMPORTANT - Fasteners used for securing the floor plate(s) to the floor require an installed retention force rating of at least 400 lbs / 188 kg
each and must be “flat head” (countersunk) type.
For installation on concrete floors, a 1/4” self tapping fastener with flat (countersunk) head is recommended (sugg. ITW TAPCON /
UCAN SCRU-IT ). Follow manufacturers recommendations for proper installation and ensure that the concrete is in suitable condition. For
wood deck type floors, a bolt/nut/washers combination is recommended with 1/4” diameter, min. grade 5 flat (countersunk) type bolt. If a
wood floor support beam is present, you may install a 1/4” diameter wood screw in those hole locations over the beam, ensuring at least a
3"/7cm thread engagement, and suitable condition of the wood beam to provide a retention force of at least 400 lbs (188kg)
TM TM
TM TM
Screw heads should be firmly installed so as not to protrude above the top surface of the floor
plate.
Installation Notes
Floor Fasteners
concrete sleeve
anchor
(min 5/16" dia)
Self tapping
concrete screw
1/4” dia
hole drilled for
sleeve anchor
hole drilled for
sleeve anchor
Floor plate
Floor plate
3"/7 cm
minimum
thread
engagement
wood
floor
deck
support
beam
Drill tight pilot
hole for secure
thread
engagement Split lock washer
(qty 2)
hex lock nut
Flat head bolt
1/4” or 5/16”
(min grade 5)
Flat head
wood screw
min 1/4” dia
washer (USS style)
wood
floor
deck
Concrete Floor
Installation
Floor Drilling Guide
Drill hole for fastener
Alignment mark also indicates
bar locking position
Use floor plate as drilling guide
to ensure hole location accuracy
Ensure that heads of fasteners do not
protrude above floor plate top surface
Option: drill 1/2” dia by 1/2” deep
hole for debris accumulation
wood floor deck
support
beam
Wood Deck Floor
Installation
Option A
Wood Screw
over support
beam
Option A
Self tapping
concrete
screw
Option B
flat head
expansion type
concrete
anchor
Option B
Bolt/nut/washers
over wood
deck floor
B
A
Fastener Recommendations & Installation Notes
BPre-assemble & insert rail & secure pivot bushing
re-install screw to
retain pivot bushing
using hex key
Each pin hole
coresponds to a
specific horizontal
rail height
Slide white pivot
bushing and plastic
sleeve up rail
Slide plastic sleeve up rail until
clearance hole aligns with
desired pin-hole in rail - tap
pin through pin hole with
hammer leaving an
amount of the pin on either
side of tube.
equal
5
4
5
30"/75cm
32"/80cm
34"/85cm
36"/90cm
38"/95cm
7
68
10
CAUTION
RISK OF INJURY!
!
** First read
complete
instructions for
ideas on locating
rail, installing
floor plate,
fasteners to use,
and caution
notes.
Uninstall pivot bushing by
removing screw with hex key
A
Prepare mast unit for assembly
2
3
1
insert rail
assembly
into mast
8
9
Assembly of Advantage Rail Portable Unit
Sight in alignment mark & secure to floor plate Operating Rail
Mating Surfaces Detail
Placing Portable Advantage Rail on floor plate
CAUTION
RISK OF INJURY!
!
!
IMPORTANT - Ensure
that fastener knobs
are tightly installed
and remain tightly
fastened during use.
Inspect frequently to
ensure knobs are tight
while in use.
Rotate unit until
alignment mark appears
in middle of sight hole
Push down, and turn
each knob clockwise
aproximately four
times until tight
Alignment pin
“snaps” into
center hole of
floor plate
Knobs push
down to engage
in threaded
holes to secure
mast to floor
Place assembled Advantage Rail
Portable on top of the floor plate
such that it is approximately
centered on the floor plate
Inspect threaded holes in
plate to ensure they are
clear of debris
Lift rail 1/4” to unlock,
keep up to rotate
freely, lower at any
time to lock
Move the Advantage Rail Portable
side to side until you hear the
alignment pin “click” into the center
hole of the floor plate, or until the rail
will not move side to side any more
Sight hole helps to
locate knobs
directly over
threaded holes in
floor plate
floor plate alignment mark
Advantage Rail Portable
(Bottom of mast)
2
3
3
1
1
5
4
2
“CLICK”
Installing & Operating Rail

This manual suits for next models

1

Other Healthcraft Mobility Aid manuals

Healthcraft SuperPole F.R.S. Series User manual

Healthcraft

Healthcraft SuperPole F.R.S. Series User manual

Healthcraft SuperPole FRS Series User manual

Healthcraft

Healthcraft SuperPole FRS Series User manual

Healthcraft Advantage-Rail series User manual

Healthcraft

Healthcraft Advantage-Rail series User manual

Healthcraft Dependa-Bar DB-18 User manual

Healthcraft

Healthcraft Dependa-Bar DB-18 User manual

Healthcraft Assista-Rail Series User manual

Healthcraft

Healthcraft Assista-Rail Series User manual

Healthcraft Advantage Rail AR-T User manual

Healthcraft

Healthcraft Advantage Rail AR-T User manual

Healthcraft Advantage Rail Portable AR-PT User manual

Healthcraft

Healthcraft Advantage Rail Portable AR-PT User manual

Popular Mobility Aid manuals by other brands

B+B Capero instruction manual

B+B

B+B Capero instruction manual

Invacare OCMK01 Assembly, installation and operating instructions

Invacare

Invacare OCMK01 Assembly, installation and operating instructions

SALJOL AR62 instruction manual

SALJOL

SALJOL AR62 instruction manual

Pressalit Care keep living R8112 Mounting instruction

Pressalit Care

Pressalit Care keep living R8112 Mounting instruction

Vermeiren Magda instruction manual

Vermeiren

Vermeiren Magda instruction manual

NRS Healthcare M29495 User instructions

NRS Healthcare

NRS Healthcare M29495 User instructions

Alber scalamobil S35 user manual

Alber

Alber scalamobil S35 user manual

NRS Healthcare L71134 User instructions

NRS Healthcare

NRS Healthcare L71134 User instructions

Eurovema Euroflex miniflex ABC manual

Eurovema

Eurovema Euroflex miniflex ABC manual

Sunrise Medical Quickie Smart Seat User instruction manual

Sunrise Medical

Sunrise Medical Quickie Smart Seat User instruction manual

Invacare Discontinued 1/00 parts catalog

Invacare

Invacare Discontinued 1/00 parts catalog

Otto Bock Xeno Instructions for use

Otto Bock

Otto Bock Xeno Instructions for use

Nova MOBILITY STAR8 DX WIDE quick start guide

Nova

Nova MOBILITY STAR8 DX WIDE quick start guide

zopa B-4500 manual

zopa

zopa B-4500 manual

Liberty Hardware Decorative Series Installation, Operating and Care Instructions

Liberty Hardware

Liberty Hardware Decorative Series Installation, Operating and Care Instructions

FREERIDER COMPANION User instruction manual

FREERIDER

FREERIDER COMPANION User instruction manual

Medline GUARDIAN G1-506DWX1 user guide

Medline

Medline GUARDIAN G1-506DWX1 user guide

ADAPT SOLUTIONS XL-SEAT installation manual

ADAPT SOLUTIONS

ADAPT SOLUTIONS XL-SEAT installation manual

manuals.online logo
manuals.online logoBrands
  • About & Mission
  • Contact us
  • Privacy Policy
  • Terms and Conditions

Copyright 2025 Manuals.Online. All Rights Reserved.