manuals.online logo
Brands
  1. Home
  2. •
  3. Brands
  4. •
  5. Drive
  6. •
  7. Mobility Aid
  8. •
  9. Drive Diamond Deluxe User manual

Drive Diamond Deluxe User manual

Gebrauchsanweisung
Operating instructions
Manuel d’utilisation
Gebruiksaanwijzing
Rollator „Diamond Deluxe“
mit abnehm - und schwenkbaren Fußstützen, Stockhalter
with removable and swivelling footrests, cane holder
avec repose-pieds amovibles et pivotants, porte-canne
met afneembare en zwenkbare voetsteunen, stokhouder
Art.Nr. / REF 745R
2
Teile des Rollator
– Parts of walking device
Parties du rollator – Onderdelen van de rollator
1 Schiebegriff höhenverstellbar– Adjustable tube of handgrips
Poignée réglable en hauteur – In hoogte verstelbare handgreep
2 Bremse – Brake - Frein – Rem
3 Rückenstütze – Backrest - Dossier – Rugleuning
4 Sitz – Seat - Siège – Zitting
5 Hinterrad – Rear wheel - Roue arrière – Achterwiel
6 Vorderrad – Front wheel - Roue avant – Voorwiel
7 Tasche – Bag - Sacoche – Tas
8 Fußstütze – Footrest - Repose-pied – Voetsteun
9 Sicherungsschraube für Hinterrad – Safety screw Footrest
Vis de sécurité pour la roue arrière – Borgschroef t.b.v. achterwiel
10 Stockhalter – Cane holder - Porte-canne – Stokhouder
1
3
8
9
4
5
7
2
10
6
3
Indikation – Indication - Indications – Indicatie
Gehhilfe für den Innen- und Außenbereich
zum Ausgleich bzw. zur Verbesserung
eingeschränkter Gehleistung. Kann durch die
abnehm- und schwenkbaren Fußstützen auch
als Transportstuhl verwendet werden
Déambulateur pour l’intérieur et l’extérieur
pour compenser ou améliorer un handicap de
déplacement. Grâce aux repose-pieds
amovibles et pivotants, il peut aussi être
utilisé comme fauteuil de transport.
Walking device for indoor and outdoor use for
compensation and improvement respectively
of restricted ability of walking. Can be used
also as a transport chair because of the
removable and swivelling footrests.
Loophulpmiddel voor binnen en buiten ter
compensatie of verbetering van beperkingen
bij het lopen. Kan dankzij de afneem- en
zwenkbare voetsteunen ook gebruikt worden
als transportstoel
Wiedereinsatz – Reapplication - Usage multiple – Hergebruik
Dieses Produkt ist für den Wiedereinsatz
geeignet.
Bei der Aufbereitung sind die Vorgaben des
Herstellers zu beachten und werden auf
Anfrage zur Verfügung gestellt.
Ce produit est adapté à un usage multiple.
Il faudra, lors de sa préparation, tenir compte
des prescriptions du fabricant. Ces dernières
seront fournies sur demande et mises à
disposition.
This product is suitable for the reapplication.
With the processing the standards of
the manufacturer must be considered.
This standards are made available on inquiry.
Dit product is geschikt voor hergebruik.
Bij de verwerking dient de informatie van de
producent in acht te worden genomen. Deze
informatie wordt op verzoek ter beschikking
gesteld.
4
Montage –Assembly - Montage – Montage
Legen Sie die Einzelteile wie in Bild 1 gezeigt bereit. Führen Sie die Hinterräder in die
Aufnahmerohre ein (Bild 2) und sichern Sie sie mit den Sicherungsschrauben (Bild 3).
Die Vorderräder werden kraftvoll in die Aufnahmen eingedrückt bis sie einrasten (Bild 4).
Zum Lösen des Rades, den roten Knopf drücken und Rad herausziehen (Bild 5)
Prepare the individual parts as shown in picture 1. Insert the back wheels in the admission
pipes (picture 2) and protect them with the protection screws (picture 3). The front wheels
must be pushed powerfully in the admissions (picture 4). To reassemble press the red button
and pull the wheel out (picture 5).
Préparer les pièces comme montré sur l’illustration 1. Insérer les roues arrière dans les tubes
prévus à cet effet (illustration 2) et les fixer à l’aide des vis de sécurité (illustration 3).
Les roues avant doivent être emboîtées avec force jusqu’à enclenchement dans les
encoches prévues à cet effet (illustration 4). Pour débloquer une roue, presser le bouton
rouge et la retirer (illustration 5).
Leg de onderdelen klaar zoals op afbeelding 1. Schuif de achterwielen in de buisopeningen
(afbeelding 2) en borg deze met behulp van de borgschroeven (afbeelding 3). De voorwielen
worden stevig in de openingen gedrukt totdat ze vastklikken (afbeelding 4). Om het wiel te
demonteren drukt u op de rode knop en trekt u het wiel eruit (afbeelding 5).
1
2
3
4
5
5
Stellen Sie nun den Rollator (Bild 6) auf die Räder (Bild 7) und drücken Sie von oben seitlich
auf die Sitzfläche bis diese hör- und spürbar einrastet (Bild 8). Zur Höheneinstellung der
Griffe drücken sie beide Clips und verschieben das Führungsrohr in die gewünschte
Stellung (Bild 9).
Die Fußstützen so einhängen, dass sie in beiden Bolzen einrastet (Bild 10, 11). Zum
Wegschwenken die Arretierung wie in Bild 12 gezeigt lösen.
Wenn Sie die Fußstützen nicht benutzen, hängen Sie diese wie in Bild 13 gezeigt so ein,
dass alle 3 Bolzen eingerastet sind, die Fußstützen sind dann fest am Rollator arretiert.
(Bild 14)
6
7
8
9
10
11
1
2
1
3
1
4
6
Put now the Rollator (picture 6) on the wheels (picture 7) and press from above at the side of
the seat until it locks audible and perceptibly (picture 8). For height adjustment of the
handgrips press both clips and shift the leadership pipe in the desired position (picture 9).
Hang up the footrests in such a way that it engages in both bolts (picture 10, 11).
For swing away the footrests unlock the interlock as shown in picture 12. If you do not use
the footrests, hang up this as shown in picture 13 in such a way that all 3 bolts have
engaged, then the footrests are firmly arrested at the Rollator (picture 14)
Ensuite, poser le rollator (illustration 6) sur ses roues (illustration 7) et appuyer sur les côtés
du siège jusqu’à ce que l’enclenchement soit perceptible (illustration 8). Pour régler la
hauteur des poignées, appuyer sur les deux clips et placer le tube conducteur dans la
position souhaitée (illustration 9).
Insérer les repose-pieds de façon à ce qu’ils s’enclenchent dans les deux chevilles
(illustrations 10, 11). Pour les faire pivoter, tirer le dispositif d’arrêt comme montré sur
l’illustration 12.
En cas de non utilisation des repose-pieds, les insérer comme montré sur l’illustration 13 de
façon à ce que les 3 chevilles s’enclenchent. Ainsi, les repose-pieds sont bloqués contre le
rollator (illustration 14).
Zet nu de rollator (afbeelding 6) op de wielen (afbeelding 7) en druk van boven op de
zijkanten van de zitting tot deze hoorbaar en voelbaar vastklikt (afbeelding 8). Om de hoogte
van de handgrepen in te stellen drukt u beide clips in en schuift u de geleidingsbuis in de
gewenste positie (afbeelding 9).
Plaats de voetsteunen zodanig dat deze in beide bouten vastklikken (afbeelding 10, 11). Om
de voetsteunen weg te zwenken, ontgrendelt u de vergrendeling zoals afgebeeld op
afbeelding 12. Als u de voetsteunen niet gebruikt, plaats deze dan zoals afgebeeld op
afbeelding 13 zodat alle 3 de bouten zijn vastgeklikt. De voetsteunen zitten dan vergrendeld
aan de rollator (afbeelding 14)
Bremsen
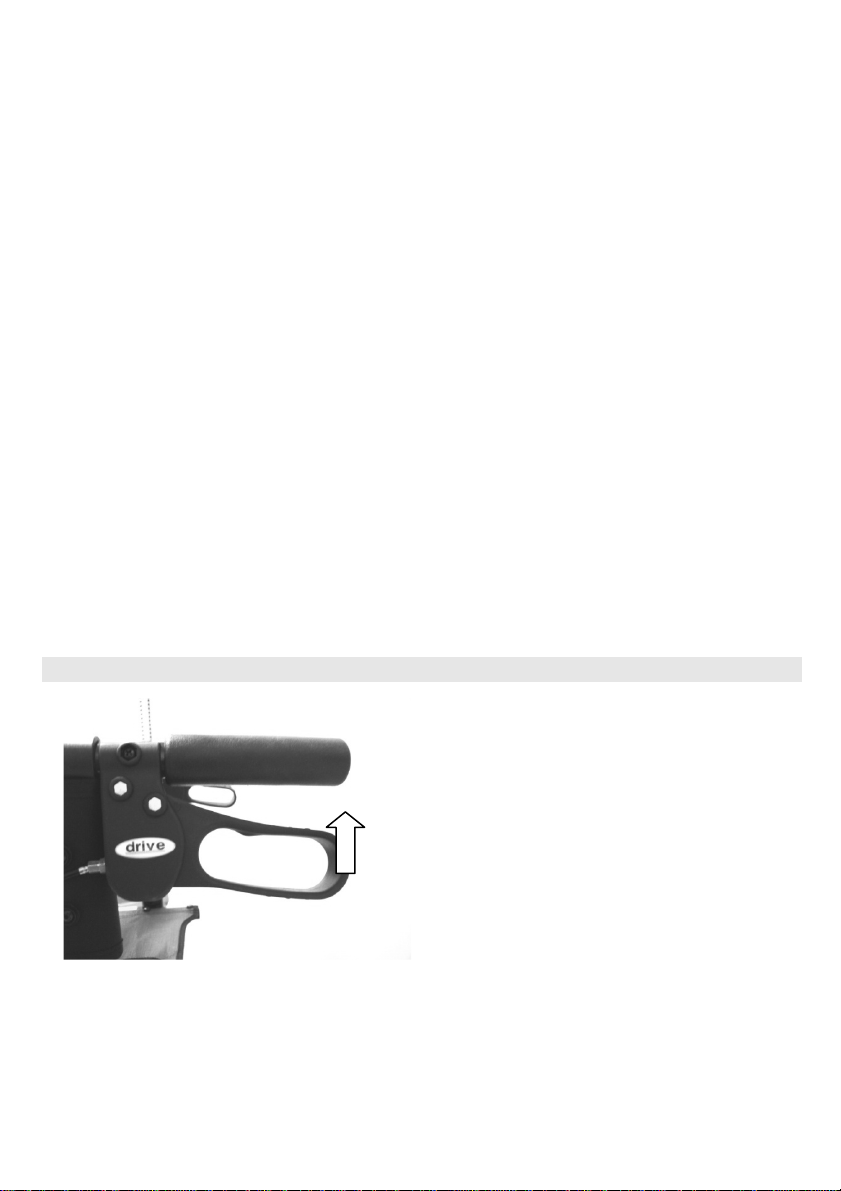
– Braking / Parking - Freins – Remmen / Parkeren
Zum Bremsen während des Gehens mit dem
Rollator beide Bremsgriffe mit den Händen
nach oben ziehen (siehe Bild).
Immer langsam und gleichmäßig mit beiden
Händen bremsen.
For braking the walking device pull both
brakes upwards to the handgrip (see
picture).
Always brake slowly and steady.
Pour freiner pendant un déplacement avec
le rollator, presser les deux freins vers le
haut (voir illustration).
Toujours freiner lentement et régulièrement
des deux mains.
Om tijdens het lopen met de rollator te
remmen trekt u beide remgrepen met de
handen naar boven (zie afbeelding). Rem
altijd langzaam en gelijkmatig met beide
handen.
7
Zum Feststellen/Parken des Rollators beide
Bremsgriffe nach unten drücken bis sie
hörbar einrasten (siehe Bild)!
Zum Entriegeln der Bremse beide
Bremsgriffe wieder nach oben ziehen bis sie
entriegelt sind (Bremsgriffe sind in mittlerer
Position).
For parking the walking device press down
the brakes until they click in the parking
position (see picture). For unlocking the
brakes pull them upwards towards the
handgrips until they are unlocked (both
brakes are in a middle position).
Afin d‘immobiliser/de garer le rollator,
pousser les deux freins vers le bas jusqu’à
ce qu’ils s‘enclenchent de façon perceptible
(voir illustration) !
Pour débloquer les freins, les presser de
nouveau vers le haut jusqu’à ce qu’ils
s’enclenchent (position médiane des freins).
Om de rollator vast te zetten/te parkeren
drukt u beide remgrepen naar beneden
totdat deze hoorbaar vastklikken (zie
afbeelding). Om de remmen te ontgrendelen
trekt u beide remgrepen weer naar boven
totdat deze zijn ontgrendeld (beide remmen
staan in de middelste positie).
Die Bremswirkung kann durch die Abnutzung der Reifen beeinträchtigt werden. Deshalb
Bremswirkung regelmäßig prüfen.
The effect of the brakes can be affected by abrasion of the wheels.
Therefore test regularly the brakes.
L’action des freins peut être influencée en cas d’usure des pneus. Il est donc nécessaire de
contrôler régulièrement les freins.
De werking van de remmen kan worden beïnvloed door het afslijten van de wielen.
Controleer daarom regelmatig of de rollator goed remt.
8
Einstellung Bremse
– Adjustment of brake –
Réglage du frein – Instelling van de rem
Bei schlechter oder zu harter Bremswirkung
kann die Bremse entweder am Brems-
gehäuse oben (Bild 1) oder mit
entsprechendem Werkzeug (nicht im
Lieferumfang) an der Einstellschraube am
Bowdenzug unten (Bild 2) auf
die gewünschte Bremswirkung eingestellt
werden.
For desired braking strength adjust the brake
either manually at the screw on the housing
of the brake (picture 1) or with the suitable
tool (not included) on the brake wire (picture
2).
En cas d’un freinage trop faible ou trop
brusque, le frein peut être réglé à la tension
voulue soit au niveau du boitier en haut
(illustration 1), soit au niveau du contre-écrou
du câble Bowden en bas (illustration 2) à
l’aide d’un outil approprié (non compris dans
la livraison).
Als de rem niet goed of te hard staat
ingesteld kunt u de rem aan de rembehuizing
boven (afbeelding 1) of met behulp van
geschikt gereedschap (niet meegeleverd) aan
de instelschroef aan de Bowdenkabel onder
(afbeelding 2) op de gewenste remwerking
instellen.
2
1
9
Zusammenfalten/
Transp
ort/
Verstauen
–
Folding/Transport/Storage –
Pliage/Transport/Rangement –
Samenvouwen/Transport/Opslag
Um den Rollator zusammen zu falten, Sitz am Rollator nach oben ziehen und Rollator seitlich
zusammendrücken!
For folding pull the handle at the seat upwards and fold the rollator sidewise
Pour plier le rollator, tirer le siège vers le haut et faire pression des deux côtés !
Om de rollator samen te vouwen trekt u de handgreep aan de zitting naar boven en drukt u
de rollator aan de zijkanten samen.
Sicherheitshinweise
– Safety instructions-
Instructions de sécurité – Veiligheidsinstructies
Zum Aufstehen stets Fußstützen
wegschwenken, diese nie als Aufstehhilfe
verwenden – Sturzgefahr !
Pour se lever, ne jamais se servir des
repose-pieds, les faire pivoter avant – sinon
risque de chute !
Never use the footrest as device to stand up,
swing them away before - Danger of falling !
Gebruik de voetsteunen nooit als hulpmiddel
om op te staan, maar zwenk deze eerst weg -
risico op vallen!
Reinigung/Wartung –Cleaning/Maintenance –
Nettoyage/Maintenance –Reiniging/Onderhoud
Von Hand mit einem feuchten Tuch
regelmäßig reinigen!
Keine aggressiven Reinigungsmittel
verwenden!
Schrauben am Rollator regelmäßig
kontrollieren und gegebenenfalls nachziehen!
Clean regularly by hand with a damp cloth!
Do not use any aggressive detergents!
Screws of walking device must be checked
regularly and if necessary retightened.
10
Nettoyer régulièrement à l’aide d’un chiffon
humide !
Ne pas utiliser de détergents agressifs !
Contrôler régulièrement les vis du rollator et
les resserrer en cas de besoin !
Regelmatig met de hand met een vochtige
doek reinigen!
Gebruik geen agressieve reinigingsmiddelen!
Controleer regelmatig de schroeven aan de
rollator en draai deze indien nodig aan!
Technische Daten – Technical Data –
Données techniques – Technische gegevens
Maße – dimensions - Dimensions – afmetingen
Länge gesamt (m.Fußstützen) –length over all (with footrests)
Longueur totale (avec les repose-pieds) -totale lengte (met
voetsteunen)
740 mm (1042 mm)
Breite gesamt – width over all
Largeur totale – totale breedte 640 mm
Breite zwischen Hinterrädern – width between the rear wheels
Largeur entre les roues arrière – breedte tussen achterwielen
460 mm
Breite zwischen Handgriffen – width between handgrips
Largeur entre les poignées – breedte tussen handgrepen
475 mm
Schiebegriffe 8-fach verstellbar - Adjustment of handgrips in 8
steps
Poignées réglables 8 positions - Handgrepen 8-staps instelbaar 770 – 945 mm
Sitzhöhe – seat height – Hauteur du siège – hoogte zitting
540 mm
Sitzplatte L/B – dimensions seat L/W - Siège L/l – afmetingen
zitting l/b 190/ 4000 mm
Gewicht – weight - Poids – gewicht
ohne Fußstützen – without footrests
sans repose-pieds – zonder voetsteunen 8,8 kg
mit Fußstützen– with footrests
avec repose-pieds – met voetsteunen
10,3 kg
11
Max. Belastungen – max. loads –
Charge max. – max. belasting 136 kg
Materialien – material - Matériaux - materiaal
Präzi-Stahlrohr, Kunststoff in Leichtbauweise
Tube acier de précision, matière plastique légère
Precision steel tube, high-quality plastic
Precisie staalbuis, lichtgewicht kunststof
Typenschild
– Type label - Plaque signalétique – Typeplaatje
1 Produktname – product name - Nom du produit – productnaam
2 Artikelnummer – article number - Numéro d’article – artikelnummer
3 Seriennummer – serial number - Numéro de série – serienummer
4 Produktionsdatum Jahr/Woche – date of manufacturing year/week -
Date de production année/semaine – productiedatum jaar/week
5 Gebrauchsanweisung beachten – Attention: See operating instructions -
Consulter le manuel d’utilisation – Let op: raadpleeg de gebruiksaanwijzing
Garantie
– Warranty - Garantie - Garantie
Die Gewährleistung beträgt 24 Monate ab
Kaufdatum.
Irrtum und Änderungen aufgrund von
technischen Verbesserungen und
Designveränderungen vorbehalten.
We issue a warranty of 24 months from date
of purchase.
Subject to technical alterations.
Errors and omissions excepted.
La garantie est valable 24 mois à compter de
la date d‘achat.
Sous réserve d‘erreurs ou de modifications
suite à des améliorations techniques ou des
modifications du design.
Wij
geven een garantie van 24 maanden vanaf de
aankoopdatum.
Eventuele fouten en wijzigingen op grond van
technische verbeteringen en veranderingen in
design voorbehouden.
1
2
3
4
5
12
Drive Medical GmbH & Co. KG
Leutkircher Straße 44
D-88316 Isny/Allgäu (Germany)
Internet www.drivemedical.de
E-mail [email protected]
Drive Medical Limited
Ainleys Industrial Estate
Elland
GB WEST YORKSHIRE HX5 9JP
Phone +44 1422-314488
Fax +44 1422-314489
Internet www.drivemedical.co.uk
Stand 03/2011
Actualisation 03/2011 As per: 03/2011
Versie: 03/2011
Ihr Fachhändler
– Your specialist dealer –
Votre magasin spécialisé – Uw speciaalzaak

Other manuals for Diamond Deluxe

3

This manual suits for next models

1

Other Drive Mobility Aid manuals

Drive Diamond Deluxe User manual

Drive

Drive Diamond Deluxe User manual

Drive 10350-1 User manual

Drive

Drive 10350-1 User manual

Drive TR 8023 User manual

Drive

Drive TR 8023 User manual

Drive 1239RD User manual

Drive

Drive 1239RD User manual

Drive Migo User manual

Drive

Drive Migo User manual

Drive ROOMBA User manual

Drive

Drive ROOMBA User manual

Drive R6 User guide

Drive

Drive R6 User guide

Drive 13031-1SV User manual

Drive

Drive 13031-1SV User manual

Drive Delphi User manual

Drive

Drive Delphi User manual

Drive DeVilbiss bellavita DIVE User manual

Drive

Drive DeVilbiss bellavita DIVE User manual

Drive ROOMBA User manual

Drive

Drive ROOMBA User manual

Drive NITRO Series User manual

Drive

Drive NITRO Series User manual

Drive GiGo User manual

Drive

Drive GiGo User manual

Drive 10252BL User manual

Drive

Drive 10252BL User manual

Drive Dr.K Go/Lite 10209RD-1 Installation instructions manual

Drive

Drive Dr.K Go/Lite 10209RD-1 Installation instructions manual

Drive R726 User manual

Drive

Drive R726 User manual

Drive 11130-2 User manual

Drive

Drive 11130-2 User manual

Drive WA008 User manual

Drive

Drive WA008 User manual

Drive Rollator User manual

Drive

Drive Rollator User manual

Drive Ready Set Go User manual

Drive

Drive Ready Set Go User manual

Drive DeVilbiss HEALTHCARE ROAD User manual

Drive

Drive DeVilbiss HEALTHCARE ROAD User manual

Drive Cristallo User manual

Drive

Drive Cristallo User manual

Drive Nitro Carbon User manual

Drive

Drive Nitro Carbon User manual

Drive arc lite 102EXL-BL User manual

Drive

Drive arc lite 102EXL-BL User manual

Popular Mobility Aid manuals by other brands

HOMCOM 713-145V00 manual

HOMCOM

HOMCOM 713-145V00 manual

NRS Healthcare M48465 User instructions

NRS Healthcare

NRS Healthcare M48465 User instructions

Vermeiren 276 instruction manual

Vermeiren

Vermeiren 276 instruction manual

Bruno ELECTRA-RIDE SRE-2010 Operator's manual

Bruno

Bruno ELECTRA-RIDE SRE-2010 Operator's manual

Invacare 1073913 Assembly, installation and operating instructions

Invacare

Invacare 1073913 Assembly, installation and operating instructions

SALJOL Allround Rollator instruction manual

SALJOL

SALJOL Allround Rollator instruction manual

Staying Home SL19 installation manual

Staying Home

Staying Home SL19 installation manual

Dolomite Maxi operating instructions

Dolomite

Dolomite Maxi operating instructions

Timago TGR-R RA 882 user manual

Timago

Timago TGR-R RA 882 user manual

Promeba PE-55 user guide

Promeba

Promeba PE-55 user guide

Decon wheel Bellis MED3040 Assembly instructions

Decon wheel

Decon wheel Bellis MED3040 Assembly instructions

aidapt VM990BLK Usage and maintenance instructions

aidapt

aidapt VM990BLK Usage and maintenance instructions

Mobilex 312410 user manual

Mobilex

Mobilex 312410 user manual

EZee Life CH3051 user manual

EZee Life

EZee Life CH3051 user manual

Pride Mobility Jazzy 600 Series owner's manual

Pride Mobility

Pride Mobility Jazzy 600 Series owner's manual

Trulife AEV320 Installation and user guide

Trulife

Trulife AEV320 Installation and user guide

KMINA K40008 user manual

KMINA

KMINA K40008 user manual

Drive DeVilbiss Healthcare MIGO 2G Instructions for use

Drive DeVilbiss Healthcare

Drive DeVilbiss Healthcare MIGO 2G Instructions for use

manuals.online logo
manuals.online logoBrands
  • About & Mission
  • Contact us
  • Privacy Policy
  • Terms and Conditions

Copyright 2025 Manuals.Online. All Rights Reserved.