manuals.online logo
Brands
  1. Home
  2. •
  3. Brands
  4. •
  5. Healthcraft
  6. •
  7. Mobility Aid
  8. •
  9. Healthcraft Advantage-Rail series User manual

Healthcraft Advantage-Rail series User manual

HealthCraft Products Inc. 2790 Fenton Rd., Ottawa, Ontario, Canada, K1T 3T7
Copyright 1999, Specifications subject to change without notice.
BPre-assemble & insert rail & secure pivot bushing
INSTALLATION
INSTRUCTIONS
Models AR-T, AR-TA
The
TM
Advantage-Rail
re-install screw to
retain pivot bushing
using allen wrench
Each pin hole
corresponds to a
specific horizontal
rail height
Slide white pivot
bushing and grey
sleeve up rail
Slide grey sleeve up rail until
clearance hole aligns with
desired pin-hole in rail - tap
pin through pin hole with
hammer leaving an equal
amount of the pin on either
side of tube.
Understand these instructions prior to using product
It is your responsibility to see that your Advantage-
Rail is properly assembled, installed, and cared for.
Failure to follow these instructions could result in
injury.
The Advantage-Rail should only be installed in
areas where the floor is structurally sound. If you are
not equipped to undertake the outlined work we
recommend that you have your Advantage-Rail
installed by a qualified contractor. Product must be
secured to floor with fasteners appropriate to the
floor material - fasteners must be rated for at least
800lbs/360kg retention force each (see reverse for
recommendations). Floor mount fasteners should be
inspected monthly and tightened if necessary.
Maximum suggested user weight of 250 lbs/113kg
for steel handle and 160 lbs/75kg for optional
aluminum (lightweight) handle (Model AR-TA)
TM
TM
TM
CAUTION
RISK OF INJURY!
!
6
5
30"/75cm
32"/80cm
34"/85cm
36"/90cm
38"/95cm
78
11
12
CAUTION
RISK OF INJURY!
!
** First see reverse
side for ideas on
locating rail,
fasteners to use,
and caution notes.
Secure mast to
floor using 6 (six)
fasteners
appropriate to the
floor material.
(see reverse)
Uninstall pivot bushing by
removing screw with Allen
wrench
A
Secure mast to floor & remove pivot bushing
4
2
3
1
Slide base
cover down,
insert rail
assembly into
mast
9
10
“Innovative Products for Independent Living”
ealth
H
TM
Craft
We strongly recommend that you give thought as to the optimal
location of your Advantage-Rail before installation. HINT - pre-
assemble the Advantage-Rail without installing the locking pin
so that different rail heights and locations may be tested. Next
install the locking pin at the desired height to determine the
locking positions. In addition, the following questions may help
you to decide upon a location:
a. What motions will you be going through? (pulling up to
standing, lowering to sitting, transferring from chair to toilet, etc.)
b. What is the most comfortable horizontal rail height for you -
30”, 32”, 34”, 36” or 38" ( 75, 80, 85, 90 or 95 cm?)
c. What is your strongest side/hand?
d. What is your complete transfer path? Will the location allow for
full support over most of your path of motion?
e. Will the rail be far enough away to allow you to stand
comfortably?
f. Does the Advantage-Rail line up with an appropriate location
of the floor in the proposed location (i.e. on floor joist, on tile grout
seam, etc)
TM
TM
TM
Locate unit adjacent to hip/belt line and as close to
bed as possible while allowing clearance for bed
coverings. You will need to set the pivot locking
positions of the bar. As a suggestion, positions A
and E are good for moving in bed, B for pulling up to
sitting, C for pulling up to standing and D for
transferring out of bed.
Toilet
Bathtub only
- suggested to locate unit between three to ten
inches forward of the knees and two to six inches to
side of knees when seated. - locate
base against tub, approximately half way along its
length. You will need to set the pivot locking
positions of the bar. As a suggestion, positions B or
D are suitable for standing from toilet, C and F for
transferring into bathtub, E and D for transferring out
of bathtub.
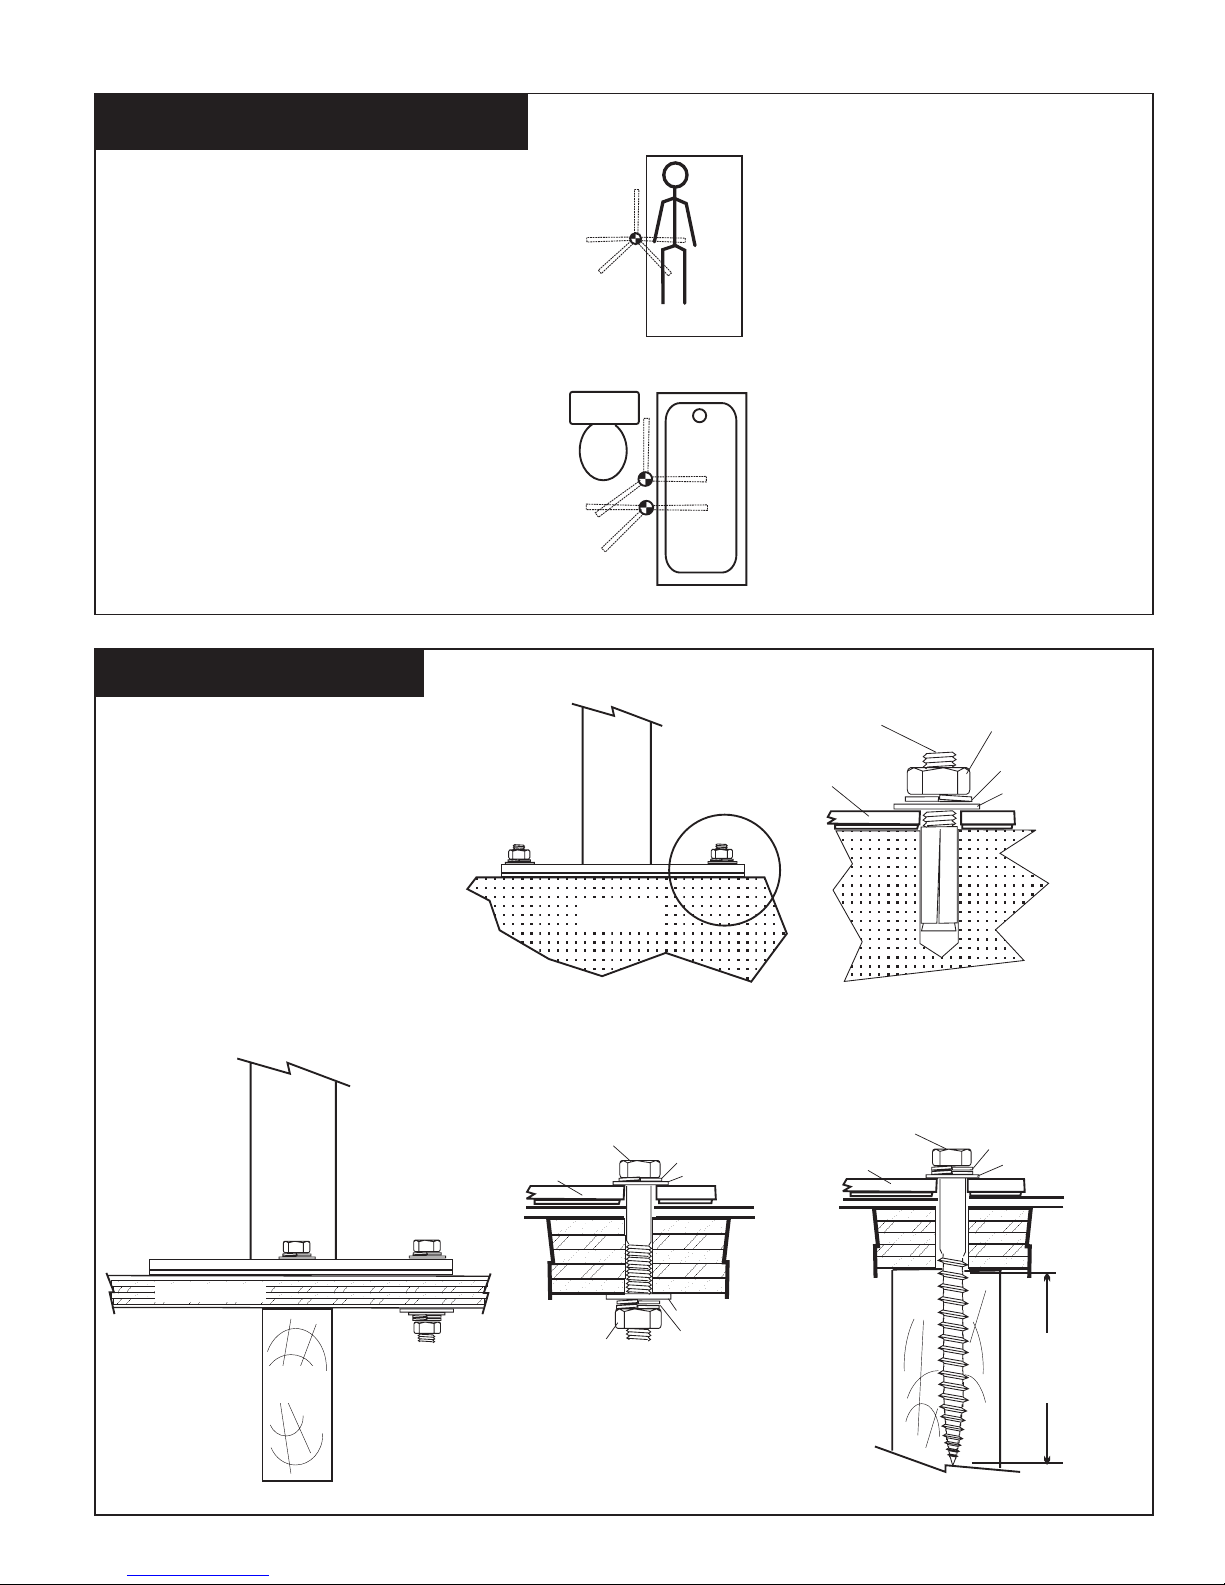
IMPORTANT - Fasteners used for securing the
Advantage-Rail to the floor require an installed
retention force rating of at least 800 lbs / 360 kg
each.
For installation on concrete floors, a 5/16" sleeve type
anchor is recommended. Follow manufacturers
recommendations for proper installation.
For wood deck floors, a bolt/nut/washers
combination is recomended. If a wood support
beam is present, install a wood lag screw in those
hole locations over the beam, ensuring at least a
3"/7cm thread engagement, and suitable condition
of the wood beam to prevent pull-out.
TM
Bed
Location Suggestions...
B
D
AC
F
E
A
B
C
E
D
Bathtub and/or Toilet
Floor FastenersFloor Fasteners
Installation NotesInstallation Notes
mast
concrete
sleeve
anchor
concrete
concrete sleeve
anchor
(min 5/16" dia)
hex nut
Adv. Rail Base
Split lock washer
washer (USS style)
hole drilled for
sleeve anchor
hex cap head
wood lag screw
3"/7 cm
minimum
thread
engagement
Adv. Rail Base
Split lock washer (qty 2)
washer (USS style)
wood
floor
deck
support
beam
Adv. Rail Base
Split lock washer
(qty 2)
hex lock nut
Split lock washer
hex head bolt
(min 5/16")
washer (USS style)
washer (USS style)
wood
floor
deck
Concrete Floor
Installation
Sleeve Anchor
Detail
Wood Lag Screw
Detail
Bolt/Nut/Washer
Detail
mast
bolt
wood lag
screw
(if over
beam)
Adv. Rail base
wood floor deck
support
beam
Wood Deck Floor
Installation

This manual suits for next models

2

Other Healthcraft Mobility Aid manuals

Healthcraft Advantage Rail Portable AR-PT User manual

Healthcraft

Healthcraft Advantage Rail Portable AR-PT User manual

Healthcraft Dependa-Bar DB-18 User manual

Healthcraft

Healthcraft Dependa-Bar DB-18 User manual

Healthcraft Advantage-Rail AR-PT User manual

Healthcraft

Healthcraft Advantage-Rail AR-PT User manual

Healthcraft Advantage Rail AR-T User manual

Healthcraft

Healthcraft Advantage Rail AR-T User manual

Healthcraft Assista-Rail Series User manual

Healthcraft

Healthcraft Assista-Rail Series User manual

Healthcraft SuperPole FRS Series User manual

Healthcraft

Healthcraft SuperPole FRS Series User manual

Healthcraft SuperPole F.R.S. Series User manual

Healthcraft

Healthcraft SuperPole F.R.S. Series User manual

Popular Mobility Aid manuals by other brands

aidapt VP174RS Fixing and maintenance instructions

aidapt

aidapt VP174RS Fixing and maintenance instructions

Drive Nitro Rollator operating instructions

Drive

Drive Nitro Rollator operating instructions

Invacare Adeo user manual

Invacare

Invacare Adeo user manual

Vela Blues 100 user manual

Vela

Vela Blues 100 user manual

Amigo J9 owner's manual

Amigo

Amigo J9 owner's manual

OasisSpace 9125A instruction manual

OasisSpace

OasisSpace 9125A instruction manual

RoMedic LoopTag Instructions for use

RoMedic

RoMedic LoopTag Instructions for use

SALJOL Carbon Rollator CR 62 instruction manual

SALJOL

SALJOL Carbon Rollator CR 62 instruction manual

Invacare Powered Seating owner's manual

Invacare

Invacare Powered Seating owner's manual

Mobiclinic Emerita instruction manual

Mobiclinic

Mobiclinic Emerita instruction manual

BraunAbility Turny HD user manual

BraunAbility

BraunAbility Turny HD user manual

Voyar Frog user manual

Voyar

Voyar Frog user manual

Etac Mustang R82 user guide

Etac

Etac Mustang R82 user guide

Etac immedia IM130DR Instructions for use

Etac

Etac immedia IM130DR Instructions for use

Ergo Fix 77600 instruction manual

Ergo Fix

Ergo Fix 77600 instruction manual

eZway Classic Tilt Table Operator instructions

eZway

eZway Classic Tilt Table Operator instructions

Etac Clean Series manual

Etac

Etac Clean Series manual

Etac molift RaiserPro user manual

Etac

Etac molift RaiserPro user manual

manuals.online logo
manuals.online logoBrands
  • About & Mission
  • Contact us
  • Privacy Policy
  • Terms and Conditions

Copyright 2025 Manuals.Online. All Rights Reserved.