Healthmark 80-10-01 User manual
Instructions for Use: Spray Gun
Brand Name of Product
Spray Gun
Generic Name of Product
Spray Gun
Product Code Number(s)
80-10-01, 80-10-70-05, 80-10-70-38, 80-10-72-05, 80-00-17, 80-00-44, 80-10-14, 80-10-
15, 80-01-05, 80-01-06, 80-01-08, 80-01-38, 80-10-12, 80-10-40, 80-10-41, 80-10-42, 80-
10-43, 80-10-44, 80-00-013, 80-10-70, 80-10-72, 80-20-20, 14RVT
Purpose of Product
For use when the highest level of cleanliness is necessary. The cleaning process is quick,
efficient and inexpensive, because the Spray Gun uses either water or pressurized air.
Range of Applications for Product
Ideal for the cleaning of cannulas, endoscopes, glassware, pipettes, syringes, catheters,
curettes, cystoscopes and a variety of other instruments, articles used in surgery, clinics,
laboratories and doctors offices.
Key specifications of product
The Spray Gun features a new type of internal flow control mechanism. It permits the
smooth and simple adjustment of the water or air flow across the entire range of the
trigger movement.
Use with the “universal” slip-tip, or the optional quick connect set of tips for
specialized functions.
Shipping & Storage
Shipping Conditions & Requirements
Storage Conditions
Packaging Conditions
Shelf Life
Instructions for Using Product
Description of Use (s)
For the cleaning of surgical instruments, endoscopes and other equipment.
Preparation for Use
Connection requirements
oWater connection:
Plumbing threaded tap or valve –3/8”, ½” or ¾” (standard gun kit includes ¾”
female connection).
oAir connection:
If operated with compressed air, the tubing must be connected to the air
supply by a suitable connector (Cannot be supplied by Healthmark).
When connecting the gun to water or air below the counter, it is recommended that a
rosette to be installed. It will minimize potential friction damage to the hose. A 1-3/8”
diameter hole will need to be drilled in the counter or sink top to accommodate the
rosette.
When the hose of the spray gun is installed to the water line, a separate shut off valve
needs to be installed to the spigot. (The spray gun is not a controller.)
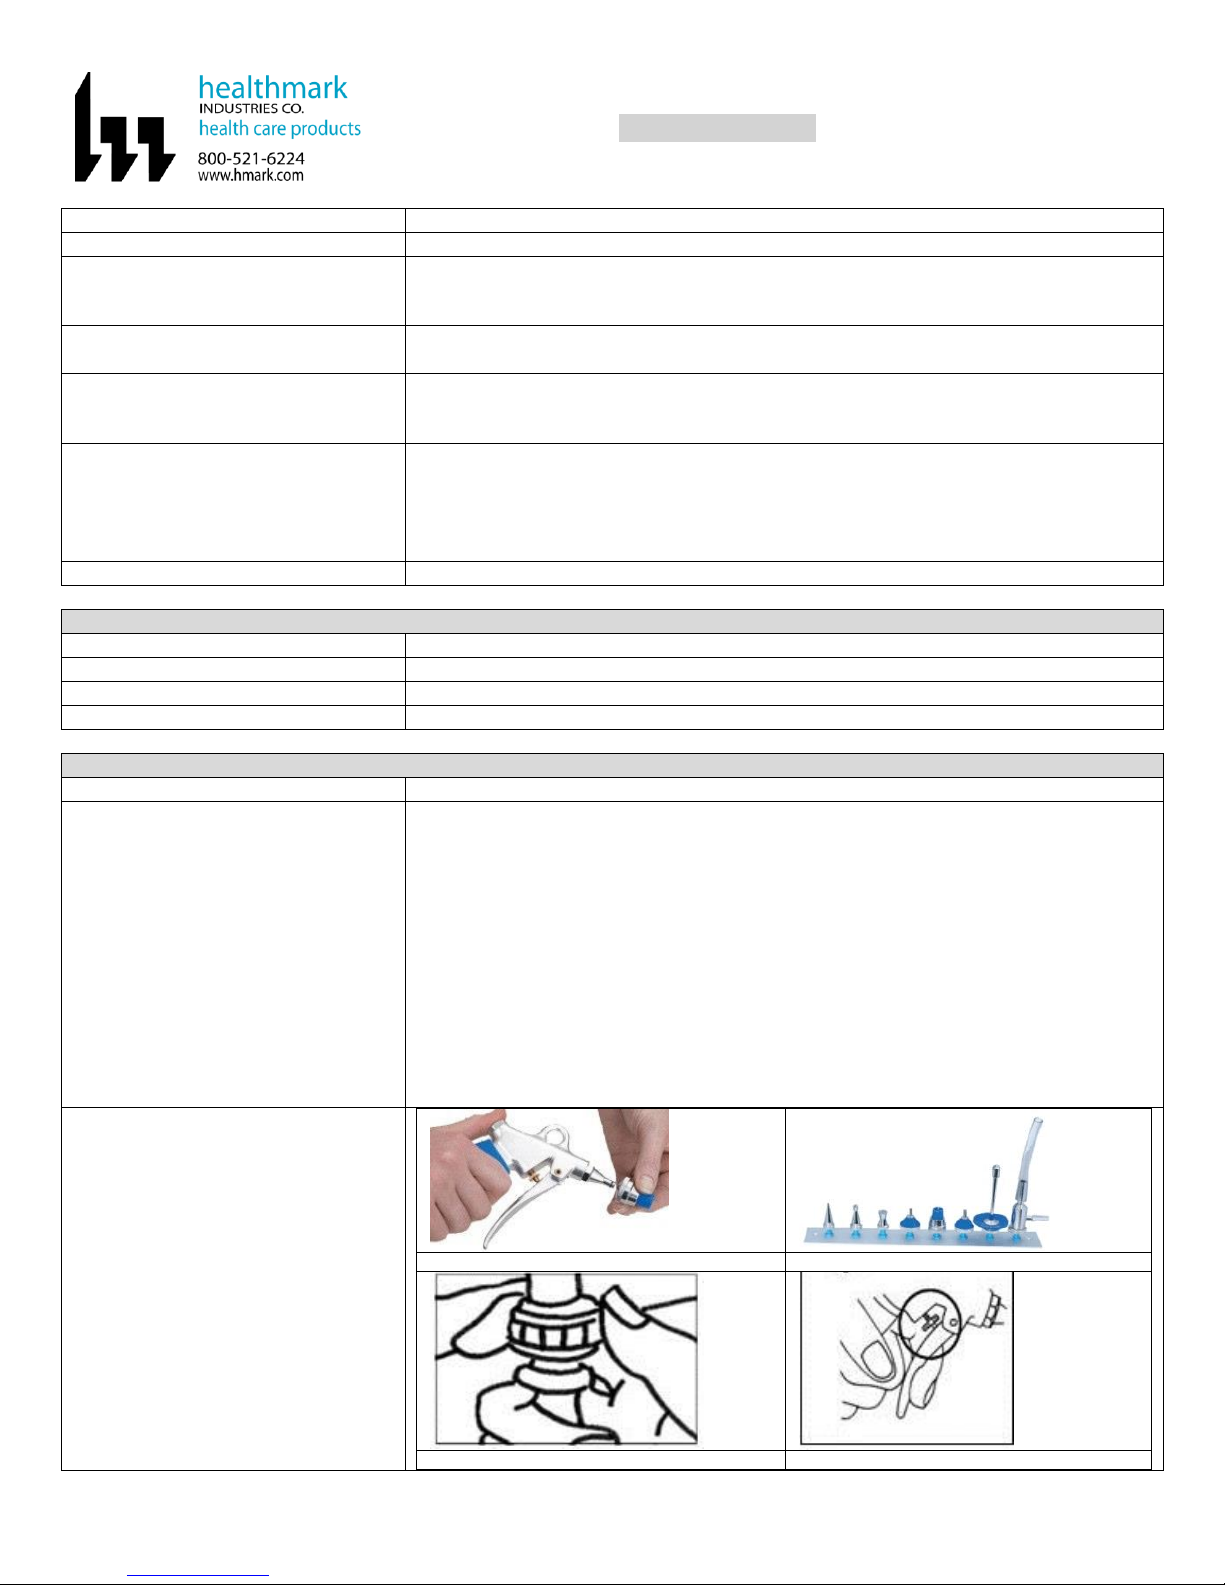
Diagrams (drawings, pictures):
Figure 1: Quick Connect Tips
Figure 2: Specialized Tips
Figure 3: Threaded nut for controlling maximum flow
Figure 4: Flow rate controlled by trigger handle

Key to Spray Gun Components
1. Gun Rinser Tip Holder complete kit
2. “O” Ring black 3mm x 1mm
3. Spiral Tension Pin
4. Trigger Handle
5. Grip for Spray Gun
6. Hose Connector
7. Gun Cap
8. Flow Control Kit
Figure 5: Diagram Spray Gun Contruction
Steps for Use of Product
1. Prior to operation, the user must make sure that the attachments are correctly seated on
the safety conell by firmly pushing them onto the spray gun rinser tip. Make sure the
valve is open that is attached to the hose.
2. When in operation, the Spray Gun must not be pointed at parts or orifices of the body
because the compressed water or air jet may be harmful.
3. Depending on the field of application, suitable safety measures must be taken to
protect the user from splashes of contaminated water (protective goggles, protective
mask, etc.).
4. If required, the maximum water or air pressure value can be set by using the small
threaded nut located behind the trigger handle.
5. The flow is controlled by pulling the trigger - up to the maximum set point fixed by the
threaded nut.
Interpretation of Results
Contraindications of Test Results
Documentation
Special Warnings and Cautions
If tubing other than that supplied by Healthmark is used, facility should independently
verify the safe and effective performance of that tubing. The liability for damage or
industry is the responsibility of the facility.
Warranty claims will only be honored for components purchased from Healthmark.
Maximum water or air pressure to use is 6 bar (86 psi).
The Spray Gun is not a medical product and is therefore not to be used as part of
medical treatments.
When in operation, the Spray Gun must not be pointed at parts or orifices of the body
because the compressed water or air jet may be harmful.
Be sure to wear proper PPE according to facility and industry guidelines.
Disposal
Reprocessing Instructions
Point of use:
Preparation for decontamination:
Disassembly Instructions:
Cleaning –Manual:
The Spray Gun with the blue silicone grip may only be cleaned with warm water and a
mild detergent.
It is not necessary to carry out water quality tests, but the user should not operate the
Spray Gun with de-mineralized water since it causes corrosion.
Cleaning –Automated:
Disinfection:
Drying:
Maintenance, inspection, and testing:
It is recommended to decalcify the Spray Gun approximately every four weeks. The
gun should be disassembled and the inner parts placed in a decalcifying agent. This is
beneficial for the service life and reliability of the spray gun.
Replacement parts and instructions for repair are available from Healthmark.
Reassembly Instructions:
Packaging:
Sterilization:
Storage:
Additional Information:

Related Healthmark Products
Other Product Support Documents
Reference Documents
Prosys Brochure, Prosys Price List
Customer Service contact:
Healthmark Industries Company, Inc
33671 Doreka
Fraser, MI 48026
1-586-774-7600
hmark.com
2015-04-09 msmith
This manual suits for next models
22
Other Healthmark Paint Sprayer manuals


