HeartSine samaritan 360P User manual

HeartSine PAD 360P Trainer User Manual 1
HeartSine®
HeartSine samaritan®PAD
360P Trainer
User Manual
model TRN-360-1

2 www.heartsine.com
HeartSine samaritan®PAD 360P Trainer, model TRN-360-1
This User Manual provides instructions on how to operate the HeartSine PAD 360P Trainer.
The HeartSine PAD 360P Trainer is a non-medical device intended to be used for the training of emergency
responders in the proper use of the HeartSine PAD 360P automated external debrillator. The Trainer has
no therapeutic capabilities and must not be used in real life rescue situations.
IMPORTANT: In order to avoid confusion in the event of a real life rescue, do not store or
leave the Trainer near the HeartSine PAD automated external debrillator.
To allow quick and easy identication the HeartSine PAD 360P Trainer incorporates a yellow front user
interface membrane whereas the HeartSine PAD 360P automated external debrillator has a navy blue/
black front membrane.
HeartSine recommends that responders who may use one of its debrillators should be trained in
Cardiopulmonary Resuscitation with debrillator use (CPR-D). The HeartSine PAD 360P Trainer is
intended to be used by approved CPR-D training providers for this purpose.
The HeartSine PAD 360P Trainer is factory congured to operate in accordance with the joint American
Heart Association/European Resuscitation Council 2010 guidelines for CPR. The device comes with six
preprogrammed scenarios based on these guidelines.
Should the CPR guidelines change, software will be available to upgrade the HeartSine PAD 360P Trainer
to comply. Please contact your HeartSine authorized distributor or HeartSine Technologies direct.
Once turned on the HeartSine PAD 360P Trainer will play audible voice prompts with accompanying visual
indicators. The Trainer can also be manually controlled using the accompanying Remote Control included
with the device.
Please contact your authorized HeartSine distributor for a list of replacement accessories.
!

HeartSine PAD 360P Trainer User Manual 3
1) Ensure that the HeartSine PAD 360P Trainer is fully charged (see the Charging section of this
manual).
2) Place the HeartSine PAD 360P Trainer and the Trainer Pad-Pak on a at surface. Push the Trainer
Pad-Pak into the opening of the HeartSine PAD 360P Trainer and listen for a “click” sound to ensure that
it is properly inserted.
3) Place the batteries supplied with your Trainer into the HeartSine PAD Remote Control.
Do not press any buttons whilst inserting the Remote Control batteries as this will reset the
Remote Control ID.
4) Press the On/Off button on the HeartSine PAD 360P Trainer and listen to the voice prompts to
ensure that the unit is functioning.
5) If the HeartSine PAD 360P Trainer has insufcient charge, it will not function correctly. When switched
on, the Status Indicator will ash red to indicate that charging is required. If the battery is fully depleted
the device will not power on at all. For full charging instructions see the Charging section of this manual.
Turning on and off the HeartSine PAD 360P Trainer
To turn on the HeartSine PAD 360P Trainer press the green On/Off button.
By default the Trainer will function in the last scenario setting used.
To turn off the HeartSine PAD 360P Trainer press the On/Off button again.
Once the HeartSine PAD 360P Trainer has been turned on, it may be turned off using the accompanying
Remote Control. To turn the Trainer off press the Off button (red button) on the Remote Control.
When turned on the HeartSine PAD 360P Trainer will automatically turn off after fteen
minutes if the device is not being used.
Preparing the HeartSine PAD 360P Trainer for Use

4 www.heartsine.com
A
B
C
D
E
F
G
H
I
J
K
Data Port
Battery Charge Status LED
Status Indicator
Shock Icon
Safe To Touch Indicator
Speaker
Pad-Pak Cartridge
On/Off Button
Do Not Touch Indicator
Pads Placement Indicator
Action Arrows
ACD
IF
G
H
E
J
K
HeartSine samaritan®PAD 360P Trainer, model TRN-360-1
HeartSine PAD 360P Trainer
B
On/Off button
Press this button to turn the device
on and off. (If pressed whilst
a shock is advised, a warning
is issued “Warning, Off button
pressed”; the device will not power
Off unless you press the button
again within three seconds.)
Pads placement indicator
The action arrows around this
icon will ash to instruct the user
that the PAD 360P pads should
be attached to the patient as
indicated.
Safe to touch indicator
It is safe to touch the patient when
the action arrows around this icon
are ashing. You may perform
CPR or check the patient.
Action arrows
The action arrows around an icon will
ash to indicate the actions that the
user should be performing.
Do not touch indicator
Do not touch the patient when the
action arrows around this icon are
ashing. The PAD 360P may be
analyzing the patient’s heart rhythm or
preparing to deliver a shock.
Status Indicator
Flashing green - Trainer is ready for use
Flashing red - Trainer requires charging
Shock icon
This indicates that a simulated shock
will be delivered.

HeartSine PAD 360P Trainer User Manual 5
Managing the Electrodes
Using the Electrodes
The training scenarios include audible prompts to remove the electrodes from the Pad-Pak and to
position the electrode pads as indicated. Follow the steps below when prompted to do so.
1) Pull the green tab to open the Trainer Pad-Pak cartridge and fully extend the electrode cables.
2) Peel the electrode pads from their protective liners.
3) Position the electrode pads as indicated by the Pads Placement Indicator; sternum and apex
electrode pads are clearly identied on their respective pads.
4) Press the pads rmly to ensure that proper contact is made.
Rewinding the Electrodes after Use
1) Re-attach the protective liners to the electrode pads, or replace with new pads.
2) Fold the pads together so that the liner is on the outside.
3) Let the electrodes hang from the device and use the handle in the blue coil mechanism to fully rewind
the electrodes:
4) Place the pads on top of the Pad-Pak cartridge, ensuring that the wires are beneath the pads.
5) Close the Pad-Pak cartridge by sliding the yellow tray into place.
A
BCoil Mechanism
Coil Handle
B
A

6 www.heartsine.com
Turning off the Trainer
The Remote Control can be used to turn off the HeartSine PAD 360P Trainer. To turn the
Trainer off press the red button on the Remote Control.
Changing the Volume
There are four volume settings available on the HeartSine PAD 360P Trainer. The volume
control buttons are to the left of the Off button on the Remote Control. To increase the
volume press the ‘+’ button and to decrease the volume press the ‘-’ button.
Pausing the Trainer
During training the HeartSine PAD 360P Trainer may be paused. To pause the Trainer
press the Pause button ( ||/►). The Trainer will remain paused until the Pause button is
pressed again at which point it will continue to play the scenario selected.
Changing the Scenario
The HeartSine PAD 360P Trainer comes with six preprogrammed training scenarios. (For
details on the scenarios see the training scenarios section of this manual.) The scenario
may be changed by pressing the appropriate number button on the Remote Control i.e.
pressing ‘3’ will select training scenario three.
Once the scenario has been changed the device will operate as detailed in the scenarios
section. The device will remain in this scenario until a new scenario is selected.
The Remote Control
PAD 360P Trainer Remote Control
A
B
C
D
E
F
G
H
Off Button
Volume Control
Low Battery Indicator
Pause Button
No Shock Required Scenario
Shock Required Scenario
Select Scenario
Attach Electrode Pads
A
B
D
EF
G
H
C

HeartSine PAD 360P Trainer User Manual 7
The HeartSine PAD 360P Trainer has six preprogrammed training scenarios to choose from. All
preprogrammed scenarios are based on AHA/ERC 2010 guidelines. Details of the scenarios are given
below.
Scenario 1
1. Setup mode - “Call for Medical assistance”, “Pull green tab”, etc
2. User intervention - “Pads” button to be pressed to conrm electrodes placed
3. Monitor mode - “Assessing heart rhythm”, “Do not touch the patient”, etc
4. Shock advised - PAD 360P automatically simulates shock
5. CPR mode - User to apply CPR with advisory as required
6. Monitor mode - “Assessing heart rhythm”, “Do not touch the patient”, etc
7. No shock advised
8. CPR mode - User to apply CPR with advisory as required
9. Repeat - Steps 6 to 8 repeated until ‘On/Off’ button is pressed
Scenario 2
1. Setup mode - “Call for Medical assistance”, “Pull green tab”, etc
2. User intervention - “Pads” button to be pressed to conrm electrodes placed
3. Monitor mode - “Assessing heart rhythm”, “Do not touch the patient”, etc
4. No shock advised
5. CPR mode - User to apply CPR with advisory as required
6. Monitor mode - “Assessing heart rhythm”, “Do not touch the patient”, etc
7. Shock advised - PAD 360P automatically simulates shock
8. CPR mode - User to apply CPR with advisory as required
9. Repeat - Steps 6 to 8 repeated until ‘On/Off’ button is pressed
Scenario 3
1. Electrodes - Device assumes the electrodes are already attached
2. Monitor mode - “Assessing heart rhythm”, “Do not touch the patient”, etc
3. Check Pads - “Check Pads”
4. User intervention - “Pads” button to be pressed to conrm electrodes placed
5. Monitor mode - “Assessing heart rhythm”, “Do not touch the patient”, etc
6. Shock advised - PAD 360P automatically simulates shock
7. CPR mode - User to apply CPR with advisory as required
8. Monitor mode - “Assessing heart rhythm”, “Do not touch the patient”, etc
9. No shock advised
10. CPR mode - User to apply CPR with advisory as required
11. Repeat - Steps 3 to 10 repeated until ‘On/Off’ button is pressed
Scenario 4
1. Electrodes - Device assumes electrodes are already attached
2. Monitor mode - “Assessing heart rhythm”, “Do not touch the patient”, etc
3. Shock advised - PAD 360P automatically simulates shock
4. CPR mode - User to apply CPR with advisory as required
5. Monitor mode - “Assessing heart rhythm”, “Do not touch the patient”, etc
6. Shock advised - PAD 360P automatically simulates shock
7. CPR mode - User to apply CPR with advisory as required
8. Monitor mode - “Assessing heart rhythm”, “Do not touch the patient”, etc
9. No shock advised
10. CPR mode - User to apply CPR with advisory as required
11. Repeat - Steps 5 to 10 repeated until ‘On/Off’ button is pressed
Preprogrammed Training Scenarios

8 www.heartsine.com
Scenario 5
Scenario 5 is the same as Scenario 1 with the addition of audible indications of when to perform
rescue breaths during CPR mode.
1. Setup mode - “Call for Medical assistance”, “Pull green tab”, etc
2. User intervention - “Pads” button to be pressed to conrm electrodes placed
3. Monitor mode - “Assessing heart rhythm”, “Do not touch the patient”, etc
4. Shock advised - PAD 360P automatically simulates shock
5. CPR mode - User to apply CPR with advisory as required; this includes an
audible indication of when to perform rescue breaths - the
metronome changes from a “beep” to a “tick” for the duration
of ten compressions.
6. Monitor mode - “Assessing heart rhythm”, “Do not touch the patient”, etc
7. No shock advised
8. CPR mode - User to apply CPR with advisory as required; this includes an
audible indication of when to perform rescue breaths - the
metronome changes from a “beep” to a “tick” for the duration
of ten compressions.
9. Repeat - Steps 6 to 8 repeated until ‘On/Off’ button is pressed
Scenario 6
Scenario 6 is the same as Scenario 2 with the addition of audible indications of when to perform
rescue breaths during CPR mode.
1. Setup mode - “Call for Medical assistance”, “Pull green tab”, etc
2. User intervention - “Pads” button to be pressed to conrm electrodes placed
3. Monitor mode - “Assessing heart rhythm”, “Do not touch the patient”, etc
4. No shock advised
5. CPR mode - User to apply CPR with advisory as required; this includes an
audible indication of when to perform rescue breaths - the
metronome changes from a “beep” to a “tick” for the duration
of ten compressions.
6. Monitor mode - “Assessing heart rhythm”, “Do not touch the patient”, etc
7. Shock advised - PAD 360P automatically simulates shock
8. CPR mode - User to apply CPR with advisory as required; this includes an
audible indication of when to perform rescue breaths - the
metronome changes from a “beep” to a “tick” for the duration
of ten compressions.
9. Repeat - Steps 6 to 8 repeated until ‘On/Off’ button is pressed
Preprogrammed Training Scenarios

HeartSine PAD 360P Trainer User Manual 9
Manual Control of the HeartSine PAD 360P Trainer
The Remote Control allows Training providers to control the scenario manually. When turned on the
HeartSine PAD 360P Trainer will operate as detailed in the training scenarios listed. Training providers
can override this by pressing the ‘Shock required’, ‘No Shock required’ or ‘Attach Electrode Pads’ button.
Shock Required
Pressing the ‘Shock required’ button will cause the HeartSine PAD 360P Trainer
to override the selected training scenario and simulate a shockable rhythm. Each
subsequent analysis period will advise a shock to be delivered until either the Trainer
is turned off or the ‘No Shock required’ button on the Remote Control is pressed.
No Shock Required
Pressing the ‘No Shock required’ button will cause the HeartSine PAD 360P Trainer
to override the selected training scenario and simulate a non-shockable rhythm. Each
subsequent analysis period will advise no shock to be delivered until either the Trainer
is turned off or the ‘Shock required’ button on the Remote Control is pressed.
Attach Electrode Pads
If the ‘Attach Electrode Pads’ button is pressed the Trainer will play the ‘Attach the
electrodes’ prompts during the analysis period of operation. The Trainer will continue
to play ‘Attach the electrodes’ prompts until the ‘Attach Electrode Pads’ button is
pressed again.

10 www.heartsine.com
HeartSine PAD 360P Trainer Battery Management
The HeartSine PAD 360P Trainer contains a rechargeable battery. It is recommended that you ensure the
HeartSine PAD 360P Trainer is fully charged prior to commencing training activities.
When fully charged the HeartSine PAD 360P Trainer will give you approximately seven hours of usage
before it needs to be recharged.
The HeartSine PAD 360P Trainer will monitor the capacity of the battery as it approaches depletion. A
minimum of one hour prior to the battery becoming depleted the Trainer will play the following message:
“Warning. Low battery”
If this warning is heard you may continue to use your HeartSine PAD 360P Trainer for a limited period of
time. If the battery becomes completely depleted the Trainer device will shut itself down. At this point the
Trainer should be recharged.
Charging and Recharging the HeartSine PAD 360P Trainer
To safely charge or recharge the HeartSine PAD 360P Trainer follow the instructions given below.
1) Insert the charger adaptor into the socket on the side of the HeartSine PAD 360P Trainer. Ensure that
the adaptor is fully inserted.
2) Plug the charger into the mains electricity supply.
3) Leave the Trainer to charge. The Battery Charge Status LED (located beside the socket) will be red
when fast charging and will ash when charging is almost complete. Once charging is complete the LED
light will switch off. To charge a depleted HeartSine PAD 360P Trainer will take a maximum of six hours.
4) Remove the adaptor from the HeartSine PAD 360P Trainer. Turn on the Trainer to ensure that the
device is working.
If the HeartSine PAD 360P Trainer is switched on during charging the charger should be switched off then
on again to restart fast charging.
The HeartSine PAD 360P Trainer must only be charged with the charger supplied with it. Use of any other
charging device will nullify the warranty and may result in damage to the HeartSine PAD 360P Trainer.
The HeartSine PAD 360P Trainer and charger are designed for indoor use only. Do not use in wet or damp
environments.
There are no user serviceable parts inside your HeartSine PAD 360P Trainer, Trainer Pad-Pak or charger.
These products should not be opened. In the unlikely event of a malfunction, please contact your
distributor immediately.
Maintenance

HeartSine PAD 360P Trainer User Manual 11
Remote Control Batteries
The HeartSine PAD 360P Trainer Remote Control contains a low battery warning indicator. If this
indicator ashes red two times after a button on the Remote Control is pressed it is an indication that the
batteries within the Remote Control need to be replaced.
The Remote Control uses two standard AAA batteries.
The batteries can be accessed by removing the battery cover at the back of the Remote Control.
Inserting the batteries into the Remote Control whilst pressing the Off button will cause the
Remote Control to enter pairing mode and take a new transmission ID. This will be different to
that previously stored on the Trainer. If this occurs accidentally it will be necessary to complete the
pairing procedure in full to pair the Remote Control with the HeartSine PAD 360P Trainer again.
Normal battery replacement does not cause a problem since pairing is only initiated when the Off
button is also held down.
HeartSine PAD 360P Trainer Conguration Tool
The HeartSine PAD 360P Trainer conguration tool is software that can be downloaded for free from the
HeartSine website (www.heartsine.com). This software allows you to upgrade your Trainer. The following
options are available:
Language
The HeartSine PAD 360P Trainer can be reprogrammed to operate with audible prompts in any one of
a selection of languages. Download the current HeartSine PAD 360P Trainer conguration tool user
manual from the HeartSine website for instructions on how to do this.
Pairing a Remote Control with the HeartSine PAD 360P Trainer
Each HeartSine PAD 360P Trainer has a specic Remote Control to operate it. This is to allow multiple
devices to be used in close vicinity without interference. In the unlikely event that your Remote Control
no longer operates with your Trainer it may need to be paired with your Trainer again.
The HeartSine PAD 360P Trainer Conguration Tool can be used to pair a Remote Control with your
Trainer. Full instructions are contained within the accompanying user manual.
Device Identications
Each HeartSine PAD 360P Trainer is given an identication number between 001 and 255 during
manufacture. The Remote Control for each Trainer is then given the same identication number. In
the unlikely event that two devices with the same ID number are being used at the same time use
the HeartSine PAD 360P Trainer Conguration Tool to assign new numbers to the devices. It will be
necessary to pair the device with its Remote Control after assigning a new ID number.
Maintenance
12 www.heartsine.com
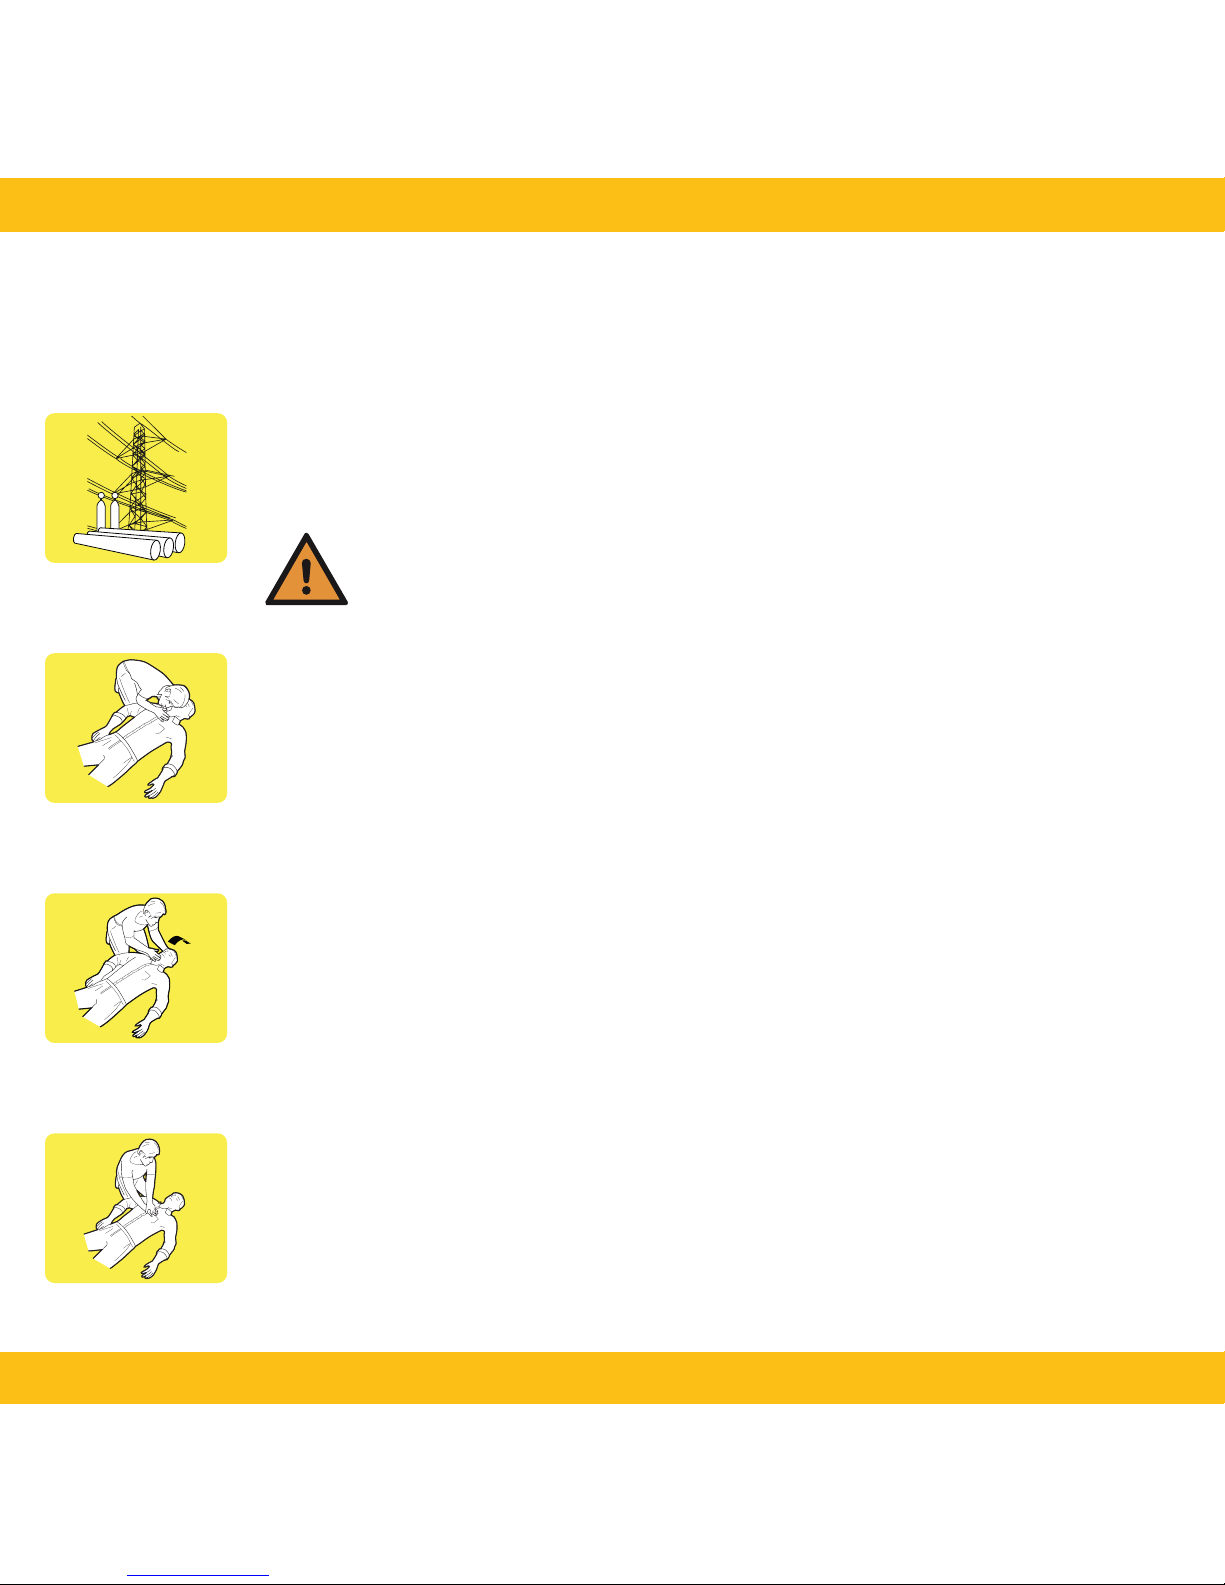
CPR Guidelines 2010
The following is a brief overview of the fundamentals of CPR for lay rescuers as advised by both the American Heart
Association (AHA) and the European Resuscitation Council (ERC) in their 2010 published Guidelines for CPR and ECC. This
is intended only as a quick reference for trained CPR providers. HeartSine recommend that all potential users of the PAD
360P are trained by a competent training organization in both the use of CPR and PAD 360P, prior to placing a PAD 360P into
service. Should the Guidelines change, software will be available to upgrade the PAD 360P to comply. Please contact your
HeartSine authorized distributor or HeartSine Technologies direct.
1. Remove danger
Remove any source of danger or move the victim away from danger. Ensure your own
safety.
Caution: You must use the SAM 360P at least 2 m (6 feet) away from
all radio frequency devices. Alternatively switch off the equipment
causing the electromagnetic interference.
1
5
3
2
2. Check for a response
Shake the victim by the shoulders. Speak loudly to the victim.
3. Check the airway
Check for breathing. Open the airway with a head tilt-chin lift if necessary.
4. Get help
Call the emergency services. Get other people to help you. Get the SAM 360P.
You do not need to remove the SAM 360P from its soft carry case to use it.
5. Perform CPR
Push hard and fast at a rate of at least 100 beats per minute, 5 to 6 cm deep, on victim’s
chest. 30 compressions followed by 2 breaths.

HeartSine PAD 360P Trainer User Manual 13
Disposal Instructions
The HeartSine PAD 360P Trainer is a reusable device. If maintained in accordance with the instructions
in this manual it has a warranty period of two years from the date of manufacture. The year of manufac-
ture of the device is indicated by the rst two digits of the serial number.
If you wish to dispose of the HeartSine PAD 360P Trainer unit, it should be disposed of at an appropriate
recycling facility according to national, state and local requirements. Alternatively return the unit to your
local distributor or HeartSine Technologies for disposal.
Disposal within the European Union:
Do not dispose of the HeartSine PAD 360P Trainer unit as unsorted municipal waste: keep the HeartSine
PAD 360P Trainer separate, to be reused or recycled in accordance with Directive 2002/96/EEC of the
European Parliament and the Council of the European Union on Waste Electronic and Electrical Equip-
ment (WEEE), or return to your local distributor or HeartSine Technologies for disposal.
Warranty Exclusion
HeartSine Technologies or the authorized distributors are not obliged to carry out service/repairs under
warranty if:
a. Unauthorized modications have been made to the device.
b. Non-standard components are used.
c. The user has not used the device in accordance with the indications for use or the instructions pro-
vided in this manual.
d. The serial number of the apparatus is removed, defaced, misused or altered.
e. The device, electrodes or batteries are stored or used operationally outside of environmental speci-
cations.
f. The device has been tested using unapproved methods or inappropriate equipment (see the Mainte-
nance section of this manual).
Any claims made under warranty must be directed via your distributor from whom the device was origi-
nally purchased. Before carrying out service under warranty, HeartSine Technologies require evidence of
purchase. The product must be used in accordance with the user manual and for the purpose for which it
was intended. If you have a query please contact [email protected] for assistance.
HeartSine samaritan®PAD 360P Trainer, model TRN-360-1

14 www.heartsine.com
Notes

HeartSine PAD 360P Trainer User Manual 15
Notes

16 www.heartsine.com
Authorized Distributor
English
H038-019-100-1 February 2014
Worldwide Headquarters:
HeartSine Technologies Inc
121 Friends Lane
Suite 400
Newtown, PA 18940
Tel: 1.215.860.8100
Fax: 1.215.860.8192
Manufactured by:
HeartSine Technologies Ltd
Canberra House
203 Airport Road West
Belfast BT3 9ED
Northern Ireland
Tel: +44 (0)28 9093 9400
www.heartsine.com
www.heartsine.eu
This manual suits for next models
1
Table of contents
Other HeartSine Fitness Equipment manuals


Popular Fitness Equipment manuals by other brands


G-FITNESS
G-FITNESS AIR ROWER user manual

CAPITAL SPORTS
CAPITAL SPORTS Dominate Edition 10028796 manual

Martin System
Martin System TT4FK user guide

CIRCLE FITNESS
CIRCLE FITNESS E7 owner's manual

G-FITNESS
G-FITNESS TZ-6017 user manual

Accelerated Care Plus
Accelerated Care Plus OMNISTIM FX2 CYCLE/WALK user manual


