Heiniger EVO User manual

swiss made
Ausgabe/Index: EVO/E 05-10
Schuranlage mit 3 Geschwindigkeiten Betriebsanleitung D
3speed shearing plant Instruction Manual GB
Moteur à 3 vitesses Mode d'emploi F
Motore di tosatura a 3 velocità Istruzioni d'uso I
Motor de esquila a 3 velocidades de rotación Manual de Instrucciones E
Scheeraandrijving met 3 snelheiden Bedieningshandleiding NL
stationær fåreklipper - 3 hastigheder Instruktionsbog DK
Stationär klippmaskin för får, 3 hastigheter Instruktionsbok S
Stasjonær tre-hastigshets klippemaskin for sau Instruksjonsbok N
3-nopeuksinen leikkuuasema Käyttöohjekirja FIN
Accionamento de tosquia a três velocidades Manual de instruções P
Κουρευτική Μηχανή τριών ταχυτήτων Εγχειρίδιο Οδηγιών
Griech

2 Instruction Manual / 3speed shearing plant
Contents
1 Stipulated usage
1.1 Component list
1.2 Purpose of use
1.3 Technical data
1.4 Equipment
2 Safety regulations
2.1 Introduction
2.2 Symbols and warning notes
2.3 Stipulated usage
2.4 Basic safety principles
2.4.1 Power supply connections
2.4.2 Safety precautions
2.4.3 Noise emission / personal protective equipment
2.4.4 Residual dangers
2.5 Operator requirements
3 Initial start-up
3.1 Important notes
3.2 Rotary speeds
3.3 Changing speeds
3.4 Assembling the shearing plant
3.4.1 Assembly height of the wall mounting
3.4.2 Assembling the rigid drive downtube / flexible drive
3.5 Switching the shearing plant on / off
4 Maintenance
4.1 Cleaning
4.2 Service
4.3 Lubrication
4.3.1 Shearing plant
4.3.2 Flexible drive
4.3.3 Rigid drive downtube
4.3.4 Handpiece
4.4 Storing the machine
5 Troubleshooting and repairs
5.1 Introduction
5.2 Troubleshooting list
6 Environmental protection and waste disposal
6.1 Introduction
6.2 Material groups
7 Contact addresses
Illustrations: at the end of Chapter 7

Instruction Manual / 3speed shearing plant 3
1 Stipulated usage
1.1 Component list
Designation of individual parts
Diag. 1
Pos Description Total
1 Handle 1x
2 Rating plate 1x
3 Cover EVO 1x
4 Sponge rubber 20 / 20 1x
5 LS-screw Phillips M6 x 30 4x
6 LS-screw Phillips M6 x 25 3x
7 Reinforcement plate EVO 240V 1x
7 Reinforcement plate EVO 120V 1x
8 LS-screw Phillips M6 x 20 4x
11 Control unit ONE/EVO 240V 1x
11 Control unit ONE/EVO 120V 1x
12 Capacitor 8µF 240V 1x
12 Capacitor 25µF 120V 1x
13 Capacitor 25µF 240V 1x
13 Capacitor 60µF 120V 1x
14 Countersunk screw Torx M4 x 20 1x
15 Washer for countersunk screw M4 1x
16 Pulley, aluminium 240V 1x
16 Pulley, aluminium 120V 1x
17 Snap-on belt 1x
18 Hexagonal nut M12 x 1 / 0.5D 1x
19 Washer 13 / 24 x 2.5 1x
20 Pulley, plastic 240V 1x
20 Pulley, plastic 120V 1x
21 Drive housing EVO 1x
22 Speed control sensor EVO 1x
23 LS-screw Torx M5 x 16 4x
24 Motor EVO 240V / 300W 1x
24 Motor EVO 120V / 300W 1x
Pos Description Total
25 Gear shaft 1x
26 Radial ball bearing 6001-2Z 2x
27 Spacer sleeve 1x
28 Retaining ring for bores Ø28 1x
29 Spring key 4 x 4 x 16 1x
31 LS-screw Phillips M6 x 12 8x
32 Switch support x
33 Washer 12 / 18 x 1 1x
34 Lever for switch 1x
35 Spring for switch 1x
37 Retaining ring for shaft size 9 1x
38 Micro switch 1x
39 Socket head cap screw
Phillips M3 x 20 2x
40 Hexagonal nut self-securing M3 2x
41 Ring spanner Ø30 x
42 Cord Ø9 x 2000 1x
43 Hexagonal nut M20 x 1.5 1x
44 Anti-kink sleeve M20 x 1.5 1x
45 Cable with Schuko plug 1x
45 Cable with USA plug 1x
45 Cable with AUS plug 1x
46 PT-screw Torx KA40 x 16 8x
47 Motor housing EVO 1x
48 Base EVO 1x
50 Micro-fuse 5A / 120V 1x
52 Catch spring ONE/EVO 1x
53 PH-screw M4 x 10 1x
Converter Schuko/GB plug 5A 1x

4 Instruction Manual / 3speed shearing plant
1.2 Purpose of use
The portable shearing plant is specially designed to provide the drive for mechanical shearing
handpieces.The complete shearing unit is expressly designed for the shearing of sheep, goats,
llamas, alpacas and other members of the Camelidae species.
1.3 Technical data
Product name: EVO
Mains voltage: see rating plate
Motor output: see rating plate
Rotary speeds: see rating plate / support plate
Required fuse protection: see rating plate
Dimensions in mm (W/H/L): 225 x 300 x 290
Weight not including cable: 7.8 kg
Max. ambient temperature: 0° - 40°C
Max. humidity: 10 % - 90 % (relative)
Noise emission (LpAm): 70 dB(A) (DIN-45635-1/04.84 + BG-PAS 26)
We reserve the right to make technical changes and improvements without notice.
1.4 Equipment
Portable shearing plant
Operating instructions
Screwdriver
Drip feed lubricator 100 ml
Universal grease
Options
Wall mounting
Rigid drive downtube, worm
Rigid drive downtube, pin
Flexible drive, worm
Flexible drive, pin
Adaptor for Lister rigid drive downtube and flexible drive
Ferrule short
Ferrule long
Shearing handpiece, Icon, worm
Shearing handpiece, Icon, pin
Combs and cutters for the shearing handpiece
cord leads (Diag. 5)
Diag. 5

Instruction Manual / 3speed shearing plant 5
2 Safety regulations
2.1 Introduction
• This chapter describes the safety regulations that are to be taken into consideration as a
matter of course when using the shearing plant.
• All persons who carry out work on and with the shearing plant must read the
operating instructions.
• The operating instructions are to be kept in a secure place that is accessible at all
times.
• Authorised service agents may only carry out service and repair work.
2.2 Symbols and warning notes
Various symbols are used in the operating instructions. These symbols indicate possible
hazards or bring to the user‘s attention such technical information that, if not complied with,
may lead to personal injury and material damage or to uneconomic operation.
Hazard symbols
Warning
Denotes a possibly hazardous situation. Serious injury and even death can result if such situ-
ations are not avoided.
Caution
Denotes a possibly hazardous situation. Light or slight injury can result if such situations are
not avoided.
Information symbols
Note
A note which, if not complied with, can lead to operational stoppages or damage.
Diagram note
This symbol, complete with diagram number, denotes the corresponding diagram at the end
of the operating instructions.
2.3 Stipulated usage
The shearing plant‘s intended purpose of use is described in Chapter 1.2, « Purpose of use ».
Use for any other purposes, particularly on people and dangerous types of animals, especially
predators, is expressly forbidden.

6 Instruction Manual / 3speed shearing plant
The shearing plant must only be used in dry areas.
The details contained in Chapter 1.3, ”Technical data“, are to be considered as legally binding
limit values and characteristic data. The safety check refers only to the portable shearing plant
and not to the mechanical shaft and the handpiece.
2.4 Basic safety principles
2.4.1 Power supply connections
• Never plug the equipment into damaged sockets. Observe the relevant regulations applica-
ble in your country.
• Maintenance and cleaning work must only be carried out when the equipment is not
plugged in.
• Sockets must be equipped with a circuit breaker (FI).
2.4.2 Safety precautions
• Avoid touching machinery that has come into contact with water or other liquids.
• Never clip wet animals.
• Children are forbidden from operating the equipment.
• Lay out the power cable cleanly.
• Check the power cable occasionally for damage.
• Keep the power cable well away from machinery & equipment operating in close proxi-
mity.
• Switch off the plant before pulling out the plug.
• After use remove the plug from its socket. The plant should only be cleaned or the cutter
replaced when the plug is removed from the power socket.
• Avoid kinks or coils in the cable. Never wind the power cable around the plant during peri-
ods of storage. This can result in breaks and damage to the insulation.
• Ensure that animals do not stand on or walk over the cable, and that they do not get caught
up in the cable.
• Keep children away from shearing areas.
• Never use a damaged plant. Have the machine checked for faults and repaired immediately
by an authorised service agent.
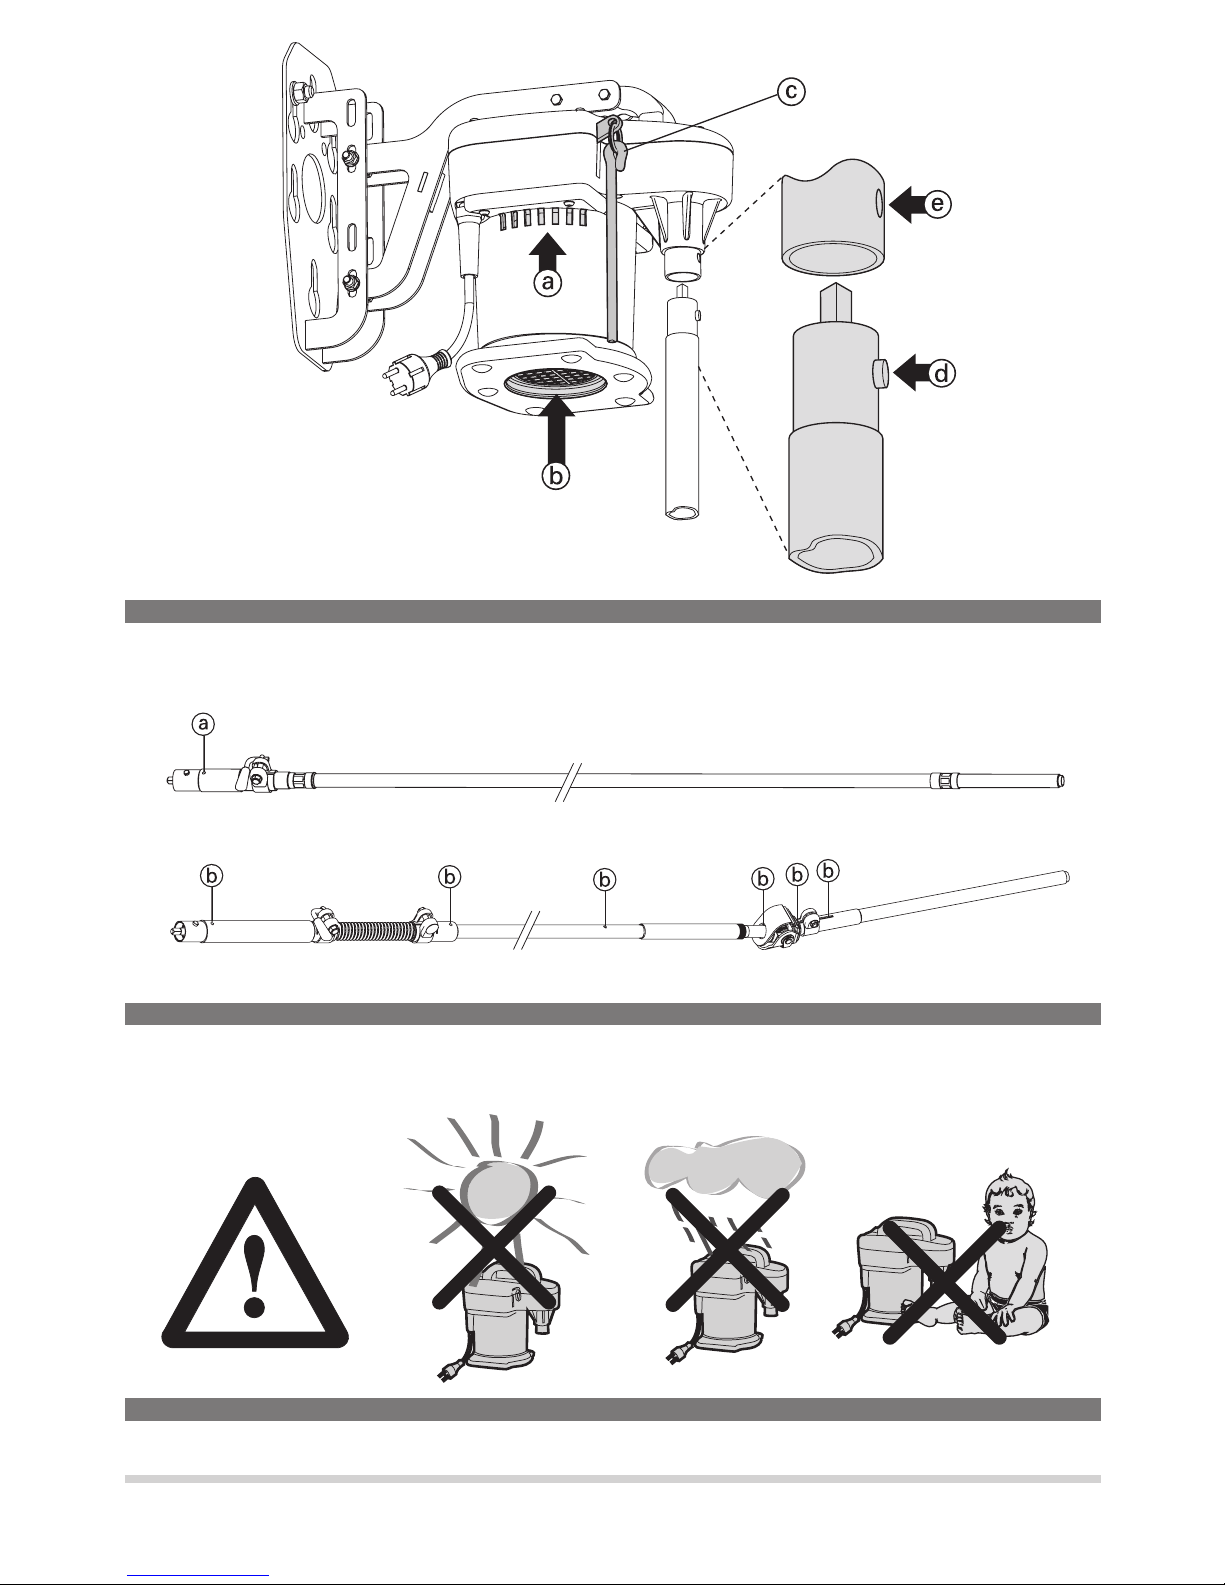
• The air intake for the side and lower ventilation holes (Diag. 6, pos. a + b) must be guaran-
teed. Never insert any object into the shearing plant‘s ventilation holes.
• Never shear in the vicinity of explosive objects or gases.
• Never shear with blunt or broken shearing combs and cutters.
• Avoid any contact with the moving shearing cutters.
• Store the plant in a clean, dry place to which children and animals have no access.
2.4.3 Noise emission / personal protective equipment
• Noise emission during operation is in excess of 70 dB (A), as the noise of the shearing hand-
piece is also present during shearing. We recommend that ear protection, safety glasses
and gloves are always worn when operating the plant.
• Personal protective equipment to be provided by the operator.
Diag. 6

Instruction Manual / 3speed shearing plant 7
2.4.4 Residual dangers
Should dangers and hazards occur during operation which are not directly related to the shea-
ring of animals, we request that you inform us of this. This also applies in the event of a tech-
nical failure that causes a hazard.
2.5 Requirements of the operator
The safe use of the machine places few demands on operating personnel. These must,
however, be observed and maintained as a matter of course.
• The operator has experience in dealing with the animals being shorn.
• The operator has read and understood the operating instructions, or has been indoctrinated
into the operation of the machine by a skilled person, and the risks and dangers have been
pointed out to him.
3 Initial start-up
3.1 Important notes
• The voltage specified on the maker‘s plate and that of the local power supply must match.
The plant may only be connected to an AC power supply.
• It is a compulsory that the operator has read the safety regulations.
• In the event that the plant is operated from a generator, the mains supply voltage must not
exceed that specified on the maker‘s rating plate.
3.2 Rotary speeds
The three-speed portable shearing plant is specially designed for professional use.
2700 RPM. The lowest speed is ideal for inexperienced shearers and for shearing under
difficult conditions.
3200 RPM. The medium speed setting is suitable for shearers with average shearing skills
and for running in new shearing hand pieces.
3500 RPM. The high speed setting is for experienced, professional shearers who demand
high shearing performance.
3.3 Changing the speeds
An authorised service point in compliance with the following instructions may only
carry out changing the speed!
• Pull out the plug from the socket.
• Remove the cover by loosening the nine screws (Diag. 2, pos. a). A plate bearing the speed
specification is fitted beneath the cover. See also Chapter 4.2, ”Service“. The self-tensioning
belt tensions the belt automatically.
• Push the belt by means of a slight movement so that it appears as in Diag. 2 Drive axis turns
into the new desired position (Diag. 2, pos. c). To ensure that the belt is not damaged, do
not use any auxiliary aids when changing speeds. Make sure that the belt is located in the
grooves at the same height on both axis.
Diag. 2

8 Instruction Manual / 3speed shearing plant
• Re-secure the cover using the nine screws (Diag. 2, pos. a).
3.4 Assembling the shearing plant
Pay attention to sufficient fastening of the shearing plant.
3.4.1 Assembly height of the wall mounting
Fix the wall mounting in such a way that a gap of approximately 10 to 25 mm remains bet-
ween the end of the rigid drive downtube (or flexible drive) and the working area (Diag. 4, pos.
c). In doing so take into consideration the type of application cited below.
If the plant is to be operated with the rigid drive downtube or flexible drive,
the shearing plant is assembled in accordance with Diag. 4, pos. b. If the plant is to be
operated with a flexible drive then it can also be suspended on a rope (Diag. 3).
3.4.2 Assembling the rigid drive downtube or flexible drive
• Start up the motor (see Chapter 3.5).
• Press the lock button, which is located at the flexible drive’s upper coupling, by hand
(Diag. 6, pos. d) .
• Now push the flexible drive coupling into the shearing plant’s coupling sleeve and then
position this by means of slight pressure upwards until the lock button in the bore (Diag. 6,
pos. e) engages.
3.5 Switching the shearing plant on / off
Important:
Make sure that the ventilation holes are always clear (Diag. 6, pos. a + b). The shearing plant
must never be switched on when it is lying on flat ground as the cooling air flow would be
interrupted and the motor could burn out (Diag. 6, pos. b).
Connecting the shearing plant to the power supply, the motor is not yet engaged. The shea-
ring plant is switched on and off respectively via the cord / lever (Diag. 6, pos. c). The drive
is switched on by means of one downward pull, and is switched off again by repeating this
operation.
Should the power supply be interrupted whilst the drive is running, for safety reasons the
motor switches off automatically, which means that the unit must be switched on again via the
cord / lever when the power supply is re-established.
Diag. 3, 4
Diag. 6
Diag. 6

Instruction Manual / 3speed shearing plant 9
4 Maintenance
4.1 Cleaning
Before commencing any maintenance work disconnect the electrical power supply by pulling
out the plug!
Remove any oil and dirt from the shearing plant by means of a dry cloth. Do not use liquids!
4.2 Service
For safety reasons the portable shearing plant should be subjected to an annual inspection. It
is important that the self-tensioning belt is checked periodically, since the functionality of the
patented safety cutout device is dependent on this.
4.3 Lubrication
Lubricate the machine in accordance with the following specifications, since a lack of lubrica-
tion is the most common source of faults for unsatisfactory shearing results.
4.3.1 Shearing plant
Requires no lubrication.
4.3.2 Flexible drive
prior to each period of operation
Oil the flexible drive prior to use, and at least each time the cutters are replaced (Diag. 7,
pos. a).
after 100 hours of operation
The flexible drive is fitted with sealed and permanently lubricated ball bearings. The rotating
shaft bore must, however, be greased at regular intervals (after approximately 100 hours of
operation or every 2 years). To perform this task dismantle the flexible drive in order to remove
old grease residue from the shaft bore. Then re-lubricate the shaft bore along its whole length
with fresh, high-quality mineral grease.
4.3.3 Rigid drive downtube
The rigid drive downtube is fitted with sealed and permanently lubricated ball bearings. The
rotating cogs of the universal joint must, however, be lubricated at regular intervals during use
(approximately every 2 operating hours). Lubricate the shaft at the lubrication points provided
in accordance with Diag. 7, pos. b. Only high quality mineral oil is to be used for this purpose
(engine or gearbox oil).
Diag. 7

10 Instruction Manual / 3speed shearing plant
4.3.4 Handpiece
See operating instructions for shearing handpiece.
4.4 Storing the machine
Get into the habit of always giving the shearing plant a good clean after use, store the unit in a
dry and clean location out of the reach of children.
5 Troubleshooting and repairs
This product has been developed and assembled using the best individual components
available. It is designed to give longevity and high performance. If spare parts are used during
the life of this product, please ensure that they are genuine Heiniger parts. Failure to use
genuine Heiniger spares may reduce the performance of this precision engineered product
and will void any warranty claim.
5.1 Introduction
The following troubleshooting guide will aid in determining problems and offer a solution. An
authorised service point may only carry out solutions that appears against a dark background.
An authorised service agent is to be contacted in the event of malfunctions that are not con-
tained in this manual.

Instruction Manual / 3speed shearing plant 11
No power.
Cable faulty.
Micro-fuse faulty.
Switch faulty.
Motor faulty.
Control unit faulty.
Capacitors faulty.
Power supply and/or fuse faulty.
Have the cable replaced.
Have the micro-fuse replaced.
Have the switch replaced.
Have the switch replaced.
Have Control unit replaced.
Have the capacitors replaced.
5.2 Troubleshooting list
Motor does not run.
Cutter blocked.
Mechanical damage in the
shearing hand piece, in the rigid
drive downtube or flexible drive.
Bearing in the shearing plant
faulty.
Remove blockage.
For the purpose of fault finding,
first of all uncouple the shearing
hand piece and re-start the motor.
If the fault persists, uncouple the
rigid drive downtube or flexible
drive from the shearing plant.
Rectify any damage.
If the fault still persists, then have
the shearing plant repaired.
Have the bearing replaced.
Motor always switching
off.
The belt is slipping. Have the belt replaced.Motor system does not
switch off by lock up.
The belt is slipping.
Bearing faulty.
Have the belt replaced.
Have the bearing replaced.
Shearing unit is noisy or
vibrates.
Bearing faulty.
Ventilation screen dirty.
Malfunctions in the rigid drive
downtube / flexible drive and /
or shearing hand piece.
Have the motor replaced.
Clean ventilation screen.
Have fault rectified.
Motor gets hot.
Switch faulty. Have the switch replaced.Shearing plant cannot be
switched off.
MALFUNCTION SOLUTIONCAUSE

12 Instruction Manual / 3speed shearing plant
6 Environmental protection and waste disposal
6.1 Introduction
The operator bears the responsibility for disposing of the machine in the proper manner.
Please observe the relevant regulations applicable in your country.
6.2 Material groups
Please hand this in to a service point or your local specialist electrical workshop when the
machine is to be dismantled.
Material contained in pos. X taken from Diag. 1
Rubber 45
Polyamide PA 1/3/21/44/47
Polypropylene PP 42
POM 20/34
Polychloroprene/Polyester
17
Santoprene TPE 48
Iron/steel 5/6/7/8/14/15/18/19/23/24/25/26/27/28/29/31/32/33/35/
37/39/40/41/46/ 52/53
Copper 45
Brass 38,43
Aluminium 16
other substances 2, 4
Electronics 11/12/13/22/38/50
7 Contact address
The sales point or company specified on your guarantee certificate are authorised service
points, or, alternatively, refer to the nearest service point in your area.

A1
1

14 Betriebsanleitung / Schuranlage mit 3 GeschwindigkeitenA2
10 - 25 mm
2
4 5
3
Betriebsanleitung / Schuranlage mit 3 Geschwindigkeiten 15
8
A3
6
7

We reserve the right to make technical changes and improvements without notice.
warranty garantie garantía
Item
Artículo
Article
Artikel
Articolo
Artico
Artikel
Artikel
Artikel
Artikkel
Tuote
Προϊόν
Serial no.
No. de serie
No. de série
Seriennummer
No. di serie
No. de série
Serie nr.
Serie Nr.
Serienr.
Serie nummer
Sarjanro
Αρ. σειράς
Date of purchase
Fecha de compra
Date d’achat
Kaufdatum
Data di vendita
Data de compra
Datum van aankoop
Købsdato
Köpdatum
Kjøpsdato
Ostopäivä
Ηµεροµηνία αγοράς
Stamp and signature
Sello y firma
Cachet et signature
Stempel und Unterschrift
Timbro e firma
Carimbo e assinatura
Stempel en handtekening
Stempel og underskrift
Stämpel och namnteckning
Stempel og underskrift fra forretningen
Myyjän leima ja allekirjoitus
Σφραγίδα και υπογραφή
In case of claim, please return your machine with the instruction manual and the warranty card directly
to your local distributor. Please do not cut off the warranty card from the instruction manual.
En caso de garantía, devuelve su máquina con el manual de instrucciones y la carta de garantía
directamente a su distribuidor local. Por favor no recorte la carta de garantía del manual.
En cas de garantie, retournez votre machine avec le mode d'emploi et la carte de garantie directement
à votre distributeur local. Nous vous prions de ne pas couper la carte de garantie du mode d'emploi.
Im Garantiefall retournieren Sie Ihre Maschine mit der Bedienungsanleitung und Garantiekarte direkt
Ihrem lokalen Händler.Trennen Sie die Garantiekarte bitte nicht aus der Bedienungsanleitung.
Garantie letzte Seite alle sprachen.indd 1 13.09.2010 10:42:55
Table of contents
Other Heiniger Pet Care Product manuals

Heiniger
Heiniger C12 User manual

Heiniger
Heiniger Handy User manual

Heiniger
Heiniger Opal User manual

Heiniger
Heiniger Saphir series User manual

Heiniger
Heiniger Xperience User manual

Heiniger
Heiniger Cordless User manual

Heiniger
Heiniger SaphirCord User manual

Heiniger
Heiniger Xpert User manual

Heiniger
Heiniger XTRA VS84-S User manual

Heiniger
Heiniger saphir User manual


