Heitronic 28030 User manual

Installationsanweisung Art. Nr. 287030, 29032 28035, 28037 Seite 1 von 3 Stand 08.2007
Installations- und Bedienungsanweisung
Anbauleuchte
Art. Nr. 28030, 28032, 28035, 28037
Herzlichen Dank, dass Sie sich für den Kauf unserer Anbauleuchte entschieden haben.
Unsere Leuchten sind aus robusten und hochwertigen Materialien hergestellt und ermöglichen Ihnen
eine ansprechende Beleuchtung. Dies gewährleistet Ihnen eine ansprechende Optik und eine hohe
Korrosionsbeständigkeit. Die Anbauleuchte eignet sich zur Montage auf normal entflammbaren
Oberflächen und ist nur zur Verwendung in trockenen Innenräumen geeignet.
Bitte lesen Sie diese Installations- und Bedienungsanweisung sorgfältig durch und bewahren
Sie diese gut auf.
Bei Sach- und Personenschäden durch Nichtbeachten der Anleitung, durch unsachgemäße
Handhabung oder für vorgenommene Änderungen am Produkt übernehmen wir keine Haftung.
Verpackungsinhalt:
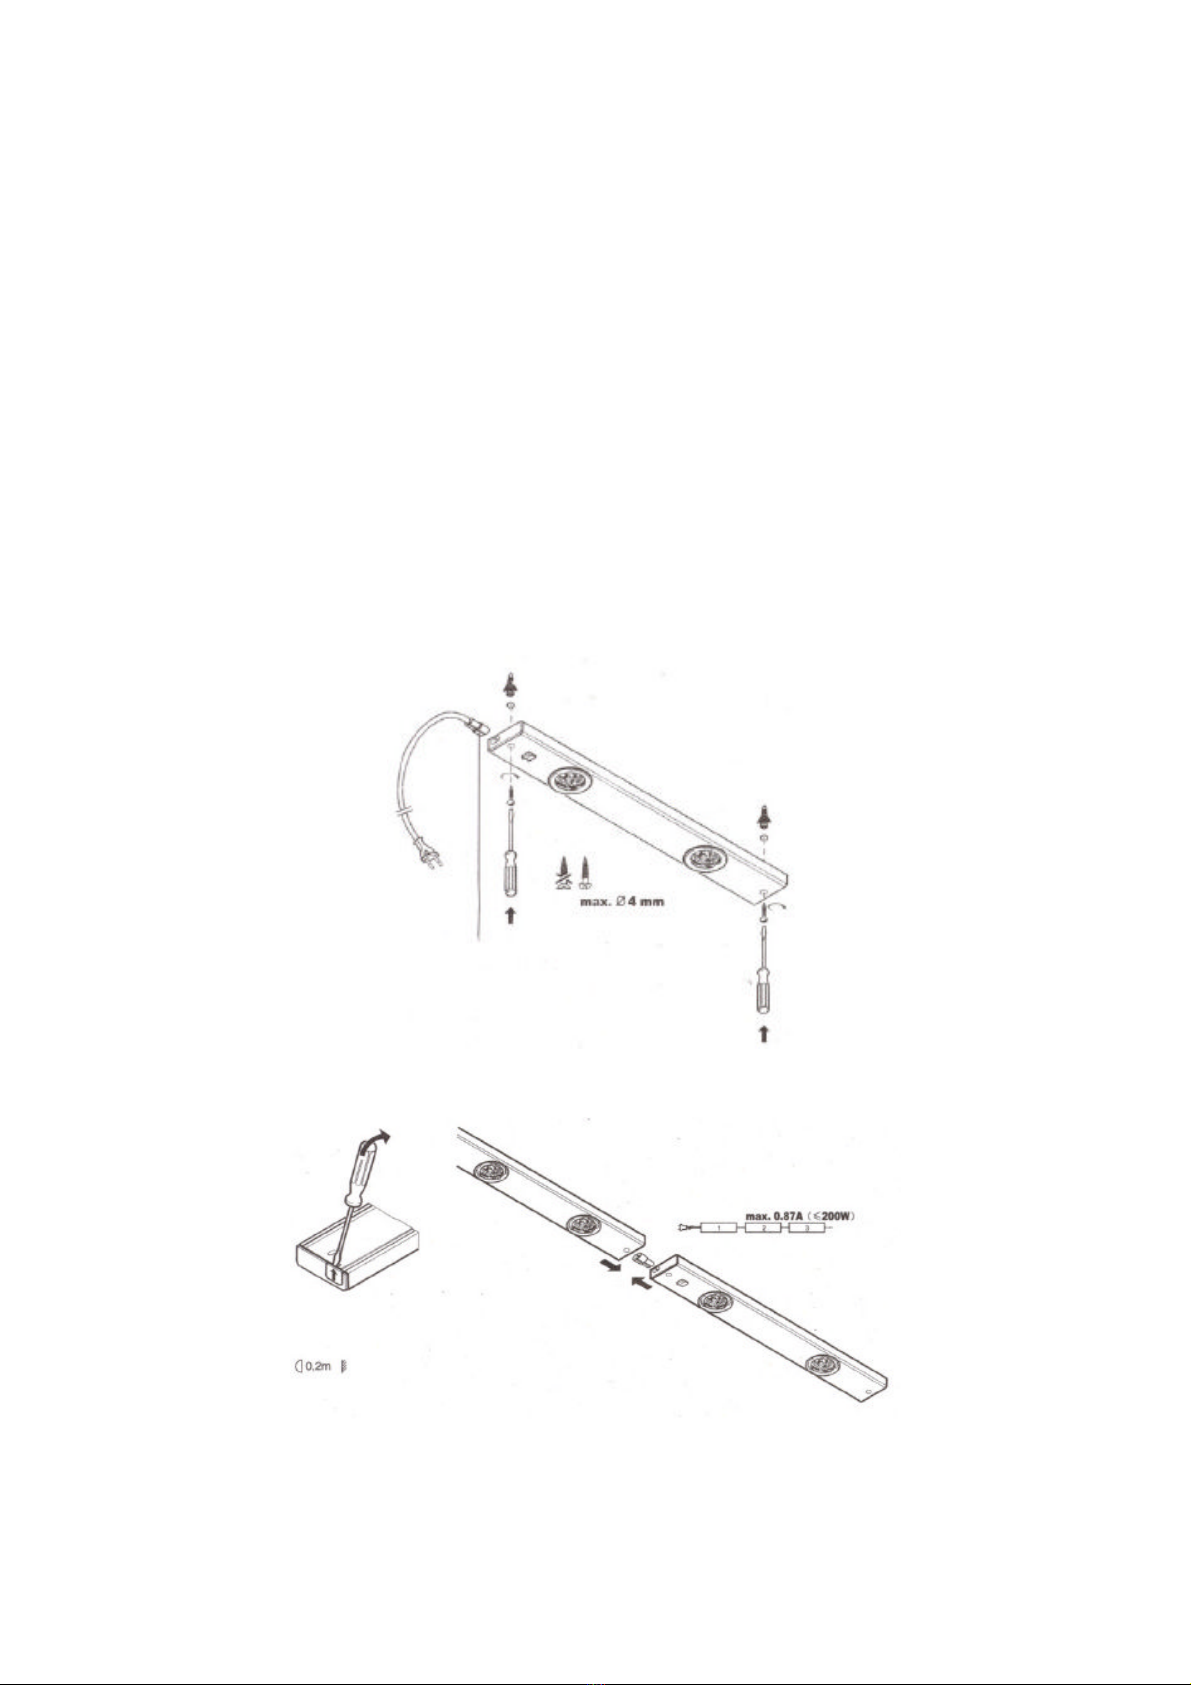
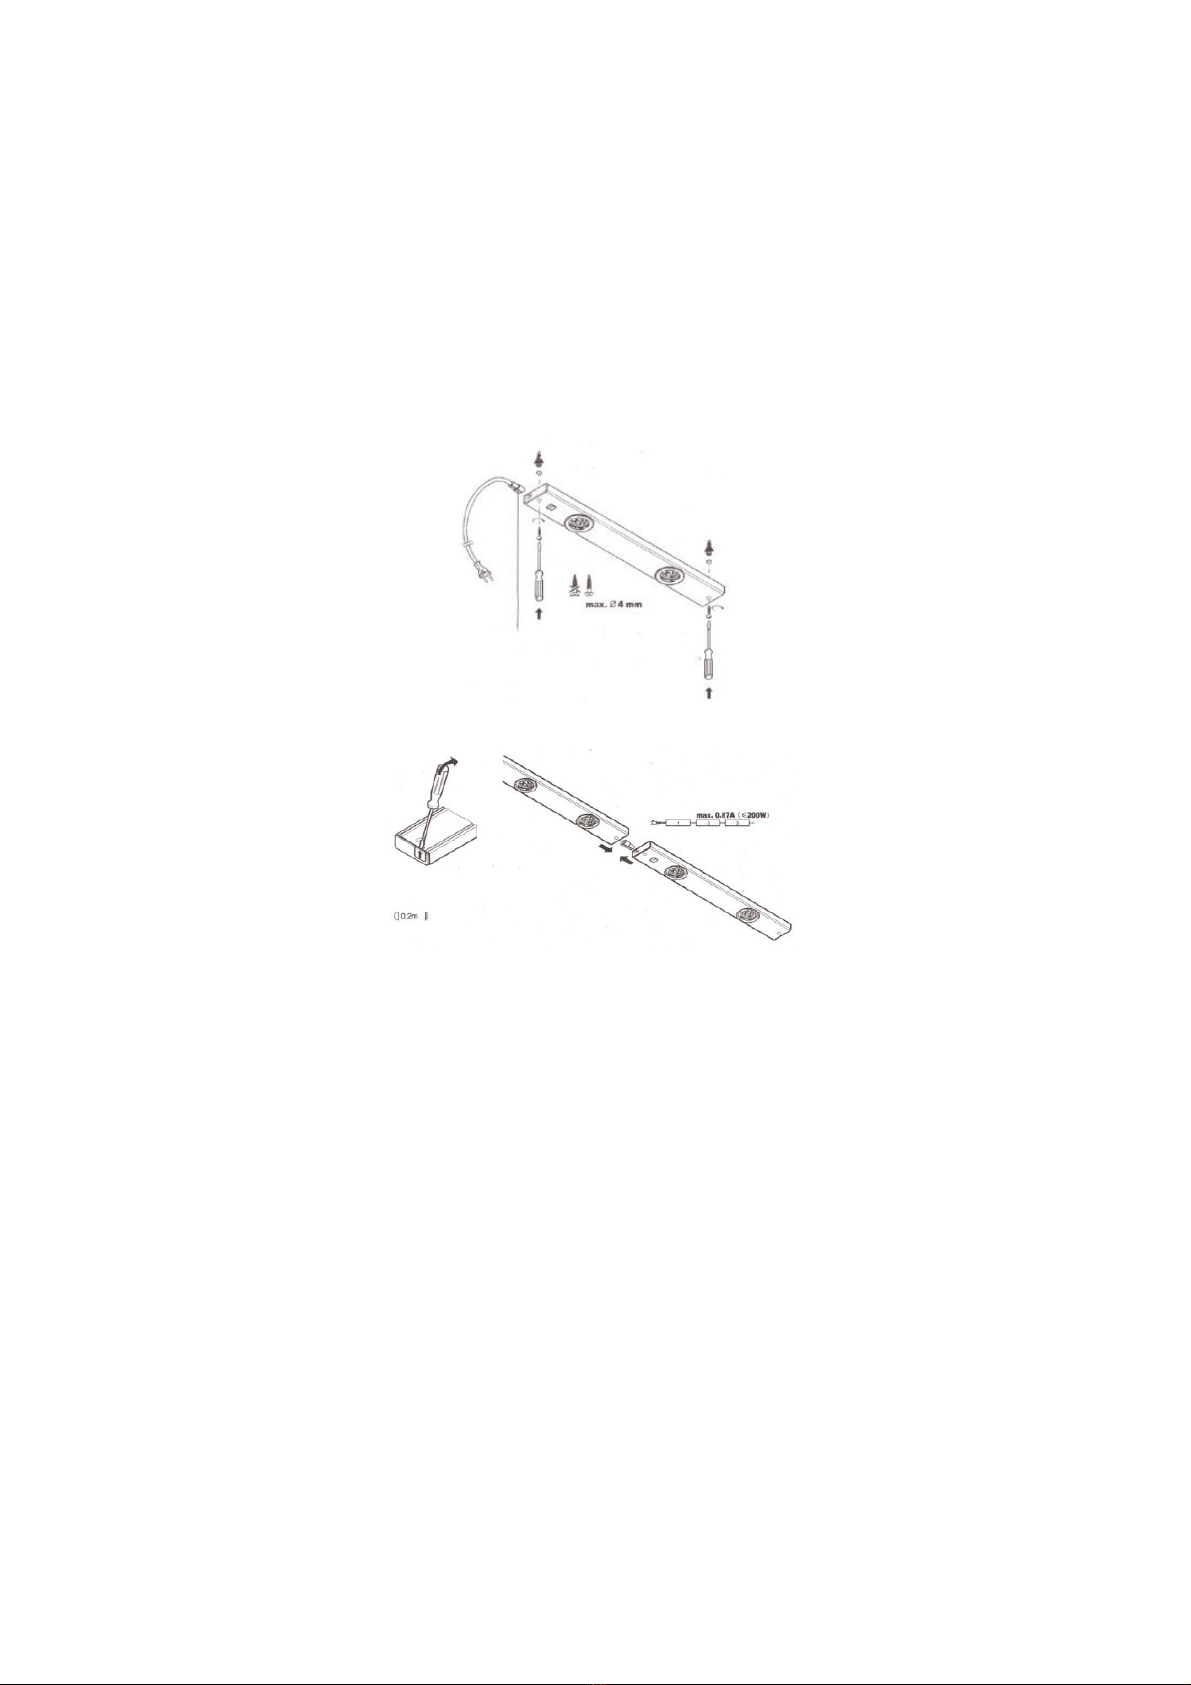
1 Anbauleuchte mit Leuchtmittel
1 Anschlusskabel
1 Verbindungsstecker und Montagematerial
Installation- und Bedienungsanweisung
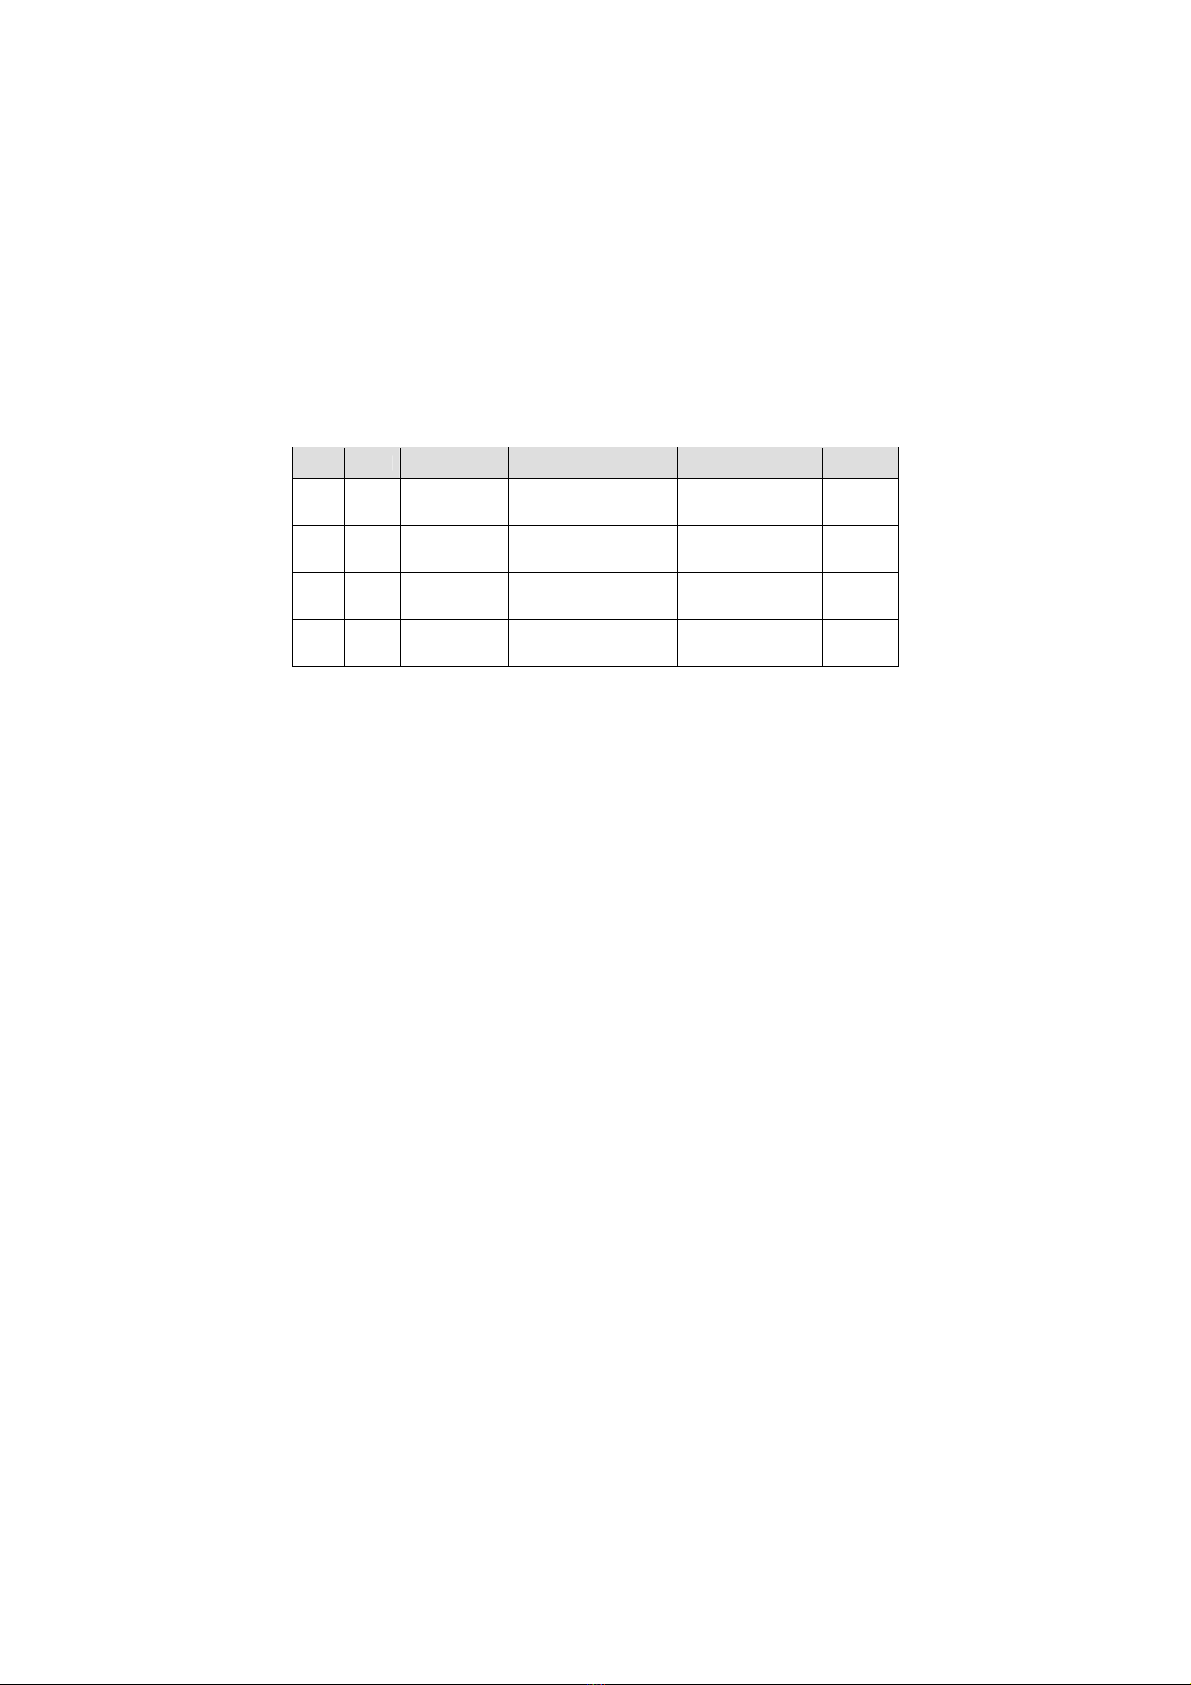
Technische Daten:
Artikel Farbe Anschluss Transformator Leuchtmittel Schutz-
klasse
28030 Weiß 230 V, 50 Hz 220–240V
Sec. 11,6V, 3,9A, 40W
Stiftsockellampe 12 V
G4, 2 max. 20W II
28032 Weiß 230 V, 50 Hz 220–240V
Sec. 11,6V, 4,9A, 60W
Stiftsockellampe 12 V
G4, 3 max. 20W II
28035 Silber 230 V, 50 Hz 220–240V
Sec. 11,6V, 3,9A, 40W
Stiftsockellampe 12 V
G4, 2 max. 20W II
28037 Silber 230 V, 50 Hz 220–240V
Sec. 11,6V, 4,9A, 60W
Stiftsockellampe 12 V
G4, 3 max. 20W II
Sicherheits- und Warnhinweise:
Nehmen Sie die Leuchte vorsichtig aus der Verpackung.
Stellen Sie sicher, dass die Anschlusswerte Ihrer Hausinstallation der Stromzufuhr zur
Leuchte mit den Daten am Typenschild dieser Leuchte übereinstimmen.
Bevor Sie die Leuchte in Betrieb nehmen, versichern Sie sich, dass diese auf dem
Transportweg nicht beschädigt wurde. Bei Beschädigung am Kabel oder elektrischen Teilen
darf die Leuchte nicht betrieben werden. Reparaturen dürfen ausschließlich durch eine
Elektro-Fachkraft ausgeführt werden.
Montieren Sie die Leuchte nicht in unmittelbarer Nähe von Hitzequellen, Gas- oder
Ölleitungen, offenen Feuerstellen, oder ähnlichen Objekten. Bringen Sie die Leuchte nicht mit
extremer Hitze oder offener Flamme in Kontakt.
Während des Betriebes wird das Leuchtmittel heiß. Auch das äußere Lampengehäuse wird
heiß. Berühren Sie die Leuchte während des Betriebes nicht mit bloßen Händen.
Kinder nicht unbeaufsichtigt im Bereich der Leuchten oder anderen elektrischen Geräten
spielen lassen.
Verpackungsmaterial von Kindern und Haustieren fernhalten. Erstickungsgefahr!
Vorsichtig. Die Verpackung enthält Kleinteile, die von Kleinkindern verschluckt werden
können.
Mindestabstand zu beleuchteten Oberflächen 0,2m.
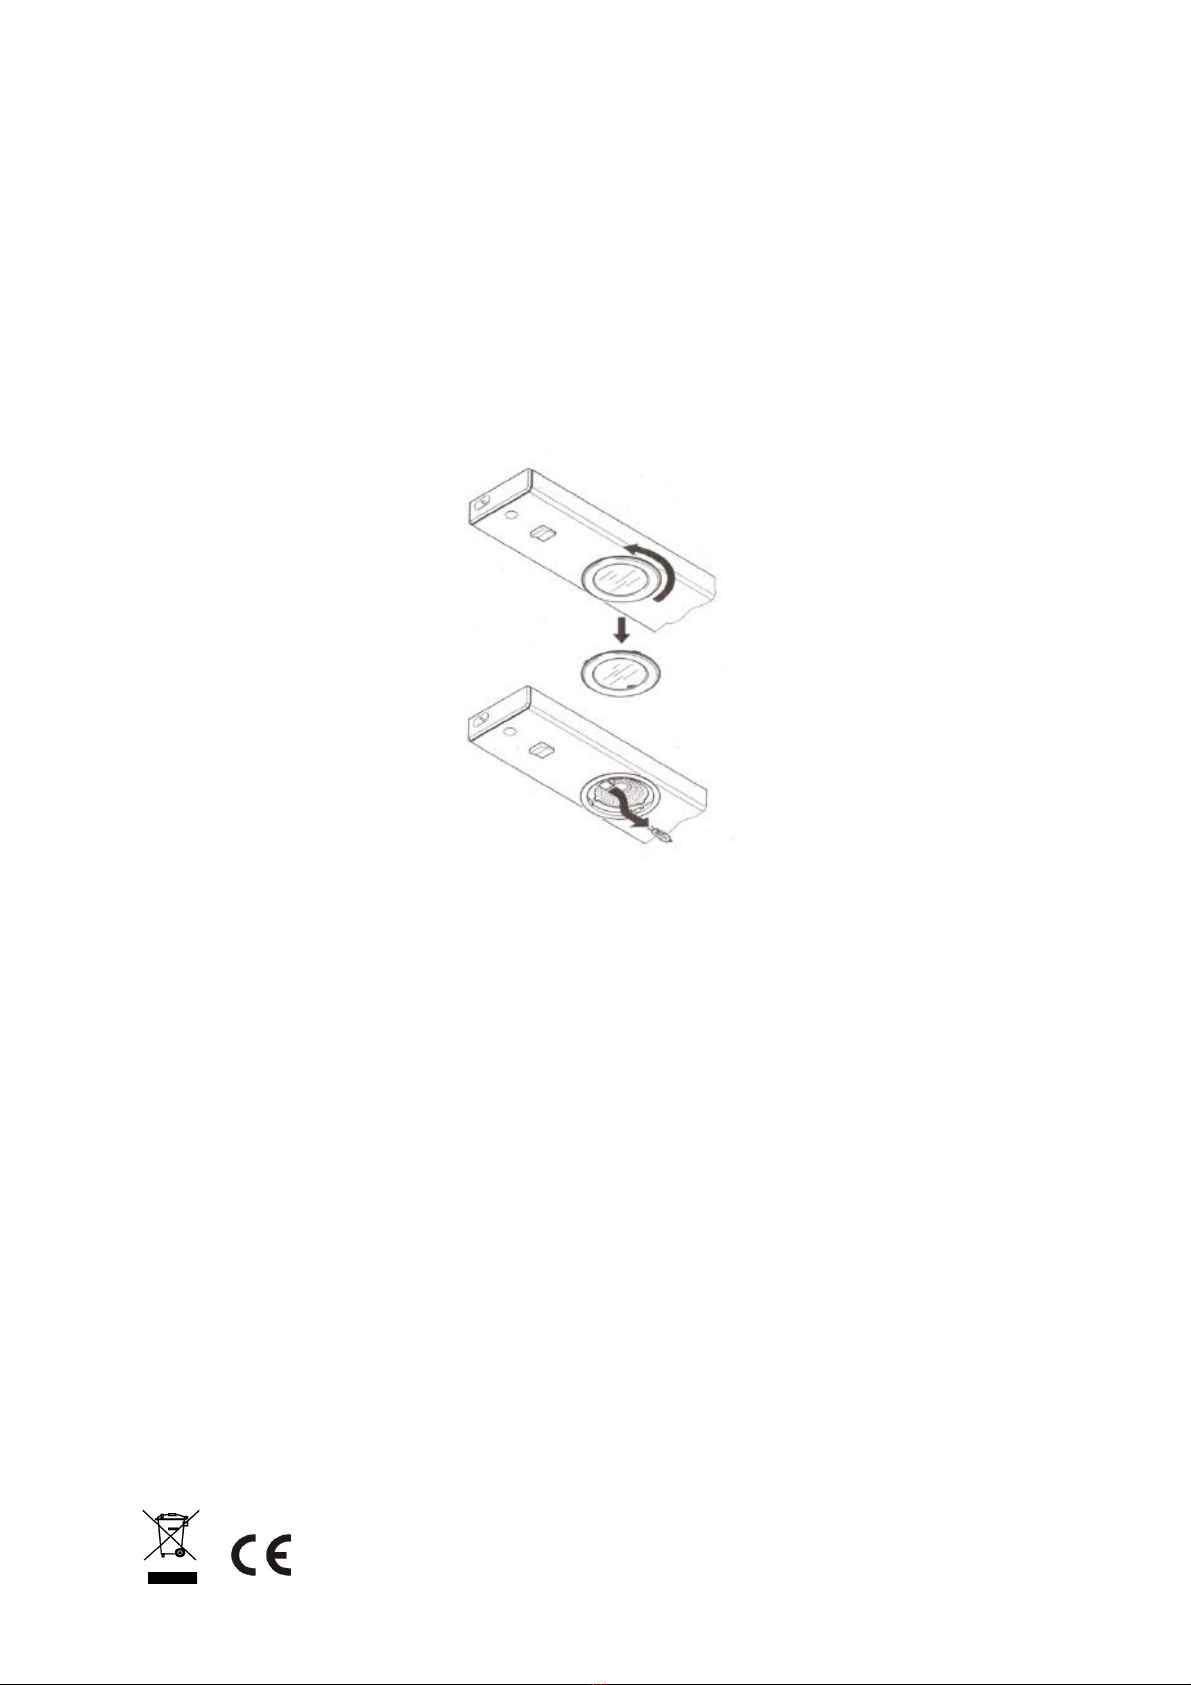
Ersetze jede gebrochene Schutzscheibe.
Das gesamte Produkt darf nicht verändert oder umgebaut werden. Veränderungen an den
Leuchten führen zum Erlöschen der Garantie (Gewährleistung).
Heitronic
®
H. Vollmer GmbH
Allmendring 29
D-75203 Königsbach-Stein

Installationsanweisung Art. Nr. 287030, 29032 28035, 28037 Seite 2 von 3 Stand 08.2007
Installation:
Die Anbauleuchte eignet sich zur Montage auf normal entflammbaren Oberflächen. Achten
Sie darauf, dass der Untergrund geeignet ist das Gewicht der Leuchte dauerhaft und
zuverlässig zu tragen.
Alle Handhabungen an dieser Leuchte wie Montagearbeiten, Leuchtmittelwechsel etc.
müssen im spannungsfreien Zustand ausgeführt werden. Entfernen Sie hierzu den
Netzstecker aus der Steckdose.
Halten Sie das Lampengehäuse an die gewünschte Montageposition und markieren Sie die
Bohrlöcher. Zur Befestigung der Leuchte verwenden Sie geeignete Schrauben, max.
Durchmesser 4 mm. Achten Sie darauf, dass keine Leitungen beschädigt werden.
Stecken Sie die Dübel in die Bohrlöcher und befestigen Sie das Lampengehäuse. Achten Sie
auf eine stabile und zuverlässige Befestigung.
Kabel nicht knicken; bitte darauf achten, dass die Kabel und Stecker frei von Zug- und
Drehkräften sind. Schützen Sie alle Kabel und Isolierungen vor eventuellen Beschädigungen.
Verbinden Sie nun die Anbauleuchte mit dem mitgelieferten Netzanschlusskabel. Das Ein-
und Ausschalten erfolgt am seitlich angebrachten Wippschalter.
Es können mehrere Lampen miteinander verbunden werden. Benutzen Sie hierzu den
mitgelieferten Verbindungsstecker. Beachten Sie dabei: max. 0,87A (≤200W).
Das Typenschild darf nicht entfernt werden.
Heitronic
®
H. Vollmer GmbH
Allmendring 29
D-75203 Königsbach-Stein

Installationsanweisung Art. Nr. 287030, 29032 28035, 28037 Seite 3 von 3 Stand 08.2007
Leuchtmittelwechsel:
Verwenden Sie nur Leuchtmittel wie in den technischen Daten angegeben. Die Verwendung
anderer Leuchtmittel kann zu Überhitzung führen.
Vor dem Leuchtmittelwechsel ist die Stromzufuhr zu unterbrechen.
Falls der Leuchtmittelwechsel unmittelbar nach dem Ausfall des Leuchtmittels vorgenommen
wird, müssen Sie die Leuchte erst ausreichend lange abkühlen lassen.
Drehen Sie vorsichtig die runde Lampenabdeckung und entnehmen Sie das defekte
Leuchtmittel. Stecken Sie das neue Leuchtmittel vorsichtig in die Fassung und überprüfen Sie
den ordnungsgemäßen Sitz. Keine Gewalt oder zu starken Druck ausüben.
Schalten Sie die Spannungsversorgung wieder ein.
Pflege und Wartung:
Vor der Reinigung müssen Sie sicherstellen, dass die Stromzufuhr unterbrochen ist.
Zur Reinigung verwenden Sie ein trockenes oder leicht angefeuchtetes Tuch.
Verwenden Sie niemals Chemikalien, brennbare Reiniger oder Scheuermittel. Diese können
die Oberflächenbeschichtung und/oder die Isolierungen der Leuchte beschädigen.
Entsorgung:
Elektronik-Altgeräte müssen den öffentlichen Sammelstellen zugeführt werden und dürfen
nicht als Hausmüll entsorgt werden.
Heitronic
®
H. Vollmer GmbH
Allmendring 29
D-75203 Königsbach-Stein

Návod k instalaci výr. č. 287030, 29032 28035, 28037 Strana 1 z 3 stav 08.2007
Návod k instalaci a obsluze
Svítidlo
Č. výr. 28030, 28032, 28035, 28037
SrdečněVám děkujeme, že jste se rozhodli pro koupi našeho svítidla.
Naše svítidla jsou vyráběna z robustních a kvalitních materiálůa umožní Vám působivé osvětlení. To
Vám zaručuje atraktivní vzhled a velkou odolnost proti korozi. Svítidlo je vhodné pro montážna
normální nehořlavé plochy a je určeno pouze pro použití v suchých vnitřních prostorách.
Tento návod k instalaci a obsluze si pozorněpřečtěte a dobře uschovejte.
V případěvěcných škod a zranění v důsledku nerespektování tohoto návodu, nesprávného zacházení
nebo změn provedených na výrobku nepřebíráme žádné ručení.
Obsah balení:
1 svítidlo se světelným zdrojem
1 připojovací kabel
1 připojovací konektor a montážní materiál
Návod k instalaci a obsluze
Technické údaje:
Výrobek Barva Přípoj Transformátor Zdroj světla Stupeň
ochrany
28030 bílá 230 V, 50
Hz
220–240V
Sek. 11,6V, 3,9A, 40W
Žárovka s kolíkovými
vývody 12 V
G4, 2 max. 20W
II
28032 bílá 230 V, 50
Hz
220–240V
Sek. 11,6V, 4,9A, 60W
Žárovka s kolíkovými
vývody 12 V
G4, 3 max. 20W
II
28035 stříbrná 230 V, 50
Hz
220–240V
Sek. 11,6V, 3,9A, 40W
Žárovka s kolíkovými
vývody 12 V
G4, 2 max. 20W
II
28037 stříbrná 230 V, 50
Hz
220–240V
Sek. 11,6V, 4,9A, 60W
Žárovka s kolíkovými
vývody 12 V
G4, 3 max. 20W
II
Bezpečnostní a výstražné pokyny:
Opatrněvyjměte svítidlo z balení.
Ujistěte se, že přípojné hodnoty Vaší domovní elektroinstalace souhlasí s údaji uvedenými na
typovém štítku tohoto svítidla.
Před uvedením svítidla do provozu se ujistěte, že nebylo při přepravěpoškozeno. Je-li
poškozen kabel nebo elektrické části, nesmí být svítidlo používáno. Opravy smí provádět
pouze odborní elektrikáři.
Nemontujte toto svítidlo v bezprostřední blízkosti zdrojůtepla, vedení plynu nebo oleje,
otevřeného ohněnebo podobných objektů. Nepřipusťte kontakt svítidla s extrémním horkem
nebo otevřeným plamenem.
Během provozu se světelný zdroj ohřívá. Také vnější kryt svítidla bude horký. Nedotýkejte se
svítidla během provozu holýma rukama.
Nenechávejte děti, aby si bez dozoru hrály v oblasti svítidel nebo jiných elektrických přístrojů.
Udržujte materiál balení mimo dosah dětí a domácích zvířat. Nebezpečí udušení!
Pozor. Balení obsahuje malé části, které mohou být malými dětmi spolknuty.
Minimální vzdálenost od osvětlovaných ploch činí 0,2 m.
Každé rozbité ochranné sklo vyměňte.
Celý výrobek nesmí být měněn popř. měněna jeho konstrukce. Změny na svítidle vedou ke
ztrátězáruky (ručení).
Heitronic
®
H. Vollmer GmbH
Allmendring 29
D-75203 Königsbach-Stein

Návod k instalaci výr. č. 287030, 29032 28035, 28037 Strana 2 z 3 stav 08.2007
Instalace:
Svítidlo je vhodné pro montážna normálních nehořlavých plochách. Dbejte na to, aby měl
podklad dostatečnou nosnost pro trvale spolehlivé držení svítidla.
Všechny činnosti na tomto svítidle, jako montážní práce, výměna světelného zdroje atd. musí
být prováděny ve stavu bez napětí. Vytáhněte proto síťovou zástrčku ze zásuvky.
Přidržte těleso svítidla na požadované pozici montáže a označte otvory pro vrtání. Pro
upevnění svítidla použijte vhodné šrouby s max. průměrem 4 mm. Dbejte na to, aby nebyla
poškozena žádná vedení.
Do vyvrtaných otvorůzastrčte hmoždinky a upevněte těleso svítidla. Dbejte na stabilní a
spolehlivé upevnění svítidla.
Kabel nelámejte; dbejte na to, aby kabel a konektory nebyly namáhány tahovými a zkrutnými
silami. Všechny kabely a izolace chraňte před případným poškozením.
Připojte svítidlo dodaným síťovým kabelem. Zapínání a vypínání se provádí bočněumístěným
kolébkovým vypínačem.
Vzájemněmůže být propojeno více svítidel. K tomu používejte přiložený propojovací konektor.
Dbejte prosím na: max. 0,87A (≤200W).
Typový štítek se nesmí odstraňovat.
Heitronic
®
H. Vollmer GmbH
Allmendring 29
D-75203 Königsbach-Stein

Návod k instalaci výr. č. 287030, 29032 28035, 28037 Strana 3 z 3 stav 08.2007
Výměna světelného zdroje:
Použijte pouze světelný zdroj uvedený v technických údajích. Použití jiných světelných zdrojů
může vést k přehřátí.
Před výměnou světelného zdroje je nutné odpojit proud.
Pokud se výměna světelného zdroje provádí bezprostředněpo jeho výpadku, musí se nejprve
nechat svítidlo dostatečnědlouho vychladnout.
Opatrněvyšroubujte kulatý kryt a vyjměte vadný světelný zdroj. Nový světelný zdroj opatrně
zastrčte do patice a zkontrolujte jeho správné dosednutí. Nepoužívejte žádné násilí nebo příliš
silný tlak.
Opět zapněte přívod proudu.
Péče a údržba:
Před čištěním se musíte ujistit, že je přívod proudu odpojený.
Pro čištění používejte suchý nebo mírněnavlhčený hadr.
Nikdy nepoužívejte chemikálie, hořlavé ani abrazivní čisticí prostředky. Ty by mohly poškodit
povrchovou vrstvu a/nebo izolace svítidla.
Likvidace:
Staré elektronické přístroje musí být odevzdávány ve sběrnách surovin a nesmí být
likvidovány jako domovní odpad.
Heitronic
®
H. Vollmer GmbH
Allmendring 29
D-75203 Königsbach-Stein

Installation instructions Art. no. 287030, 29032 28035, 28037 Page 1 of 3 Last revision 08.2007
Installation and operating instructions
Surface-mounted luminaire
Art. no. 28030, 28032, 28035, 28037
Congratulations on your purchase of our surface-mounted luminaire.
Our lights are made of sturdy, high-quality materials and provide pleasant and attractive lighting. This
will guarantee an attractive visual appearance and a high degree of corrosion resistance. This surface-
mounted luminaire is suitable for installation on regularly flammable surfaces and may only be used in
dry and protected indoor rooms.
Please read these installation and operating instructions carefully and store them for future
reference.
We are not responsible for any property damage or personal injury caused by failure to observe these
instructions, improper handling or unauthorised modifications to the product.
Contents of packaging:
1 surface-mounted luminaire with illuminant
1 wiring cable
1 connecting plug and installation material
Installation and operating instructions
Technical specifications:
Item Colour Connection Transformer Illuminant Protection
class
28030 White 230 V, 50 Hz 220–240V
Sec. 11.6V, 3.9A, 40W
Pin-type base lamp
12 V
G4, 2 max. 20W
II
28032 White 230 V, 50 Hz 220–240V
Sec. 11.6V, 4.9A, 60W
Pin-type base lamp
12 V
G4, 3 max. 20W
II
28035 Silver 230 V, 50 Hz 220–240V
Sec. 11.6V, 3.9A, 40W
Pin-type base lamp
12 V
G4, 2 max. 20W
II
28037 Silver 230 V, 50 Hz 220–240V
Sec. 11.6V, 4.9A, 60W
Pin-type base lamp
12 V
G4, 3 max. 20W
II
Safety information and warnings:
Carefully remove the luminaire from its packaging.
Make sure the electrical specifications for the connection lines in your building correspond with
the specifications given on the nameplate of this luminaire.
Before starting to use this luminaire, make sure it has not been damaged during transport.
Never use the luminaire if it shows any damage on its cables or electrical components. All
repairs must be performed by a trained electrician only.
Never install the luminaire in close vicinity of heat sources, gas or oil lines, open fireplaces or
other similar objects. Never allow the luminaire to come into contact with open flames or
external heat sources.
The illuminant will become very hot during operation. The outer light housing will become hot
as well. Never touch the light with your bare hands during operation.
Never leave children unattended in the vicinity of the lights and do not allow them to play with
electrical devices.
Keep packaging material away from the reach of children and pets. Risk of suffocation!
Caution. The packaging contains small parts that may be swallowed by children.
Minimum distance to lit surfaces 0.2 m.
Replace any broken safety screens immediately.
No part of the product must be modified or retrofit. Any changes to the luminaires will void
your guarantee (warranty).
Heitronic
®
H. Vollmer GmbH
Allmendring 29
D-75203 Königsbach-Stein

Installation instructions Art. no. 287030, 29032 28035, 28037 Page 2 of 3 Last revision 08.2007
Installation:
These surface-mounted luminaires are suitable for installation on regularly flammable
surfaces. Make sure the subsurface is sturdy enough to safely and permanently support the
weight of the light.
Before handling this luminaire, e.g. during installation, when changing the illuminant, etc.,
make sure it has been completely discharged. To de-energise the luminaire, unplug the mains
plug from the socket.
Hold the light housing up to the desired installation position and mark the drill holes. To fasten
the luminaire, use suitable screws with a diameter of no more than 4 mm. Make sure no lines
can be damaged.
Insert the plugs into the drill holes and tighten the light housing. Make sure the luminaire is
mounted tightly and securely.
Do not bend the wire; make sure the wire and the plug are not subjected to any tensile or
rotary forces. Protect all wires and insulators against any damage.
Proceed by connecting the surface-mounted luminaire with the included mains supply cable.
The rocker switch on the side is used to switch the light on and off.
You can connect several lights with one another. To do do, use the included connecting plug.
When doing so, pay attention to: max. 0.87A (≤200W).
Do not remove the nameplate.
Heitronic
®
H. Vollmer GmbH
Allmendring 29
D-75203 Königsbach-Stein

Installation instructions Art. no. 287030, 29032 28035, 28037 Page 3 of 3 Last revision 08.2007
Changing the illuminant:
Use only illuminants listed in the technical specifications. The use of other illuminants may
cause the light to overheat.
Disconnect the power supply before changing the illuminant.
If you are replacing the illuminant immediately after the light has failed, wait until the light has
cooled off sufficiently.
Carefully unscrew the light cover and remove the defective illuminant. Carefully insert the new
illuminant and make sure the illuminant is properly installed in the socket. Do not apply too
much force or pressure.
Switch the voltage supply back on.
Maintenance and care:
Prior to cleaning the light, make sure it has been disconnected form the power supply.
Use a dry or slightly moistened cloth for cleaning.
Never use any chemicals, flammable cleaning agents or abrasives. These may cause damage
to the surface coating and/or the insulators of the light.
Disposal:
Used electronic devices must be collected for recycling and must never be disposed off with
regular household garbage.
Heitronic
®
H. Vollmer GmbH
Allmendring 29
D-75203 Königsbach-Stein

Instructions d'installation Réf. art. : 287030, 29032 28035, 28037 Page 1 / 3 Édition 08.2007
Instructions d'installation et d'utilisation
Luminaire
Réf. art. 28030, 28032, 28035, 28037
Merci d'avoir choisi d'acheter un de nos luminaires.
Nos luminaires sont fabriqués dans de robustes matériaux de qualité supérieure et vous promettent un
éclairage agréable. Ceci leur confère un aspect séduisant et une grande résistance à la corrosion. Ce
luminaire est conçu pour un montage sur des surfaces d'inflammabilité normale et est réservé
exclusivement à une utilisation à l'intérieur, dans des locaux secs.
Vous devez lire attentivement ces instructions d'installation et d'utilisation et bien les
conserver.
Nous déclinons toute responsabilité en cas de dommages matériels ou aux personnes suite à la non
observation de ces instructions, à une manipulation abusive ou à des changements effectués sur le produit.
Contenu de l'emballage :
1 luminaire avec ampoule
1 câble de branchement
1 connecteur avec matériel de montage
Instructions d'installation et d'utilisation
Caractéristiques techniques:
Article Couleur Branchement Transformateur Ampoule Classe de
protection
28030 blanc 230 V, 50
Hz
220–240V
Sec. 11,6V, 3,9A, 40W
Lampe avec culot à
ergots 12 V
G4, 2 max. 20W
II
28032 blanc 230 V, 50
Hz
220–240V
Sec. 11,6V, 4,9A, 60W
Lampe avec culot à
ergots 12 V
G4, 3 max. 20W
II
28035 argent 230 V, 50
Hz
220–240V
Sec. 11,6V, 3,9A, 40W
Lampe avec culot à
ergots 12 V
G4, 2 max. 20W
II
28037 argent 230 V, 50
Hz
220–240V
Sec. 11,6V, 4,9A, 60W
Lampe avec culot à
ergots 12 V
G4, 3 max. 20W
II
Consignes de sécurité et avertissements :
Sortez doucement le luminaire de son emballage.
Vérifiez sur votre tableau électrique que les valeurs de branchement pour l'alimentation de ce
luminaire correspondent aux données indiquées sur sa plaque signalétique.
Avant de mettre en service le luminaire, assurez-vous qu'il n'a pas été endommagé durant le
transport. Si le câble ou les pièces électriques sont endommagés, il n'est pas permis d'utiliser
ce luminaire. Seul, un électricien est autorisé à effectuer des réparations.
Ne montez pas ce luminaire à proximité immédiate des sources de chaleur, des conduites de
gaz et de mazout, de feux ou autres objets similaires. Ne mettez pas le luminaire en contact
avec une chaleur extrême ni une flamme nue.
Au cours de son utilisation, l'ampoule devient brûlante. L'enveloppe extérieure de la lampe
également devient brûlante. Ne touchez pas le luminaire à mains nues quand il est allumé.
Ne laissez pas les enfants jouer sans surveillance près des luminaires ni d'autres appareils
électriques.
Ne laissez pas les enfants ou les animaux domestiques s'approcher du matériel d'emballage.
Ils risquent de s'étouffer !
Attention. L'emballage contient de petites pièces qui peuvent être ingérées par les enfants.
Distance minimum vers les surfaces éclairées 0,2 m.
Remplacez les verres cassés.
Le produit dans son ensemble ne doit pas être modifié ni transformé. Toute modification du
luminaire entraîne l'annulation de la garantie.
Heitronic
®
H. Vollmer GmbH
Allmendring 29
D-75203 Königsbach-Stein

Instructions d'installation Réf. art. : 287030, 29032 28035, 28037 Page 2 / 3 Édition 08.2007
Installation :
Ce luminaire est conçu pour un montage sur des surfaces d'une inflammabilité normale.
Vérifiez que la base est bien adaptée et peut supporter durablement le poids du luminaire de
manière fiable.
Toutes les manipulations sur ce luminaire, tel le montage, le remplacement de l'ampoule et
autre doivent s'effectuer hors tension. Pour ce faire, sortez la fiche de la prise électrique.
Tenez le boîtier de la lampe dans la position voulue et repérez les trous à percer. Pour fixer le
luminaire, utilisez des vis adéquates de diamètre maxi 4 mm. Attention à ne pas endommager
de conduites.
Enfoncez les chevilles dans les trous percés puis fixez le boîtier de la lampe. Veillez à une
fixation solide et fiable.
Ne pliez pas les câbles, veillez à ce que les câbles et la prise ne subissent aucune force de
traction ni de rotation. Protégez tous les câbles et isolations contre d'éventuels dommages.
Raccordez le luminaire avec le câble fourni. Pour allumer ou éteindre, utilisez l'interrupteur à
bascule placé sur le côté.
Il est possible de raccorder plusieurs lampes entre elles. Utilisez pour ce faire le connecteur
fourni. Intensité maximale à respecter : max. 0,87A (≤200W).
Il n'est pas permis de retirer la plaque signalétique.
Heitronic
®
H. Vollmer GmbH
Allmendring 29
D-75203 Königsbach-Stein

Instructions d'installation Réf. art. : 287030, 29032 28035, 28037 Page 3 / 3 Édition 08.2007
Remplacement des ampoules :
Utilisez uniquement les ampoules indiquées dans les coordonnées techniques. L'emploi
d'autres ampoules peut entraîner une surchauffe.
Il faut couper le courant avant de remplacer une ampoule.
Au cas où vous voudriez remplacer une ampoule juste après que l'ampoule précédente ait
grillé, vous devez d'abord laisser le luminaire refroidir suffisamment.
Tournez avec précaution le couvercle rond de la lampe puis sortez l'ampoule cassée.
Introduisez doucement la nouvelle ampoule dans la douille puis vérifiez qu'elle y est bien
assise. N'exercez aucune force ni pression excessive.
Remettez le courant.
Soin et entretien :
Vérifiez avant le nettoyage que le courant est bien coupé.
Utilisez pour nettoyer un chiffon sec ou légèrement humecté.
N'employez jamais de produits chimiques, de détergents inflammables ni abrasifs. Ils
risqueraient d'abîmer le revêtement de surface et/ou les isolations de la lampe.
Élimination :
Les appareils électroniques usagés doivent être amenés aux déchetteries officielles ; ne les
jetez jamais avec les ordures ménagères.
Heitronic
®
H. Vollmer GmbH
Allmendring 29
D-75203 Königsbach-Stein

Manuale di installazione cod. art. 287030, 29032 28035, 28037 Pagina 1 di 3 Stato 08.2007
Manuale di installazione e funzionamento
Apparecchio di illuminazione per montaggio a plafone
Cod.art. 28030, 28032, 28035, 28037
Grazie per aver scelto il nostro apparecchio di illuminazione per montaggio a plafone.
I nostri apparecchi di illuminazione sono costruiti in materiali robusti e pregiati e Le permettono
un'illuminazione gradevole. Questo Le garantisce un'estetica piacevole ed un'alta resistenza alla
corrosione. L'apparecchio di illuminazione per montaggio a plafone è adatto per il montaggio su
superfici normalmente infiammabili ed è solo per l'utilizzo in ambienti interni asciutti.
Legga attentamente le istruzioni di installazione ed utilizzo e le conservi con cura.
In caso di danni agli oggetti o alle persone causati dall'inosservanza del manuale, da manipolazione
non conforme o per modifiche al prodotto non ci assumiamo responsabilità.
Contenuto imballo:
1 apparecchio di illuminazione per montaggio a plafone con lampadina
1 cavo di collegamento
1 spina di raccordo e materiale di montaggio
Manuale di installazione e funzionamento
Specifiche tecniche:
Articolo Colore Collegame
nto Trasformatore Lampadina Classe di
protezione
28030 Bianco 230 V,
50 Hz
220–240V
Sec. 11,6V, 3,9A, 40W
Lampada con zoccolo a
spina 12 V
G4, 2 max. 20W
II
28032 Bianca 230 V,
50 Hz
220–240V
Sec. 11,6V, 4,9A, 60W
Lampada con zoccolo a
spina 12 V
G4, 3 max. 20W
II
28035 Argento 230 V,
50 Hz
220–240V
Sec. 11,6V, 3,9A, 40W
Lampada con zoccolo a
spina 12 V
G4, 2 max. 20W
II
28037 Argento 230 V,
50 Hz
220–240V
Sec. 11,6V, 4,9A, 60W
Lampada con zoccolo a
spina 12 V
G4, 3 max. 20W
II
Indicazioni di sicurezza ed avvisi:
Estragga con attenzione la lampada dall'imballo.
Si assicuri che i valori di collegamento del Suo impianto domestico per l'alimentazione alla
lampada siano conformi ai dati riportati sulla targhetta di questa lampada.
Prima di mettere in funzione la lampada, si assicuri che questa non sia stata danneggiata
durante il trasporto. In caso di danni al cavo o a componenti elettrici non utilizzare la lampada.
Le riparazioni possono essere svolte solo da un elettricista esperto.
Non monti la lampada nelle immediate vicinanze di fonti di calore, condotte di gas o olio,
fiamme vive, o oggetti simili. Non metta la lampada a contatto con calore estremo o fiamme
vive.
Durante il funzionamento la lampadina diventa calda. Anche la custodia esterna della
lampada diventa calda. Non tocchi mai la lampada durante il funzionamento a mani nude.
Non lasciare giocare i bambini senza sorveglianza nella zona delle lampade o di altri
apparecchi elettrici.
Tenere il materiale di imballo lontano da bambini ed animali. Pericolo di soffocamento!
Attenzione. La confezione contiene minuteria che potrebbe essere ingerita dai bambini.
Distanza minima dalle superfici illuminate 0,2m.
Sostituire ogni disco protettivo rotto.
L'intero prodotto non può essere modificato o convertito. Modifiche alle lampade causano una
scadenza della garanzia.
Heitronic
®
H. Vollmer GmbH
Allmendring 29
D-75203 Königsbach-Stein

Manuale di installazione cod. art. 287030, 29032 28035, 28037 Pagina 2 di 3 Stato 08.2007
Montaggio:
La lampada da montaggio a plafone è adatta per montaggio su superfici normalmente
infiammabili. Si assicuri che il fondo sia adatto a sostenere per lungo tempo ed in maniera
affidabile il peso della lampada.
Tutti i lavori su questa lampada come i lavori di montaggio, il cambio della lampadina etc.
devono essere svolti senza tensione. Stacchi quindi la spina dalla presa.
Tenga la custodia della lampada sulla posizione di montaggio desiderata e segni i fori. Per
fissare la lampada utilizzi le viti adatte, diametro max. 4 mm. Si assicuri di non danneggiare
linee.
Inserisca i tasselli nei fori e fissi la custodia della lampada. Faccia in modo che il fissaggio sia
stabile ed affidabile.
Non piegare i cavi, assicurarsi che cavo e spina siano liberi da forze di trazione e torsione.
Protegga tutti i cavi e gli isolamenti da eventuali danni.
Colleghi adesso la lampada per montaggio a plafone con il cavo di collegamento fornito.
L'accensione e lo spegnimento hanno luogo tramite l'interruttore a bilico laterale.
Si possono collegare tra loro più lampade. A tale scopo utilizzi la spina di raccordo fornita.
Osservi: max. 0,87A (≤200W).
Non si può rimuovere la targhetta.
Heitronic
®
H. Vollmer GmbH
Allmendring 29
D-75203 Königsbach-Stein

Manuale di installazione cod. art. 287030, 29032 28035, 28037 Pagina 3 di 3 Stato 08.2007
Cambio lampadina:
Utilizzi solo le lampadine indicate nelle specifiche tecniche. L'utilizzo di altre lampadine può
causare un surriscaldamento.
Prima di sostituire la lampadina si deve interrompere il flusso di corrente.
Se il cambio lampadina è eseguito subito dopo che la lampadina si è fulminata, la lampada
deve prima raffreddarsi per un tempo sufficiente.
Giri con attenzione la copertura lampada rotonda e rimuova la lampadina difettosa. Inserisca
la nuova lampadina con attenzione nell'attacco e controlli che la sede sia in ordine. Non
esercitare una forza eccessiva.
Ripristini l'alimentazione.
Cura e manutenzione:
Prima della pulizia si assicuri che il flusso di corrente sia interrotto.
Per la pulizia utilizzi solo un panno asciutto o leggermente inumidito.
Non utilizzi mai agenti chimici, detergenti infiammabili o abrasivi. Essi potrebbero danneggiare
il rivestimento superficiale e/o l'isolamento della lampada.
Smaltimento:
Gli apparecchi elettronici obsoleti devono essere portati a centri di raccolta pubblici e non
possono essere smaltiti con la spazzatura domestica.
Heitronic
®
H. Vollmer GmbH
Allmendring 29
D-75203 Königsbach-Stein

Installatie aanwijzing art. nr. 287030, 29032 28035, 28037 Pagina 1 van 3 Stand 08.2007
Installatie- en bedieningsinstructie
Inbouwlamp
Art. nr. 28030, 28032, 28035, 28037
Hartelijk dank dat u voor de aankoop van onze inbouwlamp heeft gekozen.
Onze lampen zijn vervaardigd van robuuste en hoogwaardige materialen en zorgen voor een
attractieve verlichting. Bovendien is een attractief uiterlijk en een hoge corrosiebestendigheid
gegarandeerd. De inbouwlamp is geschikt voor montage op normaal ontvlambare oppervlakken en
mag uitsluitend in droge ruimtes binnenshuis gebruikt worden.
Lees deze installatie- en bedieningsinstructie a.u.b. zorgvuldig door en bewaar ze goed.
Wij stellen ons niet aansprakelijk voor persoonlijke of materiële schade die ontstaat door het niet in
acht nemen van de handleiding, het ondeskundig hanteren van het product of het aanbrengen van
wijzingen aan het product.
Inhoud van de verpakking:
1 Inbouwspot met lamp
1 Aansluitkabel
1 Verbindingsstekker en montagemateriaal
Installatie - en bedieningsinstructie
Technische gegevens:
Artikel Kleur Aansluiting Transformator Lamp Veiligheids
klasse
28030 Wit 230 V, 50 Hz 220–240V
Sec. 11,6V, 3,9A, 40W
Stiftvoetlamp 12 V
G4, 2 max. 20W II
28032 Wit 230 V, 50 Hz 220–240V
Sec. 11,6V, 4,9A, 60W
Stiftvoetlamp 12 V
G4, 3 max. 20W II
28035 Zilver 230 V, 50 Hz 220–240V
Sec. 11,6V, 3,9A, 40W
Stiftvoetlamp 12 V
G4, 2 max. 20W II
28037 Zilver 230 V, 50 Hz 220–240V
Sec. 11,6V, 4,9A, 60W
Stiftvoetlamp 12 V
G4, 3 max. 20W II
Veiligheids- en waarschuwingsinstructies:
Neem de lamp voorzichtig uit de verpakking.
Controleer of de aansluitwaarden van de stroomtoevoer door uw huisinstallatie overeenkomen
met de gegevens op het typeplaatje van deze lamp.
Controleer eerst of de lamp tijdens het transport beschadigd werd, voordat u ze in gebruik
neemt. Als de kabel of elektrische delen beschadigd zijn, mag de lamp niet gebruikt worden.
Reparaties mogen uitsluitend door een elektricien worden uitgevoerd.
Monteer de lamp niet in de directe nabijheid van hittebronnen, gas- of olieleidingen,
stookplaatsen of dergelijke objecten. Laat de lamp niet in aanraking komen met extreme hitte
of met open vuur.
De lamp wordt heet tijdens het gebruik. De behuizing van de lamp wordt echter ook heet.
Raak de lamp tijdens de werking niet met blote handen aan.
Laat kinderen nooit zonder toezicht in de buurt van lampen of andere elektrische apparaten
spelen.
Verpakkingsmateriaal uit de buurt van kinderen en huisdieren houden. Verstikkingsgevaar!
Voorzichtig. De verpakking bevat kleine delen, die door kinderen ingeslikt zouden kunnen
worden.
Minimum afstand tot verlichte oppervlakken 0,2m.
Vervang elk gebroken veiligheidsglas.
Het gehele product mag niet gewijzigd of omgebouwd worden. Door wijzigingen aan de
lampen komt de garantie (waarborg) te vervallen.
Heitronic
®
H. Vollmer GmbH
Allmendring 29
D-75203 Königsbach-Stein

Installatie aanwijzing art. nr. 287030, 29032 28035, 28037 Pagina 2 van 3 Stand 08.2007
Installatie:
De inbouwspot is geschikt voor montage op normaal ontvlambare oppervlakken. Let erop dat
de ondergrond geschikt is om het gewicht van de lamp constant en betrouwbaar te dragen.
Alle werkzaamheden aan deze inbouwspot, zoals montagewerkzaamheden, het vervangen
van de lamp enz., moeten uitgevoerd worden terwijl de spot spanningsvrij is. Trek hiervoor de
stekker uit het stopcontact.
Houd de behuizing in de gewenste montagepositie en markeer de boorgaten. Gebruik voor de
bevestiging van de lamp geschikte schroeven met een max. diameter van 4 mm. Let op dat u
geen leidingen beschadigt.
Steek de pluggen in de boorgaten en bevestig de behuizing van de lamp. Let op dat de
behuizing stabiel en betrouwbaar bevestigd is.
Kabel niet knikken; let er a.u.b. op dat de kabels en de stekkers vrij zijn van trek-en
draaikrachten. Bescherm alle kabels en isolaties tegen eventuele beschadigingen.
Verbind de inbouwspot nu met de meegeleverde netaansluitkabel. Het aan- en uitschakelen
gebeurt aan de zijdelings aangebrachte wipschakelaar.
Er kunnen meerdere lampen met elkaar verbonden worden. Maak hiervoor gebruik van de
meegeleverde verbindingstekker. Let hierbij op: max. 0,87A (≤200W).
Het typeplaatje mag niet verwijderd worden.
Heitronic
®
H. Vollmer GmbH
Allmendring 29
D-75203 Königsbach-Stein

Installatie aanwijzing art. nr. 287030, 29032 28035, 28037 Pagina 3 van 3 Stand 08.2007
Vervangen van de lamp:
Gebruik uitsluitend lampen zoals ze in de technische gegevens aangegeven zijn. Het gebruik
van andere lampen kan oververhitting tot gevolg hebben.
Voordat u een lamp gaat vervangen moet u de stroomtoevoer onderbreken.
Als u de lamp direct nadat ze uitgevallen is, gaat vervangen, dan moet u deze eerst lang
genoeg laten afkoelen.
Draai voorzichtig aan de ronde lampafdekking en verwijder de defecte lamp. Steek de nieuwe
lamp voorzichtig in de fitting en controleer of ze correct zit. Geen geweld gebruiken of te
sterke druk uitoefenen.
Schakel de spanningsvoeding weer in.
Onderhoud en instandhouding:
Vóór de reiniging moet u controleren, of de stroomtoevoer onderbroken is.
Gebruik voor de reiniging een droge of licht vochtige doek.
Maak nooit gebruik van chemicaliën, brandbare reinigingsmiddelen of schuurmiddelen. Deze
kunnen de oppervlaktelaag en/of de isoleringen van de lamp beschadigen.
Afvalverwijdering:
Oude elektronische apparaten moeten aan de openbare verzamelplaatsen aangeboden
worden en mogen niet samen met het gewone huisvuil verwijderd worden.
Heitronic
®
H. Vollmer GmbH
Allmendring 29
D-75203 Königsbach-Stein

Instrucţiuni de instalare pt. art. nr. 287030, 29032 28035, 28037 pagina 1 din 3 Versiunea 08.2007
Instrucţiuni de instalare şi utilizare
Spoturi ataşabile
Nr. art. 28030, 28032, 28035, 28037
Vămulţumim căv-aţi decis săachiziţionaţi spoturile noastre ataşabile de iluminat.
Corpurile noastre de iluminat sunt confecţionate din materiale robuste şi de calitate superioară,şi
permit crearea unei iluminări atractive. Aceasta asigurăun sistem optic atractiv şi o mare rezistenţă la
coroziune. Spturile ataşabile sunt adecvate pentru montare pe suprafeţe normal inflamabile, şi sunt
destinate pentru utilizare în spaţii interioare uscate.
Vărugăm săcitiţi cu atenţie prezentele instrucţiuni de instalare şi utilizare şi săle păstraţi cu
grijă.ie diese Installations- und Bedienungsanweisung sorgfältig.
Nu preluăm nici un fel de răspundere în caz de pagube materiale şi vătămări corporale datorate
nerespectării instrucţiunilor, prin manipulare necorespunzătoare sau datoritămodificărilor aduse produsului.
Conţinutul ambalajului:
1 corp de iluminat cu spoturi ataşabil, cu lămpi
1 cablu de conectare
1 cablu de legătură şi materiale de montaj
Instrucţiuni de instalare şi utilizare
Date tehnice:
Articol Culoare Conectare
electricăTransformator LampăClasăde
protecţie
28030 alb 230 V, 50
Hz
220–240V
sec. 11,6V, 3,9A, 40W
lampăde 12 V cu
soclu-baionetă
G4, 2 max. 20W
II
28032 alb 230 V, 50
Hz
220–240V
sec. 11,6V, 4,9A, 60W
lampăde 12 V cu
soclu-baionetă
G4, 3 max. 20W
II
28035 argintiu 230 V, 50
Hz
220–240V
sec. 11,6V, 3,9A, 40W
lampăde 12 V cu
soclu-baionetă
G4, 2 max. 20W
II
28037 argintiu 230 V, 50
Hz
220–240V
sec. 11,6V, 4,9A, 60W
lampăde 12 V cu
soclu-baionetă
G4, 3 max. 20W
II
Indicaţii cu privire la securitatea în exploatare şi avertismente:
Scoateţi cu atenţie corpul de iluminat din ambalaj.
Asiguraţi-văcăvalorile de alimentare electricădin instalaţia din locuinţa dv. coincid cu datele
de pe plăcuţa de identificare a corpului de iluminat.
Înainte de a pune în funcţiune corpul de iluminat asiguraţi-văcăacesta nu a fost deteriorat în
timpul transportului. În cazul deteriorării cablului sau a componentelor electrice nu mai este
permisăutilizarea corpului de iluminat. Reparaţiile trebuie săfie efectuate numai de către un
electrician profesionist.
Nu montaţi corpul de iluminat în apropierea directăde surse de căldură, conducte de gaz şi de
combustibil lichid, surse deschise de foc sau obiecte similare. Nu aduceţi corpul de iluminat în
contact cu căldurăextremăsau cu flacărădirectă.
În timpul funcţionării lampa devine fierbinte. Şi carcasa exterioarăa corpului de iluminat
devine fierbinte. Nu atingeţi cu mâna goalăcorpurile de iluminat în timpul funcţionării.
Nu lăsaţi copiii săse joace nesupravegheaţi în zona corpurilor de iluminat sau a altor aparate
electrice.
Menţineţi materialele ambalajului la distanţă de copii şi animale de casă. Pericol de sufocare!
Precauţie. Pachetul conţine piese mici, care pot săfie înghiţite de copiii mici.
Distanţă minimăde suprafeţele de iluminat 0,2 m.
Fiecare capac de protecţie trebuie săfie înlocuit.
Nu este permisămodificarea sau adaptarea produsului. Modificările la corpurile de iluminat
duc la stingerea garanţiei.
Heitronic
®
H. Vollmer GmbH
Allmendring 29
D-75203 Königsbach-Stein

Instrucţiuni de instalare pt. art. nr. 287030, 29032 28035, 28037 pagina 2 din 3 Versiunea 08.2007
Instalare:
Spoturile ataşabile sunt adecvate pentru montare pe suprafeţe normal inflamabile. Aveţi grijă
ca baza de fixare săfie adecvatăpentru a suporta stabil şi sigur greutatea corpului de iluminat
cu spoturi.
Toate lucrările la acest corp de iluminat, precum cele de montaj, înlocuirea lămpilor, etc.
trebuie săfie efectuate cu corpul de iluminat scos de sub tensiune. În acest scop scoateţi din
priză ştecherul pentru alimentare.
Ţineţi carcasa corpului de iluminat în poziţia de montaj dorită,şi marcaţi găurile ce trebuie să
fie date. Pentru fixarea corpului de iluminat utilizaţişuruburi adecvate, diametru max. 4 mm.
Aveţi grijăsănu se deterioreze cabluri sau ţevi.
Introduceţi diblurile în găurile date, şi fixaţi carcasa corpului de iluminat. Aveţi grijăca
prinderea săfie stabilă şi solidă.
Nu pliaţi cablurile, aveţi grijăca ştecherele şi cablurile săfie libere de forţe de tracţiune şi de
torsiune. Protejaţi toate cablurile şi izolaţiile contra unor eventuale deteriorări.
Acum conectaţi corpul de iluminat cu spoturi ataşabil prin intermediul cablului de alimentare
livrat. Oprirea şi pornirea se face cu întrerupătorul basculant amplasat lateral.
Pot săfie legate împreunămai multe spoturi. În acest scop utilizaţiştecherul de legăturălivrat.
În acest caz aveţi grijă: max. 0,87A (≤200W).
Nu este permisăîndepărtarea plăcuţei de identificare.
Heitronic
®
H. Vollmer GmbH
Allmendring 29
D-75203 Königsbach-Stein
This manual suits for next models
3
Table of contents
Languages:
Other Heitronic Lantern manuals

Heitronic
Heitronic 500795 User manual

Heitronic
Heitronic 35023 User manual

Heitronic
Heitronic 35322 User manual

Heitronic
Heitronic 35837 User manual

Heitronic
Heitronic 500047 User manual

Heitronic
Heitronic 35371 User manual

Heitronic
Heitronic 36840 User manual

Heitronic
Heitronic SLATE User manual

Heitronic
Heitronic 35293 User manual

Heitronic
Heitronic 35266 User manual