Heras Cloud Unit User manual

EN –Translation of the original user manual - 1.4 | 2021
User manual
Heras Cloud Unit

EN –Translation of the original user manual - 1.4 | 2021
2

EN –Translation of the original user manual - 1.4 | 2021
3
CONTENTS
FOREWORD .............................................................................................................. 4
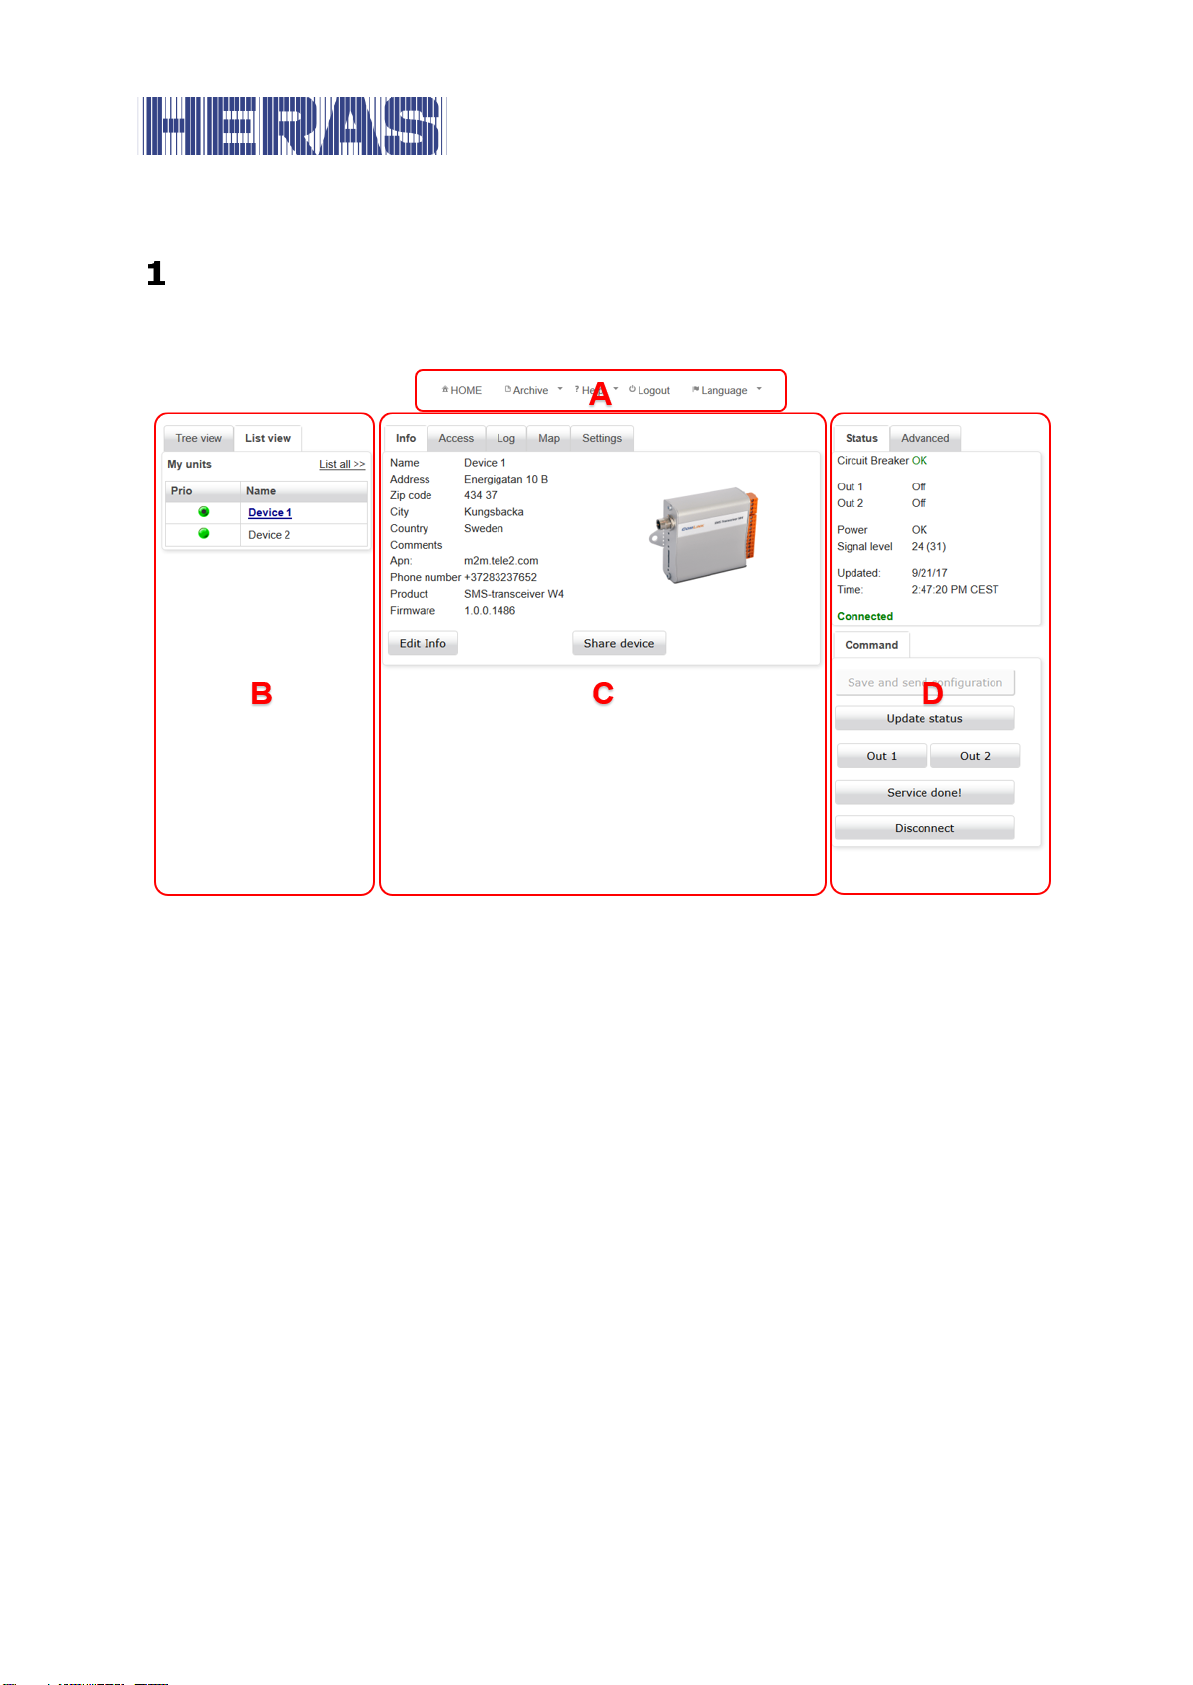
OVERVIEW ......................................................................................................... 5
ACCESS............................................................................................................. 6
CONNECTING TO THE UNIT.............................................................................. 6
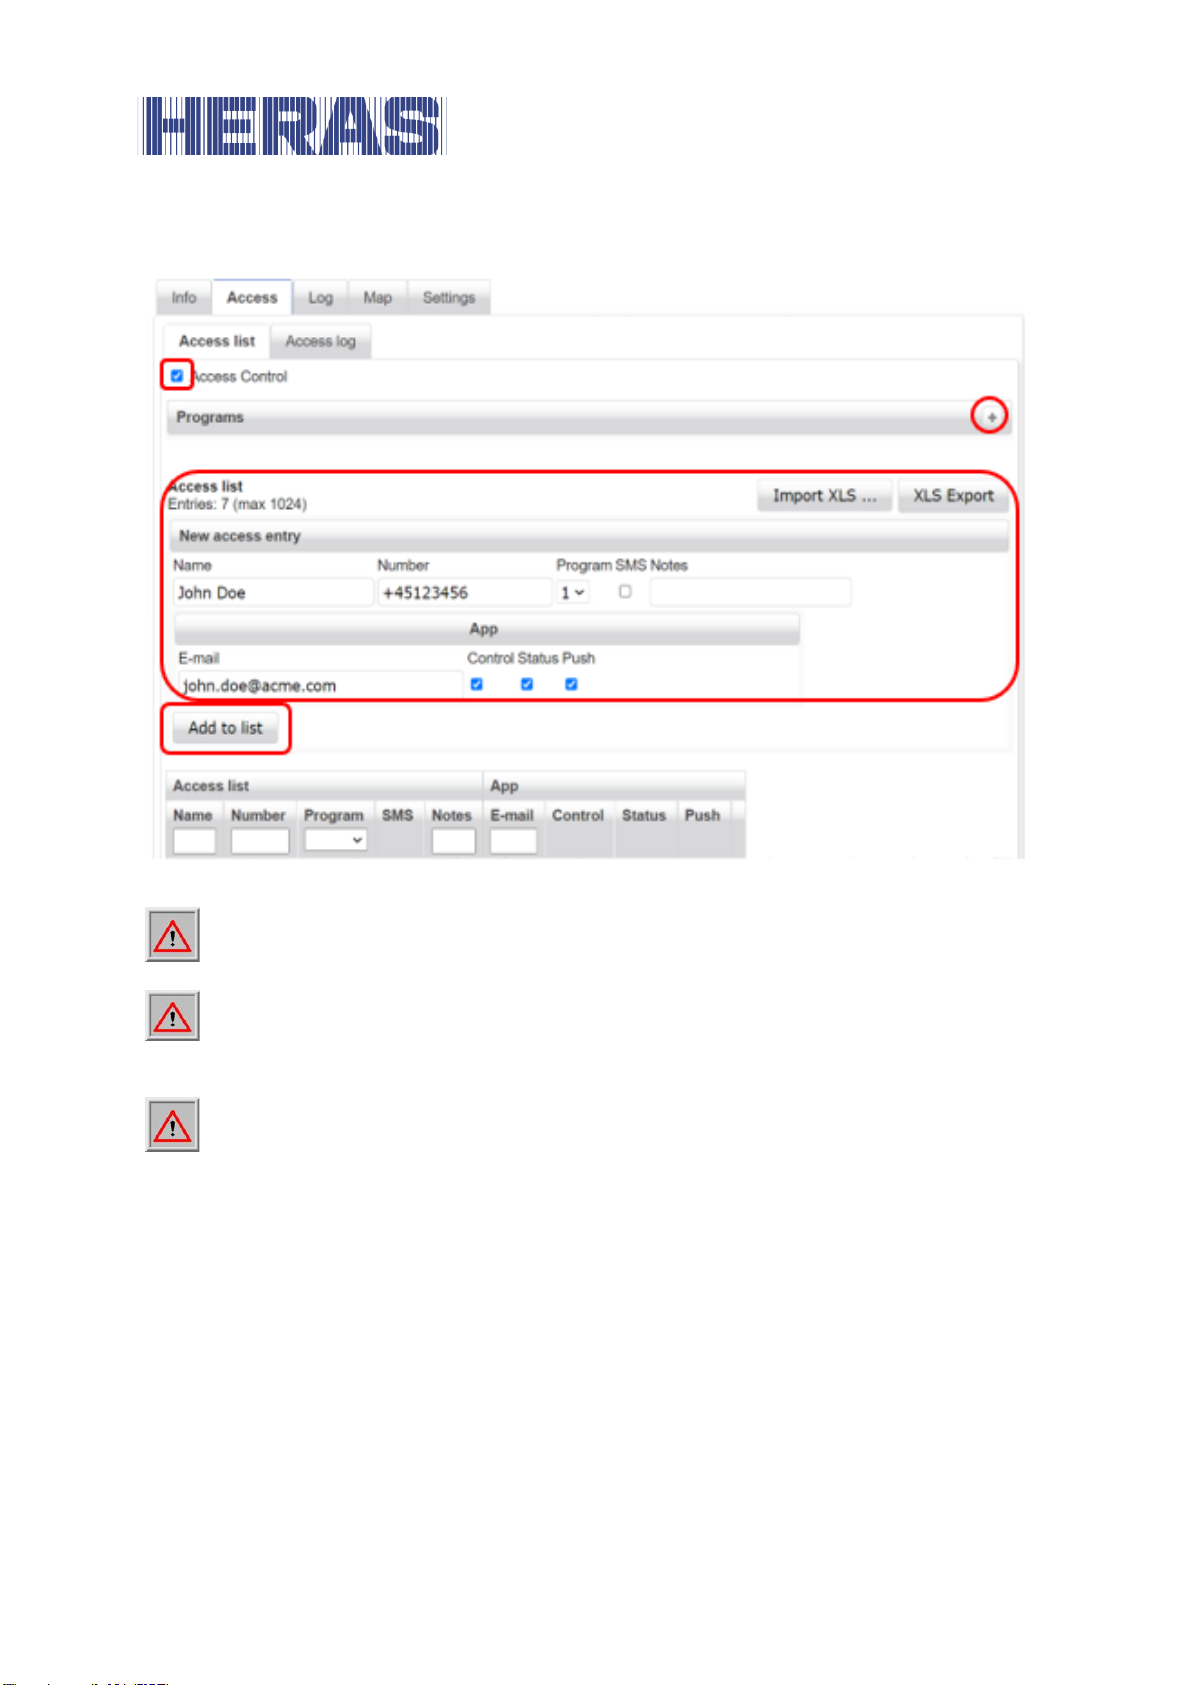
SETTING ACCESS CONTROL............................................................................ 7
IMPORT ACCESS LIST................................................................................... 10
COPY ACCESS LIST...................................................................................... 11
CUSTOMIZE ACCESS.................................................................................... 13
ACCESS LOG .............................................................................................. 14
YEARLY TIME SWITCH .................................................................................. 15
SETTING YEARLY TIME SWITCH...................................................................... 16
PAIR ANNUAL CLOCK TO ARELAY................................................................... 17
CONNECT......................................................................................................... 18
LOG FUNCTIONALITY.................................................................................... 18
CONFIGURE INPUTS AND ALERTS................................................................... 19
VIEW STATUS OF THE INSTALLATION............................................................... 22
SMS COMMANDS............................................................................................... 23
LED INDICATIONS.............................................................................................. 25
FAQ................................................................................................................. 26

EN –Translation of the original user manual - 1.4 | 2021
4
FOREWORD
This manual enables you to make settings or changes to your Heras Cloud Unit. It
describes how to add, change or delete numbers in Access control. There is a chap-
ter how to use the Yearly time switch and how to combine this with user rights.
Further there is a possibility to use the log system for analysis.
Chapter 4 and 5 give information about the possible SMS commands and explana-
tion about the LED’s on the unit.
A number of fields are not visible or visible but not adjustable. Depending on the
solution you have chosen, this may differ. Only the relevant fields are explained
here.
If there are any questions for which this answer can’t be found in this document,
then please contact us for further assistance.

EN –Translation of the original user manual - 1.4 | 2021
5
OVERVIEW
A Via the menu bar you can do various things such as change the language or look
up the manual.
B You can manage your devices in a hierarchical tree structure or as a list.
From the tree, right-click on a device or group for more functions.
The black dot in the device icon indicates that the device is connected to the Heras
Cloud.
C The content of this field is determined by where you are in the system. This can
contain your own information or that of a selected unit.
D Status and Commands field. The visibility of this field is limited when using Ac-
cess.
Under Status you can see the last known status of the device, even if it is currently
offline. Only filtered values are shown here. This means that the displayed values
do not change until the set filter time of the input has elapsed. The Advanced tab
shows live input values for devices that are online. In other words, you can even
see input changes that do not trigger an alert as they are shorter than the filter
time.

EN –Translation of the original user manual - 1.4 | 2021
6
There are several buttons in the Commands box. For example, you can connect to
a device, control an output remotely, or confirm that a service has been performed.
This is also where you transfer new settings to an online device.
ACCESS
In order to change the Heras Cloud Units settings, you must be connected to it.
Select the device (Heras Cloud Unit) you wish to change from the list and click on
Connect.
CONNECTING TO THE UNIT
When the Heras Cloud Unit is online, there will be a black dot in the Device icon
and the word Connected will appear in the Status box.

EN –Translation of the original user manual - 1.4 | 2021
7
SETTING ACCESS CONTROL
The settings for the Heras Cloud Units access control can be found under the Access
tab. Access control is activated by default. If you wish to deactivate it, simply click
on the box to uncheck it. When deactivated(uncheck), anyone will be able to call the
Heras Cloud Unit to activate a relay output or send a status request by text mes-
sage.
You can add up to 1024 names, telephone numbers and email addresses for the
app to the access list. To add a new record, complete the fields under New access
record and then click on Add to list.
Remember that you must always include the country code (for example +31, +49
or +46) for all telephone numbers. Note that the phone numbers initial zero must
be omitted.
Note that a disabled caller ID cannot be identified by the Heras Cloud Unit.
Access will only be granted when the caller ID of the dialing user is dis-

EN –Translation of the original user manual - 1.4 | 2021
8
played.
Click on the SMS (text message) check box if you want that person to be able to
manage and query the Cloud Unit via text message.
This box must be checked in order for the Cloud Unit to respond to texts from that
number.
The Yearly Time Switch (see chapter 2.7) bar can be expanded to show the con-
tents of each schedule.
The schedule you choose determines when you will have access to and can manage
the functions.
Find out more about the Yearly Time Switch function and how to change the set-
tings under the heading Yearly Time Switch. Here you can only view the Yearly Time
Switch settings, not change them.
Selecting Program 1-5 (Yearly Time Switch program) for a user (eg. John Doe) de-
termines during which times this individual will have access. Typically selecting
Program 1 means that the user will always have access. You could define a custom
program under the Yearly Time Switch tab that will for example grant access only
during weekdays.

EN –Translation of the original user manual - 1.4 | 2021
9
The App options “Status” and “Push” are only visible if you have selected
Connect.
If you have Connect, you can choose not to give every App user the rights to
see Status and Push. These are, for example, relevant for a technical ser-
vice.
If a user with App options is added, the user automatically receives an email
with a link to the Apple store or Google Play store. If someone is not given
this option, you must provide the number of the unit to the user yourself. You will
find this number on the Info tab.
When new access records have been added to the list, you must click on Save to
send the new settings to the Cloud Unit.

EN –Translation of the original user manual - 1.4 | 2021
10
Make a habit of clicking on Save every now and then, as the Cloud Unit au-
tomatically disconnects after a period of inactivity.
IMPORT ACCESS LIST
First, click XLS export to get sample file for update, make sure you have at least
one access item in your list before exporting. This will ensure that you get enough
sample information to properly edit the file. All data in your current access list is
exported and can then be edited in Excel.
Note that importing an access list will replace the previous list.
Open the file with Microsoft Excel.
Select the B column by right-clicking the header to resize it to text via cell proper-
ties. This ensures that the + at the beginning of the phone number is not removed.
You can now add, remove or change items as desired. When you are done, save
the file and click Import XLS, select the file and click Next.

EN –Translation of the original user manual - 1.4 | 2021
11
The file is validated and displayed in a new window before it is imported.
Click with the pen to fix any problems, the red mark will delete the entry and then
import the file.
Do not forget to save the settings when the import is done.
COPY ACCESS LIST
If you have several units in which the same users may be added, you can copy
them from a unit in which the numbers are already stored.
Connect to the unit where the numbers should go. Go through the tree structure
and right click on the unit from which you want to copy. In this example, we will
copy the list from Device 1 to Device 2.

EN –Translation of the original user manual - 1.4 | 2021
12
Then click on Copy settings from Device 1 after which a pop-up will appear.

EN –Translation of the original user manual - 1.4 | 2021
13
Uncheck everything with the exception of Access; that's the list of names and
numbers. Click on Copy to execute it. The list is now also added to Device 2.
CUSTOMIZE ACCESS
You can click on the headings to sort the records by column. You can also enter
search words for each column, which makes it easier to find a specific user.
To edit a record, click on the pen to the far right. This will open a pop-up window in
which you can make changes.
You can edit a record (Update), Delete from list or leave it unchanged (Cancel).
Once you have updated the access record, click Save again.

EN –Translation of the original user manual - 1.4 | 2021
14
ACCESS LOG
All incoming calls, web and App controls are registered and displayed in the Heras
Cloud Portal. You can sort these by clicking on the column headings. The 50 most
recent entries are listed via the Access log. You can select the number of registra-
tions yourself. You also have the option to use the search field for specific users,
numbers, etc. You can also export the log data as CSV or XLS files. If someone who
is not on the access list has called the Heras Cloud Unit, their caller ID will be dis-
played instead of a name.
Refresh collects updated information from the Heras Cloud Unit (if it is online).
Delete clears the log, (export and store a list in case you need it at a later date).
Via the key there is a possibility to adjust the content of the Access Log.

EN –Translation of the original user manual - 1.4 | 2021
15
If you click on this, a pop-up window will open with the following options:
Date, Time, Name, Notes and Source are already displayed by default. The options
Status, Message and Output can be added as desired.
Source shows how the installation is operated. This can be done via the App, by
telephone call or via the web account.
Message includes system information such as an access attempt that has been de-
nied.
Status will indicate whether an attempt to operate the installation was successful or
unsuccessful; a phone call shows no status.
Output shows which relay of the cloud unit has been actuated.
YEARLY TIME SWITCH
On the Yearly Time Switch tab you can define up to five different timing programs.
Each program has one or more tracks, which you can use to customize the sched-
ule. Each track begins and ends at midnight, so if you want to set up a schedule
that begins before and ends after midnight, you have to use two tracks, with one
ending at 12.00 midnight and the other starting at 00.00 the next morning. Each
day begins at 00.00 AM and ends at 12.00 midnight (24.00).

EN –Translation of the original user manual - 1.4 | 2021
16
SETTING YEARLY TIME SWITCH
The schedule can be used for 3 different functions:
•For restricting incoming calls and Text messages or app controls controlling
the outputs.
•For preventing the Cloud Unit from sending Text messages/Email notifica-
tions/Push notifications, for example when the gate or barrier is open.
•For automatic control of the relay outputs according to a particular schedule,
for example to keep the gate or barrier open at certain times.
To configure public, national, religious and bank holidays, expand the Holidays title
bar by clicking on the + sign. We have already added a list of national bank holi-
days, so all you have to do is add or remove holidays from the list.
The Heras Cloud Unit must be online in order to edit the holidays list.

EN –Translation of the original user manual - 1.4 | 2021
17
PAIR ANNUAL CLOCK TO A RELAY
A clock program can be used to keep the installation open during certain times. The
installation will open and remain open at the set time and close again after that
time has elapsed.
By going to the Outputs tab, a program can be linked to Output 1 there. After sav-
ing the changes, the installation will respond to the chosen program.

EN –Translation of the original user manual - 1.4 | 2021
18
AWith the option SMS acknowledge a caller can receive an SMS message that
Output 1 has been active.
BWith the Toggle option, Output 1 will become and remain active after the first
call. Only after a second call will the ignition switch off again.
CAt Show you can determine which buttons are visible in the App for control.
CONNECT
If you have chosen Connect there are, apart from the previous chapters, more op-
tions that you can find in the dashboard. The following chapters provide more ex-
planation about this.
LOG FUNCTIONALITY
The Log tab allows you to view the history depending on the type of installation. Up
to 3 tabs are available:
•Status log
•Live log
•HMD log
The first 2 logs are always present, the HMD log only in the case that the HCU is
connected to an HMD drive. You can also export the log to a file that you can save
if desired.
Status log
All changes that have taken place are recorded in the status log and are recogniza-
ble because the change is underlined. If the column, recognizable by a #, is colored
green, this is the built-in heart beat which means that no changes have been made
for 12 hours and the unit tests the communication.

EN –Translation of the original user manual - 1.4 | 2021
19
Live log
This log will immediately show changes when the installation is in use and there is
a connection to the unit.
HMD log
This tab gives you a number of options for reading information from the HMD con-
trol. It concerns the following options:
System log
This log will display the last 255 events that are stored in the HMD.
Event log
This log will immediately display any current errors in the installation.
Serial number
The serial number of the built-in controller is displayed.
Version
The installed software will be displayed.
Parameter
The parameter table that is in use will be displayed.
CONFIGURE INPUTS AND ALERTS
The order of the inputs is always pre-configured by Heras and cannot be adjusted
by a user. A filter time has been determined for each input. This filter time blocks
the status change during that time. A status in the status field on the right will only

EN –Translation of the original user manual - 1.4 | 2021
20
change after the filter time has expired. This prevents a lot of notifications that,
although they occur but do not have to be displayed immediately.
As an example, an active photocell will only be shown after 10 minutes. Heras ad-
vises to maintain these times as much as possible..
It is also possible to receive a notification by Text message, App push notification
and/or email if a specific status is longer than normal. The gate is open for longer
than 600 seconds, then a message will be sent. This way you can be reminded re-
motely that an action is needed. If the gate is open during the day by means of the
clock functionality, and one does not want to receive a Text message, App push
notification and/or email, it is possible that the program used to keep the gate
open can also be used to block the a Text message, App push notification and/or
email in that range. In the example below, clock program 2 has been selected:
Table of contents
Other Heras Gate Opener manuals