Hercules SAL Series User manual

User Manual
SAL Uni, SAL Ergo, SAL Fold, SAL Fold-L

HERCULES COMPLETE LIFTING SOLUTIONS
WWW.HERCULES.COM.AU
P a g e 1 | 17
Contents
1 INTRODUCTION AND FEATURES .................................................................................2
1.1 General safety instructions...................................................................................................................................2
1.2 Technical data of the Hercules LITE SAL standard model.................................................................................3
1.3 Technical data of the snap on battery..................................................................................................................3
2 CONTROLS .....................................................................................................................4
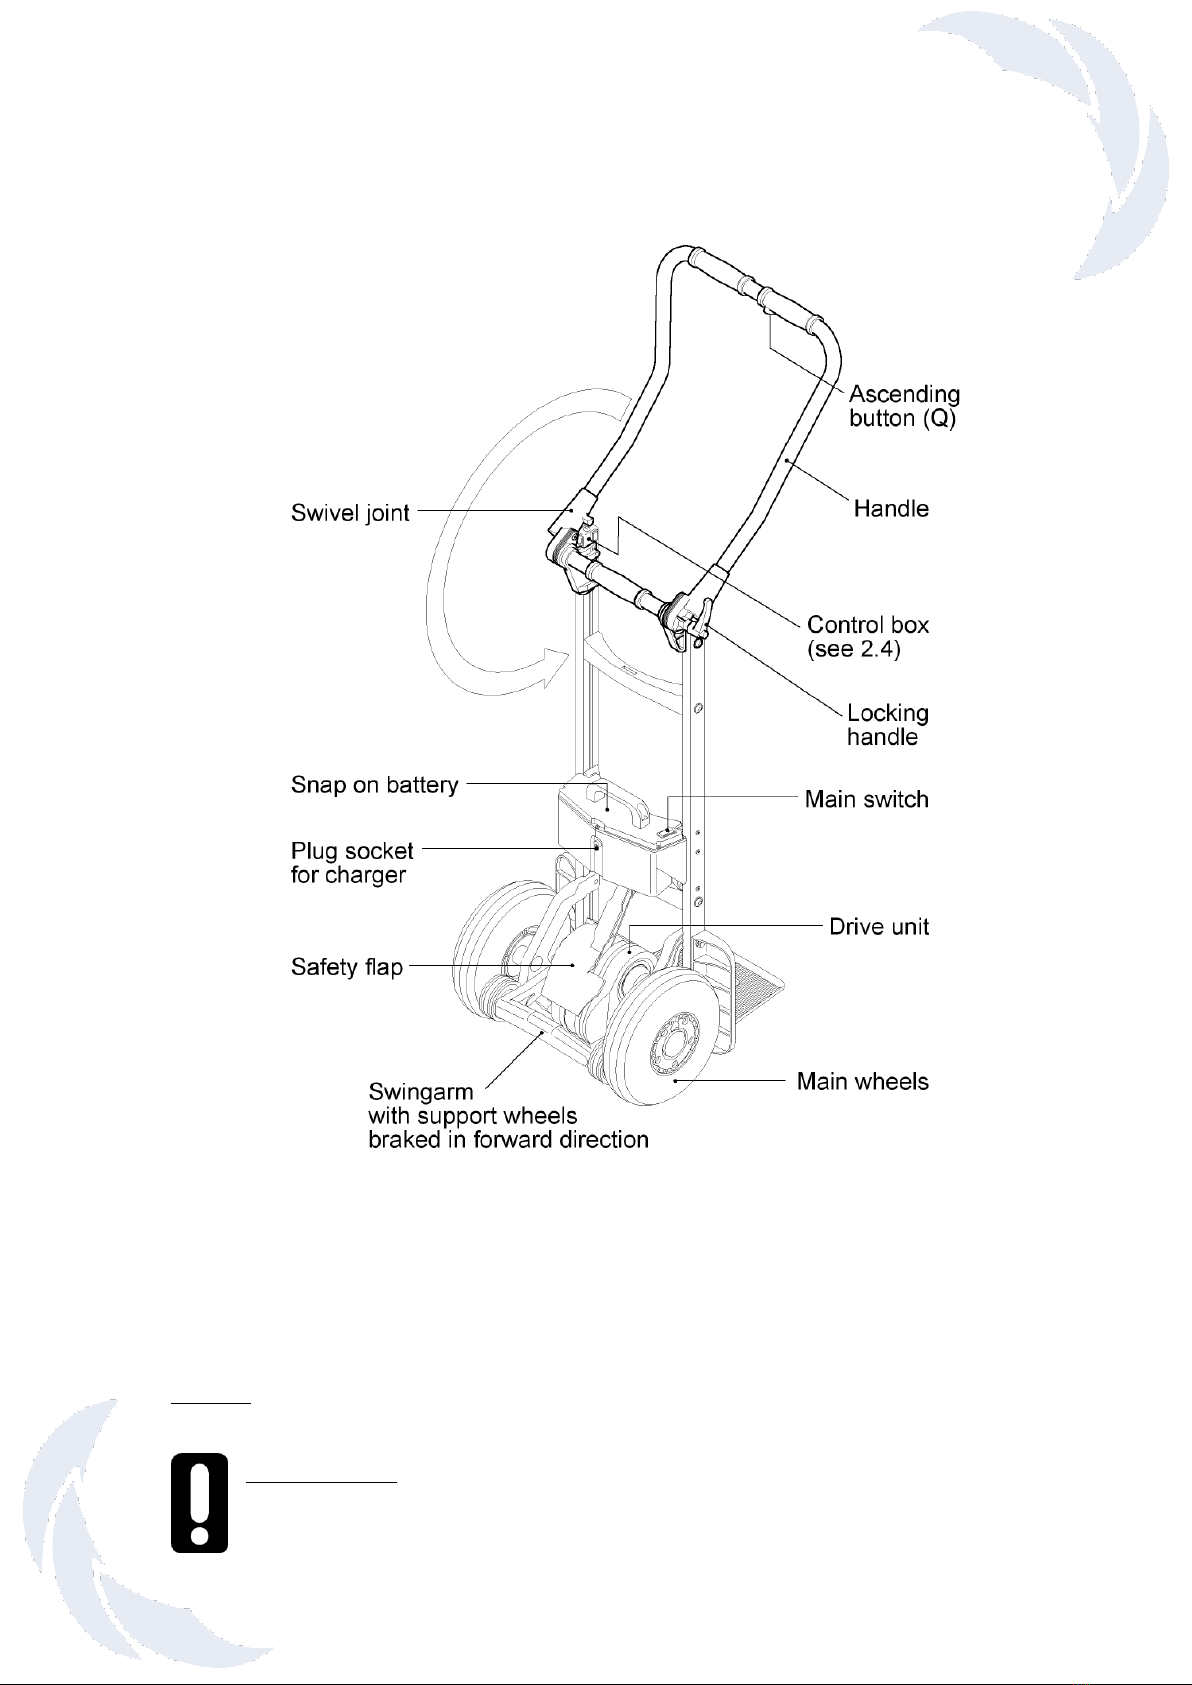
2.1 Model ERGO...........................................................................................................................................................4
2.2 Model FOLD............................................................................................................................................................5
2.2.1 The swivel joint ........................................................................................................................................................5
2.3 Model UNI ...............................................................................................................................................................6
2.4 Control box.............................................................................................................................................................7
2.4.1 Button (P) for ascending / descending.....................................................................................................................7
2.4.2 Indicator light............................................................................................................................................................7
2.4.3 Speed switch............................................................................................................................................................7
2.5 Ascend button in upper handle ............................................................................................................................8
2.6 Safety flap...............................................................................................................................................................8
2.7 Main switch.............................................................................................................................................................8
2.8 Switching off ..........................................................................................................................................................8
2.9 Tyre Pressure...........................................................................................................................8
3 FITTING AND REMOVING THE BATTERY.....................................................................9
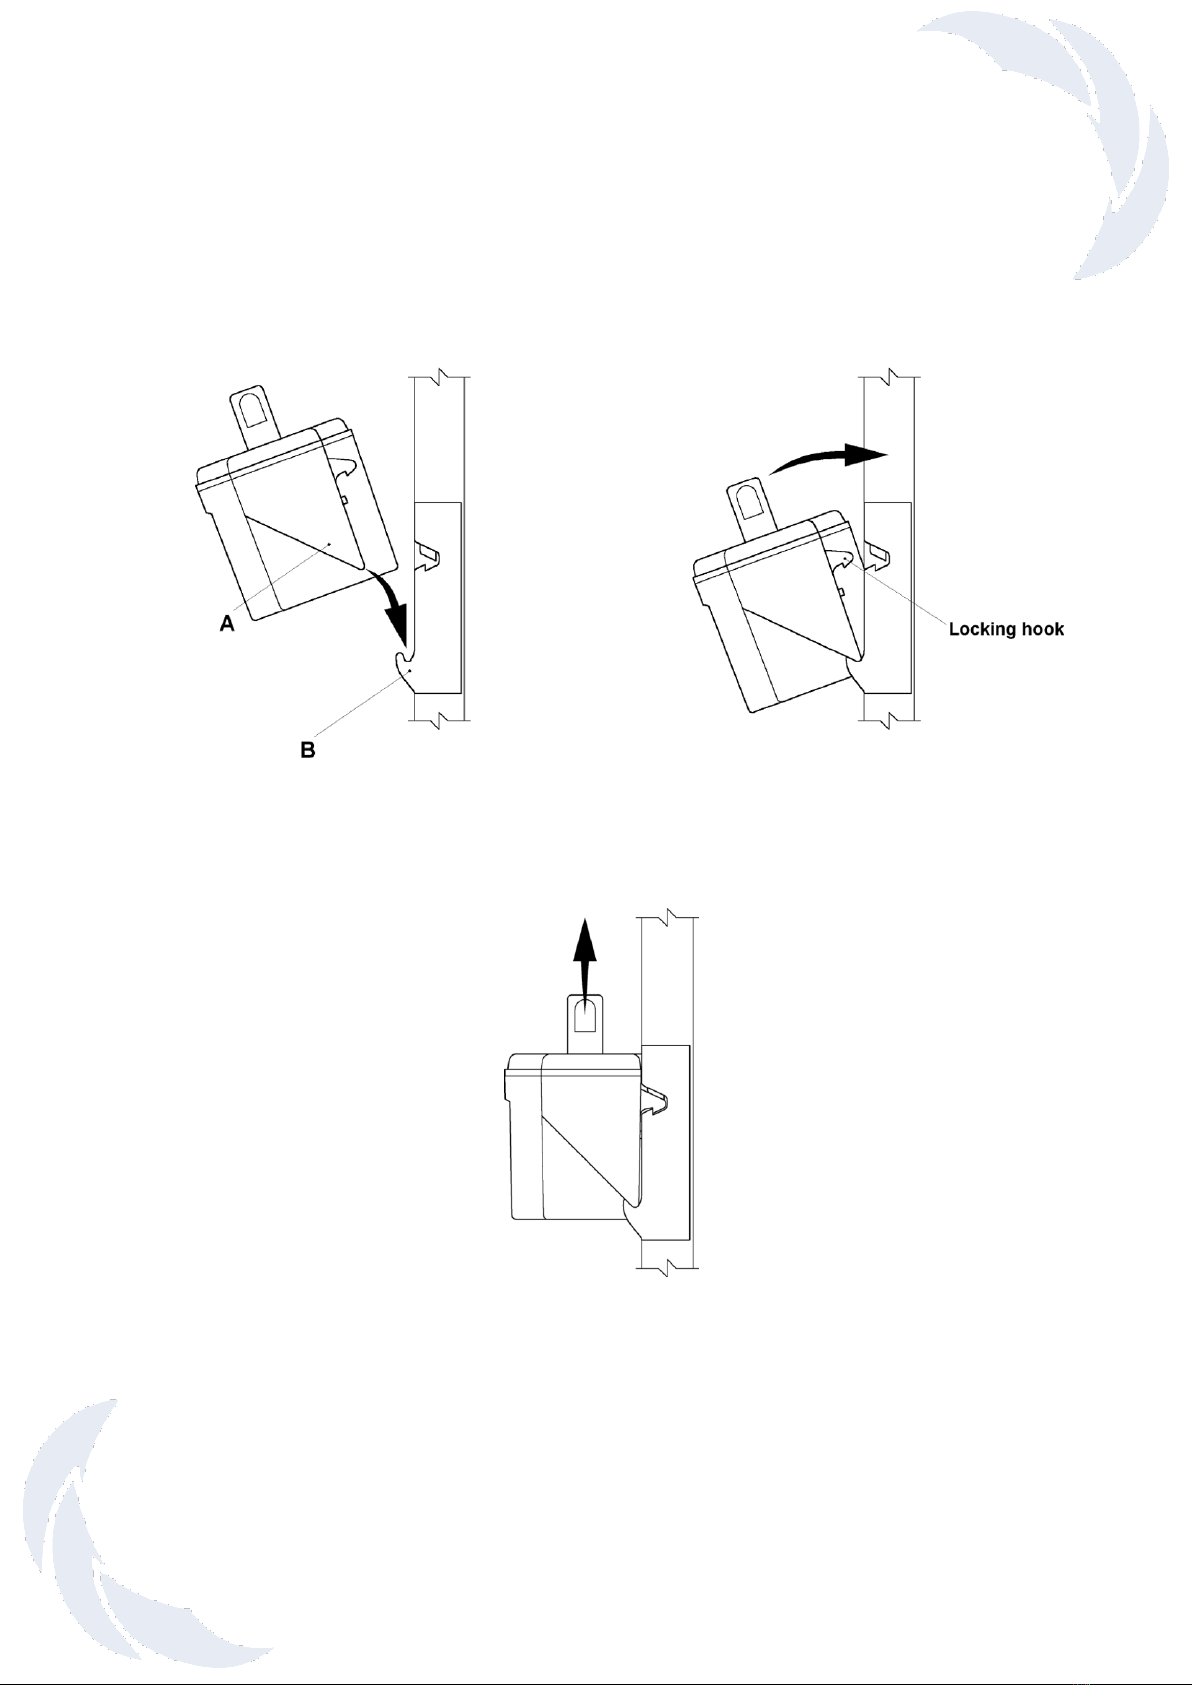
3.1 Fitting the battery...................................................................................................................................................9
3.2 Removing the battery ............................................................................................................................................9
4 OPERATION..................................................................................................................10
4.1 Ascending stairs..................................................................................................................................................10
4.2 Descending stairs................................................................................................................................................10
4.3 Please pay attention to........................................................................................................................................11
4.3.1 Shift of balance ......................................................................................................................................................11
4.3.2 Hooking in underneath the step .............................................................................................................................12
4.3.3 Overload ................................................................................................................................................................12
4.3.4 Hercules LITE is not a rubber pad .........................................................................................................................12
4.3.5 Failure to negotiate steps "square-on"...................................................................................................................13
5 CHARGING THE BATTERY..........................................................................................13
6 ACCESSORIES AND OPTIONS....................................................................................16
7 WARRANTY AND LIABILITY........................................................................................16
7.1 Warranty ...............................................................................................................................................................16
7.2 Liability .................................................................................................................................................................16
8 CE DECLARATION OF CONFORMITY.........................................................................16
9 DESIGN PROTECTION BY PATENTS..........................................................................16

HERCULES COMPLETE LIFTING SOLUTIONS
WWW.HERCULES.COM.AU
P a g e 2 | 17
Changes without notice Edition 05/2001
1Introduction and features
Congratulations!
With the new Hercules LITE SAL you have purchased a handy modular–designed sack truck with an
unladen weight of only 16kg.
Once you fit the snap-on battery, this simple sack truck becomes a versatile all-rounder: a normal sack
truck for general use on level ground and a powered stair climber for use on steps and stairs.
Additional features, such as the wide pneumatic tyres*, make this equal to any conventional hand truck for
use outdoors and for professional deliveries but with the added bonus of going up steps and stairs as well.
With the SAL Series climbing stairs has been reduced to the essential: The Hercules LITE pulls itself up
onto the step above and lifts to only the necessary step height.
During descend, the motor acts like an electric brake and the load is brought down without “bumping”. It is
also ideal for winding staircases and across tight landings.
The Hercules LITE SAL has a mechanical clutch which will prevent damage if the unit is used to descend
the stairs with the controls in the ascend position.
The unit also features electronic overload protection preventing ascend with too heavy a load.
The Hercules LITE SAL has two ascending speed settings (slow and fast –with a speed of up to 48 stairs
per minute in the case of the SAL 110 models), plus a wide variety of model options, lifting capacities and
additional accessories.
In other words, a professional for professionals!
1.1 General safety instructions
▪Always ensure that there is no member of the public, or anyone who is not directly associated with
operating or assisting with the operation of the stairclimber beneath the load.
▪Always secure the load with the appropriate straps or other accessories
▪Always wear rubber soled shoes. Some stairs can be extremely slippery
▪It is recommended, but not mandatory, to wear shoes with steel caps
▪Never reach into the lifting mechanism with your hands if the battery is inserted
▪At first practice using Hercules LITE SAL either unladen or with a light load of 20 –30 kgs
▪For transportation remove battery to lighten the unit and to prevent accidental operation in transit
* puncture proof version also available

HERCULES COMPLETE LIFTING SOLUTIONS
WWW.HERCULES.COM.AU
P a g e 3 | 17
1.2 Technical data of the HERCULES LITE SAL standard model
Model ... ERGO/UNI/FOLD
SAL 110
SAL 140
SAL 170
Capacity
110 kg
140 kg
170 kg
Maximum climbing speed
48 steps /min
35 steps /min
29 steps /min
Weight
16 kg
16 kg
16 kg
Maximum step height
210 mm
Overall height –fixed frame (UNI, ERGO)
1.570 mm
Overall height –folding frame (FOLD)
1.000 mm
Width
484 mm
Depth
484 mm x 275 mm
Battery capacity (maximum load) approx.
260 steps
220 steps
220 steps
Battery capacity (half load) approx.
350 steps
300 steps
300 steps
1.3 Technical data of the snap on battery
Fuse: Internal blow-out fuse (30 amps)
Plug-socket for charger: DC jack ø 2.1 x 9.5
Weight: 4 kg
Capacity: 5 Ah
Voltage: 24 VDC (2 x 12 VDC –5 Ah)
Battery cells: Sealed lead-acid maintance free and approved for air travel by DOT and
IATA

HERCULES COMPLETE LIFTING SOLUTIONS
WWW.HERCULES.COM.AU
P a g e 4 | 17
2Controls
2.1 Model ERGO

HERCULES COMPLETE LIFTING SOLUTIONS
WWW.HERCULES.COM.AU
P a g e 5 | 17
2.2 Model FOLD or FOLD-L
2.2.1 The swivel joints
The necessary friction for the rotary joint is obtained through multiple friction disks, which are compressed
simultaneously on the left and right sides. The lock must be tightened sufficiently to avoid movement in
use.
As a rule: The lock will be sufficiently tightened if a single operator can tilt back the load from the upright
position without any handle movement.
Safety instruction: With heavy loads (over 100 kg) ensure the lock is tightened especially firmly.

HERCULES COMPLETE LIFTING SOLUTIONS
WWW.HERCULES.COM.AU
P a g e 6 | 17
2.3 Model UNI

HERCULES COMPLETE LIFTING SOLUTIONS
WWW.HERCULES.COM.AU
P a g e 7 | 17
2.4 Control box
2.4.1 Button (P) for ascending / descending
▪Briefly press the push button to switch the Hercules LITE SAL to ascend mode or descend mode. See
section 4.1 Operation.
▪If the button is pressed for more than 3 seconds, the Hercules LITE SAL will switch off.
2.4.2 Indicator light
▪Shines green: The Hercules LITE SAL is in ascend mode. (In the ascend mode the push button Q in
the handle bar is active. The lifting mechanism operates when the push button Q is pressed and stops
when released (refer also chapter Operation [4.1])
▪Flashing green: The Hercules LITE is in descend mode. (The push button Q is not active now –refer
also to chapter Operation [4.2])
▪Constantly red: The Hercules LITE is in descend mode and the support wheels move (fast) to the
descend position (takes a max. of 0.5 seconds –refer also to chapter Operation [4.2])
▪Flashing red: The Hercules LITE is overloaded. (Flashes for 3 seconds and goes out –see also chapter
Operation [4.3.3])
▪Alternating red and green: the battery pack is running low and urgently needs to be recharged. The
stairclimber will certainly manage another flight of stairs, but it is recommended that you move down
stairs and either change the battery pack or recharge it with the quick charger supplied
2.4.3 Beep feature & Speed switch
This is a people warning feature for transports in public areas.
How to activate the Beep feature: Turn on the device and hold down the On-/Off- /Ascend-/Descend –
button (P) for about 30 seconds until you can hear a beep signal. Now the recurring beep signal is
available while you are driving with the SAL.

HERCULES COMPLETE LIFTING SOLUTIONS
WWW.HERCULES.COM.AU
P a g e 8 | 17
How to disable the Beep feature: Turn on the device and hold down the On-/Off-/Ascend-/Descend –
button (P) for about 30 seconds until you can hear a beep signal. Afterwards you can drive without the
recurring beep signal.
Use the speed switch to select either high or low speed –this can only be used in ascend mode. (In descend
mode the descending speed is permanently set so that optimum braking will always be secured –refer also
chapter Operation [4.2])
Low speed is advisable for: training, heavy loads and in awkward locations.
2.5 Ascend button in upper handle
This button [Q] is only active in the ascend mode and switches the lifting mechanism on and off.
2.6 Safety flap
To start tilting a load, it may be necessary to use your foot to assist in tilting. The axle of the conventional
sack truck is normally used for this purpose. With the Hercules LITE SAL, the swing arm with the support
wheels, a wheel, or the drive unit may be used to support by foot. The safety flap is installed to prevent
your foot getting jammed in by the swing arm. If you press onto the lower part of the flap with your foot all
functions will be stopped.
Safety instructions
You avoid all risk if you switch on only after tilting the load.
2.7 Main switch
The main switch is situated on the battery cover. The power supply is switched on or off by way of the main
switch.
2.8 Switching off
Battery power is removed:
▪By switching off the main switch on the battery unit
▪By removing the battery
▪By pressing button (P) for 3 seconds
▪Automatically after 10 minutes
The main switch or removal of the battery provide a higher degree of safety than switching off with
the button P or with the timer cut-out, as button P may be touched inadvertently.
2.9 Tyre Pressure
The tyre pressure is to be maintained at no less than 50 PSI.

HERCULES COMPLETE LIFTING SOLUTIONS
WWW.HERCULES.COM.AU
P a g e 9 | 17
3Fitting and removing the battery
3.1 Fitting the battery
(1) Locate corner "A" on both sides into hook "B" on frame
(2) Snap battery forward to engage locking hooks
3.2 Removing the battery
Battery must be lifted vertically to disengage locking hook. Do not hinge back.

HERCULES COMPLETE LIFTING SOLUTIONS
WWW.HERCULES.COM.AU
P a g e 10 | 17
4Operation
4.1 Ascending stairs
Press button (P) briefly until the indicator light shines green continuously.
The Hercules LITE is now in the UP MODE.
Pressing button (Q) in the upper handle, will operate the support wheels and will lift the Hercules LITE over
the step continuing until the button is released.
Important:
On each cycle, immediately the main wheels rest on the tread, pull the Hercules LITE back to
touch the rise of the next step up.
Holding the Hercules LITE too flat, on stairs with open risers, can also result in the support wheels
being partially trapped under the tread. This may result in excessive pressure on the drive unit,
causing it to go into overload mode, and shutting down. Press button (P) to reset.
If you hold the Hercules LITE too flat during ascending, there will be insufficient height for the
support wheels to rest on the next step.
4.2 Descending stairs
Press button (P) briefly again until the indicator light flashes green. The Hercules LITE is now in the DOWN-
MODE and the support wheels will move to the descend position automatically.
The ascending button Q is now out of function.

HERCULES COMPLETE LIFTING SOLUTIONS
WWW.HERCULES.COM.AU
P a g e 11 | 17
With the support wheels in the descend position the Hercules LITE can be rolled over the step margin and
the support wheels will, under controlled conditions, lower the machine onto the next step down. When the
main wheels land on the lower step, the support wheels automatically rotate to the descend position for the
descend onto the next step down, all within approx. half a second.
During the descend movement the indicator light changes to constant red. After reaching the descend
position the light changes back to flashing green.
Important:
As soon as the Hercules LITE rolls off the tread, ensure the main wheels are kept against the rise
until the support wheels reach the descend position.
Just before the suspension arm reaches the descending position, the support wheels reach the
upper edge of the stair and lift the Hercules LITE approximately 10 mm. This is normal and is
used as an advance signal by experienced drivers. As a matter of fact, you may already advance
while the support wheels are in contact with the floor. This results in smooth continuous down-
the-stairs motion.
In the case of closed stairs with short step, for instance on the inside of narrow circular staircases,
the support wheels may touch the stair step and the Hercules LITE can move approximately 8 to
9 cm forward. This also is normal since the Hercules LITE will then be ready for advancing again
anyway.
If the load is under 15 kg or the driver holds back the load, the automatic movement to the descend
position will be slowed down.
Unlike all other stairclimbers the operator does not need to control the electrics to descend, as the support
wheels operate automatically.
4.3 Please pay attention to
4.3.1 Shift of balance
When ascending the balance of the load changes as soon the
support wheels start lifting the load. Operators quickly become
accustomed to this and compensate by tilting the handle.
Initially, before this operation becomes automatic, care should be
taken at the point where the support wheels take the load when
ascending. There is a forward movement of the machine which is
easily compensated for by tilting the handle backwards.
Lowering backwards by 10° to 20° before the support wheels
start to lift eliminates any major forward movement.

HERCULES COMPLETE LIFTING SOLUTIONS
WWW.HERCULES.COM.AU
P a g e 12 | 17
4.3.2 Hooking in underneath the step
Under normal operating conditions, with the
load in a well-balanced position, the moving
support arm is always clear of the underside of
the upper step. If the Hercules LITE is laid back
too far, the support arm will be tripped by
touching the tread it is on, causing it to rotate
under the upper tread. The electronics will go
into overload mode and will need to be reset.
4.3.3 Overload
Do not overload.
Exceeding the load capacity will activate overload mode causing the operation to stop, lowering the main
wheels slowly to the lower step. The indicator lamp flashes red for about 3 seconds after which the
ascend/descend button will need to be reset.
Once the battery has been discharged the unit will go into overload even with loads below the
specified capacity.
4.3.4 HERCULES LITE is not a rubber pad
In the beverage industry drums are sometimes directly thrown from the truck onto the hand truck instead
of a rubber pad or old tyre.

HERCULES COMPLETE LIFTING SOLUTIONS
WWW.HERCULES.COM.AU
P a g e 13 | 17
This is not possible with the Hercules LITE when the support wheels are in the descending position. The
impact will be transmitted to the connecting bar via the drive unit, which may result in fracture. With the
support wheels raised between the main wheels, throwing barrels on the unit is possible in principle since
the pneumatic tyres would absorb part of the impact, it is nevertheless not recommended as it detrimental
to service life.
4.3.5 Inadvertent battery ejection
For all normal operations the battery is held
securely by locking hooks. A strong pull is
required to remove it. Abuse of the Hercules
LITE by moving backwards very quickly, and
striking a high step, or similar, will result in the
battery being ejected from its location.
Depending on the drivestyle of the user it
might be an ongoing problem. For this we offer
as an option a battery-blocker (nr. 930 140).
4.3.6 Failure to negotiate steps "square-on"
Failure to negotiate steps "square-on" will result in damage to the underside of the drive unit.
4.3.7 Driving on a winding staircase
When you have to drive on a winding staircase please pay attention to the following:
When ascending, the SAL lite (or any other hand truck) tends to move to the inside of the staircase (any
step a few cm depending on the angle of the winding). Therefore, start as far as possible at the outside
when ascending.
When descending, the SAL Lite tends to move to the outside of the staircase. Therefore, start as far as
possible at the inside when descending.
However, if the winding staircase is still too narrow it is possible to move sideways by reversing, preferably
at one of the wider steps.
5Charging the battery
The battery-cells within the battery housing are maintenance-free, sealed and rechargeable. Their durability
largely depends on the charge/discharge cycles. It is possible for instance to extract far more than 1,000
partial discharges from lead-acid batteries if total discharge is avoided.
▪For this reason, avoid total discharge. Recharge as often as possible.

HERCULES COMPLETE LIFTING SOLUTIONS
WWW.HERCULES.COM.AU
P a g e 14 | 17
▪Lead-acid batteries are subjected to ‘self-discharge’. For this reason, the snap-on battery should be
recharged after a maximum of three weeks of disuse.
▪The charger automatically switches to trickle charging so overcharging is not possible.
▪Do not leave the battery discharged or half discharged. Always charge immediately after use.
▪The optimum temperature for charging is 20 –25 °C. Too cold or too warm has a negative effect on
the capacity.
If the battery has not been fully charged or tends to lose charge too rapidly, this will not only reduce
the speed of the Hercules LITE but also reduce the capacity. It may move into the overload mode
as a result, even with light loads. See Operation [4.3.3]
5.1.1 Battery charger
High performance is achieved by 2-step automatic und digital control engineering. This allows for quick
charging in the first step, then compensation/trickle charging in the second step. It is possible to check the
condition of the battery. With LCD display and revolving mains plug.
1. Connect the charging unit to the battery
2. The off-load voltage of the battery is shown on the display
3. Plug the charging unit into the mains
4. The charging operation begins
Once the battery is fully charged, the charging unit switches over to compensation/trickle charge. On the
display, the battery symbol is shown with 4 bars and remains solid.
If charging does not begin, there are two possible reasons:
Connect the battery charger with the battery (without plugging into the mains) After approximately 9
seconds the test result is displayed (off-load voltage of the battery)

HERCULES COMPLETE LIFTING SOLUTIONS
WWW.HERCULES.COM.AU
P a g e 15 | 17
5.1.2 Protective features, technical data
If the battery fails to reach a certain voltage value within a pre-determined time, the charger automatically
cuts out What to do after a safety cut-out:
1. Unplug the charger from the mains
2. Disconnect the charger from the battery
3. Investigate the reason for the safety cut-out

HERCULES COMPLETE LIFTING SOLUTIONS
WWW.HERCULES.COM.AU
P a g e 16 | 17
6Accessories and options
A continuously growing list of accessories and options is available. For instance different toeplate sizes,
securing straps, in-transit charger, different frame heights, fixed or hinged toeplate.
7Warranty and liability
7.1 Warranty
The warranty period for the Hercules LITE is 12 months (6 months for batteries) from the date of purchase
and covers defective material and production faults
Not included in the warranty are:
▪Normal wear and tear on parts
▪Damage resulting from excessive load
▪Damage due to the exertion of force
▪Unadmissible modifications to the unit or accessory parts
▪Collision damage –wilful damage or neglect
7.2 Liability
Hercules Complete Lifting Solutions as importer or its agents or distributors are not responsible for the
safety of the Hercules LITE if:
▪the Hercules LITE is used other than is intended to be used –as described in this Operator Manual,
▪the Hercules LITE is not regularly maintained by a Hercules authorised mechanical workshop,
▪the instructions in this Operator Manual are not observed,
▪non-original parts are installed or connected with the Hercules LITE,
▪original parts are removed.
8CE declaration of conformity
The manufacturer, declares that the HERCULES LITE stair trolley corresponds to the
applicable basic safety and health requirements of the EC guidelines for machines
89/392/EEC, appendix I A. This declaration will loose its validity if changes are performed
on the unit without our approval.
9Design protection by patents
The lifting system of the SAL series is protected by international patent applications for Europe, USA and
Japan. The modular structure of the basic frame is also protected by a patent application. Also for the rotary
joint of the FOLD model patent is pending.
This manual suits for next models
4
Table of contents
Other Hercules Fitness Equipment manuals
Popular Fitness Equipment manuals by other brands

Bowflex
Bowflex Gym Style Ab Crunch Station Owner's/assembly manual

NORBERTS
NORBERTS MBR-100 Assembly/installation instructions

Movement
Movement EDGE Assembling manual

Inflight Fitness
Inflight Fitness Multi-Lat/Arm Assembly instructions

Livestrong
Livestrong L10.0E-02 Service manual

Nautilus
Nautilus EVO S9AA owner's manual