Hertz HMR 50 User manual
HMR 50
Rev. 0.1a
OWNER’S MANUAL
Marine grade source units
hertz-audio.com
SEL
HMR 50
ZONES
PARTY
VOL
SRC
READY

2
2. PRECAUTIONS ..............................................................................................................................4
3. PACKAGING CONTENTS...............................................................................................................6
4. DIMENSIONS ................................................................................................................................6
5. INSTALLATION..............................................................................................................................7
5.1 Before Starting ......................................................................................................................7
5.2 Installation Cautions.............................................................................................................7
5.3 Mounting hole .......................................................................................................................7
6. MOUNTING ...................................................................................................................................8
7. CONNECTIONS..............................................................................................................................9
8. CONTROLS ..................................................................................................................................10
8.1 Front Panel Controls...........................................................................................................10
8.2 Name of Buttons and their Functions..............................................................................10
9. OPERATIONS ..............................................................................................................................11
9.1 Basic Operation ...................................................................................................................11
•Power On/Off ...................................................................................................................11
•Adjusting the volume.......................................................................................................11
9.2 System Setting ....................................................................................................................12
•System Setting Menu ......................................................................................................12
•Display...............................................................................................................................12
•Audio..................................................................................................................................12
•Beep...................................................................................................................................14
•System...............................................................................................................................14
•Low Battery Alert .............................................................................................................14
9.3 Tuner Operation (AM/FM)..................................................................................................14
•Select tuner as Playing source........................................................................................14
•Settings Menu (AM/FM)..................................................................................................15
•Preset Station Selection (AM/FM) .................................................................................15
•Auto Seek Tuning (AM/FM).............................................................................................15
•Manual Tune (AM/FM) ....................................................................................................15
•Save a Preset....................................................................................................................16
•Select a preset from Favorites list (AM/FM).................................................................16
9.4 Weather Band Tuner Operation (Am/Fm)........................................................................16
•Select WB tuner as Playing Source ................................................................................16
•Preset Station Selection (AM/FM) .................................................................................16
Index

3
Owner’s Manual
9.5 USB Mode Operation (when USB device is connected)...................................................17
•Select USB as Playing Source..........................................................................................17
•Connecting a USB device .................................................................................................17
•Select a Track....................................................................................................................17
•Fast Forward/Fast Rewind ............................................................................................17
•Play / Pause .....................................................................................................................17
•USB Setting Menu............................................................................................................17
9.6 Music Playback On An Apple Device Connected Via Usb................................................18
•Select the desired song ...................................................................................................18
9.7 Bluetooth Operation ...........................................................................................................19
•Select Bluetooth as Playing Source................................................................................19
•Pair Bluetooth Device ......................................................................................................19
•Disconnect Current Device ..............................................................................................19
•Connect Last Device.........................................................................................................19
•Remove a device from the list of paired devices ..........................................................19
•Play / Pause .....................................................................................................................20
•Select a Track....................................................................................................................20
9.8 SiriusXM ...............................................................................................................................20
•SiriusXM Activation Process ...........................................................................................20
•SiriusXM Inteface .............................................................................................................21
•Direct Tuning.....................................................................................................................21
•SiriusXM Settings.............................................................................................................22
•Manage Lock Code ...........................................................................................................23
•SiriusXM Factory Default ................................................................................................23
9.9 AUX In Mode Operation ......................................................................................................24
9.10 Video In Mode Operation.................................................................................................24
•Automatic switching to VIDEO IN mode........................................................................24
10. OPTIONAL ACCESSORIES ..........................................................................................................25
11. TROUBLESHOOTING ..................................................................................................................26
11.1 General...............................................................................................................................26
11.2 USB.....................................................................................................................................26
11.3 Bluetooth...........................................................................................................................27
11.4 SirusXM Connect Tuner Troubleshooting......................................................................28
12. TECHNICAL SPECIFICATIONS....................................................................................................29

4
WARNING: for your safety, while boating,
keep the volume to a level at which
external sounds can be heard.
1. This unit uses precision parts and components
for its operation. In the event of any operating
issues, never open the case or disassemble the unit.
Contact your Hertz dealer or service center.
2. FCC STATEMENT
2.1 This device complies with Part 15 of the FCC Rules.
Operation is subject to the following two conditions:
(1) This device may not cause harmful interference.
(2) This device must accept any interference received,
including interference that may cause undesired
operation.
2.2 Changes or modifications not expressly approved
by the party responsible for compliance could
void the user’s authority to operate the equipment.
FCC ID: 2AYOQ-HMR50
NOTE: This equipment has been tested and found
to comply with the limits for a Class B digital device,
pursuant to Part 15 of the FCC Rules. These limits
are designed to provide reasonable protection
against harmful interference in a residential
installation. This equipment generates, uses and can
radiate radio frequency energy and, if not installed
and used in accordance with the instructions,
may cause harmful interference to radio
communications. However, there is no guarantee
that interference will not occur in a particular
installation. If this equipment does cause harmful
interference to radio or television reception, which
can be determined by turning the equipment off and on,
the user is encouraged to try to correct the interference
by one or more of the following measures:
-Reorient or relocate the receiving antenna.
-Increase the separation between the equipment
and receiver.
-Connect the equipment into an outlet on a circuit
different from that to which the receiver is connected.
-Consult the dealer or an experienced radio/TV
technician for help.
FCC Radiation Exposure Statement.
This equipment complied with FCC radiation exposure
limits set forth for an uncontrolled environment. This
equipment should be installed and operated with
minimum distance 20 cm between the unit & your body.
3. IC warning
This device complies with Industry Canada’s
license-exempt RSS standard(s).
Operation is subject to the following two conditions:
(1)This device may not cause interference
(2)This device must accept any interference,
including interference that may cause undesired
operation of the device.
This Class B digital apparatus complies with Canadian
ICES-0003. Le présent appareil est conforme aux CNR
d’Industrie Canada applicables aux appareils radio
exempts de licence.
L’exploitation est autorisée aux deux conditions suivantes:
(1)l’appareil ne doit pas produire de brouillage
(2)l’utilisateur de l’appareil doit accepter tout
brouillage radioélectrique subi, même si le
brouillage est susceptible d’en compromettre
le fonctionnement.
This equipment complies with IC radiation exposure
limits set forth for an uncontrolled environment.
The antenna should be installed and operated with
minimum distance of 20 cm between the radiator
and your body.
This transmitter must not be co-located or operating
in conjunction with any other antenna or transmitter.
Cet appareil est conforme aux limites d’exposition aux
rayonnements de la IC pour un environnement non
contrôlé. L’antenne doit être installé de façon à garder
une distance minimale de 20 centimètres entre la
source de rayonnements et votre corps.
L’émetteur ne doit pas être colocalisé ni fonctionner
conjointement avec à autre antenne ou autre émetteur.
2. PRECAUTIONS

5
Owner’s Manual
WARNING: changes or modifications to this unit not
expressly approved by the party responsible for
compliance could void the user’s authority to
operate the equipment.
IC ID: 24882-HMR50
4. The Bluetooth word mark and logos are registered
trademarks owned by the Bluetooth SIG, Inc. and
any use of such marks by Elettromedia srl is under
license. Other trademarks and trade names belong
to their respective owners.
5. aptX™ : Qualcomm aptX is a product of Qualcomm
Technologies, Inc. and/or its subsidiaries.
Qualcomm is a trademark of Qualcomm Incorporated,
registered in the United States and other countries.
aptX is a trademark of Qualcomm Technologies
International, Ltd., registered in the United States
and other countries and any use of such marks
by Elettromedia srl is under license.
6. USB Port
-The USB memory sticks must be recognized as
“USB” to work properly. Some models may not
operate correctly. In the event data is lost or
damaged under any condition, Elettromedia srl
shall not be liable for any damage. When using
the USB memory stick, we recommend that you
backup your data (music) to a personal computer
before using.
-Data (music) files may be damaged when USB
memory sticks are removed while the device
is reading data, or by static electricity and/or an
electrical surge.
-Connect/disconnect the USB memory stick when
it is not accessed.
-Disconnect the USB memory device when not
in use.
7. Cleaning the Body
-Use a soft, dry cloth and gently wipe off any
dirt or dust.
-For persistent dirt, apply some neutral detergent
diluted in water on a soft cloth, wipe off the dirt
gently, then wipe again with a dry cloth.
-Do not use benzene, thinner, boat cleaner, etc., as
these substances may damage the body or
cause the paint to peel. Also, leaving rubber or
plastic products in contact with the body for long
periods of time may cause stains.
CAUTIONS ON HANDLING
Protect from high temperatures. Exposure to direct sunlight for an extended period of time can produce
very high temperature inside the unit. It is recommended to protect the unit with the special cover when
not in use.

6
x 4 Screws
∅
3,5 x 38
mm.
AC
E
B
D
USB extension cable
150 cm / 59 in. PWR/SPK CABLE
16 cm / 6.3 in.
VOL
SEL
ZONES
SRC
3. PACKAGING CONTENTS
4. DIMENSIONS
HMR 50 Silicon Cover
PARTY HMR 50
READY
SEL
HMR50
ZONES
PARTY
VOL
SRC
READY
A B C D E
HMR 50 146 105 98 34 50 mm
5.75 4.13 3.86 1.34 1.97 in.
7
Owner’s Manual
1. This set is exclusively for use in vessels with a negative ground 12 V power supply.
2.
Read these instructions carefully.
3.
Make sure the battery “-” terminal is disconnected before starting.
This is to prevent short circuits during installation. (Figure 1).
1. In order to avoid any interference, do not install the tuner module or control unit in the proximity of the
engine compartment.
2. The use of unauthorized parts can cause permanent damage to the unit.
3. Always check your wire connections to ensure proper installation before turning on the unit.
4. Consult with your nearest dealer for proper installation or if other accessories are needed to complete
the installation.
5. Seek assistance if modifications or drilling holes to your vessel is needed.
6. Do not install the unit where it will be subjected to excessive moisture, dust, dirt, foreign particles or vibration.
Areas of high temperature from the engine, direct sunlight, or heat sources should also be avoided.
7. Do not install the unit in a location where it will interfere with the vessel operation, or it will injure the
passengers if there is a sudden or emergency stop.
5.1 BEFORE STARTING
5.2 INSTALLATION CAUTIONS
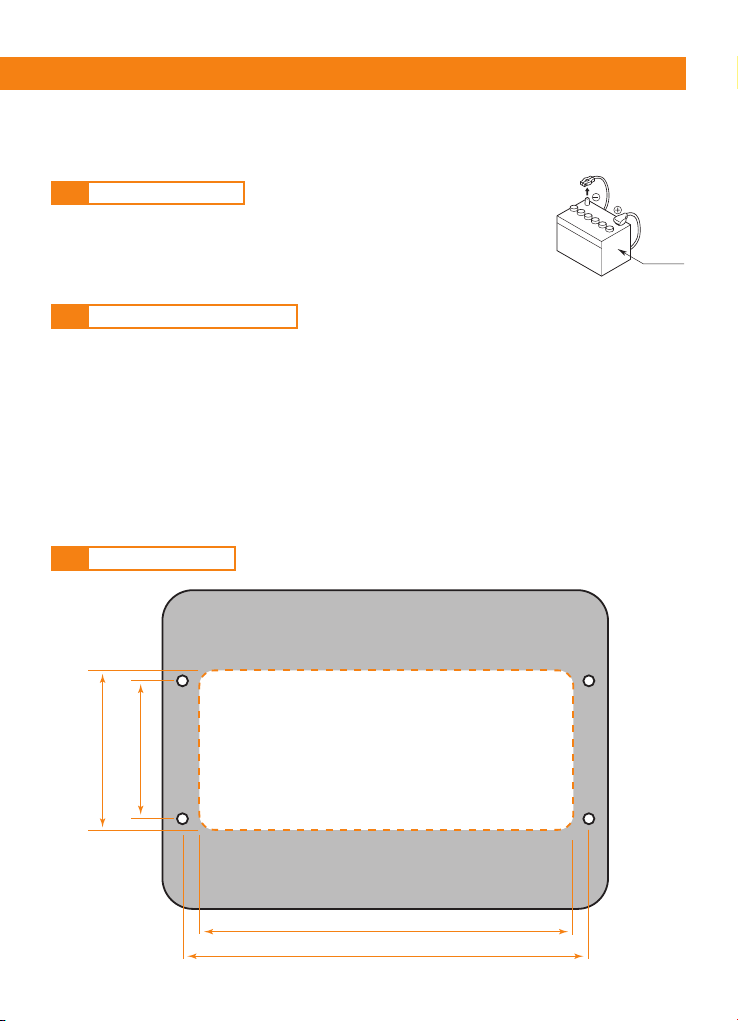
5.3 MOUNTING HOLE
5. INSTALLATION
Battery
Figure 1
122 mm (4.8 in.)
52 mm (2.05 in.)
50 mm (1.97 in.)
133 mm (5.2 in.)
8
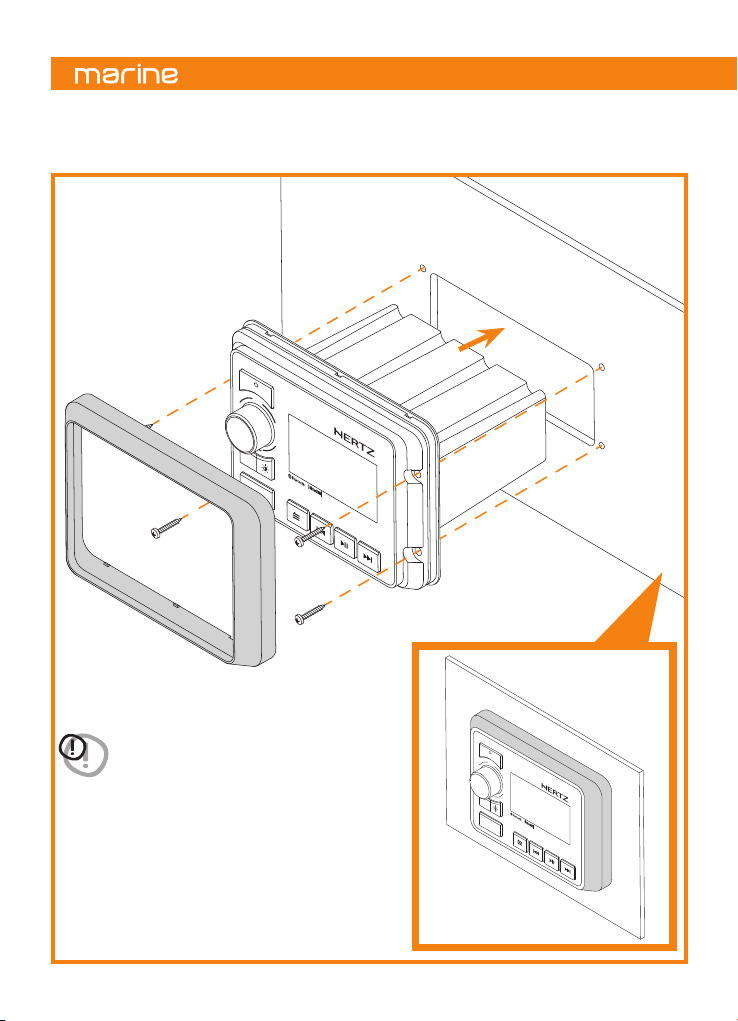
6. MOUNTING
VOL
READY
HMR 50
VOL
ZONES
SRC
PARTY
SRC
PARTY
HMR 50
ZONES
READY
WARNING: before drilling or cutting, make sure there
is adequate space behind the mounting surface
to fit the HMR 50, including its wire harness.
VOL
READY
HMR 50
VOL
ZONES
SRC
PARTY
SRC
PARTY
HMR 50
ZONES
READY
9
Owner’s Manual
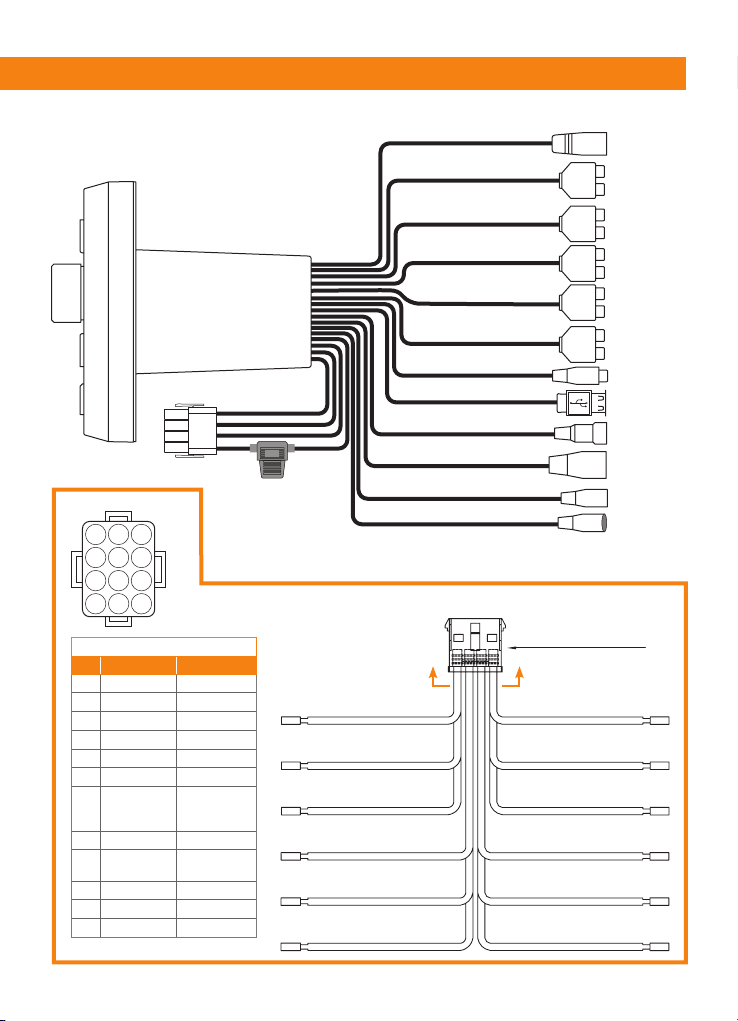
7. CONNECTIONS
12 pin Harness pin out
No. Wire color Description
1Yellow Battery (+12V)
2White/black Front left -
3White Front left +
4Red ACC (+12V)
5Grey/black Front right -
6Grey Front right +
7Blue
Antenna/
Remote out
(+12V)
8Green/black Rear left -
9Green Rear left +
10 Black GND
11 Violet/black Rear right -
12 Violet Rear right +
121110
987
654
321
A-A
Note: cable out view
12 PIN HARNESS
Water Seal (Blue)
WHITE FRONT LEFT +BLACK GROUND
BLUE ANTENNA/REM OUT (+12V)GREEN REAR LEFT +
VIOLET/BLACK REAR RIGHT -GRAY FRONT RIGHT +
WHITE/BLACK FRONT LEFT -
YELLOW BATTERY (+12V)
VIOLET REAR RIGHT +GREEN/BLACK REAR LEFT -
RED ACC (+12V)GRAY/BLACK FRONT RIGHT -
A A
RADIO
ANTENNA
CAMERA
USB
Rch Red
Rch Red
Rch Red
Rch Red
Rch Red
Lch White
Lch White
Lch White
Lch White
Lch White
To HMC U1
To SXM
To HMC D1
FUSE
(15A)
BLACK ZONE 1
BROWN ZONE 2
GREEN ZONE 1 SUB
GRAY ZONE 3
RED AUX IN
BLACK USB IN
BLACK CAMERA IN
BLACK ANTENNA IN
BLACK REMOTE
BLACK WIRE REMOTE
BLACK SXM INPUT
VIOLET/WHITE
CAMERA
TRIGGER

10
8.1 FRONT PANEL CONTROLS
8.2 NAME OF BUTTONS
AND THEIR FUNCTIONS
8. CONTROLS
- Power ON (short press).
- Power OFF (long press).
- Enter to SOURCE SELECTION (short press).
SRC Button
1
VOL/SEL Knob
- Adjust volume level (rotate).
- Menu navigation and setting adjustments (rotate/press).
- Mute ON/OFF (short press).
- AM/FM: FAVORITES menu (long press).
2
- Switch between two different brightness values for the display (short press).
DIMMER Button
4
- Brings the volume of all audio zones to level “15”.
PARTY Button (long press)
3
ZONES Button
- Access AUDIO ZONE LEVEL menu (short press).
- When into AUDIO ZONE LEVEL to switch between Zone1, Zone2, SUB (short press).
8
- AM/FM mode: access to manual tuning (short press).
- USB mode: pause or resume playback (Short press).
- BT mode: pause or resume playback (Short press).
- SirusXM mode: Direct Tuning function
(see sec. 9.9)
.
PLAY/PAUSE Button
6
MENU/BACK Button
- Access system settings (long press).
- Exit from system settings (long press).
- Access active source settings (short press).
- To go back/return to the previous screen (long press).
7
- AM/FM mode: previous/next preset station (short press).
Seek the previous/next strongest station (long press).
- USB mode: previous/next track (short press).
fast forward/rewind (press and hold).
- BT mode: previous/next track (short press).
- SiriusXM mode: seek the next / previous channel (short press).
quick search for the next / previous channel (long press).
5Button
VOL
SEL
ZONES
SRC
PARTY HMR 50
1
2
43
7 5 5
86
SOURCE SELECTION
press to select Bluetooth
12.5 V
FM AM WB USB
AUX VIDEO
IN
sxm
READY
11
Owner’s Manual
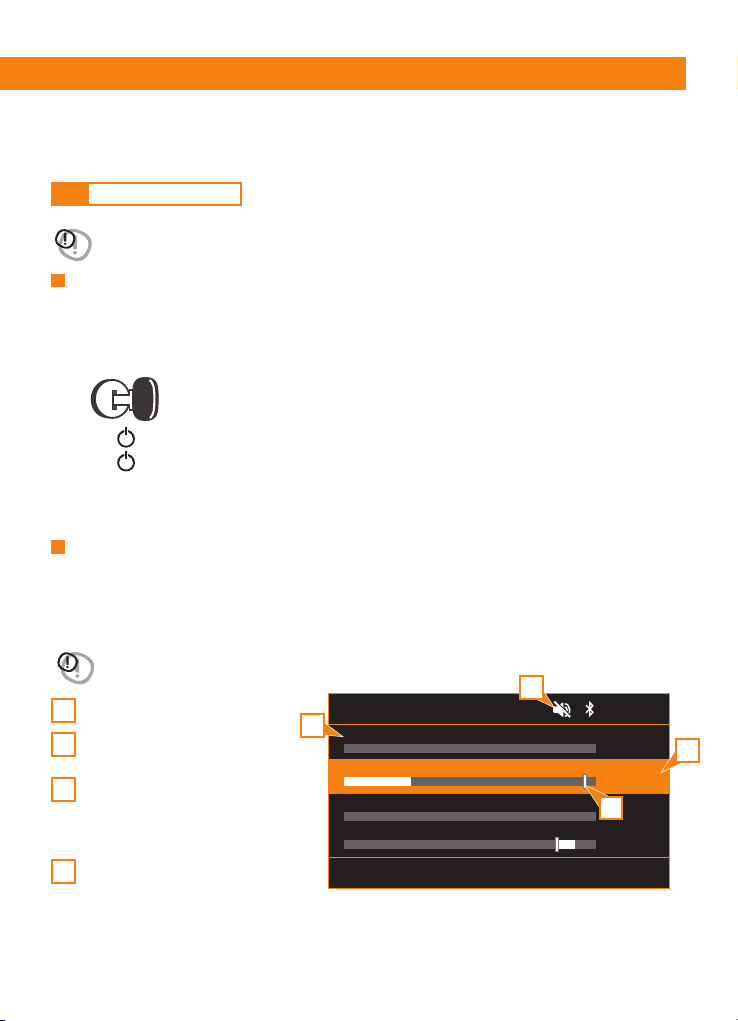
Selected zone volume level.
Zone max volume limit.
(rename option available, see chapter 9.2).
Zone name.
- When in AUDIO ZONE LEVEL to change
between Zone1, Zone2, Zone3, SUB.
(short press).
Mute on.
WARNING: when the unit is turned on, starting and stopping the engine with its volume raised to the
maximum level may cause hearing damage. Make sure you adjust the volume in advance.
WARNING: while boating, keep the volume at a level at which external sounds can still be heard.
Please be aware of the volume levels in residential, public areas and local volume level ordinances.
Engine ON position
9.1 BASIC OPERATION
9. OPERATIONS
Adjusting the volume
Power On/Off
Rotate VOL/SEL knob to increase or decrease the volume.
The adjustable range of volume is from 0 to 40.
-The volume of each Zone and Sub relative level are adjustable separately in AUDIO ZONE LEVEL menu.
-Sub volume is linked with Zone1, adjustable relative level range is from -30 to +10.
1
2
3
4
Note:
-Start the engine before using this unit.
-Be careful about using this unit for a long time without running the engine. If you drain the vessel
battery, you may not be able to start the engine and this can reduce the service life of the battery.
1. Start the engine.
2. Press /SCR to turn the unit ON.
3. Press /SCR to access the SOURCE SELECTION menu.
4. Rotate VOL/SEL knob to highlight the desired source, press to select.
(FM>AM>WB>USB>BT>SXM*>AUX IN>VIDEO IN).
*only available in USA and Canada.
AUDIO ZONE LEVEL
Z1: ZONE 1 (OFF) 0
+3
12
Z2: ZONE 2
Z3: STATEROOM 3 (Fixed @ 4 Vrms)
SUB
12.5 V
press ZONES button to change selection
1
2
3
4
12
-Long press to access the system settings menu.
-Rotate VOL/SEL knob to highlight one of the available options, press to select.
(DISPLAY>AUDIO> BEEP> SYSTEM >LOW BATTERY ALERT>).
-Press to go back to the previous screen menu.
-Long press to exit from the system settings menu.
ZONE 1 (settings for ZONE 1 rca out, speaker outputs and ZONE 1 SUB rca out)
-Rotate VOL/SEL knob to highlight one of the available options, press to select.
(EQ>BALANCE-FADER>LOUDNESS>CROSSOVER>SUB>ZONE RENAME>MAX VOLUME LIMIT>LEVEL CONTROL MODE).
EQ (Equalizer Setting)
Rotate VOL/SEL knob to highlight one of the available options, press to select.
(CUSTOM>CLASS>JAZZ>ROCK>POP>FLAT)
The “CUSTOM” curve can be customized by the user:
-Rotate VOL/SEL knob and select the “CUSTOM” curve.
- Press VOL/SEL knob to select the desired frequency.
- Rotate VOL/SEL knob to vary the gain level of the selected frequency.
- Press again VOL/SEL knob to go to the following frequency.
BALANCE-FADER
Press VOL/SEL knob to switch between the options:
Balance: rotate VOL/SEL knob to adjust the Balance between the right and left channels from R07
(full right) to L07 (full left).
Fader: rotate VOL/SEL knob to adjust the level from F07 (full front) to R07 (full rear).
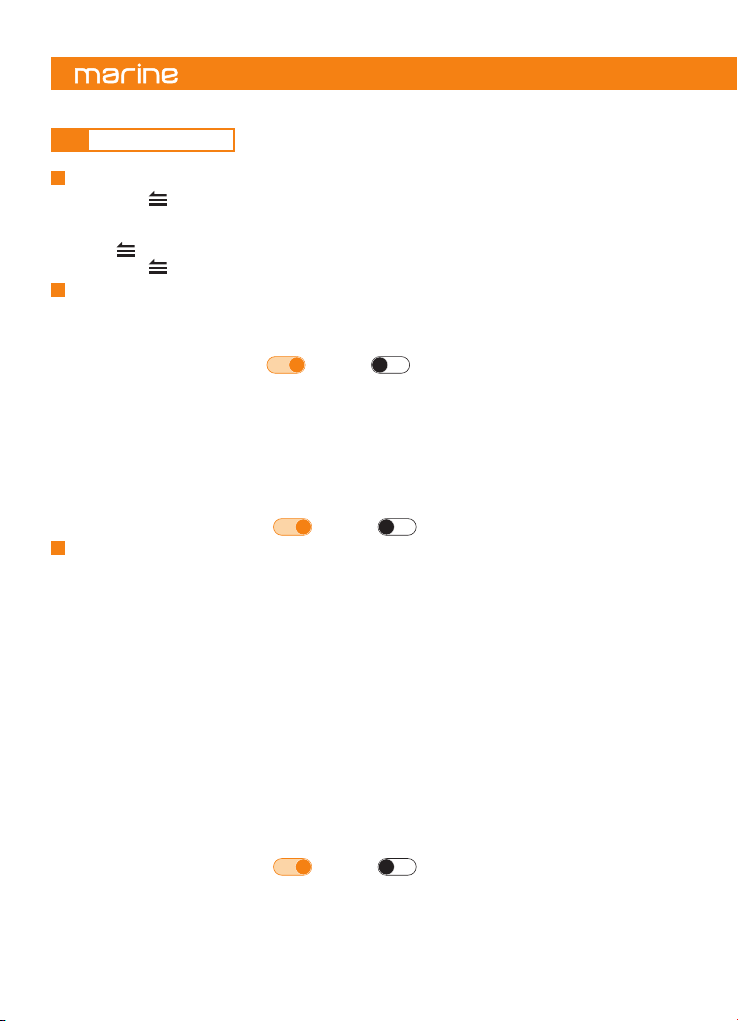
LOUDNESS
Rotate VOL/SEL knob to enable or disable this function.
CROSSOVER (to set the cutoff frequency for ZONE 1 rca out and speaker outputs).
Rotate the knob to select the desired cut-off frequency of the high pass filter (OFF>100Hz>80Hz>60Hz)
SUB (ZONE 1 SUB out settings)
SUB LEVEL
Rotate VOL/SEL to adjust the output volume level from -30 to +10.
9.2 SYSTEM SETTING
System Setting Menu
-Rotate VOL/SEL knob to highlight one of the available options, press to select.
(DIMMER>DIMMER BRIGHTNESS>BUTTONS BACKLIGHT, TEXT SCROLLING).
DIMMER
Press VOL/SEL knob to enable or disable this function.
DIMMER BRIGHTNESS
Press VOL/SEL knob to switch between the options:
DIMMER ON: rotate VOL/SEL knob to adjust brightness level from 0 to 8 when dimmer is enabled.
DIMMER OFF: rotate VOL/SEL knob to adjust brightness level from 0 to 8 when dimmer is disabled.
BUTTONS BACKLIGHT
Rotate VOL/SEL knob to highlight one of the available options, press to select.
(RED>GREEN>BLUE>WHITE>YELLOW>PURPLE>CAMBRIDGE BLUE>AUTO)
TEXT SCROLLING (enable continuous text scrolling where available)
Rotate VOL/SEL knob to enable or disable this function.
Display
Audio

13
Owner’s Manual
SUB LPF (to set the subwoofer cut-off frequency).
Rotate VOL/SEL knob to select the desired cut-off frequency of the low pass filter.
(OFF>100Hz>80Hz>60Hz).
INVERT PHASE
Rotate VOL/SEL knob to select the phase of the signal on the output.
When the function is enable the signal phase is inverted (180°).
ZONE RENAME (to select the desired name of an audio zone, to facilitate identification)
Rotate VOL/SEL knob to highlight one of the available options, press to select.
(BOW>BRIDGE>COCKPIT>FLY>GALLEY>HELM>SALOON>STATEROOM 1
STATEROOM 2>STATEROOM 3>STERN>TOWER>TRANSOM>ZONE 1).
MAX VOLUME LIMIT (to limit the maximum volume output of this zone).
Rotate VOL/SEL knob to adjust the desired Volume level limit from 0 to 40.
LEVEL CONTROL MODE.
Rotate VOL/SEL knob to highlight one of the available options:
- VARIABLE (default): the volume level of the signal output from this audio zone is variable and can
be controlled via the volume mixer ([ZONES] button).
- FIXED 4 VRMS MAX: the level of the output signal from this audio zone is fixed at 4Vrms. It will no
longer be possible to change the volume level for this zone until the “Variable” mode is selected.
- FIXED 2 VRMS MAX: the level of the output signal from this audio zone is fixed at 2Vrms.
It will no longer be possible to change the volume level for this zone until the “Variable” mode is selected.
- FIXED 1 VRMS MAX: the level of the output signal from this audio zone is fixed at 1Vrms.
It will no longer be possible to change the volume level for this zone until the “Variable” mode is selected.
- OFF: this audio zone is off. This zone will no longer play any sound until “Variable” or “Fixed” mode is selected.
ZONE 2 - ZONE 3 (ZONE 2 rca out, ZONE 3 rca out setting).
-Rotate VOL/SEL knob to highlight one of the available options, press to select.
(EQ>BALANCE >LOUDNESS>ZONE RENAME>MAX VOLUME LIMIT>LEVEL CONTROL MODE).
EQ (Equalizer Setting)
Rotate VOL/SEL knob to highlight one of the available options, press to select.
(CUSTOM>CLASS>JAZZ>ROCK>POP>FLAT).
The “CUSTOM” curve can be customized by the user:
-Rotate VOL/SEL knob and select the “CUSTOM” curve.
- Press VOL/SEL knob to select the desired frequency.
- Rotate VOL/SEL knob to vary the gain level of the selected frequency.
- Press again VOL/SEL knob to go to the following frequency.
BALANCE
Balance: rotate VOL/SEL knob to adjust the Balance between the right and left channels from R07
(full right) to L07 (full left).
LOUDNESS
Rotate VOL/SEL knob to enable or disable this function.
ZONE RENAME (to select the desired name of an audio zone, to facilitate identification).
Rotate VOL/SEL knob to highlight one of the available options, press to select.
(BOW>BRIDGE>COCKPIT>FLY>GALLEY>HELM>SALOON>STATEROOM 1
STATEROOM 2>STATEROOM 3>STERN>TOWER>TRANSOM>ZONE 2*).
*ZONE 3 for the ZONE 3.
MAX VOLUME LIMIT (to limit the maximum volume output of this zone).
Rotate VOL/SEL knob to adjust the desired Volume level limit from 0 to 40.

14
Press VOL/SEL knob to enable or disable this function.
Beep
(FACTORY DEFAULT>SOFTWARE VERSION)
FACTORY DEFAULT
Press VOL/SEL knob, then select and press [YES] to restore all settings to the factory default values.
SOFTWARE VERSION
Press VOL/SEL knob to show the software version information.
System
LEVEL CONTROL MODE
Rotate VOL/SEL knob to highlight one of the available options:
- VARIABLE (default): the volume level of the signal output from this audio zone is variable and can
be controlled via the volume mixer ([ZONES] button).
- FIXED 4 VRMS MAX: the level of the output signal from this audio zone is fixed at 4Vrms. It will no
longer be possible to change the volume level for this zone until the “Variable” mode is selected.
- FIXED 2 VRMS MAX: the level of the output signal from this audio zone is fixed at 2Vrms.
It will no longer be possible to change the volume level for this zone until the “Variable” mode is selected.
- FIXED 1 VRMS MAX: the level of the output signal from this audio zone is fixed at 1Vrms.
It will no longer be possible to change the volume level for this zone until the “Variable” mode is selected.
- OFF: this audio zone is off. This zone will no longer play any sound until “Variable” or “Fixed” mode is selected.
Press VOL/SEL knob to enable or disable this function.
Remark: this notification alerts you when the 12VDC supply voltage drops below 10 volts. If enabled, the
device will enter safe mode and disable the audio output. A warning will also be displayed on the
screen with instructions to shut down the device until normal operating voltage is restored.
Low Battery Alert (Notifies of low battery voltage condition).
9.3 Tuner Operation (AM/FM)
Select tuner as Playing Source
1.Press /SCR to access the SOURCE SELECTION menu.
2.Rotate VOL/SEL knob to highlight the desired tuner mode,
press to select (FM>AM).
FM
press Menu for Settings
Station name
Radio text
Mhz106.50
12.5 V
long press KNOB to save

15
Owner’s Manual
-Press to access the settings menu. (AM/FM).
-Rotate VOL/SEL knob to highlight the desired option, press to select.
(PRESETS>RADIO REGION>LOCAL>AUTO STORE>RDS*>AF*).
*Europe region only.
- Press to go back to the previous screen or exit the menu.
PRESETS
- Press VOL/SEL knob to access the FAVORITES list.
- Rotate VOL/SEL knob to select the desired preset then press to select.
RADIO REGION
Rotate VOL/SEL knob to highlight the desired radio region, press to select.
(EUROPE>USA).
LOCAL (to tune in only the stations with the strongest signal)
Press VOL/SEL knob to enable or disable this function.
AUTO STORE
(only station with sufficient signal strength will be detected and stored in the memory).
Press VOL/SEL knob to automatically find the available stations and store them into presets
(the new station replaces any stations already stored).
RDS (FM Radio Data System)
Press VOL/SEL knob to enable or disable this function.
AF (FM Alternative Frequencies)
Press VOL/SEL knob to enable or disable this function
-Press to move to the previous preset.
-Press to move to the next preset.
-Long press to SEEK the previous strongest station.
-Long press to SEEK the next strongest station.
-Press to access the manual seek tuning, the screen will display MANUAL tune
(the system returns to AUTO mode after a few seconds if no key is pressed).
- Press or to manually tune to the desired frequency.
(the system returns to AUTO mode after a few seconds if no key is pressed).
Settings menu (AM/FM)
Preset station selection (AM/FM)
Auto Seek Tuning (AM/FM)
Manual Tune (AM/FM)

16
Select a preset from FAVORITES list (AM/FM).
Save a preset (You can save up to 18 of your favorite stations when in FM, or
up to 12 when in AM, as presets for a quick access).
1) Long press VOL/SEL knob to access the FAVORITES screen (AM/FM).
2) Rotate VOL/SEL knob to highlight the desired preset, press to select.
1) Tune the desired station / frequency.
2) Long press VOL/SEL knob to access the FAVORITES screen (AM/FM).
3) Rotate VOL/SEL knob to select the desired preset number.
4) Long press VOL/SEL knob to store it.
9.4 WEATHER BAND TUNER OPERATION (AM/FM)
Select WB tuner as Playing Source
1.Press /SCR to access the SOURCE SELECTION menu.
2.Rotate VOL/SEL knob to highlight the desired tuner mode, press to select (WB).
Preset Station Selection (AM/FM)
-Press to move to the previous preset.
-Press to move to the next preset.
FM FAVORITES
long press knob to save
12.5 V
FM
VIRGIN
01
06
FM
BBC
02
07
FM
87.50
03
08
FM
108.00
04
09
FM
96.50
05
10
WB
long press Menu for general Settings
12.5 V
Mhz106.50
Preset 1

17
Owner’s Manual
9.5 USB Mode Operation (available only when a USB device is connected)
Connecting a USB device
-Insert a USB device into the USB port (please check the tech sheet at the end of this manual for details).
- To remove the USB device, you should select another source or turn off the power, in order to avoid.
- damaging the USB device. Then remove the USB device.
-Press to move to the next track/song. Press to go back to the previous track/song.
Select a Track
-Press the to pause the track/song that is currently playing, lights up.
-Press the to resume playing the track/song that has been paused, lights up.
Play / Pause
Select USB as Playing Source
1.Press /SCR to access the SOURCE SELECTION menu.
2.Rotate VOL/SEL knob to highlight USB, press to select.
-Press and hold to fast forward through the track/song.
-Press again and hold to speed up the progress.
-Press and hold to fast rewind through the track/song.
-Press to return to playback.
Fast Forward/Fast Rewind
1Press to enter the USB settings menu.
2Rotate VOL/SEL knob to the desired option, press to select
(BROWSER>REPEAT>SHUFFLE).
3Press to go back to previous screen or exit from the menu.
BROWSER
Use VOL/SEL knob and to browse the USB device content.
Rotate VOL/SEL knob to highlight the desired song or folder.
Press VOL/SEL knob to play the song or access the folder.
Press to exit from the current folder.
Press to exit the USB browsing (only if you are in the USB root).
Remark: the system exits from the USB browsing after a few seconds if no button is pressed.
USB Setting Menu
USB 12.5 V
1:13 / 3:44 07 of 10
Song name
Artist name
Album name
Album cover
folder name
18
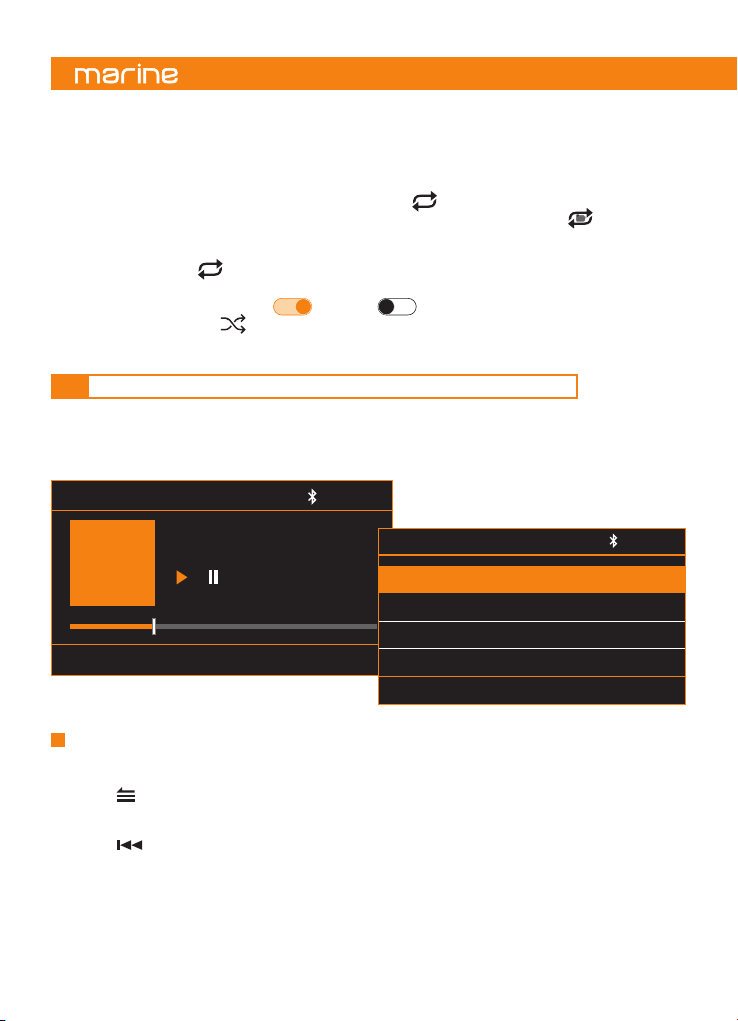
REPEAT
Rotate VOL/SEL knob to the desired option, press to select:
REPEAT OFF>REPEAT ONE>REPEAT DIR>REPEAT ALL [DEFAULT]):
REPEAT OFF: the repeat play function is disabled. No “repeat” logo is shown on the screen.
REPEAT ONE: repeat playback of the current track. The logo is displayed on the screen.
REPEAT DIR: repeat playback of the songs contained in the current folder. The logo
is displayed on the screen.
REPEAT ALL: when all the tracks contained in the device have been played, playback restarts from the
first track. The logo is displayed on the screen.
SHUFFLE
Rotate VOL/SEL knob to enable or disable this function.
When enabled the logo is displayed on the screen.
1
ALL
9.6 MUSIC PLAYBACK ON AN APPLE DEVICE CONNECTED VIA USB
1.Connect a compatible Apple smartphone or media player to the head unit via USB.
2.You can use the music application on the Apple®device or the head unit controls to browse the music
library and to select, play, pause and skip tracks.
*Apple® is a trademark of Apple Inc., registered in
the US and other countries.
MOBILE PHONE 12.5 V
1:13 / 3:44 07 of 10
Song name
Artist name
Album name
Album cover
FILE BROWSING
press to select
PLAYLIST >
ARTISTS >
ALBUMS >
GENRES >
12.5 V
The songs contained in the * Apple® device are grouped as it happens in the device itself, through
playlists, such as: “Playlists”, “Artists”, “Albums”, “Genres”, “Songs”, “Composers” and “Audiobooks”.
-Press to view the contents of the Apple®device.
-Rotate VOL/SEL knob to highlight the desired playlist. Press to confirm selection.
-Rotate VOL/SEL knob to highlight the desired track. Press VOL/SEL knob to play the track.
-Press to go back.
Remark: the system exits USB navigation after a few seconds if no button is pressed.
Select the desired song
19
Owner’s Manual
9.7 BLUETOOTH OPERATION
Select Bluetooth as Playing Source
1.Press /SCR to access the SOURCE SELECTION menu.
2.Rotate VOL/SEL knob to highlight BT, press to select.
Enable Bluetooth in your streaming device and scan for nearby devices, select HMR 50 from your list
of available devices to connect.
Pair Bluetooth Device
1When the device is connected short press to access BT Setting.
2Rotate VOL/SEL knob and select SELECT DEVICE. Press to select.
3The device currently connected is highlighted with the icon .
4 Rotate VOL/SEL knob to select the device currently connected and to be disconnected.
5 Press VOL/SEL knob to disconnect the selected device. The icon becomes
1When the device is disconnected short press to access BT Setting.
2Rotate VOL/SEL knob and select SELECT DEVICE. Press to select.
3Rotate VOL/SEL knob to select the device to connect.
4Press VOL/SEL knob to connect the device selected. The icon becomes
1Short press to access BT Setting.
2Rotate VOL/SEL knob and select REMOVE DEVICE. Press to select.
3Rotate VOL/SEL knob to select the device to remove.
4Press VOL/SEL knob to remove the device selected.
Disconnect Current Device
Connect Last Device
Remove a device from the list of paired devices
WARNING: please avoid operating your connected mobile phone while audio streaming as this may
cause noise or stuttering on the song playback. Audio streaming may or may not resume after
telephone interruption as this depends on the mobile phone used.
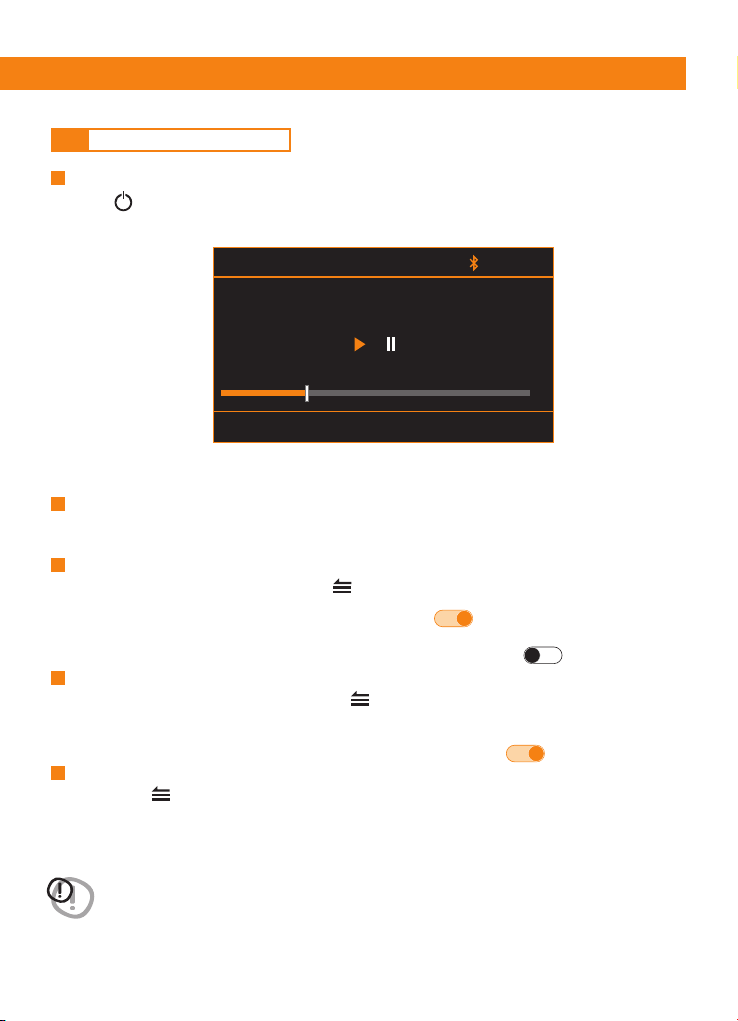
BT: phone name
press Menu for Settings
12.5 V
1:13 / 3:44 07 of 10
Song name
Artist name
Album name

20
Remark: playing order will depend on Bluetooth audio player. When is pressed some A2DP devices will
restart the current track depending on the duration of the playback. Some Bluetooth audio players may not
allow play/pause synchronization with this unit. Please make sure both the device and the main unit are in
the same play/pause status in BT Music mode.
-Press to pause the track/song that is currently playing. The icon is displayed on the screen.
-Press to resume playing the track/song that has been paused.
The icon is displayed on the screen.
-Press to move on to the previous track/song.
-Press to go back to the next track/song.
Play / Pausa
Select a Track
SiriusXM is where moments happen. The widest, deepest variety of music, ad-free. More games, more
sports, more coverage than anywhere. The most extensive entertainment, complete news coverage and
every kind of comedy. Listen in your car, on your phone, online and at home. A SiriusXM Connect Tuner
and subscription are required. For more information, visit www.siriusxm.com.
1Activating your SiriusXM Subscription
After installing your SiriusXM Connect Tuner and antenna, power on your HMR 50 and select
SiriusXM mode. You should be able to hear the SiriusXM preview channel on Channel 1. If you cannot
hear the preview channel, please check the installation instructions to make sure your SiriusXM.
Connect tuner is properly installed.
After you can hear the preview channel, tune to Channel 0 to find the Radio ID of your tuner.
In addition, the Radio ID is located on the bottom of the SiriusXM Connect Tuner and its packaging.
You will need this number to activate your subscription. Write the number down for reference.
Note: the SiriusXM Radio ID does not include the letters I, O, S or F.
In the USA, you can activate online or by calling SiriusXM Listener care:
• Visit www.siriusxm.com/activatenow.
• Call SiriusXM Listener Care at 1-866-635-2349.
For Canadian Subscriptions, please contact:
• Visit www.siriusxm.ca/activate.
• Call SiriusXM Customer Care at 1-888-539-7474.
As part of the activation process, the SiriusXM satellites will send an activation message to your tuner.
When your radio detects that the tuner has received the activation message, your radio will display:
SUBSCRIPTION UPDATED.
Once subscribed, you can tune to channels in your subscription plan. Note, the activation process
usually takes 10 to 15 minutes, but may take up to an hour. Your radio will need to be powered on
and receiving the SiriusXM signal to receive the activation message.
2IDENTIFYING THE SiriusXM Connect Tuner RADIO ID NUMBER
The SiriusXM Radio ID is required for activation and can be found by tuning to Channel 0 as well as
by looking on the label found on the SiriusXM Connect Tuner and its packaging. The Radio ID does
not include the letters I, O, S or F.
SiriusXM ACTIVATION PROCESS
9.8 SiriusXM®
Table of contents
Other Hertz Marine Equipment manuals


