Hi-Link HLK-SW16 User manual
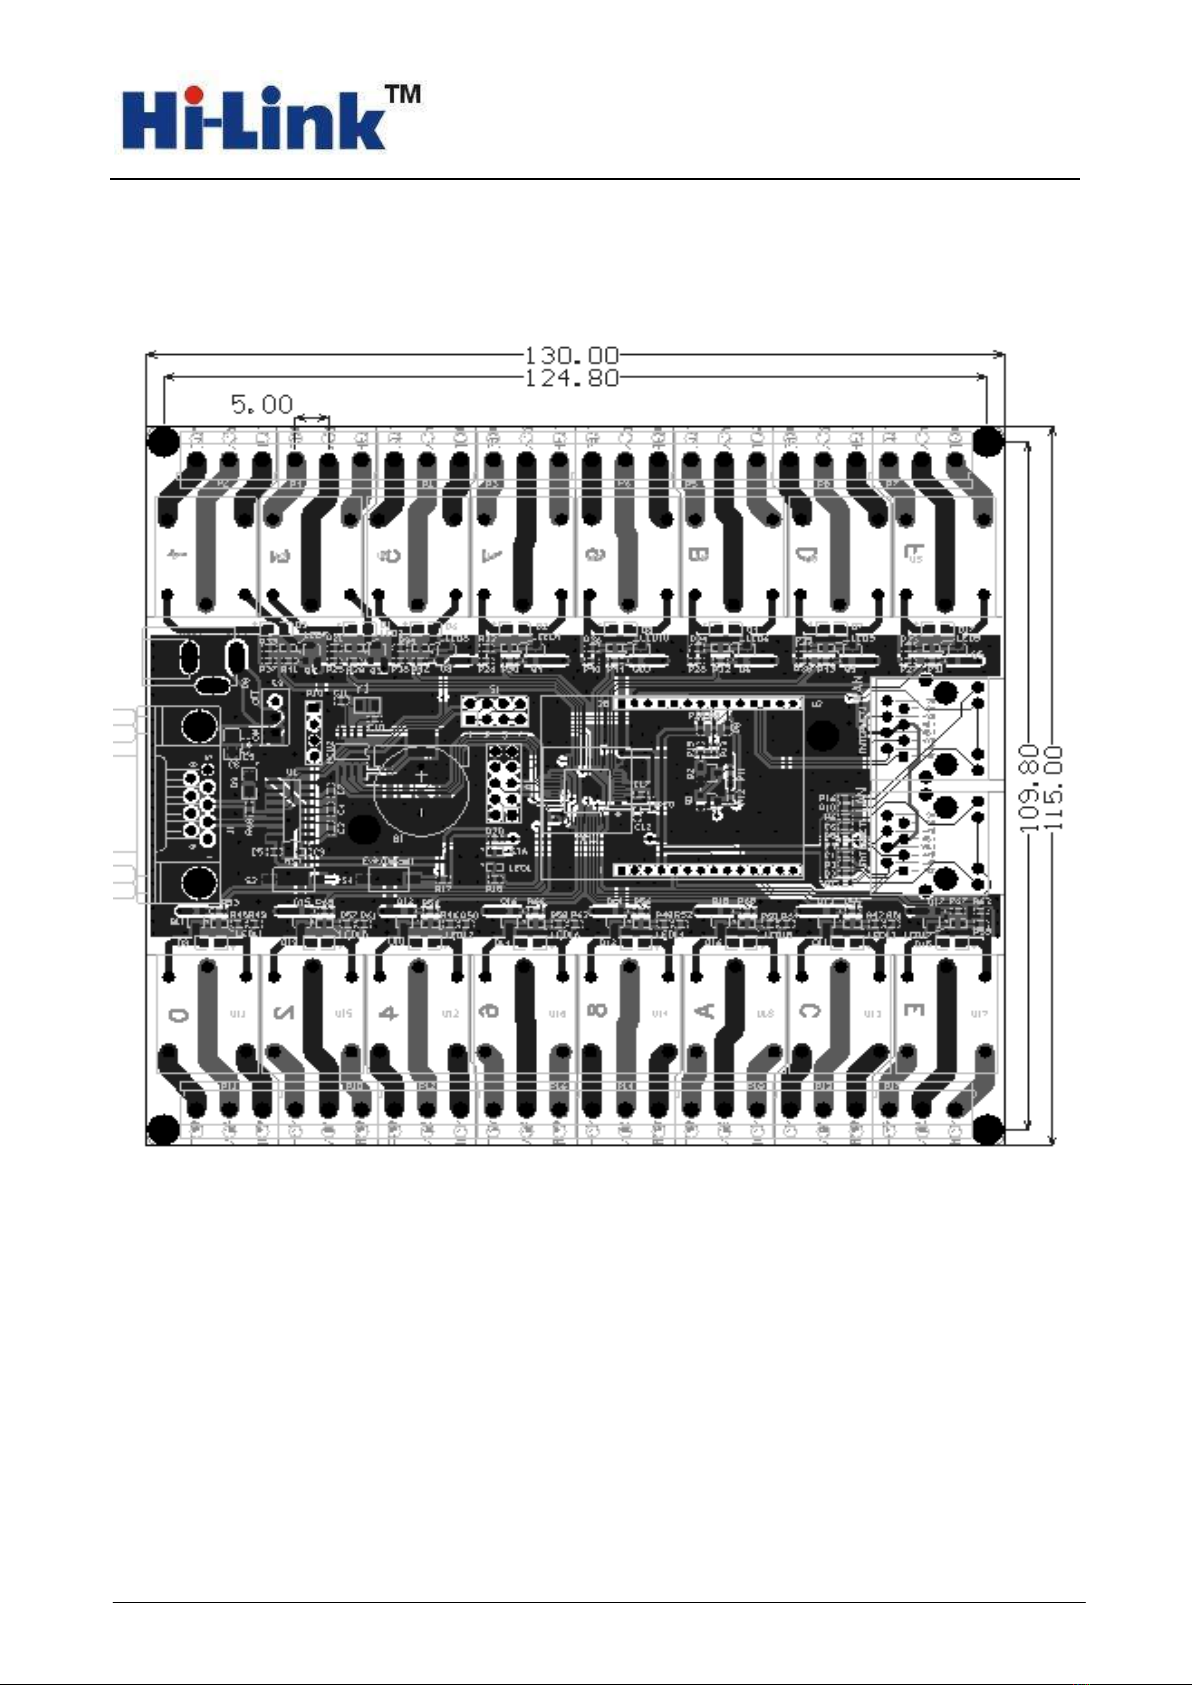
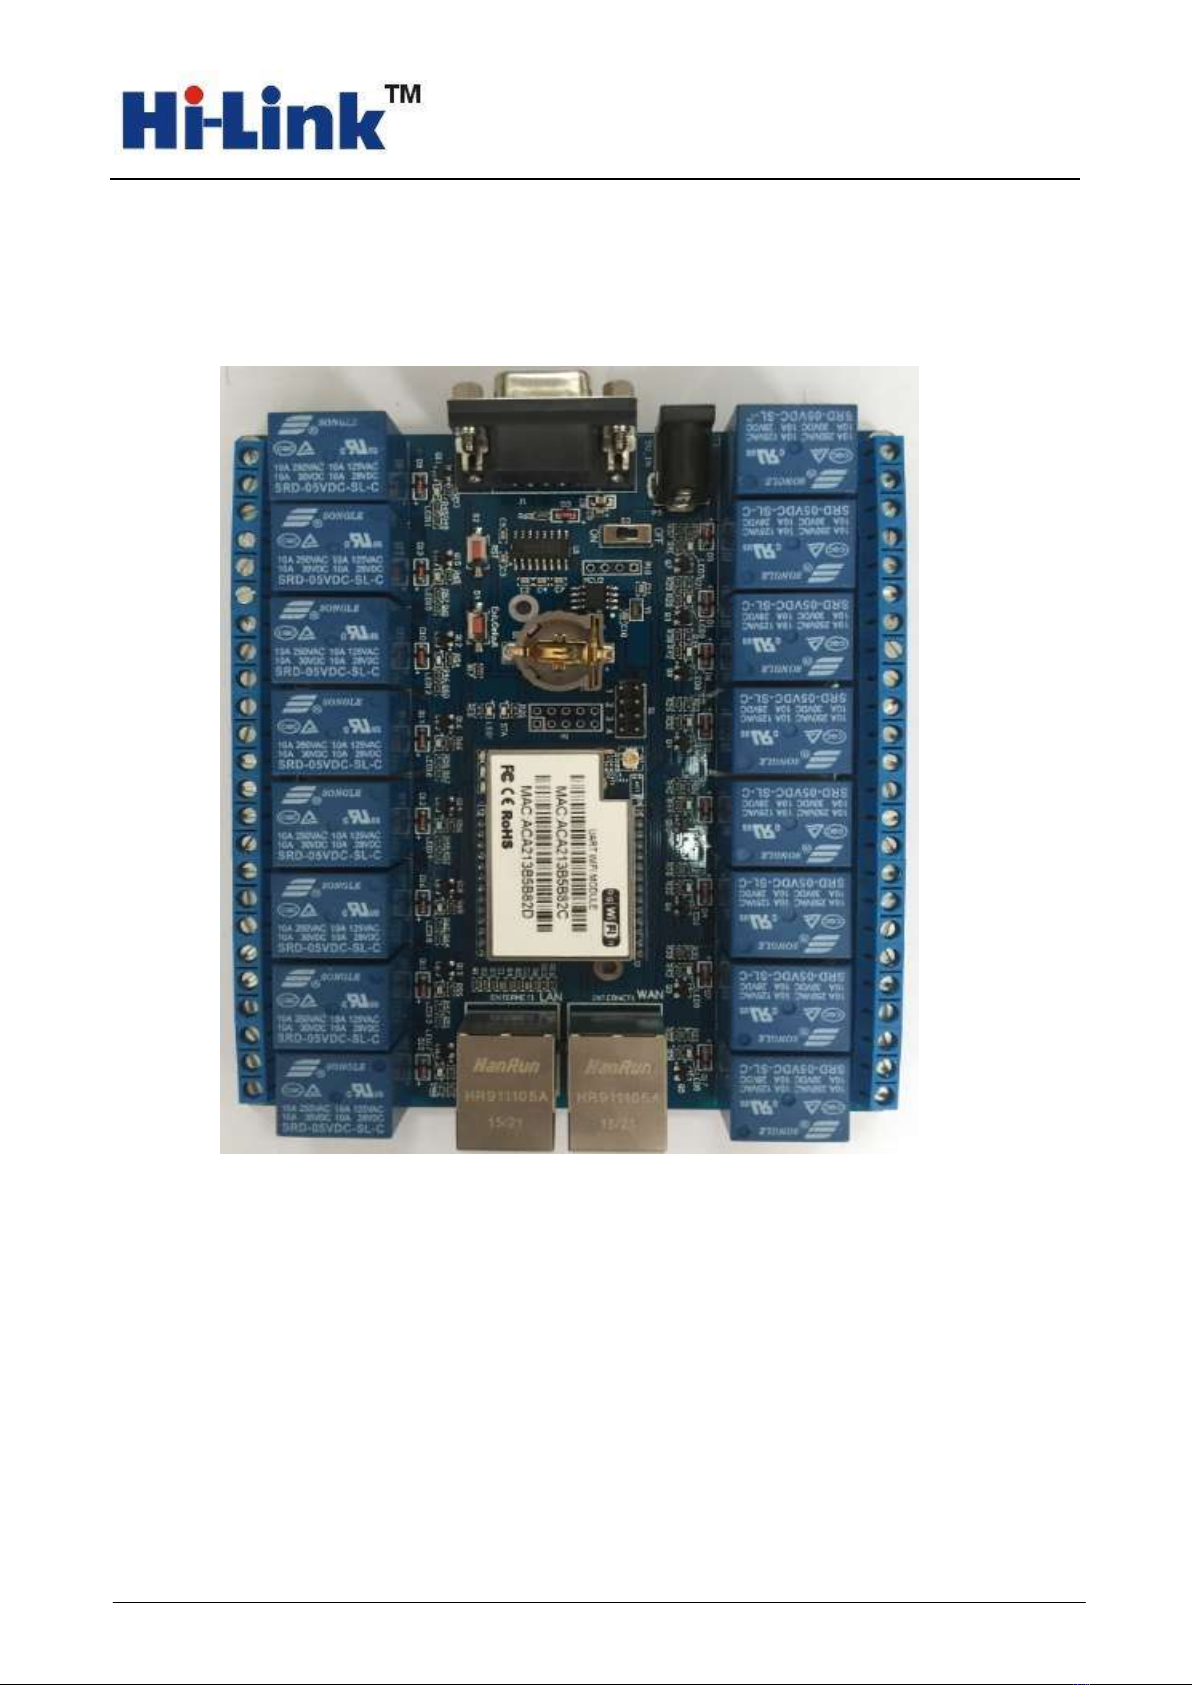
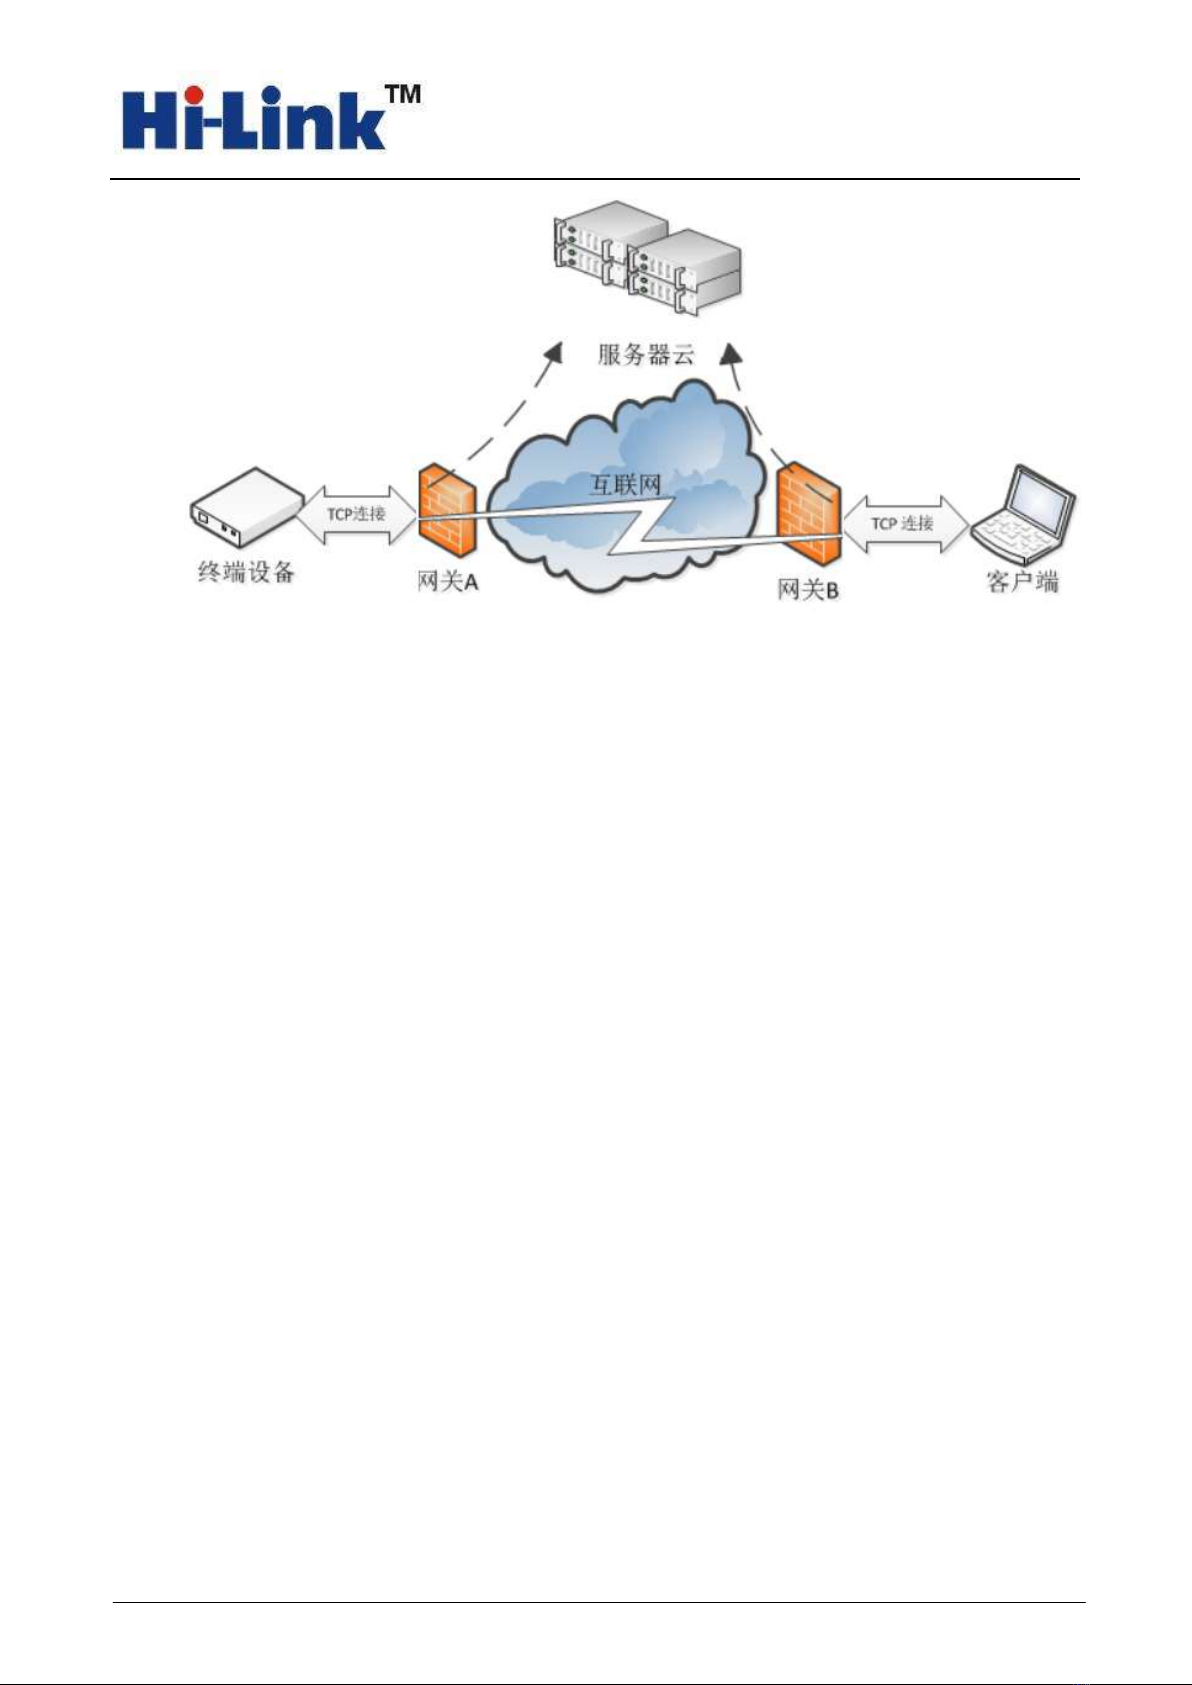
深圳市海凌科电子有限公司 Shenzhen Hi-Link Electronic Co.,Ltd
Http://www.hlktech.com Tel:0755-23152658 Fax:0755-83575189
Shenzhen Hi-Link Electronic Co.,Ltd
1
HLK-SW16 User Manual
Serial to Ethernet
Shenzhen Hi-Link electronic Co., LTD

深圳市海凌科电子有限公司 Shenzhen Hi-Link Electronic Co.,Ltd
Http://www.hlktech.com Tel:0755-23152658 Fax:0755-83575189
Shenzhen Hi-Link Electronic Co.,Ltd
2
1 Summary
HLK-SW16 is a new professional remote control terminal launched by Hi-Link electronic , is a
realization of TCP through the gateway and establishes communication connection with the remote
device, it can be based on without modifying the original protocol, to realize the connection of network
client and equipment directly, save the development cycle, enhance the user experience.
Compared with the traditional dynamic domain name plus router port mapping mode,has the
incomparable superiority, for the user saving the application of dynamic domain name, the router port
mapping and frequent operation, make equipment to achieve the plug-in effect.
1.1 Technical Specifications:
Table1 HLK-SW16 Technical Specifations
wireless:IEEE 802.11n、IEEE 802.11g、IEEE 802.11b
Network standard
wired:IEEE 802.3、IEEE 802.3u
Wireless transmission rate
11n: maximum up to 150Mbps
11g: maximum up to 54Mbps
11b: maximum up to 11Mbps
Tracks number 1-14
Frequency range 2.4-2.4835G
Emission power 12-15DBM
Interface 2 Ethernet,1 serial,1 5V power interface
Antenna
Antenna type External Antenna
Functional Parameters
WIFI work mode Client/AP/Router
WDS Function Support WDS wireless bridge connection
Wireless MAC address filtering
Wireless security function switch
64/128/152 bit WEP encryption
Wireless security
WPA-PSK/WPA2-PSK、WPA/WPA2 security mechanism

深圳市海凌科电子有限公司 Shenzhen Hi-Link Electronic Co.,Ltd
Http://www.hlktech.com Tel:0755-23152658 Fax:0755-83575189
Shenzhen Hi-Link Electronic Co.,Ltd
3
Remote Web management
Configuration file import and export
Network management
WEB software upgrade
Serial to Ethernet
Maximum transmission
rate
500000bps
TCP connection Max connection number>20
UDP connection Max connection number>20
Serial baud rate 1200~500000bps
Other Parameters
Status indicator Status indicator
Operating temperature:-20-70℃
Operating humidity:10%-90%RH(noncondensing)
Storage temperature:-40-80℃
Environmental standard
Storage humidity:5%-90%RH(noncondensing)
Additional properties Frequency bandwidth optional:20MHz、40MHz,Automatic
1.2 Electrical Characteristics
1.Input Power: 5V
2.Input Current: 2A
3.Relay Maximum input voltage: 220v
4.Relay Maximum Input Current: 10A
5.Input and output: 16 outputs
6.Default IP: 192.168.16.254
7.The default port number: 8080
8.Networking Series: No restrictions

深圳市海凌科电子有限公司 Shenzhen Hi-Link Electronic Co.,Ltd
Http://www.hlktech.com Tel:0755-23152658 Fax:0755-83575189
Shenzhen Hi-Link Electronic Co.,Ltd
4
1.3 Dimensions
HLK-SW16 Dimension(TOP view)
Note
:
130
×
115
×
19mm

深圳市海凌科电子有限公司 Shenzhen Hi-Link Electronic Co.,Ltd
Http://www.hlktech.com Tel:0755-23152658 Fax:0755-83575189
Shenzhen Hi-Link Electronic Co.,Ltd
5
1.4 Hardware instruction
Some features of based board are shown below :
HLK-SW16 STARTKIT
Interface introduction
Function
Name Tag No. Description
DB9 J1 RS232 interface,For data communications and
execute AT commands
DC5V P1 DC 5V input voltage range: 4.5-5.5V
Status Light LED1 Microcontroller running status lights, 1 second
flash once
Outside
interface
Network port
LAN,WAN
WAN:with router function,LAN:without router
uart
5Vpower
Relay
Binding
POST
WAN
LAN
RM04 module
Wifi led
STA LED
Power switch
Indicator
LED
Time Battery

深圳市海凌科电子有限公司 Shenzhen Hi-Link Electronic Co.,Ltd
Http://www.hlktech.com Tel:0755-23152658 Fax:0755-83575189
Shenzhen Hi-Link Electronic Co.,Ltd
6
function
Binding Post
P1-P8 16 way 220v,10A relay
STA STA
Indicates the connection status of the client and
the server:
ON: client and server has been connected
Off: client and server is not connected
Flashing: The client and server is going on data
communication
WIFI
WIFI indicator, when wifi working, wifi light
starts blinking, if it has data transmission ,
accelerate flashes
LED
LED3-18 LED3-18
Indicates the Work status of relay
ON: relay works
OFF: relay break
RST RST MCU reset
Button Exit/Default Exit/Default
Short Press (0.5-5 seconds): module go into
the AT command mode
Long press (more than 6 seconds): restore
factory default settings
1.5 Typical Application
Handheld device
Remote control
Consumer Electronics
IOT application
Industial control
Medical device
LED control
Sensor network application

深圳市海凌科电子有限公司 Shenzhen Hi-Link Electronic Co.,Ltd
Http://www.hlktech.com Tel:0755-23152658 Fax:0755-83575189
Shenzhen Hi-Link Electronic Co.,Ltd
7
Note: To ensure the normal operation, please ensure that you have bought our HLK-SW16 development
kit. As shown below
HLK-RM04 module P2P version
HLK-SW16 based board
2.4G flexible antenna
5V 2000mA power supply
Network Cable (optional)

深圳市海凌科电子有限公司 Shenzhen Hi-Link Electronic Co.,Ltd
Http://www.hlktech.com Tel:0755-23152658 Fax:0755-83575189
Shenzhen Hi-Link Electronic Co.,Ltd
8
Please connect the module well as the way shown in the followed picture:
Please note the direction that the HLK-RM04 module plug in the carrier
board!
2.1 System principle.
The whole system consists of server, terminal program and client components, as shown in fig.:

深圳市海凌科电子有限公司 Shenzhen Hi-Link Electronic Co.,Ltd
Http://www.hlktech.com Tel:0755-23152658 Fax:0755-83575189
Shenzhen Hi-Link Electronic Co.,Ltd
9
1) server
Receiving device and client registration, to assist the client to find equipment and establish the
connection
2) device
Automatically connect to the server after the device is started
3) the client
Run the client will automatically connect to the server, to establish a connection to terminal equipment
with the aid of a server.
2.2 Look over the module P2P account and password
1 To ensure that the RM04 module is in the factory default settings.Method for Restore factory
settings: to power on the module , wait for about 35 seconds. Then press the Exit/Default button on
the based board more than 6 seconds,then the module will restart automatically.
2 Power on the module again, waiting for 35S, the LEDs on the module flashing .
3 Use Ethernet cable connect the computer and the module LAN port, configuration the computer’s
IP and module’s IP in the same network segment, Set path: Control Panel - "Network and Internet-"
Network and Sharing Center - "Change adapter settings -" local connection - "Properties -" Internet
Control Version 4 (TCP / IPv4), as shown:as shown in fig.:

深圳市海凌科电子有限公司 Shenzhen Hi-Link Electronic Co.,Ltd
Http://www.hlktech.com Tel:0755-23152658 Fax:0755-83575189
Shenzhen Hi-Link Electronic Co.,Ltd
10
(You can also use a computer or cell phone to connect module’s Wifi)
4. Enter the 192.168.16.254/p2p.asp in your computer's web browser,enter the user name
admin,password admin, click OK. To view account and password; at the same time, can change the
password on this interface (account can not be modified). Shown as the following diagram:

深圳市海凌科电子有限公司 Shenzhen Hi-Link Electronic Co.,Ltd
Http://www.hlktech.com Tel:0755-23152658 Fax:0755-83575189
Shenzhen Hi-Link Electronic Co.,Ltd
11
(Note: the account and passwords are case sensitive!!!)
2.3 Open P2P software, enter the account number and password, and click
Connect, as shown in the picture below:
1.Connection
If SW16 module in the LAN, then the software will automatically connect to the
module through Lan, if not , the software will automatically connect to the module
through remote way .

深圳市海凌科电子有限公司 Shenzhen Hi-Link Electronic Co.,Ltd
Http://www.hlktech.com Tel:0755-23152658 Fax:0755-83575189
Shenzhen Hi-Link Electronic Co.,Ltd
12
Note: This picture shows is the PC side, If you use mobile client,just as
same way
2.Connection Status Displays
The lowermost interface displays the connection status.
3.Time Dispaly
The bottom screen display items shows the current time
4.On and off
Click the button Can control the opening and closing of the relay 0, click
the all open all closed ,the 16 groups can be fully open and fully
closed.
5.Time calibration
SW16 comes with clock chip, you can click button to upgrade the time
6.Advanced Button

深圳市海凌科电子有限公司 Shenzhen Hi-Link Electronic Co.,Ltd
Http://www.hlktech.com Tel:0755-23152658 Fax:0755-83575189
Shenzhen Hi-Link Electronic Co.,Ltd
13
Click the Advanced button to expand the interface,from where you can control
corresponding properties through the button.Shown as below:
7.Modify button’s name
For example,You want to change the Button 0 to T.V,firstly,you need to click on
the button 0,in the place here will show the name of this
button,,modify the 0 to TV ,Then click the button,after that you will
find the button 0 become to TV already.
8.Set inching function
Firstly choose one button you want to set for,click on the button ,
in the inching time item ,input the time you want to set,like
5 ,then click the button commit ,If the pop-up prompt window reads:出提
,it means you already set the inching function successfully.
When you open the button,it will close automatically after 5 second.
9. Set the timer function

深圳市海凌科电子有限公司 Shenzhen Hi-Link Electronic Co.,Ltd
Http://www.hlktech.com Tel:0755-23152658 Fax:0755-83575189
Shenzhen Hi-Link Electronic Co.,Ltd
14
First choose the button you want,like 0,select timer ,then you can set
timer function now.,if you want to set the time to 8am On Monday,set it firstly
,then click the add button ,Then you will
get the clue ,at this time,the time you add will show in the time
list: ,click the submit button ,when you get the
pop-up window ,it shows the timer function for 0 have
finished.On Monday 8AM,the relay for button 0 will open auto.If you want delete
it,just choose the time in the list ,then click delete
button ,you will get clue window ,it means the time have
been deleted.
10.Remove the inching and timer function
First,click the botton like 0,then choose the button or ,then
click thesubmit button,if you see the po-up window ,which
shows you have remove it succesfully.
11.Inquiry
Fist click the button like 0,then click on the inquiry button,you can see the
parametersof button 0.
Table of contents
Other Hi-Link Control Unit manuals

Hi-Link
Hi-Link HLK-LD015-5G User manual

Hi-Link
Hi-Link HLK-B20 User manual

Hi-Link
Hi-Link HLK-RM08S User manual

Hi-Link
Hi-Link HLK-RM08K User manual

Hi-Link
Hi-Link HLK-7628N User manual

Hi-Link
Hi-Link HLK-LD2410 User manual

Hi-Link
Hi-Link HLK-B10 User manual

Hi-Link
Hi-Link HLK-LD2420 User manual

Hi-Link
Hi-Link HLK-LD2410 User manual

Hi-Link
Hi-Link HLK-7628D User manual